8 LibreOffice: The Office Suite
Abstract#
LibreOffice is an open source office suite that provides tools for all types of office tasks such as writing texts, working with spreadsheets, or creating graphics and presentations. With LibreOffice, you can use the same data across different computing platforms. You can also open and edit files in other formats, including Microsoft Office, then save them back to this format, if needed. This chapter contains information that applies to all of the LibreOffice modules.
8.1 LibreOffice Modules #
LibreOffice consists of several application modules (subprograms), which are designed to interact with each other. They are listed in Table 8.1. A full description of each module is available in the online help, described in Section 8.10, “For More Information”.
Table 8.1: The LibreOffice Application Modules #
|
Module |
Purpose |
|---|---|
|
Writer |
Word processor application module |
|
Calc |
Spreadsheet application module |
|
Impress |
Presentation application module |
|
Base |
Database application module |
|
Draw |
Application module for drawing vector graphics |
|
Math |
Application module for generating mathematical formulas |
8.2 Starting LibreOffice #
To start LibreOffice click › › .
The following chapters cover individual LibreOffice modules:
- Chapter 9, LibreOffice Writer
Introduces LibreOffice Writer.
- Chapter 10, LibreOffice Calc
Introduces LibreOffice Calc.
- Chapter 11, LibreOffice Impress, Base, Draw, and Math
Introduces LibreOffice Impress, Base, Draw, and Math.
In the selection dialog, choose the module you want to open or which file type you want to create. If any LibreOffice application is open, you can start any of the other applications by clicking › › .
You can also start individual LibreOffice modules from your main menu. As an
alternative, use the command libreoffice and one of
the options --writer, --calc,
--impress, --draw or
--base to start the respective module. Find more useful
options with --help.
Before you start working with LibreOffice, you may be interested in changing some options from the preferences dialog. Click › to open it. The most important ones are:
- ›
Insert your user data like company, first and last name, street, city, and other useful information. This data is used in LibreOffice Writer for annotations, for example.
- ›
Offers mappings from one font name to another. This could be useful, if you exchange documents with others and the document you received contains fonts that are not available on your system.
- ›
Contains loading and saving specific options. For example, you can choose whether to always create a backup copy and which default file format LibreOffice should use.
To learn more about configuring LibreOffice, see Section 8.7, “Changing the Global Settings”.
8.3 Compatibility with Other Office Applications #
LibreOffice can work with documents, spreadsheets, presentations, and databases in many other formats, including Microsoft Office. They can be easily opened like other files and saved back to the original format. If you have problems with your documents, consider opening them in the original application and resaving them in an open format such as RTF for text documents.
In case of migration issues with spreadsheets, however, it is advisable to always save them as Excel files. Use the Excel format as an intermediate format. The CSV format can work, too, but you will lose all cell formatting. CSV sometimes also leads to incorrect cell type detection for spreadsheets.
8.3.1 Converting Documents to the LibreOffice Format #
LibreOffice can read, edit, and save documents in several formats. It is not necessary to convert files from those formats to the LibreOffice format to use those files. However, if you want to convert the files, you can do so. To convert several documents, such as when first switching to LibreOffice, do the following:
Select › › .
Choose the file format from which to convert.
Click .
Specify where LibreOffice should look for templates and documents to convert and in which directory the converted files should be placed.
Documents retrieved from a Windows partition are usually in a subdirectory of
/windows.Make sure that all other settings are correct, then click .
Review the summary of the actions to perform, then start the conversion by clicking . When everything is done, close the Wizard by clicking .
The amount of time needed for the conversion depends on the number of files and their complexity. For most documents, conversion does not take very long.
8.4 Saving LibreOffice Files with a Password #
You can save files, no matter in which LibreOffice format, with a password. Note that this offers limited protection only. For stronger protection, use encryption methods as described in Book “Security Guide”, Chapter 11 “Encrypting Partitions and Files”. To save a file with a password, select › or › . In the dialog that opens, activate the check box and click . After you have typed and confirmed your password, your file will be saved. The next time a user opens the file, he will be prompted for the password.
To change the password, either overwrite the same file by selecting › or select › and click to access the password dialog.
8.5 Signing Documents #
You can digitally sign documents to protect them. For this you need a personal certificate, similar to an HTTPS certificate. You can either create a self-signed certificate or choose to get one from a Certificate Authority.
When applying a digital signature to a document, a kind of checksum is created from the document's content and your personal key. The checksum is stored together with the document.
When another person opens the document, the checksum will be generated again. The new checksum is then compared to the original checksum If both are equal, the application will signal that the document has not been changed in the meantime.
To add a certificate to LibreOffice, you need to use Firefox. Start Firefox by selecting › › . Go to the certificates preferences by opening the menu (the button with the three-lines icon), then select › › › . Add your certificate by selecting and clicking and then locate your certificate.
To sign a document, first open it in LibreOffice. Then select › › . Select the certificate you want to use for signing, then click .
openSUSE Leap allows you to access certificates from the certificate store. For more information, refer to Book “Security Guide”, Chapter 12 “Certificate Store”.
8.6 Customizing LibreOffice #
You can customize LibreOffice to best suit your needs and working style. Toolbars, menus, and key combinations can all be reconfigured to help you more quickly access the features you use the most. You can also assign macros to application events if you want specific actions to occur when those events take place. For example, if you always work with a specific spreadsheet, you can create a macro that opens the spreadsheet and assign the macro to the Start Application event.
This section contains simple, generic instructions for customizing your environment. The changes you make are effective immediately, so you can see if the changes are what you wanted and go back and modify them if they are not. See the LibreOffice help files for detailed instructions.
To access the customization dialog in any open LibreOffice module, select › .
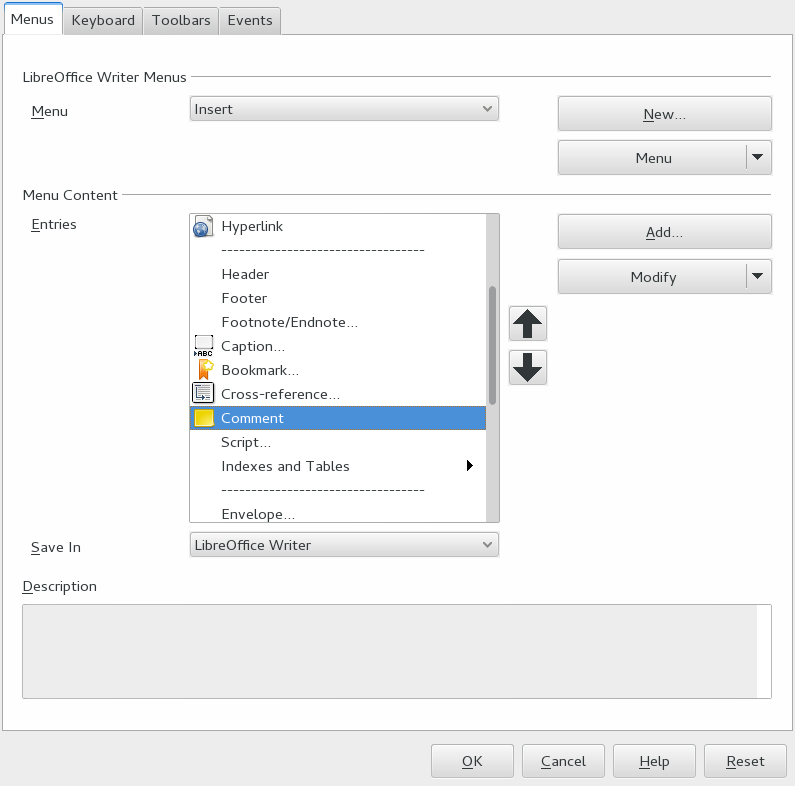
Figure 8.1: Customization Dialog in Writer #
Note: Further Information
Click for more information about the options in the dialog.
Procedure 8.1: Customizing Toolbars #
In the customization dialog, click the tab.
From the drop-down box, select the toolbar you want to customize.
Select the check boxes next to the commands you want to appear on the toolbar, and deselect the check boxes next to the commands you do not want to appear. A short description for each command is shown at the bottom of the dialog.
With , select whether to save your customized toolbar in the current LibreOffice module or in the current document. If you decide to save it in the LibreOffice module, the customized toolbar is used whenever you open that module. If you decide to save it together with the current document, the customized toolbar is used whenever you open that document.
Repeat to customize additional toolbars.
Click .
If you want to switch back to the original settings again, open the customization dialog, click the drop-down box and select . Click and to proceed.
Procedure 8.2: Showing or Hiding Buttons in the Toolbar #
Click the arrow icon at the right edge of the toolbar you want to change.
Click to display a list of buttons.
Select the buttons in the list to enable (check) or disable (uncheck) them.
Procedure 8.3: Customizing Menus #
You can add or delete items from current menus, reorganize menus, and even create new menus.
Click › › .
Select the menu you want to change, or click to create a new menu.
Modify, add, or delete menu items as desired.
Click .
Procedure 8.4: Customizing Key Combinations #
You can reassign currently assigned key combinations and assign new ones to frequently used functions.
Click › › .
Select the keys you want to assign to a combination.
Select a and an appropriate .
Click to assign the function to the key or to remove an existing assignment.
Click .
Procedure 8.5: Customizing Events #
LibreOffice also provides ways to assign macros to events such as application start-up or the saving of a document. The assigned macro runs automatically whenever the selected event occurs.
Click › › .
Select the event you want to change.
Assign or remove macros for the selected event.
Click .
8.7 Changing the Global Settings #
Global settings can be changed in any LibreOffice application by clicking › on the menu bar. This opens the window shown in the figure below. A tree structure is used to display categories of settings.

Figure 8.2: The Options Window #
The settings categories that appear depend on the module you are working in. For example, if you are in Writer, the LibreOffice Writer category appears in the list, but the LibreOffice Calc category does not. The LibreOffice Base category appears in both Calc and Writer. The Module column in the table shows where each setting category is available.
The following table lists the settings categories along with a brief description of each category:
Table 8.2: Global Setting Categories #
|
Settings Category |
Description |
Module |
|---|---|---|
|
|
Various basic settings, including your user data (such as your address and e-mail), important paths, and settings for printers and external programs. |
All |
|
|
Includes the settings related to the opening and saving of several file types. There is a dialog for general settings and several special dialogs to define how external formats should be handled. |
All |
|
|
Covers the various settings related to languages and writing aids, such as your locale and spell checker settings. This is also the place to enable support for Asian languages. |
All |
|
|
Configures the global word processing options, such as the basic fonts and layout that Writer should use. |
Writer |
|
|
Changes the settings related to the HTML authoring features of LibreOffice. |
Writer |
|
|
Provides dialogs to set and edit connections and registered databases. |
Base |
|
|
Defines the default colors used for newly created charts. |
All |
|
|
Allows configuring a proxy and the e-mail software to use. You can also enable viewing LibreOffice documents in Firefox. |
All |
Important: Settings Apply Globally
All settings listed in the table apply globally for the specified applications. That means, they are used as defaults for every new document you create.
8.8 Using Templates #
A template is a document containing only the styles—and content— that you want to appear in every document of that type. When a document is created or opened with the template, the styles are automatically applied to that document. Templates greatly enhance the use of LibreOffice by simplifying formatting tasks for a variety of different types of documents.
For example, in a word processor, you can write letters, memos, and reports, all of which look different and require different styles. Or, for example, for spreadsheets, you could use different cell styles or headings for certain types of spreadsheets. If you use templates for each of your document types, the styles you need for each document are always readily available.
LibreOffice comes with a set of predefined templates, and you can find additional templates on the Internet. For details, see Section 8.10, “For More Information”. If you want to create your own templates, this requires some up-front planning. You need to determine how you want the document to look so you can create the styles you need in that template.
A detailed explanation of templates is beyond the scope of this section. Procedure 8.6, “Creating LibreOffice Templates” only shows how to generate a template from an existing document.
Procedure 8.6: Creating LibreOffice Templates #
For text documents, spreadsheets, presentations, and drawings, you can easily create a template from an existing document as follows:
Start LibreOffice and open or create a document that contains the styles and content that you want to re-use for other documents of that type.
Click › › .
Choose a directory to save the image in by double-clicking one of the directory names.
If you are in a subdirectory and want to go up again, use the path bar displayed above the directories.
From the toolbar, choose .
Specify a name for the template.
Click .
Note: Converting Microsoft Word Templates
You can convert Microsoft Word templates like you would convert any other Word document. For more information, see Section 8.3.1, “Converting Documents to the LibreOffice Format”.
8.9 Setting Metadata and Properties #
When exchanging documents with other people, it is sometimes useful to store metadata like the owner of the file, who it was received from, and a URL. LibreOffice lets you attach such metadata to the file. This helps you track metadata which you do not want to or cannot save in the content of the file. This feature is also the basis for later sorting, searching and retrieving your documents based on metadata.
As an example, we assume you want to set these properties to your file:
A title, subject, and some keywords
The owner of the file
Who sent you the file
To attach such metadata to your document, proceed as follows:
Procedure 8.7: Setting Properties #
Click › . A dialog opens. It has, among others, the following tabs:
Insert your title, subject, keywords and comments as you like.
Custom properties specify the editor, owner, publisher, received from, and other useful metadata.
Change to the tab and insert title, subject, and your keywords.
Switch to the tab.
In the row, click the drop-down box of an unused entry (for example,
Info 1). A list of properties appears, from it, choose .Insert the name of the owner in the row.
Repeat the previous step with the property and a suitable value.
(Optional) If you want to add more than four properties, use to add another row.
Leave the dialog with .
Save your file.
8.10 For More Information #
LibreOffice contains extensive online help. In addition, a large community of users and developers support it. The following lists shows some places where you can go for additional information.
- LibreOffice Online Help Menu
Extensive help on performing any task in LibreOffice.
- http://www.libreoffice.org
Home page of LibreOffice
- http://ask.libreoffice.org
Official question and answer page for LibreOffice.
- http://www.taming-libreoffice.com/
Taming LibreOffice: books, news, tips and tricks.
- http://www.pitonyak.org/oo.php
Extensive information about creating and using macros.
- http://www.worldlabel.com/Pages/openoffice-template.htm
Various templates for creating labels with LibreOffice.