Reference
- About This Guide
- I Advanced Administration
- II System
- 8 32-Bit and 64-Bit Applications in a 64-Bit System Environment
- 9 Booting a Linux System
- 10 The
systemdDaemon - 11
journalctl: Query thesystemdJournal - 12 The Boot Loader GRUB 2
- 13 Basic Networking
- 14 UEFI (Unified Extensible Firmware Interface)
- 15 Special System Features
- 16 Dynamic Kernel Device Management with
udev
- III Services
- IV Mobile Computers
- A An Example Network
- B GNU Licenses
3 System Recovery and Snapshot Management with Snapper
Abstract#
Being able to do file system snapshots providing the ability to do
rollbacks on Linux is a feature that was often requested in the past.
Snapper, in conjunction with the Btrfs file system or
thin-provisioned LVM volumes now fills that gap.
Btrfs, a new copy-on-write file system for Linux,
supports file system snapshots (a copy of the state of a subvolume at a
certain point of time) of subvolumes (one or more separately mountable
file systems within each physical partition). Snapshots are also
supported on thin-provisioned LVM volumes formatted with XFS, Ext4 or
Ext3. Snapper lets you create and manage these snapshots. It comes with
a command line and a YaST interface. Starting with SUSE Linux Enterprise Server 12 it
is also possible to boot from Btrfs
snapshots—see Section 3.3, “System Rollback by Booting from Snapshots” for
more information.
Using Snapper you can perform the following tasks:
Undo system changes made by
zypperand YaST. See Section 3.2, “Using Snapper to Undo Changes” for details.Restore files from previous snapshots. See Section 3.2.2, “Using Snapper to Restore Files” for details.
Do a system rollback by booting from a snapshot. See Section 3.3, “System Rollback by Booting from Snapshots” for details.
Manually create snapshots on the fly and manage existing snapshots. See Section 3.5, “Manually Creating and Managing Snapshots” for details.
3.1 Default Setup #
Snapper on openSUSE Leap is set up to serve as an “undo and
recovery tool” for system changes. By default, the root partition
(/) of openSUSE Leap is formatted with
Btrfs. Taking snapshots is automatically enabled if
the root partition (/) is big enough (approximately
more than 8GB). Taking snapshots on partitions other than
/ is not enabled by default.
When a snapshot is created, both the snapshot and the original point to
the same blocks in the file system. So, initially a snapshot does not
occupy additional disk space. If data in the original file system is
modified, changed data blocks are copied while the old data blocks are
kept for the snapshot. Therefore, a snapshot occupies the same amount of
space as the data modified. So, over time, the amount of space a snapshot
allocates, constantly grows. As a consequence, deleting files from a
Btrfs file system containing snapshots may
not free disk space!
Note: Snapshot Location
Snapshots always reside on the same partition or subvolume on which the snapshot has been taken. It is not possible to store snapshots on a different partition or subvolume.
As a result, partitions containing snapshots need to be larger than “normal” partitions. The exact amount strongly depends on the number of snapshots you keep and the amount of data modifications. As a rule of thumb you should consider using twice the size than you normally would.
3.1.1 Types of Snapshots #
Although snapshots themselves do not differ in a technical sense, we distinguish between three types of snapshots, based on the occasion on which they were taken:
- Timeline Snapshots
A single snapshot is created every hour. Old snapshots are automatically deleted. By default, the first snapshot of the last ten days, months, and years are kept. Timeline snapshots are enabled by default, except for the root partition.
- Installation Snapshots
Whenever one or more packages are installed with YaST or Zypper, a pair of snapshots is created: one before the installation starts (“Pre”) and another one after the installation has finished (“Post”). In case an important system component such as the kernel has been installed, the snapshot pair is marked as important (
important=yes). Old snapshots are automatically deleted. By default the last ten important snapshots and the last ten “regular” (including administration snapshots) snapshots are kept. Installation snapshots are enabled by default.- Administration Snapshots
Whenever you administrate the system with YaST, a pair of snapshots is created: one when a YaST module is started (“Pre”) and another when the module is closed (“Post”). Old snapshots are automatically deleted. By default the last ten important snapshots and the last ten “regular” snapshots (including installation snapshots) are kept. Administration snapshots are enabled by default.
3.1.2 Directories That Are Excluded from Snapshots #
Some directories need to be excluded from snapshots for different reasons. The following list shows all directories that are excluded:
/boot/grub2/i386-pc,/boot/grub2/x86_64-efi, ,A rollback of the boot loader configuration is not supported. The directories listed above are architecture-specific. The first two directories are present on x86_64 machines, the latter two on IBM POWER and on IBM z Systems, respectively.
/homeIf
/homedoes not reside on a separate partition, it is excluded to avoid data loss on rollbacks./opt,/var/optThird-party products usually get installed to
/opt. It is excluded to avoid uninstalling these applications on rollbacks./srvContains data for Web and FTP servers. It is excluded to avoid data loss on rollbacks.
/tmp,/var/tmp,/var/crashAll directories containing temporary files are excluded from snapshots.
/usr/localThis directory is used when manually installing software. It is excluded to avoid uninstalling these installations on rollbacks.
/var/lib/namedContains zone data for the DNS server. Excluded from snapshots to ensure a name server can operate after a rollback.
/var/lib/mailman,/var/spoolDirectories containing mails or mail queues are excluded to avoid a loss of mails after a rollback.
/var/lib/pgqslContains PostgreSQL data.
/var/logLog file location. Excluded from snapshots to allow log file analysis after the rollback of a broken system.
3.1.3 Customizing the Setup #
openSUSE Leap comes with a reasonable default setup, which should be sufficient for most use cases. However, all aspects of taking automatic snapshots and snapshot keeping can be configured according to your needs.
3.1.3.1 Disabling/Enabling Snapshots #
Each of the three snapshot types (timeline, installation, administration) can be enabled or disabled independently.
- Disabling/Enabling Timeline Snapshots
Enabling.
snapper-c rootset-config "TIMELINE_CREATE=yes"Disabling.
snapper-c rootset-config "TIMELINE_CREATE=no"Timeline snapshots are enabled by default, except for the root partition.
- Disabling/Enabling Installation Snapshots
Enabling: Install the package
snapper-zypp-pluginDisabling: Uninstall the package
snapper-zypp-pluginInstallation snapshots are enabled by default.
- Disabling/Enabling Administration Snapshots
Enabling: Set
USE_SNAPPERtoyesin/etc/sysconfig/yast2.Disabling: Set
USE_SNAPPERtonoin/etc/sysconfig/yast2.Administration snapshots are enabled by default.
3.1.3.2 Controlling Installation Snapshots #
Taking snapshot pairs upon installing packages with YaST or Zypper
is handled by the
snapper-zypp-plugin. An XML
configuration file, /etc/snapper/zypp-plugin.conf
defines, when to make snapshots. By default the file looks like the
following:
 1 <?xml version="1.0" encoding="utf-8"?>
 2 <snapper-zypp-plugin-conf>
 3  <solvables>
 4   <solvable match="w"1 important="true"2>kernel-*3</solvable>
 5   <solvable match="w" important="true">dracut</solvable>
 6   <solvable match="w" important="true">glibc</solvable>
 7   <solvable match="w" important="true">systemd*</solvable>
 8   <solvable match="w" important="true">udev</solvable>
 9   <solvable match="w">*</solvable>4
10  </solvables>
11 </snapper-zypp-plugin-conf>
The match attribute defines whether the pattern is a Unix shell-style
wild card ( | |
If the given pattern matches and the corresponding package is marked as important (for example Kernel packages), the snapshot will also be marked as important. | |
Pattern to match a package name. Based on the setting of the
| |
This line unconditionally matches all packages. |
With this configuration snapshot, pairs are made whenever a package is installed (line 9). When Kernel, dracut, glibc, systemd, or udev packages marked as important are installed, the snapshot pair will also be marked as important (lines 4 to 8). All rules are evaluated.
To disable a rule, either delete it or deactivate it using XML comments. To prevent the system from making snapshot pairs for every package installation for example, comment line 9:
 1 <?xml version="1.0" encoding="utf-8"?>
 2 <snapper-zypp-plugin-conf>
 3  <solvables>
 4   <solvable match="w" important="true">kernel-*</solvable>
 5   <solvable match="w" important="true">dracut</solvable>
 6   <solvable match="w" important="true">glibc</solvable>
 7   <solvable match="w" important="true">systemd*</solvable>
 8   <solvable match="w" important="true">udev</solvable>
 9   <!-- <solvable match="w">*</solvable> -->
10  </solvables>
11 </snapper-zypp-plugin-conf>
3.1.3.3 Creating and Mounting New Subvolumes #
Creating a new subvolume underneath the /-hierarchy
and permanently mounting it is supported. However, you need to make sure
not to create it inside a snapshot, since you would not be able to delete
snapshots anymore after a rollback.
openSUSE Leap is configured with the /@/ subvolume
which serves as an independent root for permanent subvolumes such as
/opt, /srv,
/home and others. Any new subvolumes you create and
permanently mount need to be created in this initial root file system.
To do so, run the following commands. In this example, a new subvolume
/usr/important is created from
/dev/sda2.
mount /dev/sda2 -o subvol=@ /mnt
btrfs subvolume create /mnt/usr/important
umount /mnt
The corresponding entry in /etc/fstab needs to look
like the following:
/dev/sda2 /usr/important btrfs subvol=@/usr/important 0 0
3.1.3.4 Controlling Snapshot Archiving #
Snapshots occupy disk space. To prevent disks from running out of space and thus causing system outages, old snapshots are automatically deleted. By default, the following snapshots are kept:
the first snapshot of the last ten days, months, and years
the last ten installation snapshot pairs marked as important
the last ten installation/administration snapshots
Refer to Section 3.4.1, “Managing Existing Configurations” for instructions on how to change these values.
3.1.3.5 Using Snapper on Thin-Provisioned LVM Volumes #
Apart from snapshots on Btrfs file systems, Snapper
also supports taking snapshots on thin-provisioned LVM volumes
(snapshots on regular LVM volumes are not
supported) formatted with XFS, Ext4 or Ext3. For more information and
setup instructions on LVM volumes, refer to
Section 5.2, “LVM Configuration”.
To use Snapper on a thin-provisioned LVM volume you need to
create a Snapper configuration for it. On LVM it is required to specify
the file system with
--fstype=lvm(FILESYSTEM).
ext3, etx4 or
xfs are valid values for
FILESYSTEM. Example:
snapper -c lvm create-config --fstype="lvm(xfs)" /thin_lvm
You can adjust this configuration according to your needs as described in Section 3.4.1, “Managing Existing Configurations”.
3.2 Using Snapper to Undo Changes #
Snapper on openSUSE Leap is preconfigured to serve as a tool that lets
you undo changes made by zypper and YaST. For
this purpose, Snapper is configured to create a pair of snapshots before
and after each run of zypper and YaST. Snapper
also lets you restore system files that have been accidentally deleted or
modified. Timeline snapshots for the root partition need to be enabled
for this purpose—see
Section 3.1.3.1, “Disabling/Enabling Snapshots” for details.
By default, automatic snapshots as described above are configured for the
root partition and its subvolumes. To make snapshots available
for other partitions such as /home for example, you
can create custom configurations.
Important: Undoing Changes vs. Rollback
When working with snapshots to restore data, it is important to know that there are two fundamentally different scenarios Snapper can handle:
- Undoing Changes
When undoing changes as described in the following, two snapshots are being compared and the changes between these two snapshots are made undone. Using this method also allows to explicitly select the files that should be restored.
- Rollback
When doing rollbacks as described in Section 3.3, “System Rollback by Booting from Snapshots”, the system is reset to the state at which the snapshot was taken.
When undoing changes, it is also possible to compare a snapshot against the current system. When restoring all files from such a comparison, this will have the same result as doing a rollback. However, using the method described in Section 3.3, “System Rollback by Booting from Snapshots” for rollbacks should be preferred, since it is faster and allows you to review the system before doing the rollback.
Warning: Data Consistency
There is no mechanism to ensure data consistency when creating a
snapshot. Whenever a file (for example, a database) is written at the
same time as the snapshot is being created, it will result in a broken
or partly written file. Restoring such a file will cause problems.
Furthermore, some system files such as /etc/mtab
must never be restored. Therefore it is strongly recommended to
always closely review the list of changed files and
their diffs. Only restore files that really belong to the action you
want to revert.
3.2.1 Undoing YaST and Zypper Changes #
If you set up the root partition with Btrfs during
the installation, Snapper—preconfigured for doing rollbacks of
YaST or Zypper changes—will automatically be installed.
Every time you start a YaST module or a Zypper transaction, two
snapshots are created: a “pre-snapshot” capturing the state
of the file system before the start of the module and a
“post-snapshot” after the module has been finished.
Using the YaST Snapper module or the snapper
command line tool, you can undo the changes made by YaST/Zypper by
restoring files from the “pre-snapshot”. Comparing two
snapshots the tools also allow you to see which files have been changed.
You can also display the differences between two versions of a file
(diff).
Procedure 3.1: Undoing Changes Using the YaST Module #
Start the module from the section in YaST or by entering
yast2 snapper.Make sure is set to . This is always the case unless you have manually added own Snapper configurations.
Choose a pair of pre- and post-snapshots from the list. Both, YaST and Zypper snapshot pairs are of the type . YaST snapshots are labeled as
zypp(y2base)in the ; Zypper snapshots are labeledzypp(zypper).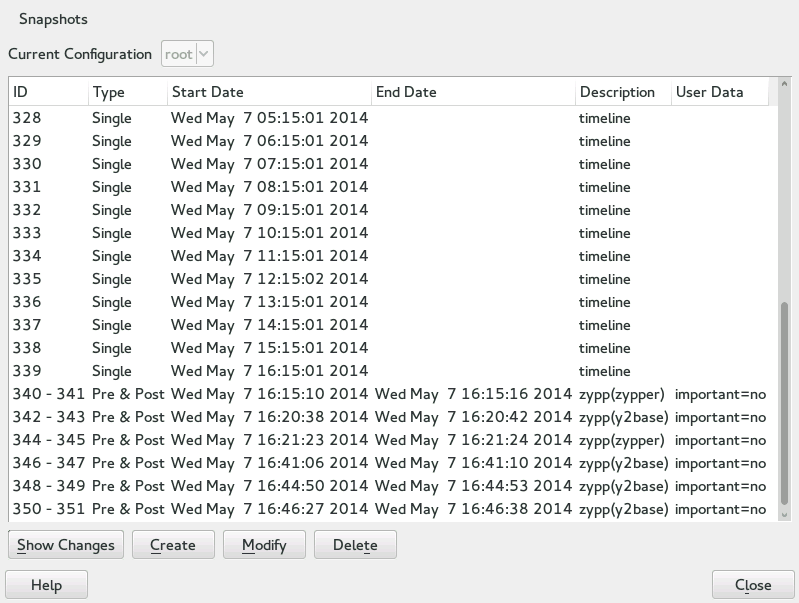
Click to open the list of files that differ between the two snapshots.
Review the list of files. To display a “diff” between the pre- and post-version of a file, select it from the list.
To restore one or more files, select the relevant files or directories by activating the respective check box. Click and confirm the action by clicking .
To restore a single file, activate its diff view by clicking its name. Click and confirm your choice with .
Procedure 3.2: Undoing Changes Using the snapper Command #
Get a list of YaST and Zypper snapshots by running
snapper list-t pre-post. YaST snapshots are labeled asyast module_namein the ; Zypper snapshots are labeledzypp(zypper).root #snapper list -t pre-post Pre # | Post # | Pre Date | Post Date | Description ------+--------+-------------------------------+-------------------------------+-------------- 311 | 312 | Tue 06 May 2014 14:05:46 CEST | Tue 06 May 2014 14:05:52 CEST | zypp(y2base) 340 | 341 | Wed 07 May 2014 16:15:10 CEST | Wed 07 May 2014 16:15:16 CEST | zypp(zypper) 342 | 343 | Wed 07 May 2014 16:20:38 CEST | Wed 07 May 2014 16:20:42 CEST | zypp(y2base) 344 | 345 | Wed 07 May 2014 16:21:23 CEST | Wed 07 May 2014 16:21:24 CEST | zypp(zypper) 346 | 347 | Wed 07 May 2014 16:41:06 CEST | Wed 07 May 2014 16:41:10 CEST | zypp(y2base) 348 | 349 | Wed 07 May 2014 16:44:50 CEST | Wed 07 May 2014 16:44:53 CEST | zypp(y2base) 350 | 351 | Wed 07 May 2014 16:46:27 CEST | Wed 07 May 2014 16:46:38 CEST | zypp(y2base)Get a list of changed files for a snapshot pair with
snapper statusPRE..POST. Files with content changes are marked with , files that have been added are marked with and deleted files are marked with .root #snapper status 350..351 +..... /usr/share/doc/packages/mikachan-fonts +..... /usr/share/doc/packages/mikachan-fonts/COPYING +..... /usr/share/doc/packages/mikachan-fonts/dl.html c..... /usr/share/fonts/truetype/fonts.dir c..... /usr/share/fonts/truetype/fonts.scale +..... /usr/share/fonts/truetype/みかちゃん-p.ttf +..... /usr/share/fonts/truetype/みかちゃん-pb.ttf +..... /usr/share/fonts/truetype/みかちゃん-ps.ttf +..... /usr/share/fonts/truetype/みかちゃん.ttf c..... /var/cache/fontconfig/7ef2298fde41cc6eeb7af42e48b7d293-x86_64.cache-4 c..... /var/lib/rpm/Basenames c..... /var/lib/rpm/Dirnames c..... /var/lib/rpm/Group c..... /var/lib/rpm/Installtid c..... /var/lib/rpm/Name c..... /var/lib/rpm/Packages c..... /var/lib/rpm/Providename c..... /var/lib/rpm/Requirename c..... /var/lib/rpm/Sha1header c..... /var/lib/rpm/Sigmd5To display the diff for a certain file, run
snapper diffPRE..POST FILENAME. If you do not specify FILENAME, a diff for all files will be displayed.root #snapper diff 350..351 /usr/share/fonts/truetype/fonts.scale --- /.snapshots/350/snapshot/usr/share/fonts/truetype/fonts.scale 2014-04-23 15:58:57.000000000 +0200 +++ /.snapshots/351/snapshot/usr/share/fonts/truetype/fonts.scale 2014-05-07 16:46:31.000000000 +0200 @@ -1,4 +1,4 @@ -1174 +1486 ds=y:ai=0.2:luximr.ttf -b&h-luxi mono-bold-i-normal--0-0-0-0-c-0-iso10646-1 ds=y:ai=0.2:luximr.ttf -b&h-luxi mono-bold-i-normal--0-0-0-0-c-0-iso8859-1 [...]To restore one or more files run
snapper -v undochangePRE..POST FILENAMES. If you do not specify a FILENAMES, all changed files will be restored.root #snapper -v undochange 350..351 create:0 modify:13 delete:7 undoing change... deleting /usr/share/doc/packages/mikachan-fonts deleting /usr/share/doc/packages/mikachan-fonts/COPYING deleting /usr/share/doc/packages/mikachan-fonts/dl.html deleting /usr/share/fonts/truetype/みかちゃん-p.ttf deleting /usr/share/fonts/truetype/みかちゃん-pb.ttf deleting /usr/share/fonts/truetype/みかちゃん-ps.ttf deleting /usr/share/fonts/truetype/みかちゃん.ttf modifying /usr/share/fonts/truetype/fonts.dir modifying /usr/share/fonts/truetype/fonts.scale modifying /var/cache/fontconfig/7ef2298fde41cc6eeb7af42e48b7d293-x86_64.cache-4 modifying /var/lib/rpm/Basenames modifying /var/lib/rpm/Dirnames modifying /var/lib/rpm/Group modifying /var/lib/rpm/Installtid modifying /var/lib/rpm/Name modifying /var/lib/rpm/Packages modifying /var/lib/rpm/Providename modifying /var/lib/rpm/Requirename modifying /var/lib/rpm/Sha1header modifying /var/lib/rpm/Sigmd5 undoing change done
Warning: Reverting User Additions
Reverting user additions via undoing changes with Snapper is not recommended. Since certain directories are excluded from snapshots, files belonging to these users will remain in the file system. If a user with the same user ID as a deleted user is created, this user will inherit the files. Therefore it is strongly recommended to use the YaST tool to remove users.
3.2.2 Using Snapper to Restore Files #
Apart from the installation and administration snapshots, Snapper creates timeline snapshots. You can use these backup snapshots to restore files that have accidentally been deleted or to restore a previous version of a file. By making use of Snapper's diff feature you can also find out which modifications have been made at a certain point of time.
Being able to restore files is especially interesting for data, which
may reside on subvolumes or partitions for which snapshots are not taken
by default. To be able to restore files from home directories, for
example, create a separate Snapper configuration for
/home doing automatic timeline snapshots. See
Section 3.4, “Creating and Modifying Snapper Configurations” for instructions.
Warning: Restoring Files vs. Rollback
Snapshots taken from the root file system (defined by Snapper's root configuration), can be used to do a system rollback. The recommended way to do such a rollback is to boot from the snapshot and then perform the rollback. See Section 3.3, “System Rollback by Booting from Snapshots” for details.
Performing a rollback would also be possible by restoring all files
from a root file system snapshot as described below. However, this is
not recommended. You may restore single files, for example a
configuration file from the /etc directory,
but not the complete list of files from the snapshot.
This restriction only affects snapshots taken from the root file system!
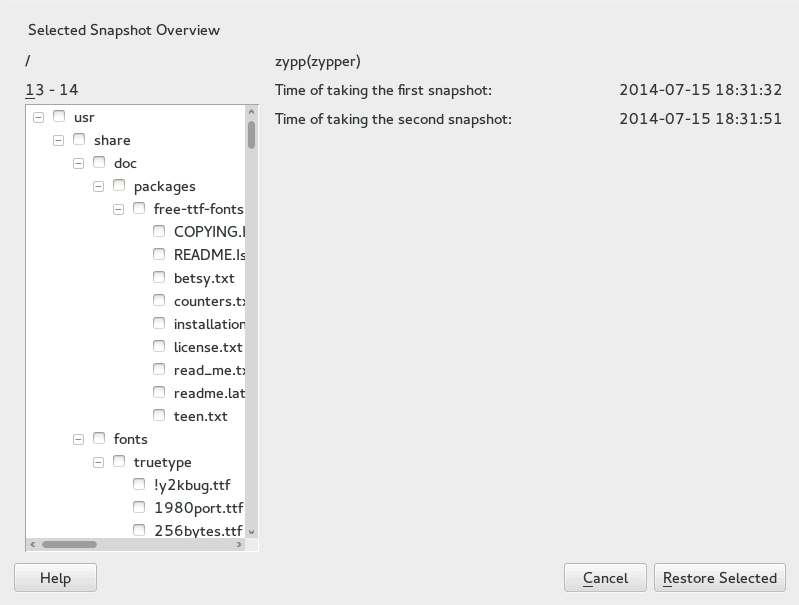
Procedure 3.3: Restoring Files Using the YaST Module #
Start the module from the section in YaST or by entering
yast2 snapper.Choose the from which to choose a snapshot.
Select a timeline snapshot from which to restore a file and choose . Timeline snapshots are of the type with a description value of .
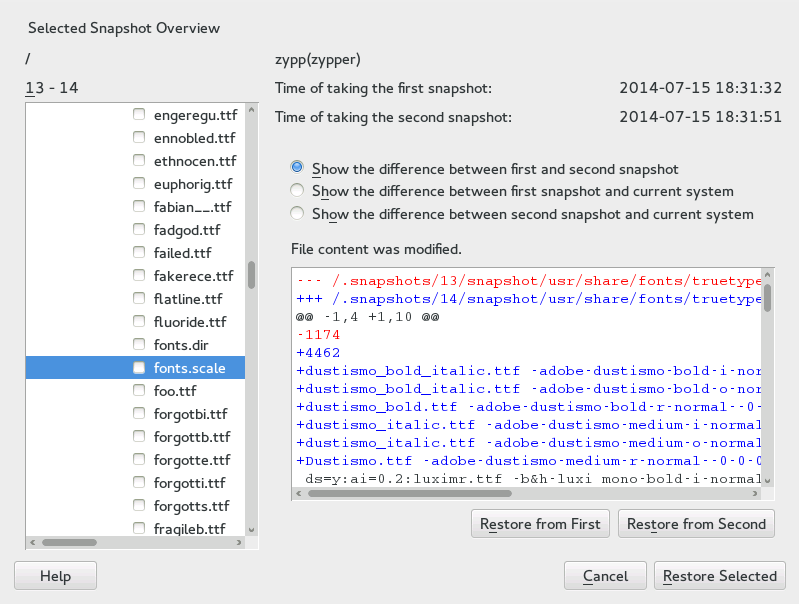
Select a file from the text box by clicking the file name. The difference between the snapshot version and the current system is shown. Activate the check box to select the file for restore. Do so for all files you want to restore.
Click and confirm the action by clicking .
Procedure 3.4: Restoring Files Using the snapper Command #
Get a list of timeline snapshots for a specific configuration by running the following command:
snapper -c CONFIG list -t single | grep timeline
CONFIG needs to be replaced by an existing Snapper configuration. Use
snapper list-configsto display a list.Get a list of changed files for a given snapshot by running the following command:
snapper -c CONFIG status SNAPSHOT_ID>..0
Replace SNAPSHOT_ID by the ID for the snapshot from which you want to restore the file(s).
Optionally list the differences between the current file version and the one from the snapshot by running
snapper -c CONFIG diff SNAPSHOT_ID..0 FILE NAME
If you do not specify <FILE NAME>, the difference for all files are shown.
To restore one or more files, run
snapper -c CONFIG -v undochange
      SNAPSHOT_ID..0 FILENAME1 FILENAME2
If you do not specify file names, all changed files will be restored.
3.3 System Rollback by Booting from Snapshots #
The GRUB 2 version included on openSUSE Leap can boot from
Btrfs snapshots. Together with Snapper's rollback feature, this allows to
recover a misconfigured system. Only snapshots created for the default
Snapper configuration (root) are bootable.
Important: Supported Configuration
As of openSUSE Leap 42.1 system rollbacks are only supported by
SUSE if the default Snapper configuration (root) and
the default configuration of the root partition have not been changed.
When booting a snapshot, the parts of the file system included in the snapshot are mounted read-only; all other file systems and parts that are excluded from snapshots are mounted read-write and can be modified.
Important: Undoing Changes vs. Rollback
When working with snapshots to restore data, it is important to know that there are two fundamentally different scenarios Snapper can handle:
- Undoing Changes
When undoing changes as described in Section 3.2, “Using Snapper to Undo Changes”, two snapshots are compared and the changes between these two snapshots are reverted. Using this method also allows to explicitly exclude selected files from being restored.
- Rollback
When doing rollbacks as described in the following, the system is reset to the state at which the snapshot was taken.
To do a rollback from a bootable snapshot, the following requirements must be met. When doing a default installation, the system is set up accordingly.
Requirements for a Rollback from a Bootable Snapshot #
The root file system needs to be Btrfs. Booting from LVM volume snapshots is not supported.
The root file system needs to be on a single device, a single partition and a single subvolume. Directories that are excluded from snapshots such as
/srv(see Section 3.1.2, “Directories That Are Excluded from Snapshots” for a full list) may reside on separate partitions.The system needs to be bootable via the installed boot loader.
To perform a rollback from a bootable snapshot, do as follows:
Boot the system. In the boot menu choose and select the snapshot you want to boot. The list of snapshots is listed by date—the most recent snapshot is listed first.
Log in to the system. Carefully check whether everything works as expected. Note that you will not be able to write to any directory that is part of the snapshot. Data you write to other directories will not get lost, regardless of what you do next.
Depending on whether you want to perform the rollback or not, choose your next step:
If the system is in a state where you do not want to do a rollback, reboot to boot into the current system state, to choose a different snapshot, or to start the rescue system.
If you want to perform the rollback, run
sudo snapper rollback
and reboot afterwards. On the boot screen, choose the default boot entry to reboot into the reinstated system.
Tip: Rolling Back to a Specific Installation State
If snapshots are not disabled during installation, an initial bootable
snapshot is created at the end of the initial system installation. You can
go back to that state at any time by booting this snapshot. The snapshot
can be identified by the description after installation.
A bootable snapshot is also created when starting a system upgrade to a service pack or a new major release (provided snapshots are not disabled).
3.3.1 Accessing and Identifying Snapshot Boot Entries #
To boot from a snapshot, reboot your machine and choose . A screen listing all bootable snapshots opens. The most recent snapshot is listed first, the oldest last. Use the keys ↓ and ↑ to navigate and press Enter to activate the selected snapshot. Activating a snapshot from the boot menu does not reboot the machine immediately, but rather opens the boot loader of the selected snapshot.
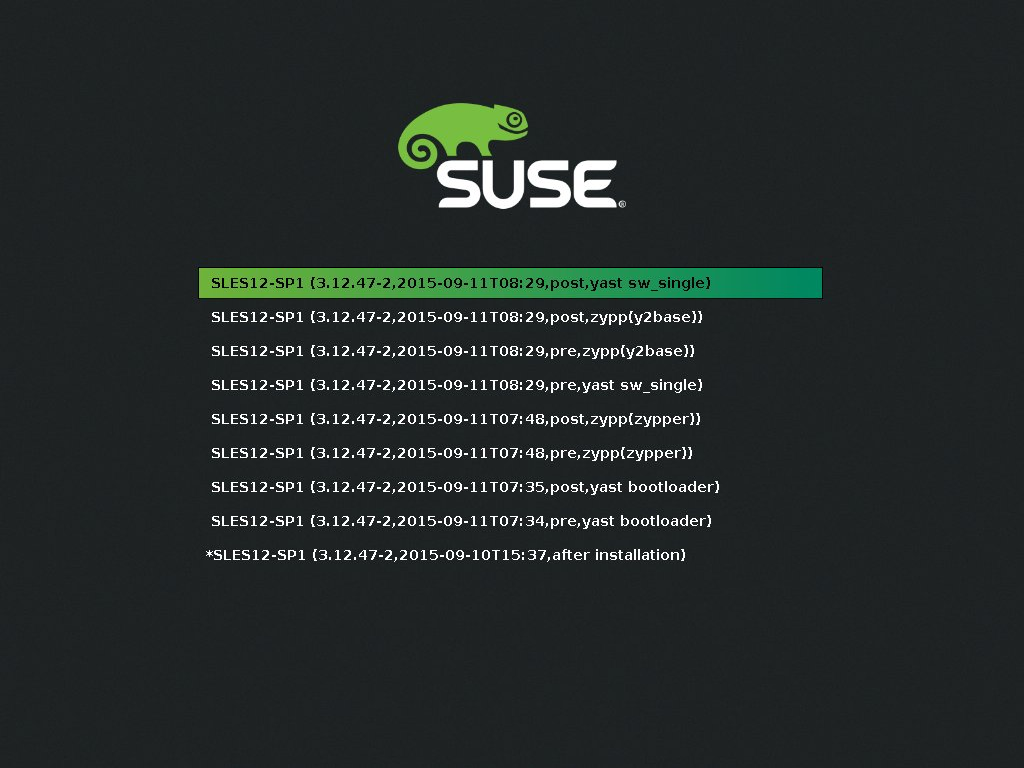
Figure 3.1: Boot Loader: Snapshots #
Each snapshot entry in the boot loader follows a naming scheme which makes it possible to identify it easily:
[*]1OS2 (KERNEL3,DATE4TTIME5,DESCRIPTION6)
If the snapshot was marked | |
Operating system label. | |
Date in the format | |
Time in the format | |
This field contains a description of the snapshot. In case of a manually
created snapshot this is the string created with the option
|
Tip: Setting a Custom Description for Boot Loader Snapshot Entries
It is possible to replace the default string in the description field of a snapshot with a custom string. This is for example useful if an automatically created description is not sufficient, or a user-provided description is too long. To set a custom string STRING for snapshot NUMBER, use the following command:
snapper modify --userdata "bootloader=STRING" NUMBER
3.3.2 Limitations #
A complete system rollback, restoring the complete system to exactly the same state as it was in when a snapshot was taken, is not possible.
3.3.2.1 Directories Excluded from Snapshots #
Root file system snapshots do not contain all directories. See Section 3.1.2, “Directories That Are Excluded from Snapshots” for details and reasons. As a general consequence, data from these directories is not restored, resulting in the following limitations.
- Add-ons and Third Party Software may be Unusable after a Rollback
Applications and add-ons installing data in subvolumes excluded from the snapshot, such as
/opt, may not work after a rollback, if others parts of the application data are also installed on subvolumes included in the snapshot. Re-install the application or the add-on to solve this problem.- File Access Problems
If an application had changed file permissions and/or ownership in between snapshot and current system, the application may not be able to access these files. Reset permissions and/or ownership for the affected files after the rollback.
- Incompatible Data Formats
If a service or an application has established a new data format in between snapshot and current system, the application may not be able to read the affected data files after a rollback.
- Subvolumes with a Mixture of Code and Data
Subvolumes like
/srvmay contain a mixture of code and data. A rollback may result in non-functional code. A downgrade of the PHP version, for example, may result in broken PHP scripts for the Web server.- User Data
If a rollback removes users from the system, data that is owned by these users in directories excluded from the snapshot, is not removed. If a user with the same user ID is created, this user will inherit the files. Use a tool like
findto locate and remove orphaned files.
3.3.2.2 No Rollback of Boot Loader Data #
A rollback of the boot loader is not possible, since all “stages” of the boot loader must fit together. This cannot be guaranteed when doing rollbacks.
3.4 Creating and Modifying Snapper Configurations #
The way Snapper behaves is defined in a configuration file that is
specific for each partition or Btrfs subvolume. These
configuration files reside under
/etc/snapper/configs/. The default configuration
installed with Snapper for the / directory is named
root. It creates and manages the YaST and
Zypper snapshots plus the hourly backup snapshot for
/.
You may create your own configurations for other partitions formatted
with Btrfs or existing subvolumes on a
Btrfs partition. In the following example we will set
up a Snapper configuration for backing up the Web server data residing on
a separate, Btrfs-formatted partition mounted at
/srv/www.
After a configuration has been created, you can either use
snapper itself or the YaST
module to restore files from these snapshots.
In YaST you need to select your , while you need to specify your configuration for
snapper with the global switch -c
(for example, snapper -c myconfig
list).
To create a new Snapper configuration, run snapper
create-config:
snapper -c www-data1 create-config /srv/www2
Name of configuration file. | |
Mount point of the partition or |
This command will create a new configuration file
/etc/snapper/configs/www-data with reasonable
default values (taken from
/etc/snapper/config-templates/default). Refer to
Section 3.4.1, “Managing Existing Configurations” for instructions on how to
adjust these defaults.
Tip: Configuration Defaults
Default values for a new configuration are taken from
/etc/snapper/config-templates/default. To use your
own set of defaults, create a copy of this file in the same directory
and adjust it to your needs. To use it, specify the -t
option with the create-config command:
snapper -c www-data create-config -t my_defaults /srv/www
3.4.1 Managing Existing Configurations #
The snapper offers several subcommands for managing
existing configurations. You can list, show, delete and modify them:
- List Configurations
Use the command
snapper list-configsto get all existing configurations:root #snapper list-configs Config | Subvolume -------+---------- root | / usr | /usr local | /local- Delete a Configuration
Use the subcommand
snapper-c CONFIGdelete-config to delete a configuration. Config needs to be replaced by a configuration name shown bysnapper list-configs.- Show a Configuration
Use the subcommand
snapper-c CONFIGget-config to display the specified configuration. Config needs to be replaced by a configuration name shown bysnapper list-configs. See Section 3.4.1.1, “Configuration Data” for more information on the configuration options.Use the subcommand
snapper-c CONFIGset-config OPTION=VALUE to modify an option in the specified configuration. Config needs to be replaced by a configuration name shown bysnapper list-configs. Possible values for OPTION and VALUE are listed in Section 3.4.1.1, “Configuration Data”.
3.4.1.1 Configuration Data #
Each configuration contains a list of options that can be modified from the command line. The following list provides details for each option:
ALLOW_GROUPS,ALLOW_USERSGranting permissions to use snapshots to regular users. See Section 3.4.1.2, “Using Snapper as Regular User” for more information.
The default value is
"".BACKGROUND_COMPARISONDefines whether pre and post snapshots should be compared in the background after creation..
The default value is
"yes".- EMPTY_PRE_POST_CLEANUP
If set to
yes, pre and post snapshot pairs that do not differ will be deleted.The default value is
"yes".- EMPTY_PRE_POST_MIN_AGE
Defines the minimum age in seconds a pre and post snapshot pair that does not differ must have before it can automatically be deleted.
The default value is
"1800".FSTYPEFile system type of the partition. Do not change.
The default value is
"btrfs".NUMBER_CLEANUPDefines whether to automatically delete old installation and administration snapshot pairs when the total snapshot count exceeds a number specified with
NUMBER_LIMITand an age specified withNUMBER_MIN_AGE. Valid values:yes,noThe default value is
"no".
Note: Limit and Age
NUMBER_LIMIT,NUMBER_LIMIT_IMPORTANTandNUMBER_MIN_AGEare always evaluated. Snapshots are only deleted when all conditions are met. If you always want to keep a certain number of snapshots regardless of their age, setNUMBER_MIN_AGEto0. On the other hand, if you do not want to keep snapshots beyond a certain age, setNUMBER_LIMITandNUMBER_LIMIT_IMPORTANTto0.NUMBER_LIMITDefines how many installation and administration snapshot pairs that are not marked as important to keep if
NUMBER_CLEANUPis set toyes. Only the youngest snapshots will be kept.The default value is
"50".NUMBER_LIMIT_IMPORTANTDefines how many snapshot pairs marked as important to keep if
NUMBER_CLEANUPis set toyes. Only the youngest snapshots will be kept.The default value is
"10".NUMBER_MIN_AGEDefines the minimum age in seconds a snapshot pair must have before it can automatically be deleted.
The default value is
"1800".SUBVOLUMEMount point of the partition or subvolume to snapshot. Do not change.
SYNC_ACLIf Snapper is to be used by regular users (see Section 3.4.1.2, “Using Snapper as Regular User”) the users must be able to access the
.snapshotdirectories and to read files within them. If SYNC_ACL is set toyes, Snapper automatically makes them accessible using ACLs for users and groups from the ALLOW_USERS or ALLOW_GROUPS entries.The default value is
"no".TIMELINE_CLEANUPDefines whether to automatically delete old snapshots when the snapshot count exceeds a number specified with the
TIMELINE_LIMIT_*options and an age specified withTIMELINE_MIN_AGE. Valid values:yes,noThe default value is
"no".TIMELINE_CREATEIf set to
yes, hourly snapshots are created. This is currently the only way to automatically create snapshots, therefore setting it toyesis strongly recommended. Valid values:yes,noThe default value is
"no".TIMELINE_LIMIT_DAILY,TIMELINE_LIMIT_HOURLY,TIMELINE_LIMIT_MONTHLY,TIMELINE_LIMIT_YEARLYNumber of snapshots to keep for hour, day, month, year.
The default value for each entry is
"10".Example 3.1: Example timeline configuration #
TIMELINE_CLEANUP="yes"
TIMELINE_CREATE="yes"
TIMELINE_LIMIT_DAILY="10"
TIMELINE_LIMIT_HOURLY="10"
TIMELINE_LIMIT_MONTHLY="10"
TIMELINE_LIMIT_YEARLY="10"
TIMELINE_MIN_AGE="1800"
This example configuration enables hourly snapshots which are automatically cleaned up.
TIMELINE_MIN_AGEandTIMELINE_LIMIT_*are always evaluated both. In this example, the minimum age of a snapshot, before it can be deleted is set to 30 minutes (1800 seconds). Since we create hourly snapshots, this ensures that only the latest snapshots are kept. IfTIMELINE_LIMIT_DAILYis set to not zero, this means that the first snapshot of the day is kept, too.Snapshots to be Kept #
Hourly: The last ten snapshots that have been made.
Daily: The first daily snapshot that has been made is kept for the last ten days.
Monthly: The first snapshot made on the last day of the month is kept for the last ten months.
Yearly: The first snapshot made on the last day of the year is kept for the last ten years.
TIMELINE_MIN_AGEDefines the minimum age in seconds a snapshot must have before it can automatically be deleted.
The default value is
"1800".
3.4.1.2 Using Snapper as Regular User #
By default Snapper can only be used by root. However, there
are cases in which certain groups or users need to be able to create
snapshots or undo changes by reverting to a snapshot:
Web site administrators who want to take snapshots of
/srv/wwwusers who want to take a snapshot of their home directory
For these purposes Snapper configurations that grant permissions to
users or/and groups can be created. The corresponding
.snapshots directory needs to be readable and
accessible by the specified users. The easiest way to achieve this is
to set the SYNC_ACL option to yes.
Procedure 3.5: Enabling Regular Users to Use Snapper #
Note that all steps in this procedure need to be run by root.
If not existing, create a Snapper configuration for the partition or subvolume on which the user should be able to use Snapper. Refer to Section 3.4, “Creating and Modifying Snapper Configurations” for instructions. Example:
snapper --config web_data create /srv/www
The configuration file is created under
/etc/snapper/configs/CONFIG, where CONFIG is the value you specified with-c/--configin the previous step (for example/etc/snapper/configs/web_data). Adjust it according to your needs; see Section 3.4.1, “Managing Existing Configurations” for details.Set values for
ALLOW_USERSand/orALLOW_GROUPSto grant permissions to users and/or groups, respectively. Multiple entries need to be separated by Space. To grant permissions to the userwww_adminfor example, run:snapper -c web_data set-config "ALLOW_USERS=www_admin" SYNC_ACL="yes"
The given Snapper configuration can now be used by the specified user(s) and/or group(s). You can test it with the
listcommand, for example:www_admin:~ > snapper -c web_data list
3.5 Manually Creating and Managing Snapshots #
Snapper is not restricted to creating and managing snapshots automatically by configuration; you can also create snapshot pairs (“before and after”) or single snapshots manually using either the command line tool or the YaST module.
All Snapper operations are carried out for an existing configuration (see
Section 3.4, “Creating and Modifying Snapper Configurations” for details). You can only take
snapshots of partitions or volumes for which a configuration exists. By
default the system configuration (root) is used. If
you want to create or manage snapshots for your own configuration you
need to explicitly choose it. Use the drop-down box in YaST or specify the
-c on the command line (snapper
-c MYCONFIG
COMMAND).
3.5.1 Snapshot Metadata #
Each snapshot consists of the snapshot itself and some metadata. When creating a snapshot you also need to specify the metadata. Modifying a snapshot means changing its metadata—you cannot modify its content. The following metadata is available for each snapshot:
Type: Snapshot type, see Section 3.5.1.1, “Snapshot Types” for details. This data cannot be changed.
Number: Unique number of the snapshot. This data cannot be changed.
Pre Number: Specifies the number of the corresponding pre snapshot. For snapshots of type post only. This data cannot be changed.
Description: A description of the snapshot.
Userdata: An extended description where you can specify custom data in the form of a comma-separated key=value list:
reason=testing, project=foo. This field is also used to mark a snapshot as important (important=yes) and to list the user that created the snapshot (user=tux).Cleanup-Algorithm: Cleanup-algorithm for the snapshot, see Section 3.5.1.2, “Cleanup-algorithms” for details.
3.5.1.1 Snapshot Types #
Snapper knows three different types of snapshots: pre, post, and single. Physically they do not differ, but Snapper handles them differently.
preSnapshot of a file system before a modification. Each
presnapshot has got a correspondingpostsnapshot. Used for the automatic YaST/Zypper snapshots, for example.postSnapshot of a file system after a modification. Each
postsnapshot has got a correspondingpresnapshot. Used for the automatic YaST/Zypper snapshots, for example.singleStand-alone snapshot. Used for the automatic hourly snapshots, for example. This is the default type when creating snapshots.
3.5.1.2 Cleanup-algorithms #
Snapper provides three algorithms to clean up old snapshots. The algorithms are executed in a daily cron-job. It is possible to define the number of the different types of snapshots to keep in the Snapper configuration (see Section 3.4.1, “Managing Existing Configurations” for details).
- number
Deletes old snapshots when a certain snapshot count is reached.
- timeline
Deletes old snapshots having passed a certain age, but keeps a number of hourly, daily, monthly, and yearly snapshots.
- empty-pre-post
Deletes pre/post snapshot pairs with empty diffs.
3.5.2 Creating Snapshots #
Creating a snapshot is done by running snapper create
or by clicking in the YaST module
. The following examples explain how to create
snapshots from the command line. It should be easy to adopt them when
using the YaST interface.
Tip: Snapshot Description
You should always specify a meaningful description to later be able to identify its purpose. Even more information can be specified via the user data option.
snapper create--description "Snapshot for week 2 2014"Creates a stand-alone snapshot (type single) for the default (
root) configuration with a description. Because no cleanup-algorithm is specified, the snapshot will never be deleted automatically.snapper--config homecreate--description "Cleanup in ~tux"Creates a stand-alone snapshot (type single) for a custom configuration named
homewith a description. Because no cleanup-algorithm is specified, the snapshot will never be deleted automatically.snapper--config homecreate--description "Daily data backup" --cleanup-algorithm timelineCreates a stand-alone snapshot (type single) for a custom configuration named
homewith a description. The file will automatically be deleted when it meets the criteria specified for the timeline cleanup-algorithm in the configuration.snapper create--type pre--print-number--description "Before the Apache config cleanup"--userdata "important=yes"Creates a snapshot of the type
preand prints the snapshot number. First command needed to create a pair of snapshots used to save a “before” and “after” state. The snapshot is marked as important.snapper create--type post--pre-number 30--description "After the Apache config cleanup"--userdata "important=yes"Creates a snapshot of the type
postpaired with thepresnapshot number30. Second command needed to create a pair of snapshots used to save a “before” and “after” state. The snapshot is marked as important.snapper create--command COMMAND--description "Before and after COMMAND"Automatically creates a snapshot pair before and after running COMMAND. This option is only available when using snapper on the command line.
3.5.3 Modifying Snapshot Metadata #
Snapper allows you to modify the description, the cleanup algorithm, and the userdata of a snapshot. All other metadata cannot be changed. The following examples explain how to modify snapshots from the command line. It should be easy to adopt them when using the YaST interface.
To modify a snapshot on the command line, you need to know its number.
Use snapper list to display all
snapshots and their numbers.
The YaST module already lists all snapshots. Choose one from the list and click .
snapper modify--cleanup-algorithm "timeline"10Modifies the metadata of snapshot 10 for the default (
root) configuration. The cleanup algorithm is set totimeline.snapper--config homemodify--description "daily backup" -cleanup-algorithm "timeline"120Modifies the metadata of snapshot 120 for a custom configuration named
home. A new description is set and the cleanup algorithm is unset.
3.5.4 Deleting Snapshots #
To delete a snapshot with the YaST module, choose a snapshot from the list and click .
To delete a snapshot with the command line tool, you need to know its
number. Get it by running snapper list. To delete a
snapshot, run snapper delete
NUMBER.
When deleting snapshots with Snapper, the freed space will be claimed by a
Btrfs process running in the background. Thus the visibility and the
availability of free space is delayed. In case you need space freed by
deleting a snapshot to be available immediately, use the option
--sync with the delete command.
Tip: Deleting Snapshot Pairs
When deleting a pre snapshot, you should always
delete its corresponding post snapshot (and vice
versa).
snapper delete 65Deletes snapshot 65 for the default (
root) configuration.snapper-c homedelete 89 90Deletes snapshots 89 and 90 for a custom configuration named
home.snapper--sync23Deletes snapshot 23 for the default (
root) configuration and makes the freed space available immediately.
Tip: Delete Unreferenced Snapshots
Sometimes the Btrfs snapshot is present but the XML file containing the metadata for Snapper is missing. In this case the snapshot is not visible for Snapper and needs to be deleted manually:
btrfs subvolume delete /.snapshots/SNAPSHOTNUMBER/snapshot
rm -rf /.snapshots/SNAPSHOTNUMBER
Tip: Old Snapshots Occupy More Disk Space
If you delete snapshots to free space on your hard disk, make sure to delete old snapshots first. The older a snapshot is, the more disk space it occupies.
Snapshots are also automatically deleted by a daily cron-job. Refer to Section 3.5.1.2, “Cleanup-algorithms” for details.
3.6 Frequently Asked Questions #
-
Why does Snapper Never Show Changes in
/var/log,/tmpand Other Directories? For some directories we decided to exclude them from snapshots. See Section 3.1.2, “Directories That Are Excluded from Snapshots” for a list and reasons. To exclude a path from snapshots we create a subvolume for that path.
- How much disk space is used by snapshots? How to free disk space?
Since the
dfdoes not show the correct disk usage onBtrfsfile systems, you need to use the commandbtrfs filesystem dfMOUNT_POINT. Displaying the amount of disk space a snapshot allocates is currently not supported by theBtrfstools.To free space on a
Btrfspartition containing snapshots you need to delete unneeded snapshots rather than files. Older snapshots occupy more space than recent ones. See Section 3.1.3.4, “Controlling Snapshot Archiving” for details.Doing an upgrade from one service pack to another results in snapshots occupying a lot of disk space on the system subvolumes, because a lot of data gets changed (package updates). Manually deleting these snapshots after they are no longer needed is recommended. See Section 3.5.4, “Deleting Snapshots” for details.
- Can I Boot a Snapshot from the Boot Loader?
Yes—refer to Section 3.3, “System Rollback by Booting from Snapshots” for details.
- Where can I get more information on Snapper?
See the Snapper home page at http://snapper.io/.