Security Guide
- About This Guide
- 1 Security and Confidentiality
- I Authentication
- II Local Security
- III Network Security
- IV Confining Privileges with AppArmor
- 18 Introducing AppArmor
- 19 Getting Started
- 20 Immunizing Programs
- 21 Profile Components and Syntax
- 22 AppArmor Profile Repositories
- 23 Building and Managing Profiles with YaST
- 24 Building Profiles from the Command Line
- 25 Profiling Your Web Applications Using ChangeHat
- 26 Confining Users with
pam_apparmor - 27 Managing Profiled Applications
- 28 Support
- 29 AppArmor Glossary
- V SELinux
- VI The Linux Audit Framework
- A GNU Licenses
16 Configuring a VPN Server
AbstractReport Bug #
Nowadays, the Internet connection is cheap and available almost everywhere. It is important that the connection is as secure as possible. Virtual Private Network (VPN) is a secure network within a second, insecure network such as the Internet or Wi-Fi. It can be implemented in different ways and serves several purposes. In this chapter, we focus on the OpenVPN implementation to link branch offices via secure wide area networks (WANs).
16.1 Conceptual Overview Report Bug #
This section defines some terms regarding VPN and gives a brief overview of some scenarios.
16.1.1 Terminology Report Bug #
- Endpoint
The two “ends” of a tunnel, the source or destination client.
- Tap Device
A tap device simulates an Ethernet device (layer 2 packets in the OSI model such as IP packets). A tap device is used for creating a network bridge. It works with Ethernet frames.
- Tun Device
A tun device simulates a point-to-point network (layer 3 packets in the OSI model such as Ethernet frames). A tun device is used with routing and works with IP frames.
- Tunnel
Linking two locations through a primarily public network. From a more technical viewpoint, it is a connection between the client's device and the server's device. Usually a tunnel is encrypted, but it does need to be by definition.
16.1.2 VPN Scenarios Report Bug #
Whenever you set up a VPN connection, your IP packets are transferred over a secured tunnel. A tunnel can use a so-called tun or tap device. They are virtual network kernel drivers which implement the transmission of Ethernet frames or IP frames/packets.
Any userspace program OpenVPN can attach itself to a tun or tap device to receive packets sent by your operating system. The program is also able to write packets to the device.
There are many solutions to set up and build a VPN connection. This section focuses on the OpenVPN package. Compared to other VPN software, OpenVPN can be operated in two modes:
- Routed VPN
Routing is an easy solution to set up. It is more efficient and scales better than bridged VPN. Furthermore, it allows the user to tune MTU (Maximum Transfer Unit) to raise efficiency. However, in a heterogeneous environment NetBIOS broadcasts do not work if you do not have a Samba server on the gateway. If you need IPv6, each tun drivers on both ends must support this protocol explicitly. This scenario is depicted in Figure 16.1, “Routed VPN”.
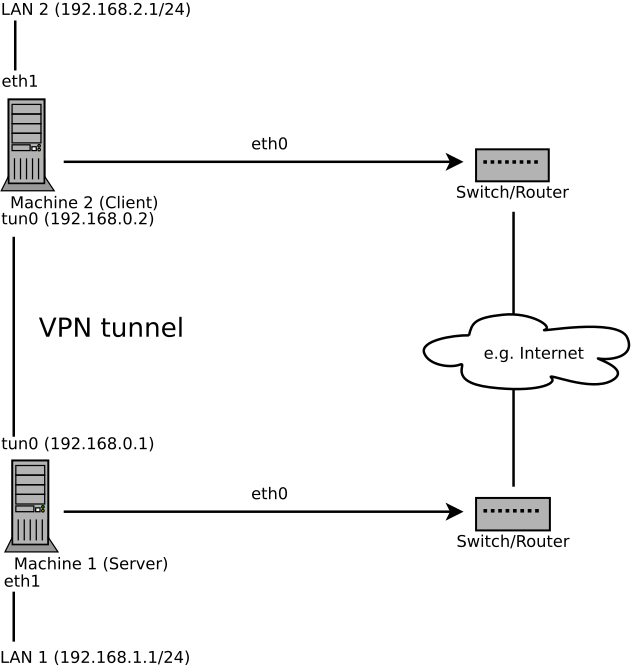
Figure 16.1: Routed VPN Report Bug #
- Bridged VPN
Bridging is a more complex solution. It is recommended when you need to browse Windows file shares across the VPN without setting up a Samba or WINS server. Bridged VPN is also needed if you want to use non-IP protocols (such as IPX) or applications relying on network broadcasts. However, it is less efficient than routed VPN. Another disadvantage is that it does not scale well. This scenario is depicted in the following figures.
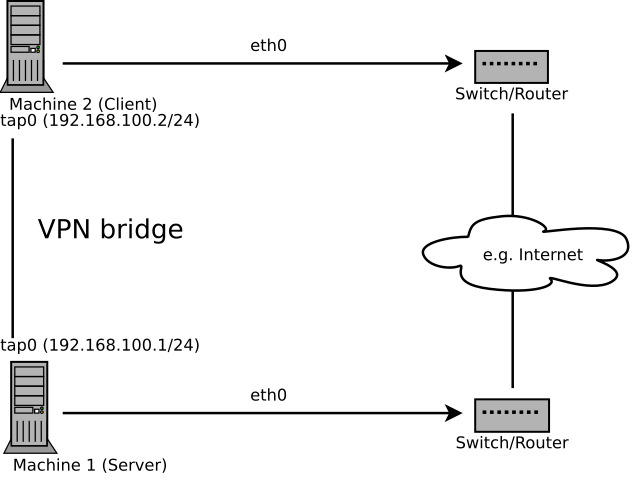
Figure 16.2: Bridged VPN - Scenario 1 Report Bug #
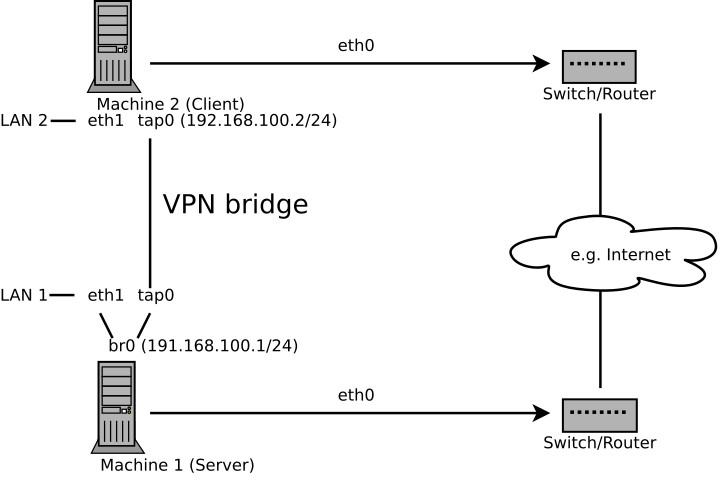
Figure 16.3: Bridged VPN - Scenario 2 Report Bug #
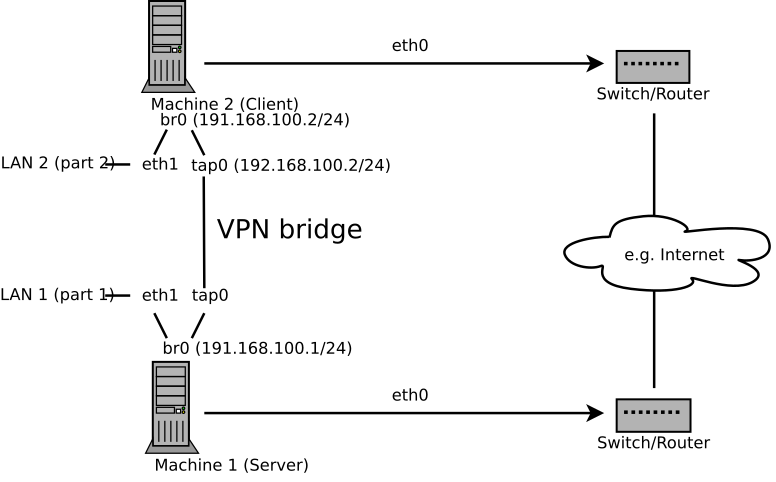
Figure 16.4: Bridged VPN - Scenario 3 Report Bug #
The major difference between bridging and routing is that a routed VPN cannot IP-broadcast while a bridged VPN can.
16.2 Setting Up a Simple Test Scenario Report Bug #
In the following example we will create a point-to-point VPN tunnel. The
example demonstrates how to create a VPN tunnel between one client and a
server. It is assumed that your VPN server will use private IP addresses
like IP_OF_SERVER and your
client the IP address
IP_OF_CLIENT. You can
modify these private IP addresses to your needs but make sure you select
addresses which do not conflict with other IP addresses.
Warning: Use Only For Testing
This scenario is only useful for testing and is considered as an example to get familiar with VPN. Do not use this as a real world scenario as it can compromise security and safety of your IT infrastructure!
It is recommended to use configuration file names structured as
/etc/openvpn/XXX.conf.
If you need to store more files, create a configuration directory
/etc/openvpn/XXX/.
This makes life a bit easier as you know exactly which file
belongs to which configuration file.
16.2.1 Configuring the VPN Server Report Bug #
To configure a VPN server, proceed as follows:
Procedure 16.1: VPN Server Configuration Report Bug #
Install the package
openvpnon the machine that will later become your VPN server.Open a shell, become
rootand create the VPN secret key:root #openvpn --genkey --secret /etc/openvpn/secret.keyCopy the secret key to your client:
root #scp /etc/openvpn/secret.key root@IP_OF_CLIENT:/etc/openvpn/Create the file
/etc/openvpn/server.confwith the following content:dev tun ifconfig IP_OF_SERVER IP_OF_CLIENT secret secret.key
If you use a firewall, start YaST and open UDP port 1194 ( › › ).
Start the OpenVPN server service:
sudo systemctl start openvpn@server
This notation points to the OpenVPN server configuration file located at
/etc/openvpn/server.conf. See/usr/share/doc/packages/openvpn/README.SUSEfor details.
16.2.2 Configuring the VPN Client Report Bug #
To configure the VPN client, do the following:
Procedure 16.2: VPN Client Configuration Report Bug #
Install the package
openvpnon your client VPN machine.Create
/etc/openvpn/client.confwith the following content:remote DOMAIN_OR_PUBLIC_IP_OF_SERVER dev tun ifconfig IP_OF_CLIENT IP_OF_SERVER secret secret.key
Replace the placeholder IP_OF_CLIENT in the first line with either the domain name, or the public IP address of your server.
If you use a firewall, start YaST and open UDP port 1194 as described in Step 5 of Procedure 16.1, “VPN Server Configuration”.
Start the OpenVPN service:
sudo systemctl start openvpn@client
16.2.3 Testing the VPN Example Scenario Report Bug #
After OpenVPN has successfully started, test the availability of the tun device with the following command:
ip addr show tun0
To verify the VPN connection, use ping on both client
and server side to see if they can reach each other. Ping the server
from the client:
ping -I tun0 IP_OF_SERVER
Ping the client from the server:
ping -I tun0 IP_OF_CLIENT
16.3 Setting Up Your VPN Server Using Certificate Authority Report Bug #
The example in Section 16.2 is useful for testing, but not for daily work. This section explains how to build a VPN server that allows more than one connection at the same time. This is done with a public key infrastructure (PKI). A PKI consists of a pair of public and private keys for the server and each client, and a master certificate authority (CA), which is used to sign every server and client certificate.
This setup involves the following basic steps:
16.3.1 Creating Certificates Report Bug #
Before a VPN connection gets established, the client must authenticate the server certificate. Conversely, the server must also authenticate the client certificate. This is called mutual authentication. To create such certificates, use the YaST CA module. See Chapter 17, Managing X.509 Certification for more details.
To create a VPN root, server, and client CA, proceed as follows:
Procedure 16.3: Creating a VPN Server Certificate Report Bug #
Prepare a common VPN Certificate Authority (CA):
Start the YaST CA module.
Click .
Enter a and a , for example
VPN-Server-CA.Fill out the other boxes like e-mail addresses, organization, etc. and proceed with .
Enter your password twice and proceed with .
Review the summary. YaST displays the current settings for confirmation. Click . The root CA is created and displayed in the overview.
Create a VPN server certificate:
Select the root CA you created in Step 1 and click .
When prompted, enter the .
Click the tab and click › .
Enter a , for example,
openvpn.example.comand proceed with .Enter your password twice and click .
Switch to the › list and check one of the following sets:
digitalSignatureandkeyEncipherment, or,digitalSignatureandkeyAgreement
Switch to the › and type
serverAuthfor a server certificate.When using the method
remote-cert-tls serverorremote-cert-tls clientto verify the certificates, then the certificates can only have a certain number of key usages set. The reason for this is to prevent or at least mitigate the possibility of a man-in-the-middle attack. For further background information, see http://openvpn.net/index.php/open-source/documentation/howto.html#mitm. Finish with and then proceed with .Review the summary. YaST displays the current settings for confirmation. Click . The VPN server certificate is created and displayed in the tab.
Create VPN client certificates:
Make sure you are on the tab.
Click › .
Enter a , for example,
client1.example.com.Enter the e-mail addresses for your client, for example,
user1@client1.example.com, and click . Proceed with .Enter your password twice and click .
Switch to › list and check one of the following flags:
digitalSignatureor,keyAgreementor,digitalSignatureandkeyAgreement.
Switch to the › and type
clientAuthfor a server certificate.Review the summary. YaST displays the current settings for confirmation. Click . The VPN client certificate is created and is displayed in the tab.
Repeat Step 3 if you need certificates for more clients.
After you have successfully finished Procedure 16.3, “Creating a VPN Server Certificate” you have a VPN root CA, a VPN server CA, and one or more VPN client CAs. To finish the task, proceed with the following procedure:
Choose the tab.
Export the VPN server certificate in two formats: PEM and unencrypted key in PEM.
Export the VPN client certificates and choose an export format, PEM or PKCS12 (preferred). For each client:
Select your VPN client certificate (
client1.example.comin our example) and choose › .Select , enter your VPN client certificate key password and provide a PKCS12 password. Enter a , click and save the file to
/etc/openvpn/client1.p12.
Copy the files to your client (in our example,
client1.example.com).Export the VPN CA (in our example
VPN-Server-CA):Switch to the tab and select .
Select › .
Mark and save the file to
/etc/openvpn/vpn_ca.pem.
If desired, the client PKCS12 file can be converted into the PEM format using this command:
openssl pkcs12 -in client1.p12 -out client1.pem
Enter your client password to create the
client1.pem file. The PEM file contains the client
certificate, client key, and the CA certificate. You can split this
combined file using a text editor and create three separate files. The
file names can be used for the ca,
cert, and key options in the OpenVPN
configuration file (see Example 16.1, “VPN Server Configuration File”).
16.3.2 Configuring the Server Report Bug #
For your configuration, copy to /etc/openvpn/ and
modify the example configuration file that is provided with
/usr/share/doc/packages/openvpn/sample-config-files/server.conf.
You need to adjust some paths.
Example 16.1: VPN Server Configuration File Report Bug #
# /etc/openvpn/server.conf
port 1194 1
proto udp 2
dev tun0 3

# Security 4

ca    vpn_ca.pem
cert  server_crt.pem
key   server_key.pem

# ns-cert-type server
remote-cert-tls client 5
dh   server/dh2048.pem 6

server 192.168.1.0 255.255.255.0 7
ifconfig-pool-persist /var/run/openvpn/ipp.txt 8

# Privileges 9
user nobody
group nobody

# Other configuration 10
keepalive 10 120
comp-lzo
persist-key
persist-tun
# status      /var/log/openvpn-status.tun0.log 11
# log-append  /var/log/openvpn-server.log 12
verb 4
The TCP/UDP port which OpenVPN listens to. You need to open the port in the Firewall, see Chapter 15, Masquerading and Firewalls. The standard port for VPN is 1194, so you can usually leave that as it is. | |
The protocol, either UDP or TCP. | |
The tun or tap device, see Section 16.1.1, “Terminology” for the differences. | |
The following lines contain the relative or absolute path to the root
server CA certificate ( | |
Require that peer certificate to have been signed with an explicit key usage and extended key usage based on RFC3280 TLS rules. There is a description of how to make a server use this explicit key in Procedure 16.3, “Creating a VPN Server Certificate”. | |
The Diffie-Hellman parameters. Create the required file with the following command: openssl dhparam -out /etc/openvpn/dh2048.pem 2048 | |
Supplies a VPN subnet. The server can be reached by
| |
Records a mapping of clients and its virtual IP address in the given file. Useful when the server goes down and (after the restart) the clients get their previously assigned IP address. | |
For security reasons it is a good idea to run the OpenVPN daemon with
reduced privileges. For this reason the group and user
| |
Several other configuration options—see the comment in the
example configuration file:
| |
Enable this option, if you prefer a short status with statistical data
(“operational status dump”). By default, it is not set;
all output is written to syslog. If you have more than one
configuration file (for example, one for home and another for work), it
is recommended to include the device name into the file name. This
avoids overwriting each other's output files accidentally. In this case
it is | |
By default, log messages go to syslog. Overwrite this behavior by
removing the hash character. In that case, all messages go to
|
After having completed this configuration, you can see log messages of
your OpenVPN server under /var/log/openvpn.log.
After having started it for the first time, it should finish with:
... Initialization Sequence Completed
If you do not see this message, check the log carefully for any hints of what is wrong in your configuration file.
16.3.3 Configuring the Clients Report Bug #
For your configuration, copy and modify the example configuration file
that is provided with
/usr/share/doc/packages/openvpn/sample-config-files/client.conf.
You need to adjust some paths.
Example 16.2: VPN Client Configuration File Report Bug #
# /etc/openvpn/client.conf
client 1
dev tun 2
proto udp 3
remote IP_OR_HOST_NAME 1194 4
resolv-retry infinite
nobind

remote-cert-tls server 5

# Privileges 6
user nobody
group nobody

# Try to preserve some state across restarts.
persist-key
persist-tun

# Security 7
pkcs12 client1.p12

comp-lzo 8
You need to specify that this machine is a client. | |
The network device. Both clients and server must use the same device. | |
The protocol. Use the same settings as on the server. | |
This is a useful security option for clients, to ensure that the host they connect to is a designated server. | |
Replace the placeholder IP_OR_HOST_NAME
with the respective host name or IP address of your VPN server. After
the host name, the port of the server is given. You can have multiple
lines of | |
For security reasons it is a good idea to run the OpenVPN daemon with
reduced privileges. For this reason the group and user
| |
Contains the client files. For security reasons, it is better to have a separate file pair for each client. | |
Turns compression on. Use only when the server has this parameter switched on as well. |
16.4 Changing Name Servers in VPN Report Bug #
If you need to change name servers before or during a VPN session, use
netconfig.
Important: Differences between SUSE Linux Enterprise Desktop and SUSE Linux Enterprise Server
The following procedure is for SUSE Linux Enterprise Server only without NetworkManager (with
ifup). SUSE Linux Enterprise Desktop installations use NetworkManager and must
install the NetworkManager-openvpn plug-in.
Use the following procedure to change a name server:
Procedure 16.4: Changing Name Servers Report Bug #
Copy the following scripts and make them executable:
cp /usr/share/doc/packages/openvpn/sample-scripts/client-netconfig.* \
  /etc/openvpn/
chmod +x /etc/openvpn/client-netconfig.*
Add the following lines to
/etc/openvpn/client.conf:pull dhcp-options up /etc/openvpn/client-netconfig.up down /etc/openvpn/client-netconfig.down
If you need to specify a ranking list of fallback services, use the
NETCONFIG_DNS_RANKING variable in
/etc/sysconfig/network/config. The default value is
auto which resolves to (documented in man 8
netconfig):
+/vpn/ -/auto/ +strongswan +openswan +racoon -avahi
Preferred service names have the + prefix, fallback
services the - prefix.
16.5 The GNOME Applet Report Bug #
The following sections describe the setup of OpenVPN connections with the GNOME tool.
Make sure the package
NetworkManager-openvpn-gnomeis installed and all dependencies have been resolved.Press Alt–F2 and enter
nm-connection-editorinto the text box to start the . A new window appears.Select the tab and click .
Choose the VPN connection type, in this case .
Choose the type. Depending on the setup of your OpenVPN server, choose between or .
Insert the necessary values into the respective text boxes. For our example configuration, these are:
The user (only available when you have selected )
The password for the user (only available when you have selected )
/etc/openvpn/client1.crt/etc/openvpn/ca.crt/etc/openvpn/client1.keyFinish with and .
Enable the connection with your Network Manager applet.
16.6 For More Information Report Bug #
For more information about VPN, see:
http://www.openvpn.net: the OpenVPN home page
manopenvpn/usr/share/doc/packages/openvpn/sample-config-files/: example configuration files for different scenarios./usr/src/linux/Documentation/networking/tuntap.txt, to install thekernel-sourcepackage.