openSUSE Leap 15.3
AutoYaST Guide
Abstract#
AutoYaST is a system for unattended mass deployment of openSUSE Leap systems. It uses an AutoYaST profile that contains installation and configuration data. The book guides you through the basic steps of auto-installation: preparation, installation, and configuration.
- Preface
- 1 Introduction to AutoYaST
- I Understanding and creating the AutoYaST control file
- II AutoYaST configuration examples
- 4 Configuration and installation options
- 4.1 General options
- 4.2 Reporting
- 4.3 The boot loader
- 4.4 Partitioning
- 4.5 iSCSI initiator overview
- 4.6 Fibre channel over Ethernet configuration (FCoE)
- 4.7 Country settings
- 4.8 Software
- 4.9 Upgrade
- 4.10 Services and targets
- 4.11 Network configuration
- 4.12 Proxy
- 4.13 NIS client and server
- 4.14 NIS server
- 4.15 Hosts definition
- 4.16 Windows domain membership
- 4.17 Samba server
- 4.18 Authentication client
- 4.19 NFS client and server
- 4.20 NTP client
- 4.21 Mail server configuration
- 4.22 Apache HTTP server configuration
- 4.23 Squid server
- 4.24 FTP server
- 4.25 TFTP server
- 4.26 Firstboot workflow
- 4.27 Security settings
- 4.28 Linux audit framework (LAF)
- 4.29 Users and groups
- 4.30 Custom user scripts
- 4.31 System variables (sysconfig)
- 4.32 Adding complete configurations
- 4.33 Ask the user for values during installation
- 4.34 Kernel dumps
- 4.35 DNS server
- 4.36 DHCP server
- 4.37 Firewall configuration
- 4.38 Miscellaneous hardware and system components
- 4.39 Importing SSH keys and configuration
- 4.40 Configuration management
- III Managing mass installations with dynamic profiles
- IV Understanding the auto-installation process
- V Uses for AutoYaST on installed systems
- VI Appendixes
- 2.1 AutoYaST control file (profile)
- 2.2 Control file container
- 2.3 Nested resources
- 3.1 Example file for replacing the host name/domain by script
- 4.1 General options
- 4.2 Reporting behavior
- 4.3 LVM-based guided partitioning
- 4.4 Creating
/,/homeandswappartitions - 4.5 Using a whole disk as a file system
- 4.6 Automated partitioning on selected drives
- 4.7 Installing on multiple drives
- 4.8 Mount options
- 4.9 Keeping partitions
- 4.10 Auto-detection of partitions to be kept.
- 4.11 Create LVM physical volume
- 4.12 LVM logical volumes
- 4.13 RAID1 configuration
- 4.14 RAID1 without partitions
- 4.15 Old style RAID1 configuration
- 4.16 Using multipath devices
- 4.17 Listing multipath devices
- 4.18 Using the WWID to identify a multipath device
- 4.19
bcachedefinition - 4.20 Multi-device Btrfs configuration
- 4.21 NFS share definition
- 4.22
tmpfsdefinition - 4.23 iSCSI client
- 4.24 FCoE configuration
- 4.25 Language
- 4.26 Time zone
- 4.27 Keyboard
- 4.28 Package selection in the control file with patterns and packages sections
- 4.29 Activating image deployment
- 4.30 Creating a package database with the additional package inst-source-utils.rpm
- 4.31
add_on_products.xml - 4.32 Adding the SDK extension and a user defined repository
- 4.33 Kernel selection in the control file
- 4.34 Package selection in control file
- 4.35 Upgrade and backup
- 4.36 Configuring services and targets
- 4.37 Network configuration
- 4.38 Bonding interface configuration
- 4.39 Bridge interface configuration
- 4.40 Multiple IP Addresses
- 4.41 Assigning a persistent name using the MAC address
- 4.42 Network routing configuration
- 4.43 Network configuration: proxy
- 4.44 Network configuration: NIS
- 4.45 NIS server configuration
- 4.46 /etc/hosts
- 4.47 Samba client configuration
- 4.48 Samba server configuration
- 4.49 Network configuration: NFS client
- 4.50 Network configuration: NFS server
- 4.51 Network configuration: NTP client
- 4.52 Mail configuration
- 4.53 HTTP server configuration
- 4.54 Squid server configuration
- 4.55 FTP server configuration:
- 4.56 TFTP server configuration:
- 4.57 Enabling firstboot workflow
- 4.58 Security configuration
- 4.59 LAF configuration
- 4.60 Minimal user configuration
- 4.61 Complex user configuration
- 4.62 Group configuration
- 4.63 Enabling autologin and password-less login
- 4.64 Script configuration
- 4.65 Sysconfig configuration
- 4.66 Dumping files into the installed system
- 4.67 Dumping files into the installed system
- 4.68 Kdump configuration
- 4.69 Disabled Kdump configuration
- 4.70 Kdump memory reservation with multiple values
- 4.71 Basic DNS server settings
- 4.72 Configuring DNS server zones and advanced settings
- 4.73 Example dhcp-server section
- 4.74 Example firewall section
- 4.75 Printer configuration
- 4.76 Sound configuration
- 4.77 Importing SSH keys and configuration from /dev/sda2
- 4.78 Client/server with manual authentication
- 4.79 Client/server with preseed keys
- 4.80 Stand-alone mode
- 6.1 Simple rules file
- 6.2 Simple rules file
- 7.1 Including a file using ERB
- 7.2 Running commands with Ruby
- 7.3 Using Ruby structures
- 7.4 Configuring the boot loader
- 7.5 Using the largest disk
- 7.6 Configure the connected network cards
- 7.7 Reusing the same profile for different distributions
- 7.8 Filtering USB devices
- 7.9 Running helpers
- 7.10 Rendering profile
- 7.11 Preparing the debug environment
- 7.12 Adding a breakpoint
- 7.13 Rules and classes
- 7.14 ERB
- 8.1 Using the MAC address to get the profile
- 8.2 Accessing ERB helpers from a Ruby script
- 9.1 Determine HEX code for an IP address
- 9.2
linuxrcOptions in the AutoYaST control file
Copyright © 2006– 2022 SUSE LLC and contributors. All rights reserved.
Permission is granted to copy, distribute and/or modify this document under the terms of the GNU Free Documentation License, Version 1.2 or (at your option) version 1.3; with the Invariant Section being this copyright notice and license. A copy of the license version 1.2 is included in the section entitled “GNU Free Documentation License”.
For SUSE trademarks, see https://www.suse.com/company/legal/. All other third-party trademarks are the property of their respective owners. Trademark symbols (®, ™ etc.) denote trademarks of SUSE and its affiliates. Asterisks (*) denote third-party trademarks.
All information found in this book has been compiled with utmost attention to detail. However, this does not guarantee complete accuracy. Neither SUSE LLC, its affiliates, the authors nor the translators shall be held liable for possible errors or the consequences thereof.
Preface #Edit source
1 Available documentation #Edit source
- Online documentation
The online documentation for this product is available at http://doc.opensuse.org/. Browse or download the documentation in various formats.

Note: Latest updates
The latest documentation updates are usually available in the English version of the documentation.
- In your system
For offline use, find documentation in your installed system under
/usr/share/doc. Many commands are also described in detail in their manual pages. To view them, runman, followed by a specific command name. If themancommand is not installed on your system, install it withsudo zypper install man.
2 Improving the documentation #Edit source
Your feedback and contributions to this documentation are welcome. The following channels for giving feedback are available:
- Bug reports
Report issues with the documentation at https://bugzilla.opensuse.org/. To simplify this process, you can use the links next to headlines in the HTML version of this document. These preselect the right product and category in Bugzilla and add a link to the current section. You can start typing your bug report right away. A Bugzilla account is required.
- Contributions
To contribute to this documentation, use the links next to headlines in the HTML version of this document. They take you to the source code on GitHub, where you can open a pull request. A GitHub account is required.
Note: only available for English
The links are only available for the English version of each document. For all other languages, use the links instead.
For more information about the documentation environment used for this documentation, see the repository's README at https://github.com/SUSE/doc-sle/blob/main/README.adoc
You can also report errors and send feedback concerning the documentation to <doc-team@suse.com>. Include the document title, the product version, and the publication date of the document. Additionally, include the relevant section number and title (or provide the URL) and provide a concise description of the problem.
- Help
If you need further help on openSUSE Leap, see https://en.opensuse.org/Portal:Support.
3 Documentation conventions #Edit source
The following notices and typographical conventions are used in this documentation:
/etc/passwd: directory names and file namesPLACEHOLDER: replace PLACEHOLDER with the actual value
PATH: the environment variable PATHls,--help: commands, options, and parametersuser: users or groupspackage name : name of a package
Alt, Alt–F1: a key to press or a key combination; keys are shown in uppercase as on a keyboard
, › : menu items, buttons
Dancing Penguins (Chapter Penguins, ↑Another Manual): This is a reference to a chapter in another manual.
Commands that must be run with
rootprivileges. Often you can also prefix these commands with thesudocommand to run them as non-privileged user.#command>sudocommandCommands that can be run by non-privileged users.
>commandNotices

Warning: Warning notice
Vital information you must be aware of before proceeding. Warns you about security issues, potential loss of data, damage to hardware, or physical hazards.

Important: Important notice
Important information you should be aware of before proceeding.
Note: Note notice
Additional information, for example about differences in software versions.

Tip: Tip notice
Helpful information, like a guideline or a piece of practical advice.
1 Introduction to AutoYaST #Edit source
1.1 Motivation #Edit source
Standard installations of openSUSE Leap are based on a wizard workflow. This is user-friendly and efficient when installing on few machines. However, it becomes repetitive and time-consuming when installing on many machines.
To avoid this, you could do mass deployments by copying the hard disk of the first successful installation. Unfortunately, that leads to the issue that even minute configuration changes between each machine need to later be dealt with individually. For example, when using static IP addresses, these IP addresses would need to be reset for each machine.
A regular installation of openSUSE Leap is semi-automated by default. The user is prompted to select the necessary information at the beginning of the installation (usually language only). YaST then generates a proposal for the underlying system depending on different factors and system parameters. Usually—and especially for new systems—such a proposal can be used to install the system and provides a usable installation. The steps following the proposal are fully automated.
AutoYaST can be used where no user intervention is required or where customization is required. Using an AutoYaST profile, YaST prepares the system for a custom installation and does not interact with the user, unless specified in the file controlling the installation.
AutoYaST is not an automated GUI system. This means that usually many screens will be skipped—you will never see the language selection interface, for example. AutoYaST will simply pass the language parameter to the sub-system without displaying any language related interface.
1.2 Overview and concept #Edit source
Using AutoYaST, multiple systems can easily be installed in parallel and
quickly. They need to share the same environment and similar, but not
necessarily identical, hardware. The installation is defined by an XML
configuration file (usually named autoinst.xml) called
the “AutoYaST profile”. You can create this using existing
configuration resources, and easily tailor it for any specific environment.
AutoYaST is fully integrated and provides various options for installing and configuring a system. The main advantage over other auto-installation systems is the possibility to configure a computer by using existing modules and avoiding using custom scripts which are normally executed at the end of the installation.
This document will guide you through the three steps of auto-installation:
Preparation: All relevant information about the target system is collected and turned into the appropriate directives in the profile. The profile is transferred onto the target system where its directives will be parsed and fed into YaST.
Installation: YaST performs the installation and basic configuration (for example, partitioning, networking, firewall) of the target system using the data from the AutoYaST profile.
Post-configuration: After the installation and configuration of the basic system, the system can run a second stage to perform any aditional configuration that requires the target system to be already running, such as post-installation scripts, third party modules or even some YaST modules.
Note: Second stage
A regular installation of openSUSE Leap 15.3 is performed in a single stage. The auto-installation process, however, is divided into two stages. After the installation and main configuration of the basic system, it is booted into a second stage to perform any post-installation configuration steps.
The packages autoyast2 and
autoyast2-installation need to be installed to run the
second stage in the installed system correctly. Otherwise an error will be
shown before booting into the installed system.
The second stage runs only if it is strictly necessary, and the second
stage can be turned off completely with the second_stage
parameter:
<general>
  <mode>
    <confirm config:type="boolean">false</confirm>
    <second_stage config:type="boolean">false</second_stage>
  </mode>
</general>
Part I Understanding and creating the AutoYaST control file #Edit source
- 2 The AutoYaST control file
A control file, also known as a profile, is a configuration description for a single system. It consists of sets of resources with properties including support for complex structures such as lists, records, trees and large embedded or referenced objects.
- 3 Creating an AutoYaST control file
To create the control file, you need to collect information about the systems you are going to install. This includes hardware data and network information among other things. Make sure you have the following information about the machines you want to install:
2 The AutoYaST control file #Edit source
2.1 Introduction #Edit source
A control file, also known as a profile, is a configuration description for a single system. It consists of sets of resources with properties including support for complex structures such as lists, records, trees and large embedded or referenced objects.
Important: Control files from OS releases older than SLES 12 GA and openSUSE 42.0 are incompatible
Many major changes were introduced with SLES 12 and openSUSE Leap 42.0, such as the switch to systemd and GRUB 2. These changes also required fundamental changes in AutoYaST Therefore you cannot use AutoYaST control files created on SLES 11 to install openSUSE Leap 15.3 and vice versa.
2.2 Format #Edit source
The XML configuration format provides a consistent file structure, which is easy to learn and to remember when attempting to configure a new system.
The AutoYaST control file uses XML to describe the system installation and
configuration. XML is a commonly used markup, and many users are familiar
with the concepts of the language and the tools used to process XML files.
If you edit an existing control file or create a control file using an
editor from scratch, it is strongly recommended to validate the control
file. This can be done using a validating XML parser such as
xmllint or jing, for example (see
Section 3.3, “Creating/editing a control file manually”).
The following example shows a control file in XML format:
Example 2.1: AutoYaST control file (profile) #
<?xml version="1.0"?>
<!DOCTYPE profile>
<profile
  xmlns="http://www.suse.com/1.0/yast2ns"
  xmlns:config="http://www.suse.com/1.0/configns">
  <partitioning config:type="list">
    <drive>
      <device>/dev/sda</device>
      <partitions config:type="list">
        <partition>
          <filesystem config:type="symbol">btrfs</filesystem>
          <size>10G</size>
          <mount>/</mount>
        </partition>
        <partition>
          <filesystem config:type="symbol">xfs</filesystem>
          <size>120G</size>
          <mount>/data</mount>
        </partition>
      </partitions>
    </drive>
  </partitioning>
  <scripts>
    <pre-scripts>
      <script>
        <interpreter>shell</interpreter>
        <filename>start.sh</filename>
        <source>
        <![CDATA[
#!/bin/sh
echo "Starting installation"
exit 0

]]>

        </source>
      </script>
    </pre-scripts>
  </scripts>
</profile>
2.3 Structure #Edit source
Below is an example of a basic control file container, the actual content of which is explained later on in this chapter.
Example 2.2: Control file container #
<?xml version="1.0"?>
<!DOCTYPE profile>
<profile
  xmlns="http://www.suse.com/1.0/yast2ns"
  xmlns:config="http://www.suse.com/1.0/configns">
  <!-- RESOURCES -->
</profile>
The <profile> element (root node) contains one or
more distinct resource elements. The permissible resource elements are
specified in the schema files
2.3.1 Resources and properties #Edit source
A resource element either contains multiple and distinct property and resource elements, or multiple instances of the same resource element, or it is empty. The permissible content of a resource element is specified in the schema files.
A property element is either empty or contains a literal value. The permissible property elements and values in each resource element are specified in the schema files
An element can be either a container of other elements (a resource) or it has a literal value (a property); it can never be both. This restriction is specified in the schema files. A configuration component with more than one value must either be represented as an embedded list in a property value or as a nested resource.
An empty element, such as <foo></foo> or
<bar/>, will not be in the
parsed data model. Usually this is interpreted as wanting a sensible
default value. In cases where you need an explicitly empty string instead,
use a CDATA section:
<foo><![CDATA[]]></foo>.
2.3.2 Nested resources #Edit source
Nested resource elements allow a tree-like structure of configuration components to be built to any level.
There are two kinds of nested resources: maps and lists. Maps, also known as associative arrays, hashes, or dictionaries, contain mixed contents, identified by their tag names. Lists, or arrays, have all items of the same type.
Example 2.3: Nested resources #
...
<drive>
  <device>/dev/sda</device>
  <partitions config:type="list">
     <partition>
        <size>10G</size>
        <mount>/</mount>
     </partition>
     <partition>
        <size>1G</size>
        <mount>/tmp</mount>
     </partition>
  </partitions>
</drive>
....
In the example above, the drive resource is a map
consisting of a device property and a
partitions resource. The partitions
resource is a list containing multiple instances of the
partition resource. Each partition
resource is a map containing a size and
mount property.
The default type of a nested resource is map, although you can specify it
as you want. Lists must be marked as such using the
config:type="list" attribute.
Tip: Using sorter type annotations
In the example above, the drive resource is a map
consisting of a device property and a
partitions resource. The partitions
resource is a list containing multiple instances of the
partition resource. Each partition
resource is a map containing a size and
mount property.
2.3.3 Attributes #Edit source
Global attributes are used to define metadata on resources and properties. Attributes are used to define context switching. They are also used for naming and typing properties as shown in the previous sections. Attributes are in a separate namespace so they do not need to be treated as reserved words in the default namespace.
The config:type attribute determines the type of the
resource or property in the parsed data model. For resources, lists need
a list type whereas a map is the default type that
does not need an attribute. For properties, boolean,
symbol, and integer can be used,
the default being a string.
Tip: Using sorter type annotations
Starting with openSUSE Leap
15.3, it is possible to use the attribute
t instead of config:type to specify
the element type.
<mode t="boolean">true</mode>
Attributes are not optional. It may appear that attributes are optional,
because various parts of the schema are not very consistent in their usage
of data types. In some places an enumeration is represented by a symbol,
elsewhere a string is required. One resource needs
config:type="integer", another will parse the number
from a string property. Some resources use
config:type="boolean", others want
yes or even 1. If in doubt, consult
the schema file.
3 Creating an AutoYaST control file #Edit source
3.1 Collecting information #Edit source
To create the control file, you need to collect information about the systems you are going to install. This includes hardware data and network information among other things. Make sure you have the following information about the machines you want to install:
Hard disk types and sizes
Graphical interface and attached monitor, if any
Network interface and MAC address if known (for example, when using DHCP)
Also verify that both autoyast2-installation and autoyast2 are installed.
3.2 Using the configuration management system (CMS) #Edit source
To create the control file for one or more computers, a configuration interface based on YaST is provided. This system depends on existing modules which are usually used to configure a computer in regular operation mode, for example, after openSUSE Leap is installed.
The configuration management system lets you easily create control files and manage a repository of configurations for use in a networked environment with multiple clients.
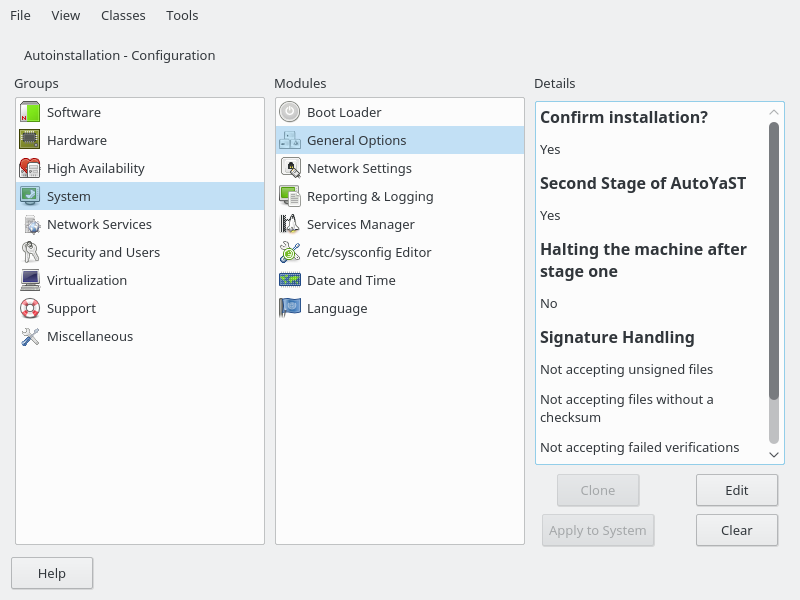
Figure 3.1: Configuration system #
3.2.1 Creating a new control file #Edit source
The easiest way to create an AutoYaST profile is to use an existing
openSUSE Leap system as a template. On an already installed system, launch
› › . Then select
› from the menu. Choose the system components
you want to include in the profile. Alternatively, create a profile
containing the complete system configuration by launching
› › or running
sudo yast clone_system from the command line.
Both methods will create the file /root/autoinst.xml.
The cloned profile can be used to set up an identical clone of the system
it was created from. However, you will usually want to adjust the file to
allow for installing multiple machines that are very similar, but not
identical. This can be done by adjusting the profile with your favorite
text/XML editor.
Warning: Sensitive data in profiles
Be aware that the profile might contain sensitive information such as password hashes and registration keys.
Carefully review the exported profiles and make sure to keep file permissions restrictive.
With some exceptions, almost all resources of the control file can be configured using the configuration management system. The system offers flexibility and the configuration of some resources is identical to the one available in the YaST control center. In addition to the existing and familiar modules new interfaces were created for special and complex configurations, for example for partitioning, general options and software.
Furthermore, using a CMS guarantees the validity of the resulting control file and its direct use for starting automated installation.
Make sure the configuration system is installed (package
autoyast2) and call it using the
YaST control center or as root with the following command (make sure the
DISPLAY variable is set correctly to start the graphical
user interface instead of the text-based one):
/sbin/yast2 autoyast
3.3 Creating/editing a control file manually #Edit source
If editing the control file manually, make sure it has a valid syntax. To
check the syntax, use the tools already available on the distribution. For
example, to verify that the file is well-formed (has a valid XML structure),
use the utility xmllint available with the
libxml2 package:
xmllint <control file>
If the control file is not well formed, for example, if a tag is not closed,
xmllint will report the errors.
To validate the control file, use the tool jing from the
package with the same name. During validation, misplaced or missing tags and
attributes and wrong attribute values are detected.
jing /usr/share/YaST2/schema/autoyast/rng/profile.rng <control file>
/usr/share/YaST2/schema/autoyast/rng/profile.rng is
provided by the package yast2-schema. This file describes
the syntax and classes of an AutoYaST profile.
Note: Schema extensions
AutoYaST can be extended by other products and modules, but the schema does not contain the specification for those extensions. As a consequence, when AutoYaST is given a profile that uses one of those extensions, it might report the profile as invalid.
Thus, starting in openSUSE Leap
15.3,
AutoYaST does not validate top-level unknown sections, and ignores them. For
example, in the example below, <sap-inst> is not
validated. The rest is validated as usual.
<general>
  <mode>
    <confirm config:type="boolean">true</confirm>
  </mode>
</general>

<sap-inst>
  <!-- this section is not validated -->>
</sap-inst>
Before going on with the autoinstallation, fix any errors resulting from such checks. The autoinstallation process cannot be started with an invalid and not well-formed control file.
You can use any XML editor available on your system or any text editor with XML support (for example, Emacs, Vim). However, it is not optimal to create the control file manually for many machines and it should only be seen as an interface between the autoinstallation engine and the Configuration Management System (CMS).
Tip: Using Emacs as an XML editor
The built-in nxml-mode turns Emacs into a fully-fledged XML editor with automatic tag completion and validation. Refer to the Emacs help for instructions on how to set up nxml-mode.
3.4 Creating a control file via script with XSLT #Edit source
If you have a template and want to change a few things via script or command
line, use an XSLT processor like xsltproc. For example,
if you have an AutoYaST control file and want to fill out the host name via
script for any reason. (If doing this often, you should consider scripting
it.)
First, create an XSL file:
Example 3.1: Example file for replacing the host name/domain by script #
<?xml version="1.0" encoding="utf-8"?>
<xsl:stylesheet xmlns:xsl="http://www.w3.org/1999/XSL/Transform"
  xmlns:y2="http://www.suse.com/1.0/yast2ns"
  xmlns:config="http://www.suse.com/1.0/configns"
  xmlns="http://www.suse.com/1.0/yast2ns"
  version="1.0">
  <xsl:output method="xml" encoding="UTF-8" indent="yes" omit-xml-declaration="no" cdata-section-elements="source"/>

  <!-- the parameter names -->
  <xsl:param name="hostname"/>
  <xsl:param name="domain"/>

  <xsl:template match="/">
    <xsl:apply-templates select="@*|node()"/>
  </xsl:template>

  <xsl:template match="y2:dns">
    <xsl:copy>
      <!-- where to copy the parameters -->
      <domain><xsl:value-of select="string($domain)"/></domain>
      <hostname><xsl:value-of select="string($hostname)"/></hostname>
      <xsl:apply-templates select="@*|node()"/>
    </xsl:copy>
  </xsl:template>


  <xsl:template match="@*|node()" >
    <xsl:copy>
      <xsl:apply-templates select="@*|node()"/>
    </xsl:copy>
  </xsl:template>

</xsl:stylesheet>
This file expects the host name and the domain name as parameters from the user.
<xsl:param name="hostname"/>
<xsl:param name="domain"/>
There will be a copy of those parameters in the DNS section of the control file. This means that if there already is a domain element in the DNS section, you will get a second one, which will cause conflicts.
For more information about XSLT, go to the official Web page www.w3.org/TR/xslt
3.5 Checking a control file #Edit source
Depending on the use case, creating an AutoYaST profile can be difficult, especially if you build a dynamic profile using rules/classes, ERB templates or pre-scripts. For more information, see Part III, “Managing mass installations with dynamic profiles”.
Starting with openSUSE Leap
15.3, AutoYaST validates the profile
during the installation, reporting any problem found to the user. Although
it is recommended to check whether the profile is correct or not, you can
disable this behavior by setting the
YAST_SKIP_XML_VALIDATION boot parameter to
1.
Moreover, to simplify the testing and debugging process, AutoYaST offers the
check-profile command, which takes care of fetching,
building and, optionally, importing the profile to detect any potential
problem.
Note: Results may vary
Although this command uses the same approach as the installation, the results may vary depending on the differences between the current system and installation media: YaST package versions, architecture, etc.
Warning: Use only trusted profiles
You must be careful when running this command because pre-installation
scripts and ERB code would run as the root user. Use
only profiles that you trust.
3.5.1 Basic checks #Edit source
The simplest way to use this command is just to read and validate the profile:
>sudoyast2 autoyast check-profile filename=autoinst.xml output=result.xml
The result.xml file contains the result of evaluating
the profile. Bear in mind that, even if you do not use any advanced
feature, the content of autoinst.xml and
result.xml may differ. The reason is that AutoYaST does
some cleaning up when it processes the profile.
check-profile can deal with remote files too:
>sudoyast2 autoyast check-profile filename=http://192.168.1.100/autoinst.xml output=result.xml
3.5.2 Running pre-scripts #Edit source
Optionally, AutoYaST can run the scripts that are included in the profile,
reporting any error found during the execution. This is especially relevant
if you are using a pre-installation script to modify the profile. To enable
this feature, you need to set the run-scripts option to
true.
>sudoyast2 autoyast check-profile filename=http://192.168.1.100/autoinst.xml output=result.xml run-scripts=true
Warning: Scripts run as root
You must be careful when enabling the run-scripts
option, because the scripts will run as root and they may affect the
current system.
3.5.3 Importing the profile #Edit source
It is possible to face some problems when importing a valid profile, even if it is correct. The reason is that AutoYaST does not perform any logic check when fetching, building and validating the profile.
To anticipate such problems, the check-profile command
imports the profile and reports problems that it has detected. As it may
take a while, you can disable this behavior by setting the
import-all option to false.
>sudoyast2 autoyast check-profile filename=http://192.168.1.100/autoinst.xml output=result.xml import-all=false
Importing the profile is a safe operation and does not alter the underlying system in any way.
Part II AutoYaST configuration examples #Edit source
- 4 Configuration and installation options
This section contains configuration examples for services, registration, user and group management, upgrades, partitioning, configuration management, SSH key management, firewall configuration, and other installation options.
4 Configuration and installation options #Edit source
Abstract#
This section contains configuration examples for services, registration, user and group management, upgrades, partitioning, configuration management, SSH key management, firewall configuration, and other installation options.
- 4.1 General options
- 4.2 Reporting
- 4.3 The boot loader
- 4.4 Partitioning
- 4.5 iSCSI initiator overview
- 4.6 Fibre channel over Ethernet configuration (FCoE)
- 4.7 Country settings
- 4.8 Software
- 4.9 Upgrade
- 4.10 Services and targets
- 4.11 Network configuration
- 4.12 Proxy
- 4.13 NIS client and server
- 4.14 NIS server
- 4.15 Hosts definition
- 4.16 Windows domain membership
- 4.17 Samba server
- 4.18 Authentication client
- 4.19 NFS client and server
- 4.20 NTP client
- 4.21 Mail server configuration
- 4.22 Apache HTTP server configuration
- 4.23 Squid server
- 4.24 FTP server
- 4.25 TFTP server
- 4.26 Firstboot workflow
- 4.27 Security settings
- 4.28 Linux audit framework (LAF)
- 4.29 Users and groups
- 4.30 Custom user scripts
- 4.31 System variables (sysconfig)
- 4.32 Adding complete configurations
- 4.33 Ask the user for values during installation
- 4.34 Kernel dumps
- 4.35 DNS server
- 4.36 DHCP server
- 4.37 Firewall configuration
- 4.38 Miscellaneous hardware and system components
- 4.39 Importing SSH keys and configuration
- 4.40 Configuration management
This chapter introduces important parts of a control file for standard purposes. To learn about other available options, use the configuration management system.
Note that for some configuration options to work, additional packages need to be installed, depending on the software selection you have configured. If you choose to install a minimal system then some packages might be missing and need to be added to the individual package selection.
YaST will install packages required in the second phase of the installation
and before the post-installation phase of AutoYaST has started. However, if
necessary YaST modules are not available in the system, important
configuration steps will be skipped. For example, no security settings will
be configured if yast2-security is
not installed.
4.1 General options #Edit source
The general section includes all settings that influence the installation workflow. The overall structure of this section looks like the following:
<?xml version="1.0"?>
<!DOCTYPE profile>
<profile xmlns="http://www.suse.com/1.0/yast2ns"
 xmlns:config="http://www.suse.com/1.0/configns">
 <general>
  <ask-list>1
   ...
  </ask-list>
  <cio_ignore>
   ...
  </cio_ignore>
  <mode>2
   ...
  </mode>
  <proposals>3
   ...
  </proposals>
  <self_update>4
  ...
 </self_update>
  <self_update_url>
   ...
  </self_update_url>
  <semi-automatic config:type="list">5
  ...
  </semi-automatic>
  <signature-handling>6
   ...
  </signature-handling>
  <storage>7
   ...
  </storage>
  <wait>8
   ...
  </wait>
 </general>
<profile>
4.1.1 The mode section #Edit source
The mode section configures the behavior of AutoYaST with regard to user
confirmations and rebooting. The following elements are allowed in the
mode section:
activate_systemd_default_targetIf you set this entry to
false, the defaultsystemdtarget will not be activated via the callsystemctl isolate. Setting this value is optional. The default istrue.<general> <mode> <activate_systemd_default_target config:type="boolean"> true </activate_systemd_default_target> </mode> ... </general>
confirmBy default, the installation stops at the screen. Up to this point, no changes have been made to the system and settings may be changed on this screen. To proceed and finally start the installation, the user needs to confirm the settings. By setting this value to
falsethe settings are automatically accepted and the installation starts. Only set tofalseto carry out a fully unattended installation. Setting this value is optional. The default istrue.<general> <mode> <confirm config:type="boolean">true</confirm> </mode> ... </general>
confirm_base_product_licenseIf you set this to
true, the EULA of the base product will be shown. The user needs to accept this license. Otherwise the installation will be canceled. Setting this value is optional. The default isfalse. This setting applies to the base product license only. Use the flagconfirm_licensein theadd-onsection for additional licenses (see Section 4.8.3, “Installing additional/customized packages or products” for details).<general> <mode> <confirm_base_product_license config:type="boolean"> false </confirm_base_product_license> </mode> ... </general>
final_haltWhen set to
true, the machine shuts down after everything is installed and configured at the end of the second stage. If you enablefinal_halt, you do not need to set thefinal_rebootoption totrue.<general> <mode> <final_halt config:type="boolean">false</final_halt> </mode> ... </general>
final_rebootWhen set to
true, the machine reboots after everything is installed and configured at the end of the second stage. If you enablefinal_reboot, you do not need to set thefinal_haltoption totrue.<general> <mode> <final_reboot config:type="boolean">true</final_reboot> </mode> ... </general>
final_restart_servicesIf you set this entry to
false, services will not be restarted at the end of the installation (when everything is installed and configured at the end of the second stage). Setting this value is optional. The default istrue.<general> <mode> <final_restart_services config:type="boolean"> true </final_restart_services> </mode> ... </general>
forcebootSome openSUSE releases use Kexec to avoid the reboot after the first stage. They immediately boot into the installed system. You can force a reboot by setting this to
true. Setting this value is optional. The default is set by the product.<general> <mode> <forceboot config:type="boolean">false</forceboot> </mode> ... </general>
Important: Drivers may need a reboot
Some drivers, for example the proprietary drivers for Nvidia and ATI graphics cards, need a reboot and will not work properly when using Kexec. Therefore the default on openSUSE Leap products is to always do a proper reboot.
haltShuts down the machine after the first stage. All packages and the boot loader have been installed and all your chroot scripts have run. Instead of rebooting into stage two, the machine is turned off. If you turn it on again, the machine boots and the second stage of the autoinstallation starts. Setting this value is optional. The default is
false.<general> <mode> <halt config:type="boolean">false</halt> </mode> ... </general>
max_systemd_waitSpecifies how long AutoYaST waits (in seconds) at most for
systemdto set up the default target. Setting this value is optional and should not normally be required. The default is30(seconds).<general> <mode> <max_systemd_wait config:type="integer">30</max_systemd_wait> </mode> ... </general>
ntp_sync_time_before_installationSpecify the NTP server with which to synchronize time before starting the installation. Time synchronization will only occur if this option is set. Keep in mind that you need a network connection and access to a time server. Setting this value is optional. By default no time synchronization will occur.
<general> <mode> <ntp_sync_time_before_installation> &ntpname; </max_systemd_wait> </mode> ... </general>second_stageA regular installation of openSUSE Leap is performed in a single stage. The auto-installation process, however, is divided into two stages. After the installation of the basic system the system boots into the second stage where the system configuration is done. Set this option to
falseto disable the second stage. Setting this value is optional. The default istrue.<general> <mode> <second_stage config:type="boolean">true</second_stage> </mode> ... </general>
4.1.2 Configuring the installation settings screen #Edit source
AutoYaST allows you to configure the
screen, which shows a summary of the installation settings. On this screen,
the user can change the settings before confirming them to start the
installation. Using the proposal tag, you can
control which settings (“proposals”) are shown in the
installation screen. A list of valid proposals for your products is
available from the /control.xml file on the
installation medium. This setting is optional. By default all configuration
options will be shown.
<proposals config:type="list">
 <proposal>partitions_proposal</proposal>
 <proposal>timezone_proposal</proposal>
 <proposal>software_proposal</proposal>
</proposals>
4.1.3 The self-update section #Edit source
During the installation, YaST can update itself to solve bugs in the installer that were discovered after the release. Refer to the Deployment Guide for further information about this feature.
Use the following tags to configure the YaST self-update:
self_updateIf set to
trueorfalse, this option enables or disables the YaST self-update feature. Setting this value is optional. The default istrue.<general> <self_update config:type="boolean">true</self_update> ... </general>
Alternatively, you can specify the boot parameter
self_update=1on the kernel command line.self_update_urlLocation of the update repository to use during the YaST self-update. For more information, refer to the Deployment Guide.
Important: Installer self-update repository only
The
self_update_urlparameter expects only the installer self-update repository URL. Do not supply any other repository URL—for example the URL of the software update repository.<general> <self_update_url> http://example.com/updates/$arch </self_update_url> ... </general>
The URL may contain the variable
$arch. It will be replaced by the system's architecture, such asx86_64,s390x, etc.Alternatively, you can specify the boot parameter
self_update=1together withself_update=URLon the kernel command line.
4.1.4 The semi-automatic section #Edit source
AutoYaST offers to start some YaST modules during the installation. This is useful to give the administrators installing the machine the possibility to manually configure some aspects of the installation while at the same time automating the rest of the installation. Within the semi-automatic section, you can start the following YaST modules:
The network settings module (
networking)The partitioner (
partitioning)The registration module (
scc)
The following example starts all three supported YaST modules during the installation:
<general>
 <semi-automatic config:type="list">
  <semi-automatic_entry>networking</semi-automatic_entry>
  <semi-automatic_entry>scc</semi-automatic_entry>
  <semi-automatic_entry>partitioning</semi-automatic_entry>
 </semi-automatic>
</general>
4.1.5 The signature handling section #Edit source
By default AutoYaST will only install signed packages from sources with known GPG keys. Use this section to overwrite the default settings.
Warning: Overwriting the signature handling defaults
Installing unsigned packages, packages with failing checksum checks, or packages from sources you do not trust is a major security risk. Packages may have been modified and may install malicious software on your machine. Only overwrite the defaults in this section if you are sure the repository and packages can be trusted. SUSE is not responsible for any problems arising from software installed with integrity checks disabled.
Default values for all options are false. If an option is set to false and a package or repository fails the respective test, it is silently ignored and will not be installed.
accept_unsigned_fileIf set to
true, AutoYaST will accept unsigned files like the content file.<general> <signature-handling> <accept_unsigned_file config:type="boolean"> false </accept_unsigned_file> </signature-handling> ... <general>
accept_file_without_checksumIf set to
true, AutoYaST will accept files without a checksum in the content file.<general> <signature-handling> <accept_file_without_checksum config:type="boolean"> false </accept_file_without_checksum> </signature-handling> ... <general>
accept_verification_failedIf set to
true, AutoYaST will accept signed files even when the signature verification fails.<general> <signature-handling> <accept_verification_failed config:type="boolean"> false </accept_verification_failed> </signature-handling> ... <general>
accept_unknown_gpg_keyIf set to
true, AutoYaST will accept new GPG keys of the installation sources, for example the key used to sign the content file.<general> <signature-handling> <accept_unknown_gpg_key config:type="boolean"> false </accept_unknown_gpg_key> </signature-handling> ... <general>
accept_non_trusted_gpg_keySet this option to
trueto accept known keys you have not yet trusted.<general> <signature-handling> <accept_non_trusted_gpg_key config:type="boolean"> false </accept_non_trusted_gpg_key> </signature-handling> ... <general>
import_gpg_keyIf set to
true, AutoYaST will accept and import new GPG keys on the installation source in its database.<general> <signature-handling> <import_gpg_key config:type="boolean"> false </import_gpg_key> </signature-handling> ... <general>
4.1.6 The wait section #Edit source
In the second stage of the installation the system is configured by running
modules, for example the network configuration. Within the
wait section you can define scripts that will
get executed before and after a specific module has run. You can also
configure a span of time in which the system is inactive
(“sleeps”) before and after each module.
pre-modulesDefines scripts and sleep time executed before a configuration module starts. The following code shows an example setting the sleep time to ten seconds and executing an echo command before running the network configuration module.
<general> <wait> <pre-modules config:type="list"> <module> <name>networking</name> <sleep> <time config:type="integer">10</time> <feedback config:type="boolean">true</feedback> </sleep> <script> <source>echo foo</source> <debug config:type="boolean">false</debug> </script> </module> </pre-modules> ... </wait> <general>post-modulesDefines scripts and sleep time executed after a configuration module starts. The following code shows an example setting the sleep time to ten seconds and executing an echo command after running the network configuration module.
<general>
 <wait>
  <post-modules config:type="list">
   <module>
    <name>networking</name>
    <sleep>
     <time config:type="integer">10</time>
     <feedback config:type="boolean">true</feedback>
    </sleep>
    <script>
     <source>echo foo</source>
     <debug config:type="boolean">false</debug>
    </script>
   </module>
  </post-modules>
  ...
 </wait>
<general>
4.1.7 Examples for the general section #Edit source
Find examples covering several use cases in this section.
Example 4.1: General options #
This example shows the most commonly used options in the general section. The scripts in the pre- and post-modules sections are only dummy scripts illustrating the concept.
<?xml version="1.0"?>
<!DOCTYPE profile>
<profile xmlns="http://www.suse.com/1.0/yast2ns"
xmlns:config="http://www.suse.com/1.0/configns">
<general>
<! -- Use cio_ignore on &zseries; only -->
<cio_ignore config:type="boolean">false</cio_ignore>
<mode>
<halt config:type="boolean">false</halt>
<forceboot config:type="boolean">false</forceboot>
<final_reboot config:type="boolean">false</final_reboot>
<final_halt config:type="boolean">false</final_halt>
<confirm_base_product_license config:type="boolean">
false
</confirm_base_product_license>
<confirm config:type="boolean">true</confirm>
<second_stage config:type="boolean">true</second_stage>
</mode>
<proposals config:type="list">
<proposal>partitions_proposal</proposal>
</proposals>
<self_update config:type="boolean">true</self_update>
<self_update_url>http://example.com/updates/$arch</self_update_url>
<signature-handling>
<accept_unsigned_file config:type="boolean">
true
</accept_unsigned_file>
<accept_file_without_checksum config:type="boolean">
true
</accept_file_without_checksum>
<accept_verification_failed config:type="boolean">
true
</accept_verification_failed>
<accept_unknown_gpg_key config:type="boolean">
true
</accept_unknown_gpg_key>
<import_gpg_key config:type="boolean">true</import_gpg_key>
<accept_non_trusted_gpg_key config:type="boolean">
true
</accept_non_trusted_gpg_key>
</signature-handling>
<wait>
<pre-modules config:type="list">
<module>
<name>networking</name>
<sleep>
<time config:type="integer">10</time>
<feedback config:type="boolean">true</feedback>
</sleep>
<script>
<source>>![CDATA[
echo "Sleeping 10 seconds"
]]></source>
<debug config:type="boolean">false</debug>
</script>
</module>
</pre-modules>
<post-modules config:type="list">
<module>
<name>networking</name>
<sleep>
<time config:type="integer">10</time>
<feedback config:type="boolean">true</feedback>
</sleep>
<script>
<source>>![CDATA[
echo "Sleeping 10 seconds"
]]></source>
<debug config:type="boolean">false</debug>
</script>
</module>
</post-modules>
</wait>
</general>
</profile>4.2 Reporting #Edit source
The report resource manages three types of pop-ups that
may appear during installation:
message pop-ups (usually non-critical, informative messages),
warning pop-ups (if something might go wrong),
error pop-ups (in case an error occurs).
Example 4.2: Reporting behavior #
<report>
  <errors>
    <show config:type="boolean">true</show>
    <timeout config:type="integer">0</timeout>
    <log config:type="boolean">true</log>
  </errors>
  <warnings>
    <show config:type="boolean">true</show>
    <timeout config:type="integer">10</timeout>
    <log config:type="boolean">true</log>
  </warnings>
  <messages>
    <show config:type="boolean">true</show>
    <timeout config:type="integer">10</timeout>
    <log config:type="boolean">true</log>
  </messages>
  <yesno_messages>
    <show config:type="boolean">true</show>
    <timeout config:type="integer">10</timeout>
    <log config:type="boolean">true</log>
  </yesno_messages>
</report>
Depending on your experience, you can skip, log and show (with timeout) those
messages. It is recommended to show all messages with
timeout. Warnings can be skipped in some places but should not be ignored.
The default setting in auto-installation mode is to show errors without timeout and to show all warnings/messages with a timeout of 10 seconds.
Warning: Critical system messages
Note that not all messages during installation are controlled by the
report resource. Some critical messages concerning
package installation and partitioning will show up ignoring your settings in
the report section. Usually those messages will need to
be answered with or .
4.3 The boot loader #Edit source
This documentation is for yast2-bootloader and applies to
GRUB 2. For older product versions shipping with legacy GRUB, refer to the
documentation that comes with your distribution in
/usr/share/doc/packages/autoyast2/
The general structure of the AutoYaST boot loader part looks like the following:
<bootloader>
  <loader_type>
    <!-- boot loader type (grub2 or grub2-efi) -->
  </loader_type>
  <global>
    <!--
      entries defining the installation settings for GRUB 2 and
      the generic boot code
    -->
  </global>
  <device_map config:type="list">
    <!-- entries defining the order of devices -->
  </device_map>
 </bootloader>
4.3.1 Loader type #Edit source
This defines which boot loader (UEFI or BIOS/legacy) to use. Not all
architectures support both legacy and EFI variants of the boot loader. The
safest (default) option is to leave the decision up to
the installer.
<loader_type>LOADER_TYPE</loader_type>
Possible values for LOADER_TYPE are:
default: The installer chooses the correct boot loader. This is the default when no option is defined.grub2: Use the legacy BIOS boot loader.grub2-efi: Use the EFI boot loader.none: The boot process is not managed and configured by the installer.
4.3.2 Globals #Edit source
This is an important if optional part. Define here where to install GRUB 2
and how the boot process will work. Again,
yast2-bootloader proposes a configuration if you do not
define one. Usually the AutoYaST control file includes only this part and all
other parts are added automatically during installation by
yast2-bootloader. Unless you have some special
requirements, do not specify the boot loader configuration in the XML file.
Tip: Hibernation
If there is a need for specific hibernation settings, then
resume or noresume in the
append configuration can be used.
To disable hibernation regardless of what the installer proposes,
specify noresume as a kernel parameter in the
append section.
To specify the hibernation device, use the resume
key with the device path. The recommended way to get stable results is
configuring your own partitioning, and having a swap device with a
label:
<append>quiet resume=/dev/disk/by-label/my_swap</append>
If you do not use resume or
noresume, or if resume specifies
a device that will not exist on the installed system, then
the installer may propose a correct value for
resume, or it may remove the hibernation parameter
completely, depending on installer logic.
<global>
  <activate>true</activate>
  <timeout config:type="integer">10</timeout>
  <terminal>gfxterm</terminal>
  <gfxmode>1280x1024x24</gfxmode>
</global>
Boot loader global options #
- activate
Set the boot flag on the boot partition. The boot partition can be
/if there is no separate/bootpartition. If the boot partition is on a logical partition, the boot flag is set to the extended partition.<activate>true</activate>
- append
Kernel parameters added at the end of boot entries for normal and recovery mode.
<append>nomodeset vga=0x317</append>
- boot_boot
Write GRUB 2 to a separate
/bootpartition. If no separate/bootpartition exists, GRUB 2 will be written to/.<boot_boot>false</boot_boot>
- boot_custom
Write GRUB 2 to a custom device.
<boot_custom>/dev/sda3</boot_custom>
- boot_extended
Write GRUB 2 to the extended partition (important if you want to use generic boot code and the
/bootpartition is logical). Note: if the boot partition is logical, you should useboot_mbr(write GRUB 2 to MBR) rather thangeneric_mbr.<boot_extended>false</boot_extended>
- boot_mbr
Write GRUB 2 to the MBR of the first disk in the order. (
device.mapincludes the order of the disks.)<boot_mbr>false</boot_mbr>
- boot_root
Write GRUB 2 to
/partition.<boot_root>false</boot_root>
- generic_mbr
Write generic boot code to the MBR (will be ignored if
boot_mbris set totrue).<generic_mbr config:type="boolean">false</generic_mbr>
- gfxmode
Graphical resolution of the GRUB 2 screen (requires <terminal> to be set to
gfxterm).Valid entries are
auto,HORIZONTALxVERTICAL, orHORIZONTALxVERTICAL xCOLOR DEPTH. You can see the screen resolutions supported by GRUB 2 on a particular system by using thevbeinfocommand at the GRUB 2 command line in the running system.<gfxmode>1280x1024x24</gfxmode>
- os_prober
If set to
true, automatically searches for operating systems already installed and generates boot entries for them during the installation.<os_prober>false</os_prober>
- cpu_mitigations
Allows choosing a default setting of kernel boot command line parameters for CPU mitigation (and at the same time strike a balance between security and performance).
Possible values are:
- auto
Enables all mitigations required for your CPU model, but does not protect against cross-CPU thread attacks. This setting may impact performance to some degree, depending on the workload.
- nosmt
Provides the full set of available security mitigations. Enables all mitigations required for your CPU model. In addition, it disables Simultaneous Multithreading (SMT) to avoid side-channel attacks across multiple CPU threads. This setting may further impact performance, depending on the workload.
- off
Disables all mitigations. Side-channel attacks against your CPU are possible, depending on the CPU model. This setting has no impact on performance.
- manual
Does not set any mitigation level. Specify your CPU mitigations manually by using the kernel command line options.
<cpu_mitigations>auto</cpu_mitigations>
If not set in AutoYaST, the respective settings can be changed via kernel command line. By default, the (product-specific) settings in the
/control.xmlfile on the installation medium are used (if nothing else is specified).- suse_btrfs
Obsolete and no longer used. Booting from Btrfs snapshots is automatically enabled.
- serial
Command to execute if the GRUB 2 terminal mode is set to
serial.<serial>serial --speed=115200 --unit=0 --word=8 --parity=no --stop=1</serials>
- secure_boot
If set to
false, then UEFI secure boot is disabled. Works only forgrub2-efiboot loader.<secure_boot>false</secure_boot>
- terminal
Specify the GRUB 2 terminal mode to use. Valid entries are
console,gfxterm, andserial. If set toserial, the serial command needs to be specified with <serial>, too.<terminal>serial</terminal>
- timeout
The timeout in seconds until the default boot entry is booted automatically.
<timeout config:type="integer">10</timeout>
- trusted_boot
If set to
true, then Trusted GRUB is used. Trusted GRUB supports Trusted Platform Module (TPM). Works only forgrub2boot loader.<trusted_boot">true</trusted_boot>
- update_nvram
If set to
true, then AutoYaST adds an NVRAM entry for the boot loader in the firmware. This is the desirable behavior unless you want to preserve some specific setting or you need to work around firmware issues.<update_nvram>true</update_nvram>
- vgamode
Adds the kernel parameter
vga=VALUEto the boot entries.<vgamode>0x317</vgamode>
- xen_append
Kernel parameters added at the end of boot entries for Xen guests.
<xen_append>nomodeset vga=0x317</xen_append>
- xen_kernel_append
Kernel parameters added at the end of boot entries for Xen kernels on the VM Host Server.
<xen_kernel_append>dom0_mem=768M</xen_kernel_append>
4.3.3 Device map #Edit source
GRUB 2 avoids mapping problems between BIOS drives and Linux devices by using device ID strings (UUIDs) or file system labels when generating its configuration files. GRUB 2 utilities create a temporary device map on the fly, which is usually sufficient, particularly on single-disk systems. However, if you need to override the automatic device mapping mechanism, create your custom mapping in this section.
<device_map config:type="list">
  <device_map_entry>
    <firmware>hd0</firmware> <!-- order of devices in target map  -->
    <linux>/dev/disk/by-id/ata-ST3500418AS_6VM23FX0</linux> <!-- name of device (disk)  -->
  </device_map_entry>
</device_map>
4.4 Partitioning #Edit source
When it comes to partitioning, we can categorize AutoYaST use cases into three different levels:
Automatic partitioning. The user does not care about the partitioning and trusts in AutoYaST to do the right thing.
Guided partitioning. The user wants to set some basic settings. For example, a user wants to use LVM but has no idea about how to configure partitions, volume groups, and so on.
Expert partitioning. The user specifies how the layout should look. However, a complete definition is not required, and AutoYaST should propose reasonable defaults for missing parts.
To some extent, it is like using the regular installer. You can skip the partitioning screen and trust in YaST, use the , or define the partitioning layout through the .
4.4.1 Automatic partitioning #Edit source
AutoYaST can come up with a sensible partitioning layout without any user
indication. Although it depends on the selected product to install, AutoYaST
usually proposes a Btrfs root file system, a separate
/home using XFS and a swap partition. Additionally,
depending on the architecture, it adds any partition that might be needed to
boot (like BIOS GRUB partitions).
However, these defaults might change depending on factors like the available
disk space. For example, having a separate /home depends
on the amount of available disk space.
If you want to influence these default values, you can use the approach described in Section 4.4.2, “Guided partitioning”.
4.4.2 Guided partitioning #Edit source
Although AutoYaST can come up with a partitioning layout without any user indication, sometimes it is useful to set some generic parameters and let AutoYaST do the rest. For example, you may be interested in using LVM or encrypting your file systems without having to deal with the details. It is similar to what you would do when using the guided proposal in a regular installation.
The storage section in
Example 4.3, “LVM-based guided partitioning” instructs AutoYaST to set up a
partitioning layout using LVM and deleting all Windows partitions, no matter
whether they are needed.
Example 4.3: LVM-based guided partitioning #
<general>
   <storage>
     <proposal>
       <lvm config:type="boolean">true<lvm>
       <windows_delete_mode config:type="symbol">all<windows_delete_mode>
     </proposal>
   <storage>
<general>- lvm
Creates an LVM-based proposal. The default is
false.<lvm config:type="boolean">true</lvm>
- resize_windows
When set to
true, AutoYaST resizes Windows partitions if needed to make room for the installation.<resize_windows config:type="boolean">false</resize_windows>
- windows_delete_mode
nonedoes not remove Windows partitions.ondemandremoves Windows partitions if needed.allremoves all Windows partitions.
<windows_delete_mode config:type="symbol">ondemand</windows_delete_mode>
- linux_delete_mode
nonedoes not remove Linux partitions.ondemandremoves Linux partitions if needed.allremoves all Linux partitions.
<linux_delete_mode config:type="symbol">ondemand</linux_delete_mode>
- other_delete_mode
nonedoes not remove other partitions.ondemandremoves other partitions if needed.allremoves all other partitions.
<other_delete_mode config:type="symbol">ondemand</other_delete_mode>
- encryption_password
Enables encryption using the specified password. By default, encryption is disabled.
<encryption_password>some-secret</encryption_password>
4.4.3 Expert partitioning #Edit source
As an alternative to guided partitioning, AutoYaST allows to describe the
partitioning layout through a partitioning section.
However, AutoYaST does not need to know every single detail and can build a
sensible layout from a rather incomplete specification.
The partitioning section is a list of
drive elements. Each of these sections describes an
element of the partitioning layout like a disk, an LVM volume group, a RAID,
a multi-device Btrfs file system, and so on.
Example 4.4, “Creating /, /home and swap partitions”, asks AutoYaST to create a
/, a /home and a
swap partition using the whole disk. Note that some
information is missing, like which file systems each partition should use.
However, that is not a problem, and AutoYaST will propose sensible values for
them.
Example 4.4: Creating /, /home and swap partitions #
<partitioning config:type="list">
  <drive>
    <use>all</use>
    <partitions config:type="list">
      <partition>
        <mount>/</mount>
        <size>20GiB</size>
      </partition>
      <partition>
        <mount>/home</mount>
        <size>max</size>
      </partition>
      <partition>
        <mount>swap</mount>
        <size>1GiB</size>
      </partition>
    </partitions>
  </drive>
Tip: Proposing a boot partition
AutoYaST checks whether the layout described in the profile is bootable or not. If it is not, it adds the missing partitions. So, if you are unsure about which partitions are needed to boot, you can rely on AutoYaST to make the right decision.
4.4.3.1 Drive configuration #Edit source
The elements listed below must be placed within the following XML structure:
<profile>
  <partitioning config:type="list">
    <drive>
     ...
    </drive>
  </partitioning>
</profile>
Attribute, Values, Description #
- device
Optional, the device you want to configure. If left out, AutoYaST tries to guess the device. See Tip: Skipping devices on how to influence guessing.
If set to
ask, AutoYaST will ask the user which device to use during installation.You can use persistent device names via ID, like
/dev/disk/by-id/ata-WDC_WD3200AAKS-75L9or by-path, like/dev/disk/by-path/pci-0001:00:03.0-scsi-0:0:0:0.<device>/dev/sda</device>
In case of volume groups, software RAID or
bcachedevices, the name in the installed system may be different (to avoid clashes with existing devices).See Section 4.4.7, “Multipath support” for further information about dealing with multipath devices.
- initialize
Optional, the default is
false. If set totrue, the partition table is wiped out before AutoYaST starts the partition calculation.<initialize config:type="boolean">true</initialize>
- partitions
Optional, a list of
<partition>entries (see Section 4.4.3.2, “Partition configuration”).<partitions config:type="list"> <partition>...</partition> ... </partitions>If no partitions are specified, AutoYaST will create a reasonable partitioning layout (see Section 4.4.3.5, “Filling the gaps”).
- pesize
Optional, for LVM only. The default is 4M for LVM volume groups.
<pesize>8M</pesize>
- use
Recommended, specifies the strategy AutoYaST will use to partition the hard disk. Choose from:
all, uses the whole device while calculating the new partitioning.linux, only existing Linux partitions are used.free, only unused space on the device is used, no existing partitions are touched.1,2,3, a list of comma-separated partition numbers to use.
- type
Optional, specifies the type of the
drive. The default isCT_DISKfor a normal physical hard disk. The following is a list of all options:CT_DISKfor physical hard disks (default).CT_LVMfor LVM volume groups.CT_MDfor software RAID devices.CT_DMMULTIPATHfor Multipath devices (deprecated, implied with CT_DISK).CT_BCACHEfor softwarebcachedevices.CT_BTRFSfor multi-device Btrfs file systems.CT_NFSfor NFS.CT_TMPFSfortmpfsfile systems.<type config:type="symbol">CT_LVM</type>
- disklabel
Optional. By default YaST decides what makes sense. If a partition table of a different type already exists, it will be re-created with the given type only if it does not include any partition that should be kept or reused. To use the disk without creating any partition, set this element to
none. The following is a list of all options:msdosgptnone<disklabel>gpt</disklabel>
- keep_unknown_lv
Optional, the default is
false.This value only makes sense for type=CT_LVM drives. If you are reusing a logical volume group and you set this to
true, all existing logical volumes in that group will not be touched unless they are specified in the <partitioning> section. So you can keep existing logical volumes without specifying them.<keep_unknown_lv config:type="boolean">false</keep_unknown_lv>
- enable_snapshots
Optional, the default is
true.Enables snapshots on Btrfs file systems mounted at
/(does not apply to other file systems, or Btrfs file systems not mounted at/).<enable_snapshots config:type="boolean">false</enable_snapshots>
- quotas
Optional, the default is
false.Enables support for Btrfs subvolume quotas. Setting this element to
truewill enable support for quotas for the file system. However, you need to set the limits for each subvolume. Check Section 4.4.3.3, “Btrfs subvolumes” for further information.<quotas config:type="boolean">true</quotas>
Important: Beware of data loss
The value provided in the use property determines how
existing data and partitions are treated. The value all
means that the entire disk will be erased. Make backups and use the
confirm property if you need to keep some partitions
with important data. Otherwise, no pop-ups will notify you about
partitions being deleted.
Tip: Skipping devices
You can influence AutoYaST's device-guessing for cases where you do not specify a <device> entry on your own. Usually AutoYaST would use the first device it can find that looks reasonable but you can configure it to skip some devices like this:
<partitioning config:type="list">
  <drive>
    <initialize config:type="boolean">true</initialize>
    <skip_list config:type="list">
      <listentry>
        <!-- skip devices that use the usb-storage driver -->
        <skip_key>driver</skip_key>
        <skip_value>usb-storage</skip_value>
      </listentry>
      <listentry>
        <!-- skip devices that are smaller than 1GB -->
        <skip_key>size_k</skip_key>
        <skip_value>1048576</skip_value>
        <skip_if_less_than config:type="boolean">true</skip_if_less_than>
      </listentry>
      <listentry>
        <!-- skip devices that are larger than 100GB -->
        <skip_key>size_k</skip_key>
        <skip_value>104857600</skip_value>
        <skip_if_more_than config:type="boolean">true</skip_if_more_than>
      </listentry>
    </skip_list>
  </drive>
</partitioning>
For a list of all possible <skip_key>s, run yast2
ayast_probe on a system that has already been installed.
4.4.3.2 Partition configuration #Edit source
The elements listed below must be placed within the following XML structure:
<drive>
  <partitions config:type="list">
    <partition>
      ...
    </partition>
  </partitions>
</drive>- create
Specify if this partition or logical volume must be created, or if it already exists. If set to
false, you also need to set one ofpartition_nr,lv_name,label, oruuidto tell AutoYaST which device to use.<create config:type="boolean">false</create>
- crypt_method
Optional, the partition will be encrypted using one of these methods:
luks1: regular LUKS1 encryption.pervasive_luks2: pervasive volume encryption.protected_swap: encryption with volatile protected key.secure_swap: encryption with volatile secure key.random_swap: encryption with volatile random key.
<crypt_method config:type="symbol">luks1</crypt_method>
Encryption method selection was introduced in openSUSE Leap 15.2. To mimic the behavior of previous versions, use
luks1.See
crypt_keyelement to learn how to specify the encryption password if needed.- crypt_fs
Partition will be encrypted, the default is
false. This element is deprecated. Usecrypt_methodinstead.<crypt_fs config:type="boolean">true</crypt_fs>
- crypt_key
Required if
crypt_methodhas been set to a method that requires a password (that is,luks1orpervasive_luks2).<crypt_key>xxxxxxxx</crypt_key>
- mount
You should have at least a root partition (/) and a swap partition.
<mount>/</mount><mount>swap</mount>
- fstopt
Mount options for this partition; see
man mountfor available mount options.<fstopt>ro,noatime,user,data=ordered,acl,user_xattr</fstopt>
- label
The label of the partition. Useful when formatting the device (especially if the
mountbyparameter is set tolabel) and for identifying a device that already exists (seecreateabove). Seeman e2labelfor an example.<label>mydata</label>
- uuid
The uuid of the partition. Only useful for identifying an existing device (see
createabove). The uuid cannot be enforced for new devices. (Seeman uuidgen.)<uuid>1b4e28ba-2fa1-11d2-883f-b9a761bde3fb</uuid>
- size
The size of the partition, for example 4G, 4500M, etc. The /boot partition and the swap partition can have
autoas size. Then AutoYaST calculates a reasonable size. One partition can have the valuemaxto use all remaining space.You can also specify the size in percentage. So 10% will use 10% of the size of the hard disk or volume group. You can mix
auto,max,size, and percentage as you like.<size>10G</size>
Starting with openSUSE Leap 15, all values (including
autoandmax) can be used for resizing partitions as well.- format
Specify if AutoYaST should format the partition. If you set
createtotrue, then you likely want this option set totrueas well.<format config:type="boolean">false</format>
- file system
Optional. The default is
btrfsfor the root partition (/) andxfsfor data partitions. Specify the file system to use on this partition:btrfsext2ext3ext4fatxfsswap<filesystem config:type="symbol">ext3</filesystem>
- mkfs_options
Optional, specify an option string for the
mkfs. Only use this when you know what you are doing. (See the relevant mkfs man page for the file system you want to use.)<mkfs_options>-I 128</mkfs_options>
- partition_nr
The number of this partition. If you have set
create=falseor if you use LVM, then you can specify the partition viapartition_nr.<partition_nr config:type="integer">2</partition_nr>
- partition_id
The
partition_idsets the id of the partition. If you want different identifiers than 131 for Linux partition or 130 for swap, configure them withpartition_id.The default is131for a Linux partition and130for swap.<partition_id config:type="integer">131</partition_id>
FAT16 (MS-DOS): 6NTFS (MS-DOS): 7FAT32 (MS-DOS): 12Extended FAT16 (MS-DOS): 15DIAG, Diagnostics and firmware (MS-DOS, GPT): 18PPC PReP Boot partition (MS-DOS, GPT): 65Swap (MS-DOS, GPT, DASD, implicit): 130Linux (MS-DOS, GPT, DASD): 131Intel Rapid Start Technology (MS-DOS, GPT): 132LVM (MS-DOS, GPT, DASD): 142EFI System Partition (MS-DOS, GPT): 239MD RAID (MS-DOS, GPT, DASD): 253BIOS boot (GPT): 257Windows basic data (GPT): 258EFI (GPT): 259Microsoft reserved (GPT): 261- partition_type
Optional. Allowed values are
primary(default) andlogical.When using anmsdospartition table, this element sets the type of the partition. The value can beprimaryorlogical. This value is ignored when using agptpartition table, because such a distinction does not exist in that case.<partition_type>primary</partition_type>
- mountby
Instead of a partition number, you can tell AutoYaST to mount a partition by
device,label,uuid,pathorid, which are the udev path and udev id (see/dev/disk/...).See
labelanduuiddocumentation above. The default depends on YaST and usually isid.<mountby config:type="symbol">label</mountby>
- subvolumes
List of subvolumes to create for a file system of type Btrfs. This key only makes sense for file systems of type Btrfs. (See Section 4.4.3.3, “Btrfs subvolumes” for more information.)
If no
subvolumessection has been defined for a partition description, AutoYaST will create a predefined set of subvolumes for the given mount point.<subvolumes config:type="list"> <path>tmp</path> <path>opt</path> <path>srv</path> <path>var</path> ... </subvolumes>
- create_subvolumes
Determine whether Btrfs subvolumes should be created or not. It is set to
trueby default. When set tofalse, no subvolumes will be created.- subvolumes_prefix
Set the Btrfs subvolumes prefix name. If no prefix is wanted, it must be set to an empty value:
<subvolumes_prefix><![CDATA[]]></subvolumes_prefix>
It is set to
@by default.- lv_name
If this partition is on a logical volume in a volume group, specify the logical volume name here (see the
typeparameter in the drive configuration).<lv_name>opt_lv</lv_name>
- stripes
An integer that configures LVM striping. Specify across how many devices you want to stripe (spread data).
<stripes config:type="integer">2</stripes>
- stripesize
Specify the size of each block in KB.
<stripesize config:type="integer">4</stripesize>
- lvm_group
If this is a physical partition used by (part of) a volume group (LVM), you need to specify the name of the volume group here.
<lvm_group>system</lvm_group>
- pool
poolmust be set totrueif the LVM logical volume should be an LVM thin pool.<pool config:type="boolean">true</pool>
- used_pool
The name of the LVM thin pool that is used as a data store for this thin logical volume. If this is set to something non-empty, it implies that the volume is a so-called thin logical volume.
<used_pool>my_thin_pool</used_pool>
- raid_name
If this physical volume is part of a RAID array, specify the name of the RAID array.
<raid_name>/dev/md/0</raid_name>
- raid_options
Specify RAID options. Setting the RAID options at the
partitionlevel is deprecated. See Section 4.4.6, “Software RAID”.- bcache_backing_for
If this device is used as a
bcachebacking device, specify the name of thebcachedevice. See Section 4.4.8, “bcacheconfiguration” for further details.<bcache_backing_for>/dev/bcache0</bcache_backing_for>
- bcache_caching_for
If this device is used as a
bcachecaching device, specify the names of thebcachedevices. See Section 4.4.8, “bcacheconfiguration” for further details.<bcache_caching_for config:type="list"><listentry>/dev/bcache0</listentry></bcache_caching_for>
- resize
Starting with openSUSE Leap 15 resizing works with physical disk partitions and with LVM volumes
<resize config:type="boolean">false</resize>
4.4.3.3 Btrfs subvolumes #Edit source
As mentioned in Section 4.4.3.2, “Partition configuration”, it is possible to define a set of subvolumes for each Btrfs file system. In its simplest form, they are specified using a list of paths:
<subvolumes config:type="list">
  <path>usr/local</path>
  <path>tmp</path>
  <path>opt</path>
  <path>srv</path>
  <path>var</path>
</subvolumes>
However, it is possible to specify additional settings for each subvolume. For example, we might want to set a quota or to disable the copy-on-write mechanism. For that purpose, it is possible to expand any of the elements of the list as shown in the example below:
<subvolumes config:type="list">
  <listentry>usr/local</listentry>
  <listentry>
    <path>tmp</path>
    <referenced_limit>1 GiB</referenced_limit>
  </listentry>
  <listentry>opt</listentry>
  <listentry>srv</listentry>
  <listentry>
    <path>var/lib/pgsql</path>
    <copy_on_write config:type="boolean">false</copy_on_write>
  </listentry>
</subvolumes>pathMount point for the subvolume.
<path>tmp</tmp>
Required. AutoYaST will ignore the subvolume if the
pathis not specified.copy-on-writeWhether copy-on-write should be enabled for the subvolume.
<copy-on-write config:type="boolean">false</copy-on-write>
Optional. The default value is
false.referenced_limitSet a quota for the subvolume.
<referenced_limit>1 GiB</referenced_limit>
Optional. The default value is
unlimited. Btrfs supports two kinds of limits:referencedandexclusive. At this point, only the former is supported.
If there is a default subvolume used for the distribution (for example
@ in openSUSE Leap), the name of this default
subvolume is automatically prefixed to the names of the defined subvolumes.
This behavior can be disabled by setting the
subvolumes_prefix in the
Section 4.4.3.1, “Drive configuration” section.
<subvolumes_prefix><![CDATA[]]></subvolumes_prefix>
4.4.3.4 Using the whole disk #Edit source
AutoYaST allows to use a whole disk without creating any partition by setting
the disklabel to none as described in
Section 4.4.3.1, “Drive configuration”. In such cases, the
configuration in the first partition from the
drive will be applied to the whole disk.
In the example below, we are using the second disk
(/dev/sdb) as the /home file system.
Example 4.5: Using a whole disk as a file system #
<partitioning config:type="list">
  <drive>
    <device>/dev/sda</device>
    <partitions config:type="list">
      <partition>
        <create config:type="boolean">true</create>
        <format config:type="boolean">true</format>
        <mount>/</mount>
        <size>max</size>
      </partition>
    </partitions>
  </drive>
  <drive>
    <device>/dev/sdb</device>
    <disklabel>none</disklabel>
    <partitions config:type="list">
      <partition>
        <format config:type="boolean">true</format>
        <mount>/home</mount>
      </partition>
    </partitions>
  </drive>
In addition, the whole disk can be used as an LVM physical volume or as a software RAID member. See Section 4.4.5, “Logical volume manager (LVM)” and Section 4.4.6, “Software RAID” for further details about setting up an LVM or a software RAID.
For backward compatibility reasons, it is possible to achieve the same
result by setting the <partition_nr> element to
0. However, this usage of the
<partition_nr> element is deprecated from
openSUSE Leap 15.
4.4.3.5 Filling the gaps #Edit source
When using the approach, AutoYaST can create a partition plan from a rather incomplete profile. The following profiles show how you can describe some details of the partitioning layout and let AutoYaST do the rest.
Example 4.6: Automated partitioning on selected drives #
The following is an example of a single drive system, which is not pre-partitioned and should be automatically partitioned according to the described pre-defined partition plan. If you do not specify the device, it will be automatically detected.
<partitioning config:type="list">
  <drive>
    <device>/dev/sda</device>
    <use>all</use>
  </drive>
</partitioning>
A more detailed example shows how existing partitions and multiple drives are handled.
Example 4.7: Installing on multiple drives #
<partitioning config:type="list">
  <drive>
    <device>/dev/sda</device>
    <use>all</use>
    <partitions config:type="list">
      <partition>
        <mount>/</mount>
        <size>10G</size>
      </partition>
      <partition>
        <mount>swap</mount>
        <size>1G</size>
      </partition>
    </partitions>
  </drive>
  <drive>
    <device>/dev/sdb</device>
    <use>free</use>
    <partitions config:type="list">
      <partition>
        <filesystem config:type="symbol">ext4</filesystem>
        <mount>/data1</mount>
        <size>15G</size>
      </partition>
      <partition>
        <filesystem config:type="symbol">xfs</filesystem>
        <mount>/data2</mount>
        <size>auto</size>
      </partition>
    </partitions>
  </drive>
</partitioning>
4.4.4 Advanced partitioning features #Edit source
4.4.4.1 Wipe out partition table #Edit source
Usually this is not needed because AutoYaST can delete partitions one by one automatically. But you need the option to let AutoYaST clear the partition table instead of deleting partitions individually.
Go to the drive section and add:
<initialize config:type="boolean">true</initialize>
With this setting AutoYaST will delete the partition table before it starts to analyze the actual partitioning and calculates its partition plan. Of course this means, that you cannot keep any of your existing partitions.
4.4.4.2 Mount options #Edit source
By default a file system to be mounted is identified in
/etc/fstab by the device name. This identification can
be changed so the file system is found by searching for a UUID or a volume
label. Note that not all file systems can be mounted by UUID or a volume
label. To specify how a partition is to be mounted, use the
mountby property which has the symbol
type. Possible options are:
device(default)labelUUID
If you choose to mount a new partition using a label, use the
label property to specify its value.
Add any valid mount option in the fourth field of
/etc/fstab. Multiple options are separated by commas.
Possible fstab options:
- Mount read-only (
ro) No write access to the file system. Default is
false.- No access time (
noatime) Access times are not updated when a file is read. Default is
false.- Mountable by user (
user) The file system can be mounted by a normal user. Default is
false.- Data Journaling Mode (
ordered,journal,writeback) journalAll data is committed to the journal prior to being written to the main file system.
orderedAll data is directly written to the main file system before its metadata is committed to the journal.
writebackData ordering is not preserved.
- Access control list (
acl) Enable access control lists on the file system.
- Extended user attributes (
user_xattr) Allow extended user attributes on the file system.
Example 4.8: Mount options #
<partitions config:type="list">
  <partition>
    <filesystem config:type="symbol">ext4</filesystem>
    <format config:type="boolean">true</format>
    <fstopt>ro,noatime,user,data=ordered,acl,user_xattr</fstopt>
    <mount>/local</mount>
    <mountby config:type="symbol">uuid</mountby>
    <partition_id config:type="integer">131</partition_id>
    <size>10G</size>
  </partition>
</partitions>
Note: Check supported file system options
Different file system types support different options. Check the documentation carefully before setting them.
4.4.4.3 Keeping specific partitions #Edit source
In some cases you should leave partitions untouched and only format specific target partitions, rather than creating them from scratch. For example, if different Linux installations coexist, or you have another operating system installed, likely you do not want to wipe these out. You may also want to leave data partitions untouched.
Such scenarios require specific knowledge about the target systems and hard disks. Depending on the scenario, you might need to know the exact partition table of the target hard disk with partition IDs, sizes and numbers. With this data, you can tell AutoYaST to keep certain partitions, format others and create new partitions if needed.
The following example will keep partitions 1, 2 and 5 and delete partition 6 to create two new partitions. All remaining partitions will only be formatted.
Example 4.9: Keeping partitions #
<partitioning config:type="list">
  <drive>
    <device>/dev/sdc</device>
      <partitions config:type="list">
        <partition>
          <create config:type="boolean">false</create>
          <format config:type="boolean">true</format>
          <mount>/</mount>
          <partition_nr config:type="integer">1</partition_nr>
        </partition>
        <partition>
          <create config:type="boolean">false</create>
          <format config:type="boolean">false</format>
          <partition_nr config:type="integer">2</partition_nr>
          <mount>/space</mount>
        </partition>
        <partition>
          <create config:type="boolean">false</create>
          <format config:type="boolean">true</format>
          <filesystem config:type="symbol">swap</filesystem>
          <partition_nr config:type="integer">5</partition_nr>
          <mount>swap</mount>
        </partition>
        <partition>
          <format config:type="boolean">true</format>
          <mount>/space2</mount>
          <size>5G</size>
        </partition>
        <partition>
          <format config:type="boolean">true</format>
          <mount>/space3</mount>
          <size>max</size>
        </partition>
      </partitions>
    <use>6</use>
  </drive>
</partitioning>
The last example requires exact knowledge of the existing partition table and the partition numbers of those partitions that should be kept. In some cases however, such data may not be available, especially in a mixed hardware environment with different hard disk types and configurations. The following scenario is for a system with a non-Linux OS with a designated area for a Linux installation.

Figure 4.1: Keeping partitions #
In this scenario, shown in figure Figure 4.1, “Keeping partitions”, AutoYaST will not create new partitions. Instead it searches for certain partition types on the system and uses them according to the partitioning plan in the control file. No partition numbers are given in this case, only the mount points and the partition types (additional configuration data can be provided, for example file system options, encryption and file system type).
Example 4.10: Auto-detection of partitions to be kept. #
<partitioning config:type="list">
  <drive>
    <partitions config:type="list">
      <partition>
        <create config:type="boolean">false</create>
        <format config:type="boolean">true</format>
        <mount>/</mount>
        <partition_id config:type="integer">131</partition_id>
      </partition>
      <partition>
        <create config:type="boolean">false</create>
        <format config:type="boolean">true</format>
        <filesystem config:type="symbol">swap</filesystem>
        <partition_id config:type="integer">130</partition_id>
        <mount>swap</mount>
      </partition>
    </partitions>
  </drive>
</partitioning>
Note: Keeping encrypted devices
When AutoYaST is probing the storage devices, the partitioning section from the profile is not yet analyzed. In some scenarios, it is not clear which key should be used to unlock a device. For example, this can happen when more than one encryption key is defined. To solve this problem, AutoYaST will try all defined keys on all encrypted devices until a working key is found.
4.4.5 Logical volume manager (LVM) #Edit source
To configure LVM, first create a physical volume using the normal partitioning method described above.
Example 4.11: Create LVM physical volume #
The following example shows how to prepare for LVM in the
partitioning resource. A non-formatted partition is
created on device /dev/sda1 of the type
LVM and with the volume group system.
This partition will use all space available on the drive.
<partitioning config:type="list">
  <drive>
    <device>/dev/sda</device>
    <partitions config:type="list">
      <partition>
        <create config:type="boolean">true</create>
        <lvm_group>system</lvm_group>
        <partition_type>primary</partition_type>
        <partition_id config:type="integer">142</partition_id>
        <partition_nr config:type="integer">1</partition_nr>
        <size>max</size>
      </partition>
    </partitions>
    <use>all</use>
  </drive>
</partitioning>
Example 4.12: LVM logical volumes #
<partitioning config:type="list">
  <drive>
    <device>/dev/sda</device>
    <partitions config:type="list">
      <partition>
        <lvm_group>system</lvm_group>
        <partition_type>primary</partition_type>
        <size>max</size>
      </partition>
    </partitions>
    <use>all</use>
  </drive>
  <drive>
    <device>/dev/system</device>
      <type config:type="symbol">CT_LVM</type>
      <partitions config:type="list">
        <partition>
          <filesystem config:type="symbol">ext4</filesystem>
          <lv_name>user_lv</lv_name>
          <mount>/usr</mount>
          <size>15G</size>
        </partition>
        <partition>
          <filesystem config:type="symbol">ext4</filesystem>
          <lv_name>opt_lv</lv_name>
          <mount>/opt</mount>
          <size>10G</size>
        </partition>
        <partition>
          <filesystem config:type="symbol">ext4</filesystem>
          <lv_name>var_lv</lv_name>
          <mount>/var</mount>
          <size>1G</size>
        </partition>
      </partitions>
      <pesize>4M</pesize>
    <use>all</use>
  </drive>
</partitioning>
It is possible to set the size to max
for the logical volumes. Of course, you can only use max
for one(!) logical volume. You cannot set two logical volumes in one volume
group to max.
4.4.6 Software RAID #Edit source
The support for software RAID devices has been greatly improved in openSUSE Leap 15.2.
If needed, see Section 4.4.6.1, “Using the deprecated syntax” to find out further details about the old way of specifying a software RAID, which is still supported for backward compatibility.
Using AutoYaST, you can create and assemble software RAID devices. The supported RAID levels are the following:
- RAID 0
This level increases your disk performance. There is no redundancy in this mode. If one of the drives crashes, data recovery will not be possible.
- RAID 1
This mode offers the best redundancy. It can be used with two or more disks. An exact copy of all data is maintained on all disks. As long as at least one disk is still working, no data is lost. The partitions used for this type of RAID should have approximately the same size.
- RAID 5
This mode combines management of a larger number of disks and still maintains some redundancy. This mode can be used on three disks or more. If one disk fails, all data is still intact. If two disks fail simultaneously, all data is lost.
- Multipath
This mode allows access to the same physical device via multiple controllers for redundancy against a fault in a controller card. This mode can be used with at least two devices.
Similar to LVM, a software RAID definition in an AutoYaST profile is composed of two different parts:
Determining which disks or partitions are going to be used as RAID members. To do that, you need to set the
raid_nameelement in such devices.Defining the RAID itself by using a dedicated
drivesection.
The following example shows a RAID1 configuration that uses a partition from the first disk and another one from the second disk as RAID members:
Example 4.13: RAID1 configuration #
<partitioning config:type="list">
  <drive>
    <device>/dev/sda</device>
    <partitions config:type="list">
      <partition>
        <mount>/</mount>
        <size>20G</size>
      </partition>
      <partition>
        <raid_name>/dev/md/0</raid_name>
        <size>max</size>
      </partition>
    </partitions>
    <use>all</use>
  </drive>
  <drive>
    <device>/dev/sdb</device>
    <disklabel>none</disklabel>
    <partitions config:type="list">
      <partition>
        <raid_name>/dev/md/0</raid_name>
      </partition>
    </partitions>
    <use>all</use>
  </drive>
  <drive>
    <device>/dev/md/0</device>
    <partitions config:type="list">
      <partition>
        <mount>/home</mount>
        <size>40G</size>
      </partition>
      <partition>
        <mount>/srv</mount>
        <size>10G</size>
      </partition>
    </partitions>
    <raid_options>
      <chunk_size>4</chunk_size>
      <parity_algorithm>left_asymmetric</parity_algorithm>
      <raid_type>raid1</raid_type>
    </raid_options>
    <use>all</use>
  </drive>
</partitioning>
If you do not want to create partitions in the software RAID, set the
disklabel to none as you would do for
a regular disk. In the example below, only the RAID drive
section is shown for simplicity's sake:
Example 4.14: RAID1 without partitions #
<drive>
  <device>/dev/md/0</device>
  <disklabel>none</disklabel>
  <partitions config:type="list">
    <partition>
      <mount>/home</mount>
      <size>40G</size>
    </partition>
  </partitions>
  <raid_options>
    <chunk_size>4</chunk_size>
    <parity_algorithm>left_asymmetric</parity_algorithm>
    <raid_type>raid1</raid_type>
  </raid_options>
  <use>all</use>
</drive>
4.4.6.1 Using the deprecated syntax #Edit source
If the installer self-update feature is enabled, it is possible to partition a software RAID for openSUSE Leap 15. However, that scenario was not supported in previous versions and hence the way to define a software RAID was slightly different.
This section defines what the old-style configuration looks like because it is still supported for backward compatibility.
Keep the following in mind when configuring a RAID using this deprecated syntax:
The device for RAID is always
/dev/md.The property
partition_nris used to determine the MD device number. Ifpartition_nris equal to 0, then/dev/md/0is configured. Adding severalpartitionsections means that you want to have multiple software RAIDs (/dev/md/0,/dev/md/1, etc.).All RAID-specific options are contained in the
raid_optionsresource.
Example 4.15: Old style RAID1 configuration #
<partitioning config:type="list">
  <drive>
    <device>/dev/sda</device>
    <partitions config:type="list">
      <partition>
        <partition_id config:type="integer">253</partition_id>
        <format config:type="boolean">false</format>
        <raid_name>/dev/md0</raid_name>
        <raid_type>raid1</raid_type>
        <size>4G</size>
      </partition>

        <!-- Insert a configuration for the regular partitions located on
                /dev/sda here (for example / and swap) -->

    </partitions>
    <use>all</use>
  </drive>
  <drive>
    <device>/dev/sdb</device>
    <partitions config:type="list">
      <partition>
        <format config:type="boolean">false</format>
        <partition_id config:type="integer">253</partition_id>
        <raid_name>/dev/md0</raid_name>
        <size>4gb</size>
      </partition>
    </partitions>
    <use>all</use>
  </drive>
  <drive>
    <device>/dev/md</device>
    <partitions config:type="list">
      <partition>
        <filesystem config:type="symbol">ext4</filesystem>
        <format config:type="boolean">true</format>
        <mount>/space</mount>
        <partition_id config:type="integer">131</partition_id>
        <partition_nr config:type="integer">0</partition_nr>
        <raid_options>
          <chunk_size>4</chunk_size>
          <parity_algorithm>left_asymmetric</parity_algorithm>
        </raid_options>
      </partition>
    </partitions>
    <use>all</use>
  </drive>
</partitioning>
4.4.6.2 RAID options #Edit source
The following elements must be placed within the following XML structure:
<partition>
     <raid_options>
     ...
     </raid_options>
</partition>- chunk_size
<chunk_size>4</chunk_size>
- parity_algorithm
Possible values are:
left_asymmetric,left_symmetric,right_asymmetric, orright_symmetric.For RAID6 and RAID10, the following values can be used:
parity_first,parity_last,left_asymmetric_6,left_symmetric_6,right_asymmetric_6,right_symmetric_6,parity_first_6,n2,o2,f2,n3,o3, orf3.<parity_algorithm>left_asymmetric</parity_algorithm>
- raid_type
Possible values are:
raid0,raid1,raid5,raid6andraid10.<raid_type>raid1</raid_type>
The default is
raid1.- device_order
This list contains the order of the physical devices:
<device_order config:type="list"><device>/dev/sdb2</device><device>/dev/sda1</device>...</device_order>
This is optional, and the default is alphabetical order.
4.4.7 Multipath support #Edit source
AutoYaST can handle multipath devices. To take advantage of them, you need to
enable multipath support, as shown in
Example 4.16, “Using multipath devices”. Alternatively, you can use the
following parameter on the Kernel command line:
LIBSTORAGE_MULTIPATH_AUTOSTART=ON.
Example 4.16: Using multipath devices #
<general>
  <storage>
    <start_multipath config:type="boolean">true</start_multipath>
  </storage>
</general>
<partitioning>
  <drive>
    <partitions config:type="list">
      <partition>
        <size>20G</size>
        <mount>/</mount>
        <filesystem config:type="symbol">ext4</filesystem>
      </partition>
      <partition>
        <size>auto</size>
        <mount>swap</mount>
      </partition>
    </partitions>
    <type config:type="symbol">CT_DISK</type>
    <use>all</use>
  </drive>
</partitioning>
If you want to specify the device, you could use the World Wide Identifier
(WWID), its device name (for example, /dev/dm-0), any
other path under /dev/disk that refers to the multipath
device or any of its paths.
For example, given the multipath listing from
Example 4.17, “Listing multipath devices”, you could use
/dev/mapper/14945540000000000f86756dce9286158be4c6e3567e75ba5,
/dev/dm-3, any other corresponding path under
/dev/disk (as shown in
Example 4.18, “Using the WWID to identify a multipath device”), or any of its paths
(/dev/sda or /dev/sdb).
Example 4.17: Listing multipath devices #
# multipath -l
14945540000000000f86756dce9286158be4c6e3567e75ba5 dm-3 ATA,VIRTUAL-DISK
size=40G features='0' hwhandler='0' wp=rw
|-+- policy='service-time 0' prio=1 status=active
| `- 2:0:0:0 sda 8:0  active ready running
`-+- policy='service-time 0' prio=1 status=enabled
  `- 3:0:0:0 sdb 8:16 active ready running
Example 4.18: Using the WWID to identify a multipath device #
<drive>
  <partitions config:type="list">
    <device>/dev/mapper/14945540000000000f86756dce9286158be4c6e3567e75ba5</device>
    <partition>
      <size>20G</size>
      <mount>/</mount>
      <filesystem config:type="symbol">ext4</filesystem>
    </partition>
  </partitions>
  <type config:type="symbol">CT_DISK</type>
  <use>all</use>
</drive>
4.4.8 bcache configuration #Edit source
bcache is a caching system which allows the use of multiple fast drives to
speed up the access to one or more slower drives. For example, you can
improve the performance of a large (but slow) drive by using a fast one as a
cache.
For more information about bcache on openSUSE Leap, also see the blog post at https://www.suse.com/c/combine-the-performance-of-solid-state-drive-with-the-capacity-of-a-hard-drive-with-bcache-and-yast/.
To set up a bcache device, AutoYaST needs a profile that specifies the
following:
To set a (slow) block device as backing device, use the
bcache_backing_forelement.To set a (fast) block device as caching device, use the
bcache_caching_forelement. You can use the same device to speed up the access to several drives.To specify the layout of the
bcachedevice, use adrivesection and set thetypeelement toCT_BCACHE. The layout of thebcachedevice may contain partitions.
Example 4.19: bcache definition #
<partitioning config:type="list">
  <drive>
    <device>/dev/sda</device>
    <type config:type="symbol">CT_DISK</type>
    <use>all</use>
    <enable_snapshots config:type="boolean">true</enable_snapshots>
    <partitions config:type="list">
      <partition>
        <filesystem config:type="symbol">btrfs</filesystem>
        <mount>/</mount>
        <create config:type="boolean">true</create>
        <size>max</size>
      </partition>
      <partition>
        <filesystem config:type="symbol">swap</filesystem>
        <mount>swap</mount>
        <create config:type="boolean">true</create>
        <size>2GiB</size>
      </partition>
    </partitions>
  </drive>

  <drive>
    <type config:type="symbol">CT_DISK</type>
    <device>/dev/sdb</device>
    <disklabel>msdos</disklabel>
    <use>all</use>
    <partitions config:type="list">
      <partition>
        <!-- It can serve as caching device for several bcaches -->
        <bcache_caching_for config:type="list">
          <listentry>/dev/bcache0</listentry>
        </bcache_caching_for>
        <size>max</size>
      </partition>
    </partitions>
  </drive>

  <drive>
    <type config:type="symbol">CT_DISK</type>
    <device>/dev/sdc</device>
    <use>all</use>
    <disklabel>msdos</disklabel>
    <partitions config:type="list">
      <partition>
        <!-- It can serve as backing device for one bcache -->
        <bcache_backing_for>/dev/bcache0</bcache_backing_for>
      </partition>
    </partitions>
  </drive>

  <drive>
    <type config:type="symbol">CT_BCACHE</type>
    <device>/dev/bcache0</device>
    <bcache_options>
      <cache_mode>writethrough</cache_mode>
    </bcache_options>
    <use>all</use>
    <partitions config:type="list">
      <partition>
        <mount>/data</mount>
        <size>20GiB</size>
      </partition>
      <partition>
        <mount>swap</mount>
        <filesystem config:type="symbol">swap</filesystem>
        <size>1GiB</size>
      </partition>
    </partitions>
  </drive>
</partitioning>
For the time being, the only supported option in the
bcache_options section is cache_mode,
described below.
- cache_mode
Cache mode for
bcache. Possible values are:writethroughwritebackwritearoundnone
<cache_mode>writethrough</cache_mode>
4.4.9 Multi-device Btrfs configuration #Edit source
Btrfs supports creating a single volume that spans more than one storage
device, offering similar features to software RAID implementations such as
the Linux kernel's built-in mdraid subsystem.
Multi-device Btrfs offers advantages over some other
RAID implementations. For example, you can dynamically migrate a
multi-device Btrfs volume from one RAID level to another, RAID levels can be
set on a per-file basis, and more. However, not all of these features are
fully supported yet in openSUSE Leap 15 SP3.
With AutoYaST, a multi-device Btrfs can be configured by specifying a drive with
the CT_BTRFS type. The device property
is used as an arbitrary name to identify each multi-device Btrfs.
As with RAID, you need to create all block devices first (for example, partitions, LVM logical volumes, etc.) and assign them to the Btrfs file system you want to create over such block devices.
The following example shows a simple multi-device Btrfs configuration:
Example 4.20: Multi-device Btrfs configuration #
<partitioning config:type="list">
  <drive>
    <device>/dev/sda</device>
    <disklabel>none</disklabel>
    <partitions>
      <partition>
        <btrfs_name>root_fs</btrfs_name>
      </partition>
    </partitions>
    <use>all</use>
  </drive>
  <drive>
    <device>/dev/sdb</device>
    <disklabel>gpt</disklabel>
    <partitions>
      <partition>
        <partition_nr>1</partition_nr>
        <size>4gb</size>
        <filesystem>ext4</filesystem>
        <btrfs_name>root_fs</btrfs_name>
      </partition>
    </partitions>
    <use>all</use>
  </drive>
  <drive>
    <device>root_fs</device>
    <type config:type="symbol">CT_BTRFS</type>
    <partitions>
      <partition config:type="list>
        <mount>/</mount>
      </partition>
    </partitions>
    <btrfs_options>
      <raid_leve>raid1</raid_level>
      <metadata_raid_leve>raid1</metadata_raid_level>
    </btrfs_options>
  </drive>
</partitioning>
The supported data and metadata RAID levels are: default,
single, dup, raid0,
raid1, and raid10. By default, file
system metadata is mirrored across two devices and data is striped across
all of the devices. If only one device is present, metadata will be
duplicated on that one device.
Keep the following in mind when configuring a multi-device Btrfs file system:
Devices need to indicate the
btrfs_nameproperty to be included into a multi-device Btrfs file system.All Btrfs-specific options are contained in the
btrfs_optionsresource of aCT_BTRFSdrive.
4.4.10 NFS configuration #Edit source
AutoYaST allows to install openSUSE Leap onto Network File
System (NFS) shares. To do so, you must create a drive with the
CT_NFS type and provide the NFS share name
(SERVER:PATH) as device name. The information
relative to the mount point is included as part of its first partition
section. Note that for an NFS drive, only the first partition is taken into
account.
For more information on how to configure an NFS client and server after the system has been installed, refer to Section 4.19, “NFS client and server”.
Example 4.21: NFS share definition #
        <partitioning config:type="list">
          <drive>
            <device>192.168.1.1:/exports/root_fs</device>
            <type config:type="symbol">CT_NFS</type>
            <use>all</use>
            <partitions config:type="list">
              <partition>
                <mount>/</mount>
                <fstopt>nolock</fstopt>
              </partition>
            </partitions>
          </drive>
        </partitioning>
4.4.11 tmpfs configuration #Edit source
AutoYaST supports the definition of tmpfs virtual file
systems by setting the type element to
CT_TMPFS. Each partition section
represents a tmpfs file system.
Example 4.22: tmpfs definition #
      <partitioning config:type="list">
        <drive>
          <type config:type="symbol">CT_TMPFS</type>
          <partitions config:type="list">
            <partition>
              <mount>/srv</mount>
              <fstopt>size=512M</fstopt>
            </partition>
            <partition>
              <mount>/temp</mount>
            </partition>
          </partitions>
        <drive>
      <partitioning>
tmpfs devices are different from regular file systems
like Ext4 or Btrfs. Therefore, the only relevant elements are
mount, which is mandatory, and fstopt.
The latter is used to set file system attributes like its size limit, mode,
and so on. You can find additional information about the known options in
the tmpfs man page.
4.5 iSCSI initiator overview #Edit source
Using the iscsi-client resource, you can configure the
target machine as an iSCSI client.
Example 4.23: iSCSI client #
  <iscsi-client>
    <initiatorname>iqn.2013-02.de.suse:01:e229358d2dea</initiatorname>
    <targets config:type="list">
      <listentry>
         <authmethod>None</authmethod>
         <portal>192.168.1.1:3260</portal>
         <startup>onboot</startup>
         <target>iqn.2001-05.com.doe:test</target>
         <iface>default</iface>
      </listentry>
    </targets>
    <version>1.0</version>
  </iscsi-client>
iSCSI initiator configuration settings #
- initiatorname
InitiatorNameis a value from/etc/iscsi/initiatorname.iscsi. In case you have iBFT, this value will be added from there and you are only able to change it in the BIOS setup.- version
Version of the YaST module. Default: 1.0
- targets
List of targets. Each entry contains:
- authmethod
Authentication method: None/CHAP
- portal
Portal address
- startup
Value: manual/onboot
- target
Target name
- iface
Interface name
4.6 Fibre channel over Ethernet configuration (FCoE) #Edit source
Using the fcoe_cfg resource, you can configure a Fibre
Channel over Ethernet (FCoE).
Example 4.24: FCoE configuration #
  <fcoe-client>
    <fcoe_cfg>
      <DEBUG>no</DEBUG>
      <USE_SYSLOG>yes</USE_SYSLOG>
    </fcoe_cfg>
    <interfaces config:type="list">
      <listentry>
        <dev_name>eth3</dev_name>
        <mac_addr>01:000:000:000:42:42</mac_addr>
        <device>Gigabit 1313</device>
        <vlan_interface>200</vlan_interface>
        <fcoe_vlan>eth3.200</fcoe_vlan>
        <fcoe_enable>yes</fcoe_enable>
        <dcb_required>yes</dcb_required>
        <auto_vlan>no</auto_vlan>
        <dcb_capable>no</dcb_capable>
        <cfg_device>eth3.200</cfg_device>
      </listentry>
    </interfaces>
    <service_start>
      <fcoe config:type="boolean">true</fcoe>
      <lldpad config:type="boolean">true</lldpad>
    </service_start>
</fcoe-client>- fcoe_cfg
Values:
yes/noDEBUGis used to enable or disable debugging messages from the fcoe service script and fcoemon.USE_SYSLOGmessages are sent to the system log if set to yes.- interfaces
List of network cards including the status of VLAN and FCoE configuration.
- service_start
Values:
yes/noEnable or disable the start of the services
fcoeandlldpadboot time.Starting the
fcoeservice means starting the Fibre Channel over Ethernet service daemonfcoemonwhich controls the FCoE interfaces and establishes a connection with thelldpaddaemon.The
lldpadservice provides the Link Layer Discovery Protocol agent daemonlldpad, which informsfcoemonabout DCB (Data Center Bridging) features and configuration of the interfaces.
4.7 Country settings #Edit source
Language, time zone, and keyboard settings.
Example 4.25: Language #
       <language>
         <language>en_GB</language>
         <languages>de_DE,en_US</languages>
</language>- language
Primary language
- languages
Secondary languages separated by commas
A list of available languages can be found under
/usr/share/YaST2/data/languages.
If the configured value for the primary language is unknown, it will be reset
to the default, en_US.
Example 4.26: Time zone #
       <timezone>
         <hwclock>UTC</hwclock>
         <timezone>Europe/Berlin</timezone>
</timezone>- hwclock
Whether the hardware clock uses local time or UTC.
Values:
localtime/UTC.- timezone
Time zone.
A list of available time zones can be found under
/usr/share/YaST2/data/timezone_raw.ycp
Example 4.27: Keyboard #
       <keyboard>
         <keymap>german</keymap>
</keyboard>- keymap
Keyboard layout
Keymap-code values or keymap-alias values are valid. A list of available entries can be found in
/usr/share/YaST2/data/keyboards.rb. For example,english-us, us, english-uk, uk.
4.8 Software #Edit source
4.8.1 Package selection with patterns and packages sections #Edit source
Patterns or packages are configured like this:
Example 4.28: Package selection in the control file with patterns and packages sections #
<software>
  <patterns config:type="list">
    <pattern>directory_server</pattern>
  </patterns>
  <packages config:type="list">
    <package>apache</package>
    <package>postfix</package>
  </packages>
  <do_online_update config:type="boolean">true</do_online_update>
</software>
Note: Package and pattern names
The values are real package or pattern names. If the package name has been changed because of an upgrade, you will need to adapt these settings too.
4.8.2 Deploying images #Edit source
You can use images during installation to speed up the installation.
Example 4.29: Activating image deployment #
<!-- note! this is not in the software section! -->
<deploy_image>
  <image_installation config:type="boolean">false</image_installation>
</deploy_image>
4.8.3 Installing additional/customized packages or products #Edit source
In addition to the packages available for installation on the DVD-ROMs, you can add external packages including customized kernels. Customized kernel packages must be compatible to the SUSE packages and must install the kernel files to the same locations.
Unlike in earlier versions, you do not need a special resource in the control file to install custom and external packages. Instead you need to re-create the package database and update it with any new packages or new package versions in the source repository.
A script is provided for this task which will query packages available
in the repository and create the package database. Use the command
/usr/bin/create_package_descr. It can be found in
the inst-source-utils package in the openSUSE Build Service.
When creating the database, all languages will be reset to English.
Example 4.30: Creating a package database with the additional package inst-source-utils.rpm #
The unpacked DVD is located in /usr/local/DVDs/LATEST.
>cp /tmp/inst-source-utils-2016.7.26-1.2.noarch.rpm /usr/local/DVDs/LATEST/suse/noarch>cd /usr/local/DVDs/LATEST/suse>create_package_descr -d /usr/local/CDs/LATEST/suse
In the above example, the directory
/usr/local/CDs/LATEST/suse contains the
architecture dependent (for example x86_64) and
architecture independent packages (noarch). This
might look different on other architectures.
The advantage of this method is that you can keep an up-to-date repository with fixed and updated package. Additionally this method makes the creation of custom CD-ROMs easier.
To add your own module such as the SDK (SUSE Software Development Kit), add a file
add_on_products.xml to the installation source in the
root directory.
The following example shows how the SDK module can be added to the base product
repository. The complete SDK repository will be stored in the directory
/sdk.
Example 4.31: add_on_products.xml
#
This file describes an SDK module included in the base product.
<?xml version="1.0"?>
<add_on_products xmlns="http://www.suse.com/1.0/yast2ns"
   xmlns:config="http://www.suse.com/1.0/configns">
   <product_items config:type="list">
      <product_item>
         <name>SUSE Linux Enterprise Software Development Kit</name>
         <url>relurl:////sdk?alias=SLE_SDK</url>
         <path>/</path>
         <-- Users are asked whether to add such a product -->
         <ask_user config:type="boolean">false</ask_user>
         <-- Defines the default state of pre-selected state in case of ask_user used. -->
         <selected config:type="boolean">true</selected>
      </product_item>
   </product_items>
</add_on_products>
Besides this special case, all other modules, extensions and add-on products can be added from almost every other location during an AutoYaST installation.
Even repositories which do not have any product or module information
can be added during the installation. These are called other add-ons.
Example 4.32: Adding the SDK extension and a user defined repository #
<add-on>
  <add_on_products config:type="list">
    <listentry>
      <media_url>cd:///sdk</media_url>
      <product>sle-sdk</product>
      <alias>SLE SDK</alias>
      <product_dir>/</product_dir>
      <priority config:type="integer">20</priority>
      <ask_on_error config:type="boolean">false</ask_on_error>
      <confirm_license config:type="boolean">false</confirm_license>
      <name>SUSE Linux Enterprise Software Development Kit</name>
    </listentry>
  </add_on_products>
  <add_on_others config:type="list">
    <listentry>
      <media_url>https://download.opensuse.org/repositories/YaST:/Head/openSUSE_Leap_15.2/</media_url>
      <alias>yast2_head</alias>
      <priority config:type="integer">30</priority>
      <name>Latest YaST2 packages from OBS</name>
    </listentry>
  </add_on_others>
</add-on>
The add_on_others and add_on_products sections support
the same values:
- media_url
Product URL. Can have the prefix
cd:///,http://,ftp://, etc. This entry is mandatory.If you use a multi-product medium such as the SUSE Linux Enterprise Packages DVD, then the URL path should point to the root directory of the multi-product medium. The specific product directory is selected using the
product_dirvalue (see below).- product
Internal product name if the add-on is a product. The command
zypper productsshows the names of installed products.- alias
Repository alias name. Defined by the user.
- product_dir
Optional subpath. This should only be used for multi-product media such as the SUSE Linux Enterprise Packages DVD.
- priority
Sets the repository libzypp priority. Priority of 1 is the highest. The higher the number, the lower the priority. Default is 99.
- ask_on_error
AutoYaST can ask the user to make add-on products, modules or extensions available instead of reporting a time-out error when no repository can be found at the given location. Set
ask_on_errortotrue(the default isfalse).- confirm_license
The user needs to confirm the license. Default is
false.- name
Repository name. The command
zypper lrshows the names of added repositories.
To use unsigned installation sources with AutoYaST, turn off the checks with the following configuration in your AutoYaST control file.
Note: Unsigned installation sources—limitations
You can only disable signature checking during the first stage of the auto-installation process. In stage two, the installed system's configuration takes precedence over AutoYaST configuration.
The elements listed below must be placed within the following XML structure:
<general>
  <signature-handling>
    ...
  </signature-handling>
</general>
Default values for all options are false. If an
option is set to false and a package or repository
fails the respective test, it is silently ignored and will not be
installed. Note that setting any of these options to
true is a potential security risk. Never do it when
using packages or repositories from third party sources.
- accept_unsigned_file
If set to
true, AutoYaST will accept unsigned files such as the content file.<accept_unsigned_file config:type="boolean" >true</accept_unsigned_file>
- accept_file_without_checksum
If set to
true, AutoYaST will accept files without a checksum in the content file.<accept_file_without_checksum config:type="boolean" >true</accept_file_without_checksum>
- accept_verification_failed
If set to
true, AutoYaST will accept signed files even when the verification of the signature failed.<accept_verification_failed config:type="boolean" >true</accept_verification_failed>
- accept_unknown_gpg_key
If set to
true, AutoYaST will accept new GPG keys of the installation sources, for example the key used to sign the content file.<accept_unknown_gpg_key config:type="boolean" >true</accept_unknown_gpg_key>
- accept_non_trusted_gpg_key
Set this option to
trueto accept known keys you have not yet trusted.<accept_non_trusted_gpg_key config:type="boolean" >true</accept_non_trusted_gpg_key>
- import_gpg_key
If set to
true, AutoYaST will accept and import new GPG keys on the installation source in its database.<import_gpg_key config:type="boolean" >true</import_gpg_key>
It is possible to configure the signature handling for each add-on
product, module, or extension individually. The following elements must
be between the signature-handling section of the
individual add-on product, module, or extension. All settings are
optional. If not configured, the global signature-handling from the
general section is used.
- accept_unsigned_file
If set to
true, AutoYaST will accept unsigned files such as the content file for this add-on product.<accept_unsigned_file config:type="boolean" >true</accept_unsigned_file>
- accept_file_without_checksum
If set to
true, AutoYaST will accept files without a checksum in the content file for this add-on.<accept_file_without_checksum config:type="boolean" >true</accept_file_without_checksum>
- accept_verification_failed
If set to
true, AutoYaST will accept signed files even when the verification of the signature fails.<accept_verification_failed config:type="boolean" >true</accept_verification_failed>
- accept_unknown_gpg_key
If
allis set totrue, AutoYaST will accept new GPG keys on the installation source.<accept_unknown_gpg_key> <all config:type="boolean">true</all> </accept_unknown_gpg_key>
Alternatively, you can define single keys:
<accept_unknown_gpg_key> <all config:type="boolean">false</all> <keys config:type="list"> <keyid>3B3011B76B9D6523</keyid> lt;/keys> </accept_unknown_gpg_key>
- accept_non_trusted_gpg_key
This means that the key is known, but it is not trusted by you. You can trust all keys by adding:
<accept_non_trusted_gpg_key> <all config:type="boolean">true</all> </accept_non_trusted_gpg_key>
Alternatively, you can trust specific keys:
<accept_non_trusted_gpg_key> <all config:type="boolean">false</all> <keys config:type="list"> <keyid>3B3011B76B9D6523</keyid> </keys> </accept_non_trusted_gpg_key>
- import_gpg_key
If
allis set totrue, AutoYaST will accept and import all new GPG keys on the installation source into its database.<import_gpg_key> <all config:type="boolean">true</all> </import_gpg_key>
This can be done for specific keys only:
<import_gpg_key> <all config:type="boolean">false</all> <keys config:type="list"> <keyid>3B3011B76B9D6523</keyid> </keys> </import_gpg_key>
4.8.4 Kernel packages #Edit source
Kernel packages are not part of any selection. The required kernel is determined during installation. If the kernel package is added to any selection or to the individual package selection, installation will mostly fail because of conflicts.
To force the installation of a specific kernel, use the
kernel property. The following is an example of
forcing the installation of the default kernel. This kernel will be
installed even if an SMP or other kernel is required.
Example 4.33: Kernel selection in the control file #
<software>
  <kernel>kernel-default</kernel>
  ...
</software>
4.8.5 Removing automatically selected packages #Edit source
Some packages are selected automatically either because of a dependency or because it is available in a selection.
Removing these packages might break the system consistency, and it is not
recommended to remove basic packages unless a replacement which
provides the same services is provided. The best example for this case
are mail transfer agent (MTA) packages. By default,
postfix will be selected and installed. To use another MTA like sendmail, then
postfix can be removed from the list of selected package using a list
in the software resource. However, note that sendmail is not shipped
with openSUSE Leap. The following example shows how this can be
done:
Example 4.34: Package selection in control file #
<software>
  <packages config:type="list">
    <package>sendmail</package>
  </packages>
  <remove-packages config:type="list">
    <package>postfix</package>
  </remove-packages>
</software>
Note: Package removal failure
Note that it is not possible to remove a package that is part of a pattern (see Section 4.8.1, “Package selection with patterns and packages sections”). When specifying such a package for removal, the installation will fail with the following error message:
The package resolver run failed. Check
      your software section in the AutoYaST profile.
4.8.6 Installing recommended packages and patterns #Edit source
AutoYaST enables you to control which recommended packages and patterns are installed. There are three options:
Install all recommended packages and patterns
Install only required packages and patterns
Install recommended packages, ignore recommended patterns
Set the install_recommended flag to
true in the configuration file to install
all recommended packages and patterns.
If you want just a minimal installation and to install only
required packages and patterns,
set the flag to false.
Omit the flag from the configuration file to install only recommended packages, and ignore all recommended patterns. Note that this flag only affects a fresh installation and will be ignored during an upgrade.
<software>
  <install_recommended config:type="boolean">false
  </install_recommended>
</software>
4.8.7 Installing packages in stage 2 #Edit source
To install packages after the reboot during stage two, you can
use the post-packages element for that:
<software>
  <post-packages config:type="list">
    <package>yast2-cim</package>
  </post-packages>
</software>
4.8.8 Installing patterns in stage 2 #Edit source
You can also install patterns in stage 2. Use the
post-patterns element for that:
<software>
  <post-patterns config:type="list">
    <pattern>apparmor</pattern>
  </post-patterns>
</software>
4.8.9 Online update in stage 2 #Edit source
You can perform an online update at the end of the installation. Set
the boolean do_online_update to
true. Of course this only makes sense if you add an
online update repository in the suse-register/customer-center section,
for example, or in a post-script. If the online update repository was
already available in stage one via the add-on section, then AutoYaST has
already installed the latest packages available. If a kernel update is
done via online-update, a reboot at the end of stage two is triggered.
<software>
  <do_online_update config:type="boolean">true</do_online_update>
</software>
4.9 Upgrade #Edit source
AutoYaST can also be used for doing a system upgrade. Besides upgrade packages, the following sections are supported too:
scripts/pre-scriptsRunning user scripts very early, before anything else really happens.add-onDefining an additional add-on product.languageSetting language.timezoneSetting timezone.keyboardSetting keyboard.softwareInstalling additional software/patterns. Removing installed packages.suse_registerRunning registration process.
To control the upgrade process the following sections can be defined:
Example 4.35: Upgrade and backup #
  <upgrade>
    <stop_on_solver_conflict config:type="boolean">true</stop_on_solver_conflict>
  </upgrade>
  <backup>
    <sysconfig config:type="boolean">true</sysconfig>
    <modified config:type="boolean">true</modified>
    <remove_old config:type="boolean">true</remove_old>
</backup>- stop_on_solver_conflict
Halt installation if there are package dependency issues.
- modified
Create backups of modified files.
- sysconfig
Create backup of
/etc/sysconfigdirectory.- remove_old
Remove backups from previous updates.
To start the AutoYaST upgrade mode, you need:
Procedure 4.1: Starting AutoYaST in offline upgrade mode #
Copy the AutoYaST profile to
/root/autoupg.xmlon its file system.Boot the system from the installation medium.
Select the
Installationmenu item.On the command line, set
autoupgrade=1.Press Enter to start the upgrade process.
Procedure 4.2: Starting AutoYaST in online upgrade mode #
Boot the system from the installation media.
Select the
Installationmenu item.On the command line, set
netsetup=dhcp autoupgrade=1 autoyast=http://192.169.3.1/autoyast.xml.Here, network will be set up via DHCP.
Press Enter to start the upgrade process.
4.10 Services and targets #Edit source
With the services-manager resource you can set the default
systemd target and specify in detail which system services you want to start
or deactivate and how to start them.
The default-target property specifies the default systemd
target into which the system boots. Valid options are
graphical for a graphical login, or
multi-user for a console login.
To specify the set of services that should be started on boot, use the
enable and disable lists. To start a
service, add its name to the enable list. To make sure
that the service is not started on boot, add it to the
disable list.
If a service is not listed as enabled or disabled, a default setting is used. The default setting may be either disabled or enabled.
Finally, some services like cups support on-demand
activation (socket activated services). If you want to take advantage of such
a feature, list the names of those services in the
on_demand list instead of enable.
Example 4.36: Configuring services and targets #
<services-manager>
  <default_target>multi-user</default_target>
  <services>
    <disable config:type="list">
      <service>libvirtd</service>
    </disable>
    <enable config:type="list">
      <service>sshd</service>
    </enable>
    <on_demand config:type="list">
      <service>cups</service>
    </on_demand>
  </services>
</services-manager>
4.11 Network configuration #Edit source
4.11.1 Configuration Workflow #Edit source
Network configuration is mainly used to connect a single workstation to an
Ethernet-based LAN. It is commonly configured before AutoYaST starts, to fetch
the profile from a network location. This network configuration is usually
done through linuxrc
Note: The linuxrc program
For a detailed description of how linuxrc works and its
keywords, see Appendix C, Advanced linuxrc options.
By default, YaST copies the network settings that were used during the installation into the final, installed system. This configuration is merged with the one defined in the AutoYaST profile.
AutoYaST settings have higher priority than any existing configuration files.
YaST will write ifcfg-* files based on the entries in
the profile without removing old ones. If the DNS and routing section is
empty or missing, YaST will keep any pre-existing values. Otherwise, it
applies the settings from the profile file.
Network settings and service activation are defined under the
profile networking global resource.
4.11.2 The Network Resource #Edit source
Example 4.37: Network configuration #
<networking>
  <dns>
    <dhcp_hostname config:type="boolean">true</dhcp_hostname>
    <hostname>linux-bqua</hostname>
    <nameservers config:type="list">
      <nameserver>192.168.1.116</nameserver>
      <nameserver>192.168.1.117</nameserver>
      <nameserver>192.168.1.118</nameserver>
    </nameservers>
    <resolv_conf_policy>auto</resolv_conf_policy>
    <searchlist config:type="list">
      <search>example.com</search>
      <search>example.net</search>
    </searchlist>
  </dns>
  <interfaces config:type="list">
    <interface>
      <bootproto>dhcp</bootproto>
      <name>eth0</name>
      <startmode>auto</startmode>
    </interface>
  </interfaces>
  <ipv6 config:type="boolean">true</ipv6>
  <keep_install_network config:type="boolean">false</keep_install_network>
  #false means use Wicked, true means use NetworkManager
  <managed config:type="boolean">false</managed>
  <net-udev config:type="list">
    <rule>
      <name>eth0</name>
      <rule>ATTR{address}</rule>
      <value>00:30:6E:08:EC:80</value>
    </rule>
  </net-udev>
  <s390-devices config:type="list">
    <listentry>
      <chanids>0.0.0800:0.0.0801:0.0.0802</chanids>
      <type>qeth</type>
    </listentry>
  </s390-devices>
  <routing>
    <ipv4_forward config:type="boolean">false</ipv4_forward>
    <ipv6_forward config:type="boolean">false</ipv6_forward>
    <routes config:type="list">
      <route>
        <destination>192.168.100.0/24</destination>
        <name>eth1</name>
        <extrapara>scope link src 192.168.100.100 table one</extrapara>
        <gateway>-</gateway>
      </route>
      <route>
        <destination>default</destination>
        <device>eth1</device>
        <gateway>192.168.100.1</gateway>
      </route>
      <route>
        <destination>default</destination>
        <device>lo</device>
        <gateway>192.168.5.1</gateway>
      </route>
    </routes>
  </routing>
</networking>
As shown in the example above, the <networking>
section can be composed of a few subsections:
interfacesdescribes the configuration of the network interfaces, including their IP addresses, how they are started, etc.dnsspecifies DNS related settings, such as the host name, the list of name servers, etc.routingdefines the routing rules.s390-devicescovers z Systems-specific device settings.net-udevenumerates the udev rules used to set persistent names.
Additionally, there are a few elements that allow modyfing how the network configuration is applied:
- backend
Selects the network backend to be used. Supported values are
wicked,network_managerornone, the latter of which will disable the network service.<backend>network_manager<backend>
- keep_install_network
As described in Section 4.11.1, “Configuration Workflow”, by default, AutoYaST merges the network configuration from the running system with the one defined in the profile. If you want to use only the configuration from the profile, set this element to
false. The value istrueby default.<keep_install_network config:type="boolean">false<keep_install_network>
- managed
Determines whether to use NetworkManager instead of Wicked.
Deprecated. Use
backendinstead.<managed config:type="boolean">true<managed>
- start_immediately
Forces AutoYaST to restart the network just after writing the configuration.
<start_immediately config:type="boolean">true<start_immediately>
- setup_before_proposal
Use the network configuration defined in the profile during the installation process. Otherwise, AutoYaST relies on the configuration set by
linuxrc.<setup_before_proposal config:type="boolean">true<setup_before_proposal>
- strict_IP_check_timeout
After setting up the network, AutoYaST checks whether the assigned IP address is duplicated. In that case, it shows a warning whose timeout in seconds is controlled by this element. If it is set to
0, the installation is stopped.<strict_IP_check_timeout config:type="integer">5<strict_IP_check_timeout>
- virt_bridge_proposal
AutoYaST configures a bridge when a virtualization package is selected to be installed (e.g., Xen, QEMU or KVM). You can disable such a behaviour by setting this element to
false.<virt_bridge_proposal config:type="boolean">false>virt_bridge_proposal>
Tip: IPv6 address support
Using IPv6 addresses in AutoYaST is fully supported. To disable IPv6 Address Support, set <ipv6 config:type="boolean">false</ipv6>
4.11.3 Interfaces #Edit source
The interfaces section allows the user to define the
configuration of interfaces, including how they are started, their IP
addresses, networks, and more. The following elements must be enclosed in
<interfaces>...</interfaces> tags.
bootprotoBoot protocol used by the interface. Possible values:
staticfor statically assigned addresses. It is required to specify the IP using theipaddrelement.dhcp4,dhcp6ordhcpfor setting the IP address with DHCP (IPv4, IPv6 or any).dhcp+autoipto get the IPv4 configuration from Zeroconf and get IPv6 from DHCP.autoipto get the IPv4 configuration from Zeroconf.ibftto get the IP address using the iBFT protocol.noneto skip setting an address. This value is used for bridges and bonding slaves.
Required.
broadcastBroadcast IP address.
Used only with
staticboot protocol.deviceDevice name.
Deprecated. Use
nameinstead.nameDevice name, for example:
eth0.Required.
lladdrLink layer address (MAC address).
Optional.
ipaddrIP address assigned to the interface.
Used only with
staticboot protocol. It can include a network prefix, for example:192.168.1.1/24.remote_ipaddrRemote IP address for point-to-point connections.
Used only with
staticboot protocol.netmaskNetwork mask, for example:
255.255.255.0.Deprecated. Use
prefixleninstead or include the network prefix in theipaddrelement.networkNetwork IP address.
Deprecated. Use
ipaddrwithprefixleninstead.prefixlenNetwork prefix, for example:
24.Used only with
staticboot protocol.startmodeWhen to bring up an interface. Possible values are:
hotplugwhen the device is plugged in. Useful for USB network cards, for example.autowhen the system boots.onbootis a deprecated alias.ifplugdwhen the device is managed by theifplugddaemon.manualwhen the device is supposed to be started manually.nfsrootwhen the device is needed to mount the root file system, for example, when/is on an NFS volume.offto never start the device.
ifplugd_priorityPriority for
ifplugddaemon. It determines in which order the devices are activated.Used only with
ifplugdstart mode.usercontrolParameter is no longer used.
Deprecated.
bonding_slaveXName of the bonding device.
Required for bonding devices.
Xis replaced by a number starting from 0, for examplebonding_slave0. Each slave needs to have a unique number.bonding_module_optsOptions for bonding device.
Used only with
bonddevice.mtuMaximum transmission unit for the interface.
Optional.
ethtool_optionsEthtool options during device activation.
Optional.
zoneFirewall zone name which the interface is assigned to.
Optional.
vlan_idIdentifier used for this VLAN.
Used only with a
vlandevice.etherdeviceDevice to which VLAN is attached.
Used only with a
vlandevice and required for it.bridgeyesif interface is a bridge.Deprecated. It is inferred from other attributes.
bridge_portsSpace-separated list of bridge ports, for example,
eth0 eth1.Used only with a
bridgedevice and required for it.bridge_stpSpanning tree protocol. Possible values are
on(when enabled) andoff(when disabled).Used only with a
bridgedevice.bridge_forward_delayForward delay for bridge, for example:
15.Used only with
bridgedevices. Valid values are between4and30.aliasesAdditional IP addresses. See Section 4.11.4, “Assigning multiple IP addresses”.
Example 4.38: Bonding interface configuration #
<networking>
  <setup_before_proposal config:type="boolean">false</setup_before_proposal>
  <keep_install_network config:type="boolean">false</keep_install_network>
  <interfaces config:type="list">
    <interface>
      <bonding_master>yes</bonding_master>
      <bonding_module_opts>mode=active-backup miimon=100</bonding_module_opts>
      <bonding_slave0>eth1</bonding_slave0>
      <bonding_slave0>eth2</bonding_slave0>
      <bondoption>mode=balance-rr miimon=100</bondoption>
      <bootproto>static</bootproto>
      <name>bond0</name>
      <ipaddr>192.168.1.61</ipaddr>
      <prefixlen>24</prefixlen>
      <startmode>auto</startmode>
    </interface>
    <interface>
      <bootproto>none</bootproto>
      <name>eth1</name>
      <startmode>auto</startmode>
    </interface>
    <interface>
      <bootproto>none</bootproto>
      <name>eth2</name>
      <startmode>auto</startmode>
    </interface>
  </interfaces>
  <net-udev config:type="list">
    <rule>
      <name>eth1</name>
      <rule>ATTR{address}</rule>
      <value>dc:e4:cc:27:94:c7</value>
    </rule>
    <rule>
      <name>eth2</name>
      <rule>ATTR{address}</rule>
      <value>dc:e4:cc:27:94:c8</value>
    </rule>
  </net-udev>
</networking>
Example 4.39: Bridge interface configuration #
<interfaces config:type="list">
  <interface>
    <name>br0</name>
    <bootproto>static</bootproto>
    <bridge>yes</bridge>
    <bridge_forwarddelay>0</bridge_forwarddelay>
    <bridge_ports>eth0 eth1</bridge_ports>
    <bridge_stp>off</bridge_stp>
    <ipaddr>192.168.1.100</ipaddr>
    <prefixlen>24</prefixlen>
    <startmode>auto</startmode>
  </interface>
  <interface>
    <name>eth0</name>
    <bootproto>none</bootproto>
    <startmode>hotplug</startmode>
  </interface>
  <interface>
    <name>eth1</name>
    <bootproto>none</bootproto>
    <startmode>hotplug</startmode>
  </interface>
</interfaces>
4.11.4 Assigning multiple IP addresses #Edit source
AutoYaST makes it possible to assign multiple IP addresses to the same
interface. They are specified using an aliases element
that contains an aliasX entry for each address.
Each entry supports the following elements:
- IPADDR
Additional IP address. It can include a network prefix, for example:
192.168.1.1/24.- PREFIXLEN
Network prefix, for example:
24.- NETMASK
Netmask of the address.
Deprecated. Use
PREFIXLENinstead or include the network prefix in theIPADDRelement.- LABEL
Label of the address.
Note: Case sensitive elements
Keep in mind that for historical reasons, the IPADDR,
PREFIXLEN, LABEL and
NETMASK elements within the aliases
section are case-sensitive.
Example 4.40: Multiple IP Addresses #
<interfaces config:type="list">
  <interface>
    <name>br0</name>
    <bootproto>static</bootproto>
    <ipaddr>192.168.1.100</ipaddr>
    <prefixlen>24</prefixlen>
    <startmode>auto</startmode>
    <aliases>
      <alias0>
        <IPADDR>192.168.1.101</IPADDR>
        <PREFIXLEN>24</PREFIXLEN>
        <LABEL>http</LABEL>
      </alias0>
      <alias1>
        <IPADDR>192.168.2.100</IPADDR>
        <PREFIXLEN>24</PREFIXLEN>
        <LABEL>extra</LABEL>
      </alias1>
    </aliases>
  </interface>
</interfaces>
4.11.5 Persistent names of network interfaces #Edit source
The net-udev element allows to specify a set of udev
rules that can be used to assign persistent names to interfaces.
- name
Network interface name, for example
eth3. (Required.)- rule
ATTR{address}for a MAC-based rule,KERNELSfor a bus-ID-based rule. (Required.)- value
For example:
f0:de:f1:6b:da:69for a MAC rule,0000:00:1c.1 or 0.0.0700for a bus ID rule. (Required.)
Tip: Handling collisions in device names
When creating an incomplete udev rule set, the chosen
device name can collide with existing device names. For example, when
renaming a network interface to eth0, a collision with a
device automatically generated by the kernel can occur. AutoYaST tries to
handle such cases in a best effort manner and renames colliding devices.
Example 4.41: Assigning a persistent name using the MAC address #
<net-udev config:type="list">
  <rule>
  <name>eth1</name>
  <rule>ATTR{address}</rule>
  <value>52:54:00:68:54:fb</value>
  </rule>
</net-udev>
4.11.6 Domain name system #Edit source
The dns section is used to define name-service related
settings, such as the host name or name servers.
- hostname
Host name, excluding the domain name part. For example: foo instead of foo.bar. The Linux kernel allows you to use the fully-qualified domain name (FQDN) in place of the host name, and so does YaST. However, this is not the correct usage in the dns section of YaST. The resolver should determine the FQDN. (See "THE FQDN" section of
man 1 hostnamefor information on how FQDNs are resolved.)If a host name is not specified and is not taken from a DHCP server (see
dhcp_hostname), AutoYaST will generate a random hostname.- nameservers
List of name servers. Example:
<nameservers config:type="list">
  <nameserver>192.168.1.116</nameserver>
  <nameserver>192.168.1.117</nameserver>
</nameservers>
- searchlist
Search list for host name lookup.
<searchlist config:type="list">
  <search>example.com</search>
</searchlist>
Optional.
- dhcp_hostname
Specifies whether the host name must be taken from DHCP or not.
<dhcp_hostname config:type="boolean">true</dhcp_hostname>
4.11.7 Routing #Edit source
The routing table allows specification of a list of
routes and the packet-forwarding settings for IPv4 and IPv6.
- ipv4_forward
Optional: Whether IP forwarding must be enabled for IPv4.
- ipv6_forward
Optional: Whether IP forwarding must be enabled for IPv6.
- routes
Optional: List of routes.
The following settings describe how routes are defined.
- destination
Required: Route destination. An address prefix can be specified, for example:
192.168.122.0/24.The heading
defaultcan be used to indicate that the route is the default gateway in the same address family (ipv4 or ipv6) as the gateway.- device
Required: Interface associated to the route.
- gateway
Optional: Gateway's IP address.
- netmask
(Deprecated.) Destination's netmask.
Specifying the prefix as part of the
destinationvalue is preferred.- extrapara
Optional: Further route options like
metric,mtuortable.
Example 4.42: Network routing configuration #
<routing>
  <ipv4_forward config:type="boolean">true</ipv4_forward>
  <ipv6_forward config:type="boolean">true</ipv6_forward>
  <routes config:type="list">
    <route>
      <destination>192.168.100.0/24</destination>
      <device>eth1</device>
      <extrapara>scope link src 192.168.100.100 table one</extrapara>
    </route>
    <route>
      <destination>default</destination>
      <device>eth1</device>
      <gateway>192.168.100.1</gateway>
    </route>
    <route>
      <destination>default</destination>
      <device>lo</device>
      <gateway>192.168.5.1</gateway>
    </route>
  </routes>
</routing>
4.11.8 s390 options #Edit source
The following elements must be between the
<s390-devices>...
</s390-devices> tags.
- type
qeth,ctcoriucv.- chanids
channel IDs, separated by a colon (preferred) or a space
<chanids>0.0.0700:0.0.0701:0.0.0702</chanids>
- layer2
<layer2 config:type="boolean">true</layer2>
boolean; default:
false- protocol
Optional: CTC / LCS protocol, a small number (as a string)
<protocol>1</protocol>
- router
IUCV router/user
In addition to the options mentioned above, AutoYaST also supports
IBM Z-specific options in other sections of the configuration file. In
particular, you can define the logical link address, or LLADDR (in the case
of Ethernet, that is the MAC address). To do so, use the option
LLADDR in the device definition.
Tip: LLADDR for VLANs
VLAN devices inherit their LLADDR from the underlying physical devices. To set a particular address for a VLAN device, set the LLADDR option for the underlying physical device.
4.12 Proxy #Edit source
Configure your Internet proxy (caching) settings.
Configure proxies for HTTP, HTTPS, and FTP with
http_proxy, https_proxy and
ftp_proxy, respectively. Addresses or names that should be
directly accessible need to be specified with no_proxy
(space separated values). If you are using a proxy server with authorization,
fill in proxy_user and proxy_password,
Example 4.43: Network configuration: proxy #
<proxy>
  <enabled config:type="boolean">true</enabled>
  <ftp_proxy>http://192.168.1.240:3128</ftp_proxy>
  <http_proxy>http://192.168.1.240:3128</http_proxy>
  <no_proxy>www.example.com .example.org localhost</no_proxy>
  <proxy_password>testpw</proxy_password>
  <proxy_user>testuser</proxy_user>
</proxy>
Note
The proxy settings will be written during the installation when the network
configuration is forced to be written before the proposal or when the proxy
settings are given through linuxrc.
4.13 NIS client and server #Edit source
Using the nis resource, you can configure the target
machine as a NIS client. The following example shows a detailed
configuration using multiple domains.
Example 4.44: Network configuration: NIS #
 <nis>
  <nis_broadcast config:type="boolean">true</nis_broadcast>
  <nis_broken_server config:type="boolean">true</nis_broken_server>
  <nis_domain>test.com</nis_domain>
  <nis_local_only config:type="boolean">true</nis_local_only>
  <nis_options></nis_options>
  <nis_other_domains config:type="list">
    <nis_other_domain>
      <nis_broadcast config:type="boolean">false</nis_broadcast>
      <nis_domain>domain.com</nis_domain>
      <nis_servers config:type="list">
        <nis_server>10.10.0.1</nis_server>
      </nis_servers>
    </nis_other_domain>
  </nis_other_domains>
  <nis_servers config:type="list">
    <nis_server>192.168.1.1</nis_server>
  </nis_servers>
  <start_autofs config:type="boolean">true</start_autofs>
  <start_nis config:type="boolean">true</start_nis>
</nis>
4.14 NIS server #Edit source
You can configure the target machine as a NIS server. NIS Master Server and NIS Slave Server and a combination of both are available.
Example 4.45: NIS server configuration #
  <nis_server>
    <domain>mydomain.de</domain>
    <maps_to_serve config:type="list">
      <nis_map>auto.master</nis_map>
      <nis_map>ethers</nis_map>
    </maps_to_serve>
    <merge_passwd config:type="boolean">false</merge_passwd>
    <mingid config:type="integer">0</mingid>
    <minuid config:type="integer">0</minuid>
    <nopush config:type="boolean">false</nopush>
    <pwd_chfn config:type="boolean">false</pwd_chfn>
    <pwd_chsh config:type="boolean">false</pwd_chsh>
    <pwd_srcdir>/etc</pwd_srcdir>
    <securenets config:type="list">
      <securenet>
        <netmask>255.0.0.0</netmask>
        <network>127.0.0.0</network>
      </securenet>
    </securenets>
    <server_type>master</server_type>
    <slaves config:type="list"/>
    <start_ypbind config:type="boolean">false</start_ypbind>
    <start_yppasswdd config:type="boolean">false</start_yppasswdd>
    <start_ypxfrd config:type="boolean">false</start_ypxfrd>
  </nis_server>
Attribute, Values, Description #
-
domain NIS domain name.
-
maps_to_serve List of maps which are available for the server.
Values: auto.master, ethers, group, hosts, netgrp, networks, passwd, protocols, rpc, services, shadow
-
merge_passwd Select if your passwd file should be merged with the shadow file (only possible if the shadow file exists).
Value: true/false
-
mingid Minimum GID to include in the user maps.
-
minuid Minimum UID to include in the user maps.
-
nopush Do not push the changes to slave servers. (Useful if there are none).
Value: true/false
-
pwd_chfn YPPWD_CHFN - allow changing the full name
Value: true/false
-
pwd_chsh YPPWD_CHSH - allow changing the login shell
Value: true/false
-
pwd_srcdir YPPWD_SRCDIR - source directory for passwd data
Default:
/etc-
securenets List of allowed hosts to query the NIS server
A host address will be allowed if network is equal to the bitwise AND of the host's address and the netmask.
The entry with netmask 255.0.0.0 and network 127.0.0.0 must exist to allow connections from the local host.
Entering netmask 0.0.0.0 and network 0.0.0.0 gives access to all hosts.
-
server_type Select whether to configure the NIS server as a master or a slave or not to configure a NIS server.
Values: master, slave, none
-
slaves List of host names to configure as NIS server slaves.
-
start_ypbind This host is also a NIS client (only when client is configured locally).
Value: true/false
-
start_yppasswdd Also start the password daemon.
Value: true/false
-
start_ypxfrd Also start the map transfer daemon. Fast Map distribution; it will speed up the transfer of maps to the slaves.
Value: true/false
4.15 Hosts definition #Edit source
Using the host resource, you can add more entries to
the /etc/hosts file. Already existing entries will not be
deleted. The following example shows details.
Example 4.46: /etc/hosts #
    <host>
     <hosts config:type="list">
      <hosts_entry>
       <host_address>133.3.0.1</host_address>
       <names config:type="list">
        <name>booking</name>
       </names>
      </hosts_entry>
      <hosts_entry>
       <host_address>133.3.0.5</host_address>
       <names config:type="list">
        <name>test-machine</name>
       </names>
      </hosts_entry>
     </hosts>
    </host>
4.16 Windows domain membership #Edit source
Using the samba-client resource, you can configure
membership of a workgroup, NT domain, or Active Directory domain.
Example 4.47: Samba client configuration #
  <samba-client>
    <disable_dhcp_hostname config:type="boolean">true</disable_dhcp_hostname>
    <global>
      <security>domain</security>
      <usershare_allow_guests>No</usershare_allow_guests>
      <usershare_max_shares>100</usershare_max_shares>
      <workgroup>WORKGROUP</workgroup>
    </global>
    <winbind config:type="boolean">false</winbind>
  </samba-client>
Attribute, Values, Description #
-
disable_dhcp_hostname Do not allow DHCP to change the host name.
Value: true/false
-
global/security Kind of authentication regime (domain technology or Active Directory server (ADS)).
Value: ADS/domain
-
global/usershare_allow_guests Sharing guest access is allowed.
Value: No/Yes
-
global/usershare_max_shares Max. number of shares from
smb.conf.0 means that shares are not enabled.
-
global/workgroup Workgroup or domain name.
-
winbind Using winbind.
Value: true/false
4.17 Samba server #Edit source
Configuration of a simple Samba server.
Example 4.48: Samba server configuration #
  <samba-server>
    <accounts config:type="list"/>
    <backend/>
    <config config:type="list">
      <listentry>
        <name>global</name>
        <parameters>
          <security>domain</security>
          <usershare_allow_guests>No</usershare_allow_guests>
          <usershare_max_shares>100</usershare_max_shares>
          <workgroup>WORKGROUP</workgroup>
        </parameters>
      </listentry>
    </config>
    <service>Disabled</service>
    <trustdom/>
    <version>2.11</version>
  </samba-server>
Attribute, Values, Description #
- accounts
List of Samba accounts.
- backend
List of available back-ends.
Value:
true/false.- config
Setting additional user-defined parameters in
/etc/samba/smb.conf.The example shows parameters in the
globalsection of/etc/samba/smb.conf.- service
Samba service starts during boot.
Value:
Enabled/Disabled.- trustdom/
Trusted Domains.
A map of two maps (keys:
establish, revoke). Each map contains entries in the formatkey: domainnamevalue: password.- version
Samba version.
Default: 2.11.
4.18 Authentication client #Edit source
The configuration file must be in the JSON format. Verify that both autoyast2 and autoyast2-installation are installed. Use the module in YaST to generate a valid JSON configuration file. Launch YaST and switch to the › . Choose › , click , and configure the available settings. Click when done. To save the generated configuration file, use › .
Tip: Using ldaps://
To use LDAP with native SSL (rather than TLS), add the
ldaps resource.
4.19 NFS client and server #Edit source
Configuring a system as an NFS client or an NFS server can be done using the configuration system. The following examples show how both NFS client and server can be configured.
From openSUSE Leap 15.3 on, the structure of NFS client configuration has
changed. Some global configuration options were introduced:
enable_nfs4 to switch NFS4 support on/off and
idmapd_domain to define domain name for rpc.idmapd
(this only makes sense when NFS4 is enabled). Attention: the old
structure is not compatible with the new one and the control files with
an NFS section created on older releases will not work with newer
products.
For more information on how to install openSUSE Leap onto NFS shares, refer to Section 4.4.10, “NFS configuration”.
Example 4.49: Network configuration: NFS client #
<nfs>
  <enable_nfs4 config:type="boolean">true</enable_nfs4>
  <idmapd_domain>suse.cz</idmapd_domain>
  <nfs_entries config:type="list">
    <nfs_entry>
      <mount_point>/home</mount_point>
      <nfs_options>sec=krb5i,intr,rw</nfs_options>
      <server_path>saurus.suse.cz:/home</server_path>
      <vfstype>nfs4</vfstype>
    </nfs_entry>
    <nfs_entry>
      <mount_point>/work</mount_point>
      <nfs_options>defaults</nfs_options>
      <server_path>bivoj.suse.cz:/work</server_path>
      <vfstype>nfs</vfstype>
    </nfs_entry>
    <nfs_entry>
      <mount_point>/mnt</mount_point>
      <nfs_options>defaults</nfs_options>
      <server_path>fallback.suse.cz:/srv/dist</server_path>
      <vfstype>nfs</vfstype>
    </nfs_entry>
  </nfs_entries>
</nfs>
Example 4.50: Network configuration: NFS server #
<nfs_server>
  <nfs_exports config:type="list">
    <nfs_export>
      <allowed config:type="list">
        <allowed_clients>*(ro,root_squash,sync)</allowed_clients>
      </allowed>
      <mountpoint>/home</mountpoint>
    </nfs_export>
    <nfs_export>
      <allowed config:type="list">
        <allowed_clients>*(ro,root_squash,sync)</allowed_clients>
      </allowed>
      <mountpoint>/work</mountpoint>
    </nfs_export>
  </nfs_exports>
  <start_nfsserver config:type="boolean">true</start_nfsserver>
</nfs_server>
4.20 NTP client #Edit source
Important: NTP client profile incompatible
Starting with openSUSE Leap 15, the NTP client profile has a new format and is not compatible with previous profiles. You need to update your NTP client profile used in prior openSUSE Leap versions to be compatible with version 15 and newer.
Following is an example of the NTP client configuration:
Example 4.51: Network configuration: NTP client #
<ntp-client>
  <ntp_policy>auto</ntp_policy>1
  <ntp_servers config:type="list">
    <ntp_server>
      <address>cz.pool.ntp.org</address>2
      <iburst config:type="boolean">false</iburst>3
      <offline config:type="boolean">false</offline>4
    </ntp_server>
  </ntp_servers>
  <ntp_sync>15</ntp_sync>5
</ntp-client>
The | |
URL of the time server or pool of time servers. | |
| |
When the | |
For |
The following example illustrates an IPv6 configuration. You may use the server's IP address, host name, or both:
<ntp-server>
  <address>2001:418:3ff::1:53</address>
</ntp-server>

<ntp-server>
  <address>2.pool.ntp.org</address>
</ntp-server>
4.21 Mail server configuration #Edit source
For the mail configuration of the client, this module lets you create a detailed mail configuration. The module contains various options. We recommended you use it at least for the initial configuration.
Example 4.52: Mail configuration #
<mail>
  <aliases config:type="list">
    <alias>
      <alias>root</alias>
      <comment></comment>
      <destinations>foo</destinations>
    </alias>
    <alias>
      <alias>test</alias>
      <comment></comment>
      <destinations>foo</destinations>
    </alias>
  </aliases>
  <connection_type config:type="symbol">permanent</connection_type>
  <fetchmail config:type="list">
    <fetchmail_entry>
      <local_user>foo</local_user>
      <password>bar</password>
      <protocol>POP3</protocol>
      <remote_user>foo</remote_user>
      <server>pop.foo.com</server>
    </fetchmail_entry>
    <fetchmail_entry>
      <local_user>test</local_user>
      <password>bar</password>
      <protocol>IMAP</protocol>
      <remote_user>test</remote_user>
      <server>blah.com</server>
    </fetchmail_entry>
  </fetchmail>
  <from_header>test.com</from_header>
  <listen_remote config:type="boolean">true</listen_remote>
  <local_domains config:type="list">
    <domains>test1.com</domains>
  </local_domains>
  <masquerade_other_domains config:type="list">
      <domain>blah.com</domain>
  </masquerade_other_domains>
  <masquerade_users config:type="list">
    <masquerade_user>
      <address>joe@test.com</address>
      <comment></comment>
      <user>joeuser</user>
    </masquerade_user>
    <masquerade_user>
      <address>bar@test.com</address>
      <comment></comment>
      <user>foo</user>
    </masquerade_user>
  </masquerade_users>
  <mta config:type="symbol">postfix</mta>
  <outgoing_mail_server>test.com</outgoing_mail_server>
  <postfix_mda config:type="symbol">local</postfix_mda>
  <smtp_auth config:type="list">
    <listentry>
      <password>bar</password>
      <server>test.com</server>
      <user>foo</user>
    </listentry>
  </smtp_auth>
  <use_amavis config:type="boolean">true</use_amavis>
  <virtual_users config:type="list">
    <virtual_user>
      <alias>test.com</alias>
      <comment></comment>
      <destinations>foo.com</destinations>
    </virtual_user>
    <virtual_user>
      <alias>geek.com</alias>
      <comment></comment>
      <destinations>bar.com</destinations>
    </virtual_user>
  </virtual_users>
</mail>
4.22 Apache HTTP server configuration #Edit source
This section is used for configuration of an Apache HTTP server.
For less experienced users, we would suggest to configure the Apache
server using the HTTP server YaST module. After that,
call the AutoYaST configuration module,
select the HTTP server YaST module and clone the
Apache settings. These settings can be exported via the menu
File.
Example 4.53: HTTP server configuration #
  <http-server>
    <Listen config:type="list">
      <listentry>
        <ADDRESS/>
        <PORT>80</PORT>
      </listentry>
    </Listen>
    <hosts config:type="list">
      <hosts_entry>
        <KEY>main</KEY>
        <VALUE config:type="list">
          <listentry>
            <KEY>DocumentRoot</KEY>
            <OVERHEAD>
            #
            # Global configuration that will be applicable for all
            # virtual hosts, unless deleted here or overriden elsewhere.
            #
            </OVERHEAD>
            <VALUE>"/srv/www/htdocs"</VALUE>
          </listentry>
          <listentry>
            <KEY>_SECTION</KEY>
            <OVERHEAD>
            #
            # Configure the DocumentRoot
            #
            </OVERHEAD>
            <SECTIONNAME>Directory</SECTIONNAME>
            <SECTIONPARAM>"/srv/www/htdocs"</SECTIONPARAM>
            <VALUE config:type="list">
              <listentry>
                <KEY>Options</KEY>
                <OVERHEAD>
                # Possible values for the Options directive are "None", "All",
                # or any combination of:
                #   Indexes Includes FollowSymLinks SymLinksifOwnerMatch
                #   ExecCGI MultiViews
                #
                # Note that "MultiViews" must be named *explicitly*
                # --- "Options All"
                # does not give it to you.
                #
                # The Options directive is both complicated and important.
                #  Please see
                #  http://httpd.apache.org/docs/2.4/mod/core.html#options
                # for more information.
                </OVERHEAD>
                <VALUE>None</VALUE>
              </listentry>
              <listentry>
                <KEY>AllowOverride</KEY>
                <OVERHEAD>
                # AllowOverride controls what directives may be placed in
                # .htaccess files. It can be "All", "None", or any combination
                # of the keywords:
                #   Options FileInfo AuthConfig Limit
                </OVERHEAD>
                <VALUE>None</VALUE>
              </listentry>
              <listentry>
                <KEY>_SECTION</KEY>
                <OVERHEAD>
                # Controls who can get stuff from this server.
                </OVERHEAD>
                <SECTIONNAME>IfModule</SECTIONNAME>
                <SECTIONPARAM>!mod_access_compat.c</SECTIONPARAM>
                <VALUE config:type="list">
                  <listentry>
                    <KEY>Require</KEY>
                    <VALUE>all granted</VALUE>
                  </listentry>
                </VALUE>
              </listentry>
              <listentry>
                <KEY>_SECTION</KEY>
                <SECTIONNAME>IfModule</SECTIONNAME>
                <SECTIONPARAM>mod_access_compat.c</SECTIONPARAM>
                <VALUE config:type="list">
                  <listentry>
                    <KEY>Order</KEY>
                    <VALUE>allow,deny</VALUE>
                  </listentry>
                  <listentry>
                    <KEY>Allow</KEY>
                    <VALUE>from all</VALUE>
                  </listentry>
                </VALUE>
              </listentry>
            </VALUE>
          </listentry>
          <listentry>
            <KEY>Alias</KEY>
            <OVERHEAD>
            # Aliases: aliases can be added as needed (with no limit).
            # The format is Alias fakename realname
            #
            # Note that if you include a trailing / on fakename then the
            # server will require it to be present in the URL.  So "/icons"
            # is not aliased in this example, only "/icons/".  If the fakename
            # is slash-terminated, then the realname must also be slash
            # terminated, and if the fakename omits the trailing slash, the
            # realname must also omit it.
            # We include the /icons/ alias for FancyIndexed directory listings.
            # If you do not use FancyIndexing, you may comment this out.
            #
            </OVERHEAD>
            <VALUE>/icons/ "/usr/share/apache2/icons/"</VALUE>
          </listentry>
          <listentry>
            <KEY>_SECTION</KEY>
            <OVERHEAD>
            </OVERHEAD>
            <SECTIONNAME>Directory</SECTIONNAME>
            <SECTIONPARAM>"/usr/share/apache2/icons"</SECTIONPARAM>
            <VALUE config:type="list">
              <listentry>
                <KEY>Options</KEY>
                <VALUE>Indexes MultiViews</VALUE>
              </listentry>
              <listentry>
                <KEY>AllowOverride</KEY>
                <VALUE>None</VALUE>
              </listentry>
              <listentry>
                <KEY>_SECTION</KEY>
                <SECTIONNAME>IfModule</SECTIONNAME>
                <SECTIONPARAM>!mod_access_compat.c</SECTIONPARAM>
                <VALUE config:type="list">
                  <listentry>
                    <KEY>Require</KEY>
                    <VALUE>all granted</VALUE>
                  </listentry>
                </VALUE>
              </listentry>
              <listentry>
                <KEY>_SECTION</KEY>
                <SECTIONNAME>IfModule</SECTIONNAME>
                <SECTIONPARAM>mod_access_compat.c</SECTIONPARAM>
                <VALUE config:type="list">
                  <listentry>
                    <KEY>Order</KEY>
                    <VALUE>allow,deny</VALUE>
                  </listentry>
                  <listentry>
                    <KEY>Allow</KEY>
                    <VALUE>from all</VALUE>
                  </listentry>
                </VALUE>
              </listentry>
            </VALUE>
          </listentry>
          <listentry>
            <KEY>ScriptAlias</KEY>
            <OVERHEAD>
            # ScriptAlias: This controls which directories contain server
            # scripts. ScriptAliases are essentially the same as Aliases,
            # except that documents in the realname directory are treated
            # as applications and run by the server when requested rather
            # than as documents sent to the client.
            # The same rules about trailing "/" apply to ScriptAlias
            # directives as to Alias.
            #
            </OVERHEAD>
            <VALUE>/cgi-bin/ "/srv/www/cgi-bin/"</VALUE>
          </listentry>
          <listentry>
            <KEY>_SECTION</KEY>
            <OVERHEAD>
            # "/srv/www/cgi-bin" should be changed to wherever your
            # ScriptAliased CGI directory exists, if you have that configured.
            #
            </OVERHEAD>
            <SECTIONNAME>Directory</SECTIONNAME>
            <SECTIONPARAM>"/srv/www/cgi-bin"</SECTIONPARAM>
            <VALUE config:type="list">
              <listentry>
                <KEY>AllowOverride</KEY>
                <VALUE>None</VALUE>
              </listentry>
              <listentry>
                <KEY>Options</KEY>
                <VALUE>+ExecCGI -Includes</VALUE>
              </listentry>
              <listentry>
                <KEY>_SECTION</KEY>
                <SECTIONNAME>IfModule</SECTIONNAME>
                <SECTIONPARAM>!mod_access_compat.c</SECTIONPARAM>
                <VALUE config:type="list">
                  <listentry>
                    <KEY>Require</KEY>
                    <VALUE>all granted</VALUE>
                  </listentry>
                </VALUE>
              </listentry>
              <listentry>
                <KEY>_SECTION</KEY>
                <SECTIONNAME>IfModule</SECTIONNAME>
                <SECTIONPARAM>mod_access_compat.c</SECTIONPARAM>
                <VALUE config:type="list">
                  <listentry>
                    <KEY>Order</KEY>
                    <VALUE>allow,deny</VALUE>
                  </listentry>
                  <listentry>
                    <KEY>Allow</KEY>
                    <VALUE>from all</VALUE>
                  </listentry>
                </VALUE>
              </listentry>
            </VALUE>
          </listentry>
          <listentry>
            <KEY>_SECTION</KEY>
            <OVERHEAD>
            # UserDir: The name of the directory that is appended onto a
            # user's home directory if a ~user request is received.
            # To disable it, simply remove userdir from the list of modules
            # in APACHE_MODULES in /etc/sysconfig/apache2.
            #
            </OVERHEAD>
            <SECTIONNAME>IfModule</SECTIONNAME>
            <SECTIONPARAM>mod_userdir.c</SECTIONPARAM>
            <VALUE config:type="list">
              <listentry>
                <KEY>UserDir</KEY>
                <OVERHEAD>
                # Note that the name of the user directory ("public_html")
                # cannot simply be changed here, since it is a compile time
                # setting. The apache package would need to be rebuilt.
                # You could work around by deleting /usr/sbin/suexec, but
                # then all scripts from the directories would be executed
                # with the UID of the webserver.
                </OVERHEAD>
                <VALUE>public_html</VALUE>
              </listentry>
              <listentry>
                <KEY>Include</KEY>
                <OVERHEAD>
                # The actual configuration of the directory is in
                # /etc/apache2/mod_userdir.conf.
                </OVERHEAD>
                <VALUE>/etc/apache2/mod_userdir.conf</VALUE>
              </listentry>
            </VALUE>
          </listentry>
          <listentry>
            <KEY>IncludeOptional</KEY>
            <OVERHEAD>
            # Include all *.conf files from /etc/apache2/conf.d/.
            #
            # This is mostly meant as a place for other RPM packages to drop
            # in their configuration snippet.
            #
            #
            # You can comment this out here if you want those bits include
            # only in a certain virtual host, but not here.
            </OVERHEAD>
            <VALUE>/etc/apache2/conf.d/*.conf</VALUE>
          </listentry>
          <listentry>
            <KEY>IncludeOptional</KEY>
            <OVERHEAD>
            # The manual... if it is installed ('?' means it will not complain)
            </OVERHEAD>
            <VALUE>/etc/apache2/conf.d/apache2-manual?conf</VALUE>
          </listentry>
          <listentry>
            <KEY>ServerName</KEY>
            <VALUE>linux-wtyj</VALUE>
          </listentry>
          <listentry>
            <KEY>ServerAdmin</KEY>
            <OVERHEAD>
            </OVERHEAD>
            <VALUE>root@linux-wtyj</VALUE>
          </listentry>
          <listentry>
            <KEY>NameVirtualHost</KEY>
            <VALUE>192.168.43.2</VALUE>
          </listentry>
        </VALUE>
      </hosts_entry>
      <hosts_entry>
        <KEY>192.168.43.2/secondserver.suse.de</KEY>
        <VALUE config:type="list">
          <listentry>
            <KEY>DocumentRoot</KEY>
            <VALUE>/srv/www/htdocs</VALUE>
          </listentry>
          <listentry>
            <KEY>ServerName</KEY>
            <VALUE>secondserver.suse.de</VALUE>
          </listentry>
          <listentry>
            <KEY>ServerAdmin</KEY>
            <VALUE>second_server@suse.de</VALUE>
          </listentry>
          <listentry>
            <KEY>_SECTION</KEY>
            <SECTIONNAME>Directory</SECTIONNAME>
            <SECTIONPARAM>/srv/www/htdocs</SECTIONPARAM>
            <VALUE config:type="list">
              <listentry>
                <KEY>AllowOverride</KEY>
                <VALUE>None</VALUE>
              </listentry>
              <listentry>
                <KEY>Require</KEY>
                <VALUE>all granted</VALUE>
              </listentry>
            </VALUE>
          </listentry>
        </VALUE>
      </hosts_entry>
    </hosts>
    <modules config:type="list">
      <module_entry>
        <change>enable</change>
        <name>socache_shmcb</name>
        <userdefined config:type="boolean">true</userdefined>
      </module_entry>
      <module_entry>
        <change>enable</change>
        <name>reqtimeout</name>
        <userdefined config:type="boolean">true</userdefined>
      </module_entry>
      <module_entry>
        <change>enable</change>
        <name>authn_core</name>
        <userdefined config:type="boolean">true</userdefined>
      </module_entry>
      <module_entry>
        <change>enable</change>
        <name>authz_core</name>
        <userdefined config:type="boolean">true</userdefined>
      </module_entry>
    </modules>
    <service config:type="boolean">true</service>
    <version>2.9</version>
  </http-server>
List Name, List Elements, Description #
- Listen
List of host
ListensettingsPORT
port address
ADDRESS
Network address. All addresses will be taken if this entry is empty.
- hosts
List of Hosts configuration
KEY
Host name;
<KEY>main</KEY>defines the main hosts, for example<KEY>192.168.43.2/secondserver.suse.de</KEY>VALUE
List of different values describing the host.
- modules
Module list. Only user-defined modules need to be described.
name
Module name
userdefined
For historical reasons, it is always set to
true.change
For historical reasons, it is always set to
enable.
Element, Description, Comment #
- version
Version of used Apache server
Only for information. Default 2.9
- service
Enable Apache service
Optional. Default: false
Note: Firewall
To run an Apache server correctly, make sure the firewall is configured appropriately.
4.23 Squid server #Edit source
Squid is a caching and forwarding Web proxy.
Example 4.54: Squid server configuration #
  <squid>
    <acls config:type="list">
      <listentry>
        <name>QUERY</name>
        <options config:type="list">
          <option>cgi-bin \?</option>
        </options>
        <type>urlpath_regex</type>
      </listentry>
      <listentry>
        <name>apache</name>
        <options config:type="list">
          <option>Server</option>
          <option>^Apache</option>
        </options>
        <type>rep_header</type>
      </listentry>
      <listentry>
        <name>all</name>
        <options config:type="list">
          <option>0.0.0.0/0.0.0.0</option>
        </options>
        <type>src</type>
      </listentry>
      <listentry>
        <name>manager</name>
        <options config:type="list">
          <option>cache_object</option>
        </options>
        <type>proto</type>
      </listentry>
      <listentry>
        <name>localhost</name>
        <options config:type="list">
          <option>127.0.0.1/255.255.255.255</option>
        </options>
        <type>src</type>
      </listentry>
      <listentry>
        <name>to_localhost</name>
        <options config:type="list">
          <option>127.0.0.0/8</option>
        </options>
        <type>dst</type>
      </listentry>
      <listentry>
        <name>SSL_ports</name>
        <options config:type="list">
          <option>443</option>
        </options>
        <type>port</type>
      </listentry>
      <listentry>
        <name>Safe_ports</name>
        <options config:type="list">
          <option>80</option>
        </options>
        <type>port</type>
      </listentry>
      <listentry>
        <name>Safe_ports</name>
        <options config:type="list">
          <option>21</option>
        </options>
        <type>port</type>
      </listentry>
      <listentry>
        <name>Safe_ports</name>
        <options config:type="list">
          <option>443</option>
        </options>
        <type>port</type>
      </listentry>
      <listentry>
        <name>Safe_ports</name>
        <options config:type="list">
          <option>70</option>
        </options>
        <type>port</type>
      </listentry>
      <listentry>
        <name>Safe_ports</name>
        <options config:type="list">
          <option>210</option>
        </options>
        <type>port</type>
      </listentry>
      <listentry>
        <name>Safe_ports</name>
        <options config:type="list">
          <option>1025-65535</option>
        </options>
        <type>port</type>
      </listentry>
      <listentry>
        <name>Safe_ports</name>
        <options config:type="list">
          <option>280</option>
        </options>
        <type>port</type>
      </listentry>
      <listentry>
        <name>Safe_ports</name>
        <options config:type="list">
          <option>488</option>
        </options>
        <type>port</type>
      </listentry>
      <listentry>
        <name>Safe_ports</name>
        <options config:type="list">
          <option>591</option>
        </options>
        <type>port</type>
      </listentry>
      <listentry>
        <name>Safe_ports</name>
        <options config:type="list">
          <option>777</option>
        </options>
        <type>port</type>
      </listentry>
      <listentry>
        <name>CONNECT</name>
        <options config:type="list">
          <option>CONNECT</option>
        </options>
        <type>method</type>
      </listentry>
    </acls>
    <http_accesses config:type="list">
      <listentry>
        <acl config:type="list">
          <listentry>manager</listentry>
          <listentry>localhost</listentry>
        </acl>
        <allow config:type="boolean">true</allow>
      </listentry>
      <listentry>
        <acl config:type="list">
          <listentry>manager</listentry>
        </acl>
        <allow config:type="boolean">false</allow>
      </listentry>
      <listentry>
        <acl config:type="list">
          <listentry>!Safe_ports</listentry>
        </acl>
        <allow config:type="boolean">false</allow>
      </listentry>
      <listentry>
        <acl config:type="list">
          <listentry>CONNECT</listentry>
          <listentry>!SSL_ports</listentry>
        </acl>
        <allow config:type="boolean">false</allow>
      </listentry>
      <listentry>
        <acl config:type="list">
          <listentry>localhost</listentry>
        </acl>
        <allow config:type="boolean">true</allow>
      </listentry>
      <listentry>
        <acl config:type="list">
          <listentry>all</listentry>
        </acl>
        <allow config:type="boolean">false</allow>
      </listentry>
    </http_accesses>
    <http_ports config:type="list">
      <listentry>
        <host/>
        <port>3128</port>
        <transparent config:type="boolean">false</transparent>
      </listentry>
    </http_ports>
    <refresh_patterns config:type="list">
      <listentry>
        <case_sensitive config:type="boolean">true</case_sensitive>
        <max>10080</max>
        <min>1440</min>
        <percent>20</percent>
        <regexp>^ftp:</regexp>
      </listentry>
      <listentry>
        <case_sensitive config:type="boolean">true</case_sensitive>
        <max>1440</max>
        <min>1440</min>
        <percent>0</percent>
        <regexp>^gopher:</regexp>
      </listentry>
      <listentry>
        <case_sensitive config:type="boolean">true</case_sensitive>
        <max>4320</max>
        <min>0</min>
        <percent>20</percent>
        <regexp>.</regexp>
      </listentry>
    </refresh_patterns>
    <service_enabled_on_startup config:type="boolean">true</service_enabled_on_startup>
    <settings>
      <access_log config:type="list">
        <listentry>/var/log/squid/access.log</listentry>
      </access_log>
      <cache_dir config:type="list">
        <listentry>ufs</listentry>
        <listentry>/var/cache/squid</listentry>
        <listentry>100</listentry>
        <listentry>16</listentry>
        <listentry>256</listentry>
      </cache_dir>
      <cache_log config:type="list">
        <listentry>/var/log/squid/cache.log</listentry>
      </cache_log>
      <cache_mem config:type="list">
        <listentry>8</listentry>
        <listentry>MB</listentry>
      </cache_mem>
      <cache_mgr config:type="list">
        <listentry>webmaster</listentry>
      </cache_mgr>
      <cache_replacement_policy config:type="list">
        <listentry>lru</listentry>
      </cache_replacement_policy>
      <cache_store_log config:type="list">
        <listentry>/var/log/squid/store.log</listentry>
      </cache_store_log>
      <cache_swap_high config:type="list">
        <listentry>95</listentry>
      </cache_swap_high>
      <cache_swap_low config:type="list">
        <listentry>90</listentry>
      </cache_swap_low>
      <client_lifetime config:type="list">
        <listentry>1</listentry>
        <listentry>days</listentry>
      </client_lifetime>
      <connect_timeout config:type="list">
        <listentry>2</listentry>
        <listentry>minutes</listentry>
      </connect_timeout>
      <emulate_httpd_log config:type="list">
        <listentry>off</listentry>
      </emulate_httpd_log>
      <error_directory config:type="list">
        <listentry/>
      </error_directory>
      <ftp_passive config:type="list">
        <listentry>on</listentry>
      </ftp_passive>
      <maximum_object_size config:type="list">
        <listentry>4096</listentry>
        <listentry>KB</listentry>
      </maximum_object_size>
      <memory_replacement_policy config:type="list">
        <listentry>lru</listentry>
      </memory_replacement_policy>
      <minimum_object_size config:type="list">
        <listentry>0</listentry>
        <listentry>KB</listentry>
      </minimum_object_size>
    </settings>
  </squid>
Attribute, Values, Description #
-
acls List of Access Control Settings (ACLs).
Each list entry contains the name, type, and additional options. Use the YaST Squid configuration module to get an overview of possible entries.
-
http_accesses In the Access Control table, access can be denied or allowed to ACL Groups.
If there are more ACL Groups in one definition, access will be allowed or denied to members who belong to all ACL Groups at the same time.
The Access Control table is checked in the order listed here. The first matching entry is used.
-
http_ports Define all ports where Squid will listen for clients' HTTP requests.
Hostcan contain a host name or IP address or remain empty.transparentdisables PMTU discovery when transparent.-
refresh_patterns Refresh patterns define how Squid treats the objects in the cache.
The refresh patterns are checked in the order listed here. The first matching entry is used.
Mindetermines how long (in minutes) an object should be considered fresh if no explicit expiry time is given.Maxis the upper limit of how long objects without an explicit expiry time will be considered fresh.Percentis the percentage of the object's age (time since last modification). An object without an explicit expiry time will be considered fresh.-
settings Map of all available general parameters with default values.
Use the YaST Squid configuration module to get an overview about possible entries.
-
service_enabled_on_startup Squid service start when booting.
Value: true/false
4.24 FTP server #Edit source
Configure your FTP Internet server settings.
Example 4.55: FTP server configuration: #
  <ftp-server>
    <AnonAuthen>2</AnonAuthen>
    <AnonCreatDirs>NO</AnonCreatDirs>
    <AnonMaxRate>0</AnonMaxRate>
    <AnonReadOnly>NO</AnonReadOnly>
    <AntiWarez>YES</AntiWarez>
    <Banner>Welcome message</Banner>
    <CertFile/>
    <ChrootEnable>NO</ChrootEnable>
    <EnableUpload>YES</EnableUpload>
    <FTPUser>ftp</FTPUser>
    <FtpDirAnon>/srv/ftp</FtpDirAnon>
    <FtpDirLocal/>
    <GuestUser/>
    <LocalMaxRate>0</LocalMaxRate>
    <MaxClientsNumber>10</MaxClientsNumber>
    <MaxClientsPerIP>3</MaxClientsPerIP>
    <MaxIdleTime>15</MaxIdleTime>
    <PasMaxPort>40500</PasMaxPort>
    <PasMinPort>40000</PasMinPort>
    <PassiveMode>YES</PassiveMode>
    <SSL>0</SSL>
    <SSLEnable>NO</SSLEnable>
    <SSLv2>NO</SSLv2>
    <SSLv3>NO</SSLv3>
    <StartDaemon>2</StartDaemon>
    <TLS>YES</TLS>
    <Umask/>
    <UmaskAnon/>
    <UmaskLocal/>
    <VerboseLogging>NO</VerboseLogging>
    <VirtualUser>NO</VirtualUser>
  </ftp-server>
Element, Description, Comment #
AnonAuthenEnable/disable anonymous and local users.
Authenticated Users Only: 1; Anonymous Only: 0; Both: 2
AnonCreatDirsAnonymous users can create directories.
Values: YES/NO
AnonReadOnlyAnonymous users can upload.
Values: YES/NO
AnonMaxRateThe maximum data transfer rate permitted for anonymous clients.
KB/s
AntiWarezDisallow downloading of files that were uploaded but not validated by a local admin.
Values: YES/NO
BannerSpecify the name of a file containing the text to display when someone connects to the server.
CertFileDSA certificate to use for SSL-encrypted connections
This option specifies the location of the DSA certificate to use for SSL-encrypted connections.
ChrootEnableWhen enabled, local users will by default be placed in a
chrootjail in their home directory after login.Warning: This option has security implications. Values: YES/NO
EnableUploadIf enabled, FTP users can upload.
To allow anonymous users to upload, enable
AnonReadOnly. Values: YES/NOFTPUserDefines the anonymous FTP user.
FtpDirAnonFTP directory for anonymous users.
Specify a directory which is used for anonymous FTP users.
FtpDirLocalFTP directory for authenticated users.
Specify a directory which is used for FTP authenticated users.
LocalMaxRateThe maximum data transfer rate permitted for local authenticated users.
KB/s
MaxClientsNumberThe maximum number of clients allowed to connect.
MaxClientsPerIPDefines the maximum number of clients for one IP.
This limits the number of clients allowed to connect from a single source Internet address.
MaxIdleTimeThe maximum time (timeout) a remote client may wait between FTP commands.
Minutes
PasMaxPortMaximum value for a port range for passive connection replies.
PassiveModeneeds to be set to YES.PasMinPortMinimum value for a port range for passive connection replies.
PassiveModeneeds to be set to YES.PassiveModeEnable Passive Mode
Value: YES/NO
SSLSecurity Settings
Disable TLS/SSL: 0; Accept TLS and SSL: 1; Refuse Connections Without TLS/SSL: 2
SSLEnableIf enabled, SSL connections are allowed.
Value: YES/NO
SSLv2If enabled, SSL version 2 connections are allowed.
Value: YES/NO
SSLv3If enabled, SSL version 3 connections are allowed.
Value: YES/NO
StartDaemonHow the FTP daemon will be started.
Manually: 0; when booting: 1; via systemd socket: 2
TLSIf enabled, TLS connections are allowed.
Value: YES/NO
UmaskFile creation mask, in the format (umask for files):(umask for directories).
For example
177:077if you feel paranoid.UmaskAnonThe value to which the umask for file creation is set for anonymous users.
To specify octal values, remember the "0" prefix, otherwise the value will be treated as a base-10 integer.
UmaskLocalUmask for authenticated users.
To specify octal values, remember the "0" prefix, otherwise the value will be treated as a base-10 integer.
VerboseLoggingWhen enabled, all FTP requests and responses are logged.
Value: YES/NO
VirtualUserBy using virtual users, FTP accounts can be administrated without affecting system accounts.
Value: YES/NO
Note: Firewall
Proper Firewall setting will be required for the FTP server to run correctly.
4.25 TFTP server #Edit source
Configure your TFTP Internet server settings.
Use this to enable a server for TFTP (trivial file transfer protocol). The
server will be started using the systemd socket.
Note that TFTP and FTP are not the same.
Example 4.56: TFTP server configuration: #
  <tftp-server>
    <start_tftpd config:type="boolean">true</start_tftpd>
    <tftp_directory>/tftpboot</tftp_directory>
</tftp-server>- start_tftpd
Enabling TFTP server service. Value:
true/false.- tftp_directory
Boot Image Directory: Specify the directory where served files are located.
The usual value is
/tftpboot. The directory will be created if it does not exist. The server uses this as its root directory (using the-soption).
4.26 Firstboot workflow #Edit source
The YaST firstboot utility (YaST Initial System Configuration), which runs after the installation is completed, lets you configure the freshly installed system. On the first boot after the installation, users are guided through a series of steps that allow for easier configuration of a system. YaST firstboot does not run by default and needs to be configured to run.
Example 4.57: Enabling firstboot workflow #
      <firstboot>
        <firstboot_enabled config:type="boolean">true</firstboot_enabled>
      </firstboot>
4.27 Security settings #Edit source
Using the features of this module, you can change the local security settings on the target system. The local security settings include the boot configuration, login settings, password settings, user addition settings, and file permissions.
Configuring the security settings automatically is similar to the
Custom Settings in the security module available in the
running system. This allows you create a customized configuration.
Example 4.58: Security configuration #
See the reference for the meaning and the possible values of the settings in the following example.
<security>
  <console_shutdown>ignore</console_shutdown>
  <displaymanager_remote_access>no</displaymanager_remote_access>
  <fail_delay>3</fail_delay>
  <faillog_enab>yes</faillog_enab>
  <gid_max>60000</gid_max>
  <gid_min>101</gid_min>
  <gdm_shutdown>root</gdm_shutdown>
  <lastlog_enab>yes</lastlog_enab>
  <encryption>md5</encryption>
  <obscure_checks_enab>no</obscure_checks_enab>
  <pass_max_days>99999</pass_max_days>
  <pass_max_len>8</pass_max_len>
  <pass_min_days>1</pass_min_days>
  <pass_min_len>6</pass_min_len>
  <pass_warn_age>14</pass_warn_age>
  <passwd_use_cracklib>yes</passwd_use_cracklib>
  <permission_security>secure</permission_security>
  <run_updatedb_as>nobody</run_updatedb_as>
  <uid_max>60000</uid_max>
  <uid_min>500</uid_min>
  <selinux_mode>permissive</selinux_mode>
</security>
4.27.1 Password settings options #Edit source
Change various password settings. These settings are mainly stored in the
/etc/login.defs file.
Use this resource to activate one of the encryption methods currently
supported. If not set, DES is configured.
DES, the Linux default method, works in all network
environments, but it restricts you to passwords no longer than eight
characters. MD5 allows longer passwords, thus provides
more security, but some network protocols do not support this, and you may
have problems with NIS. Blowfish is also supported.
Additionally, you can set up the system to check for password plausibility and length etc.
4.27.2 Boot settings #Edit source
Use the security resource, to change various boot settings.
- How to interpret Ctrl–Alt–Del?
When someone at the console has pressed the Ctrl–Alt–Del key combination, the system usually reboots. Sometimes it is desirable to ignore this event, for example, when the system serves as both workstation and server.
- Shutdown behavior of GDM
Configure a list of users allowed to shut down the machine from GDM.
4.27.3 Login settings #Edit source
Change various login settings. These settings are mainly stored in the
/etc/login.defs file.
4.27.4 New user settings (useradd settings) #Edit source
Set the minimum and maximum possible user and group IDs.
4.27.5 SELinux settings #Edit source
Configuring SELinux mode. Possible values are
permissive,enforcing and disabled.
4.28 Linux audit framework (LAF) #Edit source
This module allows the configuration of the audit daemon and to add rules for the audit subsystem.
Example 4.59: LAF configuration #
  <audit-laf>
    <auditd>
      <flush>INCREMENTAL</flush>
      <freq>20</freq>
      <log_file>/var/log/audit/audit.log</log_file>
      <log_format>RAW</log_format>
      <max_log_file>5</max_log_file>
      <max_log_file_action>ROTATE</max_log_file_action>
      <name_format>NONE</name_format>
      <num_logs>4</num_logs>
    </auditd>
    <rules/>
  </audit-laf>
Attribute, Values, Description #
auditd/flushDescribes how to write the data to disk.
If set to
INCREMENTALthe Frequency parameter tells how many records to write before issuing an explicit flush to disk.NONEmeans: no special effort is made to flush data,DATA: keep data portion synchronized,SYNC: keep data and metadata fully synchronized.auditd/freqThis parameter tells how many records to write before issuing an explicit flush to disk.
The parameter
flushneeds to be set toINCREMENTAL.auditd/log_fileThe full path name to the log file.
auditd/log_fomatHow much information needs to be logged.
Set
RAWto log all data (store in a format exactly as the kernel sends it) orNOLOGto discard all audit information instead of writing it to disk (does not affect data sent to the dispatcher).auditd/max_log_fileHow much information needs to be logged.
Unit: Megabytes
auditd/num_logsNumber of log files.
max_log_file_actionneeds to be set toROTATEauditd/max_log_file_actionWhat happens if the log capacity has been reached.
If the action is set to
ROTATEthe Number of Log Files specifies the number of files to keep. Set toSYSLOG, the audit daemon will write a warning to the system log. WithSUSPENDthe daemon stops writing records to disk.IGNOREmeans do nothing,KEEP_LOGSis similar toROTATE, but log files are not overwritten.auditd/name_formatComputer Name Format describes how to write the computer name to the log file.
If
USERis set, the user-defined name is used.NONEmeans no computer name is inserted.HOSTNAMEuses the name returned by the 'gethostname' syscall.FQDuses the fully qualified domain name.rulesRules for auditctl
You can edit the rules manually, which we only recommend for advanced users. For more information about all options, see
man auditctl.
4.29 Users and groups #Edit source
4.29.1 Users #Edit source
A list of users can be defined in the <users>
section. To be able to log in, make sure that either the root users
are set up or rootpassword is specified as a
linuxrc option.
Example 4.60: Minimal user configuration #
<users config:type="list">
  <user>
    <username>root</username>
    <user_password>password</user_password>
    <encrypted config:type="boolean">false</encrypted>
  </user>
    <user>
    <username>tux</username>
    <user_password>password</user_password>
    <encrypted config:type="boolean">false</encrypted>
  </user>
</users>
The following example shows a more complex scenario. System-wide default
settings from /etc/default/useradd, such as the shell
or the parent directory for the home directory, are applied.
Example 4.61: Complex user configuration #
<users config:type="list">
  <user>
    <username>root</username>
    <user_password>password</user_password>
    <uid>1001</uid>
    <gid>100</gid>
    <encrypted config:type="boolean">false</encrypted>
    <fullname>Root User</fullname>
    <authorized_keys config:type="list">
      <listentry>command="/opt/login.sh" ssh-rsa AAAAB3NzaC1yc2EAAAADAQABAAABAQDKLt1vnW2vTJpBp3VK91rFsBvpY97NljsVLdgUrlPbZ/L51FerQQ+djQ/ivDASQjO+567nMGqfYGFA/De1EGMMEoeShza67qjNi14L1HBGgVojaNajMR/NI2d1kDyvsgRy7D7FT5UGGUNT0dlcSD3b85zwgHeYLidgcGIoKeRi7HpVDOOTyhwUv4sq3ubrPCWARgPeOLdVFa9clC8PTZdxSeKp4jpNjIHEyREPin2Un1luCIPWrOYyym7aRJEPopCEqBA9HvfwpbuwBI5F0uIWZgSQLfpwW86599fBo/PvMDa96DpxH1VlzJlAIHQsMkMHbsCazPNC0++Kp5ZVERiH root@example.net</listentry>
    </authorized_keys>
  </user>
  <user>
    <username>tux</username>
    <user_password>password</user_password>
    <uid>1002</uid>
    <gid>100</gid>
    <encrypted config:type="boolean">false</encrypted>
    <fullname>Plain User</fullname>
    <home>/Users/plain</home>
    <password_settings>
      <max>120</max>
      <inact>5</inact>
    </password_settings>
  </user>
</users>
Note: authorized_keys file will be overwritten
If the profile defines a set of SSH authorized keys for a user in the
authorized_keys section, an existing
$HOME/.ssh/authorized_keys file will be overwritten.
If not existing, the file will be created with the content specified. Avoid
overwriting an existing authorized_keys file by not
specifying the respective section in the AutoYaST control file.
Note: Combine rootpassword and root user options
It is possible to specify rootpassword in
linuxrc and have a user section for the root user.
If this section is missing the password, then the password from
linuxrc will be used. Passwords in profiles take
precedence over linuxrc passwords.
Note: Specifying a user ID (uid)
Each user on a Linux system has a numeric user ID. You can either specify
such a user ID within the AutoYaST control file manually by using
uid, or let the system automatically choose a
user ID by not using uid.
User IDs should be unique throughout the system. If not, some applications
such as the login manager
gdm may no longer work as
expected.
When adding users with the AutoYaST control file, it is strongly recommended not to mix user-defined IDs and automatically provided IDs. When doing so, unique IDs cannot be guaranteed. Either specify IDs for all users added with the AutoYaST control file or let the system choose the ID for all users.
Attribute, Values, Description #
usernameText
<username>lukesw</username>
Required. It should be a valid user name. Check
man 8
      useradd
if you are not sure.fullnameText
<fullname>Tux Torvalds</fullname>
Optional. User's full name.
forenameText
<forname>Tux</forename>
Optional. User's forename.
surnameText
<surname>Skywalker</surname>
Optional. User's surname.
uidNumber
<uid>1001</uid>
Optional. User ID. It should be a unique and must be a non-negative number. If not specified, AutoYaST will automatically choose a user ID. Also refer to Note: Specifying a user ID (
uid) for additional information.gidNumber
<gid>100</gid>
Optional. Initial group ID. It must be a unique and non-negative number. Moreover it must refer to an existing group.
homePath
<home>/home/luke</home>
Optional. Absolute path to the user's home directory. By default,
/home/usernamewill be used (for example,alice's home directory will be/home/alice).home_btrfs_subvolumeBoolean
<home_btrfs_subvolume config:type="boolean">true</home_btrfs_subvolume>
Optional. Generates the home directory in a Btrfs subvolume. Disabled by default.
shellPath
<shell>/usr/bin/zsh</shell>
Optional.
/bin/bashis the default value. If you choose another one, make sure that it is installed (adding the corresponding package to thesoftwaresection).user_passwordText
<user_password>some-password</user_password>
Optional. If you enter an exclamation mark (
!), a random password will be generated. A user's password can be written in plain text (not recommended) or in encrypted form. To create an encrypted password, usemkpasswd. Enter the password as written in/etc/shadow(second column). To enable or disable the use of encrypted passwords in the profile, see theencryptedparameter.encryptedBoolean
<encrypted config:type="boolean">true</encrypted>
Optional. Considered
falseif not present. Indicates if the user's password in the profile is encrypted or not. AutoYaST supports standard encryption algorithms (seeman 3 crypt).password_settingsPassword settings
<password_settings>
  <expire/>
  <max>60</max>
  <warn>7</warn>
</password_settings>
Optional. Some password settings can be customized:
expire(account expiration date in formatYYYY-MM-DD),flag(/etc/shadowflag),inact(number of days after password expiration that account is disabled),max(maximum number of days a password is valid),min(grace period in days until which a user can change password after it has expired) andwarn(number of days before expiration when the password change reminder starts).authorized_keysList of authorized keys
<authorized_keys config:type="list">
  <listentry>ssh-rsa ...</listentry>
</authorized_keys>
A list of authorized keys to be written to
$HOME/.ssh/authorized_keys. See example below.
4.29.2 User defaults #Edit source
The profile can specify a set of default values for new users like password
expiration, initial group, home directory prefix, etc. Besides using them as
default values for the users that are defined in the profile, AutoYaST will
write those settings to /etc/default/useradd or any
other appropriate file to be read for useradd.
Attribute, Values, Description #
groupText
<group>100</group>
Optional. Default initial login group.
homePath
<home>/home</home>
Optional. User's home directory prefix.
expireDate
<expire>2017-12-31</expire>
Optional. Default password expiration date in
YYYY-MM-DDformat.inactiveNumber
<inactive>3</inactive>
Optional. Number of days after which an expired account is disabled.
shellPath
<shell>/usr/bin/fish</shell>
Default login shell.
/bin/bashis the default value. If you choose another one, make sure that it is installed (adding the corresponding package to thesoftwaresection).umaskFile creation mode mask
<umask>022</umask>
Set the file creation mode mask for the home directory. By default
useraddwill use022. Checkman 8 useraddandman 1 umaskfor further information.
4.29.3 Groups #Edit source
A list of groups can be defined in <groups> as
shown in the example.
Example 4.62: Group configuration #
<groups config:type="list">
  <group>
    <gid>100</gid>
    <groupname>users</groupname>
    <userlist>bob,alice</userlist>
  </group>
</groups>
Attribute, Values, Description #
groupnameText
<groupname>users</groupname>
Required. It should be a valid group name. Check
man 8
      groupadd
if you are not sure.gidNumber
<gid>100</gid>
Optional. Group ID. It must be a unique and non-negative number.
group_passwordText
<group_password>password</group_password>
Optional. The group's password can be written in plain text (not recommended) or in encrypted form. Check the
encryptedto select the desired behavior.encryptedBoolean
<encrypted config:type="boolean">true</encrypted>
Optional. Indicates if the group's password in the profile is encrypted or not.
userlistUsers list
<userlist>bob,alice</userlist>
Optional. A list of users who belong to the group. User names must be separated by commas.
4.29.4 Login settings #Edit source
Two special login settings can be enabled through an AutoYaST profile: autologin and password-less login. Both of them are disabled by default.
Example 4.63: Enabling autologin and password-less login #
<login_settings>
  <autologin_user>vagrant</autologin_user>
  <password_less_login config:type="boolean">true</password_less_login>
</login_settings>
Attribute, Values, Description #
password_less_loginBoolean
<password_less_login config:type="boolean">true</password_less_login>
Optional. Enables password-less login. It only affects graphical login.
autologin_userText
<autologin_user>alice</autologin_user>
Optional. Enables autologin for the given user.
4.30 Custom user scripts #Edit source
By adding scripts to the auto-installation process you can customize the installation according to your needs and take control in different stages of the installation.
In the auto-installation process, five types of scripts can be executed at different points in time during the installation:
All scripts need to be in the <scripts> section.
pre-scripts(very early, before anything else really happens)postpartitioning-scripts(after partitioning and mounting to/mntbut before RPM installation)chroot-scripts(after the package installation, before the first boot)post-scripts(during the first boot of the installed system, no services running)init-scripts(during the first boot of the installed system, all services up and running)
4.30.1 Pre-install scripts #Edit source
Executed before YaST does any real change to the system (before partitioning and package installation but after the hardware detection).
You can use a pre-script to modify your control file and let AutoYaST reread it.
Find your control file in /tmp/profile/autoinst.xml.
Adjust the file and store the modified version in
/tmp/profile/modified.xml. AutoYaST will read the modified
file after the pre-script finishes.
It is also possible to modify the storage devices in your pre-scripts. For example, you can create new partitions or change the configuration of certain technologies like multipath. AutoYaST always inspects the storage devices again after executing all the pre-install scripts.
Note: Pre-install scripts with confirmation
Pre-scripts are executed at an early stage of the installation. This means
if you have requested to confirm the installation, the pre-scripts will be
executed before the confirmation screen shows up
(profile/install/general/mode/confirm).
Note: Pre-install and Zypper
To call Zypper in the pre-install script you will need to set the environment variable ZYPP_LOCKFILE_ROOT="/var/run/autoyast" to prevent conflicts with the running YaST process.
Pre-Install Script elements must be placed as follows:
<scripts>
  <pre-scripts config:type="list">
    <script>
      ...
    </script>
  </pre-scripts>
</scripts>
4.30.2 Post-partitioning scripts #Edit source
Executed after YaST has done the partitioning and written
/etc/fstab. The empty system is already mounted to
/mnt.
Post-partitioning script elements must be placed as follows:
<scripts>
  <postpartitioning-scripts config:type="list">
    <script>
      ...
    </script>
  </postpartitioning-scripts>
</scripts>
4.30.3 Chroot environment scripts #Edit source
Chroot scripts are executed before the machine reboots for the first time.
You can execute chroot scripts before the installation chroots into the
installed system and configures the boot loader or you can execute a script
after the chroot into the installed system has happened (look at the
chrooted parameter for that).
Chroot Environment script elements must be placed as follows:
<scripts>
  <chroot-scripts config:type="list">
    <script>
      ...
    </script>
  </chroot-scripts>
</scripts>
4.30.4 Post-install scripts #Edit source
These scripts are executed after AutoYaST has completed the system configuration and after it has booted the system for the first time.
Post-install script elements must be placed as follows:
<scripts>
    <post-scripts config:type="list">
      <script>
        ...
      </script>
    </post-scripts>
  </scripts>
4.30.5 Init scripts #Edit source
These scripts are executed when YaST has finished, during the initial boot
process after the network has been initialized. These final scripts are
executed using
/usr/lib/YaST2/bin/autoyast-initscripts.sh and are
executed only once. Init scripts are configured using the tag
init-scripts.
Init script elements must be placed as follows:
<scripts>
    <init-scripts config:type="list">
      <script>
        ...
      </script>
    </init-scripts>
</scripts>
Init scripts are different from the other script types because they are not executed by YaST, but after YaST has finished. For this reason, their XML representation is different from other script types.
Init script XML representation #
locationDefine a location from where the script gets fetched. Locations can be the same as for the profile (HTTP, FTP, NFS, etc.).
<location>http://10.10.0.1/myInitScript.sh</location>
Either <location> or <source> must be defined.
sourceThe script itself (source code), encapsulated in a CDATA tag. If you do not want to put the whole shell script into the XML profile, use the location parameter.
<source>
<![CDATA[echo "Testing the init script" >/tmp/init_out.txt]]></source>
Either <location> or <source> must be defined.
filenameThe file name of the script. It will be stored in a temporary directory under
/tmp<filename>mynitScript5.sh</filename>
Optional in case you only have a single init script. The default name (
init-scripts) is used in this case. If having specified more than one init script, you must set a unique name for each script.rerunNormally, a script is only run once, even if you use
ayast_setupto run an XML file multiple times. Change this default behavior by setting this boolean totrue.<rerun config:type="boolean">true</rerun>
Optional. Default is
false(scripts only run once).
When added to the control file manually, scripts need to be included in a CDATA element to avoid confusion with the file syntax and other tags defined in the control file.
4.30.6 Script XML representation #Edit source
Most of the XML elements described below can be used for all the script types described above, except for init scripts, whose definitions can contain only a subset of these elements. See Section 4.30.5, “Init scripts” for further information about them.
Important: Deprecated elements
debug is a deprecated element and can be removed in
future releases. To adapt, use an interpreter-specific debugging parameter
in interpreter. For example, instead of
<interpreter>shell</interpreter> use <interpreter>/bin/sh
-x</interpreter> for the same result as having enabled the
debug flag.
Script XML representation #
locationDefine a location from where the script gets fetched. Locations can be the same as for the control file (HTTP, FTP, NFS, etc.). Additionally a relative URL can be used that defines a path relative to the directory with the control file, using the syntax
relurl://script.sh.<location>http://10.10.0.1/myPreScript.sh</location>
Either
locationorsourcemust be defined.sourceThe script itself (source code), encapsulated in a CDATA tag. If you do not want to put the whole shell script into the XML control file, refer to the location parameter.
<source>
<![CDATA[
echo "Testing the pre script" > /tmp/pre-script_out.txt
]]>
</source>
Either
locationorsourcemust be defined.interpreterSpecify the interpreter that must be used for the script. Any interpreter available in the given environment can be specified. It is possible to provide a full path to the interpreter, including parameters. There are also deprecated keywords interpreter "shell", "perl" and "python" that are supported by the
debugflag.<interpreter>/bin/bash -x</interpreter>
Optional; default is
shell.file nameThe file name of the script. It will be stored in a temporary directory under
/tmp.<filename>myPreScript5.sh</filename>
Optional; default is the type of the script (pre-scripts in this case). If you have more than one script, you should define different names for each script. If
filenameis not defined andlocationis defined, the file name from the location path will be used.feedbackIf this boolean is
true, output and error messages of the script (STDOUT and STDERR) will be shown in a pop-up. The user needs to confirm them via the OK button.<feedback config:type="boolean">true</feedback>
Optional; default is
false.feedback_typeThis can be
message,warningorerror. Set the timeout for these pop-ups in the <report> section.<feedback_type>warning</feedback_type>
Optional; if missing, an always-blocking pop-up is used.
debugIf this is
true, every single line of a shell script is logged. Perl scripts are run with warnings turned on. This only works for the deprecated keywordinterpreter. For other languages, give the path to the interpreter as a parameter in theinterpretervalue, for example "<interpreter>ruby -w</interpreter>".<debug config:type="boolean">true</debug>
Optional; default is
true.notificationThis text will be shown in a pop-up for the time the script is running in the background.
<notification>Please wait while script is running...</notification>
Optional; if not configured, no notification pop-up will be shown.
param-listIt is possible to specify parameters given to the script being called. You may have more than one
paramentry. They are concatenated by a single space character on the script command line. If any shell quoting should be necessary (for example to protect embedded spaces) you need to include this.<param-list config:type="list"> <param>par1</param> <param>par2 par3</param> <param>"par4.1 par4.2"</param> </param-list>
Optional; if not configured, no parameters get passed to script.
rerunA script is only run once. Even if you use
ayast_setup to run an XML file multiple times, the script is only run once. Change this default behavior by setting this boolean totrue.<rerun config:type="boolean">true</rerun>
Optional; default is
false, meaning that scripts only run once.chrootedDuring installation, the new system is mounted at
/mnt. If this parameter is set tofalse, AutoYaST does not runchrootand does not install the boot loader at this stage. If the parameter is set totrue, AutoYaST performs achrootinto/mntand installs the boot loader. The result is that to change anything in the newly-installed system, you no longer need to use the/mntprefix.<chrooted config:type="boolean">true</chrooted>
Optional; default is
false. This option is only available for chroot environment scripts.
4.30.7 Script example #Edit source
Example 4.64: Script configuration #
<?xml version="1.0"?>
<!DOCTYPE profile>
<profile xmlns="http://www.suse.com/1.0/yast2ns" xmlns:config="http://www.suse.com/1.0/configns">
<scripts>
  <chroot-scripts config:type="list">
    <script>
      <chrooted config:type="boolean">true</chrooted>
      <filename>chroot-post.sh</filename>
      <interpreter>shell</interpreter>
      <source><![CDATA[
echo "Testing chroot (chrooted) scripts"
ls
]]>
      </source>
    </script>
    <script>
      <filename>chroot-pre.sh</filename>
        <interpreter>/bin/bash -x</interpreter>
        <source><![CDATA[
echo "Testing chroot scripts"
df
cd /mnt
ls
]]>
        </source>
      </script>
    </chroot-scripts>
    <post-scripts config:type="list">
      <script>
        <filename>post.sh</filename>
        <interpreter>shell</interpreter>
        <source><![CDATA[
echo "Running Post-install script"
systemctl start portmap
mount -a 192.168.1.1:/local /mnt
cp /mnt/test.sh /tmp
umount /mnt
]]>
        </source>
      </script>
      <script>
        <filename>post.pl</filename>
        <interpreter>perl</interpreter>
        <source><![CDATA[
print "Running Post-install script";
]]>
        </source>
      </script>
    </post-scripts>
    <pre-scripts config:type="list">
      <script>
        <interpreter>shell</interpreter>
        <location>http://192.168.1.1/profiles/scripts/prescripts.sh</location>
      </script>
      <script>
        <filename>pre.sh</filename>
        <interpreter>shell</interpreter>
        <source><![CDATA[
echo "Running pre-install script"
]]>
        </source>
      </script>
    </pre-scripts>
    <postpartitioning-scripts config:type="list">
      <script>
        <filename>postpart.sh</filename>
        <interpreter>shell</interpreter>
        <debug config:type="boolean">false</debug>
        <feedback config:type="boolean">true</feedback>
        <source><![CDATA[
touch /mnt/testfile
echo Hi
]]>
        </source>
      </script>
    </postpartitioning-scripts>
  </scripts>
</profile>
After installation is finished, the scripts and the output logs can be found
in the directory /var/adm/autoinstall. The scripts are
located in the subdirectory scripts and the output logs
in the log directory.
The log consists of the output produced when executing the scripts, containing a combination of both the standard output and the standard error output.
If the script ends with a non-zero exit code, then a warning will be shown
with the content of the logs, unless the feedback option
was provided.
4.31 System variables (sysconfig) #Edit source
Using the sysconfig resource, it is possible to define configuration
variables in the sysconfig repository
(/etc/sysconfig) directly. Sysconfig variables,
offer the possibility to fine-tune many system components and
environment variables exactly to your needs.
The following example shows how a variable can be set using the sysconfig resource.
Example 4.65: Sysconfig configuration #
<sysconfig config:type="list" >
  <sysconfig_entry>
    <sysconfig_key>XNTPD_INITIAL_NTPDATE</sysconfig_key>
    <sysconfig_path>/etc/sysconfig/xntp</sysconfig_path>
    <sysconfig_value>ntp.host.com</sysconfig_value>
  </sysconfig_entry>
  <sysconfig_entry>
    <sysconfig_key>HTTP_PROXY</sysconfig_key>
    <sysconfig_path>/etc/sysconfig/proxy</sysconfig_path>
    <sysconfig_value>proxy.host.com:3128</sysconfig_value>
  </sysconfig_entry>
  <sysconfig_entry>
    <sysconfig_key>FTP_PROXY</sysconfig_key>
    <sysconfig_path>/etc/sysconfig/proxy</sysconfig_path>
    <sysconfig_value>proxy.host.com:3128</sysconfig_value>
  </sysconfig_entry>
</sysconfig>
Both relative and absolute paths can be provided. If no absolute path
is given, it is treated as a sysconfig file under the
/etc/sysconfig directory.
4.32 Adding complete configurations #Edit source
For many applications and services you may have a configuration file which
should be copied to the appropriate location on the installed system. For
example, if you are installing a Web server, you may have a server
configuration file (httpd.conf).
Using this resource, you can embed the file into the control file by specifying the final path on the installed system. YaST will copy this file to the specified location.
This feature requires the autoyast2 package to be installed. If the package is missing, AutoYaST will automatically install the package if it is missing.
You can specify the file_location where the file should be
retrieved from. This can also be a location on the network such as an HTTP
server:
<file_location>http://my.server.site/issue</file_location>.
It is also possible to specify a local file using the
relurl:// prefix, for example:
<file_location>relurl://path/to/file.conf</file_location>.
You can create directories by specifying a file_path that
ends with a slash.
Example 4.66: Dumping files into the installed system #
<files config:type="list">
  <file>
    <file_path>/etc/apache2/httpd.conf</file_path>
    <file_contents>

<![CDATA[
some content
]]>

    </file_contents>
  </file>
  <file>
    <file_path>/mydir/a/b/c/</file_path> <!-- create directory -->
  </file>
</files>
A more advanced example is shown below. This configuration will create a file
using the content supplied in file_contents and change the
permissions and ownership of the file. After the file has been copied to the
system, a script is executed. This can be used to modify the file and prepare
it for the client's environment.
Example 4.67: Dumping files into the installed system #
<files config:type="list">
  <file>
    <file_path>/etc/someconf.conf</file_path>
    <file_contents>

<![CDATA[
some content
]]>

    </file_contents>
    <file_owner>tux.users</file_owner>
    <file_permissions>444</file_permissions>
    <file_script>
      <interpreter>shell</interpreter>
      <source>

<![CDATA[
#!/bin/sh

echo "Testing file scripts" >> /etc/someconf.conf
df
cd /mnt
ls
]]>

      </source>
    </file_script>
  </file>
</files>
4.33 Ask the user for values during installation #Edit source
You have the option to let the user decide the values of specific parts of
the control file during the installation. If you use this feature, a pop-up
will ask the user to enter a specific part of the control file during
installation. If you want a full auto installation, but the user should set
the password of the local account, you can do this via the
ask directive in the control file.
The elements listed below must be placed within the following XML structure:
<general>
  <ask-list config:type="list">
    <ask>
      ...
    </ask>
  </ask-list>
</general>
Ask the user for values: XML representation #
questionThe question you want to ask the user.
<question>Enter the LDAP server</question>
The default value is the path to the element (the path often looks strange, so we recommend entering a question).
defaultSet a preselection for the user. A text entry will be filled out with this value. A check box will be true or false and a selection will have the given value preselected.
<default>dc=suse,dc=de</default>
Optional.
helpAn optional help text that is shown on the left side of the question.
<help>Enter the LDAP server address.</help>
Optional.
titleAn optional title that is shown above the questions.
<title>LDAP server</title>
Optional.
typeThe type of the element you want to change. Possible values are
symbol,boolean,stringandinteger. The file system in the partition section is a symbol, while theencryptedelement in the user configuration is a boolean. You can see the type of that element if you look in your control file at theconfig:type="...."attribute. You can also usestatic_textas type. Astatic_textis a text that does not require any user input and can show information not included in the help text.<type>symbol</type>
Optional. The default is
string. If type issymbol, you must provide the selection element too (see below).passwordIf this boolean is set to
true, a password dialog pops up instead of a simple text entry. Setting this totrueonly makes sense iftypeis string.<password config:type="boolean">true</password>
Optional. The default is
false.pathlistA list of
pathelements. A path is a comma separated list of elements that describes the path to the element you want to change. For example, the LDAP server element can be found in the control file in the<ldap><ldap_server>section. So to change that value, you need to set the path toldap,ldap_server.<pathlist config:type="list"> <path>networking,dns,hostname</path> <path>...</path> </pathlist>
To change the password of the first user in the control file, you need to set the path to
users,0,user_password. The0indicates the first user in the <users config:type="list"> list of users in the control file.1would be the second one, and so on.<users config:type="list"> <user> <username>root</username> <user_password>password to change</user_password> <encrypted config:type="boolean">false</encrypted> </user> <user> <username>tux</username> <user_password>password to change</user_password> <encrypted config:type="boolean">false</encrypted> </user> </users>This information is optional but you should at least provide
pathorfile.fileYou can store the answer to a question in a file, to use it in one of your scripts later. If you ask during
stage=initialand you want to use the answer in stage 2, then you need to copy the answer-file in a chroot script that is running aschrooted=false. Use the command:cp /tmp/my_answer /mnt/tmp/. The reason is that/tmpin stage 1 is in the RAM disk and will be lost after the reboot, but the installed system is already mounted at/mnt/.<file>/tmp/answer_hostname</file>
This information is optional, but you should at least provide
pathorfile.stageStage configures the installation stage in which the question pops up. You can set this value to
contorinitial.initialmeans the pop-up comes up very early in the installation, shortly after the pre-script has run.contmeans, that the dialog with the question comes after the first reboot when the system boots for the very first time. Questions you answer during theinitialstage will write their answer into the control file on the hard disk. You should know that if you enter clear text passwords duringinitial. Of course it does not make sense to ask for the file system to use during thecontphase. The hard disk is already partitioned at that stage and the question will have no effect.<stage>cont</stage>
Optional. The default is
initial.selectionThe selection element contains a list of
entryelements. Each entry represents a possible option for the user to choose. The user cannot enter a value in a text box, but they can choose from a list of values.<selection config:type="list"> <entry> <value> btrfs </value> <label> Btrfs File System </label> </entry> <entry> <value> ext3 </value> <label> Extended3 File System </label> </entry> </selection>Optional for
type=string, not possible fortype=booleanand mandatory fortype=symbol.dialogYou can ask more than one question per dialog. To do so, specify the dialog-id with an integer. All questions with the same dialog-id belong to the same dialog. The dialogs are sorted by the id too.
<dialog config:type="integer">3</dialog>
Optional.
elementYou can have more than one question per dialog. To make that possible you need to specify the
element-idwith an integer. The questions in a dialog are sorted by ID.<element config:type="integer">1</element>
Optional (see dialog).
widthYou can increase the default width of the dialog. If there are multiple width specifications per dialog, the largest one is used. The number is roughly equivalent to the number of characters.
<width config:type="integer">50</width>
Optional.
heightYou can increase the default height of the dialog. If there are multiple height specifications per dialog, the largest one is used. The number is roughly equivalent to the number of lines.
<height config:type="integer">15</height>
Optional.
frametitleYou can have more than one question per dialog. Each question on a dialog has a frame that can have a frame title, a small caption for each question. You can put multiple elements into one frame. They need to have the same frame title.
<frametitle>User data</frametitle>
Optional; default is no frame title.
scriptYou can run scripts after a question has been answered. See the table below for detailed instructions about scripts.
<script>...</script>
Optional; default is no script.
ok_labelYou can change the label on the button. The last element that specifies the label for a dialog wins.
<ok_label>Finish</ok_label>
Optional.
back_labelYou can change the label on the button. The last element that specifies the label for a dialog wins.
<back_label>change values</back_label>
Optional.
timeoutYou can specify an integer here that is used as timeout in seconds. If the user does not answer the question before the timeout, the default value is taken as answer. When the user touches or changes any widget in the dialog, the timeout is turned off and the dialog needs to be confirmed via .
<timeout config:type="integer">30</timeout>
Optional; a missing value is interpreted as
0, which means that there is no timeout.default_value_scriptYou can run scripts to set the default value for a question (see Section 4.33.1, “Default value scripts” for detailed instructions about default value scripts). This feature is useful if you can
calculatea default value, especially in combination with thetimeoutoption.<default_value_script>...</default_value_script>
Optional; default is no script.
4.33.1 Default value scripts #Edit source
You can run scripts to set the default value for a question. This feature is
useful if you can calculate a default value, especially
in combination with the timeout option.
The scripts are defined by placing the elements described in Section 4.30.6, “Script XML representation” within the following XML structure:
<general>
  <ask-list config:type="list">
    <ask>
      <default_value_script>
        ...
      </default_value_script>
    </ask>
  </ask-list>
</general>
Whatever you echo to STDOUT will be used as default value
for the ask-dialog. If your script has an exit code other than 0, the normal
default element is used. Take care you use echo
-n to suppress the \n and that you echo
reasonable values and not “okay” for a boolean (use
“true” instead).
4.33.2 Scripts #Edit source
You can run scripts after a question has been answered.
The elements listed below must be placed within the following XML structure:
<general>
<ask-list config:type="list">
<ask>
<script>
...
</script>
</ask>
</ask-list>
</general>
In addition to the elements listed in Section 4.30.6, “Script XML representation”,
scripts in <ask> elements support these options:
Scripts: XML representation #
filenameThe file name of the script.
<filename>my_ask_script.sh</filename>
The default is ask_script.sh
environmentA boolean that passes the value of the answer to the question as an environment variable to the script. The variable is named
VAL.<environment config:type="boolean">true</environment>
Optional. Default is
false.feedbackA boolean that turns on feedback for the script execution. STDOUT will be displayed in a pop-up window that must be confirmed after the script execution.
<feedback config:type="boolean">true</feedback>
Optional, default is
false.rerun_on_errorKeep the dialog open until the script has an exit code of 0 (zero). You can use this feature to validate the user's input. The script should print some meaningful error message and return a code different from zero. Bear in mind that you should also set the
feedbackoption totrueso the user can read the error message from the script. Optional, default isfalse.
Your script can create a file /tmp/next_dialog
containing the ID of the following dialog to display. A value of -1
terminates the sequence.
Below you can see an example of the usage of the ask
feature.
<general>
<ask-list config:type="list">
<ask>
<pathlist config:type="list">
<path>ldap,ldap_server</path>
</pathlist>
<stage>cont</stage>
<help>Choose your server depending on your department</help>
<selection config:type="list">
<entry>
<value>ldap1.mydom.de</value>
<label>LDAP for development</label>
</entry>
<entry>
<value>ldap2.mydom.de</value>
<label>LDAP for sales</label>
</entry>
</selection>
<default>ldap2.mydom.de</default>
<default_value_script>
<source> <![CDATA[
echo -n "ldap1.mydom.de"
]]>
</source>
</default_value_script>
</ask>
<ask>
<pathlist config:type="list">
<path>networking,dns,hostname</path>
</pathlist>
<question>Enter Hostname</question>
<stage>initial</stage>
<default>enter your hostname here</default>
</ask>
<ask>
<pathlist config:type="list">
<path>partitioning,0,partitions,0,filesystem</path>
</pathlist>
<question>File System</question>
<type>symbol</type>
<selection config:type="list">
<entry>
<value config:type="symbol">ext4</value>
<label>default File System (recommended)</label>
</entry>
<entry>
<value config:type="symbol">ext3</value>
<label>Fallback File System</label>
</entry>
</selection>
</ask>
</ask-list>
</general>
The following example shows a to choose between AutoYaST control files. AutoYaST
will read the modified.xml file again after the
ask-dialogs are done. This way you can fetch a complete new control file.
<general>
  <ask-list config:type="list">
    <ask>
      <selection config:type="list">
        <entry>
          <value>part1.xml</value>
          <label>Simple partitioning</label>
        </entry>
        <entry>
          <value>part2.xml</value>
          <label>encrypted /tmp</label>
        </entry>
        <entry>
          <value>part3.xml</value>
          <label>LVM</label>
        </entry>
      </selection>
      <title>XML Profile</title>
      <question>Choose a profile</question>
      <stage>initial</stage>
      <default>part1.xml</default>
      <script>
        <filename>fetch.sh</filename>
        <environment config:type="boolean">true</environment>
        <source>
<![CDATA[
wget http://10.10.0.162/$VAL -O /tmp/profile/modified.xml 2>/dev/null
]]>
        </source>
        <debug config:type="boolean">false</debug>
        <feedback config:type="boolean">false</feedback>
      </script>
    </ask>tion>
  </ask-list>
</general>
You can verify the answer of a question with a script like this:
<general>
  <ask-list config:type="list">
    <ask>
      <script>
        <filename>my.sh</filename>
        <rerun_on_error config:type="boolean">true</rerun_on_error>
        <environment config:type="boolean">true</environment>
        <source><![CDATA[
if [ "$VAL" = "myhost" ]; then
    echo "Illegal Hostname!";
    exit 1;
fi
exit 0
]]>
        </source>
        <debug config:type="boolean">false</debug>
        <feedback config:type="boolean">true</feedback>
      </script>
      <dialog config:type="integer">0</dialog>
      <element config:type="integer">0</element>
      <pathlist config:type="list">
        <path>networking,dns,hostname</path>
      </pathlist>
      <question>Enter Hostname</question>
      <default>enter your hostname here</default>
    </ask>
  </ask-list>
</general>
4.34 Kernel dumps #Edit source
Note: Availability
This feature is available only on the S/390 architecture.
With Kdump the system can create crashdump files if the whole kernel crashes. Crash dump files contain the memory contents while the system crashed. Such core files can be analyzed later by support or a (kernel) developer to find the reason for the system crash. Kdump is mostly useful for servers where you cannot easily reproduce such crashes but it is important to get the problem fixed.
There is a downside to this. Enabling Kdump requires between 64 MB and 128 MB of additional system RAM reserved for Kdump in case the system crashes and the dump needs to be generated.
This section only describes how to set up Kdump with AutoYaST. It does not describe how Kdump works. For details, refer to the kdump(7) manual page.
The following example shows a general Kdump configuration.
Example 4.68: Kdump configuration #
<kdump>
  <!-- memory reservation -->
  <add_crash_kernel config:type="boolean">true</add_crash_kernel>
  <crash_kernel>256M-:64M</crash_kernel>
  <general>

    <!-- dump target settings -->
    <KDUMP_SAVEDIR>ftp://stravinsky.suse.de/incoming/dumps</KDUMP_SAVEDIR>
    <KDUMP_COPY_KERNEL>true</KDUMP_COPY_KERNEL>
    <KDUMP_FREE_DISK_SIZE>64</KDUMP_FREE_DISK_SIZE>
    <KDUMP_KEEP_OLD_DUMPS>5</KDUMP_KEEP_OLD_DUMPS>

    <!-- filtering and compression -->
    <KDUMP_DUMPFORMAT>compressed</KDUMP_DUMPFORMAT>
    <KDUMP_DUMPLEVEL>1</KDUMP_DUMPLEVEL>

    <!-- notification -->
    <KDUMP_NOTIFICATION_TO>tux@example.com</KDUMP_NOTIFICATION_TO>
    <KDUMP_NOTIFICATION_CC>spam@example.com devnull@example.com</KDUMP_NOTIFICATION_CC>
    <KDUMP_SMTP_SERVER>mail.example.com</KDUMP_SMTP_SERVER>
    <KDUMP_SMTP_USER></KDUMP_SMTP_USER>
    <KDUMP_SMTP_PASSWORD></KDUMP_SMTP_PASSWORD>

    <!-- kdump kernel -->
    <KDUMP_KERNELVER></KDUMP_KERNELVER>
    <KDUMP_COMMANDLINE></KDUMP_COMMANDLINE>
    <KDUMP_COMMANDLINE_APPEND></KDUMP_COMMANDLINE_APPEND>

    <!-- expert settings -->
    <KDUMP_IMMEDIATE_REBOOT>yes</KDUMP_IMMEDIATE_REBOOT>
    <KDUMP_VERBOSE>15</KDUMP_VERBOSE>
    <KEXEC_OPTIONS></KEXEC_OPTIONS>
  </general>
</kdump>
Kdump is enabled by default. The following configuration shows how to disable it.
Example 4.69: Disabled Kdump configuration #
<kdump>
  <add_crash_kernel config:type="boolean">false</add_crash_kernel>
</kdump>
4.34.1 Memory reservation #Edit source
The first step is to reserve memory for Kdump at boot-up. Because the memory
must be reserved very early during the boot process, the configuration is
done via a kernel command line parameter called
crashkernel. The reserved memory will be used to load a
second kernel which will be executed without rebooting if the first kernel
crashes. This second kernel has a special initrd, which contains all
programs necessary to save the dump over the network or to disk, send a
notification e-mail, and finally reboot.
To reserve memory for Kdump, specify the amount (such as
64M to reserve 64 MB of memory from the RAM) and the
offset. The syntax is
crashkernel=AMOUNT@OFFSET. The kernel can auto-detect the
right offset (except for the Xen hypervisor, where you need to specify
16M as offset). The amount of memory that needs to be
reserved depends on architecture and main memory.
You can also use the extended command line syntax to specify the amount of reserved memory depending on the System RAM. That is useful if you share one AutoYaST control file for multiple installations or if you often remove or install memory on one machine. The syntax is:
BEGIN_RANGE_1-END_RANGE_1:AMOUNT_1,BEGIN_RANGE_2-END_RANGE_2:AMOUNT_2@OFFSET
BEGIN_RANGE_1 is the start of the first memory range (for
example: 0M) and END_RANGE_1 is the
end of the first memory range (can be empty in case
infinity should be assumed) and so on. For example,
256M-2G:64M,2G-:128M reserves 64 MB of crashkernel memory
if the system has between 256 MB and 2 GB RAM and reserves 128 MB of
crashkernel memory if the system has more than 2 GB RAM.
On the other hand, it is possible to specify multiple values for the
crashkernel parameter. For example, when you need to
reserve different segments of low and high memory, use values like
72M,low and 256M,high:
Example 4.70: Kdump memory reservation with multiple values #
<kdump>
  <!-- memory reservation (high and low) -->
  <add_crash_kernel config:type="boolean">true</add_crash_kernel>
  <crash_kernel config:type="list">
    <listentry>72M,low</listentry>
    <listentry>256M,high</listentry>
  </crash_kernel>
</kdump>
The following list shows the settings necessary to reserve memory:
Kdump memory reservation settings:XML representation #
add_crash_kernelSet to
trueif memory should be reserved and Kdump enabled.<add_crash_kernel config:type="boolean">true</add_crash_kernel>
required
crash_kernelUse the syntax of the crashkernel command line as discussed above.
<crash_kernel>256M:64M</crash_kernel>
A list of values is also supported.
<crash_kernel config:type="list">
  <listentry>72M,low</listentry>
  <listentry>256M,high</listentry>
</crash_kernel>
required
4.34.2 Dump saving #Edit source
This section describes where and how crash dumps will be stored.
4.34.2.1 Target #Edit source
The element KDUMP_SAVEDIR specifies the URL to where the
dump is saved. The following methods are possible:
fileto save to the local disk,ftpto save to an FTP server (without encryption),sftpto save to an SSH2 SFTP server,nfsto save to an NFS location andcifsto save the dump to a CIFS/SMP export from Samba or Microsoft Windows.
For details see the kdump(5) manual page. Two examples are:
file:///var/crash (which is the default location
according to FHS) and
ftp://user:password@host:port/incoming/dumps. A
subdirectory, with the time stamp contained in the name, will be created
and the dumps saved there.
When the dump is saved to the local disk,
KDUMP_KEEP_OLD_DUMPS can be used to delete old dumps
automatically. Set it to the number of old dumps that should be kept. If
the target partition would end up with less free disk space than specified
in KDUMP_FREE_DISK_SIZE, the dump is not saved.
To save the whole kernel and the debug information (if installed) to the
same directory, set KDUMP_COPY_KERNEL to
true. You will have everything you need to analyze the
dump in one directory (except kernel modules and their debugging
information).
4.34.2.2 Filtering and compression #Edit source
The kernel dump is uncompressed and unfiltered. It can get as large as your system RAM. To get smaller files, compress the dump file afterward. The dump needs to be decompressed before opening.
To use page compression, which compresses every page and allows dynamic
decompression with the crash(8) debugging tool, set
KDUMP_DUMPFORMAT to compressed
(default).
You may not want to save all memory pages, for example those filled with
zeroes. To filter the dump, set the KDUMP_DUMPLEVEL. 0
produces a full dump and 31 is the smallest dump. The manual pages kdump(5)
and makedumpfile(8) list for each value which pages will be saved.
4.34.2.3 Summary #Edit source
Dump target settings: XML representation #
KDUMP_SAVEDIRA URL that specifies the target to which the dump and related files will be saved.
<KDUMP_SAVEDIR>file:///var/crash/</KDUMP_SAVEDIR>
required
KDUMP_COPY_KERNELSet to
true, if not only the dump should be saved toKDUMP_SAVEDIRbut also the kernel and its debugging information (if installed).<KDUMP_COPY_KERNEL>false</KDUMP_COPY_KERNEL>
optional
KDUMP_FREE_DISK_SIZEDisk space in megabytes that must remain free after saving the dump. If not enough space is available, the dump will not be saved.
<KDUMP_FREE_DISK_SIZE>64</KDUMP_FREE_DISK_SIZE>
optional
KDUMP_KEEP_OLD_DUMPSThe number of dumps that are kept (not deleted) if
KDUMP_SAVEDIRpoints to a local directory. Specify 0 if you do not want any dumps to be automatically deleted, specify -1 if all dumps except the current one should be deleted.<KDUMP_KEEP_OLD_DUMPS>4</KDUMP_KEEP_OLD_DUMPS>
optional
4.34.3 E-mail notification #Edit source
Configure e-mail notification to be informed when a machine crashes and a dump is saved.
Because Kdump runs in the initrd, a local mail server cannot send the notification e-mail. An SMTP server needs to be specified (see below).
You need to provide exactly one address in
KDUMP_NOTIFICATION_TO. More addresses can be specified in
KDUMP_NOTIFICATION_CC. Only use e-mail addresses in both
cases, not a real name.
Specify KDUMP_SMTP_SERVER and (if the server needs
authentication) KDUMP_SMTP_USER and
KDUMP_SMTP_PASSWORD. Support for TLS/SSL is not available
but may be added in the future.
E-mail notification settings: XML representation #
KDUMP_NOTIFICATION_TOExactly one e-mail address to which the e-mail should be sent. Additional recipients can be specified in
KDUMP_NOTIFICATION_CC.<KDUMP_NOTIFICATION_TO >tux@example.com</KDUMP_NOTIFICATION_TO>
optional (notification disabled if empty)
KDUMP_NOTIFICATION_CCZero, one or more recipients that are in the cc line of the notification e-mail.
<KDUMP_NOTIFICATION_CC
>wilber@example.com geeko@example.com</KDUMP_NOTIFICATION_CC>
optional
KDUMP_SMTP_SERVERHost name of the SMTP server used for mail delivery. SMTP authentication is supported (see
KDUMP_SMTP_USERandKDUMP_SMTP_PASSWORD) but TLS/SSL are not.<KDUMP_SMTP_SERVER>email.suse.de</KDUMP_SMTP_SERVER>
optional (notification disabled if empty)
KDUMP_SMTP_USERUser name used together with
KDUMP_SMTP_PASSWORDfor SMTP authentication.<KDUMP_SMTP_USER>bwalle</KDUMP_SMTP_USER>
optional
KDUMP_SMTP_PASSWORDPassword used together with
KDUMP_SMTP_USERfor SMTP authentication.<KDUMP_SMTP_PASSWORD>geheim</KDUMP_SMTP_PASSWORD>
optional
4.34.4 Kdump kernel settings #Edit source
As already mentioned, a special kernel is booted to save the dump. If you do
not want to use the auto-detection mechanism to find out which kernel is
used (see the kdump(5) manual page that describes the algorithm which is
used to find the kernel), you can specify the version of a custom kernel in
KDUMP_KERNELVER. If you set it to foo,
then the kernel located in /boot/vmlinuz-foo or
/boot/vmlinux-foo (in that order on platforms that have
a vmlinuz file) will be used.
You can specify the command line used to boot the Kdump kernel. Normally the
boot command line is used, minus settings that are not relevant for Kdump
(like the crashkernel parameter) plus some settings
needed by Kdump (see the manual page kdump(5)). To specify additional
parameters, use KDUMP_COMMANDLINE_APPEND. If you know
what you are doing and you want to specify the entire command line, set
KDUMP_COMMANDLINE.
Kernel settings: XML representation #
KDUMP_KERNELVERVersion string for the kernel used for Kdump. Leave it empty to use the auto-detection mechanism (strongly recommended).
<KDUMP_KERNELVER
>2.6.27-default</KDUMP_KERNELVER>
optional (auto-detection if empty)
KDUMP_COMMANDLINE_APPENDAdditional command line parameters for the Kdump kernel.
<KDUMP_COMMANDLINE_APPEND
>console=ttyS0,57600</KDUMP_COMMANDLINE_APPEND>
optional
KDUMP_Command LineOverwrite the automatically generated Kdump command line. Use with care. Usually,
KDUMP_COMMANDLINE_APPENDshould suffice.<KDUMP_COMMANDLINE_APPEND >root=/dev/sda5 maxcpus=1 irqpoll</KDUMP_COMMANDLINE>
optional
4.34.5 Expert settings #Edit source
Expert settings: XML representations #
KDUMP_IMMEDIATE_REBOOTtrueif the system should be rebooted automatically after the dump has been saved,falseotherwise. The default is to reboot the system automatically.<KDUMP_IMMEDIATE_REBOOT >true</KDUMP_IMMEDIATE_REBOOT>
optional
KDUMP_VERBOSEBitmask that specifies how verbose the Kdump process should be. Read kdump(5) for details.
<KDUMP_VERBOSE>3</KDUMP_VERBOSE>
optional
KEXEC_OPTIONSAdditional options that are passed to kexec when loading the Kdump kernel. Normally empty.
<KEXEC_OPTIONS>--noio</KEXEC_OPTIONS>
optional
4.35 DNS server #Edit source
The Bind DNS server can be configured by adding a dns-server
resource. The three more straightforward properties of that resource can
have a value of 1 to enable them or 0 to disable.
|
Attribute |
Value |
Description |
|---|---|---|
|
|
0 / 1 |
The DNS server must be jailed in a chroot. |
|
|
0 / 1 |
Bind is enabled (executed on system start). |
|
|
0 / 1 |
Store the settings in LDAP instead of native configuration files. |
Example 4.71: Basic DNS server settings #
<dns-server>
  <chroot>0</chroot>
  <start_service>1</start_service>
  <use_ldap>0</use_ldap>
</dns-server>
In addition to those basic settings, there are three properties of type list that can be used to fine-tune the service configuration.
|
List |
Description |
|---|---|
|
|
Options of the DNS server logging. |
|
|
Bind options like the files and directories to use, the list of forwarders and other configuration settings. |
|
|
List of DNS zones known by the server, including all the settings, records and SOA records. |
Example 4.72: Configuring DNS server zones and advanced settings #
<dns-server>
  <logging config:type="list">
    <listentry>
      <key>channel</key>
      <value>log_syslog { syslog; }</value>
    </listentry>
  </logging>
  <options config:type="list">
    <option>
      <key>forwarders</key>
      <value>{ 10.10.0.1; }</value>
    </option>
  </options>
  <zones config:type="list">
    <listentry>
      <is_new>1</is_new>
      <modified>1</modified>
      <options config:type="list"/>
      <records config:type="list">
        <listentry>
          <key>mydom.uwe.</key>
          <type>MX</type>
          <value>0 mail.mydom.uwe.</value>
        </listentry>
        <listentry>
          <key>mydom.uwe.</key>
          <type>NS</type>
          <value>ns.mydom.uwe.</value>
        </listentry>
      </records>
      <soa>
        <expiry>1w</expiry>
        <mail>root.aaa.aaa.cc.</mail>
        <minimum>1d</minimum>
        <refresh>3h</refresh>
        <retry>1h</retry>
        <serial>2005082300</serial>
        <server>aaa.aaa.cc.</server>
        <zone>@</zone>
      </soa>
      <soa_modified>1</soa_modified>
      <ttl>2d</ttl>
      <type>master</type>
      <update_actions config:type="list">
        <listentry>
          <key>mydom.uwe.</key>
          <operation>add</operation>
          <type>NS</type>
          <value>ns.mydom.uwe.</value>
        </listentry>
      </update_actions>
      <zone>mydom.uwe</zone>
    </listentry>
  </zones>
</dns-server>
4.36 DHCP server #Edit source
The dhcp-server resource makes it possible to configure
all the settings of a DHCP server by means of the six following properties.
|
Element |
Value |
Description |
|---|---|---|
|
|
0 / 1 |
A value of 1 means that the DHCP server must be jailed in a chroot. |
|
|
0 / 1 |
Set this to 1 to enable the DHCP server (that is, run it on system start-up). |
|
|
0 / 1 |
If set to 1, the settings will be stored in LDAP instead of native configuration files. |
|
|
Text |
String with parameters that will be passed to the DHCP server executable when started. For example, use "-p 1234" to listen on a non-standard 1234 port. For all possible options, consult the dhcpd manual page. If left blank, default values will be used. |
|
|
List |
List of network cards in which the DHCP server will be operating. See the example below for the exact format. |
|
|
List |
List of settings to configure the behavior of the DHCP server. The
configuration is defined in a tree-like structure where the root
represents the global options, with subnets and host nested from there.
The |
Example 4.73: Example dhcp-server section #
<dhcp-server>
  <allowed_interfaces config:type="list">
    <allowed_interface>eth0</allowed_interface>
  </allowed_interfaces>
  <chroot>0</chroot>
  <other_options>-p 9000</other_options>
  <start_service>1</start_service>
  <use_ldap>0</use_ldap>

  <settings config:type="list">
    <settings_entry>
      <children config:type="list"/>
      <directives config:type="list">
        <listentry>
          <key>fixed-address</key>
          <type>directive</type>
          <value>192.168.0.10</value>
        </listentry>
        <listentry>
          <key>hardware</key>
          <type>directive</type>
          <value>ethernet d4:00:00:bf:00:00</value>
        </listentry>
      </directives>
      <id>static10</id>
      <options config:type="list"/>
      <parent_id>192.168.0.0 netmask 255.255.255.0</parent_id>
      <parent_type>subnet</parent_type>
      <type>host</type>
    </settings_entry>
    <settings_entry>
      <children config:type="list">
        <child>
          <id>static10</id>
          <type>host</type>
        </child>
      </children>
      <directives config:type="list">
        <listentry>
          <key>range</key>
          <type>directive</type>
          <value>dynamic-bootp 192.168.0.100 192.168.0.150</value>
        </listentry>
        <listentry>
          <key>default-lease-time</key>
          <type>directive</type>
          <value>14400</value>
        </listentry>
        <listentry>
          <key>max-lease-time</key>
          <type>directive</type>
          <value>86400</value>
        </listentry>
      </directives>
      <id>192.168.0.0 netmask 255.255.255.0</id>
      <options config:type="list"/>
      <parent_id/>
      <parent_type/>
      <type>subnet</type>
    </settings_entry>
    <settings_entry>
      <children config:type="list">
        <child>
          <id>192.168.0.0 netmask 255.255.255.0</id>
          <type>subnet</type>
        </child>
      </children>
      <directives config:type="list">
        <listentry>
          <key>ddns-update-style</key>
          <type>directive</type>
          <value>none</value>
        </listentry>
        <listentry>
          <key>default-lease-time</key>
          <type>directive</type>
          <value>14400</value>
        </listentry>
      </directives>
      <id/>
      <options config:type="list"/>
      <parent_id/>
      <parent_type/>
      <type/>
    </settings_entry>
  </settings>
</dhcp-server>
4.37 Firewall configuration #Edit source
SuSEfirewall2 has been replaced by firewalld starting with openSUSE Leap
15.0.
Profiles using SuSEfirewall2 properties will be translated to firewalld
profiles. However, not all profile properties can be converted.
.
Important: Limited backward compatibility with SuSEFirewall2 based profiles
The use of SuSEfirewall2-based profiles will be only partially supported as
many options are not valid in firewalld, and some missing configuration
could affect your network security.
4.37.1 General firewall configuration #Edit source
In firewalld, the general configuration only exposes a few properties, and
most of the configuration is done by zones.
|
Attribute |
Value |
Description |
|---|---|---|
|
|
Boolean |
Whether |
|
|
Boolean |
Whether |
|
|
Zone name |
The default zone is used for everything that is not explicitly assigned. |
|
|
Type of dropped packages to be logged |
Enable logging of dropped packages for the type selected. Values:
|
|
|
Identifier of zone |
Used to identify a zone. If the zone is not known yet, a new zone will be created. |
|
|
Short summary of zone |
Briefly summarizes the purpose of the zone. Ignored for already existing zones. If not specified, the name is used. |
|
|
Description of zone |
Describes the purpose of the zone. Ignored for already existing zones. If not specified, the name is used. |
|
|
Default action |
Defines the default action in the zone if no rule matches. Possible
values are |
4.37.2 Firewall zones configuration #Edit source
The configuration of firewalld is based on the existence of several zones,
which define the trust level for a connection, interface, or source address.
The behavior of each zone can be tweaked in several ways although not all
the properties are exposed yet.
|
Attributes |
Value |
Description |
|---|---|---|
|
|
List of interface names |
List of interface names assigned to this zone. Interfaces or sources can only be part of one zone. |
|
|
List of services |
List of services accessible in this zone. |
|
|
List of ports |
List of single ports or ranges to be opened in the assigned zone. |
|
|
List of protocols |
List of protocols to be opened or be accessible in the assigned zone. |
|
|
Enable masquerade |
It will enable or disable network address translation (NAT) in the assigned zone. |
4.37.3 Installation stages when the firewalld profile is applied #Edit source
Starting with openSUSE Leap 15 SP3, the firewalld profile is
usually applied at the end of the first stage of the installation. (To learn
about the installation stages, see Section 1.2, “Overview and concept”.)
However, there are circumstances where the profile is applied in the second
stage. The following list specifies the conditions under which the
firewalld profile is applied in the first or second stage:
You are running AutoYaST with a
firewalldsection, and not installing SLE over SSH or VNC. The firewall is configured in the first stage.You are running AutoYaST with a
firewalldsection, installing SLE over SSH or VNC, and no second stage is required. The firewall is configured in the first stage.You are running AutoYaST with a
firewalldsection, installing SLE over SSH or VNC, and the second stage is required. The firewall is configured in the second stage.You are running AutoYaST without a
firewalldsection. The firewall is configured in the first stage according to the default product proposals.You are running AutoYaST with or without a firewall section, together with custom script which requires network access. The firewall is configured in the first stage either according to the profile or the product proposals, and the firewall configuration must be adapted so that the custom script has network access as needed.
4.37.4 A full example #Edit source
A full example of the firewall section, including general and zone specific properties, could look like this.
Example 4.74: Example firewall section #
<firewall>
  <enable_firewall config:type="true">true</enable_firewall>
  <log_denied_packets>all</log_denied_packets>
  <default_zone>external</default_zone>
  <zones config:type="list">
    <zone>
      <name>public</name>
      <interfaces config:type="list">
        <interface>eth0</interface>
      </interfaces>
      <services config:type="list">
        <service>ssh</service>
        <service>dhcp</service>
        <service>dhcpv6</service>
        <service>samba</service>
        <service>vnc-server</service>
      </services>
      <ports config:type="list">
        <port>21/udp</port>
        <port>22/udp</port>
        <port>80/tcp</port>
        <port>443/tcp</port>
        <port>8080/tcp</port>
      </ports>
    </zone>
    <zone>
      <name>dmz</name>
      <interfaces config:type="list">
        <interface>eth1</interface>
      </interfaces>
    </zone>
  </zones>
</firewall>
4.38 Miscellaneous hardware and system components #Edit source
In addition to the core component configuration, like network authentication and security, AutoYaST offers a wide range of hardware and system configuration options, the same as available by default on any system installed manually and in an interactive way. For example, it is possible to configure printers, sound devices, TV cards and any other hardware components which have a module within YaST.
Any new configuration options added to YaST will be automatically available in AutoYaST.
4.38.1 Printer #Edit source
AutoYaST support for printing is limited to basic settings defining how CUPS is used on a client for printing via the network.
There is no AutoYaST support for setting up local print queues. Modern
printers are usually connected via USB. CUPS accesses USB printers by a
model-specific device URI like
usb://ACME/FunPrinter?serial=1a2b3c. Usually it is
not possible to predict the correct USB device URI in advance, because
it is determined by the CUPS back-end usb during
runtime. Therefore it is not possible to set up local print queues with
AutoYaST.
Basics on how CUPS is used on a client workstation to print via network:
On client workstations application programs submit print jobs to the
CUPS daemon process (cupsd).
cupsd forwards the print jobs to a CUPS print
server in the network where the print jobs are processed. The server
sends the printer specific data to the printer device.
If there is only a single CUPS print server in the network, there is no
need to have a CUPS daemon running on each client workstation. Instead
it is simpler to specify the CUPS server in
/etc/cups/client.conf and access it directly (only
one CUPS server entry can be set). In this case application programs
that run on client workstations submit print jobs directly to the
specified CUPS print server.
Example 4.75, “Printer configuration” shows a printer
configuration section. The cupsd_conf_content entry
contains the whole verbatim content of the
cupsd configuration file
/etc/cups/cupsd.conf. The
client_conf_content entry contains the whole
verbatim content of /etc/cups/client.conf. The
printer section contains the
cupsd configuration but it does
not specify whether the cupsd should run.
Example 4.75: Printer configuration #
  <printer>
    <client_conf_content>
      <file_contents><![CDATA[
... verbatim content of /etc/cups/client.conf ...
]]></file_contents>
    </client_conf_content>
    <cupsd_conf_content>
      <file_contents><![CDATA[
... verbatim content of /etc/cups/cupsd.conf ...
]]></file_contents>
    </cupsd_conf_content>
  </printer>
Note: /etc/cups/cups-files.conf
With release 1.6 the CUPS configuration file has been split into two
files: cupsd.conf and
cups-files.conf. As of openSUSE Leap 15.3,
AutoYaST only supports modifying cupsd.conf since
the default settings in cups-files.conf are
sufficient for usual printing setups.
4.38.2 Sound devices #Edit source
An example of the sound configuration created using the configuration system is shown below.
Example 4.76: Sound configuration #
<sound>
  <autoinstall config:type="boolean">true</autoinstall>
  <modules_conf config:type="list">
    <module_conf>
      <alias>snd-card-0</alias>
      <model>M5451, ALI</model>
      <module>snd-ali5451</module>
      <options>
        <snd_enable>1</snd_enable>
        <snd_index>0</snd_index>
        <snd_pcm_channels>32</snd_pcm_channels>
      </options>
    </module_conf>
  </modules_conf>
  <volume_settings config:type="list">
    <listentry>
      <Master config:type="integer">75</Master>
    </listentry>
  </volume_settings>
</sound>
4.39 Importing SSH keys and configuration #Edit source
YaST allows SSH keys and server configuration to be imported from previous installations. The behavior of this feature can also be controlled through an AutoYaST profile.
Example 4.77: Importing SSH keys and configuration from /dev/sda2 #
<ssh_import>
  <import config:type="boolean">true</import>
  <copy_config config:type="boolean">true</copy_config>
  <device>/dev/sda2</device>
</ssh_import>
|
Attributes |
Value |
Description |
|---|---|---|
|
|
true / false |
SSH keys will be imported. If set to |
|
|
true / false |
Additionally, SSH server configuration will be imported. This setting
will not have effect if |
|
|
Partition |
Partition to import keys and configuration from. If it is not set, the partition which contains the most recently accessed key is used. |
4.40 Configuration management #Edit source
AutoYaST allows delegating part of the configuration to a configuration management tool like Salt. AutoYaST takes care of the basic system installation (partitioning, network setup, etc.) and the remaining configuration tasks can be delegated.
Note: Only Salt is officially supported
Although Puppet is mentioned in this document, only Salt is officially supported. Nevertheless, feel free to report any problems you might find with Puppet.
AutoYaST supports two different approaches:
Using a configuration management server. In this case, AutoYaST sets up a configuration management tool. It connects to a master server to get the instructions to configure the system.
Getting the configuration from elsewhere (for example, an HTTP server or a flash disk like a USB stick) and running the configuration management tool in stand-alone mode.
4.40.1 Connecting to a configuration management server #Edit source
This approach is especially useful when a configuration management server (a master in Salt and Puppet jargon) is already in place. In this case, the hardest part might be to set up a proper authentication mechanism.
Both Salt and Puppet support the following authentication methods:
Manual authentication on the fly. When AutoYaST starts the client, a new authentication request is generated. The administrator can manually accept this request on the server. AutoYaST will retry the connection. If the key was accepted meanwhile, AutoYaST continues the installation.
Using a preseed key. Refer to the documentation of your configuration management system of choice to find out how to generate them. Use the
keys_urloption to tell AutoYaST where to look for them.
With the configuration example below, AutoYaST will launch the client to generate the authentication request. It will try to connect up to three times, waiting 15 seconds between each try.
Example 4.78: Client/server with manual authentication #
<configuration_management>
    <type>salt</type>
    <master>my-salt-server.example.net</master>
    <auth_attempts config:type="integer">3</auth_attempts>
    <auth_time_out config:type="integer">15</auth_time_out>
</configuration_management>
However, with the following example, AutoYaST will retrieve the keys from a flash disk (for example, a USB stick) and will use them to connect to the master server.
Example 4.79: Client/server with preseed keys #
<configuration_management>
    <type>salt</type>
    <master>my-salt-server.example.net</master>
    <keys_url>usb:/</keys_url>
</configuration_management>
The table below summarizes the supported options for these scenarios.
|
Attributes |
Value |
Description |
|---|---|---|
|
|
String |
Configuration management name. Currently only |
|
|
String |
Host name or IP address of the configuration management server. |
|
|
Integer |
Maximum attempts to connect to the server. The default is three attempts. |
|
|
Integer |
Time (in seconds) between attempts to connect to the server. The default is 15 seconds. |
|
|
URL of used key |
Path to an HTTP server, hard disk, flash disk or similar with the files
|
|
|
True/False |
Enables the configuration management services on the client side after
the installation. The default is |
4.40.2 Running in stand-alone mode #Edit source
For simple scenarios, deploying a configuration management server is unnecessary. Instead, use Salt or Puppet in stand-alone (or masterless) mode.
As there is no server, AutoYaST needs to know where to get the configuration from. Put the configuration into a TAR archive and store it anywhere (for example, on a flash disk, an HTTP/HTTPS server, an NFS/SMB share).
The TAR archive must have the same layout that is expected under
/srv in a Salt server. This means that you need to place
your Salt states in a salt directory and your formulas
in a separate formulas directory.
Additionally, you can have a pillar directory
containing the pillar data. Alternatively, you can provide that data in a
separate TAR archive by using the pillar_url option.
Example 4.80: Stand-alone mode #
<configuration_management>
    <type>salt</type>
    <states_url>my-salt-server.example.net</states_url>
    <pillar_url>my-salt-server.example.net</pillar_url>
</configuration_management>|
Attributes |
Value |
Description |
|---|---|---|
|
|
String |
Configuration management name. Currently only |
|
|
URL |
Location of the Salt states TAR archive. It may include formulas and
pillars. Files must be located in a |
|
|
URL |
Location of the TAR archive that contains the pillars. |
|
|
URL |
Location of Puppet modules. |
4.40.3 SUSE Manager Salt formulas support #Edit source
AutoYaST offers support for SUSE Manager Salt formulas when running in stand-alone mode. In case a formula is found in the states TAR archive, AutoYaST displays a screen which allows the user to select and configure the formulas to apply.
Bear in mind that this feature defeats the AutoYaST purpose of performing an unattended installation, as AutoYaST will wait for the user's input.
Part III Managing mass installations with dynamic profiles #Edit source
- 5 Supported approaches to dynamic profiles
When dealing with the installation of multiple systems, it might be useful to use a single profile (or a reduced set of them) that adapts automatically to each system. In this regard, AutoYaST offers three different mechanisms to modify the profile at installation time.
- 6 Rules and classes
Rules and classes allow customizing installations for sets of machines in different ways:
- 7 ERB templates
ERB templates are for embedding Ruby code within an AutoYaST profile to modify the profile during the installation. With this approach, you can inspect the system and adjust the profile by setting values, adding or skipping sections, and so on.
- 8 Combining ERB templates and scripts
Section 4.30.1, “Pre-install scripts” already describes how to use a pre-script to modify the current profile. In a nutshell, if the script creates a
/tmp/profile/modified.xmlfile, AutoYaST imports that profile and forgets about the initial one.
5 Supported approaches to dynamic profiles #Edit source
When dealing with the installation of multiple systems, it might be useful to use a single profile (or a reduced set of them) that adapts automatically to each system. In this regard, AutoYaST offers three different mechanisms to modify the profile at installation time.
- Rules and classes
Rules and classes offer the possibility to configure a system by merging multiple control files during installation. You can read more about this feature in the Chapter 6, Rules and classes section.
- ERB templates
AutoYaST supports Embedded Ruby (ERB) templates syntax to modify the profile's content during installation. The Chapter 7, ERB templates section describes how to use them.
- Pre-installation scripts
You can use a pre-installation script to modify or even create a brand new profile during installation. Section 4.30.1, “Pre-install scripts” describes how to benefit from them.
- Asking the user during installation
As an alternative, AutoYaST can ask the user for values to use in the profile at runtime. The installation is not fully unattended in that case, but it can be rather useful to set user names, passwords, IP addresses and so on. You can find more information about this feature in the Section 4.33, “Ask the user for values during installation” section.
6 Rules and classes #Edit source
Rules and classes allow customizing installations for sets of machines in different ways:
Rules allow configuring a system depending on its attributes.
Classes represent configurations for groups of target systems. Classes can be assigned to systems.
Note: Use autoyast boot option only
Rules and classes are only supported by the boot parameter
autoyast=URL.
autoyast2=URL is not
supported, because this option downloads a single AutoYaST control file only.
6.1 Rule-based automatic installation #Edit source
Rules offer the possibility to configure a system depending on system attributes by merging multiple control files during installation. The rule-based installation is controlled by a rules file.
For example, this could be useful to install systems in two departments in one go. Assume a scenario where machines in department A need to be installed as office desktops, whereas machines in department B need to be installed as developer workstations. You would create a rules file with two different rules. For each rule, you could use different system parameters to distinguish the installations from one another. Each rule would also contain a link to an appropriate profile for each department.
The rules file is an XML file containing rules for each group of systems (or single systems) that you want to automatically install. A set of rules distinguish a group of systems based on one or more system attributes. After passing all rules, each group of systems is linked to a control file. Both the rules file and the control files must be located in a pre-defined and accessible location.
The rules file is retrieved only if no specific control file is supplied
using the autoyast keyword. For example, if the following
is used, the rules file will not be evaluated:
autoyast=http://10.10.0.1/profile/myprofile.xml
autoyast=http://10.10.0.1/profile/rules/rules.xml
Instead use:
autoyast=http://10.10.0.1/profile/
which will load http://10.10.0.1/profile/rules/rules.xml
(the slash at the end of the directory name is important).
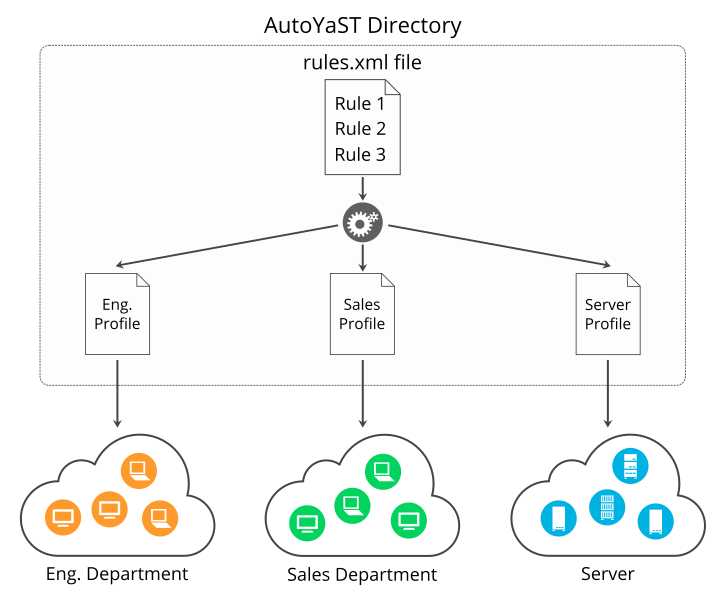
Figure 6.1: Rules #
If more than one rule applies, the final control file for each group is generated on the fly using a merge script. The merging process is based on the order of the rules and later rules override configuration data in earlier rules. Note that the names of the top sections in the merged XML files need to be in alphabetical order for the merge to succeed.
The use of a rules file is optional. If the rules file is not found, system installation proceeds in the standard way by using the supplied control file or by searching for the control file depending on the MAC or the IP address of the system.
6.1.1 Rules file explained #Edit source
Example 6.1: Simple rules file #
The following simple example illustrates how the rules file is used to retrieve the configuration for a client with known hardware.
<?xml version="1.0"?>
<!DOCTYPE autoinstall>
<autoinstall xmlns="http://www.suse.com/1.0/yast2ns" xmlns:config="http://www.suse.com/1.0/configns">
  <rules config:type="list">
    <rule>
       <disksize>
            <match>/dev/sdc 1000</match>
            <match_type>greater</match_type>
       </disksize>
       <result>
            <profile>department_a.xml</profile>
            <continue config:type="boolean">false</continue>
        </result>
    </rule>
    <rule>
       <disksize>
            <match>/dev/sda 1000</match>
            <match_type>greater</match_type>
       </disksize>
       <result>
            <profile>department_b.xml</profile>
            <continue config:type="boolean">false</continue>
        </result>
    </rule>
  </rules>
</autoinstall>
The last example defines two rules and provides a different control file
for every rule. The rule used in this case is disksize.
After parsing the rules file, YaST attempts to match the target system
with the rules in the rules.xml file. A rule match
occurs when the target system matches all system attributes defined in the
rule. When the system matches a rule, the respective resource is added to
the stack of control files AutoYaST will use to create the final control file.
The continue property tells AutoYaST whether it should
continue with other rules after a match has been found.
If the first rule does not match, the next rule in the list is examined until a match is found.
Using the disksize attribute, you can provide different
configurations for systems with hard disks of different sizes. The first
rule checks if the device /dev/sdc is available and if
it is greater than 1 GB in size using the match
property.
A rule must have at least one attribute to be matched. If you need to check more attributes, such as memory or architectures, you can add more attributes in the rule resource as shown in the next example.
Example 6.2: Simple rules file #
The following example illustrates how the rules file is used to retrieve the configuration for a client with known hardware.
<?xml version="1.0"?>
<!DOCTYPE autoinstall>
<autoinstall xmlns="http://www.suse.com/1.0/yast2ns" xmlns:config="http://www.suse.com/1.0/configns">
  <rules config:type="list">
    <rule>
       <disksize>
            <match>/dev/sdc 1000</match>
            <match_type>greater</match_type>
       </disksize>
       <memsize>
            <match>1000</match>
            <match_type>greater</match_type>
       </memsize>
       <result>
            <profile>department_a.xml</profile>
            <continue config:type="boolean">false</continue>
        </result>
    </rule>
    <rule>
       <disksize>
            <match>/dev/shda 1000</match>
            <match_type>greater</match_type>
       </disksize>
       <memsize>
            <match>256</match>
            <match_type>greater</match_type>
       </memsize>
       <result>
            <profile>department_b.xml</profile>
            <continue config:type="boolean">false</continue>
        </result>
    </rule>
  </rules>
</autoinstall>
The rules directory must be located in the same directory specified via the
autoyast keyword at boot time. If the client was booted
using autoyast=http://10.10.0.1/profiles/, AutoYaST will
search for the rules file at http://10.10.0.1/profiles/rules/rules.xml.
6.1.2 Custom rules #Edit source
If the attributes AutoYaST provides for rules are not enough for your purposes, use custom rules. Custom rules contain a shell script. The output of the script (STDOUT, STDERR is ignored) can be evaluated.
Here is an example for the use of custom rules:
<rule>
  <custom1>
    <script>
if grep -i intel /proc/cpuinfo > /dev/null; then
echo -n "intel"
else
echo -n "non_intel"
fi;
    </script>
    <match>*</match>
    <match_type>exact</match_type>
  </custom1>
  <result>
    <profile>@custom1@.xml</profile>
    <continue config:type="boolean">true</continue>
  </result>
</rule>
The script in this rule can echo either intel or
non_intel to STDOUT (the output of the grep command must
be directed to /dev/null in this case). The output of the rule script will
be filled between the two '@' characters, to determine the file name of the
control file to fetch. AutoYaST will read the output and fetch a file with the
name intel.xml or non_intel.xml.
This file can contain the AutoYaST profile part for the software selection; for
example, in case you want a different software selection on Intel hardware
than on others.
The number of custom rules is limited to five. So you can use
custom1 to custom5.
6.1.3 Match types for rules #Edit source
You can use five different match_types:
exact(default)greaterlowerrangeregex(a simple=~operator like in Bash)
If using exact, the string must match exactly as
specified. regex can be used to match substrings like
ntel will match Intel, intel and intelligent.
greater and lower can be used for
memsize or totaldisk for example.
They can match only with rules that return an integer value. A range is
only possible for integer values too and has the form of
value1-value2, for example 512-1024.
6.1.4 Combine attributes #Edit source
Multiple attributes can be combined via a logical operator. It is possible
to let a rule match if disksize is greater than 1GB or
memsize is exactly 512MB.
You can do this with the operator element in the
rules.xml file. and and or are
possible operators, and being the default. Here is an
example:
<rule>
  <disksize>
    <match>/dev/sda 1000</match>
    <match_type>greater</match_type>
  </disksize>
  <memsize>
    <match>256</match>
    <match_type>greater</match_type>
  </memsize>
  <result>
    <profile>machine2.xml</profile>
    <continue config:type="boolean">false</continue>
  </result>
  <operator>or</operator>
</rule>
6.1.5 Rules file structure #Edit source
The rules.xml file needs to:
have at least one rule,
have the name
rules.xml,be located in the directory
rulesin the profile repository,have at least one attribute to match in the rule.
6.1.6 Predefined system attributes #Edit source
The following table lists the predefined system attributes you can match in the rules file.
If you are unsure about a value on your system, run
/sbin/yast2 ayast_probe ncurses. The
text box displaying the detected values can be scrolled. Note that this
command will not work while another YaST process that requires a lock
(for example the installer) is running. Therefore you cannot run it during
the installation.
Table 6.1: System attributes #
|
Attribute |
Values |
Description |
|---|---|---|
|
|
IP address of the host |
This attribute must always match exactly. |
|
|
The name of the host |
This attribute must always match exactly. |
|
|
Domain name of host |
This attribute must always match exactly. |
|
|
The name of the product to be installed. |
This attribute must always match exactly. |
|
|
The version of the product to be installed. |
This attribute must always match exactly. |
|
|
network address of host |
This attribute must always match exactly. |
|
|
MAC address of host |
This attribute must always match exactly (the MAC addresses should
have the form |
|
|
Number of installed Linux partitions on the system |
This attribute can be 0 or more. |
|
|
Number of installed non-Linux partitions on the system |
This attribute can be 0 or more. |
|
|
X Server needed for graphic adapter |
This attribute must always match exactly. |
|
|
Memory available on host in megabytes |
All match types are available. |
|
|
Total disk space available on host in megabytes |
All match types are available. |
|
|
Hex representation of the IP address |
Exact match required |
|
|
Architecture of host |
Exact match required |
|
|
Kernel Architecture of host (for example SMP kernel, Xen kernel) |
Exact match required |
|
|
Drive device and size |
All match types are available. |
|
|
The hardware product name as specified in SMBIOS |
Exact match required |
|
|
The hardware vendor as specified in SMBIOS |
Exact match required |
|
|
The system board name as specified in SMBIOS |
Exact match required |
|
|
The system board vendor as specified in SMBIOS |
Exact match required |
|
|
Custom rules using shell scripts |
All match types are available. |
6.1.7 Rules with dialogs #Edit source
You can use dialog pop-ups with check boxes to select rules you want matched.
The elements listed below must be placed within the following XML structure
in the rules.xml file:
<rules config:type="list">
  <rule>
    <dialog>
      ...
    </dialog>
  </rule>
</rules>
Attribute, Values, Description #
dialog_nrAll rules with the same
dialog_nrare presented in the same pop-up dialog. The samedialog_nrcan appear in multiple rules.<dialog_nr config:type="integer">3</dialog_nr>
This element is optional and the default for a missing dialog_nr is always
0. To use one pop-up for all rules, you do not need to specify thedialog_nr.elementSpecify a unique ID. Even if you have more than one dialog, you must not use the same id twice. Using id
1on dialog 1 and id1on dialog 2 is not supported. (This behavior is contrary to theaskdialog, where you can have the same ID for multiple dialogs.)<element config:type="integer">3</element>
Optional. If omitted, AutoYaST adds its own IDs internally. Then you cannot specify conflicting rules (see below).
titleCaption of the pop-up dialog
<title>Desktop Selection</title>
Optional
questionQuestion shown in the pop-up behind the check box.
<question>GNOME Desktop</question>
Optional. If you do not configure a text here, the name of the XML file that is triggered by this rule will be shown instead.
timeoutTimeout in seconds after which the dialog will automatically “press” the okay button. Useful for a non-blocking installation in combination with rules dialogs.
<timeout config:type="integer">30</timeout>
Optional. A missing timeout will stop the installation process until the dialog is confirmed by the user.
conflictsA list of element ids (rules) that conflict with this rule. If this rule matches or is selected by the user, all conflicting rules are deselected and disabled in the pop-up. Take care that you do not create deadlocks.
<conflicts config:type="list">
  <element config:type="integer">1</element>
  <element config:type="integer">5</element>
  ...
</conflicts>
Optional
Here is an example of how to use dialogs with rules:
<rules config:type="list">
  <rule>
    <custom1>
      <script>
echo -n 100
      </script>
      <match>100</match>
      <match_type>exact</match_type>
    </custom1>
    <result>
      <profile>rules/gnome.xml</profile>
      <continue config:type="boolean">true</continue>
    </result>
    <dialog>
      <element config:type="integer">0</element>
      <question>GNOME Desktop</question>
      <title>Desktop Selection</title>
      <conflicts config:type="list">
        <element config:type="integer">1</element>
      </conflicts>
      <dialog_nr config:type="integer">0</dialog_nr>
    </dialog>
  </rule>
  <rule>
    <custom1>
      <script>
echo -n 100
      </script>
      <match>101</match>
      <match_type>exact</match_type>
    </custom1>
    <result>
      <profile>rules/gnome.xml</profile>
      <continue config:type="boolean">true</continue>
    </result>
    <dialog>
      <element config:type="integer">1</element>
      <dialog_nr config:type="integer">0</dialog_nr>
      <question>Gnome Desktop</question>
      <conflicts config:type="list">
        <element config:type="integer">0</element>
      </conflicts>
    </dialog>
  </rule>
  <rule>
    <custom1>
      <script>
echo -n 100
      </script>
      <match>100</match>
      <match_type>exact</match_type>
    </custom1>
    <result>
      <profile>rules/all_the_rest.xml</profile>
      <continue config:type="boolean">false</continue>
    </result>
  </rule>
</rules>
6.2 Classes #Edit source
Classes represent configurations for groups of target systems. Unlike rules, classes need to be configured in the control file. Then classes can be assigned to target systems.
Here is an example of a class definition:
<classes config:type="list">
  <class>
    <class_name>TrainingRoom</class_name>
    <configuration>Software.xml</configuration>
  </class>
</classes>
In the example above, the file Software.xml must be
placed in the subdirectory classes/TrainingRoom/ It
will be fetched from the same place the AutoYaST control file and rules were
fetched from.
If you have multiple control files and those control files share parts, better use classes for common parts. You can also use XIncludes.
Using the configuration management system, you can define a set of classes. A class definition consists of the following variables:
Name: class name
Description:
Order: order (or priority) of the class in the stack of migration
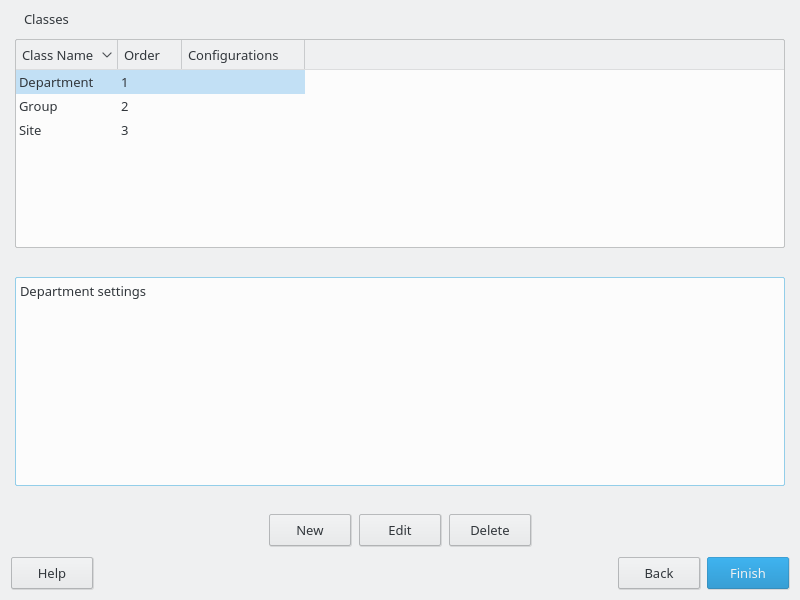
Figure 6.2: Defining classes #
You can create as many classes as you need, however it is recommended to keep the set of classes as small as possible to keep the configuration system concise. For example, the following sets of classes can be used:
site: classes describing a physical location or site,
machine: classes describing a type of machine,
role: classes describing the function of the machine,
group: classes describing a department or a group within a site or a location.
A file saved in a class directory can have the same syntax and format as a regular control file but represents a subset of the configuration. For example, to create a new control file for a computer with a specific network interface, you only need the control file resource that controls the configuration of the network. Having multiple network types, you can merge the one needed for a special type of hardware with other class files and create a new control file which suits the system being installed.
6.3 Mixing rules and classes #Edit source
It is possible to mix rules and classes during an auto-installation session. For example you can identify a system using rules which contain class definitions in them. The process is described in the figure Figure A.1, “Rules retrieval process”.
After retrieving the rules and merging them, the generated control file is parsed and checked for class definitions. If classes are defined, then the class files are retrieved from the original repository and a new merge process is initiated.
6.4 Merging of rules and classes #Edit source
With classes and with rules, multiple XML files get merged into one resulting XML file. This merging process is often confusing for people, because it behaves different than one would expect. First of all, it is important to note that the names of the top sections in the merged XML files must be in alphabetical order for the merge to succeed.
For example, the following two XML parts should be merged:
<partitioning config:type="list">
  <drive>
    <partitions config:type="list">
      <partition>
        <filesystem config:type="symbol">swap</filesystem>
        <format config:type="boolean">true</format>
        <mount>swap</mount>
        <partition_id config:type="integer">130</partition_id>
        <size>2000mb</size>
      </partition>
      <partition>
        <filesystem config:type="symbol">xfs</filesystem>
        <partition_type>primary</partition_type>
        <size>4Gb</size>
        <mount>/data</mount>
      </partition>
    </partitions>
  </drive>
</partitioning>
<partitioning config:type="list">
<drive>
<initialize config:type="boolean">false</initialize>
<partitions config:type="list">
<partition>
<format config:type="boolean">true</format>
<filesystem config:type="symbol">xfs</filesystem>
<mount>/</mount>
<partition_id config:type="integer">131</partition_id>
<partition_type>primary</partition_type>
<size>max</size>
</partition>
</partitions>
<use>all</use>
</drive>
</partitioning>
You might expect the control file to contain three partitions. This is not
the case. You will end up with two partitions and the first partition is a
mix up of the swap and the root partition. Settings configured in both
partitions, like mount or size, will
be used from the second file. Settings that only exist in the first or
second partition, will be copied to the merged partition too.
In this example, you do not want a second drive. The two
drives should be merged into one. With regard to partitions, three separate
ones should be defined. Using the dont_merge method
solves the merging problem:
<classes config:type="list">
  <class>
    <class_name>swap</class_name>
    <configuration>largeswap.xml</configuration>
    <dont_merge config:type="list">
      <element>partition</element>
    </dont_merge>
  </class>
</classes>
<rule>
<board_vendor>
<match>ntel</match>
<match_type>regex</match_type>
</board_vendor>
<result>
<profile>classes/largeswap.xml</profile>
<continue config:type="boolean">true</continue>
<dont_merge config:type="list">
<element>partition</element>
</dont_merge>
</result>
<board_vendor>
<match>PowerEdge [12]850</match>
<match_type>regex</match_type>
</board_vendor>
<result>
<profile>classes/smallswap.xml</profile>
<continue config:type="boolean">true</continue>
<dont_merge config:type="list">
<element>partition</element>
</dont_merge>
</result>
</rule>7 ERB templates #Edit source
ERB templates are for embedding Ruby code within an AutoYaST profile to modify the profile during the installation. With this approach, you can inspect the system and adjust the profile by setting values, adding or skipping sections, and so on.
To activate the ERB processing, the profile must have the extension
.erb (for example,
autoyast.xml.erb). Hence, it is not possible to
combine rules/classes and ERB templates.
7.1 What is ERB? #Edit source
ERB stands for Embedded Ruby. ERB uses the power of the Ruby programming language to generate different kind of content. With ERB, you can include some Ruby code in your profiles to adapt them at runtime, depending on the installation system.
When using ERB, the Ruby code is enclosed between <%
and %> signs. Use an equals sign,
=, to include command output in the resulting profile.
Example 7.1: Including a file using ERB #
<bootloader>
  <% require "open-uri" %>
  <%= URI.open("http://192.168.1.1/profiles/bootloader-common.xml").read %>
</bootloader> <!-- this line gets replaced with the content of bootloader-common.xml -->
You can use Ruby facilities to run arbitrary commands. If you want
to get the output of a command, then enclose it between backticks.
If you want to know whether a command was successful or not, run the
command with the system function.
Example 7.2: Running commands with Ruby #
<% files = `ls` %> <!-- files contains the output of the command (for instance "file1\nfile2\nfile3") -->
<% success = system("dmidecode | grep some-model") %> <!-- success contains true or false -->
Also, you can use more advanced Ruby code structures such as conditions and loops.
Example 7.3: Using Ruby structures #
<% ip_forward = File.read("/proc/sys/net/ipv4/ip_forward").strip %>
<% if ip_forward == "1" %>
  <!-- something -->
<% end %>

<% files = `ls /tmp/config/*.xml` %>
<% files.split.each do |file| %>
  <%= file.read %>
<% end %>
AutoYaST offers a small set of helper functions to retrieve
information from the underlying system, like disks or
network_cards. You can check the list of helpers and
their values in the Section 7.2, “Template helpers” section.
7.2 Template helpers #Edit source
Template helpers are sets of Ruby methods that can be used in the profiles to retrieve information about the installation system.
7.2.1 boot_efi? #Edit source
boot_efi? is a boolean helper that returns
whether the system is booted using EFI. In the example below, the
profile configures the bootloader according to the current boot mode.
Example 7.4: Configuring the boot loader #
<% if env.boot_efi? %>
  <loader_type>grub2-efi</loader_type>
<% else %>
  <loader_type>grub2</loader_type>
<% end %>
7.2.2 disks #Edit source
The disks helper returns a list of the detected disks.
Each element of the list contains some basic information like the device
name or the size.
|
Key |
Type |
Value |
|---|---|---|
|
|
String |
Device kernel name (for example, |
|
|
String |
Disk model |
|
|
String |
Serial number |
|
|
Integer |
Disk size (in bytes) |
|
|
Array<String> |
List of disk udev names. You can use any of them to refer to the device. |
|
|
String |
Disk vendor's name |
The profile in the example below installs the system on the largest disk.
It sorts the list of existing disks by size and takes the last one. Then it
uses the :device key as value for the
device element.
Example 7.5: Using the largest disk #
<partitioning t="list">
  <drive>
    <% disk = disks.sort_by { |d| d[:size] }.last %> <!-- find the largest disk -->
    <device><%= disk[:device] %></device> <!-- print the disk device name -->
    <initialize t="boolean">true</initialize>
    <use>all</use>
  </drive>
</partitioning>
7.2.3 network_cards #Edit source
The network_cards helper returns a list of network
cards, including their names, status information (for example, if they are
connected or not).
|
Key |
Type |
Value |
|---|---|---|
|
|
String |
Device name (for example, |
|
|
String |
MAC address |
|
|
Boolean |
Whether the device is active or not |
|
|
Boolean |
Whether the device is connected or not |
|
|
String |
Disk vendor's name |
The following example finds the first network card that is connected to the network and configures it to use DHCP.
Example 7.6: Configure the connected network cards #
<interfaces t="list">
  <% with_link = netword_cards.sort_by { |n| n[:name] }.find { |n| n[:link] } %>
  <% if with_link %>
    <interface>
      <device><%= with_link[:device] %></device>
      <startmode>auto</startmode>
      <bootproto>dhcp</bootproto>
      </interface>
  <% end >
</interfaces>
7.2.4 os_release #Edit source
The os_release helper returns the operating system
information, which is included in the /etc/os-release
file.
|
Key |
Type |
Value |
|---|---|---|
|
|
String |
Distribution ID (for example,
|
|
|
String |
Distribution name (for example,
|
|
|
String |
Distribution version (for example,
|
You might use this information to decide which product to install, using pretty much the same profile for all of them (SLE or openSUSE distributions).
Example 7.7: Reusing the same profile for different distributions #
<products t="list">
  <% if os_release[:id] == 'sle' %>
  <product>SLES</product>
  <% else %>
  <product>openSUSE</product>
  <% end %<
</products>
7.2.5 hardware #Edit source
The hardware helper provides additional hardware information.
It returns all the information from hwinfo command. You can
use this helper as an escape hatch for those cases in which the information available
through the described helpers is not enough. In the next example,
hardware helper is used to filter USB devices. Check
Section 7.3, “Running ERB helpers” to learn how to inspect all the information
provided by the hardware helper.
Example 7.8: Filtering USB devices #
<% usb_disks = hardware["disk"].select { |d| d["driver"] != "usb-storage" } %>7.3 Running ERB helpers #Edit source
You can use the Ruby console to run AutoYaST ERB
helpers and find out what they offer. All ERB helpers are
accessed through an instance of the
Y2Autoinstallation::Y2ERB::TemplateEnvironment class. Start the
Ruby interactive interpreter by running, as root:
irb -ryast -rautoinstall/y2erb.
Example 7.9: Running helpers #
irb > env = Y2Autoinstallation::Y2ERB::TemplateEnvironment.new  # the env variable gives access to the helpers

irb > env.disks
=>
[{:vendor=>"WDC", :device=>"sda", ...},
 {:vendor=>"TOSHIBA", :device=>"sdb", ...},
...]

irb > env.hardware.keys
=>
["architecture",
 "bios",
 "bios_video",
 ...]

irb > env.hardware["architecture"]
=>
"x86_64"
7.4 Rendering ERB profiles #Edit source
The AutoYaST command line provides a check-profile command that can be used
to generate a profile from a ERB file. This command asks AutoYaST to parse, run the ERB code, and
generate the resulting profile. You can inspect the rendered profile to check that everything
worked as expected. See the command help for all the options if supports:
autoyast check-profile --help.
In the following example check-profile asks AutoYaST to download and parse
the profile, interpret the ERB code and run the pre-scripts. The result
will be dumped to the result.xml file.
Example 7.10: Rendering profile #
>sudoyast2 autoyast check-profile filename=http://192.168.1.100/autoinst.erb output=result.xml run-scripts=true run-erb=true
Warning: check-profile permissions
In most cases, check-profile requires root permissions,
so be careful when running pre-installation scripts and ERB profiles as root.
Use only profiles that you trust.
7.5 Debugging ERB profiles #Edit source
For those cases in which you would like to stop the ERB evaluation
and check what is happening, YaST offers integration with the
byebug
debugger. Install the rubygem(byebug) package and set
the Y2DEBUGGER environment variable to 1.
Example 7.11: Preparing the debug environment #
>sudozypper --non-interactive in "rubygem(byebug)">sudoY2DEBUGGER=1 yast2 autoyast check-profile ...
Adding breakpoints is as easy as adding <% byebug %> where you want to stop.
For more information about byebug, see
https://github.com/deivid-rodriguez/byebug.
Example 7.12: Adding a breakpoint #
<% byebug %>
<% if system("dmidecode | grep some-model") %>
  <!-- do something -->
%<% end %>
7.6 ERB vs. rules and classes #Edit source
Although both ERB and rules/classes enable generating profiles
dynamically, in general ERB profiles are easier to read and
understand. One important difference is that rules and classes can
merge profiles,
and ERB can not. See more about merging profiles at
Chapter 6, Rules and classes. On the other hand, ERB brings all
the power of a high level language, Ruby. Let's see an example
using both. In the following example, we want to place /home
directory in /dev/sdb if it exists.
Example 7.13: Rules and classes #
<rule>
  <custom1>
    <script>
if blkid | grep /dev/sdb > /dev/null; then
echo -n "yes"
else
echo -n "no"
fi;
    </script>
    <match>yes</match>
    <match_type>exact</match_type>
  </custom1>
  <result>
    <profile>classes/sdb_home.xml</profile>
    <dont_merge config:type="list">
      <element>partition</element>
    </dont_merge>
  </result>
</rule>
Example 7.14: ERB #
<% home_in_sdb = disks.map { |d| d[:device] }.include?("sdb") %>

<partitioning config:type="list">
  <drive>
    ...
  </drive>
  <% if home_in_sdb %>
  <drive>
    <device>/dev/sdb</device>
    <disklabel>none</disklabel>
    <partitions t="list">
      <partition>
        <format t="boolean">true</format>
        <filesystem t="symbol">xfs</filesystem>
        <mount>/home</mount>
      </partition>
    </partitions>
  </drive>
  <% end %>
</partitioning>
8 Combining ERB templates and scripts #Edit source
Section 4.30.1, “Pre-install scripts” already describes how to use a
pre-script to modify the current profile. In a nutshell, if the script
creates a /tmp/profile/modified.xml file, AutoYaST imports
that profile and forgets about the initial one.
This is a pretty flexible approach and the only limitation is that you need to rely on the languages and libraries that are available in the installation media.
8.1 Embedding ERB in your scripts #Edit source
Unlike with rules, it is possible to combine ERB templates with scripts. AutoYaST will evaluate any ERB tag that you include in your script before running it. This behavior only applies to the scripts defined inside the profile and not to the external ones.
The script in the example below downloads a profile whose name is based on
the MAC address. Saving the file as
/tmp/profile/modified.xml will cause AutoYaST to load and
use the downloaded profile.
Example 8.1: Using the MAC address to get the profile #
<scripts>
  <pre-scripts config:type="list">
    <script>
      <interpreter>shell</interpreter>
      <filename>load_profile.sh</filename>
      <% mac = network_cards.first >
      <source><![CDATA[#!/bin/bash
wget -O /tmp/profile/modified.xml http://myserver/<%= network_cards.first[:mac] %>.xml
]]></source>
    </script>
  </pre-scripts>
</scripts>
8.2 Accessing ERB helpers from Ruby scripts #Edit source
It is possible to use the ERB helpers in Ruby scripts. To use those helpers,
you need to require the yast and
autoinstall/y2erb libraries and use the
Y2Autoinstall::Y2ERB::TemplateEnvironment class to access
them.
Example 8.2: Accessing ERB helpers from a Ruby script #
<scripts>
  <pre-scripts config:type="list">
    <script>
      <interpreter>/usr/bin/ruby</interpreter>
      <filename>load_profile.rb</filename>
      <source><![CDATA[#!/usr/bin/env ruby
require "yast"
require "autoinstall/y2erb"
helpers = Y2Autoinstallation::Y2ERB::TemplateEnvironment.new
# Now you can use the TemplateEnvironment instance to call the helpers
disk_devices = helpers.disks.map { |d| d[:device] }
File.write("/root/disks.txt", disk_devices.join("\n"))
]]></source>
    </script>
  </pre-scripts>
</scripts>
Part IV Understanding the auto-installation process #Edit source
- 9 The auto-installation process
After the system has booted into an automatic installation and the control file has been retrieved, YaST configures the system according to the information provided in the control file. All configuration settings are summarized in a window that is shown by default and should be deactivated if a full…
9 The auto-installation process #Edit source
9.1 Introduction #Edit source
After the system has booted into an automatic installation and the control file has been retrieved, YaST configures the system according to the information provided in the control file. All configuration settings are summarized in a window that is shown by default and should be deactivated if a fully automatic installation is needed.
By the time YaST displays the summary of the configuration, YaST has only probed hardware and prepared the system for auto-installation. Nothing has been changed in the system yet. In case of any error, you can still abort the process.
A system should be automatically installable without the need to have any graphic adapter or monitor. Having a monitor attached to the client machine is nevertheless recommended so you can supervise the process and to get feedback in case of errors. Choose between the graphical and the text-based Ncurses interfaces. For headless clients, system messages can be monitored using the serial console.
9.1.1 X11 interface (graphical) #Edit source
This is the default interface while auto-installing. No special variables are required to activate it.
9.1.2 Serial console #Edit source
Start installing a system using the serial console by adding the keyword
console (for example console=ttyS0)
to the command line of the kernel. This starts linuxrc
in console mode and later YaST in serial console mode.
9.1.3 Text-based YaST installation #Edit source
This option can also be activated on the command line. To start YaST in
text mode, add textmode=1 on the command line.
Starting YaST in the text mode is recommended when installing a client with less than 64 MB or when X11 should not be configured, especially on headless machines.
9.2 Choosing the right boot medium #Edit source
There are different methods for booting the client. The computer can boot from its network interface card (NIC) to receive the boot images via DHCP or TFTP. Alternatively a suitable kernel and initrd image can be loaded from a flash disk (for example, a USB stick) or a bootable DVD-ROM.
YaST will check for autoinst.xml in the root
directory of the boot medium or the initrd upon start-up and switch to an
automated installation if it was found. In case the control file is named
differently or located elsewhere, specify its location on the kernel command
line with the parameter
AutoYaST=URL.
9.2.1 Booting from a flash disk (for example, a USB stick) #Edit source
For testing/rescue purposes or because the NIC does not have a PROM or PXE, you can build a bootable flash disk to use with AutoYaST. Flash disks can also store the control file.
Tip: Copying the installation medium image to a removable flash disk
Use the following command to copy the contents of the installation image to a removable flash disk.
>sudodd if=IMAGE of=FLASH_DISK bs=4M && sync
IMAGE needs to be replaced with the path to the
SLE-15-SP3-Online-ARCH-GM-media1.iso or SLE-15-SP3-Full-ARCH-GM-media1.iso
image file. FLASH_DISK needs to be replaced
with the flash device. To identify the device, insert it and run:
# grep -Ff <(hwinfo --disk --short) <(hwinfo --usb --short)
      disk:
      /dev/sdc             General USB Flash Disk
Make sure the size of the device is sufficient for the desired image. You can check the size of the device with:
# fdisk -l /dev/sdc | grep -e "^/dev"
      /dev/sdc1  *     2048 31490047 31488000  15G 83 Linux
In this example, the device has a capacity of 15 GB. The command to use
for the SLE-15-SP3-Full-ARCH-GM-media1.iso would be:
dd if=SLE-15-SP3-Full-ARCH-GM-media1.iso of=/dev/sdc bs=4M && sync
The device must not be mounted when running the dd
command. Note that all data on the partition will be erased!
9.2.2 Booting from the SUSE Linux Enterprise installation medium #Edit source
You can use the SUSE Linux Enterprise installation medium
(SLE-15-SP3-Online-ARCH-GM-media1.iso or
SLE-15-SP3-Full-ARCH-GM-media1.iso) in combination with other media. For
example, the control file can be provided via a flash disk or a specified
location on the network. Alternatively, create a customized installation
media that includes the control file.
9.2.3 Booting via PXE over the network #Edit source
Booting via PXE requires a DHCP and a TFTP server in your network. The computer will then boot without a physical medium.
If you install via PXE, the installation will run in an endless loop. This happens because after the first reboot, the machine performs the PXE boot again and restarts the installation instead of booting from the hard disk for the second stage of the installation.
There are several ways to solve this problem. You can use an HTTP server to provide the AutoYaST control file. Alternatively, instead of a static control file, run a CGI script on the Web server that provides the control file and changes the TFTP server configuration for your target host. This way, the next PXE boot of the machine will be from the hard disk by default.
Another way is to use AutoYaST to upload a new PXE boot configuration for the target host via the control file:
<pxe>
  <pxe_localboot config:type="boolean">true</pxe_localboot>
  <pxelinux-config>
    DEFAULT linux
    LABEL linux
    localboot 0
  </pxelinux-config>
  <tftp-server>192.168.1.115</tftp-server>
  <pxelinux-dir>/pxelinux.cfg</pxelinux-dir>
  <filename>__MAC__</filename>
</pxe>
This entry will upload a new configuration for the target host to the TFTP
server shortly before the first reboot happens. In most installations the
TFTP daemon runs as user nobody.
You need to make sure this user has write permissions to the
pxelinux.cfg directory. You can also configure the
file name that will be uploaded. If you use the “magic”
__MAC__ file name, the file name will be the MAC address
of your machine like, for example 01-08-00-27-79-49-ee.
If the file name setting is missing, the IP address will be used for the
file name.
To do another auto-installation on the same machine, you need to remove the file from the TFTP server.
9.3 Invoking the auto-installation process #Edit source
9.3.1 Command line options #Edit source
Adding the command line variable autoyast causes
linuxrc to start in automated mode. The
linuxrc program searches for a configuration file, which
should be distinguished from the main control file, in the following
places:
in the root directory of the initial RAM disk used for booting the system;
in the root directory of the boot medium.
The linuxrc configuration file supports multiple
keywords. For a detailed description of how linuxrc
works and other keywords, see Appendix C, Advanced linuxrc options. Some of
the more common ones are:
- autoupgrade
Initiate an automatic upgrade using AutoYaST; see Section 4.9, “Upgrade”.
- autoyast
Location of the control file for automatic installation; see AutoYaST control file locations for details.
- ifcfg
Configure and start the network. Required if the AutoYaST is to be fetched from a remote location. See Section C.3, “Advanced network setup” for details.
- insmod
Kernel modules to load
- install
Location of the installation directory, for example
install=nfs://192.168.2.1/CDs/.Note: Disabling SSL checks
When you are using HTTPS, SSL checking is enabled by default. If necessary, you can disable SSL checking by appending
ssl_verify=noto your HTTPS URL, like the following examples:install=https://192.168.2.1/CDs/?ssl_verify=no
If you are passing multiple query options, separate them with ampersands:
install=https://192.168.2.1/CDs/?foo=bar&ssl_verify=no
See the "FTP/HTTP/HTTPS directory tree" section of
man 8 zypperfor more information.- instmode
Installation mode, for example
nfs,httpetc. (not needed ifinstallis set).- rootpassword
Password for root user if not specified in AutoYaST profile
- server
Server (NFS) to contact for source directory
- serverdir
Directory on NFS Server
- y2confirm
Even with <confirm>no</confirm> in the control file, the confirm proposal comes up.
These variables and keywords will bring the system up to the point where
YaST can take over with the main control file. Currently, the source
medium is automatically discovered, which in some cases makes it possible
to initiate the auto-install process without giving any instructions to
linuxrc.
The traditional linuxrc configuration file
(info) has the function of giving the client enough
information about the installation server and the location of the sources.
Usually, this file is not required, but it is needed in special network
environments where DHCP and BOOTP are not used or when special kernel
modules need to be loaded.
You can pass keywords to linuxrc using the kernel
command line. This can be done in several ways. You can specify
linuxrc keywords along with other kernel parameters
interactively at boot time, in the usual way. You can also insert kernel
parameters into custom network-bootable disk images. It is also possible to
configure a DHCP server to pass kernel parameters in combination with
Etherboot or PXE.
Note: Using autoyast2 boot option instead of autoyast
The autoyast2 option is similar to the
autoyast option, but linuxrc parses
the provided value and, for example, tries to configure a network when
needed. This option is not described in this documentation. For
information about differences between the AutoYaST and
linuxrc URI syntax, see the linuxrc
appendix: Appendix C, Advanced linuxrc options. AutoYaST's rules and classes are
not supported.
The command line variable autoyast can be used in the
format described in the following list.
AutoYaST control file locations #
- Format of URIs
The
autoyastsyntax for the URIs for your control file locations can be confusing. The format is SCHEMA://HOST/PATH-TO-FILE. The number of forward slashes to use varies. For remote locations of your control file, the URI looks like this example for an NFS server, with two slashes:autoyast=nfs://SERVER/PATH.It is different when your control file is on a local file system. For example,
autoyast=usb:///profile.xmlis the same asautoyast=usb://localhost/profile.xml. You may omit the local host name, but you must keep the third slash.autoyast=usb://profile.xmlwill fail becauseprofile.xmlis interpreted as the host name.- When no control file specification is needed
For upgrades, no
autoyastvariable is needed for an automated offline upgrade, see Procedure 4.1, “Starting AutoYaST in offline upgrade mode”.For new installations,
autoyastwill be started if a file namedautoinst.xmlis in one of the following three locations:The root directory of the installation flash disk (for example, a USB stick)
The root directory of the installation medium
The root directory of the initial RAM disk used to boot the system
autoyast=file:///PATHLooks for control file in the specified path, relative to the source root directory, for example
file:///autoinst.xmlwhen the control file is in the top-level directory of any local file system, including mounted external devices such as a CD or USB drive. (This is the same asfile://localhost/autoinst.xml.)autoyast=device://DEVICE/FILENAMELooks for the control file on a storage device. Do not specify the full path to the device, but the device name only (for example,
device://vda1/autoyast.xml). You may also omit specifying the device and triggerautoyastto search all devices, for example,autoyast=device://localhost/autoinst.xml, orautoyast=device:///autoinst.xml.autoyast=nfs://SERVER/PATHLooks for the control file on an NFS server.
autoyast=http://[user:password@]SERVER/PATHRetrieves the control file from a Web server using the HTTP protocol. Specifying a user name and a password is optional.
autoyast=https://[user:password@]SERVER/PATHRetrieves the control file from a Web server using HTTPS. Specifying a user name and a password is optional.
autoyast=tftp://SERVER/PATHRetrieve the control file via TFTP.
autoyast=ftp://[user:password@]SERVER/PATHRetrieve the control file via FTP. Specifying a user name and a password is optional.
autoyast=usb:///PATHRetrieve the control file from USB devices (
autoyastwill search all connected USB devices).autoyast=relurl://PATHRetrieve the control file from the installation source: either from the default installation source or from the installation source defined in
install=INSTALLATION_SOURCE_PATH.autoyast=cifs://SERVER/PATHLooks for the control file on a CIFS server.
autoyast=label://LABEL/PATHSearches for a control file on a device with the specified label.
Several scenarios for auto-installation are possible using different types
of infrastructure and source media. The simplest way is to use the
appropriate installation media of openSUSE Leap
(SLE-15-SP3-Online-ARCH-GM-media1.iso or
SLE-15-SP3-Full-ARCH-GM-media1.iso). But to initiate the
auto-installation process, the auto-installation command line variable
should be entered at system boot-up and the control file should be
accessible for YaST.
In a scripting context, you can use a serial console for your virtual machine, that allows you to work in text mode. Then you can pass the required parameters from an expect script or equivalent.
The following list of scenarios explains how the control file can be supplied:
- Using the openSUSE Leap installation media
When using the original installation media (
SLE-15-SP3-Online-ARCH-GM-media1.isoorSLE-15-SP3-Full-ARCH-GM-media1.isois needed), the control file needs to be accessible via flash disk (for example, a USB stick) or network:Flash disk (for example, a USB stick). Access the control file via the
autoyast=usb://PATHoption.Network. Access the control file via the following commands:
autoyast=nfs://..,autoyast=ftp://..,autoyast=http://..,autoyast=https://..,autoyast=tftp://.., orautoyast=cifs://... Network access needs to be defined using the boot options in linuxrc. This can be done via DHCP:netsetup=dhcp autoyast=http://163.122.3.5/autoyast.xml- Using a custom installation media
In this case, you can include the control file directly on the installation media. When placing it in the root directory and naming it
autoinst.xml, it will automatically be found and used for the installation. Otherwise useautoyast=file:///PATHto specify the path to the control file.- Using a network installation source
This option is the most important one because installations of multiple machines are usually done using SLP or NFS servers and other network services like BOOTP and DHCP. The easiest way to make the control file available is to place it in the root directory of the installation source, naming it
autoinst.xml. In this case, it will automatically be found and used for the installation. The control file can also reside in the following places:Flash disk (for example, a USB stick). Access the control file via the
autoyast=usb://PATHoption.Network. Access the control file via the following commands:
autoyast=nfs://..,autoyast=ftp://..,autoyast=http://..,autoyast=https://..,autoyast=tftp://.., orautoyast=cifs://...
Note: Disabling network and DHCP
To disable the network during installations where it is not needed or
unavailable, for example when auto-installing from DVD-ROMs, use the
linuxrc option netsetup=0 to disable
the network setup.
With all AutoYaST invocation options it is possible to specify the location of the control file in the following ways:
Specify the exact location of the control file:
autoyast=http://192.168.1.1/control-files/client01.xml
Specify a directory where several control files are located:
autoyast=http://192.168.1.1/control-files/
In this case the relevant control file is retrieved using the hex digit representation of the IP as described below.
The path of this directory needs to end with a
/.The files in the directory must not have any extension, for example
.xml. So the file name needs to be the IP or MAC address only.>ls -r control-files C00002 0080C8F6484C default
If only the path prefix variable is defined, YaST will fetch the control file from the specified location in the following way:
First, it will search for the control file using its own IP address in uppercase hexadecimal, for example
192.0.2.91 -> C000025B.If this file is not found, YaST will remove one hex digit and try again. This action is repeated until the file with the correct name is found. Ultimately, it will try looking for a file with the MAC address of the client as the file name (mac should have the following syntax:
0080C8F6484C) and if not found a file nameddefault(in lowercase).
As an example, for 192.0.2.91, the HTTP client will try:
C000025B C000025 C00002 C0000 C000 C00 C0 C 0080C8F6484C default
in that order.
To determine the hex representation of the IP address of the client, use
the utility called /usr/bin/gethostip available with the
syslinux package.
Example 9.1: Determine HEX code for an IP address #
> /usr/bin/gethostip 10.10.0.1
10.10.0.1 10.10.0.1 0A0A00019.3.2 Auto-installing a single system #Edit source
The easiest way to auto-install a system without any network connection is to use the original openSUSE Leap DVD-ROMs and a flash disk (for example, a USB stick). You do not need to set up an installation server nor the network environment.
Create the control file and name it autoinst.xml. Copy
the file autoinst.xml to the flash disk.
9.3.3 Combining the linuxrc info file with the AutoYaST control file #Edit source
If you choose to pass information to linuxrc using the
info file or as boot options, you may integrate the
keywords into the AutoYaST control file. Add an info_file
section as shown in the example below. This section contains
keyword—value pairs, separated by colons, one pair per line.
Example 9.2: linuxrc Options in the AutoYaST control file #
....
<install>
....
<init>
<info_file>
install: nfs://192.168.1.1/CDs/full-x86_64
dud: https://example.com/driver_updates/filename.dud
upgrade: 1
textmode: 1
</info_file>
</init>
......
</install>
....
Note that the autoyast2 keyword must point to the same
file. If it is on a flash disk (for example, a USB stick), then the option
usb:// needs to be used. If the
info file is stored in the initial RAM disk, the
file:/// option needs to be used.
9.4 System configuration #Edit source
The system configuration during auto-installation is the most important part of the whole process. As you have seen in the previous chapters, almost anything can be configured automatically on the target system. In addition to the pre-defined directives, you can always use post-scripts to change other things in the system. Additionally you can change any system variables, and if required, copy complete configuration files into the target system.
9.4.1 Post-install and system configuration #Edit source
The post-installation and system configuration are initiated directly after the last package is installed on the target system and continue after the system has booted for the first time.
Before the system is booted for the first time, AutoYaST writes all data collected during installation and writes the boot loader in the specified location. In addition to these regular tasks, AutoYaST executes the chroot-scripts as specified in the control file. Note that these scripts are executed while the system is not yet mounted.
If a different kernel than the default is installed, a hard reboot will be
required. A hard reboot can also be forced during auto-installation,
independent of the installed kernel. Use the reboot
property of the general resource (see
Section 4.1, “General options”).
9.4.2 System customization #Edit source
Most of the system customization is done in the second stage of the installation. If you require customization that cannot be done using AutoYaST resources, use post-install scripts for further modifications.
You can define an unlimited number of custom scripts in the control file, either by editing the control file or by using the configuration system.
Part V Uses for AutoYaST on installed systems #Edit source
- 10 Running AutoYaST in an installed system
In some cases it is useful to run AutoYaST in a running system.
10 Running AutoYaST in an installed system #Edit source
In some cases it is useful to run AutoYaST in a running system.
In the following example, an additional software package
(foo) is going to be installed. To run this
software, a user needs to be added and an NTP client needs to be configured.
The respective AutoYaST profile needs to include a section for the package installation (Section 4.8.7, “Installing packages in stage 2”), a user (Section 4.29.1, “Users”) section and an NTP client (Section 4.20, “NTP client”) section:
<?xml version="1.0"?>
<!DOCTYPE profile>
<profile xmlns="http://www.suse.com/1.0/yast2ns" xmlns:config="http://www.suse.com/1.0/configns">
<ntp-client>
<peers config:type="list">
<peer>
<address>us.pool.ntp.org</address>
<comment/>
<options> iburst</options>
<type>server</type>
</peer>
</peers>
<start_at_boot config:type="boolean">true</start_at_boot>
<start_in_chroot config:type="boolean">false</start_in_chroot>
<sync_interval config:type="integer">5</sync_interval>
<synchronize_time config:type="boolean">false</synchronize_time>
</ntp-client>
<software>
<post-packages config:type="list">
<package>ntp</package>
<package>yast2-ntp-client</package>
<package>foo</package>
</post-packages>
</software>
<users config:type="list">
<user>
<encrypted config:type="boolean">false</encrypted>
<fullname>Foo user</fullname>
<gid>100</gid>
<home>/home/foo</home>
<password_settings>
<expire/>
<flag/>
<inact/>
<max>99999</max>
<min>0</min>
<warn>7</warn>
</password_settings>
<shell>/bin/bash</shell>
<uid>1001</uid>
<user_password>linux</user_password>
<username>foo</username>
</user>
</users>
</profile>
Store this file as /tmp/install_foo.xml and start the
AutoYaST installation process by calling:
>sudoyast2 ayast_setup setup filename=/tmp/install_foo.xml dopackages="yes"
For more information, run yast2 ayast_setup longhelp
Part VI Appendixes #Edit source
- A Handling rules
The following figure illustrates how rules are handled and the processes of retrieval and merge.
- B AutoYaST FAQ—frequently asked questions
How do I invoke an AutoYaST installation?
- C Advanced
linuxrcoptions linuxrcis a small program that runs after the kernel has loaded, but before AutoYaST or other stages. It prepares the system for installation. It allows the user to load modules, start an installed system or a rescue system, and to guide the operation of YaST.- D GNU licenses
This appendix contains the GNU Free Documentation License version 1.2.
A Handling rules #Edit source
The following figure illustrates how rules are handled and the processes of retrieval and merge.
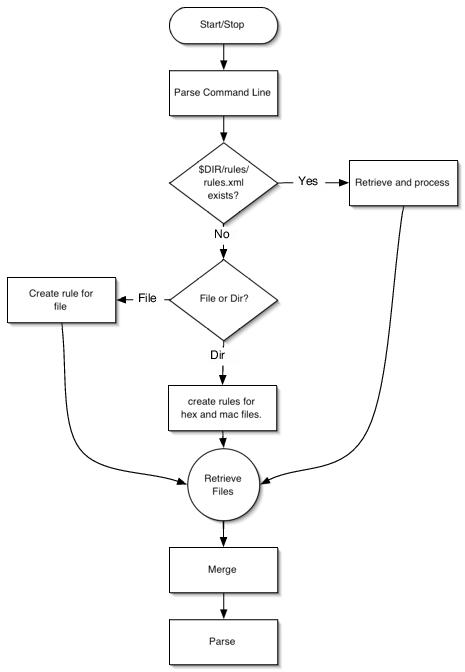
Figure A.1: Rules retrieval process #
B AutoYaST FAQ—frequently asked questions #Edit source
- Q: 1. How do I invoke an AutoYaST installation?
On all openSUSE Leap versions, the automatic installation gets invoked by adding
autoyast=<PATH_TO_PROFILE>to the kernel parameter list. So for example addingautoyast=http://MYSERVER/MYCONFIG.xmlwill start an automatic installation where the profile with the AutoYaST configuration gets fetched from the Web servermyserver. See Section 9.3, “Invoking the auto-installation process” for more information.
- Q: 2. What is an AutoYaST profile?
A profile is the AutoYaST configuration file. The content of the AutoYaST profile determines how the system will be configured and which packages will get installed. This includes partitioning, network setup, and software sources, to name but a few. Almost everything that can be configured with YaST in a running system can also be configured in an AutoYaST profile. The profile format is an ASCII XML file.
- Q: 3. How do I create an AutoYaST profile?
The easiest way to create an AutoYaST profile is to use an existing openSUSE Leap system as a template. On an already installed system, start › › . Now select › from the menu. Choose the system components you want to include in the profile. Alternatively, create a profile containing the complete system configuration by running
sudo yast clone_systemfrom the command line.Both methods will create the file
/root/autoinst.xml. The version created on the command line can be used to set up an identical clone of the system on which the profile was created. However, usually you will want to adjust the file to make it possible to install several machines that are very similar, but not identical. This can be done by adjusting the profile using your favorite text/XML editor.
- Q: 4. How can I check the syntax of a created AutoYaST profile?
The most efficient way to check your created AutoYaST profile is by using
jingorxmllint.See Section 3.3, “Creating/editing a control file manually” for details.
- Q: 5. What is smallest AutoYaST profile that makes sense?
If a section has not been defined in the AutoYaST profile the settings of the general YaST installation proposal will be used. However, you need to specify at least the
rootpassword to be able to log in to the machine after the installation.<?xml version="1.0" encoding="UTF-8"?> <!DOCTYPE profile> <profile xmlns="http://www.suse.com/1.0/yast2ns" xmlns:config="http://www.suse.com/1.0/configns"> <users config:type="list"> <user> <encrypted config:type="boolean">false</encrypted> <user_password>linux</user_password> <username>root</username> </user> </users> </profile>
- Q: 6. How do I do an automatic installation with autodetection of my sound card?
Use the following
soundsection in your profile:<sound> <autoinstall config:type="boolean">true</autoinstall> <configure_detected config:type="boolean">true</configure_detected> </sound>
- Q: 7. I want to install from DVD only. Where do I put the AutoYaST profile?
Put the profile in the root of the DVD. Refer to it with
file:///PROFILE.xml.
- Q: 8. How can I test a merging process on the command line?
To merge two profiles,
a.xmlwithbase.xml, run the following command:>/usr/bin/xsltproc --novalid --param replace "'false'" \ --param dontmerge1 "'package'" --param with "'a.xml'" --output out.xml \ /usr/share/autoinstall/xslt/merge.xslt base.xmlThis requires sections in both profiles to be in alphabetical order (<software>, for example, needs to be listed after <add-on>). If you have created the profile with YaST, profiles are automatically sorted correctly.
The
dontmerge1parameter is optional and an example of what to do when you use thedont_mergeelement in your profile. See Section 6.4, “Merging of rules and classes” for more information.
- Q: 9. Can I call Zypper from scripts?
Zypper can only be called from AutoYaST init scripts, because during the post-script phase, YaST still has an exclusive lock on the RPM database.
If you really need to use other script types (for example a post-script) you will need to break the lock at your own risk:
<post-scripts config:type="list"> <script> <filename>yast_clone.sh</filename> <interpreter>shell</interpreter> <location/> <feedback config:type="boolean">false</feedback> <source><![CDATA[#!/bin/sh mv /var/run/zypp.pid /var/run/zypp.sav zypper in foo mv /var/run/zypp.sav /var/run/zypp.pid ]]></source> </script> </post-scripts>
- Q: 10. Is the order of sections in an AutoYaST profile important?
Actually the order is not important. The order of sections in the profile has no influence on the AutoYaST workflow. However, to merge different profiles, sections need to be in alphabetical order.
- Q: 11.
linuxrcblocks the installation withFile not signed. I need to manually interact. linuxrcfound an unsigned file, such as a driver update. To use an unsigned file, you can suppress that message by passinginsecure=1to thelinuxrcparameter list (together with theautoyast=...parameter).
- Q: 12. I want to install from DVD/USB/HD but fetch the XML file from the network.
You need to pass
ifcfgtolinuxrc. This is required to set up the network, otherwise AutoYaST cannot download the profile from the remote host. See Section C.3, “Advanced network setup” for more information.
- Q: 13.
Is installation onto an NFS root (
/) possible? Yes, but it is more complex than other methods. The environment (DHCP, TFTP, etc.) must be set up very carefully. The AutoYaST profile must look like the following:
<?xml version="1.0"?> <!DOCTYPE profile> <profile xmlns="http://www.suse.com/1.0/yast2ns" xmlns:config="http://www.suse.com/1.0/configns"> <partitioning config:type="list"> <drive> <device>/dev/nfs</device> <initialize config:type="boolean">false</initialize> <type config:type="symbol">CT_NFS</type> <partitions config:type="list"> <partition> <filesystem config:type="symbol">nfs</filesystem> <fstopt>nolock</fstopt> <device>10.10.1.53:/tmp/m4</device> <mount>/</mount> </partition> </partitions> <use>all</use> </drive> </partitioning> </profile>
- Q: 14. Where can I ask questions which have not been answered here?
There is an AutoYaST mailing list where you can post your questions. Join us at http://lists.opensuse.org/opensuse-autoinstall/.
C Advanced linuxrc options #Edit source
linuxrc is a small program that runs after the kernel has
loaded, but before AutoYaST or other stages. It prepares the system for
installation. It allows the user to load modules, start an installed system
or a rescue system, and to guide the operation of YaST.
Note: AutoYaST and linuxrc settings are not identical
Some linuxrc settings coincidentally have the same names
as settings used by AutoYaST in its autoyast.xml file. This
does not mean that they take the same parameters or
function in the same way. For example, AutoYaST takes a
self_update setting. If this value is set to
1, another setting, self_update_url
will be read and followed. Although linuxrc also has a
self_update setting, linuxrc's setting
takes values of either 0 or a URL.
Do not pass AutoYaST parameters to linuxrc, as this will
almost certainly not give the desired results.
If linuxrc is installed on a machine, information about it
can be found in the directory
/usr/share/doc/packages/linuxrc/. Alternatively, its
documentation can be found online at:
https://en.opensuse.org/SDB:Linuxrc.
Note: Running linuxrc on an installed system
If you run linuxrc on an installed system, it will work
slightly differently so as not to destroy your installation. As a
consequence, you cannot test all features this way.
To keep the linuxrc binary file as small as possible, all
its libraries and other supplemental files are linked directly into the main
program binary file. This means that there is no need for any shared
libraries in the initial RAM disk, initrd.
C.1 Passing parameters to linuxrc #Edit source
Unless linuxrc is in manual mode, it will look for an
info file in these locations: first
/info on the flash disk (for example, a USB stick) and
if that does not exist, for /info in the
initrd. After that, it parses the kernel command line
for parameters. You may change the info file
linuxrc reads by setting the info
command line parameter. If you do not want linuxrc to
read the kernel command line (for example, because you need to specify a
kernel parameter that linuxrc recognizes as well), use
linuxrc=nocmdline.
linuxrc will always look for and parse a file called
/linuxrc.config. Use this file to change default values
if you need to. In general, it is better to use the
info file instead. Note that
/linuxrc.config is read before any
info file, even in manual mode.
C.2 info file format #Edit source
Lines starting with # are comments. Valid entries are of
the form:
key: value
Note that value extends to the end of the line and
therefore may contain spaces. The matching of key is on a
case-insensitive basis.
You can use the same key-value pairs on the kernel command line using the
syntax key=value. Lines that do not have the form
described above will be ignored.
The table below lists important keys and example values. For a complete list
of linuxrc parameters, refer to
https://en.opensuse.org/SDB:Linuxrc.
Table C.1: Advanced linuxrc keywords #
|
Keyword: Example Value |
Description |
|---|---|
|
|
If 0, never ask for swap; if the argument is a positive number
|
|
|
Location of the auto installation file; activates auto installation mode. See AutoYaST control file locations for details. |
|
|
10 seconds timeout for BOOTP requests. |
|
|
Sleep 5 seconds between network activation and starting bootp. |
|
|
Set the menu color scheme. |
|
|
Run command. |
|
|
Use the |
|
|
Load the installation system into RAM disk. |
|
|
Set up and start the network. See Section C.3, “Advanced network setup” for more information. |
|
|
Load MODULE. |
|
|
Install from the repository specified with URL. For the syntax of URL refer to https://en.opensuse.org/SDB:Linuxrc#url_descr. |
|
|
Virtual console keyboard map to load. |
|
|
Language preselected for the installation. |
|
|
Enable remote logging via syslog via UDP port 514 |
|
|
Enable remote logging via syslog via TCP port 514 |
|
|
Load installation system into RAM disk if free memory is above 50000 KB. |
|
|
Ask for swap if free memory drops below 10000 KB. |
|
|
Run YaST in text mode if free memory is below 20000 KB. |
|
|
Ask for swap before starting YaST if free memory is below 10000 KB. |
|
|
Defines an HTTP proxy server. For the full parameter syntax, refer to https://en.opensuse.org/SDB:Linuxrc#p_proxy. |
|
|
Load the rescue system; the URL variant specifies the location of the rescue image explicitly. |
|
|
Location of the rescue system image. |
|
|
Location of the installation system image. |
|
|
Start YaST in text mode. |
|
|
Wait four seconds after loading the USB modules. |
|
|
Overrides the confirm parameter in a control file and requests confirmation of installation proposal. |
C.3 Advanced network setup #Edit source
Even if parameters like hostip,
nameserver, and gateway are passed to
linuxrc, the network is only started when it is needed
(for example, when installing via SSH or VNC). Because
autoyast is not a linuxrc parameter
(this parameter is ignored by linuxrc and is only passed
to YaST), the network will not be started
automatically when specifying a remote location for the AutoYaST profile.
Therefore, the network needs to be started explicitly. This is done by using
the parameter ifcfg. ifcfg directly
controls the content of the
/etc/sysconfig/network/ifcfg-* files.
- DHCP network configuration
The general syntax to configure DHCP is
ifcfg=INTERFACE=DHCP*,OPTION1=VALUE1,OPTION2=VALUE2
where INTERFACE is the interface name, for example
eth0, oreth*for all interfaces. DHCP* can either bedhcp(IPv4 and IPv6),dhcp4, ordhcp6.To set up DHCP for
eth0use:ifcfg=eth0=dhcp
To set up DHCP on all interfaces use:
ifcfg=eth*=dhcp
- Static network configuration
The general syntax to configure a static network is
ifcfg=INTERFACE=IP_LIST,GATEWAY_LIST,NAMESERVER_LIST,DOMAINSEARCH_LIST,\ OPTION1=value1,...
where INTERFACE is the interface name, for example
eth0. If usingeth*, the first device available will be used. The other parameters need to be replaced with the respective values in the given order. Example:ifcfg=eth0=192.168.2.100/24,192.168.5.1,192.168.1.116,example.com
When specifying multiple addresses for a parameter, use spaces to separate them and quote the complete string. The following example uses two name servers and a search list containing two domains.
ifcfg="eth0=192.168.2.100/24,192.168.5.1,192.168.1.116 192.168.1.117,example.com example.net"
For more information refer to https://en.opensuse.org/SDB:Linuxrc#Network_Configuration.
D GNU licenses #Edit source
This appendix contains the GNU Free Documentation License version 1.2.
GNU free documentation license #Edit source
Copyright (C) 2000, 2001, 2002 Free Software Foundation, Inc. 51 Franklin St, Fifth Floor, Boston, MA 02110-1301 USA. Everyone is permitted to copy and distribute verbatim copies of this license document, but changing it is not allowed.
0. PREAMBLE #Edit source
The purpose of this License is to make a manual, textbook, or other functional and useful document "free" in the sense of freedom: to assure everyone the effective freedom to copy and redistribute it, with or without modifying it, either commercially or non-commercially. Secondarily, this License preserves for the author and publisher a way to get credit for their work, while not being considered responsible for modifications made by others.
This License is a kind of "copyleft", which means that derivative works of the document must themselves be free in the same sense. It complements the GNU General Public License, which is a copyleft license designed for free software.
We have designed this License to use it for manuals for free software, because free software needs free documentation: a free program should come with manuals providing the same freedoms that the software does. But this License is not limited to software manuals; it can be used for any textual work, regardless of subject matter or whether it is published as a printed book. We recommend this License principally for works whose purpose is instruction or reference.
1. APPLICABILITY AND DEFINITIONS #Edit source
This License applies to any manual or other work, in any medium, that contains a notice placed by the copyright holder saying it can be distributed under the terms of this License. Such a notice grants a world-wide, royalty-free license, unlimited in duration, to use that work under the conditions stated herein. The "Document", below, refers to any such manual or work. Any member of the public is a licensee, and is addressed as "you". You accept the license if you copy, modify or distribute the work in a way requiring permission under copyright law.
A "Modified Version" of the Document means any work containing the Document or a portion of it, either copied verbatim, or with modifications and/or translated into another language.
A "Secondary Section" is a named appendix or a front-matter section of the Document that deals exclusively with the relationship of the publishers or authors of the Document to the Document's overall subject (or to related matters) and contains nothing that could fall directly within that overall subject. (Thus, if the Document is in part a textbook of mathematics, a Secondary Section may not explain any mathematics.) The relationship could be a matter of historical connection with the subject or with related matters, or of legal, commercial, philosophical, ethical or political position regarding them.
The "Invariant Sections" are certain Secondary Sections whose titles are designated, as being those of Invariant Sections, in the notice that says that the Document is released under this License. If a section does not fit the above definition of Secondary then it is not allowed to be designated as Invariant. The Document may contain zero Invariant Sections. If the Document does not identify any Invariant Sections then there are none.
The "Cover Texts" are certain short passages of text that are listed, as Front-Cover Texts or Back-Cover Texts, in the notice that says that the Document is released under this License. A Front-Cover Text may be at most 5 words, and a Back-Cover Text may be at most 25 words.
A "Transparent" copy of the Document means a machine-readable copy, represented in a format whose specification is available to the general public, that is suitable for revising the document straightforwardly with generic text editors or (for images composed of pixels) generic paint programs or (for drawings) some widely available drawing editor, and that is suitable for input to text formatters or for automatic translation to a variety of formats suitable for input to text formatters. A copy made in an otherwise Transparent file format whose markup, or absence of markup, has been arranged to thwart or discourage subsequent modification by readers is not Transparent. An image format is not Transparent if used for any substantial amount of text. A copy that is not "Transparent" is called "Opaque".
Examples of suitable formats for Transparent copies include plain ASCII without markup, Texinfo input format, LaTeX input format, SGML or XML using a publicly available DTD, and standard-conforming simple HTML, PostScript or PDF designed for human modification. Examples of transparent image formats include PNG, XCF and JPG. Opaque formats include proprietary formats that can be read and edited only by proprietary word processors, SGML or XML for which the DTD and/or processing tools are not generally available, and the machine-generated HTML, PostScript or PDF produced by some word processors for output purposes only.
The "Title Page" means, for a printed book, the title page itself, plus such following pages as are needed to hold, legibly, the material this License requires to appear in the title page. For works in formats which do not have any title page as such, "Title Page" means the text near the most prominent appearance of the work's title, preceding the beginning of the body of the text.
A section "Entitled XYZ" means a named sub-unit of the Document whose title either is precisely XYZ or contains XYZ in parentheses following text that translates XYZ in another language. (Here XYZ stands for a specific section name mentioned below, such as "Acknowledgements", "Dedications", "Endorsements", or "History".) To "Preserve the Title" of such a section when you modify the Document means that it remains a section "Entitled XYZ" according to this definition.
The Document may include Warranty Disclaimers next to the notice which states that this License applies to the Document. These Warranty Disclaimers are considered to be included by reference in this License, but only as regards disclaiming warranties: any other implication that these Warranty Disclaimers may have is void and has no effect on the meaning of this License.
2. VERBATIM COPYING #Edit source
You may copy and distribute the Document in any medium, either commercially or non-commercially, provided that this License, the copyright notices, and the license notice saying this License applies to the Document are reproduced in all copies, and that you add no other conditions whatsoever to those of this License. You may not use technical measures to obstruct or control the reading or further copying of the copies you make or distribute. However, you may accept compensation in exchange for copies. If you distribute a large enough number of copies you must also follow the conditions in section 3.
You may also lend copies, under the same conditions stated above, and you may publicly display copies.
3. COPYING IN QUANTITY #Edit source
If you publish printed copies (or copies in media that commonly have printed covers) of the Document, numbering more than 100, and the Document's license notice requires Cover Texts, you must enclose the copies in covers that carry, clearly and legibly, all these Cover Texts: Front-Cover Texts on the front cover, and Back-Cover Texts on the back cover. Both covers must also clearly and legibly identify you as the publisher of these copies. The front cover must present the full title with all words of the title equally prominent and visible. You may add other material on the covers in addition. Copying with changes limited to the covers, as long as they preserve the title of the Document and satisfy these conditions, can be treated as verbatim copying in other respects.
If the required texts for either cover are too voluminous to fit legibly, you should put the first ones listed (as many as fit reasonably) on the actual cover, and continue the rest onto adjacent pages.
If you publish or distribute Opaque copies of the Document numbering more than 100, you must either include a machine-readable Transparent copy along with each Opaque copy, or state in or with each Opaque copy a computer-network location from which the general network-using public has access to download using public-standard network protocols a complete Transparent copy of the Document, free of added material. If you use the latter option, you must take reasonably prudent steps, when you begin distribution of Opaque copies in quantity, to ensure that this Transparent copy will remain thus accessible at the stated location until at least one year after the last time you distribute an Opaque copy (directly or through your agents or retailers) of that edition to the public.
It is requested, but not required, that you contact the authors of the Document well before redistributing any large number of copies, to give them a chance to provide you with an updated version of the Document.
4. MODIFICATIONS #Edit source
You may copy and distribute a Modified Version of the Document under the conditions of sections 2 and 3 above, provided that you release the Modified Version under precisely this License, with the Modified Version filling the role of the Document, thus licensing distribution and modification of the Modified Version to whoever possesses a copy of it. In addition, you must do these things in the Modified Version:
Use in the Title Page (and on the covers, if any) a title distinct from that of the Document, and from those of previous versions (which should, if there were any, be listed in the History section of the Document). You may use the same title as a previous version if the original publisher of that version gives permission.
List on the Title Page, as authors, one or more persons or entities responsible for authorship of the modifications in the Modified Version, together with at least five of the principal authors of the Document (all of its principal authors, if it has fewer than five), unless they release you from this requirement.
State on the Title page the name of the publisher of the Modified Version, as the publisher.
Preserve all the copyright notices of the Document.
Add an appropriate copyright notice for your modifications adjacent to the other copyright notices.
Include, immediately after the copyright notices, a license notice giving the public permission to use the Modified Version under the terms of this License, in the form shown in the Addendum below.
Preserve in that license notice the full lists of Invariant Sections and required Cover Texts given in the Document's license notice.
Include an unaltered copy of this License.
Preserve the section Entitled "History", Preserve its Title, and add to it an item stating at least the title, year, new authors, and publisher of the Modified Version as given on the Title Page. If there is no section Entitled "History" in the Document, create one stating the title, year, authors, and publisher of the Document as given on its Title Page, then add an item describing the Modified Version as stated in the previous sentence.
Preserve the network location, if any, given in the Document for public access to a Transparent copy of the Document, and likewise the network locations given in the Document for previous versions it was based on. These may be placed in the "History" section. You may omit a network location for a work that was published at least four years before the Document itself, or if the original publisher of the version it refers to gives permission.
For any section Entitled "Acknowledgements" or "Dedications", Preserve the Title of the section, and preserve in the section all the substance and tone of each of the contributor acknowledgements and/or dedications given therein.
Preserve all the Invariant Sections of the Document, unaltered in their text and in their titles. Section numbers or the equivalent are not considered part of the section titles.
Delete any section Entitled "Endorsements". Such a section may not be included in the Modified Version.
Do not retitle any existing section to be Entitled "Endorsements" or to conflict in title with any Invariant Section.
Preserve any Warranty Disclaimers.
If the Modified Version includes new front-matter sections or appendices that qualify as Secondary Sections and contain no material copied from the Document, you may at your option designate some or all of these sections as invariant. To do this, add their titles to the list of Invariant Sections in the Modified Version's license notice. These titles must be distinct from any other section titles.
You may add a section Entitled "Endorsements", provided it contains nothing but endorsements of your Modified Version by various parties--for example, statements of peer review or that the text has been approved by an organization as the authoritative definition of a standard.
You may add a passage of up to five words as a Front-Cover Text, and a passage of up to 25 words as a Back-Cover Text, to the end of the list of Cover Texts in the Modified Version. Only one passage of Front-Cover Text and one of Back-Cover Text may be added by (or through arrangements made by) any one entity. If the Document already includes a cover text for the same cover, previously added by you or by arrangement made by the same entity you are acting on behalf of, you may not add another; but you may replace the old one, on explicit permission from the previous publisher that added the old one.
The author(s) and publisher(s) of the Document do not by this License give permission to use their names for publicity for or to assert or imply endorsement of any Modified Version.
5. COMBINING DOCUMENTS #Edit source
You may combine the Document with other documents released under this License, under the terms defined in section 4 above for modified versions, provided that you include in the combination all of the Invariant Sections of all of the original documents, unmodified, and list them all as Invariant Sections of your combined work in its license notice, and that you preserve all their Warranty Disclaimers.
The combined work need only contain one copy of this License, and multiple identical Invariant Sections may be replaced with a single copy. If there are multiple Invariant Sections with the same name but different contents, make the title of each such section unique by adding at the end of it, in parentheses, the name of the original author or publisher of that section if known, or else a unique number. Make the same adjustment to the section titles in the list of Invariant Sections in the license notice of the combined work.
In the combination, you must combine any sections Entitled "History" in the various original documents, forming one section Entitled "History"; likewise combine any sections Entitled "Acknowledgements", and any sections Entitled "Dedications". You must delete all sections Entitled "Endorsements".
6. COLLECTIONS OF DOCUMENTS #Edit source
You may make a collection consisting of the Document and other documents released under this License, and replace the individual copies of this License in the various documents with a single copy that is included in the collection, provided that you follow the rules of this License for verbatim copying of each of the documents in all other respects.
You may extract a single document from such a collection, and distribute it individually under this License, provided you insert a copy of this License into the extracted document, and follow this License in all other respects regarding verbatim copying of that document.
7. AGGREGATION WITH INDEPENDENT WORKS #Edit source
A compilation of the Document or its derivatives with other separate and independent documents or works, in or on a volume of a storage or distribution medium, is called an "aggregate" if the copyright resulting from the compilation is not used to limit the legal rights of the compilation's users beyond what the individual works permit. When the Document is included in an aggregate, this License does not apply to the other works in the aggregate which are not themselves derivative works of the Document.
If the Cover Text requirement of section 3 is applicable to these copies of the Document, then if the Document is less than one half of the entire aggregate, the Document's Cover Texts may be placed on covers that bracket the Document within the aggregate, or the electronic equivalent of covers if the Document is in electronic form. Otherwise they must appear on printed covers that bracket the whole aggregate.
8. TRANSLATION #Edit source
Translation is considered a kind of modification, so you may distribute translations of the Document under the terms of section 4. Replacing Invariant Sections with translations requires special permission from their copyright holders, but you may include translations of some or all Invariant Sections in addition to the original versions of these Invariant Sections. You may include a translation of this License, and all the license notices in the Document, and any Warranty Disclaimers, provided that you also include the original English version of this License and the original versions of those notices and disclaimers. In case of a disagreement between the translation and the original version of this License or a notice or disclaimer, the original version will prevail.
If a section in the Document is Entitled "Acknowledgements", "Dedications", or "History", the requirement (section 4) to Preserve its Title (section 1) will typically require changing the actual title.
9. TERMINATION #Edit source
You may not copy, modify, sublicense, or distribute the Document except as expressly provided for under this License. Any other attempt to copy, modify, sublicense or distribute the Document is void, and will automatically terminate your rights under this License. However, parties who have received copies, or rights, from you under this License will not have their licenses terminated so long as such parties remain in full compliance.
10. FUTURE REVISIONS OF THIS LICENSE #Edit source
The Free Software Foundation may publish new, revised versions of the GNU Free Documentation License from time to time. Such new versions will be similar in spirit to the present version, but may differ in detail to address new problems or concerns. See http://www.gnu.org/copyleft/.
Each version of the License is given a distinguishing version number. If the Document specifies that a particular numbered version of this License "or any later version" applies to it, you have the option of following the terms and conditions either of that specified version or of any later version that has been published (not as a draft) by the Free Software Foundation. If the Document does not specify a version number of this License, you may choose any version ever published (not as a draft) by the Free Software Foundation.
ADDENDUM: How to use this License for your documents #Edit source
Copyright (c) YEAR YOUR NAME. Permission is granted to copy, distribute and/or modify this document under the terms of the GNU Free Documentation License, Version 1.2 or any later version published by the Free Software Foundation; with no Invariant Sections, no Front-Cover Texts, and no Back-Cover Texts. A copy of the license is included in the section entitled “GNU Free Documentation License”.
If you have Invariant Sections, Front-Cover Texts and Back-Cover Texts, replace the “with...Texts.” line with this:
with the Invariant Sections being LIST THEIR TITLES, with the Front-Cover Texts being LIST, and with the Back-Cover Texts being LIST.
If you have Invariant Sections without Cover Texts, or some other combination of the three, merge those two alternatives to suit the situation.
If your document contains nontrivial examples of program code, we recommend releasing these examples in parallel under your choice of free software license, such as the GNU General Public License, to permit their use in free software.