openSUSE Leap 42.1
Start-Up
- About This Guide
- I Installation
- 1 Installation Quick Start
- 2 Installation with YaST
- 2.1 Choosing the Installation Method
- 2.2 System Start-up for Installation
- 2.3 The Installation Workflow
- 2.4 Language, Keyboard and License Agreement
- 2.5 Network Settings
- 2.6 Installation Options
- 2.7 Suggested Partitioning
- 2.8 Clock and Time Zone
- 2.9 List Of Online Repositories
- 2.10 Add-On Product
- 2.11 Desktop Selection
- 2.12 Create New User
- 2.13 Password for the System Administrator
root - 2.14 Installation Settings
- 2.15 Performing the Installation
- II Administration
- III Managing and Updating Software
- IV The Bash Shell
- 13 Shell Basics
- 13.1 Starting a Shell
- 13.2 Entering Commands
- 13.3 Working with Files and Directories
- 13.4 Becoming Root
- 13.5 File Access Permissions
- 13.6 Useful Features of the Shell
- 13.7 Editing Texts
- 13.8 Searching for Files or Contents
- 13.9 Viewing Text Files
- 13.10 Redirection and Pipes
- 13.11 Starting Programs and Handling Processes
- 13.12 Important Linux Commands
- 14 Bash and Bash Scripts
- V Help and Troubleshooting
- A GNU Licenses
- 2.1 The Boot Screen on Machines with a Traditional BIOS
- 2.2 The Boot Screen on Machines with UEFI
- 2.3 Language, Keyboard and License Agreement
- 2.4 Network Settings
- 2.5 Installation Options
- 2.6 Partitioning
- 2.7 Clock and Time Zone
- 2.8 List Of Online Repositories
- 2.9 Add-On Product
- 2.10 Desktop Selection
- 2.11 Create New User
- 2.12 Password for the System Administrator
root - 2.13 Installation Settings
- 2.14 Software Selection and System Tasks
- 3.1 YaST User and Group Administration
- 9.1 Conflict Management of the Software Manager
- 9.2 Adding A Software Repository
- 9.3 Update Notification on GNOME Lock Screen
- 9.4 Update Notification on GNOME Desktop
- 9.5 GNOME Update Viewer
- 11.1 YaST Online Update
- 16.1 Checking Media
- 16.2 US Keyboard Layout
- 2.1 Boot Options
- 2.2 Installation Sources
- 2.3 Network Configuration
- 2.4 Miscellaneous
- 7.1 Generating PFL from Fontconfig rules
- 7.2 Results from Generating PFL from Fontconfig Rules with Changed Order
- 7.3 Results from Generating PFL from Fontconfig Rules
- 8.1 Available FUSE Plug-ins
- 13.1 Access Permissions For Files And Directories
- 14.1 Bash Configuration Files for Login Shells
- 14.2 Bash Configuration Files for Non-Login Shells
- 14.3 Special Files for Bash
- 14.4 Overview of a Standard Directory Tree
- 14.5 Useful Environment Variables
- 15.1 Man Pages—Categories and Descriptions
- 16.1 Log Files
- 16.2 System Information With the
/procFile System - 16.3 System Information With the
/sysFile System
- 6.1 Error Message from
lpd - 6.2 Broadcast from the CUPS Network Server
- 7.1 Specifying Rendering Algorithms
- 7.2 Aliases and Family Name Substitutions
- 7.3 Aliases and Family Name Substitutions
- 7.4 Aliases and Family Names Substitutions
- 12.1 List with
df -h - 13.1 Access Permissions For Files and Folders
- 13.2 Access Permissions For Files and Folders
- 14.1 A Shell Script Printing a Text
Copyright © 2006–2018 SUSE LLC and contributors. All rights reserved.
Permission is granted to copy, distribute and/or modify this document under the terms of the GNU Free Documentation License, Version 1.2 or (at your option) version 1.3; with the Invariant Section being this copyright notice and license. A copy of the license version 1.2 is included in the section entitled “GNU Free Documentation License”.
For SUSE trademarks, see http://www.suse.com/company/legal/. All other third party trademarks are the property of their respective owners. A trademark symbol (®, ™ etc.) denotes a SUSE or Novell trademark; an asterisk (*) denotes a third party trademark.
All information found in this book has been compiled with utmost attention to detail. However, this does not guarantee complete accuracy. Neither SUSE LLC, its affiliates, the authors nor the translators shall be held liable for possible errors or the consequences thereof.
About This Guide #
This manual will see you through your initial contact with openSUSE® Leap. Check out the various parts of this manual to learn how to install, use and enjoy your system.
- Installation
Guides you through the installation process and the basic configuration of your system. The Quick Start section shows a quick walk through the installation using default values. The second part of this chapter provides details for every installation step.
- Administration
Introduces YaST, the central tool for installation and configuration of your system. Learn how to initially set up your system and how to modify key components of your system.
- Managing and Updating Software
Understand how to install or remove software with either YaST or using the command line, how to use the 1-Click Install feature, and how to keep your system up-to-date.
- The Bash Shell
Learn how to work with the bash shell, the default command line interpreter on openSUSE Leap. Get to know the most commonly used Linux commands and understand basic concepts of a Linux system.
- Help and Troubleshooting
Provides an overview of where to find help and additional documentation in case you need more information or want to perform specific tasks with your system. Also find a compilation of the most frequent problems and annoyances and learn how to solve these problems on your own.
Many chapters in this manual contain links to additional documentation resources. This includes documentation that is available on the system as well as documentation available on the Internet.
For an overview of the documentation available for your product and the latest documentation updates, refer to http://doc.opensuse.org/ or to the following section.
1 Available Documentation #
We provide HTML and PDF versions of our books in different languages. The following manuals for users and administrators are available for this product:
- Start-Up
This manual will see you through your initial contact with openSUSE® Leap. Check out the various parts of this manual to learn how to install, use and enjoy your system.
- Book “Reference”
Covers system administration tasks like maintaining, monitoring and customizing an initially installed system.
- Book “Virtualization Guide”
Describes virtualization technology in general, and introduces libvirt—the unified interface to virtualization—and detailed information on specific hypervisors.
- Book “AutoYaST”
AutoYaST is a system for installing one or more openSUSE Leap systems automatically and without user intervention, using an AutoYaST profile that contains installation and configuration data. The manual guides you through the basic steps of auto-installation: preparation, installation, and configuration.
- Book “Security Guide”
Introduces basic concepts of system security, covering both local and network security aspects. Shows how to use the product inherent security software like AppArmor or the auditing system that reliably collects information about any security-relevant events.
- Book “System Analysis and Tuning Guide”
An administrator's guide for problem detection, resolution and optimization. Find how to inspect and optimize your system by means of monitoring tools and how to efficiently manage resources. Also contains an overview of common problems and solutions and of additional help and documentation resources.
- Book “GNOME User Guide”
Introduces the GNOME desktop of openSUSE Leap. It guides you through using and configuring the desktop and helps you perform key tasks. It is intended mainly for end users who want to make efficient use of GNOME as their default desktop.
Find HTML versions of most product manuals in your installed system under
/usr/share/doc/manual or in the help centers of your
desktop. Find the latest documentation updates at http://doc.opensuse.org/ where you
can download PDF or HTML versions of the manuals for your product.
2 Feedback #
Several feedback channels are available:
- Bugs and Enhancement Requests
For services and support options available for your product, refer to http://www.suse.com/support/.
To report bugs for a product component, go to https://scc.suse.com/support/requests, log in, and click .
- User Comments
We want to hear your comments about and suggestions for this manual and the other documentation included with this product. Use the User Comments feature at the bottom of each page in the online documentation or go to http://www.suse.com/doc/feedback.html and enter your comments there.
For feedback on the documentation of this product, you can also send a mail to
doc-team@suse.de. Make sure to include the document title, the product version and the publication date of the documentation. To report errors or suggest enhancements, provide a concise description of the problem and refer to the respective section number and page (or URL).
3 Documentation Conventions #
The following typographical conventions are used in this manual:
/etc/passwd: directory names and file namesplaceholder: replace placeholder with the actual value
PATH: the environment variable PATHls,--help: commands, options, and parametersuser: users or groupsAlt, Alt–F1: a key to press or a key combination; keys are shown in uppercase as on a keyboard
, › : menu items, buttons
Dancing Penguins (Chapter Penguins, ↑Another Manual): This is a reference to a chapter in another manual.
4 About the Making of This Documentation #
This documentation is written in SUSEDoc, a subset of DocBook 5. The XML source files were validated by
jing (see https://code.google.com/p/jing-trang/),
processed by xsltproc, and converted into XSL-FO
using a customized version of Norman Walsh's stylesheets. The final
PDF is formatted through FOP from Apache Software Foundation. The open source
tools and the environment used to build this documentation are
provided by the DocBook Authoring and Publishing Suite (DAPS). The
project's home page can be found at https://github.com/openSUSE/daps.
The XML source code of this documentation can be found at https://github.com/SUSE/doc-sle.
5 Source Code #
The source code of openSUSE Leap is publicly available. Refer to http://en.opensuse.org/Source_code for download links and more information.
6 Acknowledgments #
With a lot of voluntary commitment, the developers of Linux cooperate on a global scale to promote the development of Linux. We thank them for their efforts—this distribution would not exist without them. Special thanks, of course, goes to Linus Torvalds.
Part I Installation #
- 1 Installation Quick Start
Use the following procedures to install a new version of openSUSE® Leap 42.1. This document gives a quick overview on how to run through a default installation of openSUSE Leap on the x86_64 architecture.
- 2 Installation with YaST
Install your openSUSE® Leap system with YaST, the central tool for installation and configuration of your system. YaST guides you through the installation process of your system. If you are a first-time user of openSUSE Leap, you might want to follow the default YaST proposals in most parts, but you can also adjust the settings as described here to fine-tune your system according to your preferences. Help for each installation step is provided by clicking .
During the installation process, YaST analyzes both your current system settings and your hardware components. Based on this analysis your system will be set up with a basic configuration including networking (provided the system could be configured using DHCP). To fine-tune the system after the installation has finished, start YaST from the installed system.
1.1 Welcome to openSUSE Leap #
For more detailed installation instructions see Chapter 2, Installation with YaST.
1.1.1 Minimum System Requirements #
any AMD64/Intel* EM64T processor (32-bit processors are not supported)
1 GB physical RAM (2 GB or more recommended)
3 GB available disk space for a minimal install, 5 GB available for a graphical desktop (more recommended)
Supports most modern sound and graphics cards, 800 x 600 display resolution (1024 x 768 or higher recommended)
1.1.2 Installing openSUSE Leap #
Use these instructions if there is no existing Linux system on your machine, or if you want to replace an existing Linux system.
Insert the openSUSE Leap DVD into the drive, then reboot the computer to start the installation program. On machines with a traditional BIOS you will see the graphical boot screen shown below. On machines equipped with UEFI, a slightly different boot screen is used. Secure boot on UEFI machines is supported.
Use F2 to change the language for the installer. A corresponding keyboard layout is chosen automatically. See Section 2.2.1.1, “The Boot Screen on Machines Equipped with Traditional BIOS” or Section 2.2.1.2, “The Boot Screen on Machines Equipped with UEFI” for more information about changing boot options.
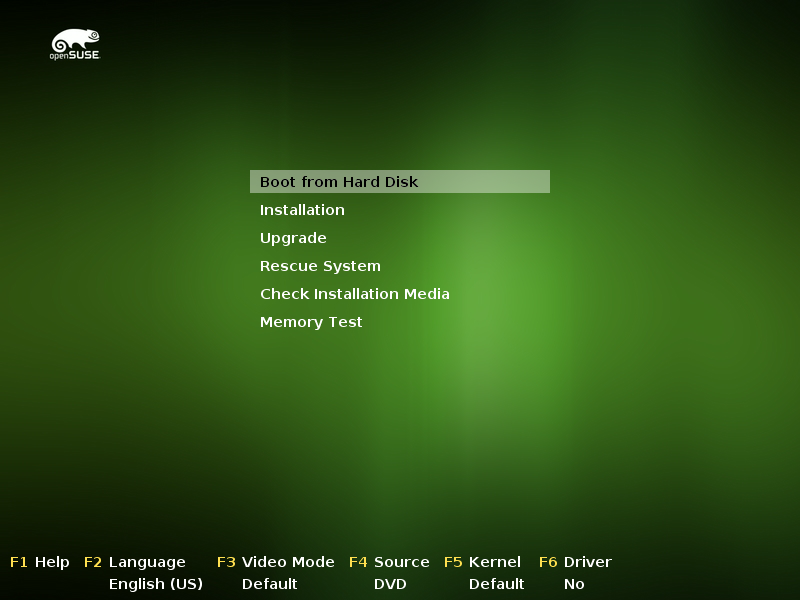
Select on the boot screen, then press Enter. This boots the system and loads the openSUSE Leap installer.
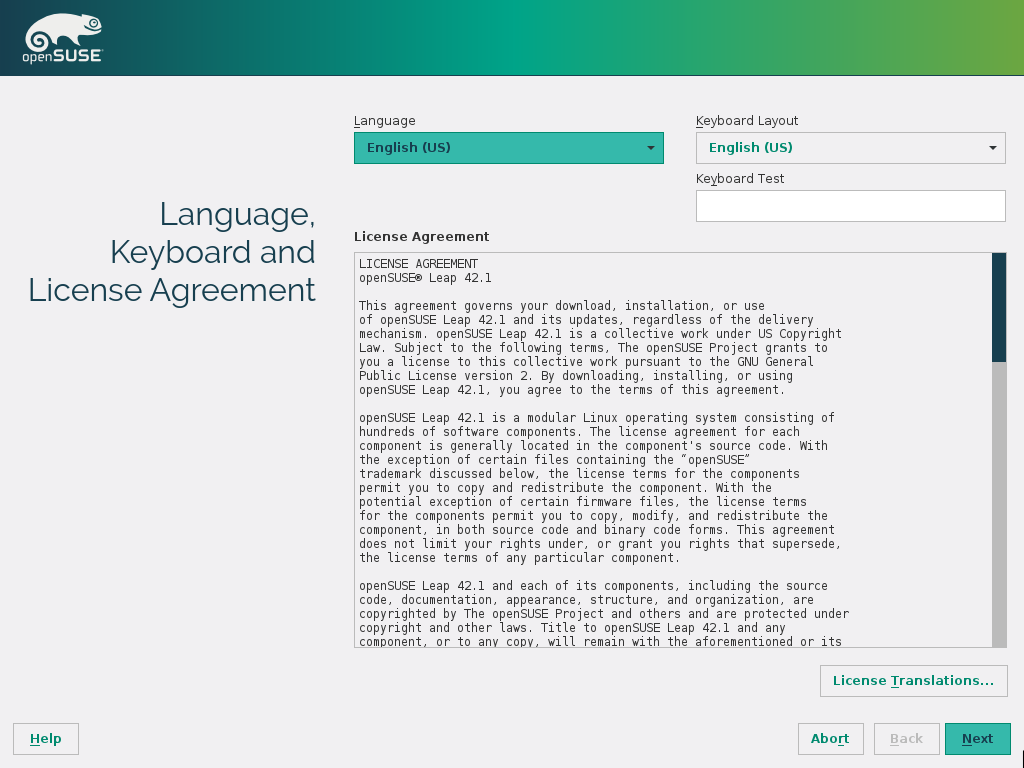
The and are initialized with the language settings you have chosen on the boot screen. Change them here, if necessary.
Read the License Agreement. It is presented in the language you have chosen on the boot screen. are available. Proceed with .
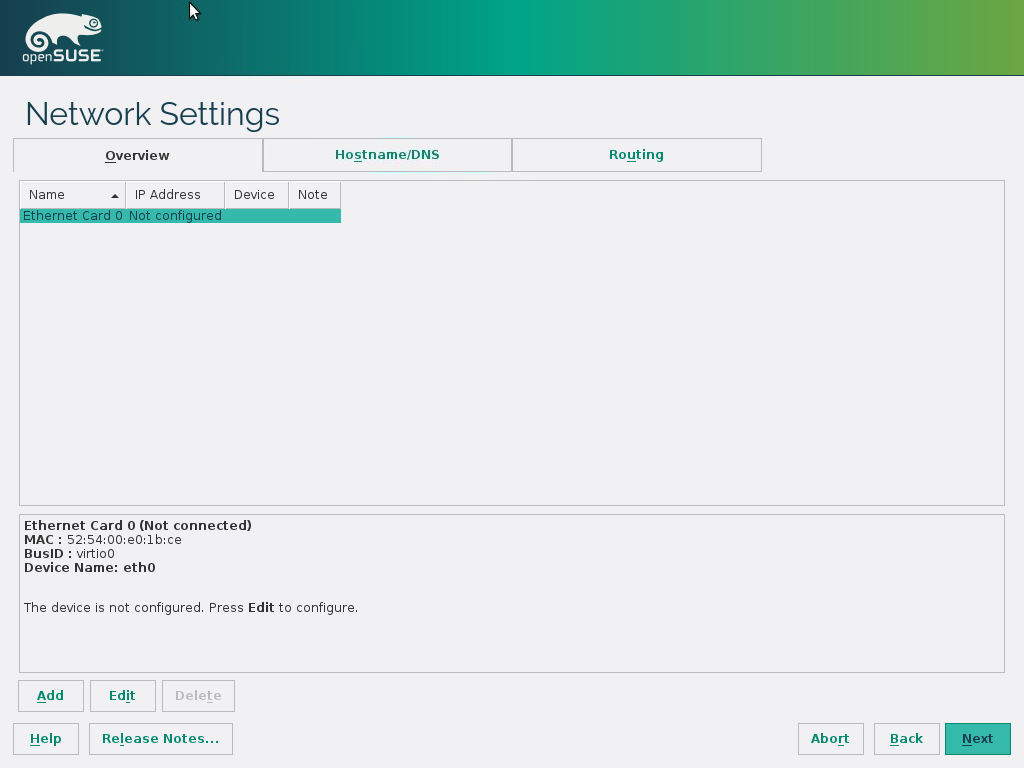
In case no network interface could be configured automatically via DHCP, the dialog opens. If you prefer to install openSUSE Leap with no network connection, choose to proceed. However, configuring the network at this stage is recommended, since it will allow to install the latest updates and security fixes from the online update repository. A working network connection will also give you access to additional software repositories. This step is skipped if a network interface was successfully configured via DHCP.
To configure the network, choose a network interface from the list and click to change its settings. Use the tabs to configure DNS and routing. See Book “Reference”, Chapter 13 “Basic Networking”, Section 13.4 “Configuring a Network Connection with YaST” for more details.
A system analysis is performed, where the installer probes for storage devices, and tries to find other installed systems. When the analasys has finished, the screen launches.
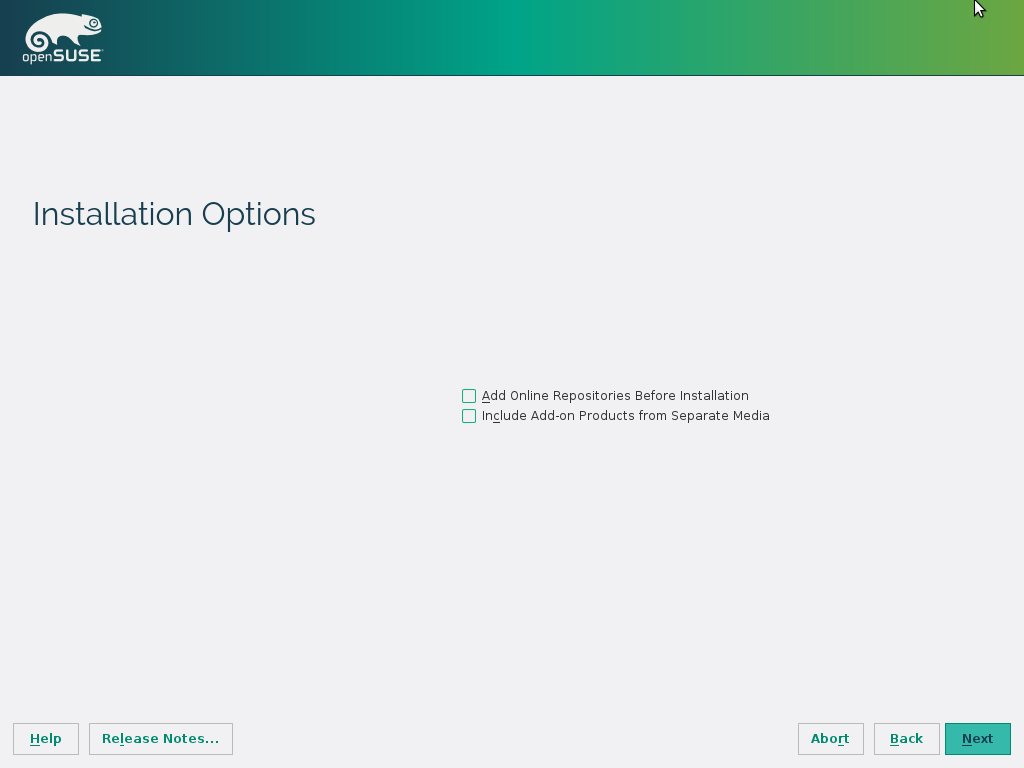
You have got two choices:
Adds the online software sources (so-called “repositories”) for openSUSE Leap from http://download.opensuse.org/distribution/leap/. It also adds the update repository for openSUSE Leap. This ensures that the system will be installed with the most current packages without having to apply the updates after installation. Activating this option is recommended. Later during the installation workflow, you will be able to specify which repositories to add.
This option allows you to add additional software repositories to openSUSE Leap, that are not provided on http://download.opensuse.org/distribution/leap/. Such add-on products may include third-party products and drivers or additional software for your system. Later during the installation workflow, you will be able to specify which repositories to add.

Tip: Release Notes
From this point on, the Release Notes can be viewed from any screen during the installation process by selecting .
Review the partition setup proposed by the system. If necessary, change it. You have the following options:
Lets you change options for the proposed settings, but not the suggested partition layout itself.
Select a disk to which to apply the proposal.
Opens the described in Book “Reference”, Chapter 5 “Advanced Disk Setup”, Section 5.1 “Using the YaST Partitioner”.
To accept the proposed setup without any changes, choose to proceed.
Select the clock and time zone to use in your system. To manually adjust the time or to configure an NTP server for time synchronization, choose . See Section 2.8, “Clock and Time Zone” for detailed information. Proceed with .
If you have selected earlier during the installation, the screen lets you choose which official openSUSE Leap online repositories to add. The default selection is the recommended choice. In case you would also like to have the repository hosting the sources for the complete distribution, add . The repositories as well as the are for experts and beta testers only.
After having proceeded with , you need to confirm the license agreement for the online repositories with .
If you have selected earlier during the installation, the step lets you add addtitional repositories.
Activate . Specify a media type, a local path or a network resource hosting the repository and follow the on-screen instructions.
Check to download the files describing the repository now. If deactivated, they will be downloaded after the installation has started. Proceed with and insert a medium if required. Depending on the product's content it may be necessary to accept additional license agreements. Proceed with . Add-On products can also be installed at any time later from the running system as described in Chapter 10, Installing Add-On Products.

Note: The Add-On Product Installation Screen
In case you have also configured the product online repositories, you will not see the screen depicted in the screensjot above, but rather a table showing the products online repositories that already have been added. Choose to advance to the screen.
Select the desktop system you would like to use. and are among the most widely used desktops on Linux. If you prefer a different desktop, choose for more options. The and the are fast and lightweight desktop environments suitable for modest hardware. With , install a graphical window manager that allows for running stand-alone X applications and console windows but does not provide the usual integrated desktop functionality. In , only console terminals are available.
To create a local user, type the first and last name in the field, the login name in the field, and the password in the field.
The password should be at least eight characters long and should contain both uppercase and lowercase letters and numbers. The maximum length for passwords is 72 characters, and passwords are case-sensitive.
For security reasons it is also strongly recommended not to enable the . You should also not but rather provide a separate
rootpassword in the next installation step. Mails generated by the system are delivered to the userrootby default. Check if you would rather get them as the user that you have created.Selecting gets you to the expert options explained in Chapter 3, Managing Users with YaST. Proceed with .
Type a password for the system administrator account (called the
rootuser). This step is skipped if you have chosen in the previous step.You should never forget the
rootpassword! After you entered it here, the password cannot be retrieved. See Section 2.13, “Password for the System Administratorroot” for more information. Proceed with .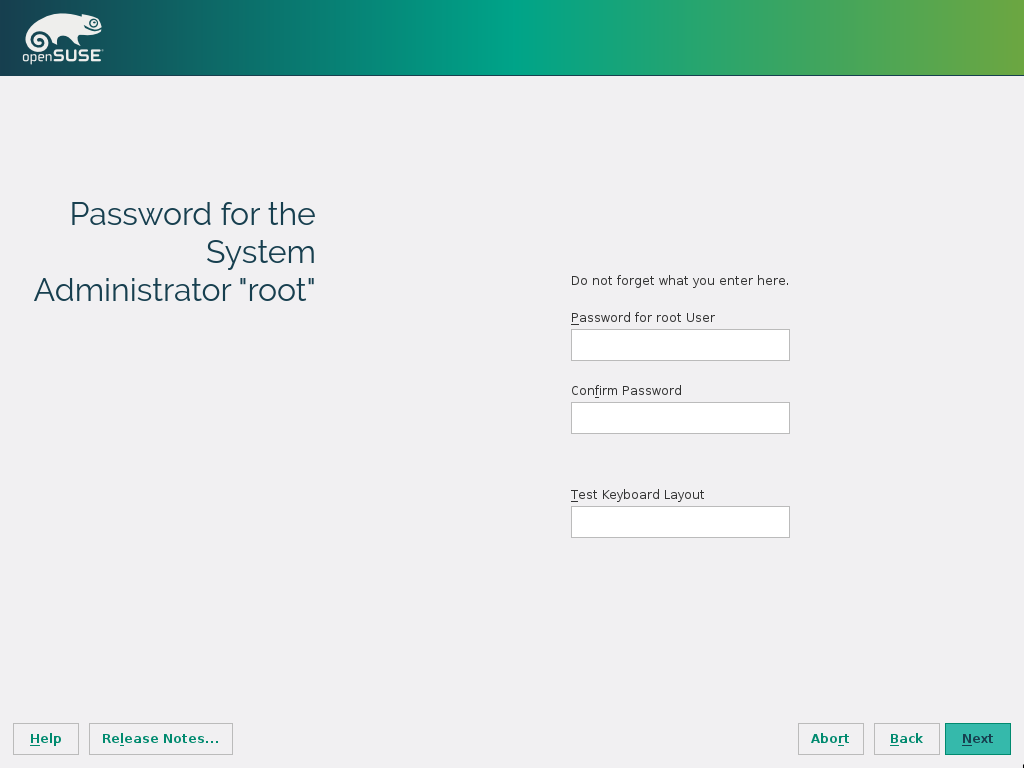
Tip: Passwords and Keyboard Layout
It is recommended to only use characters that are available on an English keyboard. In case of a system error or when you need to start your system in rescue mode a localized keyboard might not be available.
Use the screen to review and—if necessary—change several proposed installation settings. The current configuration is listed for each setting. To change it, click the headline. Some settings, such as firewall or SSH can directly be changed by clicking the respective links.
Tip: Remote Access
Changes you can make here, can also be made later at any time from the installed system. However, if you need remote access directly after the installation, you should adjust the settings by opening the SSH port and enablöing the SSH server.
The default scope of software includes the base system and X Window with the selected desktop. Clicking opens the screen, where you can change the software selection by selecting or deselecting patterns. Each pattern contains several software packages needed for specific functions (for example, Web and LAMP server or a print server). For a more detailed selection based on software packages to install, select to switch to the YaST . See Chapter 9, Installing or Removing Software for more information.
This section shows the boot loader configuration. Changing the defaults is only recommended if really needed. Refer to Book “Reference”, Chapter 12 “The Boot Loader GRUB 2” for details.
By default, the Firewall is enabled with the active network interface configured for the external zone. See Book “Security Guide”, Chapter 15 “Masquerading and Firewalls”, Section 15.4 “SuSEFirewall2” for configuration details.
The SSH service is disabled by default, its port (22) is closed. Therefore logging in from remote is not possible by default. Click to toggle these settings.
By default, the system boots into the target, with network, multiuser and display manager support. Switch to if you do not need to log in via display manager.
View detailed hardware information by clicking . In the resulting screen you can also change —see Section 2.14.5, “” for more information.
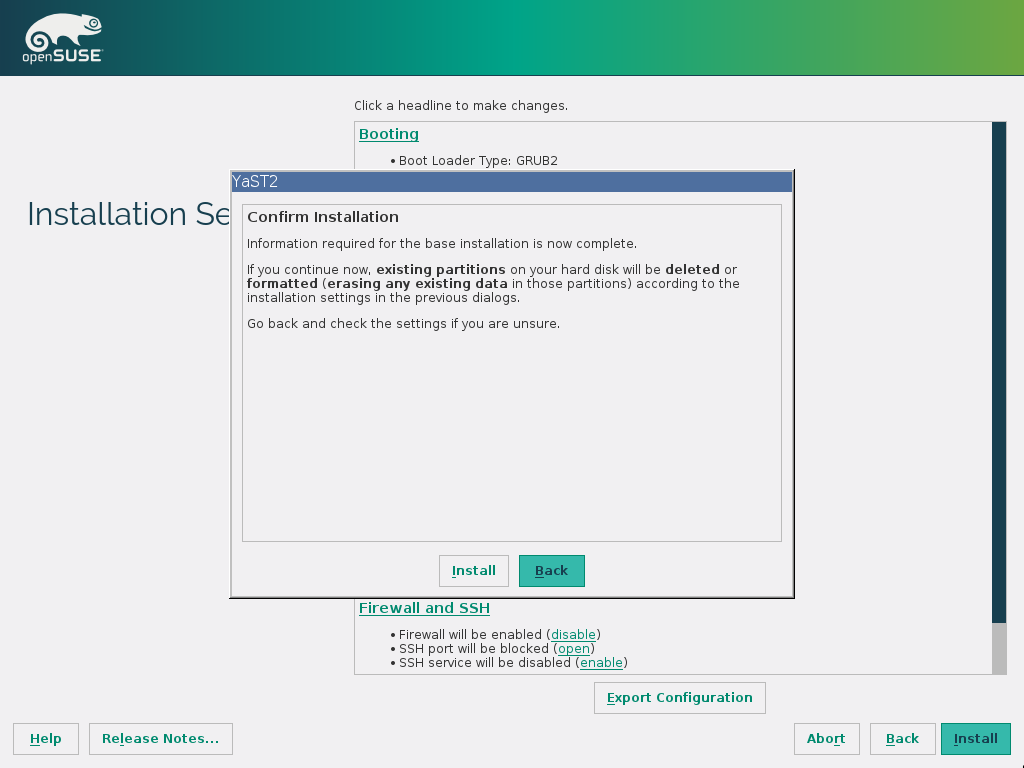
After you have finalized the system configuration on the screen, click . Depending on your software selection you may need to agree to license agreements before the installation confirmation screen pops up. Up to this point no changes have been made to your system. After you click a second time, the installation process starts.
During the installation, the progress is shown in detail on the screen.
After the installation routine has finished, the computer is rebooted into the installed system. Log in and start YaST to fine-tune the system. If you are not using a graphical desktop or are working from remote, refer to Book “Reference”, Chapter 1 “YaST in Text Mode” for information on using YaST from a terminal.
2 Installation with YaST #
Abstract#
Install your openSUSE® Leap system with YaST, the central tool for installation and configuration of your system. YaST guides you through the installation process of your system. If you are a first-time user of openSUSE Leap, you might want to follow the default YaST proposals in most parts, but you can also adjust the settings as described here to fine-tune your system according to your preferences. Help for each installation step is provided by clicking .
During the installation process, YaST analyzes both your current system settings and your hardware components. Based on this analysis your system will be set up with a basic configuration including networking (provided the system could be configured using DHCP). To fine-tune the system after the installation has finished, start YaST from the installed system.
- 2.1 Choosing the Installation Method
- 2.2 System Start-up for Installation
- 2.3 The Installation Workflow
- 2.4 Language, Keyboard and License Agreement
- 2.5 Network Settings
- 2.6 Installation Options
- 2.7 Suggested Partitioning
- 2.8 Clock and Time Zone
- 2.9 List Of Online Repositories
- 2.10 Add-On Product
- 2.11 Desktop Selection
- 2.12 Create New User
- 2.13 Password for the System Administrator
root - 2.14 Installation Settings
- 2.15 Performing the Installation
2.1 Choosing the Installation Method #
After having selected the installation medium, determine the suitable installation method and boot option that best matches your needs:
- Installing from the openSUSE Leap Media (DVD, USB)
Choose this option if you want to perform a stand-alone installation and do not want to rely on a network to provide the installation data or the boot infrastructure. The installation proceeds exactly as outlined in Section 2.3, “The Installation Workflow”.
- Installing from a Network Server
Choose this option if you have an installation server available in your network or want to use an external server as the source of your installation data. This setup can be configured to boot from physical media (flash disk, CD/DVD, or hard disk) or configured to boot via network using PXE/BOOTP. Refer to Section 2.2, “System Start-up for Installation” for details.
The installation program configures the network connection with DHCP and retrieves the location of the network installation source from the OpenSLP server. If no DHCP is available, choose › › and enter the network data. On EFI systems modify the network boot parameters as described in Section 2.2.1.2, “The Boot Screen on Machines Equipped with UEFI”.
Installing from an SLP Server. If your network setup supports OpenSLP and your network installation source has been configured to announce itself via SLP, boot the system, press F4 in the boot screen and select from the menu. On EFI systems set the
installparameter toinstall=slp:/as described in Section 2.2.1.2, “The Boot Screen on Machines Equipped with UEFI”.Installing from a Network Source without SLP. If your network setup does not support OpenSLP for the retrieval of network installation sources, boot the system and press F4 in the boot screen to select the desired network protocol (NFS, HTTP, FTP, or SMB/CIFS) and provide the server's address and the path to the installation media. On EFI systems modify the boot parameter
install=as described in Section 2.2.1.2, “The Boot Screen on Machines Equipped with UEFI”.
2.2 System Start-up for Installation #
The way the system is started for the installation depends on the architecture—system start-up is different for PC (x86_64) or mainframe, for example. If you install openSUSE Leap as a VM Guest on a KVM or Xen hypervisor, follow the instructions for the x86_64 architecture.
2.2.1 PC (x86_64): System Start-up #
openSUSE Leap supports several different boot options from which you can choose, depending on the hardware available and on the installation scenario you prefer. Booting from the openSUSE Leap media is the most straightforward option, but special requirements might call for special setups:
Table 2.1: Boot Options #
|
Boot Option |
Description |
|---|---|
|
DVD |
This is the easiest boot option. This option can be used if the system has a local DVD-ROM drive that is supported by Linux. |
|
USB Mass Storage Device |
In case your machine is not equipped with an optical drive, you can
boot the installation image from a USB mass storage device such as
a flash disk. To create a bootable USB storage device, you need to
copy either the DVD or the Mini CD iso image to the device using
the dd if=PATH_TO_ISO_IMAGE of=USB_STORAGE_DEVICE bs=4M Important: CompatibilityNote that booting from a USB Mass Storage Device is not supported on UEFI machines (this includes the complete ia64 architecture) and on the ppc64 architecture. |
|
PXE or BOOTP |
Booting over the network must be supported by the system's BIOS or firmware, and a boot server must be available in the network. This task can also be handled by another openSUSE Leap system. |
|
Hard Disk |
openSUSE Leap installation can also be booted from the hard
disk. To do this, copy the kernel ( |
Tip: Booting from DVD on UEFI Machines
DVD1 can be used as a boot medium for machines equipped with UEFI (Unified Extensible Firmware Interface). Refer to your vendor's documentation for specific information. If booting fails, try to enable CSM (Compatibility Support Module) in your firmware.
2.2.1.1 The Boot Screen on Machines Equipped with Traditional BIOS #
The boot screen displays several options for the installation procedure. boots the installed system and is selected by default, because the CD is often left in the drive. Select one of the other options with the arrow keys and press Enter to boot it. The relevant options are:
The normal installation mode. All modern hardware functions are enabled. In case the installation fails, see F5 for boot options that disable potentially problematic functions.
Perform a system upgrade. For more information refer to Chapter 12, Upgrading the System and System Changes.
Starts a minimal Linux system without a graphical user interface. For more information, see Section 16.6.2, “Using the Rescue System”.
This option is only available when you install from media created from downloaded ISOs. In this case it is recommended to check the integrity of the installation medium. This option starts the installation system before automatically checking the media. In case the check was successful, the normal installation routine starts. If a corrupt media is detected, the installation routine aborts.

Warning: Failure of Media Check
If the media check fails, your medium is damaged. Do not continue the installation because installation may fail or you may lose your data. Replace the broken medium and restart the installation process.
Tests your system RAM using repeated read and write cycles. Terminate the test by rebooting. For more information, see Section 16.2.4, “Fails to Boot”.
Figure 2.1: The Boot Screen on Machines with a Traditional BIOS #
Use the function keys indicated in the bar at the bottom of the screen to change the language, screen resolution, installation source or to add an additional driver from your hardware vendor:
- F1
Get context-sensitive help for the active element of the boot screen. Use the arrow keys to navigate, Enter to follow a link, and Esc to leave the help screen.
- F2
Select the display language and a corresponding keyboard layout for the installation. The default language is English (US).
- F3
Select various graphical display modes for the installation. By the video resolution is automatically determined using KMS (Kernel Mode Settings). If this setting does not work on your system, choose and, optionally, specify
vga=askon the boot command line to get prompted for the video resolution. Choose if the graphical installation causes problems.- F4
Normally, the installation is performed from the inserted installation medium. Here, select other sources, like FTP or NFS servers. If the installation is deployed on a network with an SLP server, select an installation source available on the server with this option.
- F5
If you encounter problems with the regular installation, this menu offers to disable a few potentially problematic functions. If your hardware does not support ACPI (advanced configuration and power interface) select to install without ACPI support. disables support for APIC (Advanced Programmable Interrupt Controllers) which may cause problems with some hardware. boots the system with the DMA mode (for CD/DVD-ROM drives) and power management functions disabled.
If you are not sure, try the following options first: or . Experts can also use the command line () to enter or change kernel parameters.
- F6
Press this key to notify the system that you have an optional driver update for openSUSE Leap. With or , load drivers directly before the installation starts. If you select , you are prompted to insert the update disk at the appropriate point in the installation process.
2.2.1.2 The Boot Screen on Machines Equipped with UEFI #
UEFI (Unified Extensible Firmware Interface) is a new industry standard which replaces and extends the traditional BIOS. The latest UEFI implementations contain the “Secure Boot” extension, which prevents booting malicious code by only allowing signed boot loaders to be executed. See Book “Reference”, Chapter 14 “UEFI (Unified Extensible Firmware Interface)” for more information.
The boot manager GRUB 2, used to boot machines with a traditional
BIOS, does not support UEFI, therefore GRUB 2 is replaced with
ELILO. If Secure Boot is enabled, a GRUB 2 UEFI module is used
via an ELILO compatibility layer. From an administrative and user
perspective, both boot manager implementations behave the same and are
called ELILO in the following.
Tip: UEFI and Secure Boot are Supported by Default
The installation routine of SUSE Linux Enterprise automatically detects if the machine is equipped with UEFI. All installation sources also support Secure Boot. If an EFI system partition already exists on dual boot machines (from a Microsoft Windows 8 installation, for example), it will automatically be detected and used. Partition tables will be written as GPT on UEFI systems.
Warning: Using Non-Inbox Drivers with Secure Boot
There is no support for adding non-inbox drivers (that is, drivers that do not come with SLE) during installation with Secure Boot enabled. The signing key used for SolidDriver/PLDP is not trusted by default.
To solve this problem, it is necessary to either add the needed keys to the firmware database via firmware/system management tools before the installation or to use a bootable ISO that will enroll the needed keys in the MOK list at first boot. For more information, see Book “Reference”, Chapter 14 “UEFI (Unified Extensible Firmware Interface)”, Section 14.1 “Secure Boot”.
The boot screen displays several options for the installation procedure. Change the selected option with the arrow keys and press Enter to boot it. The relevant options are:
The normal installation mode.
Perform a system upgrade.
Starts a minimal Linux system without a graphical user interface. For more information, see Section 16.6.2, “Using the Rescue System”.
This option is only available when you install from media created from downloaded ISOs. In this case it is recommended to check the integrity of the installation medium. This option starts the installation system before automatically checking the media. In case the check was successful, the normal installation routine starts. If a corrupt media is detected, the installation routine aborts.
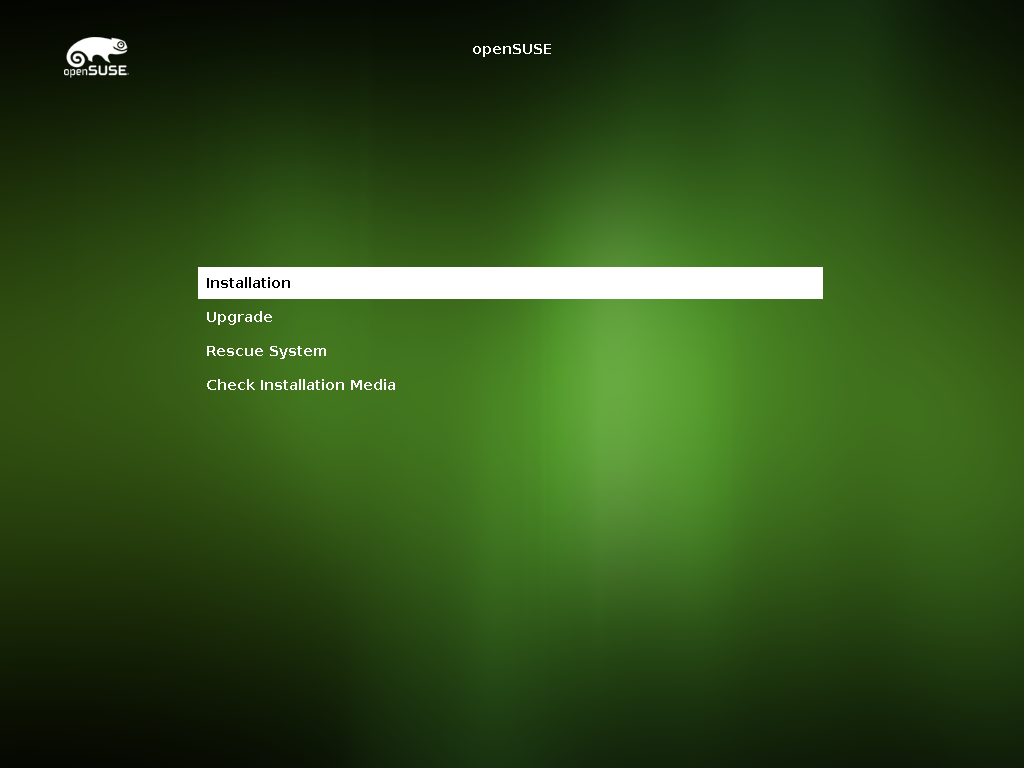
Figure 2.2: The Boot Screen on Machines with UEFI #
ELILO on openSUSE Leap does not support a boot prompt or function keys for adding boot parameters. By default, the installation will be started with American English and the boot media as the installation source. A DHCP lookup will be performed to configure the network. To change these defaults or to add additional boot parameters you need to edit the respective boot entry. Highlight it using the arrow keys and press E. See the on-screen help for editing hints (note that only an English keyboard is available now). The entry will look similar to the following:
setparams 'Installation'

    set gfxpayload=keep
    echo 'Loading kernel ...'
    linuxefi /boot/x86_64/loader/linux splash=slilent
    echo 'Loading initial ramdisk ...'
    initrdefi /boot/x86_64/loader/initrd
Add space-separated parameters to the end of the line starting with
linuxefi. To boot the edited entry, press
F10. If you access the machine via serial console,
press Esc–0. A complete list of parameters is
available at http://en.opensuse.org/Linuxrc. The
most important ones are:
Table 2.2: Installation Sources #
|
CD/DVD (default) |
|
|
Hard disk |
|
|
SLP |
|
|
FTP |
|
|
HTTP |
|
|
NFS |
|
|
SMB / CIFS |
|
Table 2.3: Network Configuration #
|
DHCP (default) |
netsetup=dhcp |
|
Prompt for Parameters |
|
|
Host IP address |
|
|
Netmask |
|
|
Gateway |
|
|
Name Server |
|
|
Domain Search Path |
|
Table 2.4: Miscellaneous #
|
Driver Updates: Prompt |
|
|
Driver Updates: URL |
|
|
Installation Language |
Supported values for LANGUAGE are,
among others, |
|
Kernel: No ACPI |
|
|
Kernel: No Local APIC |
|
|
Video: Disable KMS |
|
|
Video: Start Installer in Text Mode |
|
2.2.2 Boot Parameters for Advanced Setups #
In case you want to configure access to a local SMT or
supportconfig server for the installation, you
can specify boot parameters that will be parsed by the installation
routine to set up these services. The same is also true if you need IPv6
support during the installation.
2.2.2.1 Using IPv6 During the Installation #
By default you can only assign IPv4 network addresses to your machine. To enable IPv6 during installation, enter one of the following parameters at the boot prompt:
ipv6=1(accept IPv4 and IPv6)ipv6only=1(accept IPv6 only).
2.2.2.2 Using a Proxy During the Installation #
In networks enforcing the usage of a proxy server for accessing remote Web sites, registration during installation is only possible when configuring a proxy server.
To use a proxy during the installation, press F4 on the
boot screen and set the required parameters in the dialog. Alternatively provide the Kernel parameter
proxy at the boot prompt:
proxy=http://USER:Password@proxy.example.com:PORT
Specifying USER and
Password is optional—if the server
allows anonymous access, the following data is sufficient: http://proxy.example.com:PORT.
2.2.2.3 Disabling the Import of SSH Host Keys and Users from a Previous Installation #
If installing on a machine hosting a previous Linux installation, the SSH host keys from that installation will automatically be imported into the openSUSE Leap setup by default. It is also possible to import users from that installation in the dialog.
To disable these features, specify the
ignore_features parameter at the boot prompt. Adding
the (optional) ptoptions parameter ensures that the
ignore_features parameter is only used for the
installation and not appended to the Kernel command line in the
installed system:
ignore_features=import_ssh_keys
       ptoptions=ignore_features
(do not import SSH host keys)ignore_features=import_users ptoptions=ignore_features(disable user import dialog)ignore_features=import_ssh_keys,import_users ptoptions=ignore_features(disable user import dialog)
2.2.2.4 Enabling SELinux Support #
Enabling SELinux upon installation start-up enables you to configure it after the installation has been finished without having to reboot. Use the following parameters:
security=selinux selinux=1
2.3 The Installation Workflow #
The interactive installation of openSUSE Leap split into several steps is listed below.
After starting the installation, openSUSE Leap loads and configures a minimal Linux system to run the installation procedure. To view the boot messages and copyright notices during this process, press Esc. On completion of this process, the YaST installation program starts and displays the graphical installer.
Tip: Installation Without a Mouse
If the installer does not detect your mouse correctly, use →| for navigation, arrow keys to scroll, and Enter to confirm a selection. Various buttons or selection fields contain a letter with an underscore. Use Alt–Letter to select a button or a selection directly instead of navigating there with →|.
2.4 Language, Keyboard and License Agreement #
Start the installation of openSUSE Leap by choosing your language. Changing the language will automatically preselect a corresponding keyboard layout. Override this proposal by selecting a different keyboard layout from the drop-down box. The language selected here is also used to assume a time zone for the system clock. This setting can be modified later in the installed system as described in Chapter 4, Changing Language and Country Settings with YaST.
Read the license agreement that is displayed beneath the language and keyboard selection thoroughly. Use to access translations. By proceeding with , you agree to the license agreement. Choose to cancel the installation if you do not agree to the license terms.
Figure 2.3: Language, Keyboard and License Agreement #
2.5 Network Settings #
After booting into the installation, the installation routine is set up. During this setup, an attempt to configure at least one network interface with DHCP is made. In case this attempt fails, the dialog launches. Choose a network interface from the list and click to change its settings. Use the tabs to configure DNS and routing. See Book “Reference”, Chapter 13 “Basic Networking”, Section 13.4 “Configuring a Network Connection with YaST” for more details.
Figure 2.4: Network Settings #
2.6 Installation Options #
The step let's you decide whether to add additional software sources (“repositories”) during the installaion.
Figure 2.5: Installation Options #
You have got two choices:
Adds the online software sources for openSUSE Leap from http://download.opensuse.org/distribution/leap/. It also adds the update repository for openSUSE Leap. This ensures that the system will be installed with the most current packages without having to apply the updates after installation. Activating this option is recommended. Later during the installation workflow, you will be able to specify which repositories to add.
This option allows you to add additional software repositories to openSUSE Leap, that are not provided on http://download.opensuse.org/distribution/leap/. Such add-on products may include third-party products and drivers or additional software for your system. Later during the installation workflow, you will be able to specify which repositories to add.
Tip: Release Notes
From this point on, the Release Notes can be viewed from any screen during the installation process by selecting .
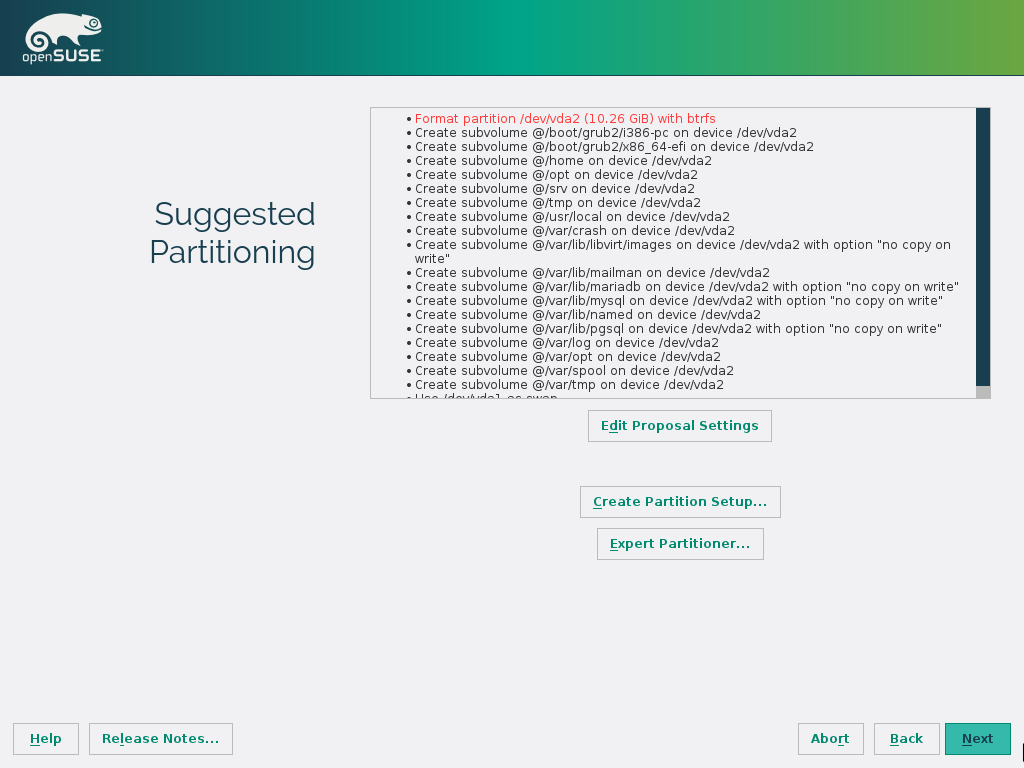
2.7 Suggested Partitioning #
Define a partition setup for openSUSE Leap in this step. The installer creates a proposal for one of the available disks containing a root partition formatted with Btrfs, a swap partition, and a home partition formatted with XFS. On hard disks smaller than 25 GB the proposal does not include a separate home partition. If one or more swap partitions have been detected on the available hard disks, these existing ones will be used (rather than proposing a new swap partition). You have several options to proceed:
To accept the proposal without any changes, click to proceed with the installation workflow.
To adjust the proposal choose . It lets you switch to an LVM-based proposal, adjust file systems for the proposed partitions and enlarge the swap partition, to enable suspend to disk. You can also enable Btrfs snapshots here.
Use this option to move the proposal described above to a different disk. Select a specific disk from the list. If the chosen hard disk does not contain any partitions yet, the whole hard disk will be used for the proposal. Otherwise, you can choose which existing partition(s) to use. lets you fine-tune the proposal.
To create a custom partition setup choose . The Expert Partitioner opens, displaying the current partition setup for all hard disks, including the proposal suggested by the installer. You can , , , or partitions.
You can also set up Logical Volumes (LVM), configure software RAID and device mapping (DM), encrypt Partitions, mount NFS shares and manage tmpfs volumes with the Expert Partitioner. To fine-tune settings such as the subvolume and snapshot handling for each Btrfs partition, choose . For more information about custom partitioning and configuring advanced features, refer to Book “Reference”, Chapter 5 “Advanced Disk Setup”, Section 5.1 “Using the YaST Partitioner”.

Important: Btrfs on an Encrypted Root Partition
The default partitioning setup suggests the root partition as Btrfs with
/bootbeing a directory. If you need to have the root partition encrypted in this setup, make sure to use the GPT partition table type instead of the default MSDOS type. Otherwise the GRUB2 boot loader may not have enough space for the second stage loader.Warning: Custom Partitioning on UEFI machines
A UEFI machine requires an EFI system partition that must be mounted to
/boot/efi. This partition must be formatted with theFATfile system.If an EFI system partition is already present on your system (for example from a previous Windows installation) use it by mounting it to
/boot/efiwithout formatting it.Warning: Custom Partitioning and Snapper
openSUSE Leap can be configured to support snapshots which provide the ability to do rollbacks of system changes. openSUSE Leap uses Snapper in conjunction with Btrfs for this feature. Btrfs needs to be set up with snapshots enabled for the root partition. Refer to Book “Reference”, Chapter 3 “System Recovery and Snapshot Management with Snapper” for details on Snapper.
Being able to create system snapshots that enable rollbacks requires most of the system directories to be mounted on a single partition. Refer to Book “Reference”, Chapter 3 “System Recovery and Snapshot Management with Snapper”, Section 3.1 “Default Setup” for more information. This also includes
/usrand/var. Only directories that are excluded from snapshots (see Book “Reference”, Chapter 3 “System Recovery and Snapshot Management with Snapper”, Section 3.1.2 “Directories That Are Excluded from Snapshots” for a list) may reside on separate partitions. Among others, this list includes/usr/local,/var/log, and/tmp.If you do not plan use Snapper for system rollbacks, the partitioning restrictions mentioned above do not apply.
Note: Supported Software RAID Volumes
Installing to and booting from existing software RAID volumes is supported for Disk Data Format (DDF) volumes and Intel Matrix Storage Manager (IMSM) volumes. IMSM is also known by the following names:
Intel Rapid Storage Technology
Intel Matrix Storage Technology
Intel Application Accelerator / Intel Application Accelerator RAID Edition
Important: Handling of Windows Partitions in Proposals
In case the disk selected for the suggested partitioning proposal contains a large Windows FAT or NTFS partition, it will automatically be resized to make room for the openSUSE Leap installation. To avoid data loss it is strongly recommended to
make sure the partition is not fragmented (run a defragmentation program from Windows prior to the openSUSE Leap installation)
double-check the suggested size for the Windows partition is big enough
back up your data prior to the openSUSE Leap installation
To adjust the proposed size of the Windows partition, use the .
Figure 2.6: Partitioning #
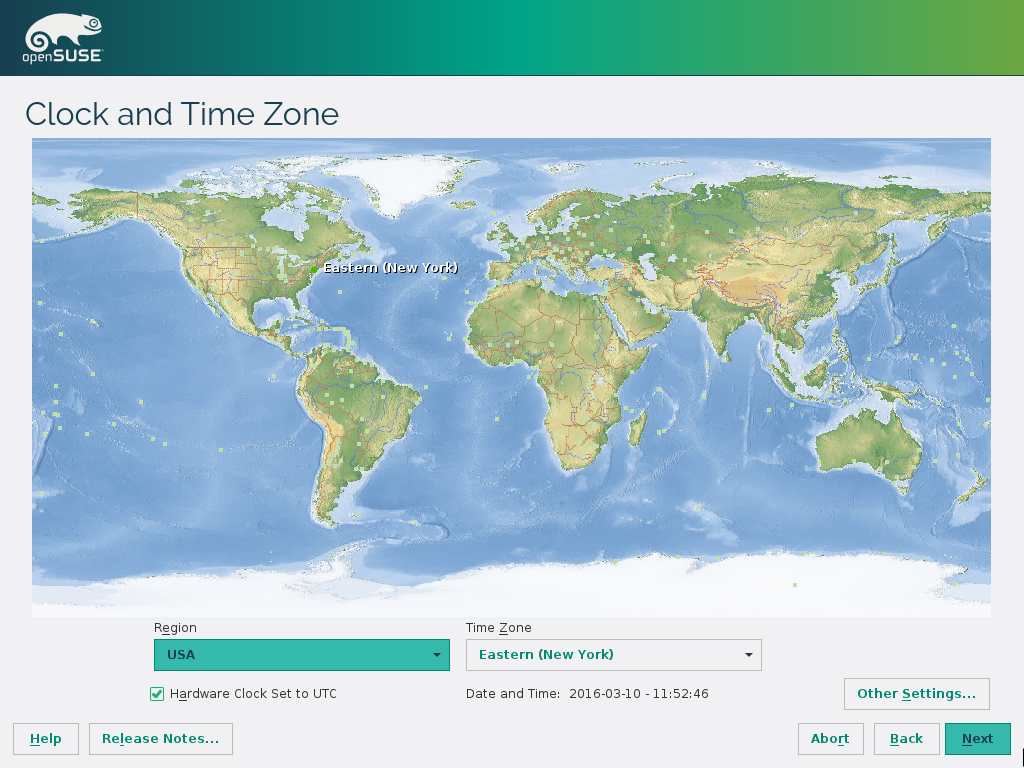
2.8 Clock and Time Zone #
In this dialog, select your region and time zone. Both are preselected according to the installation language. To change the preselected values, either use the map or the drop-down boxes for and . When using the map, point the cursor at the rough direction of your region and left-click to zoom. Now choose your country or region by left-clicking. Right-click to return to the world map.
To set up the clock, choose whether the . If you run another operating system on your machine, such as Microsoft Windows, it is likely your system uses local time instead. If you only run Linux on your machine, set the hardware clock to UTC and have the switch from standard time to daylight saving time performed automatically.
Important: Set the Hardware Clock to UTC
The switch from standard time to daylight saving time (and vice versa) can only be performed automatically when the hardware clock (CMOS clock) is set to UTC. This also applies if you use automatic time synchronization with NTP, because automatic synchronization will only be performed if the time difference between the hardware and system clock is less than 15 minutes.
Since a wrong system time can cause severe problems (missed backups, dropped mail messages, mount failures on remote file systems, etc.) it is strongly recommended to always set the hardware clock to UTC.
Figure 2.7: Clock and Time Zone #
POWER, x86_64 If a network is already configured, you can configure time synchronization with an NTP server. Click to either alter the NTP settings or to set the time. See Book “Reference”, Chapter 18 “Time Synchronization with NTP” for more information on configuring the NTP service. When finished, click to continue the installation.
POWER, x86_64
If running without NTP configured, consider setting
SYSTOHC=no (sysconfig variable)
to avoid saving unsynchronized time into the hardware clock.
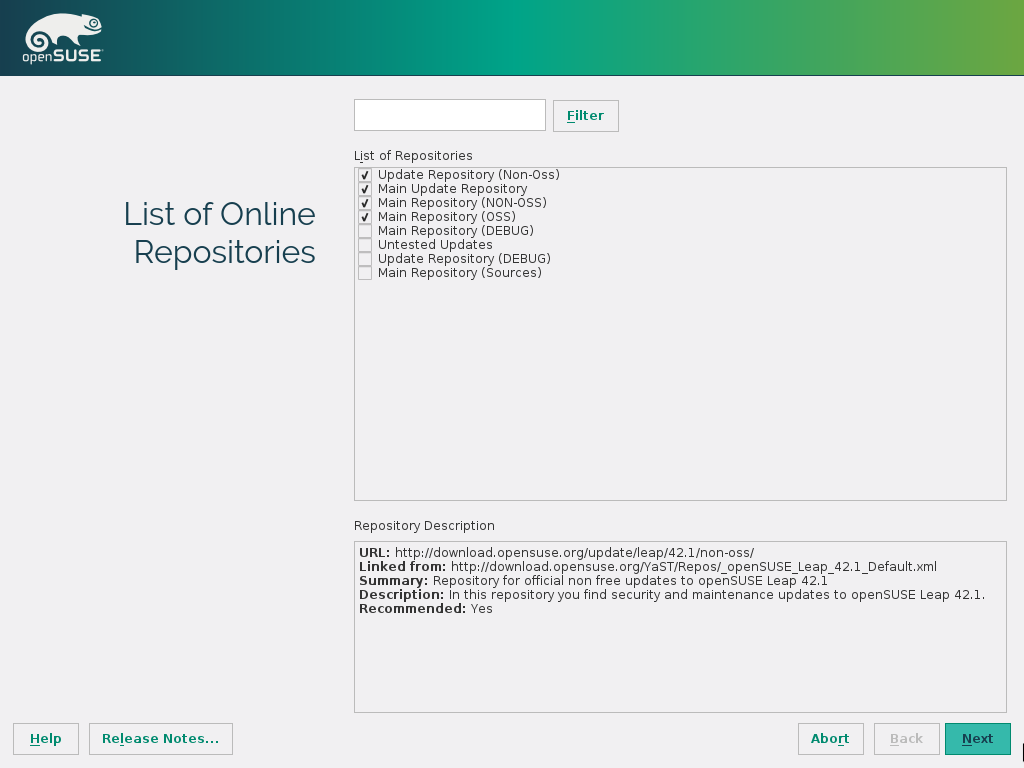
2.9 List Of Online Repositories #
If you have selected earlier during the installation, the screen lets you choose which official openSUSE Leap online repositories to add. The following repositories are available:
Figure 2.8: List Of Online Repositories #
Contains all open source software packages openSUSE Leap consists of. These are the package versions with whoch openSUSE Leap was released. This repository is activated by default. Deactivating it is not recommended.
Contains additional software packages with a proprietary license (non- open source software). These packages are not included on the DVD version of openSUSE Leap. This repository is activated by default. Deactivate it, if you do not want to install non- open source software.
Contains updates for packages from the Main Repository (OSS). This repository is activated by default and should never be deactivated.
Contains updates for packages from the Main Repository (NON-OSS). This repository is activated by default and should only be deactivated, if you have also deactivated the Main Repository (NON-OSS).
Contains sources and spec files for all packages from the Main Repository (OSS). This repository is deactivated by default.
Contains “debug” packages for packages from the Main Repository. They are useful to generate stack traces containing detailed information about the crash. This repository is deactivated by default. Useful for experts only.
Contains “debug” packages for packages from the Update Repository. They are useful to generate stack traces containing detailed information about the crash. This repository is deactivated by default. Useful for experts only.
Updates that have not yet passed the quality assurance tests. This repository is deactivated by default. Intended for beta testers.
Confirm your settings with . Depending on your choice of repositories, you may have to confirm license agreements.
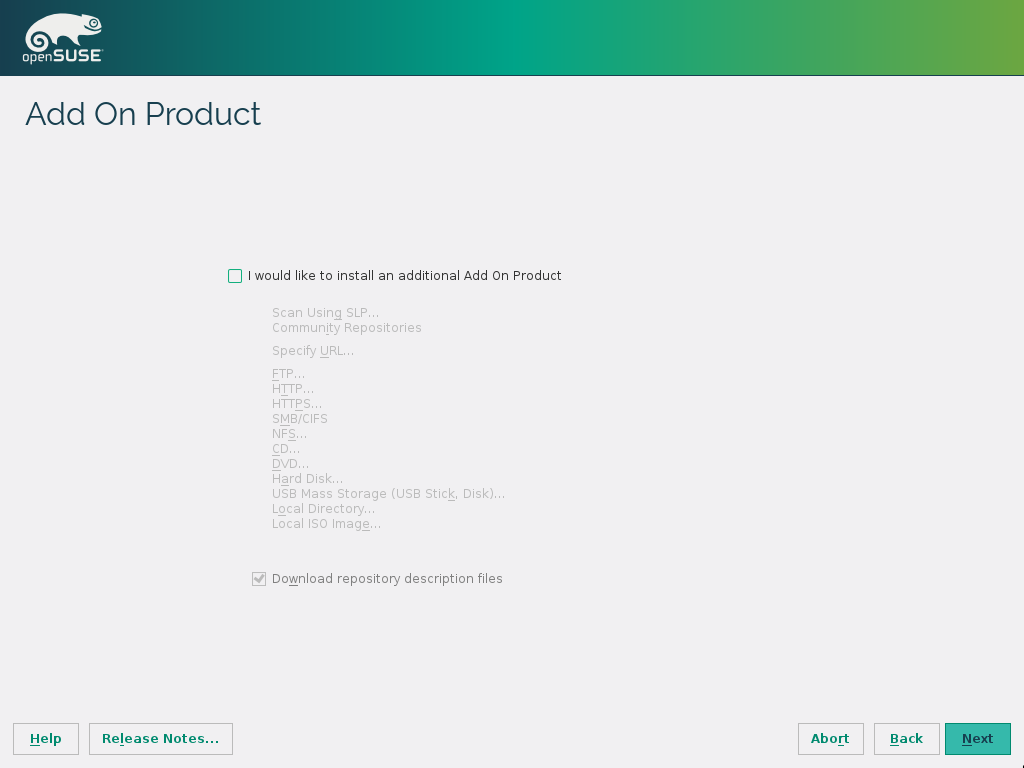
2.10 Add-On Product #
If you have selected earlier during the installation, the step lets you add addtitional repositories. An add-on product can include extensions, third-party products and drivers or additional software for your system such as support for additional languages.
Figure 2.9: Add-On Product #
Note: The Add-On Product Installation Screen
In case you have also configured the product online repositories, you will not see the screen depicted in the screensjot above, but rather a table showing the products online repositories that already have been added. Choose to advance to the screen.
Activate and specify the product source. Locally available sources include removable media, a local directory, an additional hard disk or a mount iso image. Network sources include repositories available via FTP, HTTP, NFS or CIFS. If your network distributes repositories via an SLP server, choose . contains preconfigured links to the most popular repositories on the openSUSE Build Service (https://build.opensuse.org/).
Avtivatek to download the files describing the repository now. If unchecked, they will be downloaded once the installation starts. Proceed with and insert a removable media if required. Depending on the product's content it may be necessary to accept additional license agreements.
It is also possible to configure add-on products later. Using add-on products on the installed system is described in Chapter 10, Installing Add-On Products.
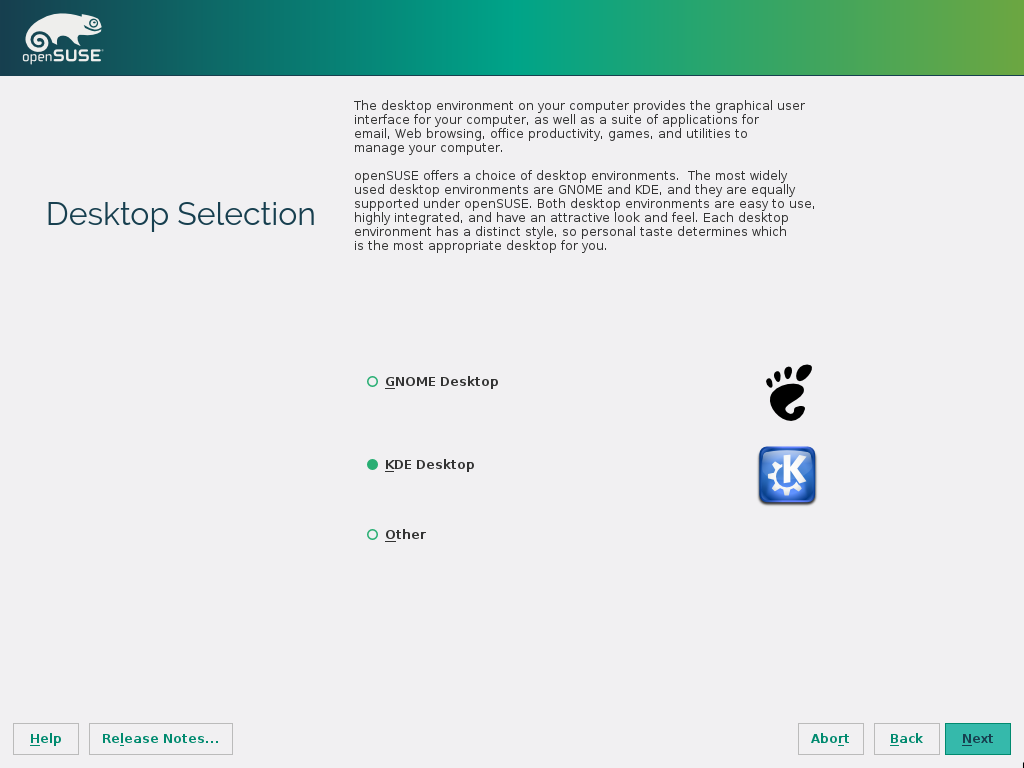
2.11 Desktop Selection #
In openSUSE Leap, you can choose from various desktops. The major ones, and , are powerful graphical desktop environments similar to Windows.
If you prefer a different desktop, choose for more options. The and the are fast and lightweight desktop environments suitable for modest hardware. With , install a graphical window manager that allows for running stand-alone X applications and console windows but does not provide the usual integrated desktop functionality. In , only console terminals are available.
Figure 2.10: Desktop Selection #
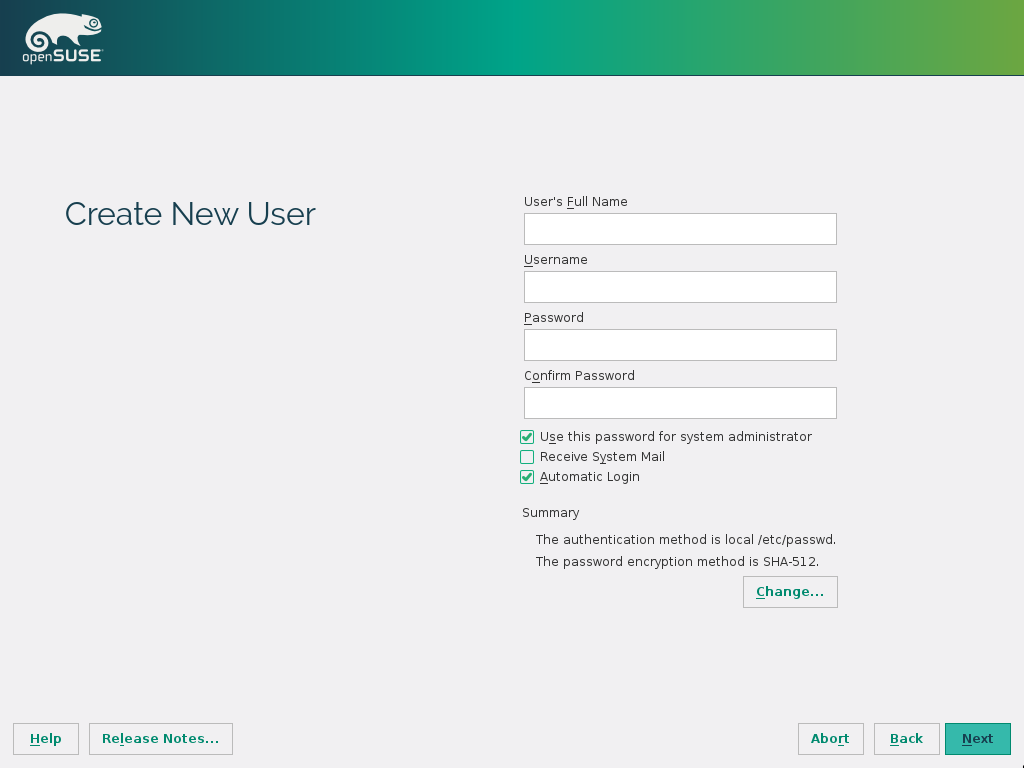
2.12 Create New User #
Create a local user in this step. In case you do not want to configure any local users, for example when setting up a client on a network with centralized user authentication, skip this step by choosing and confirming the warning. Network user authentication can be configured at any time later in the installed system, refer to Chapter 3, Managing Users with YaST for instructions.
After entering the first name and last name, either accept the proposal
or specify a new that will be used to log
in. Only use lowercase letters (a-z), digits (0-9) and the characters
. (dot), - (hyphen) and
_ (underscore). Special characters, umlauts
and accented characters are not allowed.
Finally, enter a password for the user. Re-enter it for confirmation (to ensure that you did not type something else by mistake). To provide effective security, a password should be at least six characters long and consist of uppercase and lowercase letters, digits and special characters (7-bit ASCII). Umlauts or accented characters are not allowed. Passwords you enter are checked for weakness. When entering a password that is easy to guess (such as a dictionary word or a name) you will see a warning. It is a good security practice to use strong passwords.
Important: User Name and Password
Remember both your user name and the password because they are needed each time you log in to the system.
Figure 2.11: Create New User #
Three additional options are available:
If checked, the same password you have entered for the user will be used for the system administrator
root. This option is suitable for stand-alone workstations or machines in a home network that are administrated by a single user. When not checked, you are prompted for a system administrator password in the next step of the installation workflow (see Section 2.13, “Password for the System Administratorroot”).Checking this box sends messages created by the system services to the user. These are usually only sent to
root, the system administrator. This option is useful for the most frequently used account, because it is highly recommended to log in asrootonly in special cases.The mails sent by system services are stored in the local mailbox
/var/spool/mail/username, where username is the login name of the selected user. To read e-mails after installation, you can use any e-mail client, for example KMail or Evolution.This option automatically logs the current user in to the system when it starts. This is mainly useful if the computer is operated by only one user.
Warning: Automatic Login
With the automatic login enabled, the system boots straight into your desktop with no authentication. If you store sensitive data on your system, you should not enable this option if the computer can also be accessed by others.
2.12.1 Expert Settings #
Click in the Create User dialog to import users from a previous installation (if present). Also change the password encryption type in this dialog.
The default authentication method is . If a former version of openSUSE Leap or
another system using /etc/passwd is detected, you
may import local users. To do so, check and click . In
the next dialog, select the users to import and finish with
.
By default the passwords are encrypted with the SHA-512 hash function. Changing this method is not recommended unless needed for compatibility reasons.
2.13 Password for the System Administrator root #
If you have not chosen in the previous step, you will be prompted to
enter a password for the System Administrator root. Otherwise
this configuration step is skipped.
root is the name of the superuser, or the administrator of the
system. Unlike regular users (who may or may not have permission to
access certain areas or execute certain commands on the system),
root has unlimited access to change the system configuration,
install programs, and set up new hardware. If users forget their
passwords or have other problems with the system, root can help.
The root account should only be used for system administration,
maintenance, and repair. Logging in as root for daily work is
rather risky: a single mistake could lead to irretrievable loss of system
files.
For verification purposes, the password for root must be entered
twice. Do not forget the root password. After having been
entered, this password cannot be retrieved.
Figure 2.12: Password for the System Administrator root #
Tip: Passwords and Keyboard Layout
It is recommended to only use characters that are available on an English keyboard. In case of a system error or when you need to start your system in rescue mode a localized keyboard might not be available.
The root password can be changed any time later in the installed
system. To do so run YaST and start › .
Important: The root User
The user root has all the permissions needed to make changes to
the system. To carry out such tasks, the root password is
required. You cannot carry out any administrative tasks without this
password.
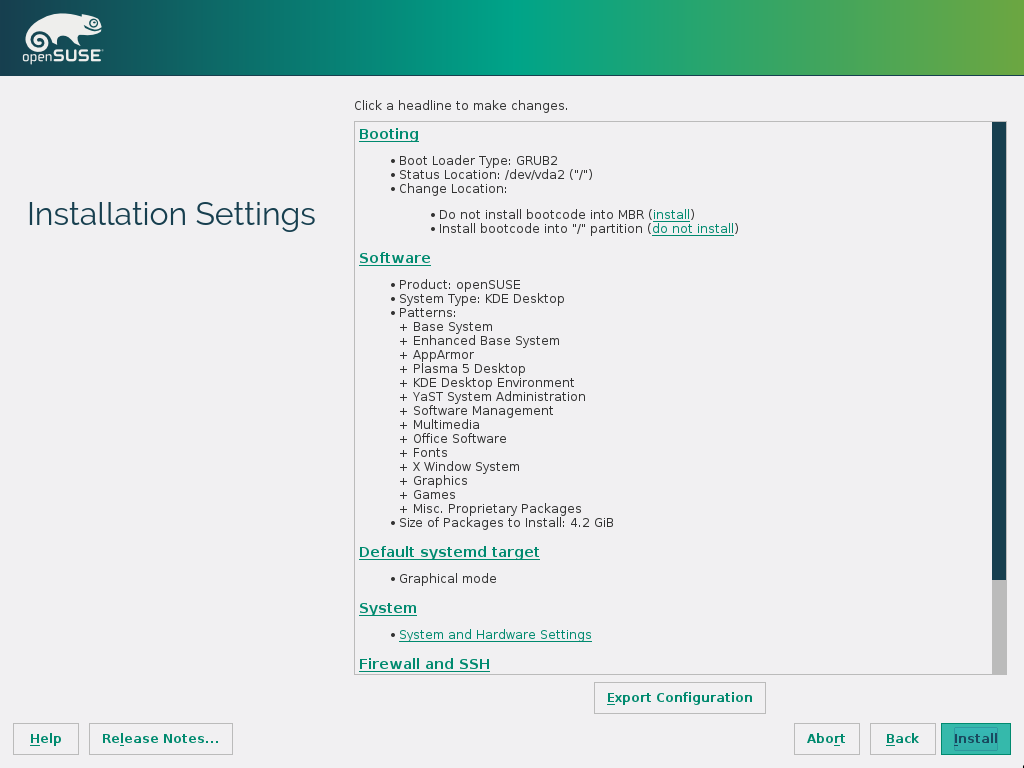
2.14 Installation Settings #
On the last step before the real installation takes place, you can alter installation settings suggested by the installer. To modify the suggestions, click the respective headline. After having made changes to a particular setting, you are always returned to the Installation Settings window, which is updated accordingly.
The option lets you save the current configuration to an XML file which can be used by AutoYaST for the automated installation of other machines.
Figure 2.13: Installation Settings #
2.14.1 #
openSUSE Leap contains several software patterns for various application purposes. Click to open the screen where you can modify the pattern selection according to your needs. Select a pattern from the list and see a description in the right-hand part of the window. Each pattern contains several software packages needed for specific functions (for example Multimedia or Office software). For a more detailed selection based on software packages to install, select to switch to the YaST Software Manager.
You can also install additional software packages or remove software packages from your system at any later time with the YaST Software Manager. For more information, refer to Chapter 9, Installing or Removing Software.
Figure 2.14: Software Selection and System Tasks #
Tip: Adding Secondary Languages
The language you selected with the first step of the installation will be used as the primary (default) language for the system. You can add secondary languages from within the dialog by choosing › › .
2.14.2 #
The installer proposes a boot configuration for your system. Other operating systems found on your computer, such as Microsoft Windows or other Linux installations, will automatically be detected and added to the boot loader. However, openSUSE Leap will be booted by default. Normally, you can leave these settings unchanged. If you need a custom setup, modify the proposal according to your needs. For information, see Book “Reference”, Chapter 12 “The Boot Loader GRUB 2”, Section 12.3 “Configuring the Boot Loader with YaST”.
Important: Software RAID 1
Booting a configuration where /boot resides on a
software RAID 1 device is supported, but it requires to install the boot
loader into the MBR ( › ). Having
/boot on software RAID devices with a level other
than RAID 1 is not supported.
2.14.3 #
By default SuSEFirewall2 is enabled on all configured network interfaces. To globally disable the firewall for this computer, click (not recommended).
Note: Firewall Settings
If the firewall is activated, all interfaces are configured to be in the “External Zone”, where all ports are closed by default, ensuring maximum security. The only port you can open during the installation is port 22 (SSH), to allow remote access. All other services requiring network access (such as FTP, Samba, Web server, etc.) will only work after having adjusted the firewall settings. Refer to Book “Security Guide”, Chapter 15 “Masquerading and Firewalls” for more information.
To enable remote access via the secure shell (SSH), make sure the
SSH service is enabled and the SSH
port is open.
Tip: Existing SSH Host Keys
If you install openSUSE Leap on a machine with one or more existing Linux installations, the installation routine automatically imports the SSH host key with the most recent access time from an existing installation.
In case you are performing a remote administration over VNC, you can also configure whether the machine should be accessible via VNC even after the installation. Note that enabling VNC also requires you to set the to .
2.14.4 #
openSUSE Leap can boot into two different targets (formerly known as “runlevels”). The target starts a display manager, whereas the target starts the command line interface.
The default target is . In case you have not installed the patterns, you need to change it to . If the system should be accessible via VNC, you need to choose .
2.14.5 #
This screen lists all the hardware information the installer could obtain about your computer. When opened for the first time, the hardware detection is started. Depending on your system, this may take some time. Select any item in the list and click to see detailed information about the selected item. Use to save a detailed list to either the local file system or a removable device.
Advanced users can also change the and Kernel Settings by choosing . A screen with two tabs opens:
Each kernel driver contains a list of device IDs of all devices it supports. If a new device is not in any driver's database, the device is treated as unsupported, even if it can be used with an existing driver. You can add PCI IDs to a device driver here. Only advanced users should attempt to do so.
To add an ID, click and select whether to enter the data, or whether to choose from a list. Enter the required data. The is the directory name from
/sys/bus/pci/drivers—if empty, the name is used as the directory name. Existing entries can be managed with and .Change the here. If is chosen, the default setting for the respective architecture will be used. This setting can also be changed at any time later from the installed system. Refer to Book “System Analysis and Tuning Guide”, Chapter 12 “Tuning I/O Performance” for details on I/O tuning.
Also activate the here. These keys will let you issue basic commands (such as rebooting the system or writing kernel dumps) in case the system crashes. Enabling these keys is recommended when doing kernel development. Refer to http://www.kernel.org/doc/Documentation/sysrq.txt for details.
2.15 Performing the Installation #
After configuring all installation settings, click in the Installation Settings window to start the installation. Some software may require a license confirmation. If your software selection includes such software, license confirmation dialogs are displayed. Click to install the software package. When not agreeing to the license, click and the software package will not be installed. In the dialog that follows, confirm with again.
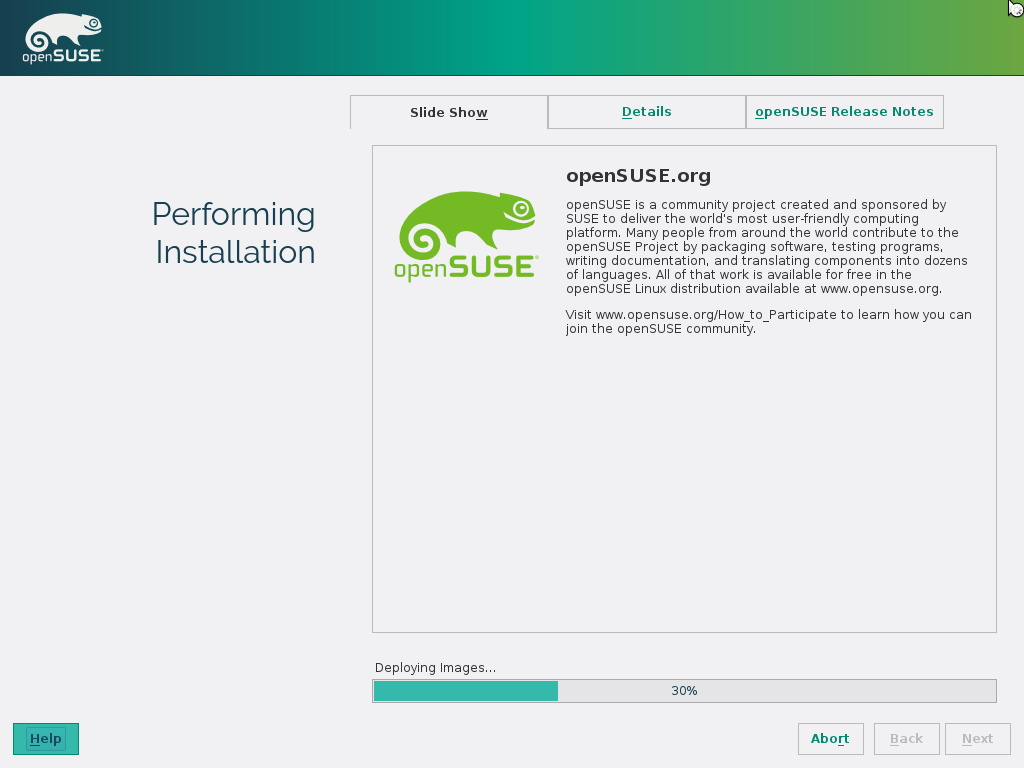
The installation usually takes between 15 and 30 minutes, depending on the system performance and the selected software scope. After having prepared the hard disk and having saved and restored the user settings, the software installation starts. During this procedure a slide show introduces the features of openSUSE Leap. Choose to switch to the installation log or to read important up-to-date information that was not available when the manuals were printed.
After the software installation has completed, the system reboots into the new installation where you can log in. To customize the system configuration or to install additional software packages, start YaST.
Part II Administration #
- 3 Managing Users with YaST
During installation, you were able to create a local user for your system. With the YaST module you can add more users or edit existing ones. It also lets you configure your system to authenticate users with a network server.
- 4 Changing Language and Country Settings with YaST
Working in different countries or having to work in a multilingual environment requires your computer to be set up to support this. openSUSE® Leap can handle different
localesin parallel. A locale is a set of parameters that defines the language and country settings reflected in the user interface.- 5 Setting Up Hardware Components with YaST
YaST allows you to configure hardware items such as audio hardware, your system keyboard layout or printers.
- 6 Printer Operation
openSUSE® Leap supports printing with many types of printers, including remote network printers. Printers can be configured manually or with YaST. For configuration instructions, refer to Section 5.3, “Setting Up a Printer”. Both graphical and command line utilities are available for starting and ma…
- 7 The X Window System
The X Window System (X11) is the de facto standard for graphical user interfaces in Unix. X is network-based, enabling applications started on one host to be displayed on another host connected over any kind of network (LAN or Internet). This chapter provides basic information on the X configuration…
- 8 Accessing File Systems with FUSE
FUSE is the acronym for file system in userspace. This means you can configure and mount a file system as an unprivileged user. Normally, you need to be
rootfor this task. FUSE alone is a kernel module. Combined with plug-ins, it allows you to extend FUSE to access almost all file systems like remote SSH connections, ISO images, and more.
3 Managing Users with YaST #
During installation, you were able to create a local user for your system. With the YaST module you can add more users or edit existing ones. It also lets you configure your system to authenticate users with a network server.
3.1 User and Group Administration Dialog #
To administer users or groups, start YaST and click › . Alternatively, start the
dialog directly by
running sudo yast2 users & from a command line.
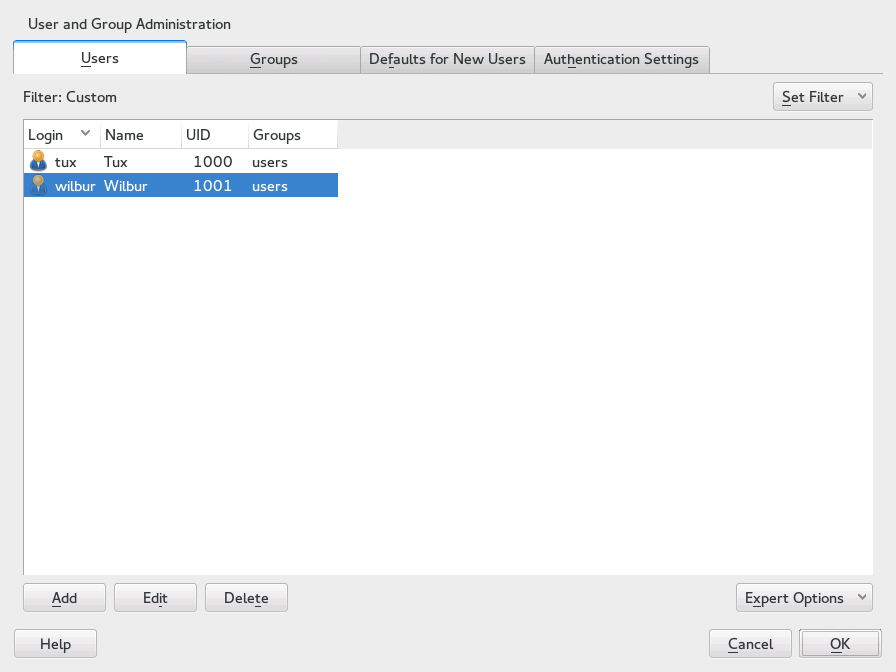
Figure 3.1: YaST User and Group Administration #
Every user is assigned a system-wide user ID (UID). Apart from the users which can log in to your machine, there are also several system users for internal use only. Each user is assigned to one or more groups. Similar to system users, there are also system groups for internal use.
Depending on the set of users you choose to view and modify with, the dialog (local users, network users, system users), the main window shows several tabs. These allow you to execute the following tasks:
- Managing User Accounts
From the tab create, modify, delete or temporarily disable user accounts as described in Section 3.2, “Managing User Accounts”. Learn about advanced options like enforcing password policies, using encrypted home directories, or managing disk quotas in Section 3.3, “Additional Options for User Accounts”.
- Changing Default Settings
Local users accounts are created according to the settings defined on the tab. Learn how to change the default group assignment, or the default path and access permissions for home directories in Section 3.4, “Changing Default Settings for Local Users”.
- Assigning Users to Groups
Learn how to change the group assignment for individual users in Section 3.5, “Assigning Users to Groups”.
- Managing Groups
From the tab, you can add, modify or delete existing groups. Refer to Section 3.6, “Managing Groups” for information on how to do this.
- Changing the User Authentication Method
When your machine is connected to a network that provides user authentication methods like NIS or LDAP, you can choose between several authentication methods on the tab. For more information, refer to Section 3.7, “Changing the User Authentication Method”.
For user and group management, the dialog provides similar functionality. You can easily switch between the user and group administration view by choosing the appropriate tab at the top of the dialog.
Filter options allow you to define the set of users or groups you want to modify: On the or tab, click to view and edit users or groups according to certain categories, such as or , for instance (if you are part of a network which uses LDAP). With › you can also set up and use a custom filter.
Depending on the filter you choose, not all of the following options and functions will be available from the dialog.
3.2 Managing User Accounts #
YaST offers to create, modify, delete or temporarily disable user accounts. Do not modify user accounts unless you are an experienced user or administrator.
Note: Changing User IDs of Existing Users
File ownership is bound to the user ID, not to the user name. After a user ID change, the files in the user's home directory are automatically adjusted to reflect this change. However, after an ID change, the user no longer owns the files he created elsewhere in the file system unless the file ownership for those files are manually modified.
In the following, learn how to set up default user accounts. For some further options, such as auto login, login without password, setting up encrypted home directories or managing quotas for users and groups, refer to Section 3.3, “Additional Options for User Accounts”.
Procedure 3.1: Adding or Modifying User Accounts #
Open the YaST dialog and click the tab.
With define the set of users you want to manage. The dialog lists users in the system and the groups the users belong to.
To modify options for an existing user, select an entry and click .
To create a new user account, click .
Enter the appropriate user data on the first tab, such as (which is used for login) and . This data is sufficient to create a new user. If you click now, the system will automatically assign a user ID and set all other values according to the default.
Activate if you want any kind of system notifications to be delivered to this user's mailbox. This creates a mail alias for
rootand the user can read the system mail without having to first log in asroot.If you want to adjust further details such as the user ID or the path to the user's home directory, do so on the tab.
If you need to relocate the home directory of an existing user, enter the path to the new home directory there and move the contents of the current home directory with . Otherwise, a new home directory is created without any of the existing data.
To force users to regularly change their password or set other password options, switch to and adjust the options. For more details, refer to Section 3.3.2, “Enforcing Password Policies”.
If all options are set according to your wishes, click .
Click to close the administration dialog and to save the changes. A newly added user can now log in to the system using the login name and password you created.
Alternatively, if you want to save all changes without exiting the dialog, click › .
Tip: Matching User IDs
For a new (local) user on a laptop which also needs to integrate into a network environment where this user already has a user ID, it is useful to match the (local) user ID to the ID in the network. This ensures that the file ownership of the files the user creates “offline” is the same as if he had created them directly on the network.
Procedure 3.2: Disabling or Deleting User Accounts #
Open the YaST dialog and click the tab.
To temporarily disable a user account without deleting it, select the user from the list and click . Activate . The user cannot log in to your machine until you enable the account again.
To delete a user account, select the user from the list and click . Choose if you also want to delete the user's home directory or if you want to retain the data.
3.3 Additional Options for User Accounts #
In addition to the settings for a default user account, openSUSE® Leap offers further options, such as options to enforce password policies, use encrypted home directories or define disk quotas for users and groups.
3.3.1 Automatic Login and Passwordless Login #
If you use the GNOME desktop environment you can configure Auto Login for a certain user and Passwordless Login for all users. Auto login causes a user to become automatically logged in to the desktop environment on boot. This functionality can only be activated for one user at a time. Login without password allows all users to log in to the system after they have entered their user name in the login manager.
Warning: Security Risk
Enabling Auto Login or Passwordless Login on a machine that can be accessed by more than one person is a security risk. Without the need to authenticate, any user can gain access to your system and your data. If your system contains confidential data, do not use this functionality.
If you want to activate auto login or login without password, access these functions in the YaST with › .
3.3.2 Enforcing Password Policies #
On any system with multiple users, it is a good idea to enforce at least basic password security policies. Users should change their passwords regularly and use strong passwords that cannot easily be exploited. For local users, proceed as follows:
Procedure 3.3: Configuring Password Settings #
Open the YaST dialog and select the tab.
Select the user for which to change the password options and click .
Switch to the tab. The user's last password change is displayed on the tab.
To make the user change his password at next login, activate .
To enforce password rotation, set a and a .
To remind the user to change his password before it expires, set a number of .
To restrict the period of time the user can log in after his password has expired, change the value in .
You can also specify a certain expiration date for the complete account. Enter the in YYYY-MM-DD format. Note that this setting is not password-related but rather applies to the account itself.
For more information about the options and about the default values, click .
Apply your changes with .
3.3.3 Managing Encrypted Home Directories #
To protect data in home directories against theft and hard disk removal, you can create encrypted home directories for users. These are encrypted with LUKS (Linux Unified Key Setup), which results in an image and an image key being generated for the user. The image key is protected with the user's login password. When the user logs in to the system, the encrypted home directory is mounted and the contents are made available to the user.
With YaST, you can create encrypted home directories for new or existing users. To encrypt or modify encrypted home directories of already existing users, you need to know the user's current login password. By default, all existing user data is copied to the new encrypted home directory, but it is not deleted from the unencrypted directory.
Warning: Security Restrictions
Encrypting a user's home directory does not provide strong security from other users. If strong security is required, the system should not be physically shared.
Find background information about encrypted home directories and which actions to take for stronger security in Book “Security Guide”, Chapter 11 “Encrypting Partitions and Files”, Section 11.2 “Using Encrypted Home Directories”.
Procedure 3.4: Creating Encrypted Home Directories #
Open the YaST dialog and click the tab.
To encrypt the home directory of an existing user, select the user and click .
Otherwise, click to create a new user account and enter the appropriate user data on the first tab.
In the tab, activate . With , specify the size of the encrypted image file to be created for this user.
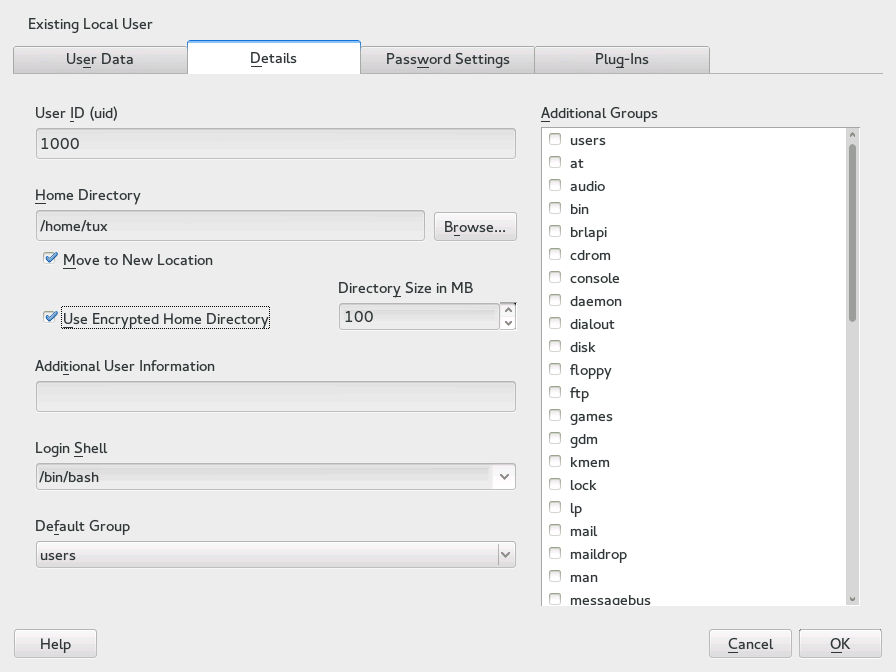
Apply your settings with .
Enter the user's current login password to proceed if YaST prompts for it.
Click to close the administration dialog and save the changes.
Alternatively, if you want to save all changes without exiting the dialog, click › .
Procedure 3.5: Modifying or Disabling Encrypted Home Directories #
Of course, you can also disable the encryption of a home directory or change the size of the image file at any time.
Open the YaST dialog in the view.
Select a user from the list and click .
If you want to disable the encryption, switch to the tab and disable .
If you need to enlarge or reduce the size of the encrypted image file for this user, change the .
Apply your settings with .
Enter the user's current login password to proceed if YaST prompts for it.
Click to close the administration dialog and save the changes.
Alternatively, if you want to save all changes without exiting the dialog, click › .
3.3.4 Managing Quotas #
To prevent system capacities from being exhausted without notification, system administrators can set up quotas for users or groups. Quotas can be defined for one or more file systems and restrict the amount of disk space that can be used and the number of inodes (index nodes) that can be created there. Inodes are data structures on a file system that store basic information about a regular file, directory, or other file system object. They store all attributes of a file system object (like user and group ownership, read, write, or execute permissions), except file name and contents.
openSUSE Leap allows usage of soft and
hard quotas. Additionally, grace intervals
can be defined that allow users or groups to temporarily
violate their quotas by certain amounts.
- Soft Quota
Defines a warning level at which users are informed that they are nearing their limit. Administrators will urge the users to clean up and reduce their data on the partition. The soft quota limit is usually lower than the hard quota limit.
- Hard Quota
Defines the limit at which write requests are denied. When the hard quota is reached, no more data can be stored and applications may crash.
- Grace Period
Defines the time between the overflow of the soft quota and a warning being issued. Usually set to a rather low value of one or several hours.
Procedure 3.6: Enabling Quota Support for a Partition #
To configure quotas for certain users and groups, you need to enable quota support for the respective partition in the YaST Expert Partitioner first.
In YaST, select › and click to proceed.
In the , select the partition for which to enable quotas and click .
Click and activate . If the
quotapackage is not already installed, it will be installed once you confirm the respective message with .Confirm your changes and leave the .
Make sure the service
quotaonis running by entering the following command:systemctl status quotaon
It should be marked as being
active. If this is not the case, start it with the commandsystemctl start quotaon.
Procedure 3.7: Setting Up Quotas for Users or Groups #
Now you can define soft or hard quotas for specific users or groups and set time periods as grace intervals.
In the YaST , select the user or the group you want to set the quotas for and click .
On the tab, select the entry and click to open the dialog.
From , select the partition to which the quota should apply.
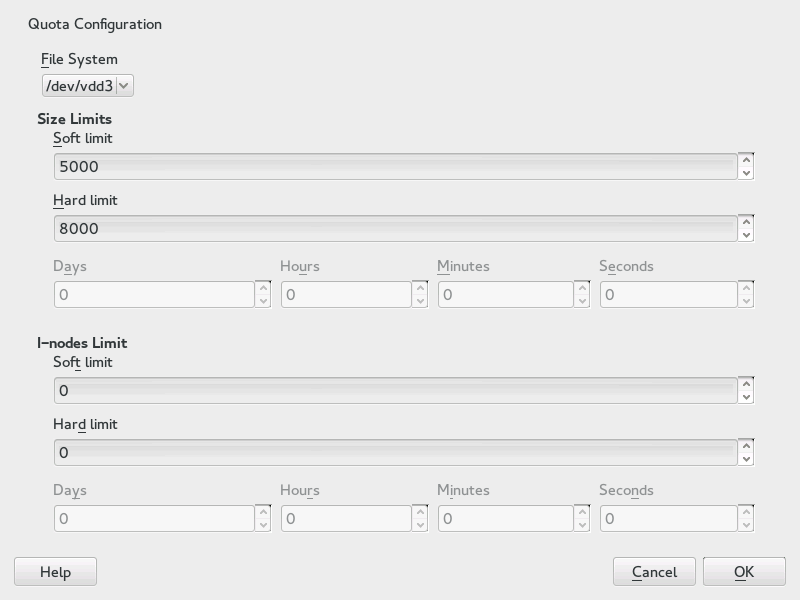
Below , restrict the amount of disk space. Enter the number of 1 KB blocks the user or group may have on this partition. Specify a and a value.
Additionally, you can restrict the number of inodes the user or group may have on the partition. Below , enter a and .
You can only define grace intervals if the user or group has already exceeded the soft limit specified for size or inodes. Otherwise, the time-related text boxes are not activated. Specify the time period for which the user or group is allowed to exceed the limits set above.
Confirm your settings with .
Click to close the administration dialog and save the changes.
Alternatively, if you want to save all changes without exiting the dialog, click › .
openSUSE Leap also ships command line tools like
repquota or warnquota with which
system administrators can control the disk usage or send e-mail
notifications to users exceeding their quota. With
quota_nld, administrators can also forward kernel
messages about exceeded quotas to D-BUS. For more information, refer to
the repquota, the
warnquota and the quota_nld
man page.
3.4 Changing Default Settings for Local Users #
When creating new local users, several default settings are used by YaST. These include, for example, the primary group and the secondary groups the user belongs to, or the access permissions of the user's home directory. You can change these default settings to meet your requirements:
Open the YaST dialog and select the tab.
To change the primary group the new users should automatically belong to, select another group from .
To modify the secondary groups for new users, add or change groups in . The group names must be separated by commas.
If you do not want to use
/home/usernameas default path for new users' home directories, modify the .To change the default permission modes for newly created home directories, adjust the umask value in . For more information about umask, refer to Book “Security Guide”, Chapter 10 “Access Control Lists in Linux” and to the
umaskman page.For information about the individual options, click .
Apply your changes with .
3.5 Assigning Users to Groups #
Local users are assigned to several groups according to the default settings which you can access from the dialog on the tab. In the following, learn how to modify an individual user's group assignment. If you need to change the default group assignments for new users, refer to Section 3.4, “Changing Default Settings for Local Users”.
Procedure 3.8: Changing a User's Group Assignment #
Open the YaST dialog and click the tab. It lists users and of the groups the users belong to.
Click and switch to the tab.
To change the primary group the user belongs to, click and select the group from the list.
To assign the user additional secondary groups, activate the corresponding check boxes in the list.
Click to apply your changes.
Click to close the administration dialog and save the changes.
Alternatively, if you want to save all changes without exiting the dialog, click › .
3.6 Managing Groups #
With YaST you can also easily add, modify or delete groups.
Procedure 3.9: Creating and Modifying Groups #
Open the YaST dialog and click the tab.
With define the set of groups you want to manage. The dialog lists groups in the system.
To create a new group, click .
To modify an existing group, select the group and click .
In the following dialog, enter or change the data. The list on the right shows an overview of all available users and system users which can be members of the group.

To add existing users to a new group select them from the list of possible by checking the corresponding box. To remove them from the group deactivate the box.
Click to apply your changes.
Click to close the administration dialog and save the changes.
Alternatively, if you want to save all changes without exiting the dialog, click › .
To delete a group, it must not contain any group members. To delete a group, select it from the list and click . Click to close the administration dialog and save the changes. Alternatively, if you want to save all changes without exiting the dialog, click › .
3.7 Changing the User Authentication Method #
When your machine is connected to a network, you can change the authentication method. The following options are available:
- NIS
Users are administered centrally on a NIS server for all systems in the network. For details, see Book “Security Guide”, Chapter 3 “Using NIS”.
- LDAP
Users are administered centrally on an LDAP server for all systems in the network. For details about LDAP, see Book “Security Guide”, Chapter 5 “LDAP—A Directory Service”.
You can manage LDAP users with the YaST user module. All other LDAP settings, including the default settings for LDAP users, need to be defined with the YaST LDAP client module as described in Book “Security Guide”, Chapter 4 “Authentication Server and Client”, Section 4.2 “Configuring an Authentication Client with YaST (SSSD)”.
- Kerberos
With Kerberos, a user registers once and then is trusted in the entire network for the rest of the session.
- Samba
SMB authentication is often used in mixed Linux and Windows networks. For details, see Book “Reference”, Chapter 21 “Samba” and Book “Security Guide”, Chapter 6 “Active Directory Support”.
To change the authentication method, proceed as follows:
Open the dialog in YaST.
Click the tab to show an overview of the available authentication methods and the current settings.
To change the authentication method, click and select the authentication method you want to modify. This takes you directly to the client configuration modules in YaST. For information about the configuration of the appropriate client, refer to the following sections:
NIS: Book “Security Guide”, Chapter 3 “Using NIS”, Section 3.2 “Configuring NIS Clients”
LDAP: Book “Security Guide”, Chapter 4 “Authentication Server and Client”, Section 4.2 “Configuring an Authentication Client with YaST (SSSD)”
Samba: Book “Reference”, Chapter 21 “Samba”, Section 21.5.1 “Configuring a Samba Client with YaST”
After accepting the configuration, return to the overview.
Click to close the administration dialog.
4 Changing Language and Country Settings with YaST #
Working in different countries or having to work in a multilingual
environment requires your computer to be set up to support this.
openSUSE® Leap can handle different locales in
parallel. A locale is a set of parameters that defines the language and
country settings reflected in the user interface.
The main system language was selected during installation and keyboard and time zone settings were adjusted. However, you can install additional languages on your system and determine which of the installed languages should be the default.
For those tasks, use the YaST language module as described in Section 4.1, “Changing the System Language”. Install secondary languages to get optional localizations if you need to start applications or desktops in languages other than the primary one.
Apart from that, the YaST timezone module allows you to adjust your country and timezone settings accordingly. It also lets you synchronize your system clock against a time server. For details, refer to Section 4.2, “Changing the Country and Time Settings”.
4.1 Changing the System Language #
Depending on how you use your desktop and whether you want to switch the entire system to another language or only the desktop environment itself, there are several ways to achieve this:
- Changing the System Language Globally
Proceed as described in Section 4.1.1, “Modifying System Languages with YaST” and Section 4.1.2, “Switching the Default System Language” to install additional localized packages with YaST and to set the default language. Changes are effective after the next login. To ensure that the entire system reflects the change, reboot the system or close and restart all running services, applications, and programs.
- Changing the Language for the Desktop Only
Provided you have previously installed the desired language packages for your desktop environment with YaST as described below, you can switch the language of your desktop using the desktop's control center. Refer to Book “GNOME User Guide”, Chapter 3 “Customizing Your Settings”, Section 3.2.2 “Configuring Language Settings” for details. After the X server has been restarted, your entire desktop reflects your new choice of language. Applications not belonging to your desktop framework are not affected by this change and may still appear in the language that was set in YaST.
- Temporarily Switching Languages for One Application Only
You can also run a single application in another language (that has already been installed with YaST). To do so, start it from the command line by specifying the language code as described in Section 4.1.3, “Switching Languages for Standard X and GNOME Applications”.
4.1.1 Modifying System Languages with YaST #
YaST knows two different language categories:
- Primary Language
The primary language set in YaST applies to the entire system, including YaST and the desktop environment. This language is used whenever available unless you manually specify another language.
- Secondary Languages
Install secondary languages to make your system multilingual. Languages installed as secondary languages can be selected manually for a specific situation. For example, use a secondary language to start an application in a certain language to do word processing in this language.
Before installing additional languages, determine which of them should be the default system language (primary language).
To access the YaST language module, start YaST and click
› . Alternatively, start the
dialog directly by running sudo yast2 language
& from a command line.

Procedure 4.1: Installing Additional Languages #
When installing additional languages, YaST also allows you to set
different locale settings for the user root, see
Step 4. The option
determines how the
locale variables (LC_*) in the file
/etc/sysconfig/language are set for root.
You can either set them to the same locale as for normal users, keep it
unaffected by any language changes or only set the variable
RC_LC_CTYPE to the same values as for the normal users.
This variable sets the localization for language-specific function
calls.
To add additional languages in the YaST language module, select the you want to install.
To make a language the default language, set it as .
Additionally, adapt the keyboard to the new primary language and adjust the time zone, if appropriate.
Tip: Advanced Settings
For advanced keyboard or time zone settings, select › or › in YaST to start the respective dialogs. For more information, refer to Section 5.1, “Setting Up Your System Keyboard Layout” and Section 4.2, “Changing the Country and Time Settings”.
To change language settings specific to the user
root, click .Set to the desired value. For more information, click .
Decide if you want to for
rootor not.
If your locale was not included in the list of primary languages available, try specifying it with . However, some localizations may be incomplete.
Confirm your changes in the dialogs with . If you have selected secondary languages, YaST installs the localized software packages for the additional languages.
The system is now multilingual. However, to start an application in a language other than the primary one, you need to set the desired language explicitly as explained in Section 4.1.3, “Switching Languages for Standard X and GNOME Applications”.
4.1.2 Switching the Default System Language #
To globally switch the default system language, start the YaST language module.
Select the desired new system language as .
Important: Deleting Former System Languages
If you switch to a different primary language, the localized software packages for the former primary language will be removed from the system. If you want to switch the default system language but want to keep the former primary language as additional language, add it as by enabling the respective check box.
Adjust the keyboard and time zone options as desired.
Confirm your changes with .
After YaST has applied the changes, restart any X sessions (for example, by logging out and logging in again) to make YaST and the desktop applications reflect your new language settings.
4.1.3 Switching Languages for Standard X and GNOME Applications #
After you have installed the respective language with YaST, you can run a single application in another language.
Start the application from the command line by using the following command:
LANG=language application
For example, to start f-spot in German, run
LANG=de_DE f-spot. For other languages, use
the appropriate language code. Get a list of all language codes
available with the locale
-av command.
4.2 Changing the Country and Time Settings #
Using the YaST date and time module, adjust your system date, clock
and time zone information to the area you are working in. To access the
YaST module, start YaST and click › .
Alternatively, start the dialog
directly by running sudo yast2 timezone & from
a command line.

First, select a general region, such as . Choose an appropriate country that matches the one you are working in, for example, .
Depending on which operating systems run on your workstation, adjust the hardware clock settings accordingly:
If you run another operating system on your machine, such as Microsoft Windows*, it is likely your system does not use UTC, but local time. In this case, deactivate .
If you only run Linux on your machine, set the hardware clock to UTC and have the switch from standard time to daylight saving time performed automatically.
Important: Set the Hardware Clock to UTC
The switch from standard time to daylight saving time (and vice versa) can only be performed automatically when the hardware clock (CMOS clock) is set to UTC. This also applies if you use automatic time synchronization with NTP, because automatic synchronization will only be performed if the time difference between the hardware and system clock is less than 15 minutes.
Since a wrong system time can cause severe problems (missed backups, dropped mail messages, mount failures on remote file systems, etc.) it is strongly recommended to always set the hardware clock to UTC.
You can change the date and time manually or opt for synchronizing your machine against an NTP server, either permanently or only for adjusting your hardware clock.
Procedure 4.2: Manually Adjusting Time and Date #
In the YaST timezone module, click to set date and time.
Select and enter date and time values.
Confirm your changes.
Procedure 4.3: Setting Date and Time With NTP Server #
Click to set date and time.
Select .
Enter the address of an NTP server, if not already populated.
Click to get your system time set correctly.
If you want to use NTP permanently, enable .
With the button, you can open the advanced NTP configuration. For details, see Book “Reference”, Chapter 18 “Time Synchronization with NTP”, Section 18.1 “Configuring an NTP Client with YaST”.
Confirm your changes.
Note: Graphics Card, Monitor, Mouse and Keyboard Settings
Graphics card, monitor, mouse and keyboard can be configured with GNOME tools. See Book “GNOME User Guide”, Chapter 3 “Customizing Your Settings”, Section 3.3 “Hardware” for details.
5.1 Setting Up Your System Keyboard Layout #
The YaST module lets you define the default keyboard layout for the system (also used for the console). Users can modify the keyboard layout in their individual X sessions, using the desktop's tools.
Start the YaST dialog by clicking › in YaST. Alternatively, start the module from the command line with
sudo yast2 keyboard.Select the desired from the list.
Optionally, you can also define the keyboard repeat rate or keyboard delay rate in the .
Try the selected settings in the text box.
If the result is as expected, confirm your changes and close the dialog. The settings are written to
/etc/sysconfig/keyboard.
5.2 Setting Up Sound Cards #
YaST detects most sound cards automatically and configures them with the appropriate values. If you want to change the default settings, or need to set up a sound card that could not be configured automatically, use the YaST sound module. There, you can also set up additional sound cards or switch their order.
To start the sound module, start YaST and click › .
Alternatively, start the dialog
directly by running yast2 sound & as user
root from a command line.
The dialog shows all sound cards that could be detected.
Procedure 5.1: Configuring Sound Cards #
If you have added a new sound card or YaST could not automatically configure an existing sound card, follow the steps below. For configuring a new sound card, you need to know your sound card vendor and model. If in doubt, refer to your sound card documentation for the required information. For a reference list of sound cards supported by ALSA with their corresponding sound modules, see http://www.alsa-project.org/main/index.php/Matrix:Main.
During configuration, you can choose between the following setup options:
You are not required to go through any of the further configuration steps—the sound card is configured automatically. You can set the volume or any options you want to change later.
Allows you to adjust the output volume and play a test sound during the configuration.
For experts only. Allows you to customize all parameters of the sound card.
Important: Advanced Configuration
Only use this option if you know exactly what your are doing. Otherwise leave the parameters untouched and use the normal or the automatic setup options.
Start the YaST sound module.
To configure a detected, but sound card, select the respective entry from the list and click .
To configure a new sound card, click . Select your sound card vendor and model and click .
Choose one of the setup options and click .
If you have chosen , you can now your sound configuration and make adjustments to the volume. You should start at about ten percent volume to avoid damage to your hearing or the speakers.
If all options are set according to your wishes, click .
The dialog shows the newly configured or modified sound card.
To remove a sound card configuration that you no longer need, select the respective entry and click .
Click to save the changes and leave the YaST sound module.
Procedure 5.2: Modifying Sound Card Configurations #
To change the configuration of an individual sound card (for experts only!), select the sound card entry in the dialog and click .
This takes you to the where you can fine-tune several parameters. For more information, click .
To adjust the volume of an already configured sound card or to test the sound card, select the sound card entry in the dialog and click . Select the respective menu item.
Note: YaST Mixer
The YaST mixer settings provide only basic options. They are intended for troubleshooting (for example, if the test sound is not audible). Access the YaST mixer settings from › . For everyday use and fine-tuning of sound options, use the mixer applet provided by your desktop or the
alsasoundcommand line tool.For playback of MIDI files, select › .
When a supported sound card is detected (like a Creative
Soundblaster Live,AudigyorAWEsound card), you can also install SoundFonts for playback of MIDI files:Insert the original driver CD-ROM into your CD or DVD drive.
Select › to copy SF2 SoundFonts™ to your hard disk. The SoundFonts are saved in the directory
/usr/share/sfbank/creative/.
If you have configured more than one sound card in your system you can adjust the order of your sound cards. To set a sound card as primary device, select the sound card in the and click › . The sound device with index
0is the default device and thus used by the system and the applications.By default, openSUSE Leap uses the PulseAudio sound system. It is an abstraction layer that helps to mix multiple audio streams, bypassing any restrictions the hardware may have. To enable or disable the PulseAudio sound system, click › . If enabled, PulseAudio daemon is used to play sounds. Disable in case you want to use something else system-wide.
The volume and configuration of all sound cards are saved when you click
and leave the YaST sound module. The mixer
settings are saved to the file /etc/asound.state. The
ALSA configuration data is appended to the end of the file
/etc/modprobe.d/sound and written to
/etc/sysconfig/sound.
5.3 Setting Up a Printer #
YaST can be used to configure a local printer that is directly connected to your machine via USB and to set up printing with network printers. It is also possible to share printers over the network. Further information about printing (general information, technical details, and troubleshooting) is available in Chapter 6, Printer Operation.
In YaST, click › to start the printer module. By default it opens in the view, displaying a list of all printers that are available and configured. This is especially useful when having access to a lot of printers via the network. From here you can also and configure printers.
Note: Starting CUPS
To be able to print from your system, CUPS must run. In case it is not running, you are asked to start it. Answer with , or you cannot configure printing. In case CUPS is not started at boot time, you will also be asked to enable this feature. It is recommended to say , otherwise CUPS would need to be started manually after each reboot.
5.3.1 Configuring Printers #
Usually a USB printer is automatically detected. There are two possible reasons it is not automatically detected:
The USB printer is switched off.
The communication between printer and computer is not possible. Check the cable and the plugs to make sure that the printer is properly connected. If this is the case, the problem may not be printer-related, but rather a USB-related problem.
Configuring a printer is a three-step process: specify the connection type, choose a driver, and name the print queue for this setup.
For many printer models, several drivers are available. When configuring
the printer, YaST defaults to those marked
recommended as a general rule. Normally it is not
necessary to change the driver. However, if you want a color printer to
print only in black and white, it is most convenient to use a driver that
does not support color printing, for example. If you experience
performance problems with a PostScript printer when printing graphics, it
may help to switch from a PostScript driver to a PCL driver (provided
your printer understands PCL).
If no driver for your printer is listed, try to select a generic driver with an appropriate standard language from the list. Refer to your printer's documentation to find out which language (the set of commands controlling the printer) your printer understands. If this does not work, refer to Section 5.3.1.1, “Adding Drivers with YaST” for another possible solution.
A printer is never used directly, but always through a print queue. This ensures that simultaneous jobs can be queued and processed one after the other. Each print queue is assigned to a specific driver, and a printer can have multiple queues. This makes it possible to set up a second queue on a color printer that prints black and white only, for example. Refer to Section 6.1, “The CUPS Workflow” for more information about print queues.
Procedure 5.3: Adding a New Printer #
Start the YaST printer module with › .
In the screen click .
If your printer is already listed under
Specify the
     Connection
, proceed with the next step. Otherwise, try to or start the .In the text box under
Find and Assign a Driverenter the vendor name and the model name and click .Choose a driver that matches your printer. It is recommended to choose the driver listed first. If no suitable driver is displayed:
Check your search term
Broaden your search by clicking
Add a driver as described in Section 5.3.1.1, “Adding Drivers with YaST”
Specify the
Default paper size.In the field, enter a unique name for the print queue.
The printer is now configured with the default settings and ready to use. Click to return to the view. The newly configured printer is now visible in the list of printers.
5.3.1.1 Adding Drivers with YaST #
Not all printer drivers available for openSUSE Leap are installed by default. If no suitable driver is available in the dialog when adding a new printer install a driver package containing drivers for your printers:
Procedure 5.4: Installing Additional Driver Packages #
Start the YaST printer module with › .
In the screen, click .
In the
Find and Assign a Driversection, click .Choose one or more suitable driver packages from the list. Do not specify the path to a printer description file.
Choose and confirm the package installation.
To directly use these drivers, proceed as described in Procedure 5.3, “Adding a New Printer”.
PostScript printers do not need printer driver software. PostScript printers need only a PostScript Printer Description (PPD) file which matches the particular model. PPD files are provided by the printer manufacturer.
If no suitable PPD file is available in the dialog when adding a PostScript printer install a PPD file for your printer:
Several sources for PPD files are available. It is recommended to first try additional driver packages that are shipped with openSUSE Leap but not installed by default (see below for installation instructions). If these packages do not contain suitable drivers for your printer, get PPD files directly from your printer vendor or from the driver CD of a PostScript printer. For details, see Section 6.8.2, “No Suitable PPD File Available for a PostScript Printer”. Alternatively, find PPD files at http://www.linuxfoundation.org/collaborate/workgroups/openprinting/database/databaseintro, the “OpenPrinting.org printer database”. When downloading PPD files from OpenPrinting, keep in mind that it always shows the latest Linux support status, which is not necessarily met by openSUSE Leap.
Procedure 5.5: Adding a PPD file for PostScript Printers #
Start the YaST printer module with › .
In the screen, click .
In the
Find and Assign a Driversection, click .Enter the full path to the PPD file into the text box under
Make a Printer Description File Available.Click to return to the
Add New Printer Configurationscreen.To directly use this PPD file, proceed as described in Procedure 5.3, “Adding a New Printer”.
5.3.1.2 Editing a Local Printer Configuration #
By editing an existing configuration for a printer you can change basic settings such as connection type and driver. It is also possible to adjust the default settings for paper size, resolution, media source, etc. You can change identifiers of the printer by altering the printer description or location.
Start the YaST printer module with › .
In the screen, choose a local printer configuration from the list and click .
Change the connection type or the driver as described in Procedure 5.3, “Adding a New Printer”. This should only be necessary in case you have problems with the current configuration.
Optionally, make this printer the default by checking .
Adjust the default settings by clicking . To change a setting, expand the list of options by clicking the relative
+sign. Change the default by clicking an option. Apply your changes with .
5.3.2 Configuring Printing via the Network with YaST #
Network printers are not detected automatically. They must be configured manually using the YaST printer module. Depending on your network setup, you can print to a print server (CUPS, LPD, SMB, or IPX) or directly to a network printer (preferably via TCP). Access the configuration view for network printing by choosing from the left pane in the YaST printer module.
5.3.2.1 Using CUPS #
In a Linux environment CUPS is usually used to print via the network. The simplest setup is to only print via a single CUPS server which can directly be accessed by all clients. Printing via more than one CUPS server requires a running local CUPS daemon that communicates with the remote CUPS servers.
Important: Browsing Network Print Queues
CUPS servers announce their print queues over the network either via
the traditional CUPS browsing protocol or via Bonjour/DND-SD. Clients
need to be able to browse these lists, so users can select specific
printers to send their print jobs to. To be able to browse network
print queues, the service
cups-browsed provided by the
package
cups-filters-cups-browsed
needs to run on all clients that print via CUPS
servers.cups-browsed is started
automatically when configuring network printing with YaST.
In case browsing does not work after having started
cups-browsed, the CUPS
server(s) probably announce the network print queues via
Bonjour/DND-SD. In this case you need to additionally install the
package avahi and start the
associated service with sudo systemctl start
avahi-daemon on all clients.
Procedure 5.6: Printing via a Single CUPS Server #
Start the YaST printer module with › .
From the left pane, launch the screen.
Check and specify the name or IP address of the server.
Click to make sure you have chosen the correct name or IP address.
Click OK to return to the screen. All printers available via the CUPS server are now listed.
Procedure 5.7: Printing via Multiple CUPS Servers #
Start the YaST printer module with › .
From the left pane, launch the screen.
Check .
Under
General Settingsspecify which servers to use. You may accept connections from all networks available or from specific hosts. If you choose the latter option, you need to specify the host names or IP addresses.Confirm by clicking and then when asked to start a local CUPS server. After the server has started YaST will return to the screen. Click to see the printers detected by now. Click this button again, in case more printer are to be available.
5.3.2.2 Using Print Servers other than CUPS #
If your network offers print services via print servers other than CUPS, start the YaST printer module with › and launch the screen from the left pane. Start the and choose the appropriate . Ask your network administrator for details on configuring a network printer in your environment.
5.4 Setting Up a Scanner #
You can configure a USB or SCSI scanner with YaST. The
sane-backends package contains
hardware drivers and other essentials needed to use a scanner. If you own
an HP All-In-One device, see Section 5.4.1, “Configuring an HP All-In-One Device”,
instructions on how to configure a network scanner are available at
Section 5.4.3, “Scanning over the Network”.
Procedure 5.9: Configuring a USB or SCSI Scanner #
Connect your USB or SCSI scanner to your computer and turn it on.
Start YaST and select › . YaST builds the scanner database and tries to detect your scanner model automatically.
If a USB or SCSI scanner is not properly detected, try › .
To activate the scanner select it from the list of detected scanners and click .
Choose your model form the list and click and .
Use › to make sure you have chosen the correct driver.
Leave the configuration screen with .
5.4.1 Configuring an HP All-In-One Device #
An HP All-In-One device can be configured with YaST even if it is made available via the network. If you own a USB HP All-In-One device, start configuring as described in Procedure 5.9, “Configuring a USB or SCSI Scanner”. If it is detected properly and the succeeds, it is ready to use.
If your USB device is not properly detected, or your HP All-In-One device is connected to the network, run the HP Device Manager:
Start YaST and select › . YaST loads the scanner database.
Start the HP Device Manager with › and follow the on-screen instructions. After having finished the HP Device Manager, the YaST scanner module automatically restarts the auto detection.
Test it by choosing › .
Leave the configuration screen with .
5.4.2 Sharing a Scanner over the Network #
openSUSE Leap allows the sharing of a scanner over the network. To do so, configure your scanner as follows:
Configure the scanner as described in Section 5.4, “Setting Up a Scanner”.
Choose › .
Enter the host names of the clients (separated by a comma) that should be allowed to use the scanner under › and leave the configuration dialog with .
5.4.3 Scanning over the Network #
To use a scanner that is shared over the network, proceed as follows:
Start YaST and select › .
Open the network scanner configuration menu by › .
Enter the host name of the machine the scanner is connected to under ›
Leave with . The network scanner is now listed in the Scanner Configuration window and is ready to use.
6 Printer Operation #
openSUSE® Leap supports printing with many types of printers, including remote network printers. Printers can be configured manually or with YaST. For configuration instructions, refer to Section 5.3, “Setting Up a Printer”. Both graphical and command line utilities are available for starting and managing print jobs. If your printer does not work as expected, refer to Section 6.8, “Troubleshooting”.
CUPS (Common Unix Printing System) is the standard print system in openSUSE Leap.
Printers can be distinguished by interface, such as USB or network, and printer language. When buying a printer, make sure that the printer has an interface that is supported (USB, Ethernet, or Wi-Fi) and a suitable printer language. Printers can be categorized on the basis of the following three classes of printer languages:
- PostScript Printers
PostScript is the printer language in which most print jobs in Linux and Unix are generated and processed by the internal print system. If PostScript documents can be processed directly by the printer and do not need to be converted in additional stages in the print system, the number of potential error sources is reduced.
Currently PostScript is being replaced by PDF as the standard print job format. PostScript+PDF printers that can directly print PDF (in addition to PostScript) already exist. For traditional PostScript printers PDF needs to be converted to PostScript in the printing workflow.
- Standard Printers (Languages Like PCL and ESC/P)
In the case of known printer languages, the print system can convert PostScript jobs to the respective printer language with the help of Ghostscript. This processing stage is called interpreting. The best-known languages are PCL (which is mostly used by HP printers and their clones) and ESC/P (which is used by Epson printers). These printer languages are usually supported by Linux and produce an adequate print result. Linux may not be able to address some special printer functions. Except for HP and Epson there are currently no printer manufacturers who develop Linux drivers and make them available to Linux distributors under an open source license.
- Proprietary Printers (Also Called GDI Printers)
These printers do not support any of the common printer languages. They use their own undocumented printer languages, which are subject to change when a new edition of a model is released. Usually only Windows drivers are available for these printers. See Section 6.8.1, “Printers without Standard Printer Language Support” for more information.
Before you buy a new printer, refer to the following sources to check how well the printer you intend to buy is supported:
- http://www.linuxfoundation.org/OpenPrinting/
The OpenPrinting home page with the printer database. The database shows the latest Linux support status. However, a Linux distribution can only integrate the drivers available at production time. Accordingly, a printer currently rated as “perfectly supported” may not have had this status when the latest openSUSE Leap version was released. Thus, the databases may not necessarily indicate the correct status, but only provide an approximation.
- http://pages.cs.wisc.edu/~ghost/
The Ghostscript Web page.
/usr/share/doc/packages/ghostscript/catalog.devicesList of built-in Ghostscript drivers.
6.1 The CUPS Workflow #
The user creates a print job. The print job consists of the data to print plus information for the spooler, such as the name of the printer or the name of the print queue, and optionally, information for the filter, such as printer-specific options.
At least one dedicated print queue exists for every printer. The spooler holds the print job in the queue until the desired printer is ready to receive data. When the printer is ready, the spooler sends the data through the filter and back-end to the printer.
The filter converts the data generated by the application that is printing (usually PostScript or PDF, but also ASCII, JPEG, etc.) into printer-specific data (PostScript, PCL, ESC/P, etc.). The features of the printer are described in the PPD files. A PPD file contains printer-specific options with the parameters needed to enable them on the printer. The filter system makes sure that options selected by the user are enabled.
If you use a PostScript printer, the filter system converts the data into printer-specific PostScript. This does not require a printer driver. If you use a non-PostScript printer, the filter system converts the data into printer-specific data. This requires a printer driver suitable for your printer. The back-end receives the printer-specific data from the filter then passes it to the printer.
6.2 Methods and Protocols for Connecting Printers #
There are various possibilities for connecting a printer to the system. The configuration of CUPS does not distinguish between a local printer and a printer connected to the system over the network. For more information about the printer connection, read the article CUPS in a Nutshell at http://en.opensuse.org/SDB:CUPS_in_a_Nutshell.
Warning: Changing Cable Connections in a Running System
When connecting the printer to the machine, do not forget that only USB devices can be plugged in or unplugged during operation. To avoid damaging your system or printer, shut down the system before changing any connections that are not USB.
6.3 Installing the Software #
PPD (PostScript printer description) is the computer language that describes the properties, like resolution, and options, such as the availability of a duplex unit. These descriptions are required for using various printer options in CUPS. Without a PPD file, the print data would be forwarded to the printer in a “raw” state, which is usually not desired.
To configure a PostScript printer, the best approach is to get a suitable
PPD file. Many PPD files are available in the packages
manufacturer-PPDs and
OpenPrintingPPDs-postscript. See
Section 6.7.3, “PPD Files in Various Packages” and
Section 6.8.2, “No Suitable PPD File Available for a PostScript Printer”.
New PPD files can be stored in the directory
/usr/share/cups/model/ or added to the print system
with YaST as described in
Section 5.3.1.1, “Adding Drivers with YaST”. Subsequently, the PPD
file can be selected during the printer setup.
Be careful if a printer manufacturer wants you to install entire software packages. First, this kind of installation may result in the loss of the support provided by openSUSE Leap and second, print commands may work differently and the system may no longer be able to address devices of other manufacturers. For this reason, the installation of manufacturer software is not recommended.
6.4 Network Printers #
A network printer can support various protocols, some even concurrently. Although most of the supported protocols are standardized, some manufacturers modify the standard. Manufacturers then provide drivers for only a few operating systems. Unfortunately, Linux drivers are rarely provided. The current situation is such that you cannot act on the assumption that every protocol works smoothly in Linux. Therefore, you may need to experiment with various options to achieve a functional configuration.
CUPS supports the socket,
LPD, IPP and
smb protocols.
- socket
Socket refers to a connection in which the plain print data is sent directly to a TCP socket. Some socket port numbers that are commonly used are
9100or35. The device URI (uniform resource identifier) syntax is: socket://IP.of.the.printer:port, for example:socket://192.168.2.202:9100/.- LPD (Line Printer Daemon)
The LPD protocol is described in RFC 1179. Under this protocol, some job-related data, such as the ID of the print queue, is sent before the actual print data is sent. Therefore, a print queue must be specified when configuring the LPD protocol. The implementations of diverse printer manufacturers are flexible enough to accept any name as the print queue. If necessary, the printer manual should indicate what name to use. LPT, LPT1, LP1 or similar names are often used. The port number for an LPD service is
515. An example device URI islpd://192.168.2.202/LPT1.- IPP (Internet Printing Protocol)
IPP is a relatively new protocol (1999) based on the HTTP protocol. With IPP, more job-related data is transmitted than with the other protocols. CUPS uses IPP for internal data transmission. The name of the print queue is necessary to configure IPP correctly. The port number for IPP is
631. Example device URIs areipp://192.168.2.202/psandipp://192.168.2.202/printers/ps.- SMB (Windows Share)
CUPS also supports printing on printers connected to Windows shares. The protocol used for this purpose is SMB. SMB uses the port numbers
137,138and139. Example device URIs aresmb://user:password@workgroup/smb.example.com/printer,smb://user:password@smb.example.com/printer, andsmb://smb.example.com/printer.
The protocol supported by the printer must be determined before
configuration. If the manufacturer does not provide the needed
information, the command nmap (which comes with the
nmap package) can be used to ascertain the
protocol. nmap checks a host for open ports. For
example:
nmap -p 35,137-139,515,631,9100-10000 printerIP
6.5 Configuring CUPS with Command Line Tools #
CUPS can be configured with command line tools like
lpinfo, lpadmin and
lpoptions. You need a device URI consisting of a
back-end, such as USB, and parameters. To determine valid device URIs on
your system use the command lpinfo -v | grep ":/":
# lpinfo -v | grep ":/"
direct usb://ACME/FunPrinter%20XL
network socket://192.168.2.253
With lpadmin the CUPS server administrator can add,
remove or manage print queues. To add a print queue, use the following
syntax:
lpadmin -p queue -v device-URI -P PPD-file -E
Then the device (-v) is available as
queue (-p), using the
specified PPD file (-P). This means that you must know
the PPD file and the device URI to configure the printer manually.
Do not use -E as the first option. For all CUPS
commands, -E as the first argument sets use of an
encrypted connection. To enable the printer, -E must be
used as shown in the following example:
lpadmin -p ps -v usb://ACME/FunPrinter%20XL -P \
/usr/share/cups/model/Postscript.ppd.gz -E
The following example configures a network printer:
lpadmin -p ps -v socket://192.168.2.202:9100/ -P \
/usr/share/cups/model/Postscript-level1.ppd.gz -E
For more options of lpadmin, see the man page of
lpadmin(8).
During printer setup, certain options are set as default. These options can be modified for every print job (depending on the print tool used). Changing these default options with YaST is also possible. Using command line tools, set default options as follows:
First, list all options:
lpoptions -p queue -l
Example:
Resolution/Output Resolution: 150dpi *300dpi 600dpi
The activated default option is identified by a preceding asterisk (
*).Change the option with
lpadmin:lpadmin -p queue -o Resolution=600dpi
Check the new setting:
lpoptions -p queue -l

Resolution/Output Resolution: 150dpi 300dpi *600dpi
When a normal user runs lpoptions, the settings are
written to ~/.cups/lpoptions. However,
root settings are written to
/etc/cups/lpoptions.
6.6 Printing from the Command Line #
To print from the command line, enter lp -d
queuename filename,
substituting the corresponding names for
queuename and
filename.
Some applications rely on the lp command for printing.
In this case, enter the correct command in the application's print
dialog, usually without specifying filename,
for example, lp -d
queuename.
6.7 Special Features in openSUSE Leap #
Several CUPS features have been adapted for openSUSE Leap. Some of the most important changes are covered here.
6.7.1 CUPS and Firewall #
After having performed a default installation of openSUSE Leap,
SuSEFirewall2 is active and the network interfaces are configured to
be in the External Zone which blocks incoming
traffic. More information about the SuSEFirewall2 configuration is
available in Book “Security Guide”, Chapter 15 “Masquerading and Firewalls”, Section 15.4 “SuSEFirewall2” and at
http://en.opensuse.org/SDB:CUPS_and_SANE_Firewall_settings.
6.7.1.1 CUPS Client #
Normally, a CUPS client runs on a regular workstation located in a
trusted network environment behind a firewall. In this case it is
recommended to configure the network interface to be in the
Internal Zone, so the workstation is reachable from
within the network.
6.7.1.2 CUPS Server #
If the CUPS server is part of a trusted network environment protected
by a firewall, the network interface should be configured to be in the
Internal Zone of the firewall. It is not recommended
to set up a CUPS server in an untrusted network environment unless you
take care that it is protected by special firewall rules and secure
settings in the CUPS configuration.
6.7.2 Browsing for Network Printers #
CUPS servers regularly announce the availability and status information of shared printers over the network. Clients can access this information to display a list of available printers in printing dialogs, for example. This is called “browsing”.
CUPS servers announce their print queues over the network either via the
traditional CUPS browsing protocol or via Bonjour/DND-SD. To be able to
browse network print queues, the service
cups-browsed needs to run on all
clients that print via CUPS servers.
cups-browsed is not started by
default. To start it for the active session, use sudo systemctl
start cups-browsed. To ensure it is automatically
started after booting, enable it with sudo systemctl enable
cups-browsed on all clients.
In case browsing does not work after having started
cups-browsed, the CUPS server(s)
probably announce the network print queues via Bonjour/DND-SD. In this
case you need to additionally install the package
avahi and start the associated
service with sudo systemctl start
avahi-daemon on all clients.
6.7.3 PPD Files in Various Packages #
The YaST printer configuration sets up the queues for CUPS using
the PPD files installed in /usr/share/cups/model.
To find the suitable PPD files for the printer model, YaST compares
the vendor and model determined during hardware detection with the
vendors and models in all PPD files. For this purpose, the YaST
printer configuration generates a database from the vendor and model
information extracted from the PPD files.
The configuration using only PPD files and no other information sources
has the advantage that the PPD files in
/usr/share/cups/model can be modified freely. For
example, if you have PostScript printers the PPD files can be copied
directly to /usr/share/cups/model (if they do not
already exist in the manufacturer-PPDs or
OpenPrintingPPDs-postscript packages) to
achieve an optimum configuration for your printers.
Additional PPD files are provided by the following packages:
gutenprint: the Gutenprint driver and its matching PPDs
splix: the SpliX driver and its matching PPDs
OpenPrintingPPDs-ghostscript: PPDs for Ghostscript built-in drivers
OpenPrintingPPDs-hpijs: PPDs for the HPIJS driver for non-HP printers
6.8 Troubleshooting #
The following sections cover some of the most frequently encountered printer hardware and software problems and ways to solve or circumvent these problems. Among the topics covered are GDI printers, PPD files and port configuration. Common network printer problems, defective printouts, and queue handling are also addressed.
6.8.1 Printers without Standard Printer Language Support #
These printers do not support any common printer language and can only be addressed with special proprietary control sequences. Therefore they can only work with the operating system versions for which the manufacturer delivers a driver. GDI is a programming interface developed by Microsoft* for graphics devices. Usually the manufacturer delivers drivers only for Windows, and since the Windows driver uses the GDI interface these printers are also called GDI printers. The actual problem is not the programming interface, but the fact that these printers can only be addressed with the proprietary printer language of the respective printer model.
Some GDI printers can be switched to operate either in GDI mode or in one of the standard printer languages. See the manual of the printer whether this is possible. Some models require special Windows software to do the switch (note that the Windows printer driver may always switch the printer back into GDI mode when printing from Windows). For other GDI printers there are extension modules for a standard printer language available.
Some manufacturers provide proprietary drivers for their printers. The disadvantage of proprietary printer drivers is that there is no guarantee that these work with the installed print system or that they are suitable for the various hardware platforms. In contrast, printers that support a standard printer language do not depend on a special print system version or a special hardware platform.
Instead of spending time trying to make a proprietary Linux driver work, it may be more cost-effective to purchase a printer which supports a standard printer language (preferably PostScript). This would solve the driver problem once and for all, eliminating the need to install and configure special driver software and obtain driver updates that may be required because of new developments in the print system.
6.8.2 No Suitable PPD File Available for a PostScript Printer #
If the manufacturer-PPDs or
OpenPrintingPPDs-postscript packages do not
contain a suitable PPD file for a PostScript printer, it should be
possible to use the PPD file from the driver CD of the printer
manufacturer or download a suitable PPD file from the Web page of the
printer manufacturer.
If the PPD file is provided as a zip archive (.zip) or a self-extracting
zip archive (.exe), unpack it with
unzip. First, review the license terms of the PPD
file. Then use the cupstestppd utility to check if
the PPD file complies with “Adobe PostScript Printer Description
File Format Specification, version 4.3.” If the utility returns
“FAIL,” the errors in the PPD files are serious and are
likely to cause major problems. The problem spots reported by
cupstestppd should be eliminated. If necessary, ask
the printer manufacturer for a suitable PPD file.
6.8.3 Network Printer Connections #
- Identifying Network Problems
Connect the printer directly to the computer. For test purposes, configure the printer as a local printer. If this works, the problems are related to the network.
- Checking the TCP/IP Network
The TCP/IP network and name resolution must be functional.
- Checking a Remote
lpd Use the following command to test if a TCP connection can be established to
lpd(port515) on host:netcat -z host 515 && echo ok || echo failed
If the connection to
lpdcannot be established,lpdmay not be active or there may be basic network problems.As the user
root, use the following command to query a (possibly very long) status report for queue on remote host, provided the respectivelpdis active and the host accepts queries:echo -e "\004queue" \ | netcat -w 2 -p 722 host 515
If
lpddoes not respond, it may not be active or there may be basic network problems. Iflpdresponds, the response should show why printing is not possible on thequeueonhost. If you receive a response like that shown in Example 6.1, “Error Message fromlpd”, the problem is caused by the remotelpd.Example 6.1: Error Message from
lpd#lpd: your host does not have line printer access lpd: queue does not exist printer: spooling disabled printer: printing disabled
- Checking a Remote
cupsd A CUPS network server can broadcast its queues by default every 30 seconds on UDP port
631. Accordingly, the following command can be used to test whether there is a broadcasting CUPS network server in the network. Make sure to stop your local CUPS daemon before executing the command.netcat -u -l -p 631 & PID=$! ; sleep 40 ; kill $PID
If a broadcasting CUPS network server exists, the output appears as shown in Example 6.2, “Broadcast from the CUPS Network Server”.
Example 6.2: Broadcast from the CUPS Network Server #
ipp://192.168.2.202:631/printers/queue
The following command can be used to test if a TCP connection can be established to
cupsd(port631) on host:netcat -z host 631 && echo ok || echo failed
If the connection to
cupsdcannot be established,cupsdmay not be active or there may be basic network problems.lpstat -hhost -l -t returns a (possibly very long) status report for all queues on host, provided the respectivecupsdis active and the host accepts queries.The next command can be used to test if the queue on host accepts a print job consisting of a single carriage-return character. Nothing should be printed. Possibly, a blank page may be ejected.
echo -en "\r" \
| lp -d queue -h host
- Troubleshooting a Network Printer or Print Server Box
Spoolers running in a print server box sometimes cause problems when they need to deal with multiple print jobs. Since this is caused by the spooler in the print server box, there no way to resolve this issue. As a work-around, circumvent the spooler in the print server box by addressing the printer connected to the print server box directly with the TCP socket. See Section 6.4, “Network Printers”.
In this way, the print server box is reduced to a converter between the various forms of data transfer (TCP/IP network and local printer connection). To use this method, you need to know the TCP port on the print server box. If the printer is connected to the print server box and turned on, this TCP port can usually be determined with the
nmaputility from thenmappackage some time after the print server box is powered up. For example,nmapIP-address may deliver the following output for a print server box:Port State Service 23/tcp open telnet 80/tcp open http 515/tcp open printer 631/tcp open cups 9100/tcp open jetdirect
This output indicates that the printer connected to the print server box can be addressed via TCP socket on port
9100. By default,nmaponly checks several commonly known ports listed in/usr/share/nmap/nmap-services. To check all possible ports, use the commandnmap -pfrom_port-to_port IP-address. This may take some time. For further information, refer to the man page ofnmap.Enter a command like
echo -en "\rHello\r\f" | netcat -w 1 IP-address port
cat file | netcat -w 1 IP-address port
to send character strings or files directly to the respective port to test if the printer can be addressed on this port.
6.8.4 Defective Printouts without Error Message #
For the print system, the print job is completed when the CUPS back-end completes the data transfer to the recipient (printer). If further processing on the recipient fails (for example, if the printer is not able to print the printer-specific data) the print system does not notice this. If the printer cannot print the printer-specific data, select a PPD file that is more suitable for the printer.
6.8.5 Disabled Queues #
If the data transfer to the recipient fails entirely after several
attempts, the CUPS back-end, such as USB or
socket, reports an error to the print system (to
cupsd). The back-end determines how many unsuccessful
attempts are appropriate until the data transfer is reported as
impossible. As further attempts would be in vain,
cupsd disables printing for the respective queue.
After eliminating the cause of the problem, the system administrator
must re-enable printing with the command cupsenable.
6.8.6 CUPS Browsing: Deleting Print Jobs #
If a CUPS network server broadcasts its queues to the client hosts via
browsing and a suitable local cupsd is active on the
client hosts, the client cupsd accepts print jobs
from applications and forwards them to the cupsd on
the server. When cupsd on the server accepts a print
job, it is assigned a new job number. Therefore, the job number on the
client host is different from the job number on the server. As a print
job is usually forwarded immediately, it cannot be deleted with the job
number on the client host This is because the client
cupsd regards the print job as completed as soon as
it has been forwarded to the server cupsd.
When it becomes desirable to delete the print job on the server, use a
command such as lpstat -h cups.example.com -o to
determine the job number on the server, provided the server has not
already completed the print job (that is, sent it completely to the
printer). Using this job number, the print job on the server can be
deleted:
cancel -h cups.example.com queue-jobnumber
6.8.7 Defective Print Jobs and Data Transfer Errors #
If you switch the printer off or shut down the computer during the
printing process, print jobs remain in the queue. Printing resumes when
the computer (or the printer) is switched back on. Defective print jobs
must be removed from the queue with cancel.
If a print job is defective or an error occurs in the communication between the host and the printer, the printer prints numerous sheets of paper with unintelligible characters, because it cannot process the data correctly. To rectify this situation, follow these steps:
To stop printing, remove all paper from ink jet printers or open the paper trays of laser printers. High-quality printers have a button for canceling the current printout.
The print job may still be in the queue, because jobs are only removed after they are sent completely to the printer. Use
lpstat -oorlpstat -h cups.example.com -oto check which queue is currently printing. Delete the print job withcancelqueue-jobnumber orcancel -h cups.example.comqueue-jobnumber.Some data may still be transferred to the printer even though the print job has been deleted from the queue. Check if a CUPS back-end process is still running for the respective queue and terminate it.
Reset the printer completely by switching it off for some time. Then insert the paper and turn on the printer.
6.8.8 Debugging CUPS #
Use the following generic procedure to locate problems in CUPS:
Set
LogLevel debugin/etc/cups/cupsd.conf.Stop
cupsd.Remove
/var/log/cups/error_log*to avoid having to search through very large log files.Start
cupsd.Repeat the action that led to the problem.
Check the messages in
/var/log/cups/error_log*to identify the cause of the problem.
6.8.9 For More Information #
In-depth information about printing on SUSE Linux is presented in
the openSUSE Support Database at
http://en.opensuse.org/Portal:Printing. Solutions
to many specific problems are presented in the SUSE Knowledgebase
(http://www.suse.com/support/). Locate the relevant
articles with a text search for CUPS.
7 The X Window System #
The X Window System (X11) is the de facto standard for graphical user interfaces in Unix. X is network-based, enabling applications started on one host to be displayed on another host connected over any kind of network (LAN or Internet). This chapter provides basic information on the X configuration, and background information about the use of fonts in openSUSE® Leap.
Usually, the X Window System needs no configuration. The
hardware is dynamically detected during X start-up. The use of
xorg.conf is therefore deprecated. If you still need
to specify custom options to change the way X behaves, you can still do so
by modifying configuration files under
/etc/X11/xorg.conf.d/.
7.1 Installing and Configuring Fonts #
Fonts in Linux can be categorized into two parts:
- Outline or Vector Fonts
Contains a mathematical description as drawing instructions about the shape of a glyph. As such, each glyph can be scaled to arbitrary sizes without loss of quality. Before such a font (or glyph) can be used, the mathematical descriptions need to be transformed into a raster (grid). This process is called font rasterization. Font hinting (embedded inside the font) improves and optimizes the rendering result for a particular size. Rasterization and hinting is done with the FreeType library.
Common formats under Linux are PostScript Type 1 and Type 2, TrueType, and OpenType.
- Bitmap or Raster Fonts
Consists of an array of pixels designed for a specific font size. Bitmap fonts are extremely fast and simple to render. However, compared to vector fonts, bitmap fonts cannot be scaled without losing quality. As such, these fonts are usually distributed in different sizes. These days, bitmap fonts are still used in the Linux console and sometimes in terminals.
Under Linux, Portable Compiled Format (PCF) or Glyph Bitmap Distribution Format (BDF) are the most common formats.
The appearance of these fonts can be influenced by two main aspects:
choosing a suitable font family,
rendering the font with an algorithm that achieves results comfortable for the receiver's eyes.
The last point is only relevant to vector fonts. Although the above two points are highly subjective, some defaults need to be created.
Linux font rendering systems consist of several libraries with different relations. The basic font rendering library is FreeType, which converts font glyphs of supported formats into optimized bitmap glyphs. The rendering process is controlled by an algorithm and its parameters (which may be subject to patent issues).
Every program or library which uses FreeType should consult the Fontconfig library. This library gathers font configuration from users and from the system. When a user amends his Fontconfig setting, this change will result in Fontconfig-aware applications.
More sophisticated OpenType shaping needed for scripts such as Arabic, Han or Phags-Pa and other higher level text processing lies on the shoulders of Harfbuzz or Pango, to mention some examples.
7.1.1 Showing Installed Fonts #
To get an overview about which fonts are installed on your system, ask
the commands rpm or fc-list. Both
will give you a good answer, but may return a different list depending on
system and user configuration:
rpmInvoke
rpmto see which software packages containing fonts are installed on your system:rpm -qa '*fonts*'
Every font package should satisfy this expression. However, the command may return some false positives like
fonts-config(which is neither a font nor does it contain fonts).fc-listInvoke
fc-listto get an overview about what font families can be accessed, whether they are installed on the system or in your home:fc-list ':' family
Note: Command
fc-listThe command
fc-listis a wrapper to the Fontconfig library. It is possible to query a lot of interesting information from Fontconfig—or, to be more precise, from its cache. Seeman 1 fc-listfor more details.
7.1.2 Viewing Fonts #
If you want to know what an installed font family looks like, either use
the command ftview (package
ft2demos) or visit
http://fontinfo.opensuse.org/. For example, to
display the FreeMono font in 14 point, use ftview like
this:
ftview 14 /usr/share/fonts/truetype/FreeMono.ttf
If you need further information, go to http://fontinfo.opensuse.org/ to find out which styles (regular, bold, italic, etc.) and languages are supported.
7.1.3 Querying Fonts #
To query which font is used when a pattern is given, use the
fc-match command.
For example, if your pattern contains an already installed font,
fc-match returns the file name, font family, and the
style:
tux > fc-match 'Liberation Serif'
LiberationSerif-Regular.ttf: "Liberation Serif" "Regular"
If the desired font does not exist on your system, Fontconfig's matching rules take place and try to find the most similar fonts available. This means, your request is substituted:
tux > fc-match 'Foo Family'
DejaVuSans.ttf: "DejaVu Sans" "Book"
Fontconfig supports aliases: a name is substituted with another family name. A typical example are the generic names such as “sans-serif”, “serif”, and “monospace”. These alias names can be substituted by real family names or even a preference list of family names:
tux > for font in serif sans mono; do fc-match "$font" ; done
DejaVuSerif.ttf: "DejaVu Serif" "Book"
DejaVuSans.ttf: "DejaVu Sans" "Book"
DejaVuSansMono.ttf: "DejaVu Sans Mono" "Book"
The result may vary on your system, depending on which fonts are currently installed.
Note: Similarity Rules according to Fontconfig
Fontconfig always returns a real family (if at least one is installed) according to the given request, as similar as possible. “Similarity” depends on Fontconfig's internal metrics and on the user's or administrator's Fontconfig settings.
7.1.4 Installing Fonts #
To install a new font there are these major methods:
Manually install the font files such as
*.ttfor*.otfto a known font directory. If it needs to be system-wide, use the standard directory/usr/share/fonts. For installation in your home directory, use~/.config/fonts.If you want to deviate from the standard directories, Fontconfig allows you to choose another one. Let Fontconfig know by using the
<dir>element, see Section 7.1.5.2, “Diving into Fontconfig XML” for details.Install fonts using
zypper. Lots of fonts are already available as a package, be it on your SUSE distribution or in the M17N:fonts repository. Add the repository to your list using the following command. For example, to add a repository for SLE 12:sudo zypper ar http://download.opensuse.org/repositories/M17N:/fonts/SLE_12/M17N:fonts.repoTo search for your FONT_FAMILY_NAME use this command:
sudo zypper se 'FONT_FAMILY_NAME*fonts'
7.1.5 Configuring the Appearance of Fonts #
Depending on the rendering medium, and font size, the result may be unsatisfactory. For example, an average monitor these days has a resolution of 100dpi which makes pixels too big and glyphs look clunky.
There are several algorithms available to deal with low resolutions, such as anti-aliasing (grayscale smoothing), hinting (fitting to the grid), or subpixel rendering (tripling resolution in one direction). These algorithms can also differ from one font format to another.
Important: Patent Issues with Subpixel Rendering
Subpixel rendering is not used in SUSE distributions. Although FreeType2 has support for this algorithm, it is covered by several patents expiring at the end of the year 2019. Therefore, setting subpixel rendering options in Fontconfig has no effect unless the system has a FreeType2 library with subpixel rendering compiled in.
Via Fontconfig, it is possible to select a rendering algorithms for every font individually or for a set of fonts.
7.1.5.1 Configuring Fonts via sysconfig #
openSUSE Leap comes with a sysconfig layer above
Fontconfig. This is a good starting point for experimenting with font
configuration. To change the default settings, edit the configuration
file /etc/sysconfig/fonts-config. (or use the
YaST sysconfig module). After you have edited the file, run
fonts-config:
sudo /usr/sbin/fonts-config
Restart the application to make the effect visible. Keep in mind the following issues:
A few applications do need not to be restarted. For example, Firefox re-reads Fontconfig configuration from time to time. Newly created or reloaded tabs get new font configurations later.
The
fonts-configscript is called automatically after every package installation or removal (if not, it is a bug of the font software package).Every sysconfig variable can be temporarily overridden by the
fonts-configcommand line option. Seefonts-config --helpfor details.
There are several sysconfig variables which can be altered. See
man 1 fonts-config or the help page of the YaST
sysconfig module. The following variables are examples:
- Usage of Rendering Algorithms
Consider
FORCE_HINTSTYLE,FORCE_AUTOHINT,FORCE_BW,FORCE_BW_MONOSPACE,USE_EMBEDDED_BITMAPSandEMBEDDED_BITMAP_LANGAGES- Preference Lists of Generic Aliases
Use
PREFER_SANS_FAMILIES,PREFER_SERIF_FAMILIES,PREFER_MONO_FAMILIESandSEARCH_METRIC_COMPATIBLE
The following list provides some configuration examples, sorted from the “most readable” fonts (more contrast) to “most beautiful” (more smoothed).
- Bitmap Fonts
Prefer bitmap fonts via the
PREFER_*_FAMILIESvariables. Follow the example in the help section for these variables. Be aware that these fonts are rendered black and white, not smoothed and that bitmap fonts are available in several sizes only. Consider usingSEARCH_METRIC_COMPATIBLE="no"
to disable metric compatibility-driven family name substitutions.
- Scalable Fonts Rendered Black and White
Scalable fonts rendered without antialiasing can result in a similar outcome to bitmap fonts, while maintaining font scalability. Use well hinted fonts like the Liberation families. Unfortunately, there is a lack of well hinted fonts though. Set the following variable to force this method:
FORCE_BW="yes"
- Monospaced Fonts Rendered Black and White
Render monospaced fonts without antialiasing only, otherwise use default settings:
FORCE_BW_MONOSPACE="yes"
- Default Settings
All fonts are rendered with antialiasing. Well hinted fonts will be rendered with the byte code interpreter (BCI) and the rest with autohinter (
hintstyle=hintslight). Leave all relevant sysconfig variables to the default setting.- CFF Fonts
Use fonts in CFF format. They can be considered also more readable than the default TrueType fonts given the current improvements in FreeType2. Try them out by following the example of
PREFER_*_FAMILIES. Possibly make them more dark and bold with:SEARCH_METRIC_COMPATIBLE="no"
as they are rendered by
hintstyle=hintslightby default. Also consider using:SEARCH_METRIC_COMPATIBLE="no"
- Autohinter Exclusively
Even for a well hinted font, use FreeType2's autohinter. That can lead to thicker, sometimes fuzzier letter shapes with lower contrast. Set the following variable to activate this:
FORCE_AUTOHINTER="yes"
Use
FORCE_HINTSTYLEto control the level of hinting.
7.1.5.2 Diving into Fontconfig XML #
Fontconfig's configuration format is the eXtensible Markup
Language (XML). These few examples are not a complete
reference, but a brief overview. Details and other inspiration can be
found in man 5 fonts-conf or in
/etc/fonts/conf.d/.
The central Fontconfig configuration file is
/etc/fonts/fonts.conf, which—along other
work—includes the whole /etc/fonts/conf.d/
directory. To customize Fontconfig, there are two places where you can
insert your changes:
Fontconfig Configuration Files #
System-wide changes. Edit the file
/etc/fonts/local.conf(by default, it contains an emptyfontconfigelement).User-specific changes. Edit the file
~/.config/fontconfig/fonts.conf. Place Fontconfig configuration files in the~/.config/fontconfig/conf.d/directory.
User-specific changes overwrite any system-wide settings.
Note: Deprecated User Configuration File
The file ~/.fonts.conf is marked as deprecated and
should not be used anymore. Use
~/.config/fontconfig/fonts.conf instead.
Every configuration file needs to have a fontconfig
element. As such, the minimal file looks like this:
<?xml version="1.0"?>
   <!DOCTYPE fontconfig SYSTEM "fonts.dtd">
   <fontconfig>
   <!-- Insert your changes here -->
   </fontconfig>
If the default directories are not enough, insert the
dir element with the respective directory:
<dir>/usr/share/fonts2</dir>
Fontconfig searches recursively for fonts.
Font-rendering algorithms can be chosen with following Fontconfig snippet (see Example 7.1, “Specifying Rendering Algorithms”):
Example 7.1: Specifying Rendering Algorithms #
<match target="font">
 <test name="family">
  <string>FAMILY_NAME</string>
 </test>
 <edit name="antialias" mode="assign">
  <bool>true</bool>
 </edit>
 <edit name="hinting" mode="assign">
  <bool>true</bool>
 </edit>
 <edit name="autohint" mode="assign">
  <bool>false</bool>
 </edit>
 <edit name="hintstyle" mode="assign">
  <const>hintfull</const>
 </edit>
</match>
Various properties of fonts can be tested. For example, the
<test> element can test for the font family
(as shown in the example), size interval, spacing, font format, and
others. When abandoning <test> completely,
all <edit> elements will be applied to every
font (global change).
Example 7.2: Aliases and Family Name Substitutions #
- Rule 1
<alias>
 <family>Alegreya SC</family>
 <default>
  <family>serif</family>
 </default>
</alias>
- Rule 2
<alias>
 <family>serif</family>
 <prefer>
  <family>Droid Serif</family>
 </prefer>
</alias>
- Rule 3
<alias>
 <family>serif</family>
 <accept>
  <family>STIXGeneral</family>
 </accept>
</alias>
The rules from Example 7.2, “Aliases and Family Name Substitutions” create a prioritized family list (PFL). Depending on the element, different actions are performed:
<default>from Rule 1This rule adds a
seriffamily name at the end of the PFL.<prefer>from Rule 2This rule adds “Droid Serif” just before the first occurrence of
serifin the PFL, wheneverAlegreya SCis present in PFL.<accept>from Rule 3This rule adds a “STIXGeneral” family name just after the first occurrence of the
seriffamily name in the PFL.
Putting this together, when snippets occur in the order Rule 1 - Rule 2 - Rule 3 and the user requests “Alegreya SC”, then the PFL is created as depicted in Table 7.1, “Generating PFL from Fontconfig rules”.
Table 7.1: Generating PFL from Fontconfig rules #
In Fontconfig's metrics, the family name has the highest priority over other patterns, like style, size, etc. Fontconfig checks which family is currently installed on the system. If “Alegreya SC” is installed, then Fontconfig returns it. If not, it asks for “Droid Serif”, etc.
Be careful. When the order of Fontconfig snippets is changed, Fontconfig can return different results, as depicted in Table 7.2, “Results from Generating PFL from Fontconfig Rules with Changed Order”.
Table 7.2: Results from Generating PFL from Fontconfig Rules with Changed Order #
Note: Implication.
Think of the <default> alias as a
classification or inclusion of this group (if not installed). As the
example shows, <default> should always
precede the <prefer> and
<accept> aliases of that group.
<default> classification is not limited to
the generic aliases serif, sans-serif and monospace. See
/usr/share/fontconfig/conf.avail/30-metric-aliases.conf
for a complex example.
The following Fontconfig snippet in
Example 7.3, “Aliases and Family Name Substitutions” creates a
serif group. Every family in this group could
substitute others when a former font is not installed.
Example 7.3: Aliases and Family Name Substitutions #
<alias>
 <family>Alegreya SC</family>
 <default>
  <family>serif</family>
 </default>
</alias>
<alias>
 <family>Droid Serif</family>
 <default>
  <family>serif</family>
 </default>
</alias>
<alias>
 <family>STIXGeneral</family>
 <default>
  <family>serif</family>
 </default>
</alias>
<alias>
 <family>serif</family>
 <accept>
  <family>Droid Serif</family>
  <family>STIXGeneral</family>
  <family>Alegreya SC</family>
 </accept>
</alias>
Priority is given by the order in the
<accept> alias. Similarly, stronger
<prefer> aliases can be used.
Example 7.2, “Aliases and Family Name Substitutions” is expanded by Example 7.4, “Aliases and Family Names Substitutions”.
Example 7.4: Aliases and Family Names Substitutions #
- Rule 4
<alias>
 <family>serif</family>
 <accept>
  <family>Liberation Serif</family>
 </accept>
</alias>
- Rule 5
<alias>
 <family>serif</family>
 <prefer>
  <family>DejaVu Serif</family>
 </prefer>
</alias>
The expanded configuration from Example 7.4, “Aliases and Family Names Substitutions” would lead to the following PFL evolution:
Table 7.3: Results from Generating PFL from Fontconfig Rules #
|
Order |
Current PFL |
|---|---|
|
Request |
|
|
| |
|
| |
|
| |
|
| |
|
|
Note: Implications.
In case multiple
<accept>declarations for the same generic name exist, the declaration that is parsed last “wins”. If possible, do not use<accept>after user (/etc/fonts/conf.d/*-user.conf) when creating a system-wide configuration.In case multiple
<preferdeclarations for the same generic name exist, the declaration that is parsed last “wins”. If possible, do not use<prefer>before user in the system-wide configuration.Every
<prefer>declaration overwrites<accept>declarations for the same generic name. If the administrator wants to give the user free rein to use even<accept>and not only<prefer>,the administrator should not use<prefer>in the system-wide configuration. On the other hand, users mostly use<prefer>,, so that should not be detrimental and we see the use of<prefer>also in system wide configurations.
7.2 For More Information #
Install the packages xorg-docs
to get more in-depth information about X11. man 5
xorg.conf tells you more about the format of the manual
configuration (if needed). More information on the X11 development can be
found on the project's home page at
http://www.x.org.
Drivers are found in xf86-video-* packages, for
example xf86-video-nv. Many of the drivers
delivered with these packages are described in detail in the related
manual page. For example, if you use the nv driver,
find more information about this driver in man 4 nv.
Information about third-party drivers should be available in
/usr/share/doc/packages/<package_name>.
For example, the documentation of
x11-video-nvidiaG03 is
available in
/usr/share/doc/packages/x11-video-nvidiaG03 after
the package was installed.
8 Accessing File Systems with FUSE #
Abstract#
FUSE is the acronym for file system in userspace.
This means you can configure and mount a file system as an unprivileged
user. Normally, you need to be
root for this task. FUSE alone
is a kernel module. Combined with plug-ins, it allows you to extend FUSE
to access almost all file systems like remote SSH connections, ISO
images, and more.
8.1 Configuring FUSE #
Before you can use FUSE, you need to install the package
fuse. Depending which file
system you want to use, you need additional plug-ins available as
separate packages. For an overview, see
Section 8.5, “Available FUSE Plug-ins”.
Generally you do not need to configure FUSE, you just use it. However, it
is a good idea to create a directory where all your mount points are
combined. For example, you can create a directory
~/mounts and insert your subdirectories for your
different file systems there.
8.2 Mounting an NTFS Partition #
NTFS, the New Technology File System, is the default file system of Windows. To mount a Windows partition as a normal user, proceed as follows:
Become
rootand install the packagentfs-3g.Create a directory that is to be used as a mount point, e.g.
~/mounts/windows.Find out which Windows partition you need. Use YaST and start the partitioner module to see which partition belongs to Windows, but do not modify anything. Alternatively, become
rootand execute/sbin/fdisk-l. Look for partitions with a partition type ofHPFS/NTFS.Mount the partition in read-write mode. Replace the placeholder DEVICE with your respective Windows partition:
ntfs-3g /dev/DEVICE MOUNT POINT
If you want to use your Windows partition in read-only mode, append
-o ro:ntfs-3g /dev/DEVICE MOUNT POINT -o ro
The command
ntfs-3guses the current user (UID) and group (GID) to mount the given device. If you want to set the write permissions to a different user, use the commandidUSERto get the output of the UID and GID values. Set it with:id tux uid=1000(tux) gid=100(users) groups=100(users),16(dialout),33(video) ntfs-3g /dev/DEVICE MOUNT POINT -o uid=1000,gid=100
Find additional options in the man page.
To unmount the resource, run fusermount -u
MOUNT POINT.
8.3 Mounting Remote File System with SSHFS #
SSH, the secure shell network protocol, can be used to exchange data between two computers using a secure channel. To establish an SSH connection through FUSE, proceed as follows:
Install the package
sshfs.Create a directory that is to be used as a mount point. A good idea is to use
~/mounts/HOST. Replace HOST with the name of your remote computer.Mount the remote file system:
sshfs USER:HOST MOUNT POINT
Enter your password for the remote computer.
To unmount the resource, run fusermount -u
MOUNT POINT.
8.4 Mounting an ISO File System #
To look into an ISO image, you can mount it with the
fuseiso package:
Install the package
fuseiso.Create a directory that is to be used as a mount point, e.g.
~/mounts/iso.Mount the ISO image:
fuseiso ISO_IMAGE MOUNT POINT
You can only read content from the ISO image, but you can not write back.
To unmount the resource, use fusermount -u
MOUNT POINT.
8.5 Available FUSE Plug-ins #
FUSE is dependent on plug-ins. The following table lists common plug-ins.
Table 8.1: Available FUSE Plug-ins #
|
|
mount FTP servers |
|
|
mount encrypted file systems |
|
|
mounts CD-ROM images with ISO9660 file systems in them |
|
|
mount iPods |
|
|
mount browseable Samba clients or Windows shares |
|
|
mount supported digital cameras through gPhoto |
|
|
mount NTFS volumes (with read and write support) |
|
|
mount Bluetooth devices |
|
|
file system client based on SSH file transfer protocol |
|
|
mount WebDAV file systems |
8.6 For More Information #
See the home page http://fuse.sourceforge.net of FUSE for more information.
Part III Managing and Updating Software #
- 9 Installing or Removing Software
Use YaST's software management module to search for software components you want to add or remove. YaST resolves all dependencies for you. To install packages not shipped with the installation media, add additional software repositories to your setup and let YaST manage them. Keep your system up-to-date by managing software updates with the update applet.
- 10 Installing Add-On Products
Add-on products are system extensions. You can install a third party add-on product or a special system extension of openSUSE® Leap (for example, a CD with support for additional languages or a CD with binary drivers). To install a new add-on, start YaST and select › . You can select various types of product media, like CD, FTP, USB mass storage devices (such as USB flash drives or disks) or a local directory. You can work also directly with ISO files. To add an add-on as ISO file media, select then enter the . The is arbitrary.
- 11 YaST Online Update
SUSE offers a continuous stream of software security updates for your product. By default, the update applet is used to keep your system up-to-date. Refer to Section 9.4, “Keeping the System Up-to-date” for further information on the update applet. This chapter covers the alternative tool for updati…
- 12 Upgrading the System and System Changes
You can upgrade an existing system without completely reinstalling it. There are two types of renewing the system or parts of it: updating individual software packages and upgrading the entire system. Updating individual packages is covered in Chapter 9, Installing or Removing Software and Chapter 11, YaST Online Update. Two ways to upgrade the system are discussed in the following sections— see Section 12.1.3, “Upgrading with YaST” and Section 12.1.4, “Distribution Upgrade with zypper”.
9 Installing or Removing Software #
Abstract#
Use YaST's software management module to search for software components you want to add or remove. YaST resolves all dependencies for you. To install packages not shipped with the installation media, add additional software repositories to your setup and let YaST manage them. Keep your system up-to-date by managing software updates with the update applet.
Change the software collection of your system with the YaST Software Manager. This YaST module is available in two flavors: a graphical variant for X Window and a text-based variant to be used on the command line. The graphical flavor is described here—for details on the text-based YaST, see Book “Reference”, Chapter 1 “YaST in Text Mode”.
Note: Confirmation and Review of Changes
When installing, updating or removing packages, any changes in the Software Manager are not applied immediately but only after confirming them with or respectively. YaST maintains a list with all actions, allowing you to review and modify your changes before applying them to the system.
9.1 Definition of Terms #
- Repository
A local or remote directory containing packages, plus additional information about these packages (package metadata).
- (Repository) Alias/Repository Name
A short name for a repository (called
Aliaswithin Zypper and within YaST). It can be chosen by the user when adding a repository and must be unique.- Repository Description Files
Each repository provides files describing content of the repository (package names, versions, etc.). These repository description files are downloaded to a local cache that is used by YaST.
- Product
Represents a whole product, for example openSUSE® Leap.
- Pattern
A pattern is an installable group of packages dedicated to a certain purpose. For example, the
Laptoppattern contains all packages that are needed in a mobile computing environment. Patterns define package dependencies (such as required or recommended packages) and come with a preselection of packages marked for installation. This ensures that the most important packages needed for a certain purpose are available on your system after installation of the pattern. However, not necessarily all packages in a pattern are preselected for installation and you can manually select or deselect packages within a pattern according to your needs and wishes.- Package
A package is a compressed file in
rpmformat that contains the files for a particular program.- Patch
A patch consists of one or more packages and may be applied by means of delta RPMs. It may also introduce dependencies to packages that are not installed yet.
- Resolvable
A generic term for product, pattern, package or patch. The most commonly used type of resolvable is a package or a patch.
- Delta RPM
A delta RPM consists only of the binary diff between two defined versions of a package, and therefore has the smallest download size. Before being installed, the full RPM package is rebuilt on the local machine.
- Package Dependencies
Certain packages are dependent on other packages, such as shared libraries. In other terms, a package may
requireother packages—if the required packages are not available, the package cannot be installed. In addition to dependencies (package requirements) that must be fulfilled, some packagesrecommendother packages. These recommended packages are only installed if they are actually available, otherwise they are ignored and the package recommending them is installed nevertheless.
9.2 Using the YaST Software Manager #
Start the software manager from the by choosing › .

9.2.1 Views for Searching Packages or Patterns #
The YaST software manager can install packages or patterns from all currently enabled repositories. It offers different views and filters to make it easier to find the software you are searching for. The view is the default view of the window. To change view, click and select one of the following entries from the drop-down box. The selected view opens in a new tab.
- Patterns
Lists all patterns available for installation on your system.
- Package Groups
Lists all packages sorted by groups such as , , or .
- RPM Groups
Lists all packages sorted by functionality with groups and subgroups. For example › › .
- Languages
A filter to list all packages needed to add a new system language.
- Repositories
A filter to list packages by repository. To select more than one repository, hold the Ctrl key while clicking repository names. The “pseudo repository” lists all packages currently installed.
- Search
Lets you search for a package according to certain criteria. Enter a search term and press Enter. Refine your search by specifying where to and by changing the . For example, if you do not know the package name but only the name of the application that you are searching for, try including the package in the search process.
- Installation Summary
If you have already selected packages for installation, update or removal, this view shows the changes that will be applied to your system as soon as you click . To filter for packages with a certain status in this view, activate or deactivate the respective check boxes. Press Shift–F1 for details on the status flags.
Tip: Finding Packages Not Belonging to an Active Repository
To list all packages that do not belong to an active repository, choose › › and then choose › . This is useful, for example, if you have deleted a repository and want to make sure no packages from that repository remain installed.
9.2.2 Installing and Removing Packages or Patterns #
Certain packages are dependent on other packages, such as shared libraries. On the other hand, some packages cannot coexist with others on the system. If possible, YaST automatically resolves these dependencies or conflicts. If your choice results in a dependency conflict that cannot be automatically solved, you need to solve it manually as described in Section 9.2.4, “Checking Software Dependencies”.
Note: Removal of Packages
When removing any packages, by default YaST only removes the selected packages. If you want YaST to also remove any other packages that become unneeded after removal of the specified package, select › from the main menu.
Search for packages as described in Section 9.2.1, “Views for Searching Packages or Patterns”.
The packages found are listed in the right pane. To install a package or remove it, right-click it and choose or . If the relevant option is not available, check the package status indicated by the symbol in front of the package name—press Shift–F1 for help.
Tip: Applying an Action to All Packages Listed
To apply an action to all packages listed in the right pane, go to the main menu and choose an action from › .
To install a pattern, right-click the pattern name and choose .
It is not possible to remove a pattern per se. Instead, select the packages of a pattern you want to remove and mark them for removal.
To select more packages, repeat the steps mentioned above.
Before applying your changes, you can review or modify them by clicking › . By default, all packages that will change status, are listed.
to: To revert the status for a package, right-click the package and select one of the following entries: if the package was scheduled to be deleted or updated, or if it was scheduled for installation. To abandon all changes and quit the Software Manager, click and .
When you are finished, click to apply your changes.
In case YaST found dependencies on other packages, a list of packages that have additionally been chosen for installation, update or removal is presented. Click to accept them.
After all selected packages are installed, updated or removed, the YaST Software Manager automatically terminates.
Note: Installing Source Packages
Installing source packages with YaST Software Manager is not
possible at the moment. Use the command line tool
zypper for this purpose. For more information, see
Book “Reference”, Chapter 2 “Managing Software with Command Line Tools”, Section 2.1.2.1 “Installing or Downloading Source Packages”.
9.2.3 Updating Packages #
Instead of updating individual packages, you can also update all installed packages or all packages from a certain repository. When mass updating packages, the following aspects are generally considered:
priorities of the repositories that provide the package,
architecture of the package (for example, x86_64),
version number of the package,
package vendor.
Which of the aspects has the highest importance for choosing the update candidates depends on the respective update option you choose.
To update all installed packages to the latest version, choose › › from the main menu.
All repositories are checked for possible update candidates, using the following policy: YaST first tries to restrict the search to packages with the same architecture and vendor like the installed one. If the search is positive, the “best” update candidate from those is selected according to the process below. However, if no comparable package of the same vendor can be found, the search is expanded to all packages with the same architecture. If still no comparable package can be found, all packages are considered and the “best” update candidate is selected according to the following criteria:
Repository priority: Prefer the package from the repository with the highest priority.
If more than one package results from this selection, choose the one with the “best” architecture (best choice: matching the architecture of the installed one).
If the resulting package has a higher version number than the installed one, the installed package will be updated and replaced with the selected update candidate.
This option tries to avoid changes in architecture and vendor for the installed packages, but under certain circumstances, they are tolerated.
Note: Update Unconditionally
If you choose › › instead, the same criteria apply but any candidate package found is installed unconditionally. Thus, choosing this option might actually lead to downgrading some packages.
To make sure that the packages for a mass update derive from a certain repository:
Choose the repository from which to update as described in Section 9.2.1, “Views for Searching Packages or Patterns” .
On the right hand side of the window, click . This explicitly allows YaST to change the package vendor when replacing the packages.
As soon as you proceed with , all installed packages will be replaced by packages deriving from this repository, if available. This may lead to changes in vendor and architecture and even to downgrading some packages.
To refrain from this, click . Note that you can only cancel this until you press the button.
Before applying your changes, you can review or modify them by clicking › . By default, all packages that will change status, are listed.
If all options are set according to your wishes, confirm your changes with to start the mass update.
9.2.4 Checking Software Dependencies #
Most packages are dependent on other packages. If a package, for example, uses a shared library, it is dependent on the package providing this library. On the other hand some packages cannot coexist with each other, causing a conflict (for example, you can only install one mail transfer agent: sendmail or postfix). When installing or removing software, the Software Manager makes sure no dependencies or conflicts remain unsolved to ensure system integrity.
In case there exists only one solution to resolve a dependency or a conflict, it is resolved automatically. Multiple solutions always cause a conflict which needs to be resolved manually. If solving a conflict involves a vendor or architecture change, it also needs to be solved manually. When clicking to apply any changes in the Software Manager, you get an overview of all actions triggered by the automatic resolver which you need to confirm.
By default, dependencies are automatically checked. A check is performed every time you change a package status (for example, by marking a package for installation or removal). This is generally useful, but can become exhausting when manually resolving a dependency conflict. To disable this function, go to the main menu and deactivate › . Manually perform a dependency check with › . A consistency check is always performed when you confirm your selection with .
To review a package's dependencies, right-click it and choose . A map showing the dependencies opens. Packages that are already installed are displayed in a green frame.
Note: Manually Solving Package Conflicts
Unless you are very experienced, follow the suggestions YaST makes when handling package conflicts, otherwise you may not be able to resolve them. Keep in mind that every change you make, potentially triggers other conflicts, so you can easily end up with a steadily increasing number of conflicts. In case this happens, the Software Manager, all your changes and start again.
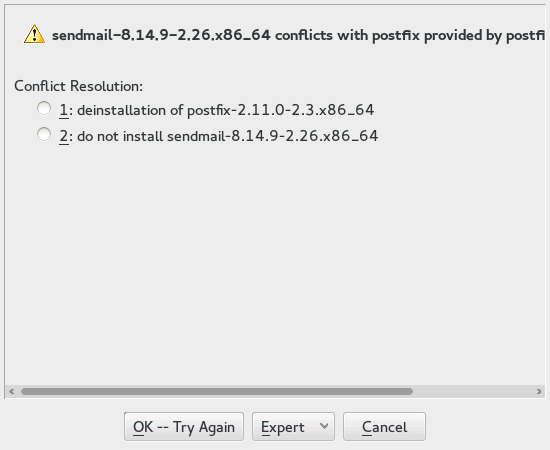
Figure 9.1: Conflict Management of the Software Manager #
9.2.4.1 Handling of Package Recommendations #
In addition to the hard dependencies required to run a program (for example a certain library), a package can also have weak dependencies, that add for example extra functionality or translations. These weak dependencies are called package recommendations.
The way package recommendations are handled has slightly changed with openSUSE Leap 12 SP1. Nothing has changed when installing a new package—recommended packages are still installed by default.
Prior to SLES 12 SP1, missing recommendations for already installed
packages were installed automatically. Starting with SLES 12
SP1, these packages will no longer be installed automatically. To
switch to the old default, set
PKGMGR_REEVALUATE_RECOMMENDED="yes" in
/etc/sysconfig/yast2. To install all missing
recommendations for already installed packages, start › and choose › .
To disable the installation of recommended packages when installing new
packages, deactivate › in the
YaST Software Manager. If using the command line tool Zypper to
install packages, use the option --no-recommends.
9.3 Managing Software Repositories and Services #
If you want to install third-party software, add additional software repositories to your system. By default, the product repositories such as openSUSE Leap-DVD 42.1 and a matching update repository are automatically configured. Depending on the initially selected product, an additional repository containing translations, dictionaries, etc. might also be configured.
To manage repositories, start YaST and select › . The dialog opens. Here, you can also manage subscriptions to so-called by changing the at the right corner of the dialog to . A Service in this context is a (RIS) that can offer one or more software repositories. Such a Service can be changed dynamically by its administrator or vendor.
Each repository provides files describing content of the repository (package names, versions, etc.). These repository description files are downloaded to a local cache that is used by YaST. To ensure their integrity, software repositories can be signed with the GPG Key of the repository maintainer. Whenever you add a new repository, YaST offers the ability to import its key.
Warning: Trusting External Software Sources
Before adding external software repositories to your list of repositories, make sure this repository can be trusted. SUSE is not responsible for any problems arising from software installed from third-party software repositories.
9.3.1 Adding Software Repositories #
You can either add repositories from DVD/CD, removable mass storage devices (such as flash disks), or a local directory or ISO image.
To add repositories from the dialog in YaST proceed as follows:
Click .
Select one of the options listed in the dialog:
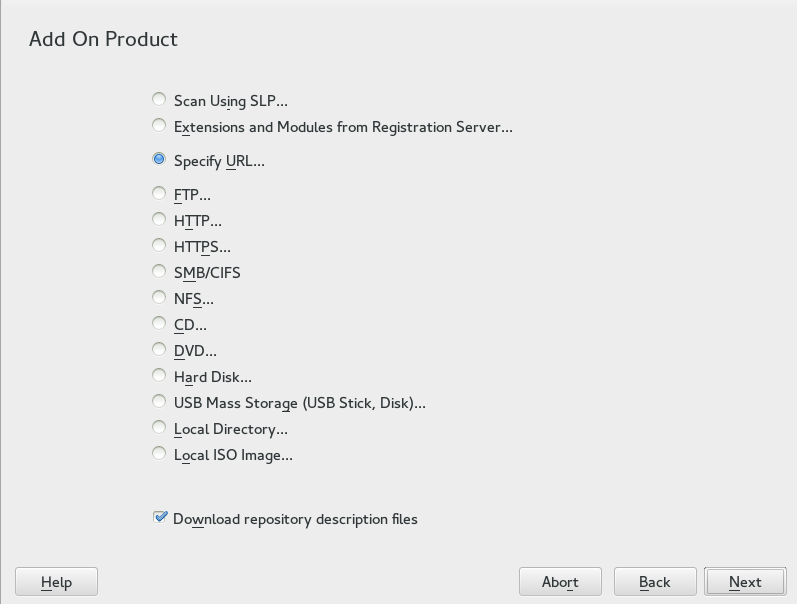
Figure 9.2: Adding A Software Repository #
To scan your network for installation servers announcing their services via SLP, select and click .
To add a repository from a removable medium, choose the relevant option and insert the medium or connect the USB device to the machine, respectively. Click to start the installation.
For the majority of repositories, you will be asked to specify the path (or URL) to the media after selecting the respective option and clicking . Specifying a is optional. If none is specified, YaST will use the product name or the URL as repository name.
The option is activated by default. If you deactivate the option, YaST will automatically download the files later, if needed.
Depending on the repository you have added, you may be asked if you want to import the GPG key with which it is signed or asked to agree to a license.
After confirming these messages, YaST will download and parse the metadata. It will add the repository to the list of .
If needed, adjust the repository as described in Section 9.3.2, “Managing Repository Properties”.
Confirm your changes with to close the configuration dialog.
After having successfully added the repository, the software manager starts and you can install packages from this repository. For details, refer to Chapter 9, Installing or Removing Software.
9.3.2 Managing Repository Properties #
The overview of the lets you change the following repository properties:
- Status
The repository status can either be or . You can only install packages from repositories that are enabled. To turn a repository off temporarily, select it and deactivate . You can also double-click a repository name to toggle its status. If you want to remove a repository completely, click .
- Refresh
When refreshing a repository, its content description (package names, versions, etc.) is downloaded to a local cache that is used by YaST. It is sufficient to do this once for static repositories such as CDs or DVDs, whereas repositories whose content changes often should be refreshed frequently. The easiest way to keep a repository's cache up-to-date is to choose . To do a manual refresh click and select one of the options.
Packages from remote repositories are downloaded before being installed. By default, they are deleted upon a successful installation. Activating prevents the deletion of downloaded packages. The download location is configured in
/etc/zypp/zypp.conf, by default it is/var/cache/zypp/packages.The of a repository is a value between
1and200, with1being the highest priority and200the lowest priority. Any new repositories that are added with YaST get a priority of99by default. If you do not care about a priority value for a certain repository, you can also set the value to0to apply the default priority to that repository (99). If a package is available in more than one repository, then the repository with the highest priority takes precedence. This is useful if you want to avoid downloading packages unnecessarily from the Internet by giving a local repository (for example, a DVD) a higher priority.Important: Priority vs. Version
The repository with the highest priority takes precedence in any case. Therefore, make sure that the update repository always has the highest priority, otherwise you might install an outdated version that will not be updated until the next online update.
- Name and URL
To change a repository name or its URL, select it from the list with a single-click and then click .
9.3.3 Managing Repository Keys #
To ensure their integrity, software repositories can be signed with the GPG Key of the repository maintainer. Whenever you add a new repository, YaST offers to import its key. Verify it as you would do with any other GPG key and make sure it does not change. If you detect a key change, something might be wrong with the repository. Disable the repository as an installation source until you know the cause of the key change.
To manage all imported keys, click in the dialog. Select an entry with the mouse to show the key properties at the bottom of the window. , or keys with a click on the respective buttons.
9.4 Keeping the System Up-to-date #
SUSE offers a continuous stream of software security patches for your product. They can be installed using the YaST Online Update module. It also offers advanced features to customize the patch installation.
The GNOME desktop also provides a tool for installing patches, and, additionally, for installing package updates of packages that are already installed. In contrast to a Patch, a package update is only related to one package and provides a newer version of a package. The GNOME tool lets you install both patches and package updates with a few clicks as described in Section 9.4.2, “Installing Patches and Package Updates”.
9.4.1 The GNOME Software Updater #
Whenever new patches or package updates are available, GNOME shows a notification about this at the bottom of the desktop (or on the locked screen).

Figure 9.3: Update Notification on GNOME Lock Screen #
9.4.2 Installing Patches and Package Updates #
Whenever new patches or package updates are available, GNOME shows a notification about this at the bottom of the desktop (or on the locked screen).

Figure 9.4: Update Notification on GNOME Desktop #
To install the patches and updates, click in the notification message. This opens the GNOME update viewer. Alternatively, open the update viewer from › › or press Alt–F2 and enter
gpk-update-viewer.All and are preselected. It is strongly recommended to install these patches. can be manually selected by activating the respective check boxes. Get detailed information on a patch or package update by clicking its title.
Click to start the installation. You will be prompted for the
rootpassword.Enter the
rootpassword in the authentication dialog and proceed.
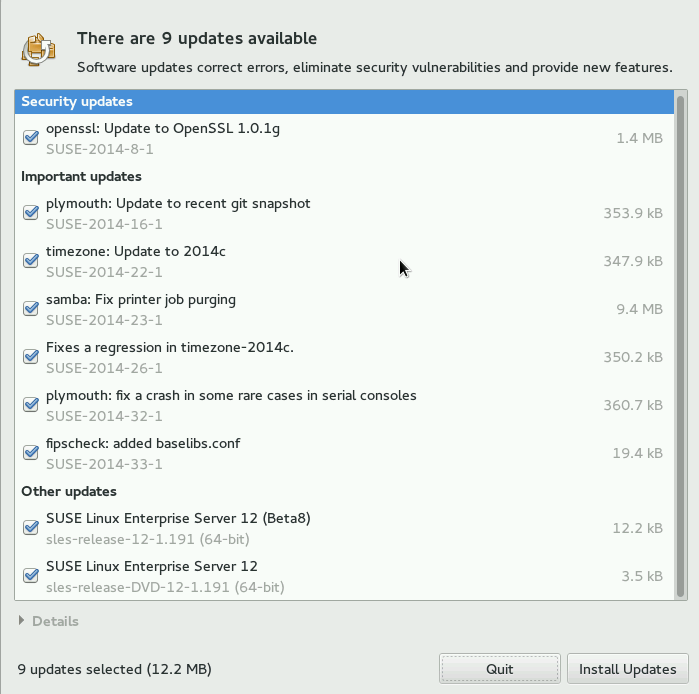
Figure 9.5: GNOME Update Viewer #
9.4.3 Configuring the GNOME Software Updater #
To define the appearance of the notification (where it appears on the screen, whether to display it on the lock screen), select › › › and change the settings according to your wishes.
To configure how often to check for updates or to activate or deactivate repositories, select › › › . The tabs of the configuration dialog let you modify the following settings:
Update Settings #
Choose how often a check for updates is performed: , , , or .
Choose how often a check for major upgrades is performed: , , or .
- Check for updates when using mobile broadband
This configuration option is only available on mobile computers. Turned off by default.
- Check for updates on battery power
This configuration option is only available on mobile computers. Turned off by default.
Software Sources #
- Repositories
Lists the repositories that will be checked for available patches and package updates. You can enable or disable certain repositories.
Important: Keep
UpdateRepository EnabledTo make sure that you are notified about any patches that are security-relevant, keep the
Updatesrepository for your product enabled.
More options are configurable using gconf-editor:
› .
10 Installing Add-On Products #
Abstract#
Add-on products are system extensions. You can install a third party add-on product or a special system extension of openSUSE® Leap (for example, a CD with support for additional languages or a CD with binary drivers). To install a new add-on, start YaST and select › . You can select various types of product media, like CD, FTP, USB mass storage devices (such as USB flash drives or disks) or a local directory. You can work also directly with ISO files. To add an add-on as ISO file media, select then enter the . The is arbitrary.
10.1 Add-Ons #
To install a new add-on, proceed as follows:
In YaST select › to see an overview of already installed add-on products.
To install a new add-on product, click .
From the list of available specify the type matching your repository.
To add a repository from a removable medium, choose the relevant option and insert the medium or connect the USB device to the machine, respectively.
You can choose to now. If the option is unchecked, YaST will automatically download the files later, if needed. Click to proceed.
When adding a repository from the network, enter the data you are prompted for. Continue with .
Depending on the repository you have added, you may be asked if you want to import the GPG key with which it is signed or asked to agree to a license.
After confirming these messages, YaST will download and parse the metadata and add the repository to the list of .
If needed, adjust the repository as described in Section 9.3.2, “Managing Repository Properties” or confirm your changes with to close the configuration dialog.
After having successfully added the repository for the add-on media, the software manager starts and you can install packages. Refer to Chapter 9, Installing or Removing Software for details.
10.2 Binary Drivers #
Some hardware needs binary-only drivers to function properly. If you have such hardware, refer to the release notes for more information about availability of binary drivers for your system. To read the release notes, open YaST and select › .
11 YaST Online Update #
SUSE offers a continuous stream of software security updates for your product. By default, the update applet is used to keep your system up-to-date. Refer to Section 9.4, “Keeping the System Up-to-date” for further information on the update applet. This chapter covers the alternative tool for updating software packages: YaST Online Update.
The current patches for openSUSE® Leap are available from an update software repository, which is automatically configured during the installation. If you have registered your product during the installation, an update repository is already configured. If you have not registered openSUSE Leap, you can do so by starting the in YaST. Alternatively, you can manually add an update repository from a source you trust. To add or remove repositories, start the Repository Manager with › in YaST. Learn more about the Repository Manager in Section 9.3, “Managing Software Repositories and Services”.
Note: Error on Accessing the Update Catalog
If you are not able to access the update catalog, this might be because of an expired subscription. Normally, openSUSE Leap comes with a one-year or three-year subscription, during which you have access to the update catalog. This access will be denied after the subscription ends.
In case of an access denial to the update catalog you will see a warning message with a recommendation to visit the SUSE Customer Center and check your subscription. The SUSE Customer Center is available at https://scc.suse.com//.
SUSE provides updates with different relevance levels:
- Security Updates
Fix severe security hazards and should always be installed.
- Recommended Updates
Fix issues that could compromise your computer.
- Optional Updates
Fix non-security relevant issues or provide enhancements.
11.1 The Online Update Dialog #
To open the YaST dialog, start
YaST and select › . Alternatively, start it
from the command line with yast2 online_update.
The window consists of four sections.
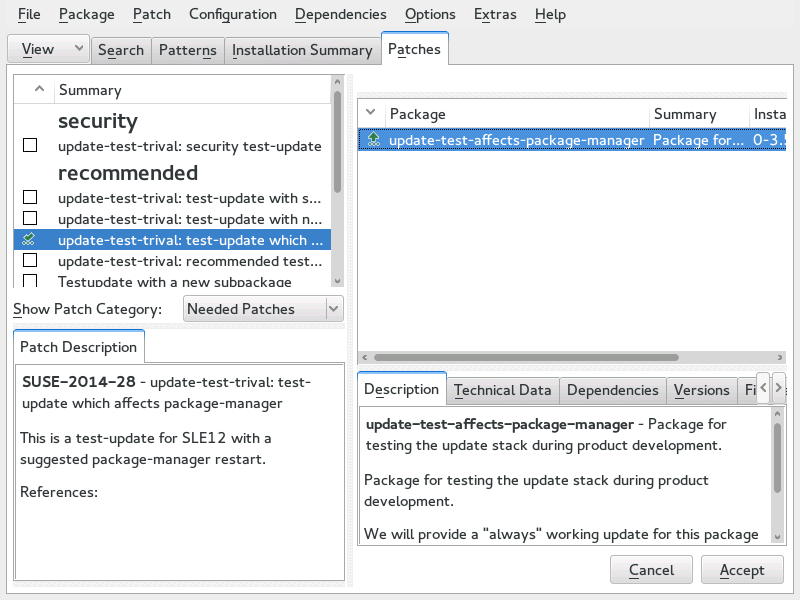
Figure 11.1: YaST Online Update #
The section on the left lists the available
patches for openSUSE Leap. The patches are sorted by security
relevance: security, recommended,
and optional. You can change the view of the
section by selecting one of the following
options from :
- (default view)
Non-installed patches that apply to packages installed on your system.
Patches that either apply to packages not installed on your system, or patches that have requirements which have already have been fulfilled (because the relevant packages have already been updated from another source).
All patches available for openSUSE Leap.
Each list entry in the section consists of a
symbol and the patch name. For an overview of the possible symbols and
their meaning, press Shift–F1. Actions required by
Security and Recommended patches
are automatically preset. These actions are
, and
.
If you install an up-to-date package from a repository other than the update repository, the requirements of a patch for this package may be fulfilled with this installation. In this case a check mark is displayed in front of the patch summary. The patch will be visible in the list until you mark it for installation. This will in fact not install the patch (because the package already is up-to-date), but mark the patch as having been installed.
Select an entry in the section to view a short at the bottom left corner of the dialog. The upper right section lists the packages included in the selected patch (a patch can consist of several packages). Click an entry in the upper right section to view details about the respective package that is included in the patch.
11.2 Installing Patches #
The YaST Online Update dialog allows you to either install all available patches at once or to manually select the patches that you want to apply to your system. You may also revert patches that have been applied to the system.
By default, all new patches (except optional ones)
that are currently available for your system are already marked for
installation. They will be applied automatically once you click
or .
If one or multiple patches require a system reboot, you will be notified
about this before the patch installation starts. You can then either
decide to continue with the installation of the selected patches, skip
the installation of all patches that need rebooting and install the rest,
or go back to the manual patch selection.
Procedure 11.1: Applying Patches with YaST Online Update #
Start YaST and select › .
To automatically apply all new patches (except
optionalones) that are currently available for your system, proceed with or to start the installation of the preselected patches.First modify the selection of patches that you want to apply:
Use the respective filters and views that the interface provides. For details, refer to Section 11.1, “The Online Update Dialog”.
Select or deselect patches according to your needs and wishes by right-clicking the patch and choosing the respective action from the context menu.
Important: Always Apply Security Updates
Do not deselect any
security-related patches without a very good reason. These patches fix severe security hazards and prevent your system from being exploited.Most patches include updates for several packages. If you want to change actions for single packages, right-click a package in the package view and choose an action.
To confirm your selection and apply the selected patches, proceed with or .
After the installation is complete, click to leave the YaST . Your system is now up-to-date.
11.3 Automatic Online Update #
YaST also offers the possibility to set up an automatic update with
daily, weekly or monthly schedule. To use the respective module, you need
to install the
yast2-online-update-configuration
package first.
By default, updates are downloaded as delta RPMs. Since rebuilding RPM packages from delta RPMs is a memory- and processor-consuming task, certain setups or hardware configurations might require you to disable the use of delta RPMs for the sake of performance.
Some patches, such as kernel updates or packages requiring license agreements, require user interaction, which would cause the automatic update procedure to stop. You can configure to skip patches that require user interaction.
Procedure 11.2: Configuring the Automatic Online Update #
After installation, start YaST and select › .
Alternatively, start the module with
yast2 online_update_configurationfrom the command line.Activate .
Choose the update interval: , , or .
To automatically accept any license agreements, activate .
Select if you want to in case you want the update procedure to proceed fully automatically.
Important: Skipping Patches
If you select to skip any packages that require interaction, run a manual occasionally to install those patches, too. Otherwise you might miss important patches.
To automatically install all packages recommended by updated packages, activate .
To disable the use of delta RPMs (for performance reasons), deactivate .
To filter the patches by category (such as security or recommended), activate and add the appropriate patch categories from the list. Only patches of the selected categories will be installed. Others will be skipped.
Confirm your configuration with .
12 Upgrading the System and System Changes #
Abstract#
You can upgrade an existing system without completely reinstalling it. There are two types of renewing the system or parts of it: updating individual software packages and upgrading the entire system. Updating individual packages is covered in Chapter 9, Installing or Removing Software and Chapter 11, YaST Online Update. Two ways to upgrade the system are discussed in the following sections— see Section 12.1.3, “Upgrading with YaST” and Section 12.1.4, “Distribution Upgrade with zypper”.
12.1 Upgrading the System #
Important: openSUSE Leap 42.1 is only available as 64-bit version
openSUSE Leap 42.1 is only available as 64-bit version. Upgrading 32-bit installations to 64-bit is not supported. Please follow the instructions in Chapter 1, Installation Quick Start and Chapter 2, Installation with YaST to install openSUSE Leap on your computer or consider switching to openSUSE Tumbleweed.
Software tends to “grow” from version to version. Therefore,
take a look at the available partition space with df
before updating. If you suspect you are running short of disk space,
secure your data before you update and repartition your system. There is
no general rule regarding how much space each partition should have.
Space requirements depend on your particular partitioning profile, the
software selected, and the version numbers of the system.
12.1.1 Preparations #
Before upgrading, copy the old configuration files to a separate medium
(such as removable hard disk or USB flash drive) to secure the data.
This primarily applies to files stored in /etc as
well as some of the directories and files in /var.
You may also want to write the user data in /home
(the HOME directories) to a backup medium. Back up this
data as root. Only
root has read permission
for all local files.
Before starting your update, make note of the root partition. The
command df / lists the device name of the root
partition. In Example 12.1, “List with df -h”, the root partition
to write down is /dev/sda3 (mounted as
/).
Example 12.1: List with df -h #
Filesystem     Size  Used Avail Use% Mounted on
/dev/sda3       74G   22G   53G  29% /
udev           252M  124K  252M   1% /dev
/dev/sda5      116G  5.8G  111G   5% /home
/dev/sda1       39G  1.6G   37G   4% /windows/C
/dev/sda2      4.6G  2.6G  2.1G  57% /windows/D
12.1.2 Possible Problems #
If you upgrade a default system from the previous version to this version, YaST works out the necessary changes and performs them. Depending on your customizations, some steps (or the entire upgrade procedure) may fail and you must resort to copying back your backup data. Check the following issues before starting the system update.
12.1.2.1 Checking passwd and group in /etc #
Before upgrading the system, make sure that
/etc/passwd and /etc/group do
not contain any syntax errors. For this purpose, start the verification
utilities pwck and grpck as
root to eliminate any
reported errors.
12.1.2.2 Shut Down Virtual Machines #
If your machine serves as a VM Host Server for KVM or Xen, make sure to properly shut down all running VM Guests prior to the update. Otherwise you may not be able to acces the guests after the update.
12.1.2.3 PostgreSQL #
Before updating PostgreSQL
(postgres), dump the
databases. See the manual page of pg_dump. This is
only necessary if you actually used PostgreSQL prior to your update.
12.1.3 Upgrading with YaST #
Following the preparation procedure outlined in Section 12.1.1, “Preparations”, you can now upgrade your system:
Insert the openSUSE Leap DVD into the drive, then reboot the computer to start the installation program. On machines with a traditional BIOS you will see the graphical boot screen shown below. On machines equipped with UEFI, a slightly different boot screen is used. Secure boot on UEFI machines is supported.
Use F2 to change the language for the installer. A corresponding keyboard layout is chosen automatically. See Section 2.2.1.1, “The Boot Screen on Machines Equipped with Traditional BIOS” or Section 2.2.1.2, “The Boot Screen on Machines Equipped with UEFI” for more information about changing boot options.
Select on the boot screen, then press Enter. This boots the system and loads the openSUSE Leap installer. Do not select .
The and are initialized with the language settings you have chosen on the boot screen. Change them here, if necessary.
Read the License Agreement. It is presented in the language you have chosen on the boot screen. are available. Proceed with .
YaST determines if there are multiple root partitions. If there is only one, continue with the next step. If there are several, select the right partition and confirm with (
/dev/sda3was selected in the example in Section 12.1.1, “Preparations”). YaST reads the oldfstabon this partition to analyze and mount the file systems listed there.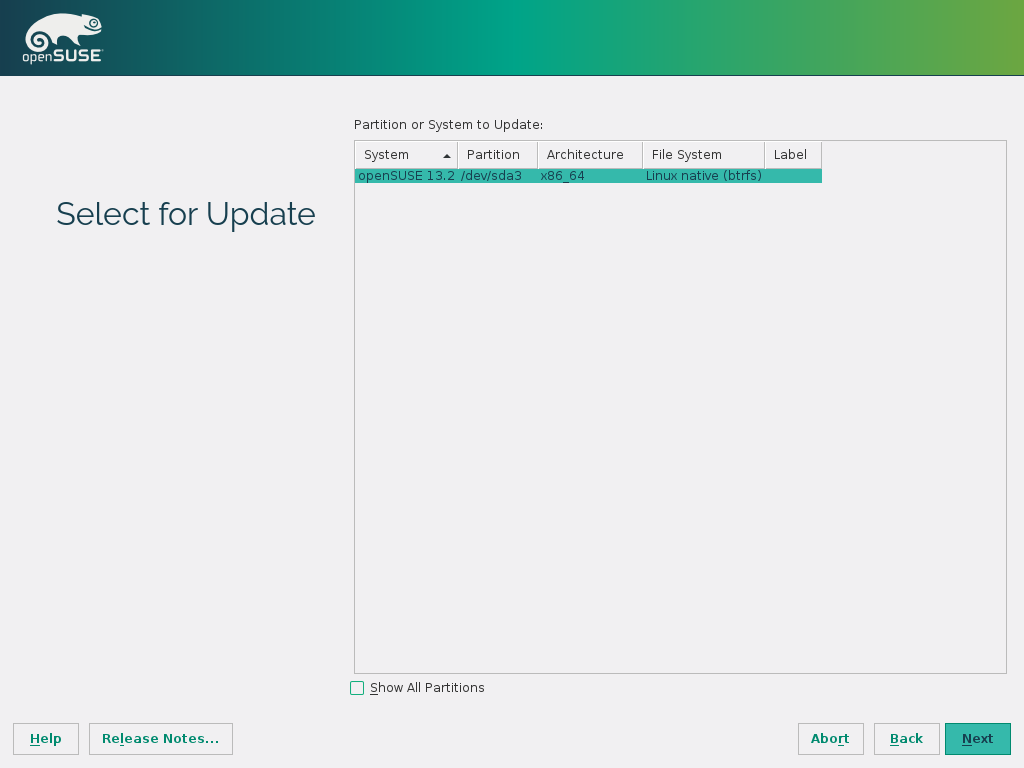
Tip: Release Notes
From this point on, the Release Notes can be viewed from any screen during the installation process by selecting .
YaST shows a list of . Enable all the repositories you want to continue using and from where you want to update third-party software. Click the for every list item, if appropriate.
If you do not select any repositories but simply leave all in state , the default repositories will be enabled in a later step.
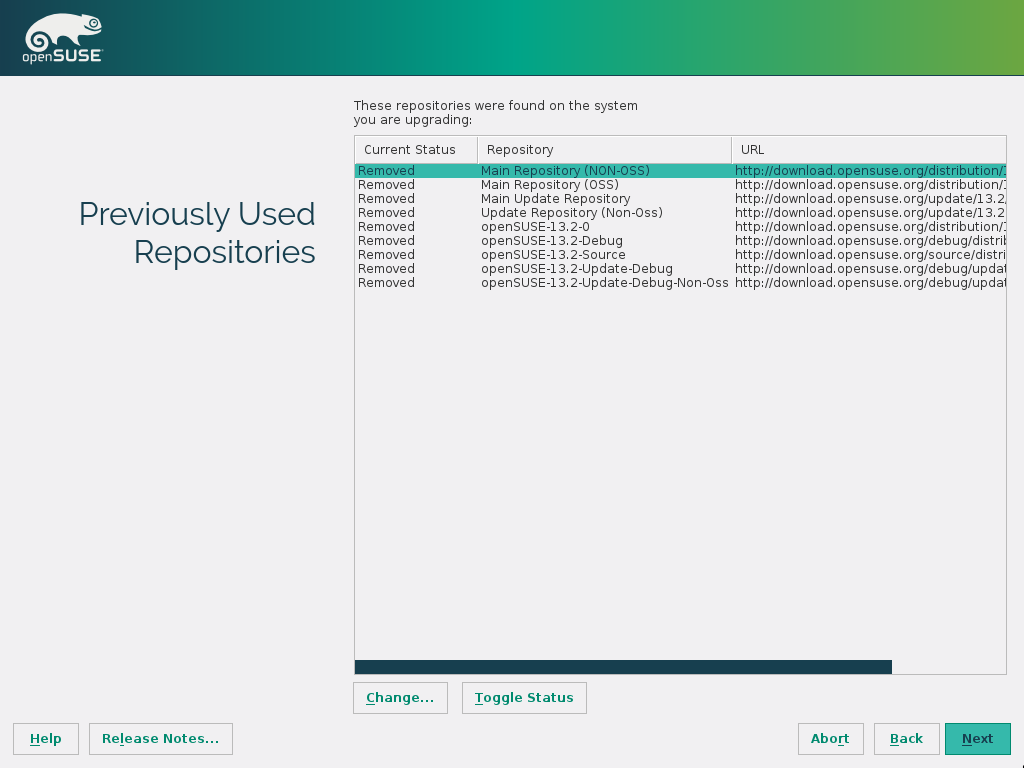
If you selected one or more online repositories, you need to configure an internet connection in the . If you prefer to install openSUSE Leap with no network connection, choose to cancel the configuration. However, configuring the network at this stage is recommended, since it will allow to install the latest updates and security fixes from the online repositories. A working network connection will also give you access to additional software repositories.
To configure the network, choose a network interface from the list and click to change its settings. Use the tabs to configure DNS and routing. Refer to Book “Reference”, Chapter 13 “Basic Networking”, Section 13.4 “Configuring a Network Connection with YaST” for more details.
If you added repositories during the upgrade procedure as recommended earlier, you now can activate those you are actually interested in. Please enable all repositories you had enable before to ensure all packages get upgraded correctly.
Refer to Section 2.9, “List Of Online Repositories” for more details.
After having proceeded with , you need to confirm the license agreement for the online repositories with .
Use the screen to review and—if necessary—change several proposed installation settings. The current configuration is listed for each setting. To change it, click the headline.
View detailed hardware information by clicking . In the resulting screen you can also change —see Section 2.14.5, “” for more information.
By default, YaST will update perform full based on a selection of patterns. Each pattern contains several software packages needed for specific functions (for example, Web and LAMP server or a print server).
Here you can change the package selection or change the to .
You can further tweak the package selection on the screen. Here you can not only select patterns but also list their contents and search for individual packages. See Chapter 9, Installing or Removing Software for more information.
If you intend to enhance your system, it is recommended to finish the upgrade first and then install additional software.
You also have the possibility to make backups of various system components. Selecting backups slows down the upgrade process. Use this option if you do not have a recent system backup.
This section allows you to change the primary language and configure addtional . Optionally, you can adjust the keyboard layout and timezone to the selected primary language.
Here you can change the keyboard layout and adjust additional .
This section shows the boot loader configuration. Changing the defaults is only recommended if really needed. Refer to Book “Reference”, Chapter 12 “The Boot Loader GRUB 2” for details.

After you have finalized the system configuration on the screen, click . Depending on your software selection you may need to agree to license agreements before the installation confirmation screen pops up. Up to this point no changes have been made to your system. After you click a second time, the upgrade process starts.
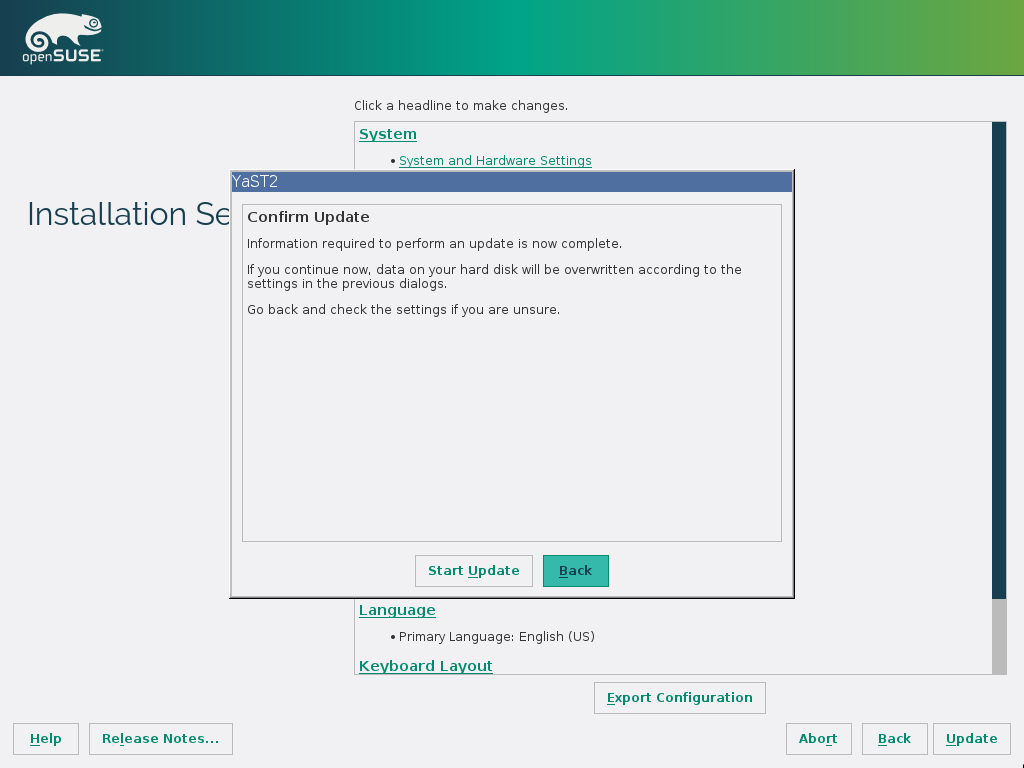
Once the basic upgrade installation is finished, YaST reboots the system. Finally, YaST updates the remaining software, if any and displays the release notes, if wanted.
12.1.4 Distribution Upgrade with zypper #
With the zypper command line utility you can upgrade to
the next version of the distribution. Most importantly, you can initiate
the system upgrade process from within the running system.
This feature is attractive for advanced users who want to run remote upgrades or upgrades on many similarly configured systems.
12.1.4.1 Before Starting the Upgrade with zypper #
To avoid unexpected errors during the upgrade process using
zypper, minimize risky constellations.
Close as many applications and stop unneeded services as possible and log out all regular users.
Disable third party repositories before starting the upgrade, or lower the priority of these repositories to make sure packages from the default system repositories will get preference. Enable them again after the upgrade and edit their version string to match the version number of the distribution of the upgraded now running system.
12.1.4.2 The Upgrade Procedure #
Warning: Check Your System Backup
Before actually starting the upgrade procedure, check that your system backup is up-to-date and restorable. This is especially important because you have to enter many of the following steps manually.
The program zypper supports long and short command
names. For example, you can abbreviate zypper install
as zypper in. In the following text, the short
variants are used.
Run the online update to make sure the software management stack is up-to-date. For more information, see Chapter 11, YaST Online Update.
Configure the repositories you want to use as update sources. Getting this right is crucial. Either use YaST (see Section 9.3, “Managing Software Repositories and Services”) or
zypper(see Book “Reference”, Chapter 2 “Managing Software with Command Line Tools”, Section 2.1 “Using Zypper”). The name of the repositories as used in the following steps could vary a little bit depending on your customizations.To view your current repositories enter:
zypper lr -u
Increase the version number of the system repositories from 13.2 to 42.1 and prefix them with
leap/. Add the new repositories with commands such as:server=http://download.example.org zypper ar $server/distribution/leap/42.1/repo/oss/ Leap-42.1-OSS zypper ar $server/update/leap/42.1/oss/ Leap-42.1-Update
And remove the old repositories:
zypper rr 13.2-OSS
zypper rr 13.2-Update
If necessary, repeat these steps for other repositories to ensure a clean upgrade path for all your packages.
Disable third party repositories or other openSUSE Build Server repositories, because
zypper dupis guaranteed to work with the default repositories only (replace repo-alias with the name of the repository you want to disable):zypper mr -d repo-alias
Alternatively, you can lower the priority of these repositories.
Note: Handling of Unresolved Dependencies
zypper dupwill remove all packages having unresolved dependencies, but it keeps packages of disabled repositories as long as their dependencies are satisfied.zypper dupensures that all installed packages come from one of the available repositories. It does not consider the version, architecture, or vendor of the installed packages; thus it emulates a fresh installation. Packages that are no longer available in the repositories are considered orphaned. Such packages get uninstalled if their dependencies can not be satisfied. If they can be satisfied, such packages stay installed.Once done, check your repository configuration with:
zypper lr -d
Refresh local metadata and repository contents with
zypper ref.Pull in Zypper and the package management stack from the 11 SP1 repository with
zypper up zypper.Run the actual distribution upgrade with
zypper dup. You are asked to confirm the license of SUSE Linux Enterprise and of some packages—depending on the set of installed packages.Reboot the system with
shutdown -r now.
12.1.5 Updating Individual Packages #
Regardless of your overall updated environment, you can always update individual packages. From this point on, however, it is your responsibility to ensure that your system remains consistent.
Use the YaST software management tool to update packages as described in Chapter 9, Installing or Removing Software. Select components from the YaST package selection list according to your needs. If a newer version of a package exists, the version numbers of the installed and the available versions are listed in blue color in the column. If you select a package essential for the overall operation of the system, YaST issues a warning. Such packages should be updated only in the update mode. For example, many packages contain shared libraries. Updating these programs and applications in the running system may lead to system instability.
12.2 For More Information #
Problems and special issues of the various versions are published online as they are identified. See the links listed below. Important updates of individual packages can be accessed using the YaST Online Update. For more information, see Chapter 11, YaST Online Update.
Refer to the Product highlights (http://en.opensuse.org/Product_highlights and the
Bugs article in the openSUSE wiki at http://en.opensuse.org/openSUSE:Most_annoying_bugs for
information about recent changes and issues.
Part IV The Bash Shell #
- 13 Shell Basics
When working with Linux these days, you can communicate with the system almost without ever requiring a command line interpreter (the shell). After booting your Linux system, you are usually directed to a graphical user interface that guides you through the login process and the following interactio…
- 14 Bash and Bash Scripts
These days many people use computers with a graphical user interface (GUI) like GNOME. Although they offer lots of features, their use is limited when it comes to the execution of automated tasks. Shells are a good addition to GUIs and this chapter gives you an overview of some aspects of shells, in this case Bash.
13 Shell Basics #
- 13.1 Starting a Shell
- 13.2 Entering Commands
- 13.3 Working with Files and Directories
- 13.4 Becoming Root
- 13.5 File Access Permissions
- 13.6 Useful Features of the Shell
- 13.7 Editing Texts
- 13.8 Searching for Files or Contents
- 13.9 Viewing Text Files
- 13.10 Redirection and Pipes
- 13.11 Starting Programs and Handling Processes
- 13.12 Important Linux Commands
When working with Linux these days, you can communicate with the system almost without ever requiring a command line interpreter (the shell). After booting your Linux system, you are usually directed to a graphical user interface that guides you through the login process and the following interactions with the operating system. The graphical user interface in Linux (the X Window System or X11) is initially configured during installation. Both KDE and GNOME desktop (and other window managers you can install) use it for interaction with the user.
Nevertheless, it is useful to have some basic knowledge of working with a shell because you might encounter situations where the graphical user interface is not available. For example, if some problem with the X Window System occurs. If you are not familiar with a shell, you might feel a bit uncomfortable at first when entering commands, but the more you get used to it, the more you will realize that the command line is often the quickest and easiest way to perform some daily tasks.
For UNIX or Linux several shells are available which differ slightly in behavior and in the commands they accept. The default shell in openSUSE® Leap is Bash (GNU Bourne-Again Shell).
The following sections will guide you through your first steps with the Bash shell and will show you how to complete some basic tasks via the command line. If you are interested in learning more or rather feel like a shell “power user” already, refer to Chapter 14, Bash and Bash Scripts.
13.1 Starting a Shell #
Basically, there are two different ways to start a shell from the graphical user interface which usually shows after you have booted your computer:
you can leave the graphical user interface or
you can start a terminal window within the graphical user interface.
While the first option is always available, you can only make use of the second option when you are already logged in to a desktop such as KDE or GNOME. Whichever way you choose, there is always a way back and you can switch back and forth between the shell and the graphical user interface.
If you want to give it a try, press Ctrl–Alt–F2 to leave the graphical user interface. The graphical user interface disappears and you are taken to a shell which prompts you to log in. Type your username and press Enter. Then type your password and press Enter. The prompt now changes and shows some useful information as in the following example:
 1   2   3
tux@linux:~>
Your login. | |
The hostname of your computer. | |
Path to the current directory. Directly after login, the current
directory usually is your home directory, indicated by the
|
When you are logged in at a remote computer the information provided by the prompt always shows you which system you are currently working on.
When the cursor is located behind this prompt, you can pass
commands directly to your computer system. For example, you can now enter
ls -l to list the contents of the
current directory in a detailed format. If this is enough for your first
encounter with the shell and you want to go back to the graphical user
interface, you should log out from your shell session first. To do so,
type exit and press Enter.
Then press Alt–F7 to switch back to the graphical user interface. You will find
your desktop and the applications running on it unchanged.
When you are already logged in to the GNOME or the KDE desktop and want
to start a terminal window within the desktop, press Alt–F2 and enter
konsole (for KDE) or gnome-terminal
(for GNOME). This opens a terminal window on your desktop. As you are
already logged in to your desktop, the prompt shows information about
your system as described above. You can now enter commands and execute
tasks just like in any shell which runs parallel to your desktop. To
switch to another application on the desktop just click on the
corresponding application window or select it from the taskbar of your
panel. To close the terminal window press Alt–F4.
13.2 Entering Commands #
As soon as the prompt appears on the shell it is ready to receive and execute commands. A command can consist of several elements. The first element is the actual command, followed by parameters or options. You can type a command and edit it by using the following keys: ←, →, Home, End, <— (Backspace), Del, and Space. You can correct typing errors or add options. The command is not executed until you press Enter.
Important: No News Is Good News
The shell is not verbose: in contrast to some graphical user interfaces, it usually does not provide confirmation messages when commands have been executed. Messages only appear in case of problems or errors —or if you explicitly ask for them by executing a command with a certain option.
Also keep this in mind for commands to delete objects. Before entering a
command like rm (without any option) for removing a
file, you should know if you really want to get rid of the object: it
will be deleted irretrievably, without confirmation.
13.2.1 Using Commands without Options #
In Section 13.5.1, “Permissions for User, Group and Others” you already got to know
one of the most basic commands: ls, which used to list the contents of a directory. This
command can be used with or without options. Entering the plain
ls command shows the contents of the current
directory:
tux@knox:~> ls
bin Desktop Documents public_html tux.txt
tux@knox:~>
Files in Linux may have a file extension or a suffix, such as
.txt, but do not need to have one. This makes it
difficult to differentiate between files and folders in this output of
the ls. By default, the colors in the Bash shell give
you a hint: directories are usually shown in blue, files in black.
13.2.2 Using Commands with Options #
A better way to get more details about the contents of a
directory is using the ls command with a string of
options. Options modify the way a command works so that you can get it
to carry out specific tasks. Options are separated from the command with
a blank and are usually prefixed with a hyphen. The ls
-l command shows the contents of the same
directory in full detail (long listing format):
tux@knox:~> ls -l
drwxr-xr-x 1 tux users     48 2015-06-23 16:08 bin
drwx---r-- 1 tux users  53279 2015-06-21 13:16 Desktop
drwx------ 1 tux users    280 2015-06-23 16:08 Documents
drwxr-xr-x 1 tux users  70733 2015-06-21 09:35 public_html
-rw-r--r-- 1 tux users  47896 2015-06-21 09:46 tux.txt
tux@knox:~>
This output shows the following information about each object:
drwxr-xr-x1 12 tux3 users4 485 2006-06-23 16:086 bin7
Type of object and access permissions. For further information, refer to Section 13.5.1, “Permissions for User, Group and Others”. | |
Number of hard links to this file. | |
Owner of the file or directory. For further information, refer to Section 13.5.1, “Permissions for User, Group and Others”. | |
Group assigned to the file or directory. For further information, refer to Section 13.5.1, “Permissions for User, Group and Others”. | |
File size in bytes. | |
Date and time of the last change. | |
Name of the object. |
Usually, you can combine several options by prefixing only the first
option with a hyphen and then write the others consecutively without a
blank. For example, if you want to see all files in a directory in long
listing format, you can combine the two options -l and
-a (show all files) for the ls
command. Executing ls -la shows also
hidden files in the directory, indicated by a dot in front (for example,
.hiddenfile).
The list of contents you get with ls is sorted
alphabetically by filenames. But like in a graphical file manager, you
can also sort the output of ls -l
according to various criteria such as date, file extension or file size:
For date and time, use
ls-lt(displays newest first).For extensions, use
ls-lx(displays files with no extension first).For file size, use
ls-lS(displays largest first).
To revert the order of sorting, add -r as an option to
your ls command. For example, ls
-lr gives you the contents list sorted in reverse
alphabetical order, ls -ltr shows the
oldest files first. There are lots of other useful options for
ls. In the following section you will learn how to
investigate them.
13.2.3 Getting Help #
Nobody is expected to know all options of all commands by heart. If you remember the command name but are not sure about the options or the syntax of the command, choose one of the following possibilities:
--helpoptionIf you only want to look up the options of a certain command, try entering the command followed by a space and
--help. This--helpoption exists for many commands. For example,ls--helpdisplays all the options for thelscommand.- Manual Pages
To learn more about the various commands, you can also use the manual pages. Manual pages also give a short description of what the command does. They can be accessed with
manfollowed by the name of the command, for example,man ls.The man pages are displayed directly in the shell. To navigate them, move up and down with Page ↑ and Page ↓. Move between the beginning and the end of a document with Home and End. End this viewing mode by pressing Q. Learn more about the
mancommand itself withman man.- Info Pages
Info pages usually provide even more information about commands. To view the info page for a certain command, enter
infofollowed by the name of the command (for example,info ls). You can browse an info page with a viewer directly in the shell and display the different sections, called “nodes.” Use Space to move forward and <— to move backwards. Within a node, you can also browse with Page ↑ and Page ↓ but only Space and <— will take you also to the previous or subsequent node. Like for the man pages, press Q to end the viewing mode.
Note that man pages and info pages do not exist for all commands. Sometimes both are available (usually for key commands), sometimes only a man page or an info page exists, and sometimes neither of them are available.
13.2.4 Bash Shortcut Keys #
After having entered several commands, your shell will begin to fill up with all sorts of commands and the corresponding outputs. In the following table, find some useful shortcut keys for navigating and editing in the shell.
|
Shortcut Key |
Function |
|---|---|
|
Ctrl–L |
Clears the screen and moves the current line to the top of the page. |
|
Ctrl–C |
Aborts the command which is currently being executed. |
|
Shift–Page ↑ |
Scrolls upwards. |
|
Shift–Page ↓ |
Scrolls downwards. |
|
Ctrl–U |
Deletes from cursor position to start of line. |
|
Ctrl–K |
Deletes from cursor position to the end of line. |
|
Ctrl–D |
Closes the shell session. |
|
↑, ↓ |
Browses in the history of executed commands. |
13.3 Working with Files and Directories #
To address a certain file or directory, you must specify the path leading to that directory or file. As you may know from MS DOS or Mac OS already, there are two ways to specify a path:
- Absolute Path
Enter the entire path from the root directory to the relevant file or directory.
- Relative Path
Enter a path to the relevant file or directory by using the current directory as a starting point. This implies to give the levels you have to move up or down in the file system tree to reach the target directory of file, starting from the current directory.
Paths contain filenames, directories or both, separated by slashes. Absolute paths always start with a slash. Relative paths do not have a slash at the beginning, but can have one or two dots.
When entering commands, you can choose either way to specify a path,
depending on your preferences or the amount of typing, both will lead to
the same result. To change directories, use the cd
command and specify the path to the directory.
Note: Handling Blanks in Filenames or Directory Names
If a filename or the name of a directory contains a space, either escape
the space using a back slash (\) in front of the
blank or enclose the filename in single
quotes. Otherwise Bash interprets a filename like My
Documents as the names of two files or directories,
My and Documents in this case.
When specifying paths, the following “shortcuts” can save you a lot of typing:
The tilde symbol (
~) is a shortcut for home directories. For example, to list the contents of your home directory, usels~. To list the contents of another user's home directory, enterls~username(or course, this will only work if you have permission to view the contents, see Section 13.5, “File Access Permissions”). For example, enteringls ~tuxwould list the contents of the home directory of a user namedtux. You can use the tilde symbol as shortcut for home directories also if you are working in a network environment where your home directory may not be called/homebut can be mapped to any directory in the file system.From anywhere in the file system, you can reach your home directory by entering
cd ~or by simply enteringcdwithout any options.When using relative paths, refer to the current directory with a dot (
.). This is mainly useful for commands such ascpormvby which you can copy or move files and directories.The next higher level in the tree is represented by two dots (
..). In order to switch to the parent directory of your current directory, entercd .., to go up two levels from the current directory entercd ../..etc.
To apply your knowledge, find some examples below. They address basic tasks you may want to execute with files or folders using Bash.
13.3.1 Examples for Working with Files and Directories #
Suppose you want to copy a file located somewhere in your home directory
to a subdirectory of /tmp that you need to create
first.
Procedure 13.1: Creating and Changing Directories #
From your home directory create a subdirectory in
/tmp:
Enter
mkdir /tmp/test
mkdirstands for “make directory”. This command creates a new directory namedtestin the/tmpdirectory. In this case, you are using an absolute path to create thetestdirectory.To check what happened, now enter
ls -l /tmp
The new directory
testshould appear in the list of contents of the/tmpdirectory.Switch to the newly created directory with
cd /tmp/test
Procedure 13.2: Creating and Copying Files #
Now create a new file in a subdirectory of your home directory and copy
it to /tmp/test. Use a relative path for this
task.
Important: Overwriting of Existing Files
Before copying, moving or renaming a file, check if your target
directory already contains a file with the same name. If yes, consider
changing one of the filenames or use cp or
mv with options like -i, which
will prompt before overwriting an existing file. Otherwise Bash will
overwrite the existing file without confirmation.
To list the contents of your home directory, enter
ls -l ~
It should contain a subdirectory called
Documentsby default. If not, create this subdirectory with themkdircommand you already know:mkdir ~/Documents
To create a new, empty file named
myfile.txtin theDocumentsdirectory, entertouch ~/Documents/myfile.txt
Usually, the
touchcommand updates the modification and access date for an existing file. If you usetouchwith a filename which does not exist in your target directory, it creates a new file.Enter
ls -l ~/Documents
The new file should appear in the list of contents.
To copy the newly created file, enter
cp ~/Documents/myfile.txt .
Do not forget the dot at the end.
This command tells Bash to go to your home directory and to copy
myfile.txtfrom theDocumentssubdirectory to the current directory,/tmp/test, without changing the name of the file.Check the result by entering
ls -l
The file
myfile.txtshould appear in the list of contents for/tmp/test.
Procedure 13.3: Renaming and Removing Files or Directories #
Now suppose you want to rename myfile.txt into
tuxfile.txt. Finally you decide to remove the
renamed file and the test subdirectory.
To rename the file, enter
mv myfile.txt tuxfile.txt
To check what happened, enter
ls -l
Instead of
myfile.txt,tuxfile.txtshould appear in the list of contents.mvstands formoveand is used with two options: the first option specifies the source, the second option specifies the target of the operation. You can usemveitherto rename a file or a directory,
to move a file or directory to a new location or
to do both in one step.
Coming to the conclusion that you do not need the file any longer, you can delete it by entering
rm tuxfile.txt
Bash deletes the file without any confirmation.
Move up one level with
cd ..and check withls -l test
if the
testdirectory is empty now.If yes, you can remove the
testdirectory by enteringrmdir test
13.4 Becoming Root #
root, also called the superuser, has privileges which authorize him
to access all parts of the system and to execute administrative tasks. He
or she has the unrestricted capacity to make changes to the system and
has unlimited access to all files. Therefore performing some
administrative tasks or running certain programs such as YaST requires
root permissions.
13.4.1 Using su #
In order to temporarily become root in a shell, proceed as
follows:
Enter
su. You are prompted for therootpassword.Enter the password. If you mistyped the
rootpassword, the shell displays a message. In this case, you have to re-entersubefore retyping the password. If your password is correct, a hash symbol#appears at the end of the prompt, signaling that you are acting asrootnow.Execute your task. For example, transfer ownership of a file to a new user which only
rootis allowed to do:chown wilber kde_quick.xml
After having completed your tasks as
root, switch back to your normal user account. To do so, enterexit
The hash symbol disappears and you are acting as “normal” user again.
13.4.2 Using sudo #
Alternatively, you can also use sudo (superuser
“do”) to execute some tasks which normally are for
roots only. With sudo, administrators can grant certain users
root privileges for some commands. Depending on the system
configuration, users can then run root commands by entering their
normal password only. Due to a timestamp function, users are only
granted a “ticket” for a restricted period of time after
having entered their password. The ticket usually expires after a few
minutes. In openSUSE, sudo requires the root password by default
(if not configured otherwise by your system administrator).
For users, sudo is convenient as it prevents you from switching accounts
twice (to root and back again). To change the ownership of a file
using sudo, only one command is necessary instead of three:
sudo chown wilber kde_quick.xml
After you have entered the password which you are prompted for, the
command is executed. If you enter a second root command shortly
after that, you are not prompted for the password again, because your
ticket is still valid. After a certain amount of time, the ticket
automatically expires and the password is required again. This also
prevents unauthorized persons from gaining root privileges in case
a user forgets to switch back to his normal user account again and
leaves a root shell open.
13.5 File Access Permissions #
In Linux, objects such as files or folders or processes generally belong to the user who created or initiated them. There are some exceptions to this rule. For more information about the exceptions, refer to Book “Security Guide”, Chapter 10 “Access Control Lists in Linux”. The group which is associated with a file or a folder depends on the primary group the user belongs to when creating the object.
When you create a new file or directory, initial access permissions for
this object are set according to a predefined scheme. As an owner of a
file or directory, you can change the access permissions for this object.
For example, you can protect files holding sensitive data against read
access by other users and you can authorize the members of your group or
other users to write, read, or execute several of your files where
appropriate. As root, you can also change the ownership of files or
folders.
13.5.1 Permissions for User, Group and Others #
Three permission sets are defined for each file object on a Linux system. These sets include the read, write, and execute permissions for each of three types of users—the owner, the group, and other users.
The following example shows the output of an ls
-l command in a shell. This command lists the
contents of a directory and shows the details for each file and folder in
that directory.
Example 13.1: Access Permissions For Files and Folders #
-rw-r----- 1 tux users      0 2015-06-23 16:08 checklist.txt
-rw-r--r-- 1 tux users  53279 2015-06-21 13:16 gnome_quick.xml
-rw-rw---- 1 tux users      0 2015-06-23 16:08 index.htm
-rw-r--r-- 1 tux users  70733 2015-06-21 09:35 kde-start.xml
-rw-r--r-- 1 tux users  47896 2015-06-21 09:46 kde_quick.xml
drwxr-xr-x 2 tux users     48 2015-06-23 16:09 local
-rwxr--r-- 1 tux users 624398 2015-06-23 15:43 tux.sh
As shown in the third column, all objects belong to user
tux. They are
assigned to the group
users which is the
primary group the user tux belongs to.
To retrieve the access permissions the first column of the list must be
examined more closely. Let's have a look at the file
kde-start.xml:
|
Type |
User Permissions |
Group Permissions |
Permissions for Others |
|
|
|
|
|
The first column of the list consists of one leading character followed
by nine characters grouped in three blocks. The leading character
indicates the file type of the object: in this case, the hyphen
(–) shows that
kde-start.xml is a file. If you find the character
d instead, this shows that the object is a directory,
like local in
Example 13.1, “Access Permissions For Files and Folders”.
The next three blocks show the access permissions for the owner, the
group and other users (from left to right). Each block follows the same
pattern: the first position shows read permissions
(r), the next position shows write permissions
(w), the last one shows execute permission
(x). A lack of either permission is indicated by
-. In our example, the owner of
kde-start.xml has read and write access to the file
but cannot execute it. The users group can read
the file but cannot write or execute it. The same holds true for the
other users as shown in the third block of characters.
13.5.2 Files and Folders #
Access permissions have a slightly different impact depending on the type of object they apply to: file or directory. The following table shows the details:
Table 13.1: Access Permissions For Files And Directories #
|
Access Permission |
File |
Folder |
|---|---|---|
|
Read (r) |
Users can open and read the file. |
Users can view the contents of the directory. Without this
permission, users cannot list the contents of this directory with
|
|
Write (w) |
Users can change the file: They can add or drop data and can even delete the contents of the file. However, this does not include the permission to remove the file completely from the directory as long as they do not have write permissions for the directory where the file is located. |
Users can create, rename or delete files in the directory. |
|
Execute (x) |
Users can execute the file. This permission is only relevant for files like programs or shell scripts, not for text files. If the operating system can execute the file directly, users do not need read permission to execute the file. However, if the file must me interpreted like a shell script or a perl program, additional read permission is needed. |
Users can change into the directory and execute files there. If they do not have read access to that directory they cannot list the files but can access them nevertheless if they know of their existence. |
Note that access to a certain file is always dependent on the correct combination of access permissions for the file itself and the directory it is located in.
13.5.3 Modifying File Permissions #
In Linux, objects such as files or folder or processes generally belong to the user who created or initiated them. The group which is associated with a file or a folder depends on the primary group the user belongs to when creating the object. When you create a new file or directory, initial access permissions for this object are set according to a predefined scheme. For further details refer to Section 13.5, “File Access Permissions”.
As the owner of a file or directory (and, of course, as
root), you can change the
access permissions to this object.
To change object attributes like access permissions of a file or folder,
use the chmod command followed by the following parameters:
the users for which to change the permissions,
the type of access permission you want to remove, set or add and
the files or folders for which you want to change permissions separated by spaces.
The users for which you can change file access permissions fall into the
following categories: the owner of the file (user, u),
the group that own the file (group, g) and the other
users (others, o). You can add, remove or set one or
more of the following permissions: read, write or execute.
As root, you can also change the ownership of a file: with the
command chown (change owner) you can transfer ownership to a new user.
13.5.3.1 Examples for Changing Access Permissions and Ownership #
The following example shows the output of an ls
-l command in a shell.
Example 13.2: Access Permissions For Files and Folders #
-rw-r----- 1 tux users      0 2015-06-23 16:08 checklist.txt
-rw-r--r-- 1 tux users  53279 2015-06-21 13:16 gnome_quick.xml
-rw-rw---- 1 tux users      0 2015-06-23 16:08 index.htm
-rw-r--r-- 1 tux users  70733 2015-06-21 09:35 kde-start.xml
-rw-r--r-- 1 tux users  47896 2015-06-21 09:46 kde_quick.xml
drwxr-xr-x 2 tux users     48 2015-06-23 16:09 local
-r-xr-xr-x 1 tux users 624398 2015-06-23 15:43 tux.jpg
In the example above, user tux owns
the file kde-start.xml and has read and write
access to the file but cannot execute it. The
users group can read the file but cannot write
or execute it. The same holds true for the other users as shown by the
third block of characters.
Procedure 13.4: Changing Access Permissions #
Suppose you are tux and want to
modify the access permissions to your files:
If you want to grant the
usersgroup also write access tokde-start.xml, enterchmod g+w kde-start.xml
To grant the
usersgroup and other users write access tokde-start.xml, enterchmod go+w kde-start.xml
To remove write access for all users, enter
chmod -w kde-start.xml
If you do not specify any kind of users, the changes apply to all users— the owner of the file, the owning group and the others. Now even the owner
tuxdoes not have write access to the file without first reestablishing write permissions.To prohibit the
usersgroup and others to change into the directorylocal, enterchmod go-x local
To grant others write permissions for two files, for
kde_quick.xmlandgnome_quick.xml, enterchmod o+w kde_quick.xml gnome_quick.xml
Procedure 13.5: Changing Ownership #
Suppose you are tux and want to
transfer the ownership of the file kde_quick.xml
to an other user, named wilber. In
this case, proceed as follows:
Enter the username and password for
root.Enter
chown wilber kde_quick.xml
Check what happened with
ls -l kde_quick.xml
You should get the following output:
-rw-r--r-- 1 wilber users 47896 2006-06-21 09:46 kde_quick.xml
If the ownership is set according to your wishes, switch back to your normal user account.
13.6 Useful Features of the Shell #
As you probably noticed in the examples above, entering commands in Bash can include a lot of typing. In the following, get to know some features of the Bash that can make your work a lot easier and save a lot of typing.
- History
By default, Bash “remembers” commands you have entered. This feature is called history. You can browse through commands that have been entered before, select one you want to repeat and then execute it again. To do so, press ↑ repeatedly until the desired command appears at the prompt. To move forward through the list of previously entered commands, press ↓. For easier repetition of a certain command from Bash history, just type the first letter of the command you want to repeat and press Page ↑.
You can now edit the selected command (for example, change the name of a file or a path), before you execute the command by pressing Enter. To edit the command line, just move the cursor to the desired position using the arrow keys and start typing.
You can also search for a certain command in the history. Press Ctrl–R to start an incremental search function. showing the following prompt:
(reverse-i-search)`':
Just type one or several letters from the command you are searching for. Each character you enter narrows down the search. The corresponding search result is shown on the right side of the colon whereas your input appears on the left of the colon. To accept a search result, press Esc. The prompt now changes to its normal appearance and shows the command you chose. You can now edit the command or directly execute it by pressing Enter.
- Completion
Completing a filename or directory name to its full length after typing its first letters is another helpful feature of Bash. To do so, type the first letters then press →| (Tabulator). If the filename or path can be uniquely identified, it is completed at once and the cursor moves to the end of the filename. You can then enter the next option of the command, if necessary. If the filename or path cannot be uniquely identified (because there are several filenames starting with the same letters), the filename or path is only completed up to the point where it becomes ambiguous again. You can then obtain a list of them by pressing →| a second time. After this, you can enter the next letters of the file or path then try completion again by pressing →|. When completing filenames and paths with the help of →|, you can simultaneously check whether the file or path you want to enter really exists (and you can be sure of getting the spelling right).
- Wild Cards
You can replace one or more characters in a filename with a wild card for pathname expansion. Wild cards are characters that can stand for other characters. There are three different types of these in Bash:
Wild Card
Function
?Matches exactly one arbitrary character
*Matches any number of characters
[set]Matches one of the characters from the group specified inside the square brackets, which is represented here by the string set.
13.6.1 Examples For Using History, Completion and Wildcards #
The following examples illustrate how to make use of these convenient features of Bash.
Procedure 13.6: Using History and Completion #
If you already did the example Section 13.3.1, “Examples for Working with Files and Directories” your shell buffer should be filled with commands which you can retrieve using the history function.
Press ↑ repeatedly until
cd ~appears.Press Enter to execute the command and to switch to your home directory.
By default, your home directory contains two subdirectories starting with the same letter,
DocumentsandDesktop.Enter
cd Dand press →|.Nothing happens since Bash cannot identify to which one of the subdirectories you want to change.
Press →| again to see the list of possible choices:
tux@knox:~> cd D Desktop/ Documents/ tux@knox:~> cd D
The prompt still shows your initial input. Type the next character of the subdirectory you want to go to and press →| again.
Bash now completes the path.
You can now execute the command with Enter.
Procedure 13.7: Using Wildcards #
Now suppose that your home directory contains a number of files with
various file extensions. It also holds several versions of one file
which you saved under different filenames
myfile1.txt, myfile2.txt etc.
You want to search for certain files according to their properties.
First, create some test files in your home directory:
Use the
touchcommand to create several (empty) files with different file extensions, for example.pdf,.xmland.jpg.You can do this consecutively (do not forget to use the Bash history function) or with only one
touchcommand: simply add several filenames separated by a space.Create at least two files that have the same file extension, for example
.html.To create several “versions” of one file, enter
touch myfile{1..5}.txtThis command creates five consecutively numbered files:
myfile1.txt,…,myfile5.txt
List the contents of your home directory. It should look similar to this:
-rw-r--r-- 1 tux users   0 2006-07-14 13:34 foo.xml
-rw-r--r-- 1 tux users   0 2006-07-14 13:47 home.html
-rw-r--r-- 1 tux users   0 2006-07-14 13:47 index.html
-rw-r--r-- 1 tux users   0 2006-07-14 13:47 toc.html
-rw-r--r-- 1 tux users   0 2006-07-14 13:34 manual.pdf
-rw-r--r-- 1 tux users   0 2006-07-14 13:49 myfile1.txt
-rw-r--r-- 1 tux users   0 2006-07-14 13:49 myfile2.txt
-rw-r--r-- 1 tux users   0 2006-07-14 13:49 myfile3.txt
-rw-r--r-- 1 tux users   0 2006-07-14 13:49 myfile4.txt
-rw-r--r-- 1 tux users   0 2006-07-14 13:49 myfile5.txt
-rw-r--r-- 1 tux users   0 2006-07-14 13:32 tux.png
With the help of wild cards, select certain subsets of the files according to various criteria:
To list all files with the
.htmlextension, enterls -l *.html
To list all “versions” of
myfile.txt, enterls -l myfile?.txt
Note that you can only use the
?wild card here because the numbering of the files is single-digit. As soon as you have a file namedmyfile10.txtyou must to use the*wild card to view all versions ofmyfile.txt(or add another question mark, so your string looks likemyfile??.txt).To remove, for example, version 1-3 and version 5 of
myfile.txt, enterrm myfile[1-3,5].txt
Check the result with
ls -l
Of all
myfile.txtversions onlymyfile4.txtshould be left.
You can also combine several wild cards in one command. In the example
above, rm myfile[1-3,5].* would lead to the same
result as rm myfile[1-3,5].txt because there are only
files with the extension .txt available.
Note: Using Wildcards in rm Commands
Wildcards in a rm command can be very useful but
also dangerous: you might delete more files from your directory than
intended. To see which files would be affected by the
rm, run your wildcard string with
ls instead of rm first.
13.7 Editing Texts #
In order to edit files from the command line, you will need to know the vi editor. vi is a default editor which can be found on nearly every UNIX/Linux system. It can run several operating modes in which the keys you press have different functions. This does not make it very easy for beginners, but you should know at least the most basic operations with vi. There may be situations where no other editor than vi is available.
Basically, vi makes use of three operating modes:
- command mode
In this mode, vi accepts certain key combinations as commands. Simple tasks such as searching words or deleting a line can be executed.
- insert mode
In this mode, you can write normal text.
- extended mode
In this mode, also known as colon mode (as you have to enter a colon to switch to this mode), vi can execute also more complex tasks such as searching and replacing text.
In the following (very simple) example, you will learn how to open and edit a file with vi, how to save your changes and quit vi.
13.7.1 Example: Editing with vi #
Note: Display of Keys
In the following, find several commands that you can enter in vi by just pressing keys. These appear in uppercase as on a keyboard. If you need to enter a key in uppercase, this is stated explicitly by showing a key combination including the Shift key.
To create and open a new file with vi, enter
vi textfile.txt
By default, vi opens in command mode in which you cannot enter text.
Press I to switch to insert mode. The bottom line changes and indicates that you now can insert text.
Write some sentences. If you want to insert a new line, first press Esc to switch back to command mode. Press O to insert a new line and to switch to insert mode again.
In the insert mode, you can edit the text with the arrow keys and with Del.
To leave vi, press Esc to switch to command mode again. Then press : which takes you to the extended mode. The bottom line now shows a colon.
To leave vi and save your changes, type
wq(wforwrite;qforquit) and press Enter. If you want to save the file under a different name, typew filenameand press Enter.To leave vi without saving, type
q!instead and press Enter.
13.8 Searching for Files or Contents #
Bash offers you several commands to search for files and to search for the contents of files:
locateThis utility is only available if you have installed the
findutils-locatepackage. With this command you can find out in which directory a specified file is located. If desired, use wild cards to specify filenames. The program is very quick, because it uses a database specifically created for the purpose (rather than searching through the entire file system). This very fact, however, also results in a major drawback: locate is unable to find any files created after the latest update of its database. The database can be generated byrootrunningupdatedb.findWith
find, search for a file in a given directory. The first argument specifies the directory in which to start the search. The option-namemust be followed by a search string, which may also include wild cards. Unlikelocate, which uses a database,findscans the actual directory.grepThe
grepcommand finds a specific search string in the specified text files. If the search string is found, the command displays the line in whichsearchstringwas found, along with the filename. If desired, use wild cards to specify filenames.
13.8.1 Examples for Searching #
The KDE and GNOME desktops store user-specific application data in
hidden directories, for example .kde and
.gnome.
To locate these directories on your computer, enter
locate .kde
if you have installed KDE desktop or
locate .gnome
if you have installed GNOME desktop.
You will see that
locatedisplays all file names in the database that contain the string.kdeor.gnomeanywhere. To learn how to modify this behavior refer to the man page oflocate.To search your home directory for all occurrences of filenames that contain the file extension
.txt, usefind ~ -name '*.txt' -print
To search a directory (in this case, your home directory) for all occurrences of files which contain, for example, the word
music, entergrep music ~/*
Note that grep is case-sensitive— unless you use it with the
-ioption. With the command above you will not find any files containingMusic.If you want to use a search string which consists of more than one word, enclose the string in double quotation marks, for example:
grep "music is great" ~/*
13.9 Viewing Text Files #
When searching for the contents of a file with grep,
the output gives you the line in which the
searchstring was found along with the filename. Often
this contextual information is still not enough information to decide
whether you want to open and edit this file. Bash offers you several
commands to have a quick look at the contents of a text file directly in
the shell, without opening an editor.
headWith
headyou can view the first lines of a text file. If you do not specify the command any further,headshows the first 10 lines of a text file.tailThe
tailcommand is the counterpart ofhead. If you usetailwithout any further options it displays the last 10 lines of a text file. This can be very useful to view log files of your system, where the most recent messages or log entries are usually found at the end of the file.lessWith
less, display the whole contents of a text file. To move up and down half a page use Page ↑ and Page ↓. Use Space to scroll down one page. Home takes you to the beginning, and End to the end of the document. To end the viewing mode, press Q.moreInstead of
less, you can also use the older programmore. It has basically the same function—however, it is less convenient because it does not allow you to scroll backwards. Use Space to move forward. When you reach the end of the document, the viewer closes automatically.catThe
catcommand displays the contents of a file, printing the entire contents to the screen without interruption. Ascatdoes not allow you to scroll it is not very useful as viewer but it is rather often used in combination with other commands.
13.10 Redirection and Pipes #
Sometimes it would be useful if you could write the output of a command to a file for further editing or if you could combine several commands, using the output of one command as the input for the next one. The shell offers this function by means of redirection or pipes.
Normally, the standard output in the shell is your screen (or an open shell window) and the standard input is the keyboard. With the help of certain symbols you can redirect the input or the output to another object, such as a file or another command.
- Redirection
With
>you can forward the output of a command to a file (output redirection), with<you can use a file as input for a command (input redirection).- Pipe
By means of a pipe symbol
|you can also redirect the output: with a pipe, you can combine several commands, using the output of one command as input for the next command. In contrast to the other redirection symbols > and <, the use of the pipe is not constrained to files.
13.10.1 Examples for Redirection and Pipe #
To write the output of a command like
lsto a file, enterls -l > filelist.txt
This creates a file named
filelist.txtthat contains the list of contents of your current directory as generated by thelscommand.However, if a file named
filelist.txtalready exists, this command overwrites the existing file. To prevent this, use>>instead of >. Enteringls -l >> filelist.txt
simply appends the output of the
lscommand to an already existing file namedfilelist.txt. If the file does not exist, it is created.Redirections also works the other way round. Instead of using the standard input from the keyboard for a command, you can use a file as input:
sort < filelist.txt
This will force the
sortcommand to get its input from the contents offilelist.txt. The result is shown on the screen. Of course, you can also write the result into another file, using a combination of redirections:sort < filelist.txt > sorted_filelist.txt
If a command generates a lengthy output, like
ls-lmay do, it may be useful to pipe the output to a viewer likelessto be able to scroll through the pages. To do so, enterls -l | less
The list of contents of the current directory is shown in
less.The pipe is also often used in combination with the
grepcommand in order to search for a certain string in the output of another command. For example, if you want to view a list of files in a directory which are owned by the usertux, enterls -l | grep tux
13.11 Starting Programs and Handling Processes #
As you have seen in Section 13.7, “Editing Texts”, programs can be
started from the shell. Applications with a graphical user interface need
the X Window System and can only be started from a terminal window within
a graphical user interface. For example, if you want to open a file named
vacation.pdf in your home directory from a terminal
window in KDE or GNOME, simply run
okular ~/vacation.pdf (or
evince ~/vacation.pdf) to start a PDF viewer
displaying your file.
When looking at the terminal window again you will realize that the
command line is blocked as long as the PDF viewer is open, meaning that
your prompt is not available. To change this, press Ctrl–Z to suspend
the process and enter bg to send the process to the background.
Now you can still have a look at vacation.pdf while
your prompt is available for further commands. An easier way to achieve
this is by sending a process to the background directly when starting it.
To do so, add an ampersand at the end of the command:
okular ~/vacation.pdf &
If you have started several background processes (also named jobs) from
the same shell, the jobs command gives you an overview of the jobs. It also shows the
job number in brackets and their status:
tux@linux:~> jobs
[1]   Running        okular book.opensuse.startup-xep.pdf &
[2]-  Running        okular book.opensuse.reference-xep.pdf &
[3]+  Stopped        man jobs
To bring a job to the foreground again, enter fg job_number.
Whereas job only shows the background
processes started from a specific shell, the ps
command (run without options) shows a list of all your
processes—those you started. Find an example output below:
tux@linux:~> ps
PID TTY          TIME CMD
15500 pts/1    00:00:00 bash
28214 pts/1    00:00:00 okular
30187 pts/1    00:00:00 kwrite
30280 pts/1    00:00:00 ps
In case a program cannot be terminated in the normal way,
use the kill command to stop the process (or
processes) belonging to that program. To do so, specify the process ID
(PID) shown by the output of ps. For example, to shut
down the KWrite editor in the example above, enter
kill 30187
This sends a TERM signal that instructs the program to shut itself down.
Alternatively, if the program or process you want to terminate is a
background job and is shown by the jobs command, you
can also use the kill command in combination with the
job number to terminate this process. When identifying the job with the
job number, you must prefix the number with a percent character
(%):
kill %job_number
If kill does not help—as is sometimes the case
for “runaway” programs—try
kill -9 PID
This sends a KILL signal instead of a TERM signal, bringing the specified process to an end in most cases.
This section is intended to introduce the most basic set of commands for handling jobs and processes. Find an overview for system administrators in Book “System Analysis and Tuning Guide”, Chapter 2 “System Monitoring Utilities”, Section 2.3 “Processes”.
13.12 Important Linux Commands #
This section gives insight into the most important commands. There are
many more commands than listed in this chapter. Along with the individual
commands, parameters are listed and, where appropriate, a typical sample
application is introduced. To learn more about the various commands, use
the manual pages, accessed with man followed by the
name of the command, for example, man ls.
Man pages are displayed directly in the shell. To navigate them, move up
and down with Page ↑ and
Page ↓. Move between the beginning and the end of a
document with Home and End. End
this viewing mode by pressing Q. Learn more about the
man command itself with man man.
In the following overview, the individual command elements are written in
different typefaces. The actual command and its mandatory options are
always printed as command option. Specifications or
parameters that are not required are placed in [square
brackets].
Adjust the settings to your needs. It makes no sense to write ls
file if no file named file actually exists.
You can usually combine several parameters, for example, by writing
ls -la instead of ls -l -a.
13.12.1 File Commands #
The following section lists the most important commands for file management. It covers everything from general file administration to the manipulation of file system ACLs.
13.12.1.1 File Administration #
ls[options][files]If you run
lswithout any additional parameters, the program lists the contents of the current directory in short form.-lDetailed list
-aDisplays hidden files
cp[options]source targetCopies
sourcetotarget.- -i
Waits for confirmation, if necessary, before an existing
targetis overwritten- -r
Copies recursively (includes subdirectories)
mv[options]source targetCopies
sourcetotargetthen deletes the originalsource.- -b
Creates a backup copy of the
sourcebefore moving- -i
Waits for confirmation, if necessary, before an existing
targetfileis overwritten
rm[options]filesRemoves the specified files from the file system. Directories are not removed by
rmunless the option-ris used.-rDeletes any existing subdirectories
-iWaits for confirmation before deleting each file
ln[options]sourcetargetCreates an internal link from
sourcetotarget. Normally, such a link points directly tosourceon the same file system. However, iflnis executed with the-soption, it creates a symbolic link that only points to the directory in whichsourceis located, enabling linking across file systems.- -s
Creates a symbolic link
cd[options][directory]Changes the current directory.
cdwithout any parameters changes to the user's home directory.mkdir[options]directoryCreates a new directory.
rmdir[options]directoryDeletes the specified directory if it is already empty.
chown[options] username[:[group]]filesTransfers ownership of a file to the user with the specified username.
-RChanges files and directories in all subdirectories
chgrp[options]groupnamefilesTransfers the group ownership of a given
fileto the group with the specified group name. The file owner can change group ownership only if a member of both the current and the new group.chmod[options]modefilesChanges the access permissions.
The
modeparameter has three parts:group,access, andaccess type.groupaccepts the following characters:- u
User
- g
Group
- o
Others
For
access, grant access with+and deny it with-.The
access typeis controlled by the following options:- r
Read
- w
Write
- x
Execute—executing files or changing to the directory
- s
Setuid bit—the application or program is started as if it were started by the owner of the file
As an alternative, a numeric code can be used. The four digits of this code are composed of the sum of the values 4, 2, and 1—the decimal result of a binary mask. The first digit sets the set user ID (SUID) (4), the set group ID (2), and the sticky (1) bits. The second digit defines the permissions of the owner of the file. The third digit defines the permissions of the group members and the last digit sets the permissions for all other users. The read permission is set with 4, the write permission with 2, and the permission for executing a file is set with 1. The owner of a file would usually receive a 6 or a 7 for executable files.
gzip[parameters]filesThis program compresses the contents of files using complex mathematical algorithms. Files compressed in this way are given the extension
.gzand need to be uncompressed before they can be used. To compress several files or even entire directories, use thetarcommand.- -d
Decompresses the packed gzip files so they return to their original size and can be processed normally (like the command
gunzip)
taroptionsarchivefilestarputs one or more files into an archive. Compression is optional.taris a quite complex command with a number of options available. The most frequently used options are:-fWrites the output to a file and not to the screen as is usually the case
-cCreates a new tar archive
-rAdds files to an existing archive
-tOutputs the contents of an archive
-uAdds files, but only if they are newer than the files already contained in the archive
-xUnpacks files from an archive (extraction)
-zPacks the resulting archive with
gzip-jCompresses the resulting archive with
bzip2-vLists files processed
The archive files created by
tarend with.tar. If the tar archive was also compressed usinggzip, the ending is.tgzor.tar.gz. If it was compressed usingbzip2, the ending is.tar.bz2.locatepatternsThis command is only available if you have installed the
findutils-locatepackage. Thelocatecommand can find in which directory a specified file is located. If desired, use wild cards to specify filenames. The program is very fast, because it uses a database specifically created for the purpose (rather than searching through the entire file system). This very fact, however, also results in a major drawback: locate is unable to find any files created after the latest update of its database. The database can be generated byrootwithupdatedb.updatedb[options]This command performs an update of the database used by
locate. To include files in all existing directories, run the program asroot. It also makes sense to place it in the background by appending an ampersand (&), so you can immediately continue working on the same command line (updatedb &). This command usually runs as a daily cron job (seecron.daily).find[options]With
find, search for a file in a given directory. The first argument specifies the directory in which to start the search. The option-namemust be followed by a search string, which may also include wild cards. Unlikelocate, which uses a database,findscans the actual directory.
13.12.1.2 Commands to Access File Contents #
cat[options]filesThe
catcommand displays the contents of a file, printing the entire contents to the screen without interruption.- -n
Numbers the output on the left margin
less[options]filesThis command can be used to browse the contents of the specified file. Scroll half a screen page up or down with PgUp and PgDn or a full screen page down with Space. Jump to the beginning or end of a file using Home and End. Press Q to exit the program.
grep[options]searchstringfilesThe grep command finds a specific search string in the specified files. If the search string is found, the command displays the line in which
searchstringwas found along with the filename.-iIgnores case
-HOnly displays the names of the relevant files, but not the text lines
-nAdditionally displays the numbers of the lines in which it found a hit
-lOnly lists the files in which
searchstringdoes not occur
diff[options]file1file2The
diffcommand compares the contents of any two files. The output produced by the program lists all lines that do not match. This is frequently used by programmers who need only to send their program alterations and not the entire source code.-qOnly reports whether the two files differ
-uProduces a “unified” diff, which makes the output more readable
13.12.1.3 File Systems #
mount[options][device]mountpointThis command can be used to mount any data media, such as hard disks, CD-ROM drives, and other drives, to a directory of the Linux file system.
-rMount read-only
-t filesystemSpecify the file system, commonly
ext2for Linux hard disks,msdosfor MS-DOS media,vfatfor the Windows file system, andiso9660for CDs
For hard disks not defined in the file
/etc/fstab, the device type must also be specified. In this case, onlyrootcan mount it. If the file system needs to also be mounted by other users, enter the optionuserin the appropriate line in the/etc/fstabfile (separated by commas) and save this change. Further information is available in themount(1)man page.umount[options]mountpointThis command unmounts a mounted drive from the file system. To prevent data loss, run this command before taking a removable data medium from its drive. Normally, only
rootis allowed to run the commandsmountandumount. To enable other users to run these commands, edit the/etc/fstabfile to specify the optionuserfor the relevant drive.
13.12.2 System Commands #
The following section lists a few of the most important commands needed for retrieving system information and controlling processes and the network.
13.12.2.1 System Information #
df[options][directory]The
df(disk free) command, when used without any options, displays information about the total disk space, the disk space currently in use, and the free space on all the mounted drives. If a directory is specified, the information is limited to the drive on which that directory is located.-hShows the number of occupied blocks in gigabytes, megabytes, or kilobytes—in human-readable format
-TType of file system (ext2, nfs, etc.)
du[options][path]This command, when executed without any parameters, shows the total disk space occupied by files and subdirectories in the current directory.
-aDisplays the size of each individual file
-hOutput in human-readable form
-sDisplays only the calculated total size
free[options]The command
freedisplays information about RAM and swap space usage, showing the total and the used amount in both categories. See Book “Reference”, Chapter 15 “Special System Features”, Section 15.1.7 “The free Command” for more information.-bOutput in bytes
-kOutput in kilobytes
-mOutput in megabytes
date[options]This simple program displays the current system time. If run as
root, it can also be used to change the system time. Details about the program are available in the date(1) man page.
13.12.2.2 Processes #
top[options]topprovides a quick overview of the currently running processes. Press H to access a page that briefly explains the main options for customizing the program.ps[options][process_ID]If run without any options, this command displays a table of all your own programs or processes—those you started. The options for this command are not preceded by hyphen.
- aux
Displays a detailed list of all processes, independent of the owner
kill[options]process_IDUnfortunately, sometimes a program cannot be terminated in the normal way. In most cases, you should still be able to stop such a runaway program by executing the
killcommand, specifying the respective process ID (seetopandps).killsends a TERM signal that instructs the program to shut itself down. If this does not help, the following parameter can be used:- -9
Sends a KILL signal instead of a TERM signal, bringing the specified process to an end in almost all cases
killall[options]processnameThis command is similar to
kill, but uses the process name (instead of the process ID) as an argument, killing all processes with that name.
13.12.2.3 Network #
ping[options]hostname_or_IP addressThe
pingcommand is the standard tool for testing the basic functionality of TCP/IP networks. It sends a small data packet to the destination host, requesting an immediate reply. If this works,pingdisplays a message to that effect, which indicates that the network link is basically functioning.-cnumberDetermines the total number of packages to send and ends after they have been dispatched (by default, there is no limitation set)
-fflood ping: sends as many data packages as possible; a popular means, reserved for
root, to test networks-ivalueSpecifies the interval between two data packages in seconds (default: one second)
host[options]hostname[server]The domain name system resolves domain names to IP addresses. With this tool, send queries to name servers (DNS servers).
ssh[options][user@]hostname[command]SSH is actually an Internet protocol that enables you to work on remote hosts across a network. SSH is also the name of a Linux program that uses this protocol to enable operations on remote computers.
13.12.2.4 Miscellaneous #
passwd[options][username]Users may change their own passwords at any time using this command. The administrator
rootcan use the command to change the password of any user on the system.su[options][username]The
sucommand makes it possible to log in under a different username from a running session. Specify a username and the corresponding password. The password is not required fromroot, becauserootis authorized to assume the identity of any user. When using the command without specifying a username, you are prompted for therootpassword and change to the superuser (root). Usesu -to start a login shell for a different user.halt[options]To avoid loss of data, you should always use this program to shut down your system.
reboot[options]Does the same as
haltexcept the system performs an immediate reboot.clearThis command cleans up the visible area of the console. It has no options.
13.12.3 For More Information #
There are many more commands than listed in this chapter. For information about other commands or more detailed information, the O'Reilly publication Linux in a Nutshell is recommended.
14 Bash and Bash Scripts #
Abstract#
These days many people use computers with a graphical user interface (GUI) like GNOME. Although they offer lots of features, their use is limited when it comes to the execution of automated tasks. Shells are a good addition to GUIs and this chapter gives you an overview of some aspects of shells, in this case Bash.
14.1 What is “The Shell”? #
Traditionally, the shell is Bash (Bourne again Shell). When this chapter speaks about “the shell” it means Bash. There are actually more available shells than Bash (ash, csh, ksh, zsh, …), each employing different features and characteristics. If you need further information about other shells, search for shell in YaST.
14.1.1 Knowing The Bash Configuration Files #
A shell can be invoked as an:
Interactive login shell. This is used when logging in to a machine, invoking Bash with the
--loginoption or when logging in to a remote machine with SSH.“Ordinary” interactive shell. This is normally the case when starting xterm, konsole, gnome-terminal or similar tools.
Non-interactive shell. This is used when invoking a shell script at the command line.
Depending on which type of shell you use, different configuration files are being read. The following tables show the login and non-login shell configuration files.
Table 14.1: Bash Configuration Files for Login Shells #
|
File |
Description |
|---|---|
|
|
Do not modify this file, otherwise your modifications can be destroyed during your next update! |
|
|
Use this file if you extend |
|
|
Contains system-wide configuration files for specific programs |
|
|
Insert user specific configuration for login shells here |
Table 14.2: Bash Configuration Files for Non-Login Shells #
|
|
Do not modify this file, otherwise your modifications can be destroyed during your next update! |
|
|
Use this file to insert your system-wide modifications for Bash only |
|
|
Insert user specific configuration here |
Additionally, Bash uses some more files:
Table 14.3: Special Files for Bash #
|
File |
Description |
|---|---|
|
|
Contains a list of all commands you have been typing |
|
|
Executed when logging out |
14.1.2 The Directory Structure #
The following table provides a short overview of the most important higher-level directories that you find on a Linux system. Find more detailed information about the directories and important subdirectories in the following list.
Table 14.4: Overview of a Standard Directory Tree #
|
Directory |
Contents |
|---|---|
|
|
Root directory—the starting point of the directory tree. |
|
|
Essential binary files, such as commands that are needed by both the system administrator and normal users. Usually also contains the shells, such as Bash. |
|
|
Static files of the boot loader. |
|
|
Files needed to access host-specific devices. |
|
|
Host-specific system configuration files. |
|
|
Holds the home directories of all users who have accounts on the
system. However, |
|
|
Essential shared libraries and kernel modules. |
|
|
Mount points for removable media. |
|
|
Mount point for temporarily mounting a file system. |
|
|
Add-on application software packages. |
|
|
Home directory for the superuser |
|
|
Essential system binaries. |
|
|
Data for services provided by the system. |
|
|
Temporary files. |
|
|
Secondary hierarchy with read-only data. |
|
|
Variable data such as log files. |
|
|
Only available if you have both Microsoft Windows* and Linux installed on your system. Contains the Windows data. |
The following list provides more detailed information and gives some examples of which files and subdirectories can be found in the directories:
/binContains the basic shell commands that may be used both by
rootand by other users. These commands includels,mkdir,cp,mv,rmandrmdir./binalso contains Bash, the default shell in openSUSE Leap./bootContains data required for booting, such as the boot loader, the kernel, and other data that is used before the kernel begins executing user-mode programs.
/devHolds device files that represent hardware components.
/etcContains local configuration files that control the operation of programs like the X Window System. The
/etc/init.dsubdirectory contains LSB init scripts that can be executed during the boot process./home/usernameHolds the private data of every user who has an account on the system. The files located here can only be modified by their owner or by the system administrator. By default, your e-mail directory and personal desktop configuration are located here in the form of hidden files and directories, such as
.gconf/and.config.Note: Home Directory in a Network Environment
If you are working in a network environment, your home directory may be mapped to a directory in the file system other than
/home./libContains the essential shared libraries needed to boot the system and to run the commands in the root file system. The Windows equivalent for shared libraries are DLL files.
/mediaContains mount points for removable media, such as CD-ROMs, flash disks, and digital cameras (if they use USB).
/mediagenerally holds any type of drive except the hard disk of your system. As soon as your removable medium has been inserted or connected to the system and has been mounted, you can access it from here./mntThis directory provides a mount point for a temporarily mounted file system.
rootmay mount file systems here./optReserved for the installation of third-party software. Optional software and larger add-on program packages can be found here.
/rootHome directory for the
rootuser. The personal data ofrootis located here./runA tmpfs directory used by
systemdand various components./var/runis a symbolic link to/run./sbinAs the
sindicates, this directory holds utilities for the superuser./sbincontains the binaries essential for booting, restoring and recovering the system in addition to the binaries in/bin./srvHolds data for services provided by the system, such as FTP and HTTP.
/tmpThis directory is used by programs that require temporary storage of files.
Important: Cleaning up
/tmpat Boot TimeData stored in
/tmpare not guaranteed to survive a system reboot. It depends, for example, on settings in/etc/sysconfig/cron./usr/usrhas nothing to do with users, but is the acronym for Unix system resources. The data in/usris static, read-only data that can be shared among various hosts compliant with theFilesystem Hierarchy Standard(FHS). This directory contains all application programs including the graphical desktops such as GNOME and establishes a secondary hierarchy in the file system./usrholds several subdirectories, such as/usr/bin,/usr/sbin,/usr/local, and/usr/share/doc./usr/binContains generally accessible programs.
/usr/sbinContains programs reserved for the system administrator, such as repair functions.
/usr/localIn this directory the system administrator can install local, distribution-independent extensions.
/usr/share/docHolds various documentation files and the release notes for your system. In the
manualsubdirectory find an online version of this manual. If more than one language is installed, this directory may contain versions of the manuals for different languages.Under
packagesfind the documentation included in the software packages installed on your system. For every package, a subdirectory/usr/share/doc/packages/packagenameis created that often holds README files for the package and sometimes examples, configuration files or additional scripts.If HOWTOs are installed on your system
/usr/share/docalso holds thehowtosubdirectory in which to find additional documentation on many tasks related to the setup and operation of Linux software./varWhereas
/usrholds static, read-only data,/varis for data which is written during system operation and thus is variable data, such as log files or spooling data. For an overview of the most important log files you can find under/var/log/, refer to Table 16.1, “Log Files”./windowsOnly available if you have both Microsoft Windows and Linux installed on your system. Contains the Windows data available on the Windows partition of your system. Whether you can edit the data in this directory depends on the file system your Windows partition uses. If it is FAT32, you can open and edit the files in this directory. For NTFS, openSUSE Leap also includes write access support. However, the driver for the NTFS-3g file system has limited functionality.
14.2 Writing Shell Scripts #
Shell scripts are a convenient way of doing all sorts of tasks: collecting data, searching for a word or phrase in a text and many other useful things. The following example shows a small shell script that prints a text:
Example 14.1: A Shell Script Printing a Text #
#!/bin/sh 1
# Output the following line: 2
echo "Hello World" 3
Before you can run this script you need some prerequisites:
Every script should contain a Shebang line (this is already the case with our example above.) If a script does not have this line, you need to call the interpreter manually.
You can save the script wherever you want. However, it is a good idea to save it in a directory where the shell can find it. The search path in a shell is determined by the environment variable
PATH. Usually a normal user does not have write access to/usr/bin. Therefore it is recommended to save your scripts in the users' directory~/bin/. The above example gets the namehello.sh.The script needs executable permissions. Set the permissions with the following command:
chmod +x ~/bin/hello.sh
If you have fulfilled all of the above prerequisites, you can execute the script in the following ways:
As Absolute Path. The script can be executed with an absolute path. In our case, it is
~/bin/hello.sh.Everywhere. If the
PATHenvironment variable contains the directory where the script is located, you can execute the script withhello.sh.
14.3 Redirecting Command Events #
Each command can use three channels, either for input or output:
Standard Output. This is the default output channel. Whenever a command prints something, it uses the standard output channel.
Standard Input. If a command needs input from users or other commands, it uses this channel.
Standard Error. Commands use this channel for error reporting.
To redirect these channels, there are the following possibilities:
Command > FileSaves the output of the command into a file, an existing file will be deleted. For example, the
lscommand writes its output into the filelisting.txt:ls > listing.txt
Command >> FileAppends the output of the command to a file. For example, the
lscommand appends its output to the filelisting.txt:ls >> listing.txt
Command < FileReads the file as input for the given command. For example, the
readcommand reads in the content of the file into the variable:read a < foo
Command1 | Command2Redirects the output of the left command as input for the right command. For example, the
catcommand outputs the content of the/proc/cpuinfofile. This output is used bygrepto filter only those lines which containcpu:cat /proc/cpuinfo | grep cpu
Every channel has a file descriptor: 0 (zero) for
standard input, 1 for standard output and 2 for standard error. It is
allowed to insert this file descriptor before a
< or > character. For
example, the following line searches for a file starting with
foo, but suppresses its errors by redirecting it to
/dev/null:
find / -name "foo*" 2>/dev/null
14.4 Using Aliases #
An alias is a shortcut definition of one or more commands. The syntax for an alias is:
alias NAME=DEFINITION
For example, the following line defines an alias lt
which outputs a long listing (option -l), sorts it by
modification time (-t) and prints it in reverse order
while sorting (-r):
alias lt='ls -ltr'
To view all alias definitions, use alias. Remove your
alias with unalias and the corresponding alias name.
14.5 Using Variables in Bash #
A shell variable can be global or local. Global variables, or environment variables, can be accessed in all shells. In contrast, local variables are visible in the current shell only.
To view all environment variables, use the printenv
command. If you need to know the value of a variable, insert the name of
your variable as an argument:
printenv PATH
A variable, be it global or local, can also be viewed with
echo:
echo $PATH
To set a local variable, use a variable name followed by the equal sign, followed by the value:
PROJECT="SLED"
Do not insert spaces around the equal sign, otherwise you get an error.
To set an environment variable, use export:
export NAME="tux"
To remove a variable, use unset:
unset NAME
The following table contains some common environment variables which can be used in you shell scripts:
Table 14.5: Useful Environment Variables #
|
|
the home directory of the current user |
|
|
the current host name |
|
|
when a tool is localized, it uses the language from this environment
variable. English can also be set to |
|
|
the search path of the shell, a list of directories separated by colon |
|
|
specifies the normal prompt printed before each command |
|
|
specifies the secondary prompt printed when you execute a multi-line command |
|
|
current working directory |
|
|
the current user |
14.5.1 Using Argument Variables #
For example, if you have the script foo.sh you can
execute it like this:
foo.sh "Tux Penguin" 2000
To access all the arguments which are passed to your script, you need
positional parameters. These are $1 for the first
argument, $2 for the second, and so on. You can have up
to nine parameters. To get the script name, use $0.
The following script foo.sh prints all arguments from
1 to 4:
#!/bin/sh
echo \"$1\" \"$2\" \"$3\" \"$4\"
If you execute this script with the above arguments, you get:
"Tux Penguin" "2000" "" ""
14.5.2 Using Variable Substitution #
Variable substitutions apply a pattern to the content of a variable either from the left or right side. The following list contains the possible syntax forms:
${VAR#pattern}removes the shortest possible match from the left:
file=/home/tux/book/book.tar.bz2 echo ${file#*/} home/tux/book/book.tar.bz2${VAR##pattern}removes the longest possible match from the left:
file=/home/tux/book/book.tar.bz2 echo ${file##*/} book.tar.bz2${VAR%pattern}removes the shortest possible match from the right:
file=/home/tux/book/book.tar.bz2 echo ${file%.*} /home/tux/book/book.tar${VAR%%pattern}removes the longest possible match from the right:
file=/home/tux/book/book.tar.bz2 echo ${file%%.*} /home/tux/book/book${VAR/pattern_1/pattern_2}substitutes the content of VAR from the pattern_1 with pattern_2:
file=/home/tux/book/book.tar.bz2
echo ${file/tux/wilber}
/home/wilber/book/book.tar.bz2
14.6 Grouping And Combining Commands #
Shells allow you to concatenate and group commands for conditional execution. Each command returns an exit code which determines the success or failure of its operation. If it is 0 (zero) the command was successful, everything else marks an error which is specific to the command.
The following list shows, how commands can be grouped:
Command1 ; Command2executes the commands in sequential order. The exit code is not checked. The following line displays the content of the file with
catand then prints its file properties withlsregardless of their exit codes:cat filelist.txt ; ls -l filelist.txt
Command1 && Command2runs the right command, if the left command was successful (logical AND). The following line displays the content of the file and prints its file properties only, when the previous command was successful (compare it with the previous entry in this list):
cat filelist.txt && ls -l filelist.txt
Command1 || Command2runs the right command, when the left command has failed (logical OR). The following line creates only a directory in
/home/wilber/barwhen the creation of the directory in/home/tux/foohas failed:mkdir /home/tux/foo || mkdir /home/wilber/bar
funcname(){ ... }creates a shell function. You can use the positional parameters to access its arguments. The following line defines the function
helloto print a short message:hello() { echo "Hello $1"; }You can call this function like this:
hello Tux
which prints:
Hello Tux
14.7 Working with Common Flow Constructs #
To control the flow of your script, a shell has while,
if, for and case
constructs.
14.7.1 The if Control Command #
The if command is used to check expressions. For
example, the following code tests whether the current user is Tux:
if test $USER = "tux"; then
  echo "Hello Tux."
else
  echo "You are not Tux."
fi
The test expression can be as complex or simple as possible. The
following expression checks if the file foo.txt
exists:
if test -e /tmp/foo.txt ; then
  echo "Found foo.txt"
fi
The test expression can also be abbreviated in angled brackets:
if [ -e /tmp/foo.txt ] ; then
  echo "Found foo.txt"
fi
Find more useful expressions at http://www.cyberciti.biz/nixcraft/linux/docs/uniqlinuxfeatures/lsst/ch03sec02.html.
14.7.2 Creating Loops With the For Command #
The for loop allows you to execute commands to a list
of entries. For example, the following code prints some information
about PNG files in the current directory:
for i in *.png; do
 ls -l $i
done
14.8 For More Information #
Important information about Bash is provided in the man pages
man bash. More about this topic can be found in the
following list:
http://tldp.org/LDP/Bash-Beginners-Guide/html/index.html—Bash Guide for Beginners
http://tldp.org/HOWTO/Bash-Prog-Intro-HOWTO.html—BASH Programming - Introduction HOW-TO
http://tldp.org/LDP/abs/html/index.html—Advanced Bash-Scripting Guide
http://www.grymoire.com/Unix/Sh.html—Sh - the Bourne Shell
Part V Help and Troubleshooting #
- 15 Help and Documentation
openSUSE® Leap comes with various sources of information and documentation, many of which are already integrated into your installed system.
- 16 Common Problems and Their Solutions
This chapter describes a range of potential problems and their solutions. Even if your situation is not precisely listed here, there may be one similar enough to offer hints to the solution of your problem.
15 Help and Documentation #
openSUSE® Leap comes with various sources of information and documentation, many of which are already integrated into your installed system.
- Documentation in
/usr/share/doc This traditional help directory holds various documentation files and release notes for your system. It contains also information of installed packages in the subdirectory
packages. Find more detailed information in Section 15.1, “Documentation Directory”.- Man Pages and Info Pages for Shell Commands
When working with the shell, you do not need to know the options of the commands by heart. Traditionally, the shell provides integrated help by means of man pages and info pages. Read more in Section 15.2, “Man Pages” and Section 15.3, “Info Pages”.
- Desktop Help Center
The help center of the GNOME desktop (Help) provides central access to the most important documentation resources on your system in searchable form. These resources include online help for installed applications, man pages, info pages, and the SUSE manuals delivered with your product.
- Separate Help Packages for Some Applications
When installing new software with YaST, the software documentation is installed automatically (in most cases) and usually appears in the help center of your desktop. However, some applications, such as GIMP, may have different online help packages that can be installed separately with YaST and do not integrate into the help centers.
15.1 Documentation Directory #
The traditional directory to find documentation on your
installed Linux system is /usr/share/doc. Usually,
the directory contains information about the packages installed on your
system, plus release notes, manuals, and more.
Note: Contents Depends on Installed Packages
In the Linux world, many manuals and other kinds of documentation are
available in the form of packages, like software. How much and which
information you find in /usr/share/docs also
depends on the (documentation) packages installed. If you cannot find
the subdirectories mentioned here, check if the respective packages are
installed on your system and add them with YaST, if needed.
15.1.1 SUSE Manuals #
We provide HTML and PDF versions of our books in different
languages. In the manual subdirectory, find HTML
versions of most of the SUSE manuals available for your product.
For an overview of all documentation available for your product refer to
the preface of the manuals.
If more than one language is installed,
/usr/share/doc/manual may contain different
language versions of the manuals. The HTML versions of the SUSE
manuals are also available in the help center of both desktops. For
information on where to find the PDF and HTML versions of the books on
your installation media, refer to the openSUSE Leap Release Notes.
They are available on your installed system under
/usr/share/doc/release-notes/ or online at your
product-specific Web page at
http://www.suse.com/doc/.
15.1.2 Package Documentation #
Under packages, find the documentation
that is included in the software packages installed on your system. For
every package, a subdirectory
/usr/share/doc/packages/packagename
is created. It often contains README files for the package and sometimes
examples, configuration files, or additional scripts. The following list
introduces typical files to be found under
/usr/share/doc/packages. None of these entries are
mandatory and many packages might only include a few of them.
AUTHORSList of the main developers.
BUGSKnown bugs or malfunctions. Might also contain a link to a Bugzilla Web page where you can search all bugs.
CHANGES,ChangeLogSummary of changes from version to version. Usually interesting for developers, because it is very detailed.
COPYING,LICENSELicensing information.
FAQQuestion and answers collected from mailing lists or newsgroups.
INSTALLHow to install this package on your system. As the package is already installed by the time you get to read this file, you can safely ignore the contents of this file.
README,README.*General information on the software. For example, for what purpose and how to use it.
TODOThings that are not implemented yet, but probably will be in the future.
MANIFESTList of files with a brief summary.
NEWSDescription of what is new in this version.
15.2 Man Pages #
Man pages are an essential part of any Linux system. They explain the
usage of a command and all available options and parameters. Man pages
can be accessed with man followed by the name of the
command, for example, man ls.
Man pages are displayed directly in the shell. To navigate them, move up
and down with Page ↑ and
Page ↓. Move between the beginning and the end of
a document with Home and End.
End this viewing mode by pressing Q. Learn more about
the man command itself with man
man. Man pages are sorted in categories as shown in
Table 15.1, “Man Pages—Categories and Descriptions” (taken from the man page for man
itself).
Table 15.1: Man Pages—Categories and Descriptions #
|
Number |
Description |
|---|---|
|
1 |
Executable programs or shell commands |
|
2 |
System calls (functions provided by the Kernel) |
|
3 |
Library calls (functions within program libraries) |
|
4 |
Special files (usually found in |
|
5 |
File formats and conventions ( |
|
6 |
Games |
|
7 |
Miscellaneous (including macro packages and conventions), for example, man(7), groff(7) |
|
8 |
System administration commands (usually only for |
|
9 |
Kernel routines (nonstandard) |
Each man page consists of several parts labeled NAME , SYNOPSIS , DESCRIPTION , SEE ALSO , LICENSING , and AUTHOR . There may be additional sections available depending on the type of command.
15.3 Info Pages #
Info pages are another important source of information on your system.
Usually, they are more detailed than man pages. They consist of more than
command line options and contain sometimes whole tutorials or reference
documentation. To view the info page for a certain command, enter
info followed by the name of the command, for example,
info ls. You can browse an info page with a viewer
directly in the shell and display the different sections, called
“nodes”. Use Space to move forward and
<— to move backwards. Within a node, you can
also browse with Page ↑ and
Page ↓ but only Space and
<— will take you also to the previous or
subsequent node. Press Q to end the viewing mode. Not
every command comes with an info page and vice versa.
15.4 Online Resources #
In addition to the online versions of the SUSE manuals installed
under /usr/share/doc, you can also access the
product-specific manuals and documentation on the Web. For an overview of
all documentation available for openSUSE Leap check out your
product-specific documentation Web page at
http://www.suse.com/doc/.
If you are searching for additional product-related information, you can also refer to the following Web sites:
- SUSE Technical Support
The SUSE Technical Support can be found at http://www.suse.com/support/ if you have questions or need solutions for technical problems.
- SUSE Forums
There are several forums where you can dive in on discussions about SUSE products. See http://forums.suse.com/ for a list.
- SUSE Conversations
An online community, which offers articles, tips, Q and A, and free tools to download: http://www.suse.com/communities/conversations/
- GNOME Documentation
Documentation for GNOME users, administrators and developers is available at http://library.gnome.org/.
- The Linux Documentation Project
The Linux Documentation Project (TLDP) is run by a team of volunteers who write Linux-related documentation (see http://www.tldp.org). It is probably the most comprehensive documentation resource for Linux. The set of documents contains tutorials for beginners, but is mainly focused on experienced users and professional system administrators. TLDP publishes HOWTOs, FAQs, and guides (handbooks) under a free license. Parts of the documentation from TLDP is also available on openSUSE Leap.
You can also try general-purpose search engines. For example, use the
search terms Linux CD-RW help or OpenOffice
file conversion problem if you have trouble with burning CDs or
LibreOffice file conversion.
16 Common Problems and Their Solutions #
This chapter describes a range of potential problems and their solutions. Even if your situation is not precisely listed here, there may be one similar enough to offer hints to the solution of your problem.
16.1 Finding and Gathering Information #
Linux reports things in a very detailed way. There are several places to look when you encounter problems with your system, most of which are standard to Linux systems in general, and some are relevant to openSUSE Leap systems. Most log files can be viewed with YaST ( › ).
YaST offers the possibility to collect all system information needed by the support team. Use › and select the problem category. When all information is gathered, attach it to your support request.
A list of the most frequently checked log files follows with the
description of their typical purpose. Paths containing
~ refer to the current user's home directory.
Table 16.1: Log Files #
|
Log File |
Description |
|---|---|
|
|
Messages from the desktop applications currently running. |
|
|
Log files from AppArmor, see Book “Security Guide” for detailed information. |
|
|
Log file from Audit to track any access to files, directories, or resources of your system, and trace system calls. See Book “Security Guide” for detailed information. |
|
|
Messages from the mail system. |
|
|
Log file from NetworkManager to collect problems with network connectivity |
|
|
Directory containing Samba server and client log messages. |
|
|
All messages from the kernel and system log daemon with the “warning” level or higher. |
|
|
Binary file containing user login records for the current machine
session. View it with |
|
|
Various start-up and runtime log files from the X Window System. It is useful for debugging failed X start-ups. |
|
|
Directory containing YaST's actions and their results. |
|
|
Log file of Zypper. |
Apart from log files, your machine also supplies you with information
about the running system. See
Table 16.2: System Information With the /proc File System
Table 16.2: System Information With the /proc File System #
|
File |
Description |
|---|---|
|
|
Contains processor information, including its type, make, model, and performance. |
|
|
Shows which DMA channels are currently being used. |
|
|
Shows which interrupts are in use, and how many of each have been in use. |
|
|
Displays the status of I/O (input/output) memory. |
|
|
Shows which I/O ports are in use at the moment. |
|
|
Displays memory status. |
|
|
Displays the individual modules. |
|
|
Displays devices currently mounted. |
|
|
Shows the partitioning of all hard disks. |
|
|
Displays the current version of Linux. |
Apart from the /proc file system, the Linux kernel
exports information with the sysfs module, an
in-memory file system. This module represents kernel objects, their
attributes and relationships. For more information about
sysfs, see the context of udev in
Book “Reference”, Chapter 16 “Dynamic Kernel Device Management with udev”.
Table 16.3
contains an overview of the most common directories under
/sys.
Table 16.3: System Information With the /sys File System #
|
File |
Description |
|---|---|
|
|
Contains subdirectories for each block device discovered in the system. Generally, these are mostly disk type devices. |
|
|
Contains subdirectories for each physical bus type. |
|
|
Contains subdirectories grouped together as a functional types of devices (like graphics, net, printer, etc.) |
|
|
Contains the global device hierarchy. |
Linux comes with several tools for system analysis and monitoring. See Book “System Analysis and Tuning Guide”, Chapter 2 “System Monitoring Utilities” for a selection of the most important ones used in system diagnostics.
Each of the following scenarios begins with a header describing the problem followed by a paragraph or two offering suggested solutions, available references for more detailed solutions, and cross-references to other scenarios that are related.
16.2 Installation Problems #
Installation problems are situations when a machine fails to install. It may fail entirely or it may not be able to start the graphical installer. This section highlights some of the typical problems you may run into, and offers possible solutions or workarounds for these kinds of situations.
16.2.1 Checking Media #
If you encounter any problems using the openSUSE Leap installation media, check the integrity of your installation media. Boot from the media and choose from the boot menu. In a running system, start YaST and choose › . To check the openSUSE Leap medium, insert it into the drive and click in the screen of YaST. This may take several minutes. If errors are detected, do not use this medium for installation. Media problems may occur when having burned the medium yourself. Burning the media at a low speed (4x) helps to avoid problems.
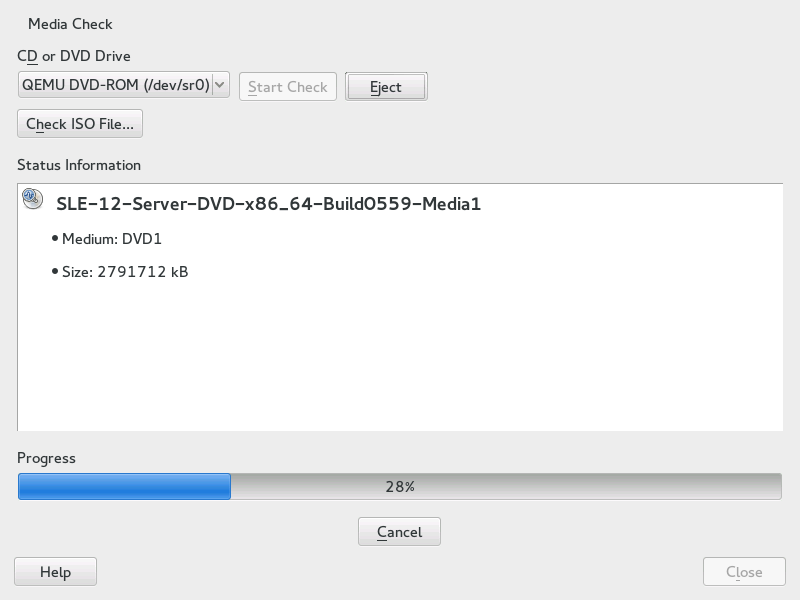
Figure 16.1: Checking Media #
16.2.2 No Bootable DVD Drive Available #
If your computer does not contain a bootable DVD-ROM drive or if the one you have is not supported by Linux, there are several options you can install your machine without a built-in DVD drive:
- Using an External Boot Device
If it is supported by your BIOS and the installation kernel, boot from external DVD drives or USB storage devices. Refer to Section 2.2.1, “PC (x86_64): System Start-up” for instructions on how to create a bootable USB storage device.
- Network Boot via PXE
If a machine lacks a DVD drive, but provides a working Ethernet connection, perform a completely network-based installation.
16.2.2.1 External Boot Devices #
Linux supports most existing DVD drives. If the system has no DVD drive, it is still possible that an external DVD drive, connected through USB, FireWire, or SCSI, can be used to boot the system. This depends mainly on the interaction of the BIOS and the hardware used. Sometimes a BIOS update may help if you encounter problems.
When installing from a Live CD, you can also create a “Live flash disk” to boot from.
16.2.3 Booting from Installation Media Fails #
One reason a machine does not boot the installation media can be an incorrect boot sequence setting in BIOS. The BIOS boot sequence must have DVD drive set as the first entry for booting. Otherwise the machine would try to boot from another medium, typically the hard disk. Guidance for changing the BIOS boot sequence can be found the documentation provided with your mainboard, or in the following paragraphs.
The BIOS is the software that enables the very basic functions of a computer. Motherboard vendors provide a BIOS specifically made for their hardware. Normally, the BIOS setup can only be accessed at a specific time—when the machine is booting. During this initialization phase, the machine performs several diagnostic hardware tests. One of them is a memory check, indicated by a memory counter. When the counter appears, look for a line, usually below the counter or somewhere at the bottom, mentioning the key to press to access the BIOS setup. Usually the key to press is one of Del, F1, or Esc. Press this key until the BIOS setup screen appears.
Procedure 16.1: Changing the BIOS Boot Sequence #
Enter the BIOS using the proper key as announced by the boot routines and wait for the BIOS screen to appear.
To change the boot sequence in an AWARD BIOS, look for the entry. Other manufacturers may have a different name for this, such as . When you have found the entry, select it and confirm with Enter.
In the screen that opens, look for a subentry called or . Change the settings by pressing Page ↑ or Page ↓ until the DVD drive is listed first.
Leave the BIOS setup screen by pressing Esc. To save the changes, select , or press F10. To confirm that your settings should be saved, press Y.
Procedure 16.2: Changing the Boot Sequence in an SCSI BIOS (Adaptec Host Adapter) #
Open the setup by pressing Ctrl–A.
Select . The connected hardware components are now displayed.
Make note of the SCSI ID of your DVD drive.
Exit the menu with Esc.
Open . Under , select and press Enter.
Enter the ID of the DVD drive and press Enter again.
Press Esc twice to return to the start screen of the SCSI BIOS.
Exit this screen and confirm with to boot the computer.
Regardless of what language and keyboard layout your final installation will be using, most BIOS configurations use the US keyboard layout as depicted in the following figure:
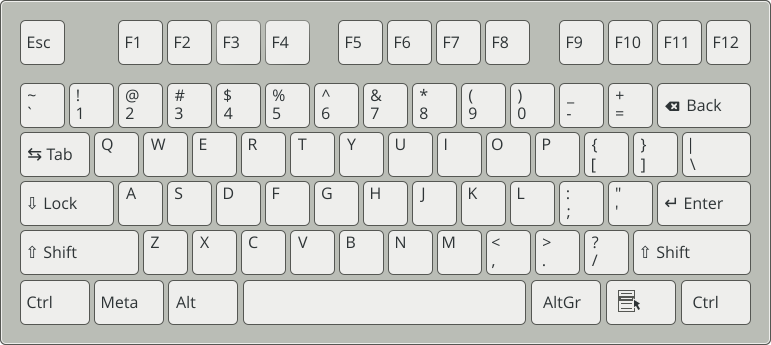
Figure 16.2: US Keyboard Layout #
16.2.4 Fails to Boot #
Some hardware types, mainly very old or very recent ones, fail to install. Often this may happen because support for this type of hardware is missing in the installation kernel, or because of certain functionality included in this kernel, such as ACPI, that can still cause problems on some hardware.
If your system fails to install using the standard mode from the first installation boot screen, try the following:
With the DVD still in the drive, reboot the machine with Ctrl–Alt–Del or using the hardware reset button.
When the boot screen appears, press F5, use the arrow keys of your keyboard to navigate to and press Enter to launch the boot and installation process. This option disables the support for ACPI power management techniques.
Proceed with the installation as described in Chapter 2, Installation with YaST.
If this fails, proceed as above, but choose instead. This option disables ACPI and DMA support. Most hardware will boot with this option.
If both of these options fail, use the boot options prompt to pass any
additional parameters needed to support this type of hardware to the
installation kernel. For more information about the parameters available
as boot options, refer to the kernel documentation located in
/usr/src/linux/Documentation/kernel-parameters.txt.
Tip: Obtaining Kernel Documentation
Install the kernel-source
package to view the kernel documentation.
There are various other ACPI-related kernel parameters that can be entered at the boot prompt prior to booting for installation:
acpi=offThis parameter disables the complete ACPI subsystem on your computer. This may be useful if your computer cannot handle ACPI or if you think ACPI in your computer causes trouble.
acpi=forceAlways enable ACPI even if your computer has an old BIOS dated before the year 2000. This parameter also enables ACPI if it is set in addition to
acpi=off.acpi=noirqDo not use ACPI for IRQ routing.
acpi=htRun only enough ACPI to enable hyper-threading.
acpi=strictBe less tolerant of platforms that are not strictly ACPI specification compliant.
pci=noacpiDisable PCI IRQ routing of the new ACPI system.
pnpacpi=offThis option is for serial or parallel problems when your BIOS setup contains wrong interrupts or ports.
notscDisable the time stamp counter. This option can be used to work around timing problems on your systems. It is a recent feature, if you see regressions on your machine, especially time related or even total hangs, this option is worth a try.
nohz=offDisable the nohz feature. If your machine hangs, this option may help. Otherwise it is of no use.
Once you have determined the right parameter combination, YaST automatically writes them to the boot loader configuration to make sure that the system boots properly next time.
If unexplainable errors occur when the kernel is loaded or during the installation, select in the boot menu to check the memory. If returns an error, it is usually a hardware error.
16.2.5 Fails to Launch Graphical Installer #
After you insert the medium into your drive and reboot your machine, the installation screen comes up, but after you select , the graphical installer does not start.
There are several ways to deal with this situation:
Try to select another screen resolution for the installation dialogs.
Select for installation.
Do a remote installation via VNC using the graphical installer.
Procedure 16.3: Change Screen Resolution for Installation #
Boot for installation.
Press F3 to open a menu from which to select a lower resolution for installation purposes.
Select and proceed with the installation as described in Chapter 2, Installation with YaST.
Procedure 16.4: Installation in Text Mode #
Boot for installation.
Press F3 and select .
Select and proceed with the installation as described in Chapter 2, Installation with YaST.
Procedure 16.5: VNC Installation #
Boot for installation.
Enter the following text at the boot options prompt:
vnc=1 vncpassword=some_password
Replace some_password with the password to use for VNC installation.
Select then press Enter to start the installation.
Instead of starting right into the graphical installation routine, the system continues to run in a text mode, then halts, displaying a message containing the IP address and port number at which the installer can be reached via a browser interface or a VNC viewer application.
If using a browser to access the installer, launch the browser and enter the address information provided by the installation routines on the future openSUSE Leap machine and press Enter:
http://ip_address_of_machine:5801
A dialog opens in the browser window prompting you for the VNC password. Enter it and proceed with the installation as described in Chapter 2, Installation with YaST.
Important: Cross-platform Support
Installation via VNC works with any browser under any operating system, provided Java support is enabled.
Provide the IP address and password to your VNC viewer when prompted. A window opens, displaying the installation dialogs. Proceed with the installation as usual.
16.2.6 Only Minimalistic Boot Screen Started #
You inserted the medium into the drive, the BIOS routines are finished, but the system does not start with the graphical boot screen. Instead it launches a very minimalistic text-based interface. This may happen on any machine not providing sufficient graphics memory for rendering a graphical boot screen.
Although the text boot screen looks minimalistic, it provides nearly the same functionality as the graphical one:
- Boot Options
Unlike the graphical interface, the different boot options cannot be selected using the cursor keys of your keyboard. The boot menu of the text mode boot screen offers some keywords to enter at the boot prompt. These keywords map to the options offered in the graphical version. Enter your choice and press Enter to launch the boot process.
- Custom Boot Options
After selecting a boot option, enter the appropriate keyword at the boot prompt or enter some custom boot options as described in Section 16.2.4, “Fails to Boot”. To launch the installation process, press Enter.
- Screen Resolutions
Use the F keys to determine the screen resolution for installation. If you need to boot in text mode, choose F3.
16.3 Boot Problems #
Boot problems are situations when your system does not boot properly (does not boot to the expected target and login screen).
16.3.1 Fails to Load the GRUB 2 Boot Loader #
If the hardware is functioning properly, it is possible that the boot loader is corrupted and Linux cannot start on the machine. In this case, it is necessary to repair the boot loader. To do so, you need to start the Rescue System as described in Section 16.6.2, “Using the Rescue System” and follow the instructions in Section 16.6.2.4, “Modifying and Re-installing the Boot Loader”.
Other reasons for the machine not booting may be BIOS-related:
- BIOS Settings
Check your BIOS for references to your hard disk. GRUB 2 may simply not be started if the hard disk itself cannot be found with the current BIOS settings.
- BIOS Boot Order
Check whether your system's boot order includes the hard disk. If the hard disk option was not enabled, your system may install properly, but fails to boot when access to the hard disk is required.
16.3.2 No Login or Prompt Appears #
This behavior typically occurs after a failed kernel upgrade and it is known as a kernel panic because of the type of error on the system console that sometimes can be seen at the final stage of the process. If, in fact, the machine has just been rebooted following a software update, the immediate goal is to reboot it using the old, proven version of the Linux kernel and associated files. This can be done in the GRUB 2 boot loader screen during the boot process as follows:
Reboot the computer using the reset button, or switch it off and on again.
When the GRUB 2 boot screen becomes visible, select the entry and choose the previous kernel from the menu. The machine will boot using the prior version of the kernel and its associated files.
After the boot process has completed, remove the newly installed kernel and, if necessary, set the default boot entry to the old kernel using the YaST module. For more information refer to Book “Reference”, Chapter 12 “The Boot Loader GRUB 2”, Section 12.3 “Configuring the Boot Loader with YaST”. However, doing this is probably not necessary because automated update tools normally modify it for you during the rollback process.
Reboot.
If this does not fix the problem, boot the computer using the installation media. After the machine has booted, continue with Step 3.
16.3.3 No Graphical Login #
If the machine comes up, but does not boot into the graphical login
manager, anticipate problems either with the choice of the default
systemd target or the configuration of the X Window System. To check the
current systemd default target run the command sudo systemctl
get-default. If the value returned is not
graphical.target, run the command sudo
systemctl isolate graphical.target. If the graphical login
screen starts, log in and start › › and set the
to . From now on the system should boot into the
graphical login screen.
If the graphical login screen does not start even if having booted or
switched to the graphical target, your desktop or X Window software is
probably misconfigured or corrupted. Examine the log files at
/var/log/Xorg.*.log for detailed messages from the
X server as it attempted to start. If the desktop fails during start, it
may log error messages to the system journal that can be queried with
the command journalctl (see
Book “Reference”, Chapter 11 “journalctl: Query the systemd Journal” for more information).. If these error
messages hint at a configuration problem in the X server, try to fix
these issues. If the graphical system still does not come up, consider
reinstalling the graphical desktop.
16.3.4 Root Btrfs Partition Cannot be Mounted #
If a btrfs root partition
becomes corrupted, try the following options:
Mount the partition with the
-o recoveryoption.If that fails, run
btrfs-zero-logon your root partition.
16.4 Login Problems #
Login problems are those where your machine does, in fact, boot to the expected welcome screen or login prompt, but refuses to accept the user name and password, or accepts them but then does not behave properly (fails to start the graphic desktop, produces errors, drops to a command line, etc.).
16.4.1 Valid User Name and Password Combinations Fail #
This usually occurs when the system is configured to use network
authentication or directory services and, for some reason, is unable to
retrieve results from its configured servers. The
root user, as the only local
user, is the only user that can still log in to these machines. The
following are some common reasons a machine appears functional but
is unable to process logins correctly:
The network is not working. For further directions on this, turn to Section 16.5, “Network Problems”.
DNS is not working at the moment (which prevents GNOME from working and the system from making validated requests to secure servers). One indication that this is the case is that the machine takes an extremely long time to respond to any action. Find more information about this topic in Section 16.5, “Network Problems”.
If the system is configured to use Kerberos, the system's local time may have drifted past the accepted variance with the Kerberos server time (this is typically 300 seconds). If NTP (network time protocol) is not working properly or local NTP servers are not working, Kerberos authentication ceases to function because it depends on common clock synchronization across the network.
The system's authentication configuration is misconfigured. Check the PAM configuration files involved for any typographical errors or misordering of directives. For additional background information about PAM and the syntax of the configuration files involved, refer to Book “Security Guide”, Chapter 2 “Authentication with PAM”.
The home partition is encrypted. Find more information about this topic in Section 16.4.3, “Login to Encrypted Home Partition Fails”.
In all cases that do not involve external network problems, the solution is to reboot the system into single-user mode and repair the configuration before booting again into operating mode and attempting to log in again. To boot into single-user mode:
Reboot the system. The boot screen appears, offering a prompt.
Press Esc to exit the splash screen and get to the GRUB 2 text-based menu.
Press B to enter the GRUB 2 editor.
Add the following parameter to the line containing the Kernel parameters:
systemd.unit=rescue.target
Press F10.
Enter the user name and password for
root.Make all the necessary changes.
Boot into the full multiuser and network mode by entering
systemctl isolate graphical.targetat the command line.
16.4.2 Valid User Name and Password Not Accepted #
This is by far the most common problem users encounter, because there are many reasons this can occur. Depending on whether you use local user management and authentication or network authentication, login failures occur for different reasons.
Local user management can fail for the following reasons:
The user may have entered the wrong password.
The user's home directory containing the desktop configuration files is corrupted or write protected.
There may be problems with the X Window System authenticating this particular user, especially if the user's home directory has been used with another Linux distribution prior to installing the current one.
To locate the reason for a local login failure, proceed as follows:
Check whether the user remembered his password correctly before you start debugging the whole authentication mechanism. If the user may not remember his password correctly, use the YaST User Management module to change the user's password. Pay attention to the Caps Lock key and unlock it, if necessary.
Log in as
rootand check the system journal withjournalctl -efor error messages of the login process and of PAM.Try to log in from a console (using Ctrl–Alt–F1). If this is successful, the blame cannot be put on PAM, because it is possible to authenticate this user on this machine. Try to locate any problems with the X Window System or the GNOME desktop. For more information, refer to Section 16.4.4, “Login Successful but GNOME Desktop Fails”.
If the user's home directory has been used with another Linux distribution, remove the
Xauthorityfile in the user's home. Use a console login via Ctrl–Alt–F1 and runrm .Xauthorityas this user. This should eliminate X authentication problems for this user. Try graphical login again.If the desktop could not start because of corrupt configuration files, proceed with Section 16.4.4, “Login Successful but GNOME Desktop Fails”.
In the following, common reasons a network authentication for a particular user may fail on a specific machine are listed:
The user may have entered the wrong password.
The user name exists in the machine's local authentication files and is also provided by a network authentication system, causing conflicts.
The home directory exists but is corrupt or unavailable. Perhaps it is write protected or is on a server that is inaccessible at the moment.
The user does not have permission to log in to that particular host in the authentication system.
The machine has changed host names, for whatever reason, and the user does not have permission to log in to that host.
The machine cannot reach the authentication server or directory server that contains that user's information.
There may be problems with the X Window System authenticating this particular user, especially if the user's home has been used with another Linux distribution prior to installing the current one.
To locate the cause of the login failures with network authentication, proceed as follows:
Check whether the user remembered their password correctly before you start debugging the whole authentication mechanism.
Determine the directory server which the machine relies on for authentication and make sure that it is up and running and properly communicating with the other machines.
Determine that the user's user name and password work on other machines to make sure that his authentication data exists and is properly distributed.
See if another user can log in to the misbehaving machine. If another user can log in without difficulty or if
rootcan log in, log in and examine the system journal withjournalctl -e> file. Locate the time stamps that correspond to the login attempts and determine if PAM has produced any error messages.Try to log in from a console (using Ctrl–Alt–F1). If this is successful, the problem is not with PAM or the directory server on which the user's home is hosted, because it is possible to authenticate this user on this machine. Try to locate any problems with the X Window System or the GNOME desktop. For more information, refer to Section 16.4.4, “Login Successful but GNOME Desktop Fails”.
If the user's home directory has been used with another Linux distribution, remove the
Xauthorityfile in the user's home. Use a console login via Ctrl–Alt–F1 and runrm .Xauthorityas this user. This should eliminate X authentication problems for this user. Try graphical login again.If the desktop could not start because of corrupt configuration files, proceed with Section 16.4.4, “Login Successful but GNOME Desktop Fails”.
16.4.3 Login to Encrypted Home Partition Fails #
It is recommended to use an encrypted home partition for laptops. If you cannot log in to your laptop, the reason is usually simple: your partition could not be unlocked.
During the boot time, you need to enter the passphrase to unlock your encrypted partition. If you do not enter it, the boot process continues, leaving the partition locked.
To unlock your encrypted partition, proceed as follows:
Switch to the text console with Ctrl–Alt–F1.
Become
root.Restart the unlocking process again with:
systemctl restart home.mount
Enter your passphrase to unlock your encrypted partition.
Exit the text console and switch back to the login screen with Alt–F7.
Log in as usual.
16.4.4 Login Successful but GNOME Desktop Fails #
If this is the case, it is likely that your GNOME configuration files have become corrupted. Some symptoms may include the keyboard failing to work, the screen geometry becoming distorted, or even the screen coming up as a bare gray field. The important distinction is that if another user logs in, the machine works normally. It is then likely that the problem can be fixed relatively quickly by simply moving the user's GNOME configuration directory to a new location, which causes GNOME to initialize a new one. Although the user is forced to reconfigure GNOME, no data is lost.
Switch to a text console by pressing Ctrl–Alt–F1.
Log in with your user name.
Move the user's GNOME configuration directories to a temporary location:
mv .gconf  .gconf-ORIG-RECOVER
mv .gnome2 .gnome2-ORIG-RECOVER
Log out.
Log in again, but do not run any applications.
Recover your individual application configuration data (including the Evolution e-mail client data) by copying the
~/.gconf-ORIG-RECOVER/apps/directory back into the new~/.gconfdirectory as follows:cp -a .gconf-ORIG-RECOVER/apps .gconf/
If this causes the login problems, attempt to recover only the critical application data and reconfigure the remainder of the applications.
16.5 Network Problems #
Many problems of your system may be network-related, even though they do not seem to be at first. For example, the reason for a system not allowing users to log in may be a network problem of some kind. This section introduces a simple checklist you can apply to identify the cause of any network problem encountered.
Procedure 16.6: How to Identify Network Problems #
When checking the network connection of your machine, proceed as follows:
If you use an Ethernet connection, check the hardware first. Make sure that your network cable is properly plugged into your computer and router (or hub, etc.). The control lights next to your Ethernet connector are normally both be active.
If the connection fails, check whether your network cable works with another machine. If it does, your network card causes the failure. If hubs or switches are included in your network setup, they may be faulty, as well.
If using a wireless connection, check whether the wireless link can be established by other machines. If not, contact the wireless network's administrator.
Once you have checked your basic network connectivity, try to find out which service is not responding. Gather the address information of all network servers needed in your setup. Either look them up in the appropriate YaST module or ask your system administrator. The following list gives some of the typical network servers involved in a setup together with the symptoms of an outage.
- DNS (Name Service)
A broken or malfunctioning name service affects the network's functionality in many ways. If the local machine relies on any network servers for authentication and these servers cannot be found because of name resolution issues, users would not even be able to log in. Machines in the network managed by a broken name server would not be able to “see” each other and communicate.
- NTP (Time Service)
A malfunctioning or completely broken NTP service could affect Kerberos authentication and X server functionality.
- NFS (File Service)
If any application needs data stored in an NFS mounted directory, it will not be able to start or function properly if this service was down or misconfigured. In the worst case scenario, a user's personal desktop configuration would not come up if their home directory containing the
.gconfsubdirectory could not be found because of a faulty NFS server.- Samba (File Service)
If any application needs data stored in a directory on a faulty Samba server, it will not be able to start or function properly.
- NIS (User Management)
If your openSUSE Leap system relies on a faulty NIS server to provide the user data, users will not be able to log in to this machine.
- LDAP (User Management)
If your openSUSE Leap system relies on a faulty LDAP server to provide the user data, users will not be able to log in to this machine.
- Kerberos (Authentication)
Authentication will not work and login to any machine fails.
- CUPS (Network Printing)
Users cannot print.
Check whether the network servers are running and whether your network setup allows you to establish a connection:
Important: Limitations
The debugging procedure described below only applies to a simple network server/client setup that does not involve any internal routing. It assumes both server and client are members of the same subnet without the need for additional routing.
Use
pingIP address or host name (replace host name with the host name of the server) to check whether each one of them is up and responding to the network. If this command is successful, it tells you that the host you were looking for is up and running and that the name service for your network is configured correctly.If ping fails with
destination host unreachable, either your system or the desired server is not properly configured or down. Check whether your system is reachable by runningpingIP address or your_host_name from another machine. If you can reach your machine from another machine, it is the server that is not runningl or not configured correctly.If ping fails with
unknown host, the name service is not configured correctly or the host name used was incorrect. For further checks on this matter, refer to Step 4.b. If ping still fails, either your network card is not configured correctly or your network hardware is faulty.Use
hosthost name to check whether the host name of the server you are trying to connect to is properly translated into an IP address and vice versa. If this command returns the IP address of this host, the name service is up and running. If thehostcommand fails, check all network configuration files relating to name and address resolution on your host:/etc/resolv.confThis file is used to keep track of the name server and domain you are currently using. It can be modified manually or automatically adjusted by YaST or DHCP. Automatic adjustment is preferable. However, make sure that this file has the following structure and all network addresses and domain names are correct:
search fully_qualified_domain_name
nameserver ipaddress_of_nameserver
This file can contain more than one name server address, but at least one of them must be correct to provide name resolution to your host. If needed, adjust this file using the YaST Network Setting module (Hostname/DNS tab).
If your network connection is handled via DHCP, enable DHCP to change host name and name service information by selecting and in the YaST DNS and Hostname module.
/etc/nsswitch.confThis file tells Linux where to look for name service information. It should look like this:
 ...
hosts: files dns
networks: files dns
...
The
dnsentry is vital. It tells Linux to use an external name server. Normally, these entries are automatically managed by YaST, but it would be prudent to check.If all the relevant entries on the host are correct, let your system administrator check the DNS server configuration for the correct zone information. For detailed information about DNS, refer to Book “Reference”, Chapter 19 “The Domain Name System”. If you have made sure that the DNS configuration of your host and the DNS server are correct, proceed with checking the configuration of your network and network device.
If your system cannot establish a connection to a network server and you have excluded name service problems from the list of possible culprits, check the configuration of your network card.
Use the command
ip addr shownetwork_device to check whether this device was properly configured. Make sure that theinet addresswith the netmask (/mask) is configured correctly. An error in the IP address or a missing bit in your network mask would render your network configuration unusable. If necessary, perform this check on the server as well.If the name service and network hardware are properly configured and running, but some external network connections still get long time-outs or fail entirely, use
traceroutefully_qualified_domain_name (executed asroot) to track the network route these requests are taking. This command lists any gateway (hop) that a request from your machine passes on its way to its destination. It lists the response time of each hop and whether this hop is reachable. Use a combination of traceroute and ping to track down the culprit and let the administrators know.
Once you have identified the cause of your network trouble, you can resolve it yourself (if the problem is located on your machine) or let the system administrators of your network know about your findings so they can reconfigure the services or repair the necessary systems.
16.5.1 NetworkManager Problems #
If you have a problem with network connectivity, narrow it down as described in Procedure 16.6, “How to Identify Network Problems”. If NetworkManager seems to be the culprit, proceed as follows to get logs providing hints on why NetworkManager fails:
Open a shell and log in as
root.Restart the NetworkManager:
systemctl restart Network.Manager
Open a Web page, for example, http://www.opensuse.org as normal user to see, if you can connect.
Collect any information about the state of NetworkManager in
/var/log/NetworkManager.
For more information about NetworkManager, refer to Book “Reference”, Chapter 28 “Using NetworkManager”.
16.6 Data Problems #
Data problems are when the machine may or may not boot properly but, in either case, it is clear that there is data corruption on the system and that the system needs to be recovered. These situations call for a backup of your critical data, enabling you to recover the system state from before your system failed. openSUSE Leap offers dedicated YaST modules for system backup and restoration and a rescue system that can be used to recover a corrupted system from the outside.
16.6.1 Managing Partition Images #
Sometimes you need to perform a backup from an entire partition or even
hard disk. Linux comes with the dd tool which can
create an exact copy of your disk. Combined with gzip
you save some space.
Procedure 16.7: Backing up and Restoring Hard Disks #
Start a Shell as user
root.Select your source device. Typically this is something like
/dev/sda(labeled as SOURCE).Decide where you want to store your image (labeled as BACKUP_PATH). It must be different from your source device. In other words: if you make a backup from
/dev/sda, your image file must not to be stored under/dev/sda.Run the commands to create a compressed image file:
dd if=/dev/SOURCE | gzip > /BACKUP_PATH/image.gz
Restore the hard disk with the following commands:
gzip -dc /BACKUP_PATH/image.gz | dd of=/dev/SOURCE
If you only need a partition to backup, replace the SOURCE placeholder with your respective partition. In this case, your image file can lie on the same hard disk, but on a different partition.
16.6.2 Using the Rescue System #
There are several reasons a system could fail to come up and run properly. A corrupted file system following a system crash, corrupted configuration files, or a corrupted boot loader configuration are the most common ones.
To help you to resolve these situations, openSUSE Leap contains a rescue system that you can boot. The rescue system is a small Linux system that can be loaded into a RAM disk and mounted as root file system, allowing you to access your Linux partitions from the outside. Using the rescue system, you can recover or modify any important aspect of your system.
Manipulate any type of configuration file.
Check the file system for defects and start automatic repair processes.
Access the installed system in a “change root” environment.
Check, modify, and re-install the boot loader configuration.
Recover from a badly installed device driver or unusable kernel.
Resize partitions using the parted command. Find more information about this tool at the GNU Parted Web site http://www.gnu.org/software/parted/parted.html.
The rescue system can be loaded from various sources and locations. The simplest option is to boot the rescue system from the original installation medium.
If your hardware setup does not include a DVD drive, you can boot the
rescue system from a network source. The following example applies to a
remote boot scenario—if using another boot medium, such as a
DVD, modify the info file accordingly and boot as
you would for a normal installation.
Enter the configuration of your PXE boot setup and add the lines
install=protocol://instsourceandrescue=1. If you need to start the repair system, userepair=1instead. As with a normal installation, protocol stands for any of the supported network protocols (NFS, HTTP, FTP, etc.) and instsource for the path to your network installation source.Boot the system using “Wake on LAN”.
Enter
rootat theRescue:prompt. A password is not required.
Once you have entered the rescue system, you can use the virtual consoles that can be reached with Alt–F1 to Alt–F6.
A shell and many other useful utilities, such as the mount program, are
available in the /bin directory. The
/sbin directory contains important file and network
utilities for reviewing and repairing the file system. This directory also
contains the most important binaries for system maintenance, such as
fdisk, mkfs,
mkswap, mount, and
shutdown, as well as ip and
ss for maintaining the network. The directory
/usr/bin contains the vi editor, find, less, and SSH.
To see the system messages, either use the command
dmesg or view the system log with
journalctl.
16.6.2.1 Checking and Manipulating Configuration Files #
As an example for a configuration that might be fixed using the rescue system, imagine you have a broken configuration file that prevents the system from booting properly. You can fix this using the rescue system.
To manipulate a configuration file, proceed as follows:
Start the rescue system using one of the methods described above.
To mount a root file system located under
/dev/sda6to the rescue system, use the following command:mount /dev/sda6 /mnt
All directories of the system are now located under
/mntChange the directory to the mounted root file system:
cd /mnt
Open the problematic configuration file in the vi editor. Adjust and save the configuration.
Unmount the root file system from the rescue system:
umount /mnt
Reboot the machine.
16.6.2.2 Repairing and Checking File Systems #
Generally, file systems cannot be repaired on a running system. If you
encounter serious problems, you may not even be able to mount your root
file system and the system boot may end with a “kernel
panic”. In this case, the only way is to repair the system from
the outside. The system contains the utilities to check and repair the
btrfs, ext2,
ext3, ext4,
reiserfs, xfs,
dosfs, and vfat file systems. Look
for the command fsck.
FILESYSTEM, for example, if you need a file
system check for btrfs, use
fsck.btrfs.
16.6.2.3 Accessing the Installed System #
If you need to access the installed system from the rescue system, you need to do this in a change root environment. For example, to modify the boot loader configuration, or to execute a hardware configuration utility.
To set up a change root environment based on the installed system, proceed as follows:
Run
lsblkto check which node corresponds to the root partition. It is/dev/sda2in our example:lsblk NAME MAJ:MIN RM SIZE RO TYPE MOUNTPOINT sda 8:0 0 149,1G 0 disk ├─sda1 8:1 0 2G 0 part [SWAP] ├─sda2 8:2 0 20G 0 part / └─sda3 8:3 0 127G 0 part └─cr_home 254:0 0 127G 0 crypt /home
Mount the root partition from the installed system:
mount /dev/sda2 /mnt
Mount
/proc,/dev, and/syspartitions:mount -t proc none /mnt/proc mount –rbind /dev /mnt/dev mount –rbind /sys /mnt/sys
Now you can “change root” into the new environment, keeping the
bashshell:chroot /mnt /bin/bash
Finally, mount the remaining partitions from the installed system:
mount -a
Now you have access to the installed system. Before rebooting the system, unmount the partitions with
umount-aand leave the “change root” environment withexit.
Warning: Limitations
Although you have full access to the files and applications of the
installed system, there are some limitations. The kernel that is running
is the one that was booted with the rescue system, not with the change
root environment. It only supports essential hardware and it is not
possible to add kernel modules from the installed system unless the
kernel versions are identical. Always check the version of the
currently running (rescue) kernel with uname -r and
then find out if a matching subdirectory exists in the
/lib/modules directory in the change root
environment. If yes, you can use the installed modules, otherwise you
need to supply their correct versions on other media, such as a flash
disk. Most often the rescue kernel version differs from the installed
one — then you cannot simply access a sound card, for example.
It is also not possible to start a graphical user interface.
Also note that you leave the “change root” environment when you switch the console with Alt–F1 to Alt–F6.
16.6.2.4 Modifying and Re-installing the Boot Loader #
Sometimes a system cannot boot because the boot loader configuration is corrupted. The start-up routines cannot, for example, translate physical drives to the actual locations in the Linux file system without a working boot loader.
To check the boot loader configuration and re-install the boot loader, proceed as follows:
Perform the necessary steps to access the installed system as described in Section 16.6.2.3, “Accessing the Installed System”.
Check that the GRUB 2 boot loader is installed on the system. If not, install the package
grub2and rungrub2-install /dev/sda
Check whether the following files are correctly configured according to the GRUB 2 configuration principles outlined in Book “Reference”, Chapter 12 “The Boot Loader GRUB 2” and apply fixes if necessary.
/etc/default/grub/boot/grub2/device.map(optional file, only present if created manually)/boot/grub2/grub.cfg(this file is generated, do not edit)/etc/sysconfig/bootloader
Re-install the boot loader using the following command sequence:
grub2-mkconfig -o /boot/grub2/grub.cfg
Unmount the partitions, log out from the “change root” environment, and reboot the system:
umount -a
exit
reboot
16.6.2.5 Fixing Kernel Installation #
A kernel update may introduce a new bug which can impact the operation of your system. For example a driver for a piece of hardware in your system may be faulty, which prevents you from accessing and using it. In this case, revert to the last working kernel (if available on the system) or install the original kernel from the installation media.
Tip: How to Keep Last Kernels after Update
To prevent failures to boot after a faulty kernel update, use the kernel
multiversion feature and tell libzypp which
kernels you want to keep after the update.
For example to always keep the last two kernels and the currently running one, add
multiversion.kernels = latest,latest-1,running
to the /etc/zypp/zypp.conf file. See
Book “Reference”, Chapter 6 “Installing Multiple Kernel Versions” for more information.
A similar case is when you need to re-install or update a broken driver for a device not supported by openSUSE Leap. For example when a hardware vendor uses a specific device, such as a hardware RAID controller, which needs a binary driver to be recognized by the operating system. The vendor typically releases a Driver Update Disk (DUD) with the fixed or updated version of the required driver.
In both cases you need to access the installed system in the rescue mode and fix the kernel related problem, otherwise the system may fail to boot correctly:
Boot from the openSUSE Leap installation media.
If you are recovering after a faulty kernel update, skip this step. If you need to use a driver update disk (DUD), press F6 to load the driver update after the boot menu appears, and choose the path or URL to the driver update and confirm with .
Choose from the boot menu and press Enter. If you chose to use DUD, you will be asked to specify where the driver update is stored.
Enter
rootat theRescue:prompt. A password is not required.Manually mount the target system and “change root” into the new environment. For more information, see Section 16.6.2.3, “Accessing the Installed System”.
If using DUD, install/re-install/update the faulty device driver package. Always make sure the installed kernel version exactly matches the version of the driver you are installing.
If fixing faulty kernel update installation, you can install the original kernel from the installation media with the following procedure.
Identify your DVD device with
hwinfo --cdromand mount it withmount /dev/sr0 /mnt.Navigate to the directory where your kernel files are stored on the DVD, for example
cd /mnt/suse/x86_64/.Install required
kernel-*,kernel-*-base, andkernel-*-extrapackages of your flavor with therpm -icommand.
Update configuration files and reinitialize the boot loader if needed. For more information, see Section 16.6.2.4, “Modifying and Re-installing the Boot Loader”.
Remove any bootable media from the system drive and reboot.
A GNU Licenses #
This appendix contains the GNU Free Documentation License version 1.2.
GNU Free Documentation License #
Copyright (C) 2000, 2001, 2002 Free Software Foundation, Inc. 51 Franklin St, Fifth Floor, Boston, MA 02110-1301 USA. Everyone is permitted to copy and distribute verbatim copies of this license document, but changing it is not allowed.
0. PREAMBLE #
The purpose of this License is to make a manual, textbook, or other functional and useful document "free" in the sense of freedom: to assure everyone the effective freedom to copy and redistribute it, with or without modifying it, either commercially or non-commercially. Secondarily, this License preserves for the author and publisher a way to get credit for their work, while not being considered responsible for modifications made by others.
This License is a kind of "copyleft", which means that derivative works of the document must themselves be free in the same sense. It complements the GNU General Public License, which is a copyleft license designed for free software.
We have designed this License to use it for manuals for free software, because free software needs free documentation: a free program should come with manuals providing the same freedoms that the software does. But this License is not limited to software manuals; it can be used for any textual work, regardless of subject matter or whether it is published as a printed book. We recommend this License principally for works whose purpose is instruction or reference.
1. APPLICABILITY AND DEFINITIONS #
This License applies to any manual or other work, in any medium, that contains a notice placed by the copyright holder saying it can be distributed under the terms of this License. Such a notice grants a world-wide, royalty-free license, unlimited in duration, to use that work under the conditions stated herein. The "Document", below, refers to any such manual or work. Any member of the public is a licensee, and is addressed as "you". You accept the license if you copy, modify or distribute the work in a way requiring permission under copyright law.
A "Modified Version" of the Document means any work containing the Document or a portion of it, either copied verbatim, or with modifications and/or translated into another language.
A "Secondary Section" is a named appendix or a front-matter section of the Document that deals exclusively with the relationship of the publishers or authors of the Document to the Document's overall subject (or to related matters) and contains nothing that could fall directly within that overall subject. (Thus, if the Document is in part a textbook of mathematics, a Secondary Section may not explain any mathematics.) The relationship could be a matter of historical connection with the subject or with related matters, or of legal, commercial, philosophical, ethical or political position regarding them.
The "Invariant Sections" are certain Secondary Sections whose titles are designated, as being those of Invariant Sections, in the notice that says that the Document is released under this License. If a section does not fit the above definition of Secondary then it is not allowed to be designated as Invariant. The Document may contain zero Invariant Sections. If the Document does not identify any Invariant Sections then there are none.
The "Cover Texts" are certain short passages of text that are listed, as Front-Cover Texts or Back-Cover Texts, in the notice that says that the Document is released under this License. A Front-Cover Text may be at most 5 words, and a Back-Cover Text may be at most 25 words.
A "Transparent" copy of the Document means a machine-readable copy, represented in a format whose specification is available to the general public, that is suitable for revising the document straightforwardly with generic text editors or (for images composed of pixels) generic paint programs or (for drawings) some widely available drawing editor, and that is suitable for input to text formatters or for automatic translation to a variety of formats suitable for input to text formatters. A copy made in an otherwise Transparent file format whose markup, or absence of markup, has been arranged to thwart or discourage subsequent modification by readers is not Transparent. An image format is not Transparent if used for any substantial amount of text. A copy that is not "Transparent" is called "Opaque".
Examples of suitable formats for Transparent copies include plain ASCII without markup, Texinfo input format, LaTeX input format, SGML or XML using a publicly available DTD, and standard-conforming simple HTML, PostScript or PDF designed for human modification. Examples of transparent image formats include PNG, XCF and JPG. Opaque formats include proprietary formats that can be read and edited only by proprietary word processors, SGML or XML for which the DTD and/or processing tools are not generally available, and the machine-generated HTML, PostScript or PDF produced by some word processors for output purposes only.
The "Title Page" means, for a printed book, the title page itself, plus such following pages as are needed to hold, legibly, the material this License requires to appear in the title page. For works in formats which do not have any title page as such, "Title Page" means the text near the most prominent appearance of the work's title, preceding the beginning of the body of the text.
A section "Entitled XYZ" means a named subunit of the Document whose title either is precisely XYZ or contains XYZ in parentheses following text that translates XYZ in another language. (Here XYZ stands for a specific section name mentioned below, such as "Acknowledgements", "Dedications", "Endorsements", or "History".) To "Preserve the Title" of such a section when you modify the Document means that it remains a section "Entitled XYZ" according to this definition.
The Document may include Warranty Disclaimers next to the notice which states that this License applies to the Document. These Warranty Disclaimers are considered to be included by reference in this License, but only as regards disclaiming warranties: any other implication that these Warranty Disclaimers may have is void and has no effect on the meaning of this License.
2. VERBATIM COPYING #
You may copy and distribute the Document in any medium, either commercially or noncommercially, provided that this License, the copyright notices, and the license notice saying this License applies to the Document are reproduced in all copies, and that you add no other conditions whatsoever to those of this License. You may not use technical measures to obstruct or control the reading or further copying of the copies you make or distribute. However, you may accept compensation in exchange for copies. If you distribute a large enough number of copies you must also follow the conditions in section 3.
You may also lend copies, under the same conditions stated above, and you may publicly display copies.
3. COPYING IN QUANTITY #
If you publish printed copies (or copies in media that commonly have printed covers) of the Document, numbering more than 100, and the Document's license notice requires Cover Texts, you must enclose the copies in covers that carry, clearly and legibly, all these Cover Texts: Front-Cover Texts on the front cover, and Back-Cover Texts on the back cover. Both covers must also clearly and legibly identify you as the publisher of these copies. The front cover must present the full title with all words of the title equally prominent and visible. You may add other material on the covers in addition. Copying with changes limited to the covers, as long as they preserve the title of the Document and satisfy these conditions, can be treated as verbatim copying in other respects.
If the required texts for either cover are too voluminous to fit legibly, you should put the first ones listed (as many as fit reasonably) on the actual cover, and continue the rest onto adjacent pages.
If you publish or distribute Opaque copies of the Document numbering more than 100, you must either include a machine-readable Transparent copy along with each Opaque copy, or state in or with each Opaque copy a computer-network location from which the general network-using public has access to download using public-standard network protocols a complete Transparent copy of the Document, free of added material. If you use the latter option, you must take reasonably prudent steps, when you begin distribution of Opaque copies in quantity, to ensure that this Transparent copy will remain thus accessible at the stated location until at least one year after the last time you distribute an Opaque copy (directly or through your agents or retailers) of that edition to the public.
It is requested, but not required, that you contact the authors of the Document well before redistributing any large number of copies, to give them a chance to provide you with an updated version of the Document.
4. MODIFICATIONS #
You may copy and distribute a Modified Version of the Document under the conditions of sections 2 and 3 above, provided that you release the Modified Version under precisely this License, with the Modified Version filling the role of the Document, thus licensing distribution and modification of the Modified Version to whoever possesses a copy of it. In addition, you must do these things in the Modified Version:
Use in the Title Page (and on the covers, if any) a title distinct from that of the Document, and from those of previous versions (which should, if there were any, be listed in the History section of the Document). You may use the same title as a previous version if the original publisher of that version gives permission.
List on the Title Page, as authors, one or more persons or entities responsible for authorship of the modifications in the Modified Version, together with at least five of the principal authors of the Document (all of its principal authors, if it has fewer than five), unless they release you from this requirement.
State on the Title page the name of the publisher of the Modified Version, as the publisher.
Preserve all the copyright notices of the Document.
Add an appropriate copyright notice for your modifications adjacent to the other copyright notices.
Include, immediately after the copyright notices, a license notice giving the public permission to use the Modified Version under the terms of this License, in the form shown in the Addendum below.
Preserve in that license notice the full lists of Invariant Sections and required Cover Texts given in the Document's license notice.
Include an unaltered copy of this License.
Preserve the section Entitled "History", Preserve its Title, and add to it an item stating at least the title, year, new authors, and publisher of the Modified Version as given on the Title Page. If there is no section Entitled "History" in the Document, create one stating the title, year, authors, and publisher of the Document as given on its Title Page, then add an item describing the Modified Version as stated in the previous sentence.
Preserve the network location, if any, given in the Document for public access to a Transparent copy of the Document, and likewise the network locations given in the Document for previous versions it was based on. These may be placed in the "History" section. You may omit a network location for a work that was published at least four years before the Document itself, or if the original publisher of the version it refers to gives permission.
For any section Entitled "Acknowledgements" or "Dedications", Preserve the Title of the section, and preserve in the section all the substance and tone of each of the contributor acknowledgements and/or dedications given therein.
Preserve all the Invariant Sections of the Document, unaltered in their text and in their titles. Section numbers or the equivalent are not considered part of the section titles.
Delete any section Entitled "Endorsements". Such a section may not be included in the Modified Version.
Do not retitle any existing section to be Entitled "Endorsements" or to conflict in title with any Invariant Section.
Preserve any Warranty Disclaimers.
If the Modified Version includes new front-matter sections or appendices that qualify as Secondary Sections and contain no material copied from the Document, you may at your option designate some or all of these sections as invariant. To do this, add their titles to the list of Invariant Sections in the Modified Version's license notice. These titles must be distinct from any other section titles.
You may add a section Entitled "Endorsements", provided it contains nothing but endorsements of your Modified Version by various parties--for example, statements of peer review or that the text has been approved by an organization as the authoritative definition of a standard.
You may add a passage of up to five words as a Front-Cover Text, and a passage of up to 25 words as a Back-Cover Text, to the end of the list of Cover Texts in the Modified Version. Only one passage of Front-Cover Text and one of Back-Cover Text may be added by (or through arrangements made by) any one entity. If the Document already includes a cover text for the same cover, previously added by you or by arrangement made by the same entity you are acting on behalf of, you may not add another; but you may replace the old one, on explicit permission from the previous publisher that added the old one.
The author(s) and publisher(s) of the Document do not by this License give permission to use their names for publicity for or to assert or imply endorsement of any Modified Version.
5. COMBINING DOCUMENTS #
You may combine the Document with other documents released under this License, under the terms defined in section 4 above for modified versions, provided that you include in the combination all of the Invariant Sections of all of the original documents, unmodified, and list them all as Invariant Sections of your combined work in its license notice, and that you preserve all their Warranty Disclaimers.
The combined work need only contain one copy of this License, and multiple identical Invariant Sections may be replaced with a single copy. If there are multiple Invariant Sections with the same name but different contents, make the title of each such section unique by adding at the end of it, in parentheses, the name of the original author or publisher of that section if known, or else a unique number. Make the same adjustment to the section titles in the list of Invariant Sections in the license notice of the combined work.
In the combination, you must combine any sections Entitled "History" in the various original documents, forming one section Entitled "History"; likewise combine any sections Entitled "Acknowledgements", and any sections Entitled "Dedications". You must delete all sections Entitled "Endorsements".
6. COLLECTIONS OF DOCUMENTS #
You may make a collection consisting of the Document and other documents released under this License, and replace the individual copies of this License in the various documents with a single copy that is included in the collection, provided that you follow the rules of this License for verbatim copying of each of the documents in all other respects.
You may extract a single document from such a collection, and distribute it individually under this License, provided you insert a copy of this License into the extracted document, and follow this License in all other respects regarding verbatim copying of that document.
7. AGGREGATION WITH INDEPENDENT WORKS #
A compilation of the Document or its derivatives with other separate and independent documents or works, in or on a volume of a storage or distribution medium, is called an "aggregate" if the copyright resulting from the compilation is not used to limit the legal rights of the compilation's users beyond what the individual works permit. When the Document is included in an aggregate, this License does not apply to the other works in the aggregate which are not themselves derivative works of the Document.
If the Cover Text requirement of section 3 is applicable to these copies of the Document, then if the Document is less than one half of the entire aggregate, the Document's Cover Texts may be placed on covers that bracket the Document within the aggregate, or the electronic equivalent of covers if the Document is in electronic form. Otherwise they must appear on printed covers that bracket the whole aggregate.
8. TRANSLATION #
Translation is considered a kind of modification, so you may distribute translations of the Document under the terms of section 4. Replacing Invariant Sections with translations requires special permission from their copyright holders, but you may include translations of some or all Invariant Sections in addition to the original versions of these Invariant Sections. You may include a translation of this License, and all the license notices in the Document, and any Warranty Disclaimers, provided that you also include the original English version of this License and the original versions of those notices and disclaimers. In case of a disagreement between the translation and the original version of this License or a notice or disclaimer, the original version will prevail.
If a section in the Document is Entitled "Acknowledgements", "Dedications", or "History", the requirement (section 4) to Preserve its Title (section 1) will typically require changing the actual title.
9. TERMINATION #
You may not copy, modify, sublicense, or distribute the Document except as expressly provided for under this License. Any other attempt to copy, modify, sublicense or distribute the Document is void, and will automatically terminate your rights under this License. However, parties who have received copies, or rights, from you under this License will not have their licenses terminated so long as such parties remain in full compliance.
10. FUTURE REVISIONS OF THIS LICENSE #
The Free Software Foundation may publish new, revised versions of the GNU Free Documentation License from time to time. Such new versions will be similar in spirit to the present version, but may differ in detail to address new problems or concerns. See http://www.gnu.org/copyleft/.
Each version of the License is given a distinguishing version number. If the Document specifies that a particular numbered version of this License "or any later version" applies to it, you have the option of following the terms and conditions either of that specified version or of any later version that has been published (not as a draft) by the Free Software Foundation. If the Document does not specify a version number of this License, you may choose any version ever published (not as a draft) by the Free Software Foundation.
ADDENDUM: How to use this License for your documents #
Copyright (c) YEAR YOUR NAME.
Permission is granted to copy, distribute and/or modify this document
under the terms of the GNU Free Documentation License, Version 1.2
or any later version published by the Free Software Foundation;
with no Invariant Sections, no Front-Cover Texts, and no Back-Cover Texts.
A copy of the license is included in the section entitled “GNU
Free Documentation License”.
If you have Invariant Sections, Front-Cover Texts and Back-Cover Texts, replace the “with...Texts.” line with this:
with the Invariant Sections being LIST THEIR TITLES, with the
Front-Cover Texts being LIST, and with the Back-Cover Texts being LIST.
If you have Invariant Sections without Cover Texts, or some other combination of the three, merge those two alternatives to suit the situation.
If your document contains nontrivial examples of program code, we recommend releasing these examples in parallel under your choice of free software license, such as the GNU General Public License, to permit their use in free software.