- Preface
- 1 Security and confidentiality
- I Authentication
- II Local security
- 9 Physical security
- 10 Software management
- 11 File management
- 12 Encrypting partitions and files
- 13 Storage encryption for hosted applications with cryptctl
- 14 User management
- 15 Restricting
cronandat - 16 Spectre/Meltdown checker
- 17 Configuring security settings with YaST
- 18 The Polkit authentication framework
- 19 Access control lists in Linux
- 20 Intrusion detection with AIDE
- III Network security
- IV Confining privileges with AppArmor
- 27 Introducing AppArmor
- 28 Getting started
- 29 Immunizing programs
- 30 Profile components and syntax
- 31 AppArmor profile repositories
- 32 Building and managing profiles with YaST
- 33 Building profiles from the command line
- 34 Profiling your Web applications using ChangeHat
- 35 Confining users with
pam_apparmor - 36 Managing profiled applications
- 37 Support
- 38 AppArmor glossary
- V SELinux
- VI The Linux Audit Framework
- A GNU licenses
openSUSE Leap 15.6
Security and Hardening Guide
Abstract#
This guide introduces basic concepts of system security and describes the usage of security software included with the product, such as AppArmor, SELinux, or the auditing system. The guide also supports system administrators in hardening an installation.
- Preface
- 1 Security and confidentiality
- I Authentication
- 2 Authentication with PAM
- 3 Using NIS
- 4 Setting up authentication clients using YaST
- 5 LDAP with 389 Directory Server
- 5.1 Structure of an LDAP directory tree
- 5.2 Creating and managing a Docker container for 389 Directory Server
- 5.3 Installing 389 Directory Server
- 5.4 Firewall configuration
- 5.5 Backing up and restoring 389 Directory Server
- 5.6 Managing LDAP users and groups
- 5.7 Managing plug-ins
- 5.8 Using SSSD to manage LDAP authentication
- 5.9 Migrating to 389 Directory Server from OpenLDAP
- 5.10 Importing TLS server certificates and keys
- 5.11 Setting up replication
- 5.12 Synchronizing with Microsoft Active Directory
- 5.13 More information
- 6 Network authentication with Kerberos
- 7 Active Directory support
- 8 Setting up a freeRADIUS server
- II Local security
- 9 Physical security
- 10 Software management
- 11 File management
- 12 Encrypting partitions and files
- 13 Storage encryption for hosted applications with cryptctl
- 13.1 Setting up a
cryptctlserver - 13.2 Setting up a
cryptctlclient - 13.3 Configuring /etc/fstab for LUKS volumes
- 13.4 Checking partition unlock status using server-side commands
- 13.5 Unlocking encrypted partitions manually
- 13.6 Maintenance downtime procedure
- 13.7 Setting up an HA environment for cryptctl-server service
- 13.8 More information
- 13.1 Setting up a
- 14 User management
- 14.1 Various account checks
- 14.2 Enabling password aging
- 14.3 Stronger password enforcement
- 14.4 Password and login management with PAM
- 14.5 Restricting
rootlogins - 14.6 Restricting
sudousers - 14.7 Setting an inactivity timeout for interactive shell sessions
- 14.8 Preventing accidental denial of service
- 14.9 Displaying login banners
- 14.10 Connection accounting utilities
- 15 Restricting
cronandat - 16 Spectre/Meltdown checker
- 17 Configuring security settings with YaST
- 18 The Polkit authentication framework
- 19 Access control lists in Linux
- 20 Intrusion detection with AIDE
- III Network security
- 21 X Window System and X authentication
- 22 Securing network operations with OpenSSH
- 22.1 OpenSSH overview
- 22.2 Server hardening
- 22.3 Password authentication
- 22.4 Managing user and host encryption keys
- 22.5 Rotating host keys
- 22.6 Public key authentication
- 22.7 Passphrase-less public key authentication
- 22.8 OpenSSH certificate authentication
- 22.9 Automated public key logins with gnome-keyring
- 22.10 Automated public key logins with ssh-agent
- 22.11 Changing an SSH private key passphrase
- 22.12 Retrieving a key fingerprint
- 22.13 Starting X11 applications on a remote host
- 22.14 Agent forwarding
- 22.15
scp—secure copy - 22.16
sftp—secure file transfer - 22.17 Port forwarding (SSH tunneling)
- 22.18 More information
- 22.19 Stopping SSH Brute Force Attacks with Fail2Ban
- 23 Masquerading and firewalls
- 24 Configuring a VPN server
- 25 Managing a PKI with XCA, X certificate and key manager
- 26 Improving network security with
sysctlvariables
- IV Confining privileges with AppArmor
- 27 Introducing AppArmor
- 28 Getting started
- 29 Immunizing programs
- 30 Profile components and syntax
- 30.1 Breaking an AppArmor profile into its parts
- 30.2 Profile types
- 30.3 Include statements
- 30.4 Capability entries (POSIX.1e)
- 30.5 Network access control
- 30.6 Profile names, flags, paths, and globbing
- 30.7 File permission access modes
- 30.8 Mount rules
- 30.9 Pivot root rules
- 30.10 PTrace rules
- 30.11 Signal rules
- 30.12 Execute modes
- 30.13 Resource limit control
- 30.14 Auditing rules
- 31 AppArmor profile repositories
- 32 Building and managing profiles with YaST
- 33 Building profiles from the command line
- 34 Profiling your Web applications using ChangeHat
- 35 Confining users with
pam_apparmor - 36 Managing profiled applications
- 37 Support
- 38 AppArmor glossary
- V SELinux
- VI The Linux Audit Framework
- 40 Understanding Linux audit
- 40.1 Introducing the components of Linux audit
- 40.2 Configuring the audit daemon
- 40.3 Controlling the audit system using
auditctl - 40.4 Passing parameters to the audit system
- 40.5 Understanding the audit logs and generating reports
- 40.6 Querying the audit daemon logs with
ausearch - 40.7 Analyzing processes with
autrace - 40.8 Visualizing audit data
- 40.9 Relaying audit event notifications
- 41 Setting up the Linux audit framework
- 42 Introducing an audit rule set
- 42.1 Adding basic audit configuration parameters
- 42.2 Adding watches on audit log files and configuration files
- 42.3 Monitoring file system objects
- 42.4 Monitoring security configuration files and databases
- 42.5 Monitoring miscellaneous system calls
- 42.6 Filtering system call arguments
- 42.7 Managing audit event records using keys
- 43 Useful resources
- A GNU licenses
- 3.1 NIS server setup
- 3.2 Master server setup
- 3.3 Changing the directory and synchronizing files for a NIS server
- 3.4 NIS server maps setup
- 3.5 Setting request permissions for a NIS server
- 3.6 Setting domain and address of a NIS server
- 5.1 Structure of an LDAP directory
- 6.1 Kerberos network topology
- 7.1 Schema of Winbind-based Active Directory authentication
- 7.2 Main window of
- 7.3 Enrolling into a domain
- 7.4 Configuration window of
- 7.5 Determining Windows domain membership
- 7.6 Providing administrator credentials
- 13.1 Key retrieval with
cryptctl(model without connection to KMIP server) - 16.1 Output from spectre-meltdown-checker
- 17.1 YaST security center and hardening: security overview
- 19.1 Minimum ACL: ACL entries compared to permission bits
- 19.2 Extended ACL: ACL entries compared to permission bits
- 22.1 jail.local file settings
- 23.1 iptables: a packet's possible paths
- 24.1 Routed VPN
- 24.2 Bridged VPN - scenario 1
- 24.3 Bridged VPN - scenario 2
- 24.4 Bridged VPN - scenario 3
- 25.1 Create a new XCA database
- 33.1
aa-notify Message in GNOME - 34.1 Adminer login page
- 40.1 Introducing the components of Linux audit
- 40.2 Flow graph—program versus system call relationship
- 40.3 Bar chart—common event types
- 5.1 Commonly used object classes and attributes
- 13.1 List of all parameters to define the resource group with the cryptctl crm script.
- 14.1 Sample rules/constraints for password enforcement
- 19.1 ACL entry types
- 19.2 Masking access permissions
- 20.1 Important AIDE check boxes
- 23.1 Important sysconfig variables for static port configuration
- 37.1 Man pages: sections and categories
- 40.1 Audit status flags
- 2.1 PAM configuration for sshd (
/etc/pam.d/sshd) - 2.2 Default configuration for the
authsection (common-auth) - 2.3 Default configuration for the
accountsection (common-account) - 2.4 Default configuration for the
passwordsection (common-password) - 2.5 Default configuration for the
sessionsection (common-session) - 2.6 pam_env.conf
- 5.1 Excerpt from CN=schema
- 5.2 Minimal 389 Directory Server instance configuration file
- 5.3 A
.dsrcfile for local administration - 5.4 Two supplier replicas
- 5.5 Four supplier replicas
- 5.6 Six replicas
- 5.7 Six replicas with read-only consumers
- 6.1 Example KDC configuration,
/etc/krb5.conf - 9.1 Configuration
- 22.1 Example sshd_config
- 23.1 Callback port configuration for the
nfskernel module in/etc/modprobe.d/60-nfs.conf - 23.2 Commands to define a new
firewalldRPC service for NFS - 24.1 VPN server configuration file
- 24.2 VPN client configuration file
- 28.1 Output of
aa-unconfined - 33.1 Learning mode exception: controlling access to specific resources
- 33.2 Learning mode exception: defining permissions for an entry
- 39.1 Security context settings using
ls -Z - 39.2 Verifying that SELinux is functional
- 39.3 Getting a list of booleans and verifying policy access
- 39.4 Getting file context information
- 39.5 The default context for directories in the root directory
- 39.6 Showing SELinux settings for processes with
ps Zaux - 39.7 Viewing default file contexts
- 39.8 Example lines from
/var/log/audit/audit.log - 39.9 Analyzing audit messages
- 39.10 Viewing which lines deny access
- 39.11 Creating a policy module allowing an action previously denied
- 40.1 Default /etc/audit/auditd.conf
- 40.2 Example output of
auditctl-s - 40.3 Example audit rules—audit system parameters
- 40.4 Example audit rules—file system auditing
- 40.5 Example audit rules—system call auditing
- 40.6 Deleting audit rules and events
- 40.7 Listing rules with
auditctl-l - 40.8 A simple audit event—viewing the audit log
- 40.9 An advanced audit event—login via SSH
- 40.10 Example /etc/audit/auditd.conf
- 40.11 Example /etc/audit/plugins.d/syslog.conf
Copyright © 2006–2024 SUSE LLC and contributors. All rights reserved.
Permission is granted to copy, distribute and/or modify this document under the terms of the GNU Free Documentation License, Version 1.2 or (at your option) version 1.3; with the Invariant Section being this copyright notice and license. A copy of the license version 1.2 is included in the section entitled “GNU Free Documentation License”.
For SUSE trademarks, see https://www.suse.com/company/legal/. All third-party trademarks are the property of their respective owners. Trademark symbols (®, ™ etc.) denote trademarks of SUSE and its affiliates. Asterisks (*) denote third-party trademarks.
All information found in this book has been compiled with utmost attention to detail. However, this does not guarantee complete accuracy. Neither SUSE LLC, its affiliates, the authors nor the translators shall be held liable for possible errors or the consequences thereof.
Preface #Edit source
1 Available documentation #Edit source
- Online documentation
Our documentation is available online at https://doc.opensuse.org. Browse or download the documentation in various formats.

Note: Latest updates
The latest updates are usually available in the English-language version of this documentation.
- SUSE Knowledgebase
If you run into an issue, check out the Technical Information Documents (TIDs) that are available online at https://www.suse.com/support/kb/. Search the SUSE Knowledgebase for known solutions driven by customer need.
- In your system
For offline use, the release notes are also available under
/usr/share/doc/release-noteson your system. The documentation for individual packages is available at/usr/share/doc/packages.Many commands are also described in their manual pages. To view them, run
man, followed by a specific command name. If themancommand is not installed on your system, install it withsudo zypper install man.
2 Improving the documentation #Edit source
Your feedback and contributions to this documentation are welcome. The following channels for giving feedback are available:
- Bug reports
Report issues with the documentation at https://bugzilla.opensuse.org/.
To simplify this process, click the icon next to a headline in the HTML version of this document. This preselects the right product and category in Bugzilla and adds a link to the current section. You can start typing your bug report right away.
A Bugzilla account is required.
- Contributions
To contribute to this documentation, click the icon next to a headline in the HTML version of this document. This will take you to the source code on GitHub, where you can open a pull request.
A GitHub account is required.
Note: only available for English
The icons are only available for the English version of each document. For all other languages, use the icons instead.
For more information about the documentation environment used for this documentation, see the repository's README.
You can also report errors and send feedback concerning the documentation to <doc-team@suse.com>. Include the document title, the product version, and the publication date of the document. Additionally, include the relevant section number and title (or provide the URL) and provide a concise description of the problem.
- Help
If you need further help on openSUSE Leap, see https://en.opensuse.org/Portal:Support.
3 Documentation conventions #Edit source
The following notices and typographic conventions are used in this document:
/etc/passwd: Directory names and file namesPLACEHOLDER: Replace PLACEHOLDER with the actual value
PATH: An environment variablels,--help: Commands, options, and parametersuser: The name of a user or grouppackage_name: The name of a software package
Alt, Alt–F1: A key to press or a key combination. Keys are shown in uppercase as on a keyboard.
, › : menu items, buttons
Chapter 1, “Example chapter”: A cross-reference to another chapter in this guide.
Commands that must be run with
rootprivileges. You can also prefix these commands with thesudocommand to run them as a non-privileged user:#command>sudocommandCommands that can be run by non-privileged users:
>commandCommands can be split into two or multiple lines by a backslash character (
\) at the end of a line. The backslash informs the shell that the command invocation will continue after the end of the line:>echoa b \ c dA code block that shows both the command (preceded by a prompt) and the respective output returned by the shell:
>commandoutputNotices

Warning: Warning notice
Vital information you must be aware of before proceeding. Warns you about security issues, potential loss of data, damage to hardware, or physical hazards.

Important: Important notice
Important information you should be aware of before proceeding.
Note: Note notice
Additional information, for example about differences in software versions.

Tip: Tip notice
Helpful information, like a guideline or a piece of practical advice.
Compact Notices
Additional information, for example about differences in software versions.
Helpful information, like a guideline or a piece of practical advice.
1 Security and confidentiality #Edit source
Abstract#
This chapter introduces basic concepts of computer security. Threats and basic mitigation techniques are described. The chapter also provides references to other chapters, guides and Web sites with further information.
1.1 Overview #Edit source
One main characteristic of Linux is its ability to handle multiple users at the same time (multiuser) and to allow these users to simultaneously perform tasks (multitasking) on the same computer. To users, there is no difference between working with data stored locally and data stored in the network.
Because of the multiuser capability, data from different users has to be stored separately to guarantee security and privacy. Also important is the ability to keep data available in spite of a lost or damaged data medium, for example a hard disk.
This chapter is primarily focused on confidentiality and privacy. But a comprehensive security concept includes a regularly updated, workable, and tested backup. Without a backup, restoring data after it has been tampered with or after a hardware failure is hard.
Use a defense-in-depth approach to security: Assume that no single threat mitigation can fully protect your systems and data, but multiple layers of defense make an attack much harder. Components of a defense-in-depth strategy can be the following:
Hashing passwords (for example with PBKDF2, bcrypt, or scrypt) and salting them
Encrypting data (for example with AES)
Logging, monitoring, and intrusion detection
Firewall
Antivirus scanner
Defined and documented emergency procedures
Backups
Physical security
Audits, security scans, and intrusion tests
openSUSE Leap includes software that addresses the requirements of the list above. The following sections provide starting points for securing your system.
1.2 Passwords #Edit source
On a Linux system, only hashes of passwords are stored. Hashes are one-way algorithms which scramble data to a digital fingerprint that is hard to reverse.
The hashes are stored in the file /etc/shadow,
which cannot be read by normal users. Because restoring passwords is
possible with powerful computers, hashed passwords should not be
visible to regular users.
The National Institute of Standards and Technology (NIST) publishes a guideline for passwords, which is available at https://pages.nist.gov/800-63-3/sp800-63b.html#sec5
For details about how to set a password policy, see Section 17.3, “”. For general information about authentication on Linux, see Part I, “Authentication”.
1.3 Backups #Edit source
If your system is compromised, backups can be used to restore a prior system state. When bugs or accidents occur, backups can also be used to compare the current system against an older version. For production systems, it is important to take some backups off-site for cases like disasters (for example, off-site storage of tapes/recordable media, or off-site initiated).
For legal reasons, some firms and organizations must be careful about backing up too much information and holding it too long. If your environment has a policy regarding the destruction of old paper files, you might need to extend this policy to Linux backup tapes as well.
The rules about physical security of servers apply to backups as well. Additionally, it is advisable to encrypt backup data. This can be done either per individual backup archive or for the complete backup file system, if applicable. Should a backup medium ever be lost, for example during transportation, the data is protected against unauthorized access. The same applies if a backup system itself is compromised. To some extent encryption also ensures the integrity of the backups. Keep in mind, however, that the appropriate people need to be able to decrypt backups in emergency situations. Also, the case that an encryption key itself is compromised and needs to be replaced should be considered.
If a system is known to be compromised or suspected to be compromised, then it is vital to determine the integrity status of backups. If a system compromise went undetected for a long period of time, then it is possible that backups already include manipulated configuration files or malicious programs. Keeping a long enough history of backups allows to inspect for possible unwarranted differences.
Even without any known security breach, a regular inspection of differences among important configuration files in backups can help with finding security issues (maybe even accidental misconfigurations). This approach is best suited for files and environments where the content does not change too frequently.
1.4 System integrity #Edit source
If it is possible to physically access a computer, the firmware and boot process can be manipulated to gain access when an authorized person boots the machine. While not all computers can be locked into inaccessible rooms, your first step should be physically locking the server room.
Also remember that disposing of old equipment must be handled in a secure manner. Securing the boot loader and restricting removable media also provide useful physical security. See Chapter 9, Physical security for more information.
Consider taking the following additional measures:
Configure your system so it cannot be booted from a removable device.
Protect the boot process with a UEFI password, Secure Boot, and a GRUB2 password.
Linux systems are started by a boot loader that allows passing additional options to the booted kernel. You can prevent others from using such parameters during boot by setting an additional password for the boot loader. This is crucial to system security. Not only does the kernel itself run with
rootpermissions, but it is also the first authority to grantrootpermissions at system start-up.For more information about setting a password in the boot loader, see Book “Reference”, Chapter 12 “The boot loader GRUB 2”, Section 12.2.6 “Setting a boot password”.
Enable hard disk encryption. For more information, see Chapter 12, Encrypting partitions and files.
Use
cryptctlto encrypt hosted storage. For more information, see Chapter 13, Storage encryption for hosted applications with cryptctl.Use AIDE to detect any changes in your system configuration. For more information, see Chapter 20, Intrusion detection with AIDE.
1.5 File access #Edit source
Because of the everything is a file approach in
Linux, file permissions are important for controlling access to most
resources. This means that by using file permissions, you can define
access to regular files, directories and hardware devices.
By default, most hardware devices are only accessible for
root. However, certain devices, for example serial ports, can be
accessible for normal users.
As a general rule, always work with the most restrictive privileges
possible for a given task. For example, it is definitely not
necessary to be root to read or write e-mail. If the mail
program has a bug, this bug could be exploited for an attack that
acts with exactly the permissions of the program at the time of the
attack. By following the above rule, minimize the possible damage.
For details, see Section 19.1, “Traditional file permissions” and Section 19.2, “Advantages of ACLs”.
AppArmor and SELinux allow you to set constraints for applications and users. For details, see Part IV, “Confining privileges with AppArmor” and Part V, “SELinux”.
If there is a chance that hard disks could be accessed outside of the installed operating system, for example by booting a live system or removing the hardware, encrypt the data. openSUSE Leap allows you to encrypt partitions containing data and the operating system. For details, see Chapter 12, Encrypting partitions and files.
1.6 Networking #Edit source
Securing network services is a crucial task. Aim to secure as many layers of the OSI model as possible.
All communication should be authenticated and encrypted with up-to-date cryptographic algorithms on the transport or application layer. Use a Virtual Private Network (VPN) as an additional secure layer on physical networks.
openSUSE Leap provides many options for securing your network:
Use
opensslto create X509 certificates. These certificates can be used for encryption and authentication of many services. You can set up your own certificate authority (CA) and use it as a source of trust in your network. For details, seeman openssl.At least parts of networks are exposed to the public Internet. Reduce attack surfaces by closing ports with firewall rules and by uninstalling or at least disabling services that are not required. For details, see Chapter 23, Masquerading and firewalls.
Use OpenVPN to secure communication channels over insecure physical networks. For details, see Chapter 24, Configuring a VPN server.
Use strong authentication for network services. For details, see Part I, “Authentication”.
1.7 Software vulnerabilities #Edit source
Software vulnerabilities are issues in software that can be exploited to obtain unauthorized access or misuse systems. Vulnerabilities are especially critical if they affect remote services, such as HTTP servers. Computer systems are complex, therefore they always include certain vulnerabilities.
When such issues become known, they must be fixed in the software by software developers. The resulting update must then be installed by system administrators in a timely and safe manner on affected systems.
Vulnerabilities are announced on centralized databases, for example the National Vulnerability Database, which is maintained by the US government. You can subscribe to feeds to stay informed about newly discovered vulnerabilities. In some cases the problems induced by the bugs can be mitigated until a software update is provided. Vulnerabilities are assigned a Common Vulnerabilities and Exposures (CVE) number and a Common Vulnerability Scoring System (CVSS) score. The score helps identify the severity of vulnerabilities.
SUSE provides a feed of security advisories. It is available at https://www.suse.com/en-us/support/update/. There is also a list of security updates by CVE number available at https://www.suse.com/support/security/.
Administrators should be prepared for severe vulnerabilities in their systems. This includes hardening all computers as far as possible. Also, we recommend to have predefined procedures in place for quickly installing updates for severe vulnerabilities.
To reduce the damage of possible attacks, use restrictive file permissions. See Section 19.1, “Traditional file permissions”.
Other useful links:
http://lists.opensuse.org/opensuse-security-announce/, mailing list with openSUSE security announcements
https://nvd.nist.gov/, the National Vulnerability Database
https://cve.mitre.org/, MITRE's CVE database
https://www.bsi.bund.de/SiteGlobals/Forms/Suche/BSI/Sicherheitswarnungen/Sicherheitswarnungen_Formular.html, German Federal Office for Information Security vulnerability feed
https://www.first.org/cvss/, information about the Common Vulnerability Scoring System
1.8 Malware #Edit source
Malware is software that is intended to interrupt the normal functioning of a computer or steal data. This includes viruses, worms, ransomware or rootkits. Sometimes malware uses software vulnerabilities to attack a computer. However, often it is accidentally executed by a user, especially when installing third-party software from unknown sources. openSUSE Leap provides an extensive list of programs (packages) in its download repositories. This reduces the need to download third-party software. All packages provided by SUSE are signed. The package manager of openSUSE Leap checks the signatures of packages after the download to verify their integrity.
The command rpm --checksig
RPM_FILE shows whether the
checksum and the signature of a package are correct.
You can find the signing key on the first DVD of openSUSE Leap and
on most key servers worldwide.
You can use the ClamAV antivirus software to detect malware on your system. ClamAV can be integrated into several services, for example mail servers and HTTP proxies. This can be used to filter malware before it reaches the user.
Restrictive user privileges can reduce the risk of accidental code execution.
1.9 Important security tips #Edit source
The following tips are a quick summary of the sections above:
Stay informed about the latest security issues. Get and install the updated packages recommended by security announcements as quickly as possible.
Avoid using
rootprivileges whenever possible. Set restrictive file permissions.Only use encrypted protocols for network communication.
Disable any network services you do not absolutely require.
Conduct regular security audits. For example, scan your network for open ports.
Monitor the integrity of files on your systems with
AIDE(Advanced Intrusion Detection Environment).Take proper care when installing any third-party software.
Check all your backups regularly.
Check your log files, for example, with Logwatch.
Configure the firewall to block all ports that are not explicitly whitelisted.
Design your security measures to be redundant.
Use encryption where possible, for example, for hard disks of mobile. computers.
1.10 Reporting security issues #Edit source
If you discover a security-related problem, first check the available update packages. If no update is available, write an e-mail to <security@suse.de>. Include a detailed description of the problem and the version number of the package concerned. We encourage you to encrypt e-mails with GPG.
You can find a current version of the SUSE GPG key at https://www.suse.com/support/security/contact/.
Part I Authentication #Edit source
- 2 Authentication with PAM
Linux uses PAM (pluggable authentication modules) in the authentication process as a layer that mediates between user and application. PAM modules are available on a system-wide basis, so they can be requested by any application. This chapter describes how the modular authentication mechanism works and how it is configured.
- 3 Using NIS
When multiple Unix systems in a network access common resources, it becomes imperative that all user and group identities are the same for all machines in that network. The network should be transparent to users: their environments should not vary, regardless of which machine they are using. This can be done by NIS and NFS services.
NIS (Network Information Service) can be described as a database-like service that provides access to the contents of
/etc/passwd,/etc/shadow, and/etc/groupacross networks. NIS can also be used for other purposes (making the contents of files like/etc/hostsor/etc/servicesavailable, for example), but this is beyond the scope of this introduction. People often refer to NIS as YP, because it works like the network's “yellow pages.”- 4 Setting up authentication clients using YaST
Whereas Kerberos is used for authentication, LDAP is used for authorization and identification. Both can work together. For more information about LDAP, see Chapter 5, LDAP with 389 Directory Server, and about Kerberos, see Chapter 6, Network authentication with Kerberos.
- 5 LDAP with 389 Directory Server
The Lightweight Directory Access Protocol (LDAP) is a protocol designed to access and maintain information directories. LDAP can be used for tasks such as user and group management, system configuration management, and address management. In openSUSE Leap 15.6 the LDAP service is provided by the 389 Directory Server, replacing OpenLDAP.
- 6 Network authentication with Kerberos
Kerberos is a network authentication protocol which also provides encryption. This chapter describes how to set up Kerberos and integrate services like LDAP and NFS.
- 7 Active Directory support
Active Directory* (AD) is a directory-service based on LDAP, Kerberos, and other services. It is used by Microsoft* Windows* to manage resources, services, and people. In a Microsoft Windows network, Active Directory provides information about these objects, restricts access to them, and enforces po…
- 8 Setting up a freeRADIUS server
The RADIUS (Remote Authentication Dial-In User Service) protocol has long been a standard service for manage network access. It provides authentication, authorization and accounting (AAA) for large businesses such as Internet service providers and cellular network providers, and is also popular for …
2 Authentication with PAM #Edit source
Abstract#
Linux uses PAM (pluggable authentication modules) in the authentication process as a layer that mediates between user and application. PAM modules are available on a system-wide basis, so they can be requested by any application. This chapter describes how the modular authentication mechanism works and how it is configured.
2.1 What is PAM? #Edit source
System administrators and programmers often want to restrict access to certain parts of the system or to limit the use of certain functions of an application. Without PAM, applications must be adapted every time a new authentication mechanism, such as LDAP, Samba, or Kerberos, is introduced. However, this process is time-consuming and error-prone. One way to avoid these drawbacks is to separate applications from the authentication mechanism and delegate authentication to centrally managed modules. Whenever a newly required authentication scheme is needed, it is sufficient to adapt or write a suitable PAM module for use by the program in question.
The PAM concept consists of:
PAM modules, which are a set of shared libraries for a specific authentication mechanism.
A module stack with of one or more PAM modules.
A PAM-aware service which needs authentication by using a module stack or PAM modules. Usually a service is a familiar name of the corresponding application, like
loginorsu. The service nameotheris a reserved word for default rules.Module arguments, with which the execution of a single PAM module can be influenced.
A mechanism evaluating each result of a single PAM module execution. A positive value executes the next PAM module. The way a negative value is dealt with depends on the configuration: “no influence, proceed” up to “terminate immediately” and anything in between are valid options.
2.2 Structure of a PAM configuration file #Edit source
PAM can be configured in two ways:
- File based configuration (
/etc/pam.conf) The configuration of each service is stored in
/etc/pam.conf. However, for maintenance and usability reasons, this configuration scheme is not used in openSUSE Leap.- Directory based configuration (
/etc/pam.d/) Every service (or program) that relies on the PAM mechanism has its own configuration file in the
/etc/pam.d/directory. For example, the service forsshdcan be found in the/etc/pam.d/sshdfile.
The files under /etc/pam.d/ define the PAM modules
used for authentication. Each file consists of lines, which define a
service, and each line consists of a maximum of four components:
TYPE  CONTROL
 MODULE_PATH  MODULE_ARGS
The components have the following meaning:
- TYPE
Declares the type of the service. PAM modules are processed as stacks. Different types of modules have different purposes. For example, one module checks the password, another verifies the location from which the system is accessed, and yet another reads user-specific settings. PAM knows about four different types of modules:
authCheck the user's authenticity, traditionally by querying a password. However, this can also be achieved with a chip card or through biometrics (for example, fingerprints or iris scan).
accountModules of this type check if the user has general permission to use the requested service. As an example, such a check should be performed to ensure that no one can log in with the user name of an expired account.
passwordThe purpose of this type of module is to enable the change of an authentication token. Usually this is a password.
sessionModules of this type are responsible for managing and configuring user sessions. They are started before and after authentication to log login attempts and configure the user's specific environment (mail accounts, home directory, system limits, etc.).
- CONTROL
Indicates the behavior of a PAM module. Each module can have the following control flags:
requiredA module with this flag must be successfully processed before the authentication may proceed. After the failure of a module with the
requiredflag, all other modules with the same flag are processed before the user receives a message about the failure of the authentication attempt.requisiteModules having this flag must also be processed successfully, in much the same way as a module with the
requiredflag. However, in case of failure a module with this flag gives immediate feedback to the user and no further modules are processed. In case of success, other modules are subsequently processed, like any modules with therequiredflag. Therequisiteflag can be used as a basic filter checking for the existence of certain conditions that are essential for a correct authentication.sufficientAfter a module with this flag has been successfully processed, the requesting application receives an immediate message about the success and no further modules are processed, provided there was no preceding failure of a module with the
requiredflag. The failure of a module with thesufficientflag has no direct consequences, in the sense that any subsequent modules are processed in their respective order.optionalThe failure or success of a module with this flag does not have any direct consequences. This can be useful for modules that are only intended to display a message (for example, to tell the user that mail has arrived) without taking any further action.
includeIf this flag is given, the file specified as argument is inserted at this place.
- MODULE_PATH
Contains a full file name of a PAM module. It does not need to be specified explicitly, if the module is located in the default directory
/lib/security(for all 64-bit platforms supported by openSUSE® Leap, the directory is/lib64/security).- MODULE_ARGS
Contains a space-separated list of options to influence the behavior of a PAM module, such as
debug(enables debugging) ornullok(allows the use of empty passwords).
In addition, there are global configuration files for PAM modules under
/etc/security, which define the exact behavior of
these modules (examples include pam_env.conf and
time.conf). Every application that uses a PAM module
calls a set of PAM functions, which then process the information
in the configuration files and return the result to the
requesting application.
To simplify the creation and maintenance of PAM modules, common default
configuration files for the types auth,
account, password, and
session modules have been introduced. These are
retrieved from every application's PAM configuration. Updates to the
global PAM configuration modules in common-* are
thus propagated across all PAM configuration files without requiring the
administrator to update every single PAM configuration file.
The global PAM configuration files are maintained using the
pam-config tool. This tool automatically adds new
modules to the configuration, changes the configuration of existing ones
or deletes modules (or options) from the configurations. Manual
intervention in maintaining PAM configurations is minimized or no longer
required.
Note: 64-bit and 32-bit mixed installations
When using a 64-bit operating system, it is possible to also include a runtime environment for 32-bit applications. In this case, make sure that you also install the 32-bit version of the PAM modules.
2.3 The PAM configuration of sshd #Edit source
Consider the PAM configuration of sshd as an example:
Example 2.1: PAM configuration for sshd (/etc/pam.d/sshd) #
#%PAM-1.0 1


auth     requisite      pam_nologin.so                              2
auth     include        common-auth                                 3
account  requisite      pam_nologin.so                              2
account  include        common-account                              3
password include        common-password                             3
session  required       pam_loginuid.so                             4
session  include        common-session                              3
session  optional       pam_lastlog.so   silent noupdate showfailed 5
Declares the version of this configuration file for PAM 1.0. This is merely a convention, but could be used in the future to check the version. | |
Checks, if | |
Refers to the configuration files of four module types:
| |
Sets the login UID process attribute for the process that was authenticated. | |
Displays information about the last login of a user. |
By including the configuration files instead of adding each module separately to the respective PAM configuration, you automatically get an updated PAM configuration when an administrator changes the defaults. Formerly, you needed to adjust all configuration files manually for all applications when changes to PAM occurred or a new application was installed. Now the PAM configuration is made with central configuration files and all changes are automatically inherited by the PAM configuration of each service.
The first include file (common-auth) calls three
modules of the auth type:
pam_env.so,
pam_gnome_keyring.so and
pam_unix.so. See
Example 2.2, “Default configuration for the auth section (common-auth)”.
Example 2.2: Default configuration for the auth section (common-auth) #
auth  required  pam_env.so                   1
auth  optional  pam_gnome_keyring.so         2
auth  required  pam_unix.so  try_first_pass 3
| |
| |
|
The whole stack of auth modules is processed before
sshd gets any feedback about
whether the login has succeeded. All modules of the stack having the
required control flag must be processed successfully
before sshd receives a message
about the positive result. If one of the modules is not successful, the
entire module stack is still processed and only then is
sshd notified about the negative
result.
When all modules of the auth type have been
successfully processed, another include statement is processed, in this
case, that in Example 2.3, “Default configuration for the account section (common-account)”.
common-account contains only one module,
pam_unix. If pam_unix returns the
result that the user exists, sshd receives a message announcing this
success and the next stack of modules (password) is
processed, shown in Example 2.4, “Default configuration for the password section (common-password)”.
Example 2.3: Default configuration for the account section (common-account) #
account required pam_unix.so try_first_pass
Example 2.4: Default configuration for the password section (common-password) #
password  requisite  pam_cracklib.so
password  optional   pam_gnome_keyring.so  use_authtok
password  required   pam_unix.so  use_authtok nullok shadow try_first_pass
Again, the PAM configuration of
sshd involves only an include
statement referring to the default configuration for
password modules located in
common-password. These modules must successfully be
completed (control flags requisite and
required) whenever the application requests the change
of an authentication token.
Changing a password or another authentication token requires a security
check. This is achieved with the pam_cracklib
module. The pam_unix module used afterward carries
over any old and new passwords from pam_cracklib, so
the user does not need to authenticate again after changing the password.
This procedure makes it impossible to circumvent the checks carried out
by pam_cracklib. Whenever the
account or the auth type are
configured to complain about expired passwords, the
password modules should also be used.
Example 2.5: Default configuration for the session section (common-session) #
session  required  pam_limits.so
session  required  pam_unix.so  try_first_pass
session  optional  pam_umask.so
session  optional  pam_systemd.so
session  optional  pam_gnome_keyring.so auto_start only_if=gdm,gdm-password,lxdm,lightdm
session  optional  pam_env.so
As the final step, the modules of the session type
(bundled in the common-session file) are called to
configure the session according to the settings for the user in question.
The pam_limits module loads the file
/etc/security/limits.conf, which may define limits
on the use of certain system resources. The pam_unix
module is processed again. The pam_umask module can
be used to set the file mode creation mask. Since this module carries the
optional flag, a failure of this module would not
affect the successful completion of the entire session module stack. The
session modules are called a second time when the user
logs out.
2.4 Configuration of PAM modules #Edit source
Some PAM modules are configurable. The configuration files are
located in /etc/security. This section briefly
describes the configuration files relevant to the sshd
example—pam_env.conf and
limits.conf.
2.4.1 pam_env.conf #Edit source
pam_env.conf can be used to define a standardized
environment for users that is set whenever the
pam_env module is called. With it, preset
environment variables using the following syntax:
VARIABLE [DEFAULT=VALUE] [OVERRIDE=VALUE]
- VARIABLE
Name of the environment variable to set.
[DEFAULT=<value>]Default VALUE the administrator wants to set.
[OVERRIDE=<value>]Values that may be queried and set by
pam_env, overriding the default value.
A typical example of how pam_env can be used is
the adaptation of the DISPLAY variable, which is changed
whenever a remote login takes place. This is shown in
Example 2.6, “pam_env.conf”.
Example 2.6: pam_env.conf #
REMOTEHOST  DEFAULT=localhost          OVERRIDE=@{PAM_RHOST}
DISPLAY     DEFAULT=${REMOTEHOST}:0.0  OVERRIDE=${DISPLAY}
The first line sets the value of the REMOTEHOST variable
to localhost, which is used whenever
pam_env cannot determine any other value. The
DISPLAY variable in turn contains the value of
REMOTEHOST. Find more information in the comments in
/etc/security/pam_env.conf.
2.4.2 pam_mount.conf.xml #Edit source
The purpose of pam_mount is to mount user home
directories during the login process, and to unmount them during logout
in an environment where a central file server keeps all the home
directories of users. With this method, it is not necessary to mount a
complete /home directory where all the user home
directories would be accessible. Instead, only the home directory of the
user who is about to log in, is mounted.
After installing pam_mount, a template for
pam_mount.conf.xml is available in
/etc/security. The description of the
elements can be found in the manual page man 5
pam_mount.conf.
A basic configuration of this feature can be done with YaST. Select › › to add the file server.
2.4.3 limits.conf #Edit source
System limits can be set on a user or group basis in
limits.conf, which is read by the
pam_limits module. The file allows you to set
hard limits, which may not be exceeded, and soft limits, which
may be exceeded temporarily. For more information about the syntax and
the options, see the comments in
/etc/security/limits.conf.
2.5 Configuring PAM using pam-config #Edit source
The pam-config tool helps you configure the global PAM
configuration files (/etc/pam.d/common-*) and
several selected application configurations. For a list of supported
modules, use the pam-config --list-modules command.
Use the pam-config command to maintain your PAM
configuration files. Add new modules to your PAM configurations, delete
other modules or modify options to these modules. When changing global
PAM configuration files, no manual tweaking of the PAM setup for
individual applications is required.
A simple use case for pam-config involves the
following:
Auto-generate a fresh unix-style PAM configuration. Let pam-config create the simplest possible setup which you can extend later on. The
pam-config --createcommand creates a simple Unix authentication configuration. Pre-existing configuration files not maintained by pam-config are overwritten, but backup copies are kept as*.pam-config-backup.Add a new authentication method. Adding a new authentication method (for example, SSSD) to your stack of PAM modules comes down to a simple
pam-config --add
      --sss
command. SSSD is added wherever appropriate across allcommon-*-pcPAM configuration files.Add debugging for test purposes. To make sure the new authentication procedure works as planned, turn on debugging for all PAM-related operations. The
pam-config
      --add --sss-debug
command turns on debugging for SSSD-related PAM operations. Find the debugging output in thesystemdjournal (see Book “Reference”, Chapter 11 “journalctl: query thesystemdjournal”).Query your setup. Before you finally apply your new PAM setup, check if it contains all the options you wanted to add. The
pam-config --query
      --
MODULE command lists both the type and the options for the queried PAM module.Remove the debug options. Finally, remove the debug option from your setup when you are entirely satisfied with its performance. The
pam-config --delete
      --sss-debug
command turns off debugging for thepam_ssh.somodule. In case you had debugging options added for other modules, use similar commands to turn these off.
For more information on the pam-config command and the
options available, refer to the manual page of
pam-config(8).
2.6 Manually configuring PAM #Edit source
If you prefer to manually create or maintain your PAM configuration
files, make sure to disable pam-config for these
files.
When you create your PAM configuration files from scratch using the
pam-config --create command, it creates symbolic links
from the common-* to the
common-*-pc files.
pam-config only modifies the
common-*-pc configuration
files. Removing these symbolic links effectively disables pam-config,
because pam-config only operates on the
common-*-pc files and
these files are not put into effect without the symbolic links.
Warning: Include pam_systemd.so in configuration
If you are creating your own PAM configuration, make sure to include
pam_systemd.so configured as session
optional. Not including the pam_systemd.so can
cause problems with systemd task limits. For details, refer to the man
page of pam_systemd.so.
2.7 Configuring U2F keys for local login #Edit source
To provide more security during the local login , you can configure
two-factor authentication using the pam-u2f framework and
the U2F feature on YubiKeys and Security Keys.
To set up U2F on your system, you need to associate your key with your account . After that, configure your system to use the key. The procedure is described in the following sections.
2.7.1 Associating the U2F key with your account #Edit source
To associate your U2F key with your account, proceed as follows:
Log in to your machine.
Insert your U2F key.
Create a directory for the U2F key configuration:
>sudomkdir -p ~/.config/YubicoRun the
pamu2fcfgcommand that outputs configuration lines:>sudopamu2fcfg > ~/.config/Yubico/u2f_keysWhen your device begins flashing, touch the metal contact to confirm the association.
We recommend using a backup U2F device, which you can set up by running the following commands:
Run:
>sudopamu2fcfg -n >> ~/.config/Yubico/u2f_keysWhen your device begins flashing, touch the metal contact to confirm the association.
You can move the output file from the default location to a directory that
requires the sudo permission to modify the file to
increase security. For example, move it to the /etc
directory.
To do so, follow the steps:
Create a directory in
/etc:>sudomkdir /etc/YubicoMove the created file:
>sudomv ~/.config/Yubico/u2f_keys /etc/Yubico/u2f_keys
Note: Placing the u2f_keys to a non-default location
If you move the output file to a different directory than is the default
($HOME/.config/Yubico/u2f_keys), you need to add the
path to the /etc/pam.d/login file as described in
Section 2.7.2, “Updating the PAM configuration”.
2.7.2 Updating the PAM configuration #Edit source
After you have created the U2F keys configuration, you need to adjust the PAM configuration on your system.
Open the file
/etc/pam.d/login.Add the line
auth required pam_u2f.soto the file as follows:#%PAM-1.0 auth include common-auth auth required pam_u2f.so account include common-account password include common-password session optional pam_keyinit.so revoke session include common-session #session optional pam_xauth.soIf you placed the
u2f_keysfile to a different location than$HOME/.config/Yubico/u2f_keys, you need to use theauthfileoption in the/etc/pam.d/loginPAM file as follows:#%PAM-1.0 auth requisite pam_nologin.so auth include common-auth auth required pam_u2f.so authfile=<PATH_TO_u2f_keys> ...where <PATH_TO_u2f_keys> is the absolute path to the
u2f_keysfile.
2.8 More information #Edit source
In the /usr/share/doc/packages/pam directory after
installing the pam-doc package, find the
following additional documentation:
- READMEs
In the top level of this directory, there is the
modulessubdirectory holding README files about the available PAM modules.- The Linux-PAM System Administrators' Guide
This document comprises everything that the system administrator should know about PAM. It discusses a range of topics, from the syntax of configuration files to the security aspects of PAM.
- The Linux-PAM Module Writers' Manual
This document summarizes the topic from the developer's point of view, with information about how to write standard-compliant PAM modules.
- The Linux-PAM Application Developers' Guide
This document comprises everything needed by an application developer who wants to use the PAM libraries.
- The PAM manual pages
PAM and the individual modules come with manual pages that provide a good overview of the functionality of all the components.
3 Using NIS #Edit source
Abstract#
When multiple Unix systems in a network access common resources, it becomes imperative that all user and group identities are the same for all machines in that network. The network should be transparent to users: their environments should not vary, regardless of which machine they are using. This can be done by NIS and NFS services.
NIS (Network Information Service) can be described as a database-like
service that provides access to the contents of
/etc/passwd, /etc/shadow, and
/etc/group across networks. NIS can also be used
for other purposes (making the contents of files like
/etc/hosts or /etc/services
available, for example), but this is beyond the scope of this
introduction. People often refer to NIS as YP,
because it works like the network's “yellow pages.”
3.1 Configuring NIS servers #Edit source
To distribute NIS information across networks, either install one single server (a master) that serves all clients, or NIS slave servers requesting this information from the master and relaying it to their respective clients.
To configure just one NIS server for your network, proceed with Section 3.1.1, “Configuring a NIS master server”.
If your NIS master server needs to export its data to slave servers, set up the master server as described in Section 3.1.1, “Configuring a NIS master server” and set up slave servers in the subnets as described in Section 3.1.2, “Configuring a NIS slave server”.
3.1.1 Configuring a NIS master server #Edit source
To manage the NIS Server functionality with YaST, install the yast2-nis-server package by running the zypper in yast2-nis-server command as root. To configure a NIS master server for your network, proceed as follows:
Start › › .
If you need just one NIS server in your network or if this server is to act as the master for further NIS slave servers, select . YaST installs the required packages.
Tip: Already installed NIS server software
If NIS server software is already installed on your machine, initiate the creation of a NIS master server by clicking .
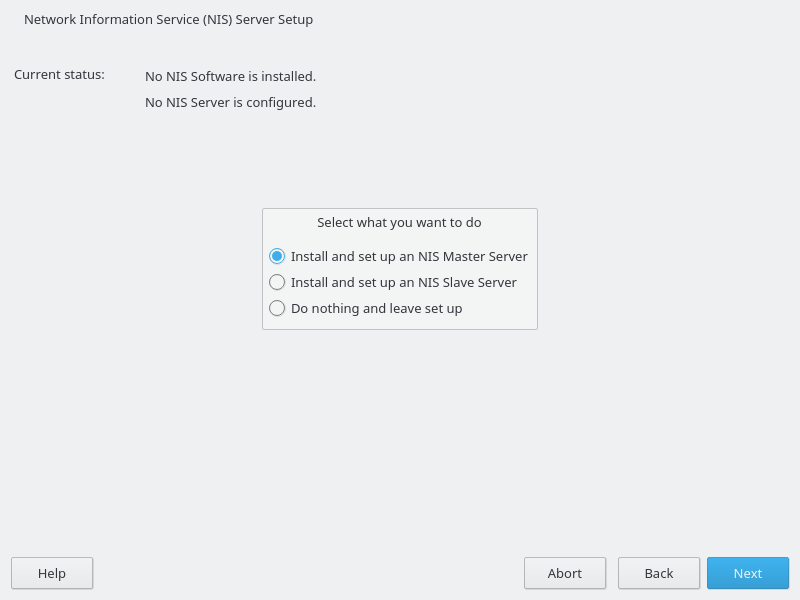
Figure 3.1: NIS server setup #
Determine basic NIS setup options:
Enter the NIS domain name.
Define whether the host should also be a NIS client (enabling users to log in and access data from the NIS server) by selecting .
If your NIS server needs to act as a master server to NIS slave servers in other subnets, select .
The option is only useful with . It speeds up the transfer of maps to the slaves.
Select to allow users in your network (both local users and those managed through the NIS server) to change their passwords on the NIS server (with the command
yppasswd). This makes the options and available. “GECOS” means that the users can also change their names and address settings with the commandypchfn. “Shell” allows users to change their default shell with the commandypchsh(for example, to switch from Bash to sh). The new shell must be one of the predefined entries in/etc/shells.Select to have YaST adapt the firewall settings for the NIS server.
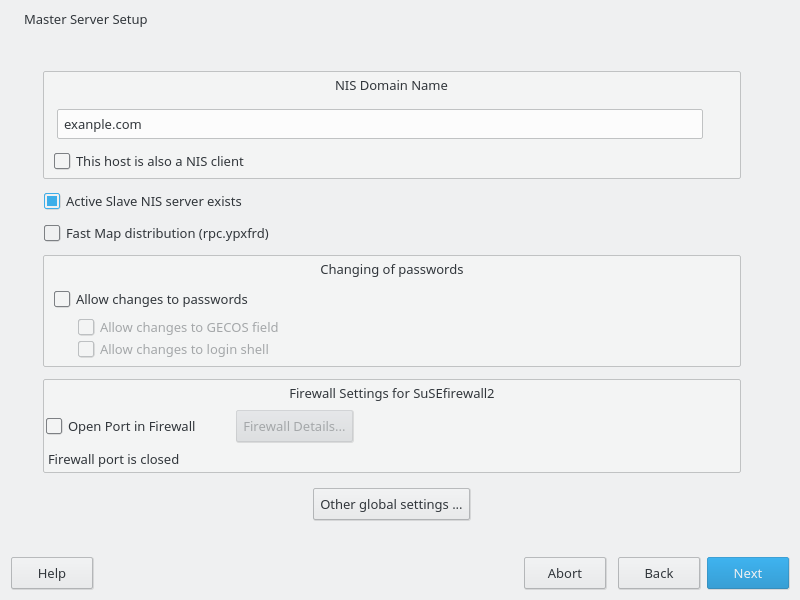
Figure 3.2: Master server setup #
Leave this dialog with or click to make additional settings.
include changing the source directory of the NIS server (
/etcby default). In addition, passwords can be merged here. The setting should be to create the user database from the system authentication files/etc/passwd,/etc/shadowand/etc/group. Also, determine the smallest user and group ID that should be offered by NIS. Click to confirm your settings and return to the previous screen.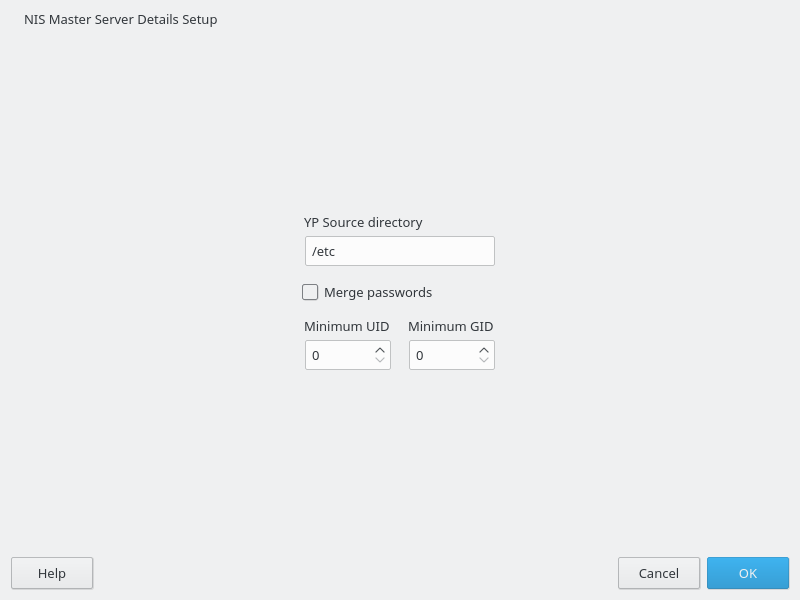
Figure 3.3: Changing the directory and synchronizing files for a NIS server #
If you previously enabled , enter the host names used as slaves and click . If no slave servers exist, this configuration step is skipped.
Continue to the dialog for the database configuration. Specify the NIS Server Maps, the partial databases to transfer from the NIS server to the client. The default settings are adequate. Leave this dialog with .
Check which maps should be available and click to continue.
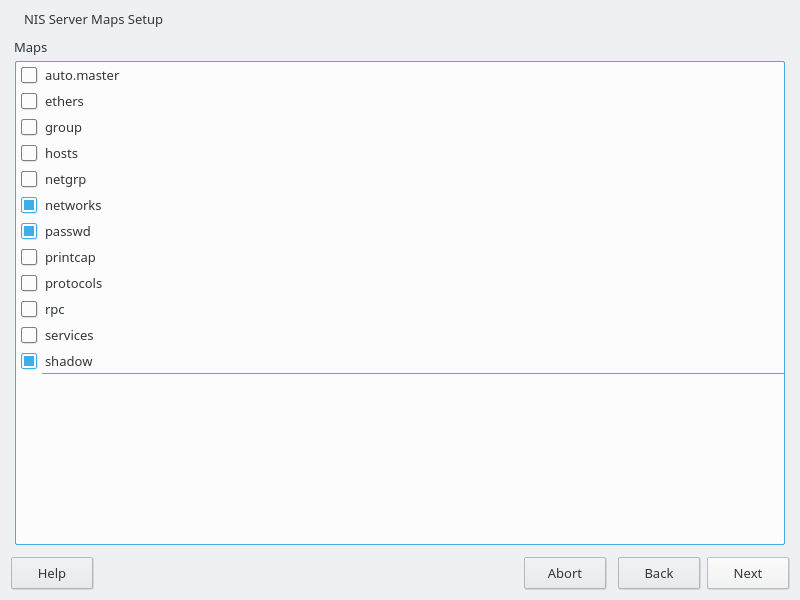
Figure 3.4: NIS server maps setup #
Determine which hosts are allowed to query the NIS server. You can add, edit, or delete hosts by clicking the appropriate button. Specify from which networks requests can be sent to the NIS server. Normally, this is your internal network. In this case, there should be the following two entries:
255.0.0.0     127.0.0.0
0.0.0.0       0.0.0.0
The first entry enables connections from your own host, which is the NIS server. The second one allows all hosts to send requests to the server.
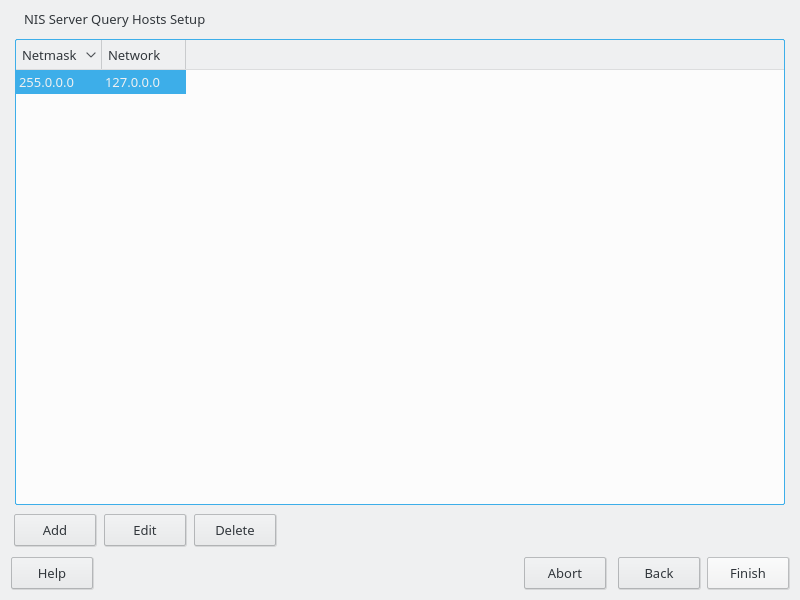
Figure 3.5: Setting request permissions for a NIS server #
Click to save your changes and exit the setup.
3.1.2 Configuring a NIS slave server #Edit source
To configure additional NIS slave servers in your network, proceed as follows:
Start › › .
Select and click .
Tip
If NIS server software is already installed on your machine, initiate the creation of a NIS slave server by clicking .
Complete the basic setup of your NIS slave server:
Enter the NIS domain.
Enter host name or IP address of the master server.
Set to enable user logins on this server.
Adapt the firewall settings with .
Click .
Enter the hosts that are allowed to query the NIS server. You can add, edit, or delete hosts by clicking the appropriate button. Specify all networks from which requests can be sent to the NIS server. If it applies to all networks, use the following configuration:
255.0.0.0     127.0.0.0
0.0.0.0       0.0.0.0
The first entry enables connections from your own host, which is the NIS server. The second one allows all hosts with access to the same network to send requests to the server.
Click to save changes and exit the setup.
3.2 Configuring NIS clients #Edit source
To use NIS on a workstation, do the following:
Start › › .
Activate the button.
Enter the NIS domain. This is a domain name given by your administrator or a static external IP address received by DHCP. For information about DHCP, see Book “Reference”, Chapter 20 “DHCP”.
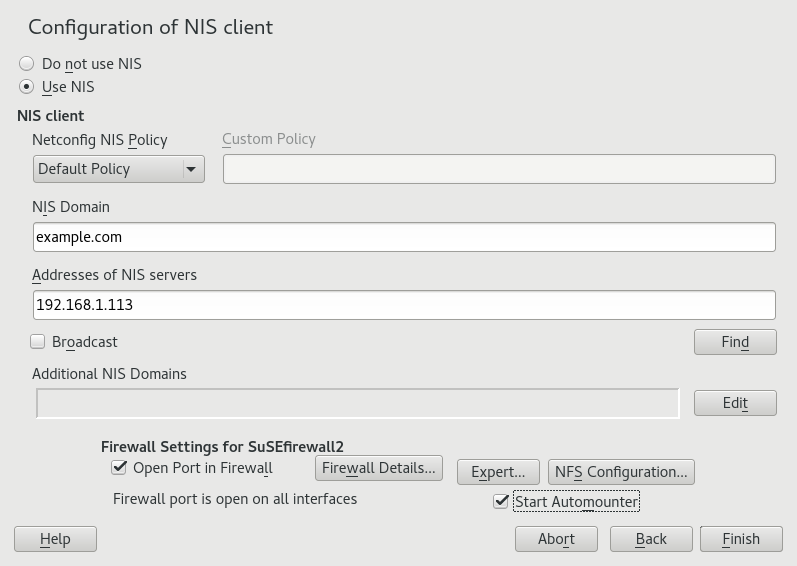
Figure 3.6: Setting domain and address of a NIS server #
Enter your NIS servers and separate their addresses by spaces. If you do not know your NIS server, click to let YaST search for any NIS servers in your domain. Depending on the size of your local network, this may be a time-consuming process. asks for a NIS server in the local network after the specified servers fail to respond.
Depending on your local installation, you may also want to activate the automounter. This option also installs additional software if required.
If you do not want other hosts to be able to query which server your client is using, go to the settings and disable . By checking , the client is enabled to receive replies from a server communicating through an unprivileged port. For further information, see
manypbind.Click to save them and return to the YaST control center. Your client is now configured with NIS.
4 Setting up authentication clients using YaST #Edit source
Abstract#
Whereas Kerberos is used for authentication, LDAP is used for authorization and identification. Both can work together. For more information about LDAP, see Chapter 5, LDAP with 389 Directory Server, and about Kerberos, see Chapter 6, Network authentication with Kerberos.
4.1 Configuring an authentication client with YaST #Edit source
YaST allows setting up authentication to clients using different modules:
. Use both an identity service (usually LDAP) and a user authentication service (usually Kerberos). This option is based on SSSD and in the majority of cases is best suited for joining Active Directory domains.
This module is described in Section 7.3.2, “Joining Active Directory using ”.
. Join an Active Directory (which entails use of Kerberos and LDAP). This option is based on
winbindand is best suited for joining an Active Directory domain if support for NTLM or cross-forest trusts is necessary.This module is described in Section 7.3.3, “Joining Active Directory using ”.
4.2 SSSD #Edit source
Two of the YaST modules are based on SSSD: and .
SSSD stands for System Security Services Daemon. SSSD talks to remote directory services that provide user data and provides authentication methods, such as LDAP, Kerberos, or Active Directory (AD). It also provides an NSS (Name Service Switch) and PAM (Pluggable Authentication Module) interface.
SSSD can locally cache user data and then allow users to use the data, even if the real directory service is (temporarily) unreachable.
4.2.1 Checking the status #Edit source
After running one of the YaST authentication modules, you can check whether SSSD is running with:
#systemctl status sssdsssd.service - System Security Services Daemon Loaded: loaded (/usr/lib/systemd/system/sssd.service; enabled) Active: active (running) since Thu 2015-10-23 11:03:43 CEST; 5s ago [...]
4.2.2 Caching #Edit source
To allow logging in when the authentication back-end is unavailable, SSSD uses its cache even if it was invalidated. This happens until the back-end is available again.
To invalidate the cache, run sss_cache -E (the
command sss_cache is part of the package
sssd-tools).
To remove the SSSD cache, run:
>sudosystemctl stop sssd>sudorm -f /var/lib/sss/db/*>sudosystemctl start sssd
5 LDAP with 389 Directory Server #Edit source
Abstract#
The Lightweight Directory Access Protocol (LDAP) is a protocol designed to access and maintain information directories. LDAP can be used for tasks such as user and group management, system configuration management, and address management. In openSUSE Leap 15.6 the LDAP service is provided by the 389 Directory Server, replacing OpenLDAP.
- 5.1 Structure of an LDAP directory tree
- 5.2 Creating and managing a Docker container for 389 Directory Server
- 5.3 Installing 389 Directory Server
- 5.4 Firewall configuration
- 5.5 Backing up and restoring 389 Directory Server
- 5.6 Managing LDAP users and groups
- 5.7 Managing plug-ins
- 5.8 Using SSSD to manage LDAP authentication
- 5.9 Migrating to 389 Directory Server from OpenLDAP
- 5.10 Importing TLS server certificates and keys
- 5.11 Setting up replication
- 5.12 Synchronizing with Microsoft Active Directory
- 5.13 More information
Ideally, a central server stores the data in a directory and distributes it to all clients using a well-defined protocol. The structured data allow a wide range of applications to access them. A central repository reduces the necessary administrative effort. The use of an open and standardized protocol such as LDAP ensures that as many client applications as possible can access such information.
A directory in this context is a type of database optimized for quick and effective reading and searching. The type of data stored in a directory tends to be long lived and changes infrequently. This allows the LDAP service to be optimized for high performance concurrent reads, whereas conventional databases are optimized for accepting many writes to data in a short time.
Structure of an LDAP directory tree #Edit source
This section introduces the layout of an LDAP directory tree, and provides the basic terminology used with regard to LDAP. If you are familiar with LDAP, read on at Section 5.3.1, “Setting up a new 389 Directory Server instance”.
An LDAP directory has a tree structure. All entries (called objects) of the directory have a defined position within this hierarchy. This hierarchy is called the directory information tree (DIT). The complete path to the desired entry, which unambiguously identifies it, is called the distinguished name or DN. An object in the tree is identified by its relative distinguished name (RDN). The distinguished name is built from the RDNs of all entries on the path to the entry.
The relations within an LDAP directory tree become more evident in the following example, shown in Figure 5.1, “Structure of an LDAP directory”.
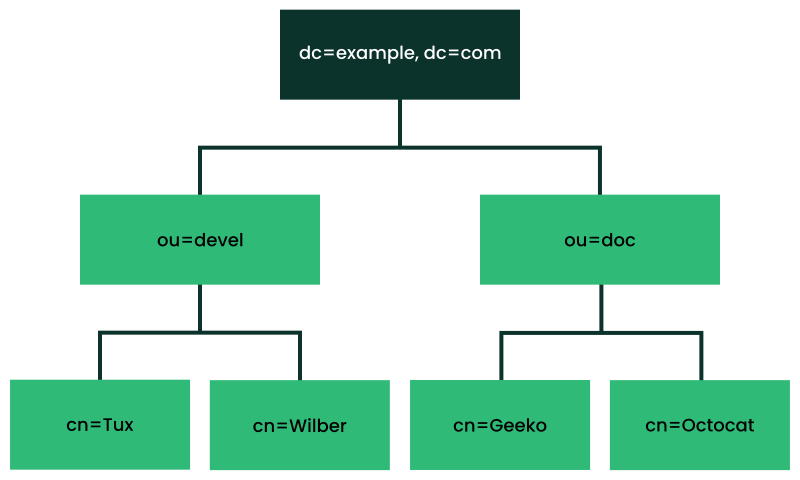
Figure 5.1: Structure of an LDAP directory #
The complete diagram is a fictional directory information tree. The
entries on three levels are depicted. Each entry corresponds to one box
in the image. The complete, valid distinguished name
for the fictional employee Geeko
Linux, in this case, is cn=Geeko
Linux,ou=doc,dc=example,dc=com. It is composed by adding the
RDN cn=Geeko Linux to the DN of the preceding entry
ou=doc,dc=example,dc=com.
The types of objects that can be stored in the DIT are globally determined following a Schema. The type of an object is determined by the object class. The object class determines what attributes the relevant object must or may be assigned. The Schema contains all object classes and attributes which can be used by the LDAP server. Attributes are a structured data type. Their syntax, ordering and other behavior is defined by the Schema. LDAP servers supply a core set of Schemas which can work in a broad variety of environments. If a custom Schema is required, you can upload it to an LDAP server.
Table 5.1, “Commonly used object classes and attributes” offers a small overview of the object
classes from 00core.ldif and
06inetorgperson.ldif used in the example, including
required attributes (Req. Attr.) and valid attribute values. After installing
389 Directory Server, these can be found in
/usr/share/dirsrv/schema.
Table 5.1: Commonly used object classes and attributes #
|
Object Class |
Meaning |
Example Entry |
Req. Attr. |
|---|---|---|---|
|
|
name components of the domain |
example |
displayName |
|
|
organizational unit |
|
|
|
|
person-related data for the intranet or Internet |
|
|
Example 5.1, “Excerpt from CN=schema” shows an excerpt from a Schema directive with explanations.
Example 5.1: Excerpt from CN=schema #
attributetype (1.2.840.113556.1.2.102 NAME 'memberOf' 1
       DESC 'Group that the entry belongs to' 2
       SYNTAX 1.3.6.1.4.1.1466.115.121.1.12 3
       X-ORIGIN 'Netscape Delegated Administrator') 4

objectclass (2.16.840.1.113730.3.2.333 NAME 'nsPerson' 5
       DESC 'A representation of a person in a directory server' 6
       SUP top STRUCTURAL 7
       MUST ( displayName $ cn ) 8
       MAY ( userPassword $ seeAlso $ description $ legalName $ mail \
             $ preferredLanguage ) 9
       X-ORIGIN '389 Directory Server Project'
  ...
The name of the attribute, its unique object identifier (OID, numerical), and the abbreviation of the attribute. | |
A brief description of the attribute with | |
The type of data that can be held in the attribute. In this case, it is a case-insensitive directory string. | |
The source of the schema element (for example, the name of the project). | |
The definition of the object class | |
A brief description of the object class. | |
The | |
With | |
With |
Creating and managing a Docker container for 389 Directory Server #Edit source
Note
This section is OPTIONAL; refer to it if you use a 389 Directory Server instance as a Docker container. For regular usage of a 389 Directory Server instance, refer to the rest of the sections.
To create and manage a 389 Directory Server instance as a Docker container, refer to the following examples:
- Pull the latest 389 Directory Server image
To pull the latest 389 Directory Server image from the container registry, run the following command:
>docker pull 389ds/dirsrv:latest- Create a new volume
To create a new volume for the container, run the following example command:
>docker volume create VOLUME- Create a container with basic configuration
To create a container with basic configuration, run the following example command:
>docker create \ -u USERNAME \ -e SUFFIX_NAME="dc=example,dc=com" \ -e DS_DM_PASSWORD=PASSWORD \ -m 1024M \ -p 3389:3389 -p 3636:3636 \ -v VOLUME:/data \ --name INSTANCE \ 389ds/dirsrv:latest- Start the Docker container for 389 Directory Server
To start the Docker container, run the following example command:
>docker start INSTANCE- Execute a command within a running 389 Directory Server container
Assuming that the primary process of the container (
PID
          1
) is running, you can run a command within a running 389 Directory Server container by using the following syntax:>sudodocker exec -u USERNAME -i -t INSTANCE COMMANDNote: The COMMAND must be executable
To run a chained command or a command enclosed within quotations, you should first run a shell session in the container. For example, you can run commands in the
shshell attached to the container:>sudodocker exec -u USERNAME -i -t INSTANCE sh -c "COMMAND"- Stop the Docker container for 389 Directory Server
To stop the running Docker container, run the following example command:
>docker stop INSTANCE- Remove the Docker container for 389 Directory Server
To remove the Docker container, run the following example command:
>docker rm INSTANCE
Installing 389 Directory Server #Edit source
Install 389 Directory Server with the following command:
>sudozypper install 389-ds
After installation, set up the server as described in Section 5.3.1, “Setting up a new 389 Directory Server instance”.
5.3.1 Setting up a new 389 Directory Server instance #Edit source
You will use the dscreate command to create new 389 Directory Server
instances, and the dsctl command to cleanly remove them.
There are two ways to configure and create a new instance: from a custom configuration file, and from an auto-generated template file. You can use the auto-generated template without changes for a test instance, though for a production system you must carefully review it and make any necessary changes.
Then you will set up administration credentials, manage users and groups, and configure identity services.
The 389 Directory Server is controlled by three primary commands:
dsctlManages a local instance and requires
rootpermissions. Requires you to be connected to a terminal which is running the directory server instance. Used for starting, stopping, backing up the database, and more.dsconfThe primary tool used for administration and configuration of the server. Manages an instance's configuration via its external interfaces. This allows you to make configuration changes remotely on the instance.
dsidmUsed for identity management (managing users, groups, passwords, etc.). The permissions are granted by access controls, so, for example, users can reset their own password or change details of their own account.
Follow these steps to set up a simple instance for testing and development, populated with a small set of sample entries.
5.3.2 Creating a 389 Directory Server instance with a custom configuration file #Edit source
You can create a new 389 Directory Server instance from a simple custom configuration file. This file must be in the INF format, and you can name it anything you like.
The default instance name is localhost. The instance name
cannot be changed after it has been created. It is better to create your own
instance name, rather than using the default, to avoid confusion and to
enable a better understanding of how it all works. The following examples
use the LDAP1 instance name, and a suffix of
dc=LDAP1,dc=COM.
Example 5.2 shows an example configuration file that you can use to create a new 389 Directory Server instance. You can copy and use this file without changes.
Copy the following example file,
LDAP1.inf, to your home directory:Example 5.2: Minimal 389 Directory Server instance configuration file #
# LDAP1.inf

[general]
config_version = 2 1

[slapd]
root_password = PASSWORD2
self_sign_cert = True 3
instance_name = LDAP1

[backend-userroot]
sample_entries = yes 4
suffix = dc=LDAP1,dc=COM
This line is required, indicating that this is a version 2 setup INF file.
Create a strong
root_passwordfor the ldap usercn=Directory Manager. This user is for connecting (binding) to the directory.Create self-signed server certificates in
/etc/dirsrv/slapd-LDAP1.Populate the new instance with sample user and group entries.
To create the 389 Directory Server instance from Example 5.2, run the following command:
>sudodscreate -v from-file LDAP1.inf |\tee LDAP1-OUTPUT.txtThis shows all activity during the instance creation, stores all the messages in
LDAP1-OUTPUT.txt, and creates a working LDAP server in about a minute. The verbose output contains a lot of useful information. If you do not want to save it, then delete the| tee LDAP1-OUTPUT.txtportion of the command.If the
dscreatecommand should fail, the messages will tell you why. After correcting any issues, remove the instance (see Step 5) and create a new instance.A successful installation reports
Completed installation for
     LDAP1
. Check the status of your new server:>sudodsctl LDAP1 statusInstance "LDAP1" is runningThe following commands are for cleanly removing the instance. The first command performs a dry run and does not remove the instance. When you are sure you want to remove it, use the second command with the
--do-itoption:>sudodsctl LDAP1 removeNot removing: if you are sure, add --do-it>sudodsctlLDAP1 remove --do-itThis command also removes partially installed or corrupted instances. You can reliably create and remove instances as often as you want.
If you forget the name of your instance, use dsctl to
list all instances:
>sudo dsctl -lslapd-LDAP1
5.3.3 Creating a 389 Directory Server instance from a template #Edit source
You can auto-create a template for a new 389 Directory Server instance with the
dscreate command. This creates a template that you can
use without making any changes, for testing. For production systems, review
and change it to suit your own requirements. The defaults are
documented in the template file, and commented out. To make changes,
uncomment the default and enter your own value. All options are well
documented.
The following example prints the template to stdout:
>sudo dscreate create-template
This is good for a quick review of the template, but you must create a file to use in creating your new 389 Directory Server instance. You can name this file anything you want:
>sudo dscreate create-template TEMPLATE.txt
This is a snippet from the new file:
# full_machine_name (str)
# Description: Sets the fully qualified hostname (FQDN) of this system. When
# installing this instance with GSSAPI authentication behind a load balancer, set
# this parameter to the FQDN of the load balancer and, additionally, set
# "strict_host_checking" to "false".
# Default value: ldapserver1.test.net
;full_machine_name = ldapserver1.test.net

# selinux (bool)
# Description: Enables SELinux detection and integration during the installation
# of this instance. If set to "True", dscreate auto-detects whether SELinux is
# enabled. Set this parameter only to "False" in a development environment.
# Default value: True
;selinux = True
It automatically configures certain options from your existing environment; for
example, the system's fully-qualified domain name, which is called
full_machine_name in the template. Use this file with no
changes to create a new instance:
>sudodscreate from-file TEMPLATE.txt
This creates a new instance named localhost, and
automatically starts it after creation:
>sudodsctl localhost statusInstance "localhost" is running
The default values create a fully operational instance, but there are certain values you might want to change.
The instance name cannot be changed after it has been created. It is better
to create your own instance name, rather than using the default, to avoid
confusion and to enable a better understanding of how it all works. To do
this, uncomment the ;instance_name = localhost line and
change localhost to your chosen name. In the following
examples, the instance name is LDAP1.
Another useful change is to populate your new instance with sample users and
groups. Uncomment ;sample_entries = no and change
no to yes. This creates the
demo_user and demo_group.
Set your own password by uncommenting ;root_password, and
replacing the default password with your own.
The template does not create a default suffix, so you should configure your
own on the suffix line, like the following example:
suffix = dc=LDAP1,dc=COM
You can cleanly remove any instance and start over with
dsctl:
>sudodsctl LDAP1 remove --do-it
5.3.4 Stopping and starting 389 Directory Server #Edit source
The following examples use LDAP1 as the instance name.
Use systemd to manage your 389 Directory Server instance. Get the status of your
instance:
>systemctl status --no-pager --full dirsrv@LDAP1.service● dirsrv@LDAP1.service - 389 Directory Server LDAP1. Loaded: loaded (/usr/lib/systemd/system/dirsrv@.service; enabled; vendor preset: disabled) Active: active (running) since Thu 2021-03-11 08:55:28 PST; 2h 7min ago Process: 4451 ExecStartPre=/usr/lib/dirsrv/ds_systemd_ask_password_acl /etc/dirsrv/slapd-LDAP1/dse.ldif (code=exited, status=0/SUCCESS) Main PID: 4456 (ns-slapd) Status: "slapd started: Ready to process requests" Tasks: 26 CGroup: /system.slice/system-dirsrv.slice/dirsrv@LDAP1.service └─4456 /usr/sbin/ns-slapd -D /etc/dirsrv/slapd-LDAP1 -i /run/dirsrv/slapd-LDAP1.pid
Start, stop and restart your LDAP server:
>sudosystemctl start dirsrv@LDAP1.service>sudosystemctl stop dirsrv@LDAP1.service>sudosystemctl restart dirsrv@LDAP1.service
See Book “Reference”, Chapter 10 “The systemd daemon” for more information on using
systemctl.
The dsctl command also starts and stops your server:
>sudodsctl LDAP1 status>sudodsctl LDAP1 stop>sudodsctl LDAP1 restart>sudodsctl LDAP1 start
5.3.5 Configuring administrator credentials for local administration #Edit source
For local administration of the 389 Directory Server, you can create a
.dsrc configuration file in the
/root directory, allowing root and sudo users to
administer the server without typing connection details with every command.
Example 5.3
shows an example for local administration on the server, using
LDAP1 and com for the
suffix.
After creating your /root/.dsrc file, try a few
administration commands, such as creating new users (see
Section 5.6, “Managing LDAP users and groups”).
Example 5.3: A .dsrc file for local administration #
# /root/.dsrc file for administering the LDAP1 instance

[LDAP1] 1

uri = ldapi://%%2fvar%%2frun%%2fslapd-LDAP1.socket 2
basedn = dc=LDAP1,dc=COM
binddn = cn=Directory Manager
This must specify your exact instance name. | |
In the URI, the slashes are replaced with |
Important: New negation feature in sudoers.ldap
In sudo versions older than 1.9.9,
negation in sudoers.ldap does
not work for the sudoUser,
sudoRunAsUser, or
sudoRunAsGroup attributes. For example:
 # does not match all but joe
# instead, it does not match anyone
sudoUser: !joe

# does not match all but joe
# instead, it matches everyone including Joe
sudoUser: ALL
sudoUser: !joe
In sudo version 1.9.9 and higher, negation is
enabled for the sudoUser attribute. See
man 5 sudoers.ldap for more information.
Firewall configuration #Edit source
The default TCP ports for 389 Directory Server are 389 and 636. TCP 389 is for unencrypted connections, and STARTTLS. 636 is for encrypted connections over TLS.
firewalld is the default firewall manager for openSUSE Leap. The following rules
activate the ldap and ldaps firewall
services:
>sudofirewall-cmd --add-service=ldap --zone=internal>sudofirewall-cmd --add-service=ldaps --zone=internal>sudofirewall-cmd --runtime-to-permanent
Replace the zone with the appropriate zone for your server. See
Section 5.10, “Importing TLS server certificates and keys” for information on securing
your connections with TLS, and
Section 23.3, “Firewalling basics” to learn about firewalld.
Backing up and restoring 389 Directory Server #Edit source
389 Directory Server supports making offline and online backups. The
dsctl command makes offline database backups, and the
dsconf command makes online database backups. Back up the
LDAP server configuration directory to enable complete restoration in case
of a major failure.
5.5.1 Backing up the LDAP server configuration #Edit source
Your LDAP server configuration is in the directory
/etc/dirsrv/slapd-INSTANCE_NAME.
This directory contains certificates, keys and the dse.ldif
file. Make a compressed backup of this directory with the
tar command:
>sudotar caf \config_slapd-INSTANCE_NAME-$(date +%Y-%m-%d_%H-%M-%S).tar.gz \/etc/dirsrv/slapd-INSTANCE_NAME/
Note: Harmless tar error message
When running tar, you may see the harmless informational
message tar: Removing leading `/' from member names.
To restore a previous configuration, unpack it to the same directory:
(Optional) To avoid overwriting an existing configuration, move it:
>sudoold /etc/dirsrv/slapd-INSTANCE_NAME/Unpack the backup archive:
>sudotar -xvzf\config_slapd-INSTANCE_NAME-DATE.tar.gzCopy it to
/etc/dirsrv/slapd-INSTANCE_NAME:>sudocp -r etc/dirsrv/slapd-INSTANCE_NAME\/etc/dirsrv/slapd-INSTANCE_NAME
5.5.2 Creating an offline backup of the LDAP database and restoring from it #Edit source
The dsctl command makes offline backups. Stop the server:
>sudodsctl INSTANCE_NAME stopInstance "INSTANCE_NAME" has been stopped
Then make the backup using your instance name. The following example creates a backup archive at /var/lib/dirsrv/slapd-INSTANCE_NAME/bak/INSTANCE_NAME-DATE:
>sudodsctl INSTANCE_NAME db2bakdb2bak successful
For example, on a test instance named ldap1 it looks like this:
/var/lib/dirsrv/slapd-ldap1/bak/ldap1-2021_10_25_13_03_17Restore from this backup, naming the directory containing the backup archive:
>sudodsctl INSTANCE_NAME bak2db\/var/lib/dirsrv/slapd-INSTANCE_NAME/bak/INSTANCE_NAME-DATE/bak2db successful
Then start the server:
>sudodsctl INSTANCE_NAME startInstance "INSTANCE_NAME" has been started
You can also create LDIF backups:
>sudodsctl INSTANCE_NAME db2ldif --replication userRootldiffile: /var/lib/dirsrv/slapd-INSTANCE_NAME/ldif/INSTANCE_NAME-userRoot-DATE.ldif db2ldif successful
Restore an LDIF backup with the name of the archive, then start the server:
>sudodsctl ldif2db userRoot\/var/lib/dirsrv/slapd-INSTANCE_NAME/ldif/INSTANCE_NAME-userRoot-DATE.ldif>sudodsctl INSTANCE_NAME start
5.5.3 Creating an online backup of the LDAP database and restoring from it #Edit source
Use the dsconf to make an online backup of your LDAP
database:
>sudodsconf INSTANCE_NAME backup createThe backup create task has finished successfully
This creates
/var/lib/dirsrv/slapd-INSTANCE_NAME/bak/INSTANCE_NAME-DATE.
Restore it:
>sudodsconf INSTANCE_NAME backup restore\/var/lib/dirsrv/slapd-INSTANCE_NAME/bak/INSTANCE_NAME-DATE
Managing LDAP users and groups #Edit source
Use the dsidm command to create, remove and manage
users and groups.
5.6.1 Querying existing LDAP users and groups #Edit source
The following examples show how to list your existing users and groups. The examples use the instance name LDAP1. Replace this with your instance name:
>sudodsidm LDAP1 user list>sudodsidm LDAP1 group list
List all information on a single user:
>sudodsidm LDAP1 user get USER
List all information on a single group:
>sudodsidm LDAP1 group get GROUP
List members of a group:
>sudodsidm LDAP1 group members GROUP
5.6.2 Creating users and managing passwords #Edit source
In the following example, we create one user, wilber. The
example server instance is named LDAP1, and the
instance's suffix is dc=LDAP1,dc=COM.
Procedure 5.1: Creating LDAP users #
The following example creates the user Wilber Fox on your 389 DS instance:
>sudodsidm LDAP1 user create --uid wilber \--cn wilber --displayName 'Wilber Fox' --uidNumber 1001 --gidNumber 101 \--homeDirectory /home/wilberVerify by looking up your new user's
distinguished name(fully qualified name to the directory object, which is guaranteed unique):>sudodsidm LDAP1 user get wilberdn: uid=wilber,ou=people,dc=LDAP1,dc=COM [...]You need the distinguished name for actions such as changing the password for a user.
Create a password for new user
wilber:>sudodsidm LDAP1 account reset_password \uid=wilber,ou=people,dc=LDAP1,dc=COMEnter the new password for
wilbertwice.If the action was successful, you get the following message:
reset password for uid=wilber,ou=people,dc=LDAP1,dc=COM
Use the same command to change an existing password.
Verify that the user's password works:
>ldapwhoami -D uid=wilber,ou=people,dc=LDAP1,dc=COM -WEnter LDAP Password: PASSWORD dn: uid=wilber,ou=people,dc=LDAP1,dc=COM
5.6.3 Creating and managing groups #Edit source
After creating users, you can create groups, and then assign
users to them. In the following examples, we create a group,
server_admins, and assign the user
wilber to this group. The example server instance is named
LDAP1, and the instance's suffix is
dc=LDAP1,dc=COM.
Procedure 5.2: Creating LDAP groups and assigning users to them #
Create the group:
>sudodsidm LDAP1 group createYou will be prompted for a group name. Enter your chosen group name, which in the following example is SERVER_ADMINS:
Enter value for cn : SERVER_ADMINS
Add the user
wilber(created in Procedure 5.1, “Creating LDAP users”) to the group:>sudodsidm LDAP1 group add_member SERVER_ADMINS\uid=wilber,ou=people,dc=LDAP1,dc=COMadded member: uid=wilber,ou=people,dc=LDAP1,dc=COM
5.6.4 Deleting users and groups, and removing users from groups #Edit source
Use the dsidm command to delete users, remove users
from groups, and delete groups. The following example removes our
example user wilber from the server_admins group:
>sudodsidm LDAP1 group remove_member SERVER_ADMINS\uid=wilber,ou=people,dc=LDAP1,dc=COM
Delete a user:
>sudodsidm LDAP1 user delete\uid=wilber,ou=people,dc=LDAP1,dc=COM
Delete a group:
>sudodsidm LDAP1 group delete SERVER_ADMINS
Managing plug-ins #Edit source
Use the following command to list all available plug-ins, enabled and disabled. Use your server's hostname rather than the instance name of your 389 Directory Server, like the following example hostname of LDAPSERVER1:
>sudodsconf -D "cn=Directory Manager" ldap://LDAPSERVER1 plugin listEnter password for cn=Directory Manager on ldap://LDAPSERVER1: PASSWORD 7-bit check Account Policy Plugin Account Usability Plugin ACL Plugin ACL preoperation [...]
The following command enables the MemberOf plug-in referenced in
Section 5.8, “Using SSSD to manage LDAP authentication”. MemberOf simplifies
user searches, by returning the user and any groups the user
belongs to, with a single command. Without MemberOf, a client must
run multiple lookups to find a user's group memberships.
>sudodsconf -D "cn=Directory Manager" ldap://LDAPSERVER1 plugin memberof enable
The plug-in names used in commands are lowercase, so they are different from how they appear when you list them. If you make a mistake with a plug-in name, you see a helpful error message:
dsconf instance plugin: error: invalid choice: 'MemberOf' (choose from
'memberof', 'automember', 'referential-integrity', 'root-dn', 'usn',
'account-policy', 'attr-uniq', 'dna', 'linked-attr', 'managed-entries',
'pass-through-auth', 'retro-changelog', 'posix-winsync', 'contentsync', 'list',
'show', 'set')
After enabling a plug-in, it is necessary to restart the server:
>sudosystemctl restart dirsrv@LDAPSERVER1.service
Next, configure the plug-in. The following example enables MemberOf to
search all entries. Use your instance name rather than the server's
hostname:
>sudodsconf LDAP1 plugin memberOf set --scope dc=example,dc=comSuccessfully changed the cn=MemberOf Plugin,cn=plugins,cn=config
After the MemberOf plug-in is enabled and configured, all new groups and
users are automatically MemberOf targets. However, any
users and groups that exist before it is enabled are not. They must be
marked manually:
>sudodsidm LDAP1 user modify suzanne add:objectclass:nsmemberofSuccessfully modified uid=suzanne,ou=people,dc=ldap1,dc=com
Now suzanne information and group membership are listed with a single command:
>sudodsidm LDAP1 user get suzannedn: uid=suzanne,ou=people,dc=ldap1,dc=com cn: suzanne displayName: Suzanne Geeko gidNumber: 102 homeDirectory: /home/suzanne memberOf: cn=SERVER_ADMINS,ou=groups,dc=ldap1,dc=com
Modifying a larger number of users is a lot of work. The following
example shows how to make all legacy users MemberOf targets with one
fixup command:
>sudodsconf LDAP1 plugin memberof fixup -f '(objectClass=*)' dc=LDAP1,dc=COM
5.7.1 Unsupported plug-ins on 389 Directory Server #Edit source
The following plug-ins are not supported on 389 Directory Server:
Distributed Numeric Assignment (DNA) plug-in
Managed Entries Plug-in (MEP)
Posix Winsync plug-in
Using SSSD to manage LDAP authentication #Edit source
The System Security Services Daemon (SSSD) manages authentication, identification, and access controls for remote users. This section describes how to use SSSD to manage authentication and identification for your 389 Directory Server.
SSSD mediates between your LDAP server and clients. It supports several provider back-ends, such as LDAP, Active Directory, and Kerberos. SSSD supports services, including SSH, PAM, NSS and sudo. SSSD provides performance benefits and resilience through caching user IDs and credentials. Caching reduces the number of requests to your 389 DS server, and provides authentication and identity services when the back-ends are unavailable.
If the Name Services Caching Daemon (nscd) is running on your network, you should disable or remove it. nscd caches only the common name service requests, such as passwd, group, hosts, service and netgroup, and will conflict with SSSD.
Your LDAP server is the provider, and your SSSD instance is the client of the provider. You may install SSSD on your 389 DS server, but installing it on a separate machine provides some resilience in case the 389 DS server becomes unavailable. Use the following procedure to install and configure an SSSD client. The example 389 DS instance name is LDAP1:
Install the
sssdandsssd-ldappackages:>sudozypper in sssd sssd-ldapBack up the
/etc/sssd/sssd.conffile, if it exists:>sudoold /etc/sssd/sssd.confCreate your new SSSD configuration template. The allowed output file names are
sssd.confandldap.conf.displaysends the output to stdout. The following example creates a client configuration in/etc/sssd/sssd.conf:>sudocd /etc/sssd>sudodsidm LDAP1 client_config sssd.confReview the output and make any necessary changes to suit your environment. The following
/etc/sssd/sssd.conffile demonstrates a working example.Important: MemberOf
The LDAP access filter relies on
MemberOfbeing configured. For details, see Section 5.7, “Managing plug-ins”.[sssd] services = nss, pam, ssh, sudo config_file_version = 2 domains = default [nss] homedir_substring = /home [domain/default] # If you have large groups (for example, 50+ members), # you should set this to True ignore_group_members = False debug_level=3 cache_credentials = True id_provider = ldap auth_provider = ldap access_provider = ldap chpass_provider = ldap ldap_schema = rfc2307bis ldap_search_base = dc=example,dc=com # We strongly recommend ldaps ldap_uri = ldaps://ldap.example.com ldap_tls_reqcert = demand ldap_tls_cacert = /etc/openldap/ldap.crt ldap_access_filter = (|(memberof=cn=<login group>,ou=Groups,dc=example,dc=com)) enumerate = false access_provider = ldap ldap_user_member_of = memberof ldap_user_gecos = cn ldap_user_uuid = nsUniqueId ldap_group_uuid = nsUniqueId ldap_account_expire_policy = rhds ldap_access_order = filter, expire # add these lines to /etc/ssh/sshd_config # AuthorizedKeysCommand /usr/bin/sss_ssh_authorizedkeys # AuthorizedKeysCommandUser nobody ldap_user_ssh_public_key = nsSshPublicKey
Set file ownership to root, and restrict read-write permissions to root:
>sudochown root:root /etc/sssd/sssd.conf>sudochmod 600 /etc/sssd/sssd.confEdit the
/etc/nsswitch.confconfiguration file on the SSSD server to include the following lines:passwd: compat sss group: compat sss shadow: compat sss
Edit the PAM configuration on the SSSD server, modifying
common-account-pc,common-auth-pc,common-password-pc, andcommon-session-pc. openSUSE Leap provides a command to modify all of these files at once,pam-config:>sudopam-config -a --sssVerify the modified configuration:
>sudopam-config -q --sssauth: account: password: session:Copy
/etc/dirsrv/slapd-LDAP1/ca.crtfrom the 389 DS server to/etc/openldap/certson your SSSD server, then rehash it:>sudoc_rehash /etc/openldap/certsEnable and start SSSD:
>sudosystemctl enable --now sssd
See Chapter 4, Setting up authentication clients using YaST for information on managing the sssd.service with systemctl.
5.8.1 Unsupported password hashes and authentication schemes #Edit source
The following are not supported as configuration values in dse.ldif for
the settings nsslapd-rootpwstoragescheme or
passwordStorageScheme, or as a value of
passwordStorageScheme in the account policy objects:
SHA
SSHA
SHA256
SSHA256
SHA384
SSHA384
SHA512
SSHA512
NS-MTA-MD5
clear
MD5
SMD5
Note
Database imports that contain these values are supported if
nsslapd-enable-upgrade-hash is set to on
(defaults to on).
Migrating to 389 Directory Server from OpenLDAP #Edit source
OpenLDAP is deprecated. It has been replaced by 389 Directory Server. SUSE
provides the openldap_to_ds utility to assist with
migration, included in the 389-ds package.
The openldap_to_ds utility automates as much of the
migration as possible. However, every LDAP deployment is different, and it
is impossible to develop a tool that satisfies all situations. When
necessary, intervene and perform manual steps. Additionally, test your
migration procedure thoroughly before attempting a production migration.
Important: Read the help page
Before using the openldap_to_ds migration tool, we
strongly recommend reading the output of openldap_to_ds
--help. It helps you learn about the capabilities and
limitations of the migration tool, and prevents you from making wrong
assumptions.
5.9.1 Testing migration from OpenLDAP #Edit source
There are enough differences between OpenLDAP and 389 Directory Server, so migration involves repeated testing and adjustments. It is helpful to do a quick migration test to get an idea of what steps are necessary for a successful migration.
Prerequisites:
A running 389 Directory Server instance
An OpenLDAP
slapdconfiguration file or directory in dynamic ldif formatAn ldif file backup of your OpenLDAP database
If your slapd configuration is not in dynamic ldif format, create a
dynamic copy with slaptest. Create a
slapd.d directory, for example
/root/slapd.d/, then run the following command:
>sudoslaptest -f /etc/openldap/slapd.conf -F /root/slapd.d
This results in several files similar to the following example:
>sudols /root/slapd.d/*/root/slapd.d/cn=config.ldif /root/slapd.d/cn=config: cn=module{0}.ldif cn=schema.ldif olcDatabase={0}config.ldif cn=schema olcDatabase={-1}frontend.ldif olcDatabase={1}mdb.ldif
Create one ldif file per suffix. In the following examples, the suffix is
dc=LDAP1,dc=COM. If
you are using the /etc/openldap/slapd.conf format,
use the following command to create the ldif backup file:
>sudoslapcat -f /etc/openldap/slapd.conf -b dc=LDAP1,dc=COM\-l /root/LDAP1-COM.ldif
Use openldap_to_ds to analyze the configuration and
files, and show a migration plan without changing anything:
>sudoopenldap_to_ds LDAP1\/root/slapd.d /root/LDAP1-COM.ldif.ldif
This performs a dry run and does not change anything. The output looks like this:
Examining OpenLDAP Configuration ...
Completed OpenLDAP Configuration Parsing.
Examining Ldifs ...
Completed Ldif Metadata Parsing.
The following migration steps will be performed:
 * Schema Skip Unsupported Attribute -> otherMailbox (0.9.2342.19200300.100.1.22)
 * Schema Skip Unsupported Attribute -> dSAQuality (0.9.2342.19200300.100.1.49)
 * Schema Skip Unsupported Attribute -> singleLevelQuality (0.9.2342.19200300.100.1.50)
 * Schema Skip Unsupported Attribute -> subtreeMinimumQuality (0.9.2342.19200300.100.1.51)
 * Schema Skip Unsupported Attribute -> subtreeMaximumQuality (0.9.2342.19200300.100.1.52)
 * Schema Create Attribute -> suseDefaultBase (SUSE.YaST.ModuleConfig.Attr:2)
 * Schema Create Attribute -> suseNextUniqueId (SUSE.YaST.ModuleConfig.Attr:3)
[...]
 * Schema Create ObjectClass -> suseDhcpConfiguration (SUSE.YaST.ModuleConfig.OC:10)
 * Schema Create ObjectClass -> suseMailConfiguration (SUSE.YaST.ModuleConfig.OC:11)
 * Database Reindex -> dc=example,dc=com
 * Database Import Ldif -> dc=example,dc=com from example.ldif -
excluding entry attributes = [{'structuralobjectclass', 'entrycsn'}]
No actions taken. To apply migration plan, use '--confirm'
The following example performs the migration, and the output looks different from the dry run:
>sudoopenldap_to_ds LDAP1 /root/slapd.d /root/LDAP1-COM.ldif --confirmStarting Migration ... This may take some time ... migration: 1 / 40 complete ... migration: 2 / 40 complete ... migration: 3 / 40 complete ... [...] Index task index_all_05252021_120216 completed successfully post: 39 / 40 complete ... post: 40 / 40 complete ... 🎉 Migration complete! ---------------------- You should now review your instance configuration and data: * [ ] - Create/Migrate Database Access Controls (ACI) * [ ] - Enable and Verify TLS (LDAPS) Operation * [ ] - Schedule Automatic Backups * [ ] - Verify Accounts Can Bind Correctly * [ ] - Review Schema Inconistent ObjectClass -> pilotOrganization (0.9.2342.19200300.100.4.20) * [ ] - Review Database Imported Content is Correct -> dc=ldap1,dc=com
When the migration is complete, openldap_to_ds creates
a checklist of post-migration tasks that must be completed. It is a best
practice to document your post-migration steps, so that you can reproduce
them in your post-production procedures. Then test clients and
application integrations to the migrated 389 Directory Server instance.
Important: Develop a rollback plan
Develop a rollback plan in case of any failures. This plan should define a successful migration, the tests to determine what worked and what needs to be fixed, which steps are critical, what can be deferred until later, how to decide when to undo any changes, how to undo them with minimal disruption, and which other teams need to be involved.
Due to the variability of deployments, it is difficult to provide a recipe for a successful production migration. After you have thoroughly tested the migration process and verified that you get good results, the following general steps help:
Lower all hostname/DNS TTLs to 5 minutes 48 hours before the change, to allow a fast rollback to your existing OpenLDAP deployment.
Pause all data synchronization and incoming data processes, so that the data in the OpenLDAP environment does not change during the migration.
Have all 389 Directory Server hosts ready for deployment before the migration.
Have your test migration documentation available.
5.9.2 Testing migration of OpenLDAP servers that use saslauthd #Edit source
In OpenLDAP deployments, it is common to use saslauthd
for passthrough authentication of users. The authentication process
involves the following components:
 ┌─────────────────┐
 │                 │
 │   LDAP client   │
 │                 │
 └─────────────────┘
          │
      binds to
          │
          ▼
 ┌─────────────────┐
 │    OpenLDAP     │
 │     server      │
 │                 │
 └─────────────────┘
          │
          │
          ▼
 ┌─────────────────┐
 │                 │
 │    saslauthd    │
 │                 │
 └─────────────────┘
          │
          │
          ▼
 ┌─────────────────┐
 │                 │
 │  External auth  │
 │                 │
 └─────────────────┘
For checking the correctness of configuration and subsequent troubleshooting, the following information is important:
OpenLDAP discovers that a user is allowed passthrough authentication if the
userPasswordattribute has a value with theuserPassword: {SASL}USERNAME@REALMformat. The prerequisite is to build the OpenLDAP server with the--enable-spasswdoption to enable passthrough authentication.OpenLDAP configures its connection to
saslauthdfrom/usr/lib/sasl2/slapd.conf.saslauthddiscovers the relevant modules using its command-line parameters configured in/etc/sysconfig/saslauthd.The backend modules of
saslauthduse their own configuration, as documented inman saslauthd.
Detailed information about passthrough authentication using OpenLDAP is available in the official OpenLDAP Admin Guide.
5.9.2.1 Migrating SASL passthrough authentication from OpenLDAP to 389 Directory Server #Edit source
As a best practice for correctly migrating SASL passthrough authentication from OpenLDAP to 389 Directory Server refer to the following steps:
Before migration, ensure that you can successfully run
testsaslauthdon the OpenLDAP server.>sudotestsaslauthd -u USERNAME@REALM -p PASSWORDThe realm routes the authentication to the correct backend in
saslauthd, and the user name is then used to check the identity.Install the pam_saslauthd package that enables 389 Directory Server to connect with
saslauthd.>sudozypper install -y pam_saslauthdMigrate from OpenLDAP to 389 Directory Server by running the
openldap_to_dscommand-line tool. For detailed information on the migration process, refer to the section Section 5.9.1, “Testing migration from OpenLDAP”.Note
While the
openldap_to_dsprocess is running, if a user is detected as having the value of theuserPsswordattribute in theuserPassword: {SASL}USERNAME@REALMformat, it is removed and placed as the value of thensSaslauthIdattribute in thensSaslauthId: USERNAME@REALMformat. Additionally, the attribute valueobjectClass: nsSaslauthAccountis automatically added to support the modification.After completion of the migration, check whether the PAM passthrough authentication is configured correctly by running the following commands:
>sudodsconf INSTANCE plugin pam-pass-through-auth show>sudodsconf INSTANCE plugin pam-pass-through-auth list
After successful migration, the passthrough authentication flow involves the following components:
  ┌─────────────────┐
  │                 │
  │   LDAP client   │
  │                 │
  └─────────────────┘
           │
       binds to
           │
           ▼
  ┌─────────────────┐
  │     389-DS      │
  │     server      │
  │                 │
  └─────────────────┘
           │
           ▼
  ┌─────────────────┐
  │                 │
  │  pam saslauthd  │
  │                 │
  └─────────────────┘
           │
           ▼
  ┌─────────────────┐
  │                 │
  │    saslauthd    │
  │                 │
  └─────────────────┘
           │
           │
           ▼
  ┌─────────────────┐
  │                 │
  │  External auth  │
  │                 │
  └─────────────────┘
5.9.2.2 Troubleshooting saslauthd passthrough authentication #Edit source
To troubleshoot problems with saslauthd passthrough
authentication before and after the migration from OpenLDAP to 389 Directory Server,
refer to the following tips:
- Ensure that
testsaslauthdworks with USERNAME@REALM. Refer to the step for running
testsaslauthdin the Section 5.9.2, “Testing migration of OpenLDAP servers that usesaslauthd” section.In case of problems, try the following:
Check
/etc/sysconfig/saslauthdto ensure thesaslauthdbackend modules are configured correctly. For detailed information on the backend modules ofsaslauthdand their configurations, runman saslauthd.Turn on debug logging by adding
SASLAUTHD_PARAMS="-d"in/etc/sysconfig/saslauthd.View the
saslauthdlogs that are available as part of the output ofjournalctl.
- Ensure that PAM
saslauthdworks correctly. To check if PAM
saslauthdworks correctly, you can use thepam_testertool available at https://github.com/kanidm/pam_tester.Note
The
pam_testertool is NOT officially supported.- Ensure that the PAM Pass Through Auth plugin is enabled.
Check the status of the PAM Pass Through Auth plugin by running the following command:
>sudodsconf INSTANCE plugin pam-passt-through-auth statusTo enable the plugin, run the following command:
>sudodsconf INSTANCE plugin pam-pass-through-auth enable- Check the configuration of the PAM Pass Through Auth plugin.
To check the configuration of the PAM Pass Through Auth plugin for the server instance, run the following command:
>sudodsconf INSTANCE plugin pam-pass-through-auth show- Check the error logs for the user of the server instance.
Check the logs available in
/var/lib/SERVER_USER_NAME/INSTANCE/error.
5.9.3 Planning your migration #Edit source
As OpenLDAP is a “box of parts” and highly customizable, it is not possible to prescribe a “one size fits all” migration. It is necessary to assess your current environment and configuration with OpenLDAP and other integrations. This includes, and is not limited to:
Replication topology
High availability and load balancer configurations
External data flows (IGA, HR, AD, etc.)
Configured overlays (plug-ins in 389 Directory Server)
Client configuration and expected server features
Customized schema
TLS configuration
Plan what your 389 Directory Server deployment will look like in the end. This includes the same list, except replace overlays with plugins. Once you have assessed your current environment and planned what your 389 Directory Server environment will look like, you can then form a migration plan. We recommended building the 389 Directory Server environment in parallel to your OpenLDAP environment to allow switching between them.
Migrating from OpenLDAP to 389 Directory Server is a one-way migration. There are enough differences between the two that they cannot interoperate, and there is not a migration path from 389 Directory Server to OpenLDAP. The following table highlights the major similarities and differences.
| Feature | OpenLDAP | 389 Directory Server | Compatible |
|---|---|---|---|
| Two-way replication | SyncREPL | 389 DS-specific system | No |
| MemberOf | Overlay | Plug-in | Yes, simple configurations only |
| External Auth | Proxy | - | No |
| Active Directory Synchronization | - | Winsync Plug-in | No |
| Inbuilt Schema | OLDAP Schemas | 389 Schemas | Yes, supported by migration tool |
| Custom Schema | OLDAP Schemas | 389 Schemas | Yes, supported by migration tool |
| Database Import | LDIF | LDIF | Yes, supported by migration tool |
| Password hashes | Varies | Varies | Yes, all formats supported excluding Argon2 |
| OpenLDAP to 389 DS replication | - | - | No mechanism to replicate to 389 DS is possible |
| Time-based one-time password (TOTP) | TOTP overlay | - | No, currently not supported |
| entryUUID | Part of OpenLDAP | Plug-in | Yes |
Importing TLS server certificates and keys #Edit source
You can manage your CA certificates and keys for 389 Directory Server with the following
command line tools: certutil, openssl, and
pk12util.
For testing purposes, you can use the self-signed certificate that
dscreate creates when you create a new 389 DS
instance. Find the certificate at
/etc/dirsrv/slapd-INSTANCE-NAME/ca.crt.
For production environments, it is a best practice to use a third-party certificate authority, such as Let's Encrypt, CAcert.org, SSL.com, or whatever CA you choose. Request a server certificate, a client certificate, and a root certificate.
Important
The Mozilla NSS (Network Security Services ) toolkit uses nicknames for certificates in the certificate store. The server certificate uses the nickname Server-Cert.
Use the following commands to remove the Self-Signed-CA and Server-Cert from the instance:
>sudodsctl INSTANCE_NAME tls remove-cert Self-Signed-CA>sudodsctl INSTANCE_NAME tls remove-cert Server-CertReplace INSTANCE_NAME with the instance name of the directory server. This is LDAP1 in the previous sections.
Import the CA that has signed your certificate.
>sudosudo dsctl INSTANCE_NAME tls import-ca /path/to/CA/in/PEM/format/CA.pem NICKNAME_FOR_CAReplace
INSTANCE_NAMEwith the instance name of the directory server. Replace/path/to/CA/in/PEM/format/CA.pemwith the full path to the CA certificate file in the PEM format. ReplaceNICKNAME_FOR_CAwith a nickname for the CA.Import the server certificate and the key for the certificate.
>sudodsctl INSTANCE_NAME tls import-server-key-cert /path/to/SERVER.pem /path/to/SERVER.keyReplace
INSTANCE_NAMEwith the instance name of the directory server. Replace/path/to/SERVER.pemwith the full path to the server certificate in PEM format. Replace/path/to/SERVER.keywith the full path to the server certificate key file in the PEM format.Restart the instance so that the new certificates are used.
>sudosystemctl restart dirsrv@INSTANCE-NAME..serviceReplace
INSTANCE_NAMEwith the instance name of the directory server.
Setting up replication #Edit source
389 Directory Server supports replicating its database content between multiple servers. According to the type of replication, this provides:
Faster performance and response times
Fault tolerance and failover
Load balancing
High availability
A database is the smallest unit of a directory that can be replicated. You can replicate an entire database, but not a subtree within a database. One database must correspond to one suffix. You cannot replicate a suffix that is distributed over two or more databases.
A replica that sends data to another replica is a supplier. A replica that receives data from a supplier is a consumer. Replication is always initiated by the supplier, and a single supplier can send data to multiple consumers. The supplier is a read-write replica, and the consumer is read-only, except in the case of multi-supplier replication. In multi-supplier replication the suppliers are both suppliers and consumers of the same data.
5.11.1 Asynchronous writes #Edit source
389 DS manages replication differently than other databases. Replication is asynchronous, and eventually consistent. This means:
Any write or change to a single server is immediately accepted.
There is a delay between a write finishing on one server, and then replicating and being visible on other servers.
If that write conflicts with writes on other servers, it may be rolled back at some point in the future.
Not all servers may show identical content at the same time due to replication delay.
As LDAP is “low-write,” these factors mean that all servers are at least up to a common baseline of a known consistent state. Small changes occur on top of this baseline, so many of these aspects of delayed replication are not perceived in day to day usage.
5.11.2 Designing your topology #Edit source
Consider the following factors when you are designing your replication topology.
The need for replication: high availability, geo-location, read scaling, or a combination of all.
How many replicas (nodes, servers) you plan to have in your topology.
Direction of data flows, both inside of the topology, and data flowing into the topology.
How clients balance across nodes of the topology for their requests (multiple ldap URIs, SRV records, load balancers).
These factors all affect how you may create your topology. (See Section 5.11.3, “Example replication topologies” for topology examples.)
5.11.3 Example replication topologies #Edit source
The following sections provide examples of replication topologies, using two to six 389 Directory Server nodes. The maximum number of supported supplier replicas in a topology is 20. Operational experience shows the optimal number for replication efficiency is a maximum of eight.
5.11.3.1 Two replicas #Edit source
Example 5.4: Two supplier replicas #
┌────┐       ┌────┐
│ S1 │◀─────▶│ S2 │
└────┘       └────┘
In Example 5.4, “Two supplier replicas” there are two replicas, S1 and S2, which replicate bi-directionally between each other, so they are both suppliers and consumers. S1 and S2 could be in separate data centers, or in the same data center. Clients can balance across the servers using LDAP URIs, a load balancer, or DNS SRV records. This is the simplest topology for high availability. Each server needs to be able to provide 100% of client load, in case the other server is offline for any reason. A two-node replication is generally not adequate for horizontal read scaling, as a single node handles all read requests if the other node is offline.
Note: Default topology
The two-node topology should be considered the default topology, because it is the simplest to manage. You can expand your topology over time, as necessary.
5.11.3.2 Four supplier replicas #Edit source
Example 5.5: Four supplier replicas #
┌────┐       ┌────┐
│ S1 │◀─────▶│ S2 │
└────┘       └────┘
   ▲            ▲
   │            │
   ▼            ▼
┌────┐       ┌────┐
│ S3 │◀─────▶│ S4 │
└────┘       └────┘
Example 5.5, “Four supplier replicas” has four supplier replicas, which all synchronize to each other. These could be in four datacenters, or two servers per datacenter. In the case of one node per data center, each node should be able to support 100% of client load. When there are two per datacenter, each one only needs to scale to 50% of the client load.
5.11.3.3 Six replicas #Edit source
Example 5.6: Six replicas #
                  ┌────┐       ┌────┐
                  │ S1 │◀─────▶│ S2 │
                  └────┘       └────┘
                     ▲            ▲
                     │            │
   ┌────────────┬────┴────────────┴─────┬────────────┐
   │            │                       │            │
   ▼            ▼                       ▼            ▼
┌────┐       ┌────┐                  ┌────┐       ┌────┐
│ S3 │◀─────▶│ S4 │                  │ S5 │◀─────▶│ S6 │
└────┘       └────┘                  └────┘       └────┘
In Example 5.6, “Six replicas”, each pair is in a separate location. S1 and S2 are the suppliers, and S3, S4, S5, and S6 are consumers of S1 and S2. Each pair of servers replicate to each other. S3, S4, S5 and S6 can accept writes, though most of the replication is done through S1 and S2. This setup provides geographic separation for high availability and scaling.
5.11.3.4 Six replicas with read-only consumers #Edit source
Example 5.7: Six replicas with read-only consumers #
             ┌────┐       ┌────┐
             │ S1 │◀─────▶│ S2 │
             └────┘       └────┘
                │            │
                │            │
   ┌────────────┼────────────┼────────────┐
   │            │            │            │
   ▼            ▼            ▼            ▼
┌────┐       ┌────┐       ┌────┐       ┌────┐
│ S3 │       │ S4 │       │ S5 │       │ S6 │
└────┘       └────┘       └────┘       └────┘
In Example 5.7, “Six replicas with read-only consumers”, S1 and S2 are the suppliers, and the other four servers are read-only consumers. All changes occur on S1 and S2, and are propagated to the four replicas. Read-only consumers can be configured to store only a subset of the database, or partial entries, to limit data exposure. You could have a fractional read-only server in a DMZ, for example, so that if data is exposed, changes can not propagate back to the other replicas.
5.11.4 Terminology #Edit source
In the example topologies we have seen that 389 DS can take on a number of roles in a topology. The following list clarifies the terminology.
- Replica
An instance of 389 DS with an attached database.
- Read-write replica
A replica with a full copy of a database, that accepts read and write operations.
- Read-only replica
A replica with a full copy of a database, that only accepts read operations.
- Fractional read-only replica
A replica with a partial copy of a database, that only accepts read- only operations.
- Supplier
A replica that supplies data from its database to another replica.
- Consumer
A replica that receives data from another replica to write into its database.
- Replication agreement
The configuration of a server defining its supplier and consumer relation to another replica.
- Topology
A set of replicas connected via replication agreements.
- Replica ID
A unique identifier of the 389 Directory Server instance within the replication topology.
- Replication manager
An account with replication rights in the directory.
5.11.5 Configuring replication #Edit source
The first example sets up a two node bi-directional replication with a single read-only server, as a minimal starting example. In the following examples, the host names of the two read-write nodes are RW1 and RW2, and the read-only server is RO1. (Use your own host names.)
All servers should have a backend with an identical suffix. Only one server, RW1, needs an initial copy of the database.
5.11.5.1 Configuring two-node replication #Edit source
The following commands configure the read-write replicas in a two-node setup (Example 5.4, “Two supplier replicas”), with the host names RW1 and RW2. (Use your own host names.)
Warning: Create a strong replication manager password
The replication manager should be considered equivalent to the directory manager in terms of security and access, and should have a strong password.
If you create different replication manager passwords for each server, be sure to keep track of which password belongs to which server. For example, when you configure the outbound connection in RW1's replication agreement, you need to set the replication manager password to the RW2 replication manager password.
First, configure RW1:
>sudodsconf INSTANCE-NAME replication create-manager>sudodsconf INSTANCE-NAME replication enable\--suffix dc=example,dc=com\--role supplier --replica-id 1 --bind-dn "cn=replication manager,cn=config"
Configure RW2:
>sudodsconf INSTANCE-NAME replication create-manager>sudodsconf INSTANCE-NAME replication enable\--suffix dc=example,dc=com\--role supplier --replica-id 2 --bind-dn "cn=replication manager,cn=config"
This will create the replication metadata required on RW1 and RW2. Note the
difference in the replica-id between the two servers. This
also creates the replication manager account, which is an account with
replication rights for authenticating between the two nodes.
RW1 and RW2 are now both configured to have replication metadata. The next step is to create the first agreement for outbound data from RW1 to RW2.
>sudodsconf INSTANCE-NAME repl-agmt create\--suffix dc=example,dc=com\--host=RW2 --port=636 --conn-protocol LDAPS --bind-dn "cn=replication manager,cn=config"\--bind-passwd PASSWORD --bind-method SIMPLE RW1_to_RW2
Data does not flow from RW1 to RW2 until after a full synchronization of the database, which is called an initialization or reinit. This resets all database content on RW2 to match the content of RW1. Run the following command to trigger a reinit of the data:
>sudodsconf INSTANCE-NAME repl-agmt init\--suffix dc=example,dc=com RW1_to_RW2
Check the status by running this command on RW1:
>sudodsconf INSTANCE-NAME repl-agmt init-status\--suffix dc=example,dc=com RW1_to_RW2
When it is finished, you should see an Agreement successfully initialized
message. If you get an error message, check the errors log. Otherwise, you
should see the identical content from RW1 on RW2.
Finally, to make this bi-directional, configure a replication agreement from RW2 outbound to RW1:
>sudodsconf INSTANCE-NAME repl-agmt create\--suffix dc=example,dc=com\--host=RW1 --port=636 --conn-protocol LDAPS\--bind-dn "cn=replication manager,cn=config" --bind-passwd PASSWORD\--bind-method SIMPLE RW2_to_RW1
Changes made on either RW1 or RW2 are now replicated to the other. Check replication status on either server with the following command:
>sudodsconf INSTANCE-NAME repl-agmt status\--suffix dc=example,dc=com\--bind-dn "cn=replication manager,cn=config"\--bind-passwd PASSWORD RW2_to_RW1
5.11.5.2 Configuring a read-only node #Edit source
To create a read-only node, start by creating the replication manager account and metadata. The hostname of the example server is RO3:
Warning: Create a strong replication manager password
The replication manager should be considered equivalent to the directory manager in terms of security and access, and should have a strong password.
If you create different replication manager passwords for each server, be sure to keep track of which password belongs to which server. For example, when you configure the outbound connection in RW1's replication agreement, you need to set the replication manager password to the RW2 replication manager password.
>sudodsconf INSTANCE_NAME replication create-manager>sudodsconf INSTANCE_NAME\replication enable --suffix dc=EXAMPLE,dc=COM\--role consumer --bind-dn "cn=replication manager,cn=config"
For a read-only replica, you do not provide a replica-id, and the
role is set to consumer. This allocates a
special read-only replica-id for all read-only replicas. After the read-only
replica is created, add the replication agreements from RW1 and RW2
to the read-only instance. The following example is on RW1:
>sudodsconf INSTANCE_NAME\repl-agmt create --suffix dc=EXAMPLE,dc=COM\--host=RO3 --port=636 --conn-protocol LDAPS\--bind-dn "cn=replication manager,cn=config" --bind-passwd PASSWORD--bind-method SIMPLE RW1_to_RO3
The following example, on RW2, configures the replication agreement between RW2 and RO3:
>sudodsconf INSTANCE_NAME repl-agmt create\--suffix dc=EXAMPLE,dc=COM\--host=RO3 --port=636 --conn-protocol LDAPS\--bind-dn "cn=replication manager,cn=config" --bind-passwd PASSWORD\--bind-method SIMPLE RW2_to_RO3
After these steps are completed, you can use either RW1 or RW2 to perform the initialization of the database on RO3. The following example initializes RO3 from RW2:
>sudodsconf INSTANCE_NAME repl-agmt init--suffix dc=EXAMPLE,dc=COM RW2_to_RO3
5.11.6 Monitoring and healthcheck #Edit source
The dsconf command includes a monitoring option. You can check the status of each
replica status directly on the replicas, or from other hosts. The following example commands are run on RW1,
checking the status on two remote replicas, and then on itself:
>sudodsconf -D "cn=Directory Manager" ldap://RW2 replication monitor>sudodsconf -D "cn=Directory Manager" ldap://RO3 replication monitor>sudodsconf -D "cn=Directory Manager" ldap://RW1 replication monitor
The dsctl command has a healthcheck option. The following
example runs a replication healthcheck on the local 389 DS instance:
>sudodsctl INSTANCE_NAME healthcheck --check replication
Use the -v option for verbosity, to see what the healthcheck examines:
>sudodsctl -v INSTANCE_NAME healthcheck --check replication
Run dsctl INSTANCE_NAME healthcheck
with no options for a general health check.
Run the following command to see a list of the checks that healthcheck performs:
>sudodsctl INSTANCE_NAME healthcheck --list-checksconfig:hr_timestamp config:passwordscheme backends:userroot:cl_trimming backends:userroot:mappingtree backends:userroot:search backends:userroot:virt_attrs encryption:check_tls_version fschecks:file_perms [...]
You can run one or more of the individual checks:
>sudodsctl INSTANCE_NAME healthcheck\--check monitor-disk-space:disk_space tls:certificate_expiration
5.11.7 Making backups #Edit source
When replication is
enabled, you need to adjust your 389 Directory Server backup strategy
(see Section 5.5, “Backing up and restoring 389 Directory Server” to learn about
making backups). If you are using
db2ldif, you must add the --replication flag
to ensure that replication
metadata is backed up. You should backup all servers in the topology. When
restoring from backup, start by restoring a single node of the topology, then
reinitialize all other nodes as new instances.
5.11.8 Pausing and resuming replication #Edit source
You can pause replication during maintenance windows, or anytime you need to stop it. A node of the topology can only be offline for a maximum of days up to the limit of the changelog (see Section 5.11.9, “ Changelog max-age”).
Use the repl-agmt command to pause replication. The
following example is on RW2:
>sudodsconf INSTANCE_NAME repl-agmt disable\--suffix dc=EXAMPLE,dc=COM RW2_to_RW1
The following example re-enables replication:
>sudodsconf INSTANCE_NAME repl-agmt enable\--suffix dc=EXAMPLE,dc=COM RW2_to_RW1
5.11.9 Changelog max-age #Edit source
A replica can be offline for up to the length of time defined by
the changelog max-age option. max-age
defines the maximum age of any entry in the changelog. Any items older
than the max-age value are automatically removed.
After the replica comes back online, it synchronizes with the other
replicas. If it is offline for longer than the max-age value,
the replica needs to be re-initialized and refuses to accept or
provide changes to other nodes, as they may be inconsistent. The following
example sets the max-age to seven days:
>sudodsconf INSTANCE_NAME\replication set-changelog --max-age 7d\--suffix dc=EXAMPLE,dc=COM
5.11.10 Removing a replica #Edit source
To remove a replica, first fence the node to prevent any incoming changes or reads. Then, find all servers that have incoming replication agreements with the node you are removing, and remove them. The following example removes RW2. Start by disabling the outbound replication agreement on RW1:
>sudodsconf INSTANCE_NAME repl-agmt delete\--suffix dc=EXAMPLE,dc=COM RW1_to_RW2
On the replica you are removing, which in the following example is RW2, remove all outbound agreements:
>sudodsconf INSTANCE_NAME repl-agmt delete\--suffix dc=EXAMPLE,dc=COM RW2_to_RW1>sudodsconf INSTANCE_NAME repl-agmt delete\--suffix dc=EXAMPLE,dc=COM RW2_to_RO3
Stop the instance on RW2:
>sudosystemctl stop dirsrv@INSTANCE_NAME.service
Then run the cleanallruv command to remove the replica ID from the topology.
The following example is run on RW1:
>sudodsconf INSTANCE_NAME repl-tasks cleanallruv\--suffix dc=EXAMPLE,dc=COM --replica-id 2>sudodsconf INSTANCE_NAME repl-tasks list-cleanruv-tasks
5.11.11 Limitations on replication of 389 Directory Server #Edit source
The use of 389 Directory Server is supported within the following replication limits:
A maximum of 8 read-write nodes
A maximum of 20 replication hubs
A maximum of 100 read-only servers
A maximum of 1 Winsync Active Directory consumer as a read-write node member
Synchronizing with Microsoft Active Directory #Edit source
389 Directory Server supports synchronizing certain user and group content from Microsoft's Active Directory, so that Linux clients can use 389 DS for their identity information without the normally required domain join process. This also allows 389 DS to extend and use its other features with the data synchronized from Active Directory.
5.12.1 Planning your synchronization topology #Edit source
Due to how the synchronization works, only a single 389 Directory Server and Active Directory server are involved. The Active Directory server must be a full Domain Controller, and not a Read Only Domain Controller (RODC). The Global Catalog is not required on the DC that is synchronized, as 389 DS only replicates the content of a single forest in a domain.
You must first choose the direction of your data flow. There are three options: from AD to 389 DS, from 389 DS to AD, or bi- directional.
Note: No password synchronization
Passwords cannot be synchronized between 389 DS and Active Directory. This may change in the future, to support Active Directory to 389 DS password flow.
Your topology looks like the following diagram. The 389 Directory Server and Active Directory topologies may differ, but the most important factor is to have only a single connection between 389 DS and Active Directory. It is important to account for this in your disaster recovery and backup plans for both 389 DS and AD, to ensure that you correctly restore only a single replication connection between these topologies.
┌────────┐     ┌────────┐         ┌────────┐     ┌────────┐
│        │     │        │         │        │     │        │
│ 389-ds │◀───▶│ 389-ds │◀ ─ ─ ─ ▶│   AD   │◀───▶│   AD   │
│        │     │        │         │        │     │        │
└────────┘     └────────┘         └────────┘     └────────┘
    ▲               ▲                  ▲             ▲
    │               │                  │             │
    ▼               ▼                  ▼             ▼
┌────────┐     ┌────────┐         ┌────────┐     ┌────────┐
│        │     │        │         │        │     │        │
│ 389-ds │◀───▶│ 389-ds │         │   AD   │◀───▶│   AD   │
│        │     │        │         │        │     │        │
└────────┘     └────────┘         └────────┘     └────────┘
5.12.2 Prerequisites for Active Directory #Edit source
A security group that is granted the Replicating Directory Changes
permission is required. For example, you have created a group named
Directory Server Sync. Follow the steps in the How to grant the
'Replicating Directory Changes' permission for the Microsoft Metadirectory Services ADMA service account
(https://docs.microsoft.com/en-US/troubleshoot/windows-server/windows-security/grant-replicating-directory-changes-permission-adma-service to set this up.
Warning: Strong security needed
You should consider members of this group to be of equivalent security importance to Domain Administrators. Members of this group have the ability to read sensitive content from the Active Directory environment, so you should use strong, randomly generated service account passwords for these accounts, and carefully audit membership to this group.
You should also create a service account that is a member of this group.
Your Active Directory environment must have certificates configured for LDAPS to ensure that authentication between 389 DS and AD is secure. Authentication with Generic Security Services API/Kerberos (GSSAPI/KRB) cannot be used.
5.12.3 Prerequisites for 389 Directory Server #Edit source
The 389 Directory Server must have a backend database already configured with Organization Units (OUs) for entries to be synchronized into.
The 389 Directory Server must have a replica ID configured as though the server is a read-write replica. (For details about setting up replication see Section 5.11, “Setting up replication”).
5.12.4 Creating an agreement from Active Directory to 389 Directory Server #Edit source
The following example command, which is run on the 389 Directory Server, creates a replication agreement from Active Directory to 389 Directory Server:
>sudodsconf INSTANCE-NAME repl-winsync-agmt create --suffix dc=example,dc=com\--host AD-HOSTNAME --port 636 --conn-protocol LDAPS\ --bind-dn"cn=SERVICE-ACCOUNT,cn=USERS,dc=AD,dc=EXAMPLE,dc=COM"\--bind-passwd "PASSWORD" --win-subtree "cn=USERS,dc=AD,dc=EXAMPLE,dc=COM"\--ds-subtree ou=AD,dc=EXAMPLE,dc=COM --one-way-sync fromWindows\--sync-users=on --sync-groups=on --move-action delete\--win-domain AD-DOMAIN adsync_agreement
Once the agreement has been created, you must perform an initial resynchronization:
>sudodsconf INSTANCE-NAME repl-winsync-agmt init --suffix dc=example,dc=com adsync_agreement
Use the following command to check the status of the initialization:
>sudodsconf INSTANCE-NAME repl-winsync-agmt init-status --suffix dc=example,dc=com adsync_agreement
Note: Some entries are not synchronized
In some cases, an entry may not be synchronized, even if the init status reports success. Check your 389 DS log files in
/var/log/dirsrv/slapd-INSTANCE-NAME/errors.
Check the status of the agreement with the following command:
>sudodsconf INSTANCE-NAME repl-winsync-agmt status --suffix dc=example,dc=com adsync_agreement
Whe you are performing maintenance on the Active Directory or 389 Directory Server topology, you can pause the agreement with the following command:
>sudodsconf INSTANCE-NAME repl-winsync-agmt disable --suffix dc=example,dc=com adsync_agreement
Resume the agreement with the following command:
>sudodsconf INSTANCE-NAME repl-winsync-agmt enable --suffix dc=example,dc=com adsync_agreement
5.13 More information #Edit source
For more information about 389 Directory Server, see:
The upstream documentation at https://www.port389.org/docs/389ds/documentation.html.
man dsconf
man dsctl
man dsidm
man dscreate
6 Network authentication with Kerberos #Edit source
Abstract#
Kerberos is a network authentication protocol which also provides encryption. This chapter describes how to set up Kerberos and integrate services like LDAP and NFS.
6.1 Conceptual overview #Edit source
An open network provides no means of ensuring that a workstation can identify its users properly, except through the usual password mechanisms. In common installations, the user must enter the password each time a service inside the network is accessed. Kerberos provides an authentication method with which a user registers only once and is trusted in the complete network for the rest of the session. To have a secure network, the following requirements must be met:
Have all users prove their identity for each desired service and make sure that no one can take the identity of someone else.
Make sure that each network server also proves its identity. Otherwise an attacker might be able to impersonate the server and obtain sensitive information transmitted to the server. This concept is called mutual authentication, because the client authenticates to the server and vice versa.
Kerberos helps you meet these requirements by providing strongly encrypted authentication. Only the basic principles of Kerberos are discussed here. For detailed technical instruction, refer to the Kerberos documentation.
6.2 Kerberos terminology #Edit source
The following glossary defines Kerberos terminology.
- credential
Users or clients need to present credentials that authorize them to request services. Kerberos knows two kinds of credentials—tickets and authenticators.
- ticket
A ticket is a per-server credential used by a client to authenticate at a server from which it is requesting a service. It contains the name of the server, the client's name, the client's Internet address, a time stamp, a lifetime, and a random session key. All this data is encrypted using the server's key.
- authenticator
Combined with the ticket, an authenticator is used to prove that the client presenting a ticket is really the one it claims to be. An authenticator is built using the client's name, the workstation's IP address, and the current workstation's time, all encrypted with the session key known only to the client and the relevant server. An authenticator can only be used once, unlike a ticket. A client can build an authenticator itself.
- principal
A Kerberos principal is a unique entity (a user or service) to which it can assign a ticket. A principal consists of the following components:
USER/INSTANCE@REALM
primary: The first part of the principal. For users, this is the same as the user name.
instance (optional): Additional information characterizing the primary. This string is separated from the primary by a
/.tux@example.organdtux/admin@example.orgcan both exist on the same Kerberos system and are treated as different principals.realm: Specifies the Kerberos realm. Normally, your realm is your domain name in uppercase letters.
- mutual authentication
Kerberos ensures that both client and server can be sure of each other's identity. They share a session key, which they can use to communicate securely.
- session key
Session keys are temporary private keys generated by Kerberos. They are known to the client and used to encrypt the communication between the client and the server for which it requested and received a ticket.
- replay
Almost all messages sent in a network can be eavesdropped, stolen and resent. In the Kerberos context, this would be most dangerous if an attacker manages to obtain your request for a service containing your ticket and authenticator. The attacker could then try to resend it (replay) to impersonate you. However, Kerberos implements several mechanisms to deal with this problem.
- server or service
Service is used to refer to a specific action to perform. The process behind this action is called a server.
6.3 How Kerberos works #Edit source
Kerberos is often called a third-party trusted authentication service, which means all its clients trust Kerberos's judgment of another client's identity. Kerberos keeps a database of all its users and their private keys.
To ensure Kerberos is working correctly, run both the authentication and
ticket-granting server on a dedicated machine. Make sure that only the
administrator can access this machine physically and over the network.
Reduce the (networking) services running on it to the absolute
minimum—do not even run sshd.
6.3.1 First contact #Edit source
Your first contact with Kerberos is similar to any login procedure at a normal networking system. Enter your user name. This piece of information and the name of the ticket-granting service are sent to the authentication server (Kerberos). If the authentication server knows you, it generates a random session key for further use between your client and the ticket-granting server. Now the authentication server prepares a ticket for the ticket-granting server. The ticket contains the following information—all encrypted with a session key only the authentication server and the ticket-granting server know:
The names of both, the client and the ticket-granting server
The current time
A lifetime assigned to this ticket
The client's IP address
The newly generated session key
This ticket is then sent back to the client together with the session key, again in encrypted form, but this time the private key of the client is used. This private key is only known to Kerberos and the client, because it is derived from your user password. Now that the client has received this response, you are prompted for your password. This password is converted into the key that can decrypt the package sent by the authentication server. The package is “unwrapped” and password and key are erased from the workstation's memory. As long as the lifetime given to the ticket used to obtain other tickets does not expire, your workstation can prove your identity.
6.3.2 Requesting a service #Edit source
To request a service from any server in the network, the client application needs to prove its identity to the server. Therefore, the application generates an authenticator. An authenticator consists of the following components:
The client's principal
The client's IP address
The current time
A checksum (chosen by the client)
All this information is encrypted using the session key that the client has already received for this special server. The authenticator and the ticket for the server are sent to the server. The server uses its copy of the session key to decrypt the authenticator, which gives it all the information needed about the client requesting its service, to compare it to that contained in the ticket. The server checks if the ticket and the authenticator originate from the same client.
Without any security measures implemented on the server side, this stage of the process would be an ideal target for replay attacks. Someone could try to resend a request stolen off the net some time before. To prevent this, the server does not accept any request with a time stamp and ticket received previously. A request with a time stamp differing too much from the time the request is received is ignored.
6.3.3 Mutual authentication #Edit source
Kerberos authentication can be used in both directions. It is not only a question of the client being the one it claims to be. The server should also be able to authenticate itself to the client requesting its service. Therefore, it sends an authenticator itself. It adds one to the checksum it received in the client's authenticator and encrypts it with the session key, which is shared between it and the client. The client takes this response as a proof of the server's authenticity and they both start cooperating.
6.3.4 Ticket granting—contacting all servers #Edit source
Tickets are designed to be used for one server at a time. Therefore, you need to get a new ticket each time you request another service. Kerberos implements a mechanism to obtain tickets for individual servers. This service is called the “ticket-granting service”. The ticket-granting service is a service (like any other service mentioned before) and uses the same access protocols that have already been outlined. Any time an application needs a ticket that has not already been requested, it contacts the ticket-granting server. This request consists of the following components:
The requested principal
The ticket-granting ticket
An authenticator
Like any other server, the ticket-granting server now checks the ticket-granting ticket and the authenticator. If they are considered valid, the ticket-granting server builds a new session key to be used between the original client and the new server. Then the ticket for the new server is built, containing the following information:
The client's principal
The server's principal
The current time
The client's IP address
The newly generated session key
The new ticket has a lifetime, which is either the remaining lifetime of the ticket-granting ticket or the default for the service. The lesser of both values is assigned. The client receives this ticket and the session key, which are sent by the ticket-granting service. But this time the answer is encrypted with the session key that came with the original ticket-granting ticket. The client can decrypt the response without requiring the user's password when a new service is contacted. Kerberos can thus acquire ticket after ticket for the client without bothering the user.
6.4 User view of Kerberos #Edit source
Ideally, a user only contact with Kerberos happens during login at the workstation. The login process includes obtaining a ticket-granting ticket. At logout, a user's Kerberos tickets are automatically destroyed, which makes it difficult for anyone else to impersonate this user.
The automatic expiration of tickets can lead to a situation when a user's
login session lasts longer than the maximum lifespan given to the
ticket-granting ticket (a reasonable setting is 10 hours). However, the user
can get a new ticket-granting ticket by running kinit.
Enter the password again and Kerberos obtains access to desired services
without additional authentication. To get a list of all the tickets silently
acquired for you by Kerberos, run klist.
Here is a short list of applications that use Kerberos authentication. These
applications can be found under /usr/lib/mit/bin or
/usr/lib/mit/sbin after installing the package
krb5-apps-clients. They all have the full
functionality of their common Unix and Linux brothers plus the additional
bonus of transparent authentication managed by Kerberos:
telnet,telnetdrloginrsh,rcp,rshdftp,ftpdksu
You no longer need to enter your password for using these applications
because Kerberos has already proven your identity. ssh, if
compiled with Kerberos support, can even forward all the tickets acquired for
one workstation to another one. If you use ssh to log in
to another workstation, ssh makes sure that the encrypted
contents of the tickets are adjusted to the new situation. Simply copying
tickets between workstations is not sufficient because the ticket contains
workstation-specific information (the IP address). XDM and GDM offer Kerberos
support, too. Read more about the Kerberos network applications in
Kerberos V5 UNIX User's Guide at
https://web.mit.edu/kerberos.
6.5 Installing and administering Kerberos #Edit source
A Kerberos environment consists of several components. A key distribution center (KDC) holds the central database with all Kerberos-relevant data. All clients rely on the KDC for proper authentication across the network. Both the KDC and the clients need to be configured to match your setup:
- General preparations
Check your network setup and make sure it meets the minimum requirements outlined in Section 6.5.1, “Kerberos network topology”. Choose an appropriate realm for your Kerberos setup, see Section 6.5.2, “Choosing the Kerberos realms”. Carefully set up the machine that is to serve as the KDC and apply tight security, see Section 6.5.3, “Setting up the KDC hardware”. Set up a reliable time source in your network to make sure all tickets contain valid time stamps, see Section 6.5.4, “Configuring time synchronization”.
- Basic configuration
Configure the KDC and the clients, see Section 6.5.5, “Configuring the KDC” and Section 6.5.6, “Configuring Kerberos clients”. Enable remote administration for your Kerberos service, so you do not need physical access to your KDC machine, see Section 6.5.7, “Configuring remote Kerberos administration”. Create service principals for every service in your realm, see Section 6.5.8, “Creating Kerberos service principals”.
- Enabling Kerberos authentication
Various services in your network can use Kerberos. To add Kerberos password-checking to applications using PAM, proceed as outlined in Section 6.5.9, “Enabling PAM support for Kerberos”. To configure SSH or LDAP with Kerberos authentication, proceed as outlined in Section 6.5.10, “Configuring SSH for Kerberos authentication” and Section 6.5.11, “Using LDAP and Kerberos”.
6.5.1 Kerberos network topology #Edit source
Any Kerberos environment must meet the following requirements to be fully functional:
Provide a DNS server for name resolution across your network, so clients and servers can locate each other. Refer to Book “Reference”, Chapter 19 “The domain name system” for information on DNS setup.
Provide a time server in your network. Using exact time stamps is crucial to a Kerberos setup, because valid Kerberos tickets must contain correct time stamps. Refer to Book “Reference”, Chapter 18 “Time synchronization with NTP” for information on NTP setup.
Provide a key distribution center (KDC) as the center piece of the Kerberos architecture. It holds the Kerberos database. Use the tightest possible security policy on this machine to prevent any attacks on this machine compromising your entire infrastructure.
Configure the client machines to use Kerberos authentication.
The following figure depicts a simple example network with only the minimum components needed to build a Kerberos infrastructure. Depending on the size and topology of your deployment, your setup may vary.
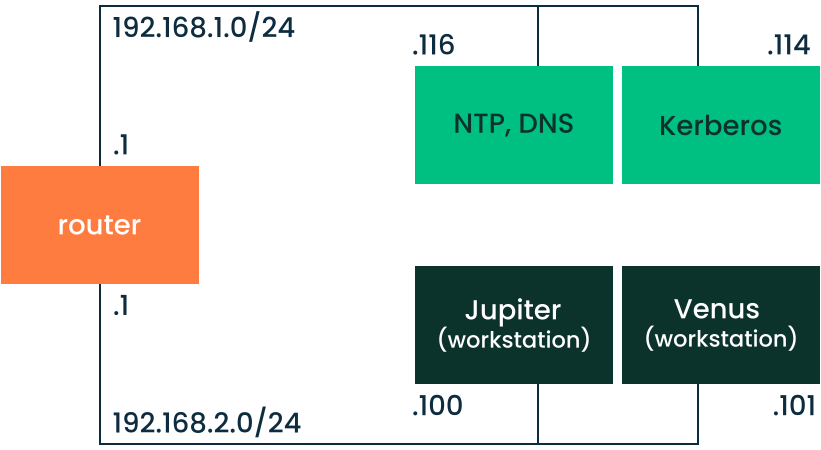
Figure 6.1: Kerberos network topology #
Tip: Configuring subnet routing
For a setup similar to the one in Figure 6.1, “Kerberos network topology”, configure routing between the two subnets (192.168.1.0/24 and 192.168.2.0/24). Refer to Book “Reference”, Chapter 13 “Basic networking”, Section 13.4.1.5 “Configuring routing” for more information on configuring routing with YaST.
6.5.2 Choosing the Kerberos realms #Edit source
The domain of a Kerberos installation is called a realm and is identified by a
name, such as EXAMPLE.COM or simply
ACCOUNTING. Kerberos is case-sensitive, so
example.com is a different realm than
EXAMPLE.COM. Use the case you prefer. However, it is common
practice to use uppercase realm names.
It is also a good idea to use your DNS domain name (or a subdomain, such as
ACCOUNTING.EXAMPLE.COM). As shown below, your life as an
administrator can be much easier if you configure your Kerberos clients to
locate the KDC and other Kerberos services via DNS. To do so, it is helpful if
your realm name is a subdomain of your DNS domain name.
Unlike the DNS name space, Kerberos is not hierarchical. So if you have a
realm named EXAMPLE.COM with two
“subrealms” named DEVELOPMENT and
ACCOUNTING, these subordinate realms do not inherit
principals from EXAMPLE.COM. Instead, you would have
three separate realms, and you would need to configure cross-realm
authentication for each realm, so that users from one realm can interact
with servers or other users from another realm.
For the sake of simplicity, let us assume you are setting up only one realm
for your entire organization. For the remainder of this section, the realm
name EXAMPLE.COM is used in all examples.
6.5.3 Setting up the KDC hardware #Edit source
The first thing required to use Kerberos is a machine that acts as the key distribution center, or KDC for short. This machine holds the entire Kerberos user database with passwords and all information.
The KDC is the most important part of your security infrastructure—if someone breaks into it, all user accounts and your infrastructure protected by Kerberos is compromised. An attacker with access to the Kerberos database can impersonate any principal in the database. Tighten security for this machine as much as possible:
Put the server machine into a physically secured location, such as a locked server room to which only a few people have access.
Do not run any network applications on it except the KDC. This includes servers and clients—for example, the KDC should not import any file systems via NFS or use DHCP to retrieve its network configuration.
Install a minimal system first then check the list of installed packages and remove any unneeded packages. This includes servers, such as
inetd,portmap, and CUPS, plus anything X-based. Even installing an SSH server should be considered a potential security risk.No graphical login is provided on this machine as an X server is a potential security risk. Kerberos provides its own administration interface.
Configure
/etc/nsswitch.confto use only local files for user and group lookup. Change the lines forpasswdandgroupto look like this:passwd: files group: files
Edit the
passwd,group, andshadowfiles in/etcand remove the lines that start with a+character (these are for NIS lookups).Disable all user accounts except
root's account by editing/etc/shadowand replacing the hashed passwords with*or!characters.
6.5.4 Configuring time synchronization #Edit source
To use Kerberos successfully, make sure that all system clocks within your organization are synchronized within a certain range. This is important because Kerberos protects against replayed credentials. An attacker might be able to observe Kerberos credentials on the network and reuse them to attack the server. Kerberos employs several defenses to prevent this. One of them is that it puts time stamps into its tickets. A server receiving a ticket with a time stamp that differs from the current time rejects the ticket.
Kerberos allows a certain leeway when comparing time stamps. However, computer clocks can be inaccurate in keeping time—it is not unheard of for PC clocks to lose or gain half an hour during a week. For this reason, configure all hosts on the network to synchronize their clocks with a central time source.
A simple way to do so is by installing an NTP time server on one machine
and having all clients synchronize their clocks with this server. Do this
by running an NTP daemon chronyd as a client on all these machines. The
KDC itself needs to be synchronized to the common time source as well.
Because running an NTP daemon on this machine would be a security risk, it
is a good idea to do this by running chronyd -q
via a cron job. To configure your machine as an NTP client, proceed as
outlined in Book “Reference”, Chapter 18 “Time synchronization with NTP”, Section 18.1 “Configuring an NTP client with YaST”.
A different way to secure the time service and still use the NTP daemon is to attach a hardware reference clock to a dedicated NTP server and an additional hardware reference clock to the KDC.
It is also possible to adjust the maximum deviation Kerberos allows when
checking time stamps. This value (called clock skew)
can be set in the krb5.conf file as described in
Section 6.5.6.3, “Adjusting the clock skew”.
6.5.5 Configuring the KDC #Edit source
This section covers the initial configuration and installation of the KDC, including the creation of an administrative principal. This procedure consists of several steps:
Install the RPMs. On a machine designated as the KDC, install the following software packages:
krb5,krb5-serverandkrb5-clientpackages.Adjust the configuration files. The
/etc/krb5.confand/var/lib/kerberos/krb5kdc/kdc.confconfiguration files must be adjusted for your scenario. These files contain all information on the KDC. See Section 6.5.5.1, “Configuring the server”.Create the Kerberos database. Kerberos keeps a database of all principal identifiers and the secret keys of all principals that need to be authenticated. Refer to Section 6.5.5.2, “Setting up the database” for details.
Adjust the ACL files: add administrators. The Kerberos database on the KDC can be managed remotely. To prevent unauthorized principals from tampering with the database, Kerberos uses access control lists. You must explicitly enable remote access for the administrator principal to enable them to manage the database. The Kerberos ACL file is located under
/var/lib/kerberos/krb5kdc/kadm5.acl. Refer to Section 6.5.7, “Configuring remote Kerberos administration” for details.Adjust the Kerberos database: add administrators. You need at least one administrative principal to run and administer Kerberos. This principal must be added before starting the KDC. Refer to Section 6.5.5.3, “Creating a principal” for details.
Start the Kerberos daemon. After the KDC software is installed and properly configured, start the Kerberos daemon to provide Kerberos service for your realm. Refer to Section 6.5.5.4, “Starting the KDC” for details.
Create a principal for yourself. You need a principal for yourself. Refer to Section 6.5.5.3, “Creating a principal” for details.
6.5.5.1 Configuring the server #Edit source
Configuring a Kerberos server is highly variable, dependent on your network architecture, DNS and DHCP configuration, realms and other considerations. You must have a default realm, and domain- to-realm mappings. The following example demonstrates a minimal configuration. This is not a copy-and-paste example; see https://web.mit.edu/kerberos/krb5-latest/doc/admin/conf_files/index.html for detailed information on Kerberos configuration.
Example 6.1: Example KDC configuration, /etc/krb5.conf #
[libdefaults]
 dns_canonicalize_hostname = false
 rdns = false
 default_realm = example.com
 ticket_lifetime = 24h
 renew_lifetime = 7d

[realms]
  example.com = {
  kdc = kdc.example.com.:88
  admin_server = kdc.example.com
  default_domain = example.com
 }

 [logging]
 kdc = FILE:/var/log/krb5kdc.log
 admin_server = FILE:/var/log/kadmind.log
 default = SYSLOG:NOTICE:DAEMON

[domain_realm]
 .example.com = example.com
 example.com = example.com
6.5.5.2 Setting up the database #Edit source
Your next step is to initialize the database where Kerberos keeps all information about principals. Set up the database master key, which is used to protect the database from accidental disclosure (in particular if it is backed up to tape). The master key is derived from a pass phrase and is stored in a file called the stash file. This is so you do not need to enter the password every time the KDC is restarted. Make sure that you choose a good pass phrase, such as a sentence from a book opened to a random page.
When you make tape backups of the Kerberos database
(/var/lib/kerberos/krb5kdc/principal), do not back up
the stash file (which is in
/var/lib/kerberos/krb5kdc/.k5.EXAMPLE.COM).
Otherwise, everyone able to read the tape could also decrypt the database.
Therefore, keep a copy of the pass phrase in a safe or another secure
location, because you need it to restore your database from backup
tape after a crash.
To create the stash file and the database, run:
>sudokdb5_util create -r EXAMPLE.COM -s
You see the following output:
Initializing database '/var/lib/kerberos/krb5kdc/principal' for realm 'EXAMPLE.COM',
master key name 'K/M@EXAMPLE.COM'
You are prompted for the database Master Password.
It is important that you NOT FORGET this password.
Enter KDC database master key:  1
Re-enter KDC database master key to verify:  2
To verify, use the list command:
>kadmin.localkadmin>listprincs
You see several principals in the database, which are for internal use by Kerberos:
K/M@EXAMPLE.COM
kadmin/admin@EXAMPLE.COM
kadmin/changepw@EXAMPLE.COM
krbtgt/EXAMPLE.COM@EXAMPLE.COM
6.5.5.3 Creating a principal #Edit source
Create two Kerberos principals for yourself: one normal principal for
everyday work and one for administrative tasks relating to Kerberos. Assuming
your login name is suzanne, proceed as follows:
>kadmin.localkadmin>ank suzanne
You see the following output:
suzanne@EXAMPLE.COM's Password: 1
Verifying password: 2
Next, create another principal named
suzanne/admin by typing
ank suzanne/admin at
the kadmin prompt. The admin
suffixed to your user name is a role. Later, use this
role when administering the Kerberos database. A user can have several roles
for different purposes. Roles act like different accounts that
have similar names.
6.5.5.4 Starting the KDC #Edit source
Start the KDC daemon and the kadmin daemon. To start the daemons manually, enter:
>sudosystemctl start krb5kdc sudo systemctl start kadmind
Also make sure that the services KDC (krb5kdc)
and kadmind (kadmind) are started by default when
the server machine is rebooted. Enable them by entering:
>sudosystemctl enable krb5kdc kadmind
or by using the YaST .
6.5.6 Configuring Kerberos clients #Edit source
When the supporting infrastructure is in place (DNS, NTP) and the KDC has been properly configured and started, configure the client machines. To configure a Kerberos client, use one of the two manual approaches described below.
When configuring Kerberos, there are two approaches you can take—static
configuration in the /etc/krb5.conf file or dynamic
configuration with DNS. With DNS configuration, Kerberos applications try to
locate the KDC services using DNS records. With static configuration, add
the host names of your KDC server to krb5.conf (and
update the file whenever you move the KDC or reconfigure your realm in
other ways).
DNS-based configuration is generally a lot more flexible and the amount of
configuration work per machine is a lot less. However, it requires that
your realm name is either the same as your DNS domain or a subdomain of it.
Configuring Kerberos via DNS also creates a security issue: An attacker can
seriously disrupt your infrastructure through your DNS (by shooting down
the name server, spoofing DNS records, etc.). However, this amounts to a
denial of service at worst. A similar scenario applies to the static
configuration case unless you enter IP addresses in
krb5.conf instead of host names.
6.5.6.1 Static configuration #Edit source
One way to configure Kerberos is to edit /etc/krb5.conf.
The file installed by default contains sample entries. Erase all
of these entries before starting. krb5.conf is made
up of several sections (stanzas), each introduced by the section name in
brackets like [this].
To configure your Kerberos clients, add the following stanza to
krb5.conf (where
kdc.example.com is the host
name of the KDC):
[libdefaults]
        default_realm = EXAMPLE.COM

[realms]
        EXAMPLE.COM = {
                kdc = kdc.example.com
                admin_server = kdc.example.com
        }
The default_realm line sets the default realm for Kerberos
applications. If you have several realms, add additional statements to the
[realms] section.
Also add a statement to this file that tells applications how to map host
names to a realm. For example, when connecting to a remote host, the Kerberos
library needs to know in which realm this host is located. This must be
configured in the [domain_realms] section:
[domain_realm]
.example.com = EXAMPLE.COM
www.example.org = EXAMPLE.COM
This tells the library that all hosts in the
example.com DNS domains are in the
EXAMPLE.COM Kerberos realm. One external
host named www.example.org should also be considered
a member of the EXAMPLE.COM realm.
6.5.6.2 DNS-based configuration #Edit source
DNS-based Kerberos configuration makes heavy use of SRV records. See (RFC2052) A DNS RR for specifying the location of services at https://datatracker.ietf.org/doc/html/rfc2052.
The name of an SRV record, as far as Kerberos is concerned, is always in the
format _service._proto.realm, where realm is the Kerberos
realm. Domain names in DNS are case-insensitive, so case-sensitive Kerberos
realms would break when using this configuration method.
_service is a service name (different names are used
when trying to contact the KDC or the password service, for example).
_proto can be either _udp or
_tcp, but not all services support both protocols.
The data portion of SRV resource records consists of a priority value, a weight, a port number, and a host name. The priority defines the order in which hosts should be tried (lower values indicate a higher priority). The weight value is there to support load balancing among servers of equal priority. You probably do not need any of this, so it is okay to set these to zero.
MIT Kerberos currently looks up the following names when looking for services:
- _kerberos
This defines the location of the KDC daemon (the authentication and ticket granting server). Typical records look like this:
_kerberos._udp.EXAMPLE.COM.  IN  SRV    0 0 88 kdc.example.com.
_kerberos._tcp.EXAMPLE.COM.  IN  SRV    0 0 88 kdc.example.com.
- _kerberos-adm
This describes the location of the remote administration service. Typical records look like this:
_kerberos-adm._tcp.EXAMPLE.COM. IN SRV 0 0 749 kdc.example.com.
Because kadmind does not support UDP, there should be no
_udprecord.
As with the static configuration file, there is a mechanism to inform
clients that a specific host is in the EXAMPLE.COM
realm, even if it is not part of the example.com DNS
domain. This can be done by attaching a TXT record to
_kerberos.host_name, as shown here:
_kerberos.www.example.org. IN TXT "EXAMPLE.COM"
6.5.6.3 Adjusting the clock skew #Edit source
The clock skew is the tolerance for accepting tickets with time stamps that do not exactly match the host's system clock. The clock skew is set to 300 seconds (five minutes). This means a ticket can have a time stamp somewhere between five minutes behind and five minutes ahead of the server's clock.
When using NTP to synchronize all hosts, you can reduce this value to
about one minute. The clock skew value can be set in
/etc/krb5.conf like this:
[libdefaults]
        clockskew = 60
6.5.7 Configuring remote Kerberos administration #Edit source
To be able to add and remove principals from the Kerberos database without
accessing the KDC's console directly, tell the Kerberos administration server
which principals are allowed to do what by editing
/var/lib/kerberos/krb5kdc/kadm5.acl. The ACL (access
control list) file allows you to specify privileges with a precise degree
of control. For details, refer to the manual page with
man 8 kadmind.
For now, grant yourself the privilege to administer the database by putting the following line into the file:
suzanne/admin *
Replace the user name suzanne with your own. Restart
kadmind for the change to take effect.
You should now be able to perform Kerberos administration tasks remotely using the kadmin tool. First, obtain a ticket for your admin role and use that ticket when connecting to the kadmin server:
> kadmin -p suzanne/admin
Authenticating as principal suzanne/admin@EXAMPLE.COM with password.
Password for suzanne/admin@EXAMPLE.COM:
kadmin:  getprivs
current privileges: GET ADD MODIFY DELETE
kadmin:
Using the getprivs command, verify which privileges you
have. The list shown above is the full set of privileges.
As an example, modify the principal suzanne:
> kadmin -p suzanne/admin
Authenticating as principal suzanne/admin@EXAMPLE.COM with password.
Password for suzanne/admin@EXAMPLE.COM:

kadmin:  getprinc suzanne
Principal: suzanne@EXAMPLE.COM
Expiration date: [never]
Last password change: Wed Jan 12 17:28:46 CET 2005
Password expiration date: [none]
Maximum ticket life: 0 days 10:00:00
Maximum renewable life: 7 days 00:00:00
Last modified: Wed Jan 12 17:47:17 CET 2005 (admin/admin@EXAMPLE.COM)
Last successful authentication: [never]
Last failed authentication: [never]
Failed password attempts: 0
Number of keys: 2
Key: vno 1, Triple DES cbc mode with HMAC/sha1, no salt
Key: vno 1, DES cbc mode with CRC-32, no salt
Attributes:
Policy: [none]

kadmin:  modify_principal -maxlife "8 hours" suzanne
Principal "suzanne@EXAMPLE.COM" modified.
kadmin:  getprinc suzanne
Principal: suzanne@EXAMPLE.COM
Expiration date: [never]
Last password change: Wed Jan 12 17:28:46 CET 2005
Password expiration date: [none]
Maximum ticket life: 0 days 08:00:00
Maximum renewable life: 7 days 00:00:00
Last modified: Wed Jan 12 17:59:49 CET 2005 (suzanne/admin@EXAMPLE.COM)
Last successful authentication: [never]
Last failed authentication: [never]
Failed password attempts: 0
Number of keys: 2
Key: vno 1, Triple DES cbc mode with HMAC/sha1, no salt
Key: vno 1, DES cbc mode with CRC-32, no salt
Attributes:
Policy: [none]
kadmin:
This changes the maximum ticket life time to eight hours. For more
information about the kadmin command and the options
available, see the krb5-doc package or refer to
the man 8 kadmin manual page.
6.5.8 Creating Kerberos service principals #Edit source
So far, only user credentials have been discussed. However,
Kerberos-compatible services need to authenticate themselves to the
client user, too. Therefore, special service principals must be in the
Kerberos database for each service offered in the realm. For example, if
ldap.example.com offers an LDAP service, you need a service principal,
ldap/ldap.example.com@EXAMPLE.COM, to authenticate this
service to all clients.
The naming convention for service principals is
SERVICE/HOSTNAME@REALM,
where HOSTNAME is the host's fully qualified
host name.
Valid service descriptors are:
|
Service Descriptor |
Service |
|---|---|
|
|
Telnet, RSH, SSH |
|
|
NFSv4 (with Kerberos support) |
|
|
HTTP (with Kerberos authentication) |
|
|
IMAP |
|
|
POP3 |
|
|
LDAP |
Service principals are similar to user principals, but have significant differences. The main difference between a user principal and a service principal is that the key of the former is protected by a password. When a user obtains a ticket-granting ticket from the KDC, they needs to type their password, so Kerberos can decrypt the ticket. It would be inconvenient for system administrators to obtain new tickets for the SSH daemon every eight hours or so.
Instead, the key required to decrypt the initial ticket for the service
principal is extracted by the administrator from the KDC only once and
stored in a local file called the keytab. Services
such as the SSH daemon read this key and use it to obtain new tickets
automatically, when needed. The default keytab file resides in
/etc/krb5.keytab.
To create a host service principal for jupiter.example.com enter
the following commands during your kadmin session:
> kadmin -p suzanne/admin
Authenticating as principal suzanne/admin@EXAMPLE.COM with password.
Password for suzanne/admin@EXAMPLE.COM:
kadmin:  addprinc -randkey host/jupiter.example.com
WARNING: no policy specified for host/jupiter.example.com@EXAMPLE.COM;
defaulting to no policy
Principal "host/jupiter.example.com@EXAMPLE.COM" created.
Instead of setting a password for the new principal, the
-randkey flag tells kadmin to generate
a random key. This is used here because no user interaction is wanted for
this principal. It is a server account for the machine.
Finally, extract the key and store it in the local keytab file
/etc/krb5.keytab. This file is owned by the superuser,
so you must be root to execute
the next command in the kadmin shell:
kadmin:  ktadd host/jupiter.example.com
Entry for principal host/jupiter.example.com with kvno 3, encryption type Triple
DES cbc mode with HMAC/sha1 added to keytab WRFILE:/etc/krb5.keytab.
Entry for principal host/jupiter.example.com with kvno 3, encryption type DES
cbc mode with CRC-32 added to keytab WRFILE:/etc/krb5.keytab.
kadmin:
When completed, make sure that you destroy the admin ticket obtained with
kinit above with kdestroy.
6.5.9 Enabling PAM support for Kerberos #Edit source
Warning: Incomplete configuration locks users out
An incomplete Kerberos configuration may lock you out of your
system, including the root user. To prevent this, add the
ignore_unknown_principals directive to the
pam_krb5 module after you have added
the pam_krb5 module to the existing PAM configuration
files as described below.
>sudopam-config --add --krb5-ignore_unknown_principals
This directs the pam_krb5 module to ignore
errors that would otherwise cause the account phase to fail.
openSUSE® Leap comes with a PAM module named pam_krb5,
which supports Kerberos login and password update. This module can be used by
applications such as console login, su, and graphical
login applications like GDM. That is, it can be used in all cases where the
user enters a password and expects the authenticating application to obtain
an initial Kerberos ticket on their behalf. To configure PAM support for
Kerberos, use the following command:
>sudopam-config --add --krb5
The above command adds the pam_krb5 module to the existing
PAM configuration files and makes sure it is called in the right order. To
make precise adjustments to how pam_krb5 is
used, edit the file /etc/krb5.conf and add default
applications to PAM. For details, refer to the manual page with
man 5 pam_krb5.
The pam_krb5 module was specifically not designed for
network services that accept Kerberos tickets as part of user authentication.
This is an entirely different matter, and is discussed below.
6.5.10 Configuring SSH for Kerberos authentication #Edit source
OpenSSH supports Kerberos authentication in both protocol version 1 and 2. In version 1, there are special protocol messages to transmit Kerberos tickets. Version 2 does not use Kerberos directly anymore, but relies on GSSAPI, the General Security Services API. This is a programming interface that is not specific to Kerberos—it was designed to hide the peculiarities of the underlying authentication system, be it Kerberos, a public-key authentication system like SPKM, or others. However, the included GSSAPI library only supports Kerberos.
To use sshd with Kerberos authentication, edit
/etc/ssh/sshd_config and set the following options:
# These are for protocol version 1
#
# KerberosAuthentication yes
# KerberosTicketCleanup yes

# These are for version 2 - better to use this
GSSAPIAuthentication yes
GSSAPICleanupCredentials yes
Then restart your SSH daemon using sudo systemctl restart
sshd.
To use Kerberos authentication with protocol version 2, enable it on the
client side as well. Do this either in the system-wide configuration file
/etc/ssh/ssh_config or on a per-user level by
editing ~/.ssh/config. In both cases, add the
option GSSAPIAuthentication yes.
You should now be able to connect using Kerberos authentication. Use
klist to verify that you have a valid ticket, then
connect to the SSH server. To force SSH protocol version 1, specify the
-1 option on the command line.
Tip: More information
The file
/usr/share/doc/packages/openssh/README.kerberos
discusses the interaction of OpenSSH and Kerberos in more detail.
Tip: Additional directives for protocol version 2
The GSSAPIKeyExchange mechanism (RFC 4462) is
supported. This directive specifies how host keys are exchanged. For more
information, see the sshd_config manual page (man
sshd_config).
6.5.11 Using LDAP and Kerberos #Edit source
While Kerberos provides authentication, LDAP is used for authorization and identification. Both services can work together.
For secure connections,389 Directory Server supports different ways of encrypting data:
SSL/TLS connections, Start TLS connections, and SASL authentication. Simple
Authentication and Security Layer (SASL) is a network protocol designed for
authentication. The SASL implementation used on openSUSE Leap is
cyrus-sasl. Kerberos authentication is performed through
GSS-API (General Security Services API), provided by the
cyrus-sasl-gssapi package. Using GSS-API, 389 Directory Server uses
Kerberos tickets to authenticate sessions and encrypt data.
With the SASL framework you can use different mechanisms to authenticate a user to the server. In Kerberos, authentication is always mutual. This means that not only have you authenticated yourself to the 389 Directory Server, but also the 389 Directory Server has authenticated itself to you. In particular, this means communication is with the desired server, rather than with a random service set up by an attacker.
To enable Kerberos to bind to the 389 Directory Server, create a principal
ldap/ldap.example.com and add that to the keytab. The
credentials used by the 389 Directory Server to authenticate are given to other servers
by the keytab. 389 Directory Server assigns a keytab through the
KRB5_KTNAME environment variable.
To set the variable, proceed as follows:
>sudosystemctl edit dirsrv@INSTANCEIf you used the default name for the 389 Directory Server instance, replace INSTANCE with
localhost.Add the following:
[Service]
  Environment=KRB5_KTNAME=/etc/dirsrv/slapd-INSTANCE/krb5.keytab
The keytab file needs to be readable by the account under which the 389 Directory Server runs (for example,
dirserv):>sudochown dirsrv:dirsrv /etc/dirsrv/slapd-INSTANCE/krb5.keytab>sudochmod 600 /etc/dirsrv/slapd-INSTANCE/krb5.keytab
6.5.11.1 Using Kerberos authentication with LDAP #Edit source
To obtain and cache an initial ticket-granting ticket, use the principal that has been created in Section 6.5.5.3, “Creating a principal”:
> kinit suzanne@EXAMPLE.COMTo check if GSSAPI authentication works, run:
> ldapwhoami -Y GSSAPI -H ldap://ldapkdc.example.com
dn: uid=testuser,ou=People,dc=example,dc=com
GSSAPI uses the ccache to authenticate the user to the
389 Directory Server without the user's password.
6.5.11.2 Configuring SASL identity mapping #Edit source
When processing a SASL bind request, the 389 Directory Server maps the SASL
authentication ID (used to authenticate to the Directory Server) with an
LDAP entry stored within the server. When using Kerberos, the SASL user ID
has the following format:
userid@REALM,
such as tux@example.com. This ID must be converted into the
DN of the user's Directory Server entry, such as
uid=tux,ou=people,dc=example,dc=com.
The 389 Directory Server comes with default maps for most common configurations.
However, you can create customized maps.
Procedure 6.1, “Managing maps” shows how to list and display a
map, how to delete a map and how to create a custom map.
Procedure 6.1: Managing maps #
To list the existing SASL maps:
>dsconf INSTANCE sasl list Kerberos uid mapping rfc 2829 dn syntax rfc 2829u syntax uid mappingTo display a map:
>sudodsconf INSTANCE sasl get "Kerberos uid mapping" dn: cn=Kerberos uid mapping,cn=mapping,cn=sasl,cn=config cn: Kerberos uid mapping nsSaslMapBaseDNTemplate: dc=\2,dc=\3 nsSaslMapFilterTemplate: (uid=\1) nsSaslMapRegexString: \(.*\)@\(.*\)\.\(.*\) objectClass: top objectClass: nsSaslMappingThe default map only works if your dc has two components. To delete the map (if it does not work for you):
>sudodsconf INSTANCE sasl delete "Kerberos uid mapping" Deleting SaslMapping cn=Kerberos uid mapping,cn=mapping,cn=sasl,cn=config : Successfully deleted cn=Kerberos uid mapping,cn=mapping,cn=sasl,cn=configTo create a new map:
>sudodsconf localhost sasl create --cn=bhgssapi --nsSaslMapRegexString "\ (.*\)@EXAMPLE.NET.DE" --nsSaslMapBaseDNTemplate="dc=example,dc=net,dc=de" --nsSaslMapFilterTemplate="(uid=\1)">sudoEnter value for nsSaslMapPriority : Successfully created bhgssapiDisplay the newly created map with:
>sudodsconf localhost sasl get "bhgssapi" dn: cn=bhgssapi,cn=mapping,cn=sasl,cn=config cn: bhgssapi nsSaslMapBaseDNTemplate: dc=example,dc=net,dc=de nsSaslMapFilterTemplate: (uid=\1) nsSaslMapPriority: 100 nsSaslMapRegexString: \(.*\)@EXAMPLE.NET.DE objectClass: top objectClass: nsSaslMappingWith this, you can check only the users of a specific realm and remap them to a different dc base. As you can see, the new map has 3
dccomponents, so the default maps would not have worked for this realm (EXAMPLE.NET.DE), only for a realm likeEXAMPLE.NET.
6.6 Kerberos and NFS #Edit source
Most NFS servers can export file systems using any combination of the
default “trust the network” form of security, known as
sec=sys, and three different levels of Kerberos-based
security, sec=krb5, sec=krb5i, and
sec=krb5p. The sec option is set as a
mount option on the client. It is often the case that the NFS service is
configured first and used with sec=sys, and then Kerberos
can be imposed afterwards. In this case it is likely that the server is
configured to support both sec=sys and one of the Kerberos
levels, and then after all clients have transitioned, the
sec=sys support is removed, thus achieving true
security. The transition to Kerberos should be transparent if done in an
orderly manner. However there is one subtle detail of NFS behavior that
works differently when Kerberos is used, and the implications of this need to
be understood and addressed. See
Section 6.6.1, “Group membership”.
The three Kerberos levels indicate different levels of security. With more security comes a need for more processor power to encrypt and decrypt messages. Choosing the right balance is an important consideration when planning a roll-out of Kerberos for NFS.
krb5 provides only authentication. The server can know
who sent a request, and the client can know that the server sent a reply. No
security is provided for the content of the request or reply, so an attacker
with physical network access could transform the request or reply, or both,
in various ways to deceive either server or client. They cannot directly
read or change any file that the authenticated user could not read or
change, but almost anything is theoretically possible.
krb5i adds integrity checks to all messages. With
krb5i, an attacker cannot modify any request or reply,
but they can view all the data exchanged, and so could discover the content
of any file that is read.
krb5p adds privacy to the protocol. As well as reliable
authentication and integrity checking, messages are fully encrypted so an
attacker can only know that messages were exchanged between client and
server, and cannot extract other information directly from the message.
Whether information can be extracted from message timing is a separate
question that Kerberos does not address.
6.6.1 Group membership #Edit source
The one behavioral difference between sec=sys and the
Kerberos security levels that might be visible is related to group
membership. In Unix and Linux, each file system access comes from a process
that is owned by a particular user and has a particular group owner and several
supplemental groups. Access rights to files can vary based on the
owner and the groups.
With sec=sys, the user-id, group-id, and a list of up to
16 supplementary groups are sent to the server in each request.
If a user is a member of more than 16 supplementary groups, the extra groups are lost and files may not be accessible over NFS that the user would normally expect to have access to. For this reason, most sites that use NFS find a way to limit all users to at most 16 supplementary groups.
If the user runs the newgrp command or runs a
set-group-id program, either of which can change the list of groups they
are a member of, these changes take effect immediately and provide
different accesses over NFS.
With Kerberos, group information is not sent in requests. Only the user is identified (using a Kerberos “principal”), and the server performs a lookup to determine the user ID and group list for that principal. This means that if the user is a member of more than 16 groups, these group memberships are used in determining file access permissions. However it also means that if the user changes a group-id on the client, the server does not notice the change and does not take it into account in determining access rights.
The improvement of having access to more groups brings a real benefit, and the loss of not being able to change groups is not noticed as it is not widely used. A site administrator considering the use of Kerberos should be aware of the difference though and ensure that it does not cause problems.
6.6.2 Performance and scalability #Edit source
Using Kerberos for security requires extra CPU power for encrypting and
decrypting messages. How much extra CPU power is required and whether the
difference is noticeable varies with different hardware and different
applications. If the server or client are already saturating the available
CPU power, it is likely that a performance drop is measurable when
switching from sec=sys to Kerberos. If there is spare CPU
capacity available, it is possible that the transition does not
result in any throughput change. The only way to be sure how much impact
the use of Kerberos has is to test your load on your hardware.
The only configuration options that might reduce the load also reduce
the quality of the protection offered. sec=krb5 should
produce noticeably less load than sec=krb5p but, as
discussed above, it does not produce strong security. Similarly it is
possible to adjust the list of ciphers that Kerberos can choose from, and this
might change the CPU requirement. However the defaults are carefully chosen
and should not be changed without similar careful consideration.
The other possible performance issue when configuring NFS to use Kerberos involves availability of the Kerberos authentication servers, known as the KDC or Key Distribution Center.
The use of NFS adds load to such servers to the same degree that adding the
use of Kerberos for any other services adds some load. Every time a given user
(Kerberos principal) establishes a session with a service, for example by
accessing files exported by a particular NFS server, the client needs to
negotiate with the KDC. Once a session key has been negotiated, the client
server can communicate without further help for many hours, depending on
details of the Kerberos configuration, particularly the
ticket_lifetime setting.
The concerns most likely to affect the provisioning of Kerberos KDC servers are availability and peak usage.
As with other core services such as DNS, LDAP or similar name-lookup
services, having two servers that are reasonably “close” to every client
provides good availability for modest resources. Kerberos allows for multiple
KDC servers with flexible models for database propagation, so distributing
servers as needed around campuses, buildings and even cabinets is
straightforward. The best mechanism to ensure each client finds a nearby
Kerberos server is to use split-horizon DNS with each building (or similar)
getting different details from the DNS server. If this is not possible,
then managing the /etc/krb5.conf file to be different
at different locations is a suitable alternative.
As access to the Kerberos KDC is infrequent, load is only likely to be a problem at peak times. If thousands of people all log in between 9:00 and 9:05, then the servers receive many more requests-per-minute than they might in the middle of the night. The load on the Kerberos server is likely to be more than that on an LDAP server, but not orders of magnitude more. A sensible guideline is to provision Kerberos replicas in the same manner that you provision LDAP replicas, and then monitor performance to determine if demand ever exceeds capacity.
6.6.3 Master KDC, multiple domains, and trust relationships #Edit source
One service of the Kerberos KDC that is not easily distributed is the handling of updates, such as password changes and new user creation. These must happen at a single master KDC.
These updates are not likely to happen with such frequency that any significant load is generated, but availability could be an issue. It can be annoying to create a new user or change a password, and the master KDC on the other side of the world is temporarily unavailable.
When an organization is geographically distributed and has a policy of handling administration tasks locally at each site, it can be beneficial to create multiple Kerberos domains, one for each administrative center. Each domain would then have its own master KDC which would be geographically local. Users in one domain can still get access to resources in another domain by setting up trust relationships between domains.
The easiest arrangement for multiple domains is to have a global domain (for example, EXAMPLE.COM) and local domains (for example, ASIA.EXAMPLE.COM, EUROPE.EXAMPLE.COM). If the global domain is configured to trust each local domain, and each local domain is configured to trust the global domain, then fully transitive trust is available between any pair of domains, and any principal can establish a secure connection with any service. Ensuring appropriate access rights to resources, for example files provided by that service, depends on the user name lookup service used, and the functionality of the NFS file server, and is beyond the scope of this document.
6.7 More information #Edit source
The official site of MIT Kerberos is https://web.mit.edu/kerberos. There, find links to any other relevant resource concerning Kerberos, including Kerberos installation, user, and administration guides.
The book Kerberos—A Network Authentication System by Brian Tung (ISBN 0-201-37924-4) offers extensive information.
7 Active Directory support #Edit source
Active Directory* (AD) is a directory-service based on LDAP, Kerberos, and other services. It is used by Microsoft* Windows* to manage resources, services, and people. In a Microsoft Windows network, Active Directory provides information about these objects, restricts access to them, and enforces policies. openSUSE® Leap lets you join existing Active Directory domains and integrate your Linux machine into a Windows environment.
7.1 Integrating Linux and Active Directory environments #Edit source
With a Linux client (configured as an Active Directory client) that is joined to an existing Active Directory domain, benefit from various features not available on a pure openSUSE Leap Linux client:
- Browsing shared files and directories with SMB
GNOME Files (previously called Nautilus) supports browsing shared resources through SMB.
- Sharing files and directories with SMB
GNOME Files supports sharing directories and files as in Windows.
- Accessing and manipulating user data on the Windows server
Through GNOME Files, users can access their Windows user data and can edit, create, and delete files and directories on the Windows server. Users can access their data without having to enter their password multiple times.
- Offline authentication
Users can log in and access their local data on the Linux machine even if they are offline or the Active Directory server is unavailable for other reasons.
- Windows password change
This port of Active Directory support in Linux enforces corporate password policies stored in Active Directory. The display managers and console support password change messages and accept your input. You can even use the Linux
passwdcommand to set Windows passwords.- Single sign-on through kerberized applications
Many desktop applications are Kerberos-enabled (kerberized), which means they can transparently handle authentication for the user without the need for password reentry at Web servers, proxies, groupware applications, or other locations.
Note: Managing Unix attributes from Windows Server* 2016 and later
In Windows Server 2016 and later, Microsoft has removed the role IDMU/NIS Server and along with it the Unix Attributes plug-in for the Active Directory Users and Computers MMC snap-in.
However, Unix attributes can still be managed manually when are enabled in the Active Directory Users and Computers MMC snap-in. For more information, see https://blogs.technet.microsoft.com/activedirectoryua/2016/02/09/identity-management-for-unix-idmu-is-deprecated-in-windows-server/.
Alternatively, use the method described in Procedure 7.1, “Joining an Active Directory domain using ” to complete attributes on the client side (in particular, see Step 6.c).
The following section contains technical background for most of the previously named features. For more information about file and printer sharing using Active Directory, see Book “GNOME User Guide”.
7.2 Background information for Linux Active Directory support #Edit source
Many system components need to interact flawlessly to integrate a Linux client into an existing Windows Active Directory domain. The following sections focus on the underlying processes of the key events in Active Directory server and client interaction.
To communicate with the directory service, the client needs to share at least two protocols with the server:
- LDAP
LDAP is a protocol optimized for managing directory information. A Windows domain controller with Active Directory can use the LDAP protocol to exchange directory information with the clients. To learn more about LDAP, refer to Chapter 5, LDAP with 389 Directory Server.
- Kerberos
Kerberos is a third-party trusted authentication service. All its clients trust Kerberos authorization of another client's identity, enabling kerberized single sign-on (SSO) solutions. Windows supports a Kerberos implementation, making Kerberos SSO possible even with Linux clients. To learn more about Kerberos in Linux, refer to Chapter 6, Network authentication with Kerberos.
Depending on which YaST module you use to set up Kerberos authentication, different client components process account and authentication data:
- Solutions based on SSSD
The
sssddaemon is the central part of this solution. It handles all communication with the Active Directory server.To gather name service information,
sssd_nssis used.To authenticate users, the
pam_sssmodule for PAM is used. The creation of user homes for the Active Directory users on the Linux client is handled bypam_mkhomedir.For more information about PAM, see Chapter 2, Authentication with PAM.
- Solution based on Winbind (Samba)
The
winbindddaemon is the central part of this solution. It handles all communication with the Active Directory server.To gather name service information,
nss_winbindis used.To authenticate users, the
pam_winbindmodule for PAM is used. The creation of user homes for the Active Directory users on the Linux client is handled bypam_mkhomedir.For more information about PAM, see Chapter 2, Authentication with PAM.
Figure 7.1, “Schema of Winbind-based Active Directory authentication” highlights the most prominent components of Winbind-based Active Directory authentication.

Figure 7.1: Schema of Winbind-based Active Directory authentication #
Applications that are PAM-aware, like the login routines and the GNOME display manager, interact with the PAM and NSS layer to authenticate against the Windows server. Applications supporting Kerberos authentication (such as file managers, Web browsers, or e-mail clients) use the Kerberos credential cache to access user's Kerberos tickets, making them part of the SSO framework.
7.2.1 Domain join #Edit source
During domain join, the server and the client establish a secure relation. On the client, the following tasks need to be performed to join the existing LDAP and Kerberos SSO environment provided by the Windows domain controller. The entire join process is handled by the YaST Domain Membership module, which can be run during installation or in the installed system:
The Windows domain controller providing both LDAP and KDC (Key Distribution Center) services is located.
A machine account for the joining client is created in the directory service.
An initial ticket granting ticket (TGT) is obtained for the client and stored in its local Kerberos credential cache. The client needs this TGT to get further tickets allowing it to contact other services, like contacting the directory server for LDAP queries.
NSS and PAM configurations are adjusted to enable the client to authenticate against the domain controller.
During client boot, the winbind daemon is started and retrieves the initial Kerberos ticket for the machine account. winbindd automatically refreshes the machine's ticket to keep it valid. To keep track of the current account policies, winbindd periodically queries the domain controller.
7.2.2 Domain login and user homes #Edit source
The login manager of GNOME (GDM) has been extended to allow the handling of Active Directory domain login. Users can choose to log in to the primary domain the machine has joined or to one of the trusted domains with which the domain controller of the primary domain has established a trust relationship.
User authentication is mediated by several PAM modules as described in Section 7.2, “Background information for Linux Active Directory support”. If there are errors, the error codes are translated into user-readable error messages that PAM gives at login through any of the supported methods (GDM, console and SSH):
Password has expiredThe user sees a message stating that the password has expired and needs to be changed. The system prompts for a new password and informs the user if the new password does not comply with corporate password policies (for example the password is too short, too simple, or already in the history). If a user's password change fails, the reason is shown and a new password prompt is given.
Account disabledThe user sees an error message stating that the account has been disabled and to contact the system administrator.
Account locked outThe user sees an error message stating that the account has been locked and to contact the system administrator.
Password has to be changedThe user can log in but receives a warning that the password needs to be changed soon. This warning is sent three days before that password expires. After expiration, the user cannot log in.
Invalid workstationWhen a user is restricted to specific workstations and the current openSUSE Leap machine is not among them, a message appears that this user cannot log in from this workstation.
Invalid logon hoursWhen a user is only allowed to log in during working hours and tries to log in outside working hours, a message informs the user that logging in is not possible at that time.
Account expiredAn administrator can set an expiration time for a specific user account. If that user tries to log in after expiration, the user gets a message that the account has expired and cannot be used to log in.
During a successful authentication, the client acquires a ticket granting ticket (TGT) from the Kerberos server of Active Directory and stores it in the user's credential cache. It also renews the TGT in the background, requiring no user interaction.
openSUSE Leap supports local home directories for Active Directory users. If configured through YaST as described in Section 7.3, “Configuring a Linux client for Active Directory”, user home directories are created when a Windows/Active Directory user first logs in to the Linux client. These home directories look and feel identical to standard Linux user home directories and work independently of the Active Directory Domain Controller.
Using a local user home, it is possible to access a user's data on this machine (even when the Active Directory server is disconnected) if the Linux client has been configured to perform offline authentication.
7.2.3 Offline service and policy support #Edit source
Users in a corporate environment must have the ability to become roaming users (for example, to switch networks or even work disconnected for some time). To enable users to log in to a disconnected machine, extensive caching was integrated into the winbind daemon. The winbind daemon enforces password policies even in the offline state. It tracks the number of failed login attempts and reacts according to the policies configured in Active Directory. Offline support is disabled by default and must be explicitly enabled in the YaST Domain Membership module.
When the domain controller has become unavailable, the user can still access network resources (other than the Active Directory server itself) with valid Kerberos tickets that have been acquired before losing the connection (as in Windows). Password changes cannot be processed unless the domain controller is online. While disconnected from the Active Directory server, a user cannot access any data stored on this server. When a workstation has become disconnected from the network entirely and connects to the corporate network again later, openSUSE Leap acquires a new Kerberos ticket when the user has locked and unlocked the desktop (for example, using a desktop screen saver).
7.3 Configuring a Linux client for Active Directory #Edit source
Before your client can join an Active Directory domain, adjustments must be made to your network setup to ensure the flawless interaction of client and server.
- DNS
Configure your client machine to use a DNS server that can forward DNS requests to the Active Directory DNS server. Alternatively, configure your machine to use the Active Directory DNS server as the name service data source.
- NTP
To succeed with Kerberos authentication, the client must have its time set accurately. It is recommended to use a central NTP time server for this purpose (this can be also the NTP server running on your Active Directory domain controller). If the clock skew between your Linux host and the domain controller exceeds a certain limit, Kerberos authentication fails and the client is logged in using the weaker NTLM (NT LAN Manager) authentication. For more details about using Active Directory for time synchronization, see Procedure 7.2, “Joining an Active Directory domain using ”.
- Firewall
To browse your network neighborhood, either disable the firewall entirely or mark the interface used for browsing as part of the internal zone.
To change the firewall settings on your client, log in as
rootand start the YaST firewall module. Select . Select your network interface from the list of interfaces and click . Select and apply your settings with . Leave the firewall settings with › . To disable the firewall, check the option, and leave the firewall module with › .- Active Directory account
You cannot log in to an Active Directory domain unless the Active Directory administrator has provided you with a valid user account for that domain. Use the Active Directory user name and password to log in to the Active Directory domain from your Linux client.
7.3.1 Choosing which YaST module to use for connecting to Active Directory #Edit source
YaST contains multiple modules that allow connecting to an Active Directory:
. Use both an identity service (usually LDAP) and a user authentication service (usually Kerberos). This option is based on SSSD and in the majority of cases is best suited for joining Active Directory domains.
This module is described in Section 7.3.2, “Joining Active Directory using ”.
. Join an Active Directory (which entails use of Kerberos and LDAP). This option is based on
winbindand is best suited for joining an Active Directory domain if support for NTLM or cross-forest trusts is necessary.This module is described in Section 7.3.3, “Joining Active Directory using ”.
7.3.2 Joining Active Directory using #Edit source
The YaST module supports authentication at an Active Directory. Additionally, it also supports the following related authentication and identification providers:
- Identification providers
. Support for legacy NSS providers via a proxy.
. FreeIPA and Red Hat Enterprise Identity Management provider.
. An LDAP provider. For more information about configuring LDAP, see
man 5 sssd-ldap.. An SSSD-internal provider for local users.
- Authentication providers
. Relay authentication to another PAM target via a proxy.
. FreeIPA and Red Hat Enterprise Identity Management provider.
. An LDAP provider.
. Kerberos authentication.
. An SSSD-internal provider for local users.
. Disables authentication explicitly.
To join an Active Directory domain using SSSD and the module of YaST, proceed as follows:
Procedure 7.1: Joining an Active Directory domain using #
Open YaST.
To be able to use DNS auto-discovery later, set up the Active Directory Domain Controller (the Active Directory server) as the name server for your client.
In YaST, click .
Select , then enter the IP address of the Active Directory Domain Controller into the text box .
Save the setting with .
From the YaST main window, start the module .
The module opens with an overview showing different network properties of your computer and the authentication method currently in use.
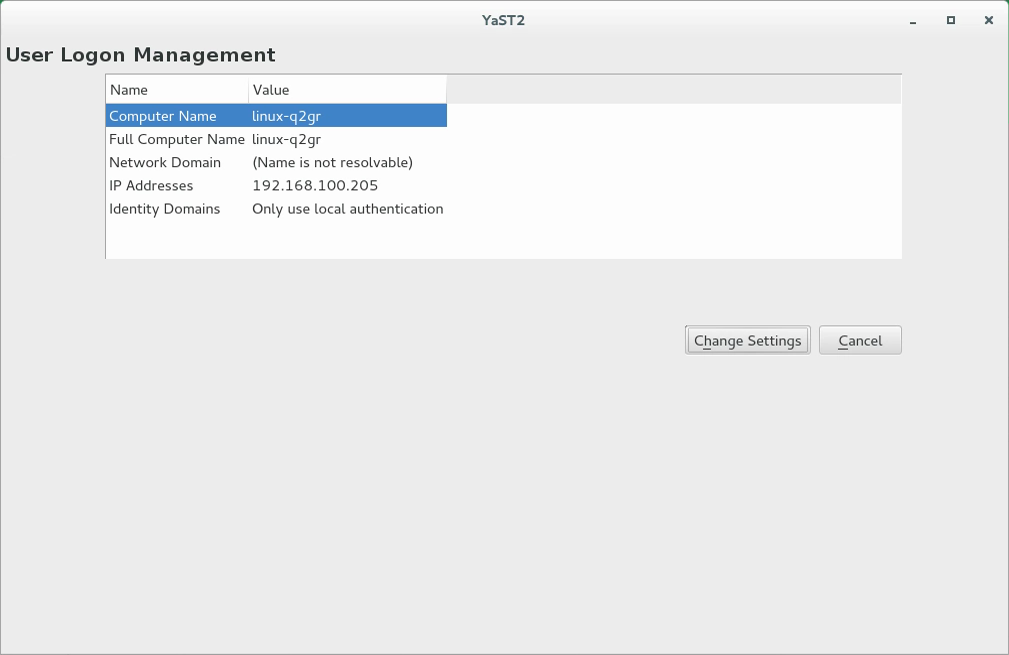
Figure 7.2: Main window of #
To start editing, click .
Now join the domain.
Click .
In the appearing dialog, specify the correct . Then specify the services to use for identity data and authentication: Select for both.
Ensure that is activated.
Click .
(Optional) You can keep the default settings in the following dialog. However, there are reasons to make changes:
If the local host name does not match the host name set on the domain controller. Find out if the host name of your computer matches the name under which your computer is known to the Active Directory Domain Controller. In a terminal, run the command
hostname, then compare its output to the configuration of the Active Directory Domain Controller.If the values differ, specify the host name from the Active Directory configuration under . Otherwise, leave the appropriate text box empty.
If you do not want to use DNS auto-discovery. Specify the that you want to use. If there are multiple Domain Controllers, separate their host names with commas.
To continue, click .
If not all software is installed already, the computer now installs missing software. It then checks whether the configured Active Directory Domain Controller is available.
If everything is correct, the following dialog should now show that it has discovered an but that you are .
In the dialog, specify the and of the Active Directory administrator account (
Administrator).To make sure that the current domain is enabled for Samba, activate .
To enroll, click .
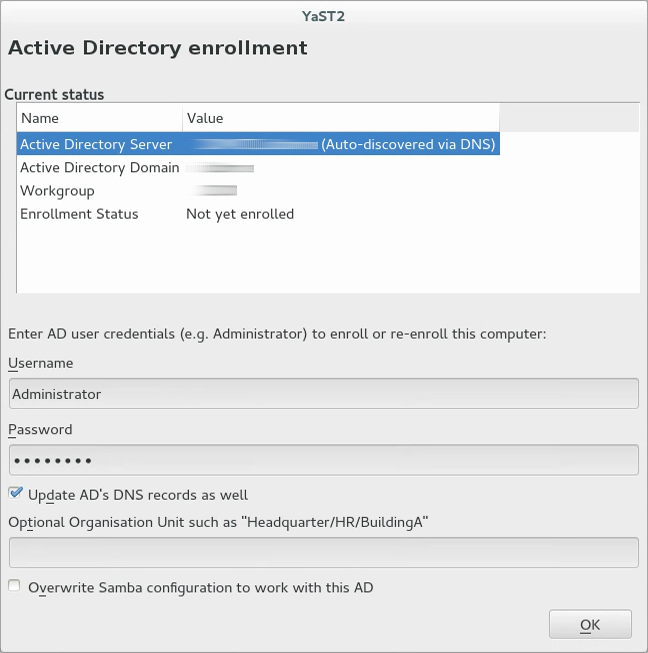
Figure 7.3: Enrolling into a domain #
You should now see a message confirming that you have enrolled successfully. Finish with .
After enrolling, configure the client using the window .
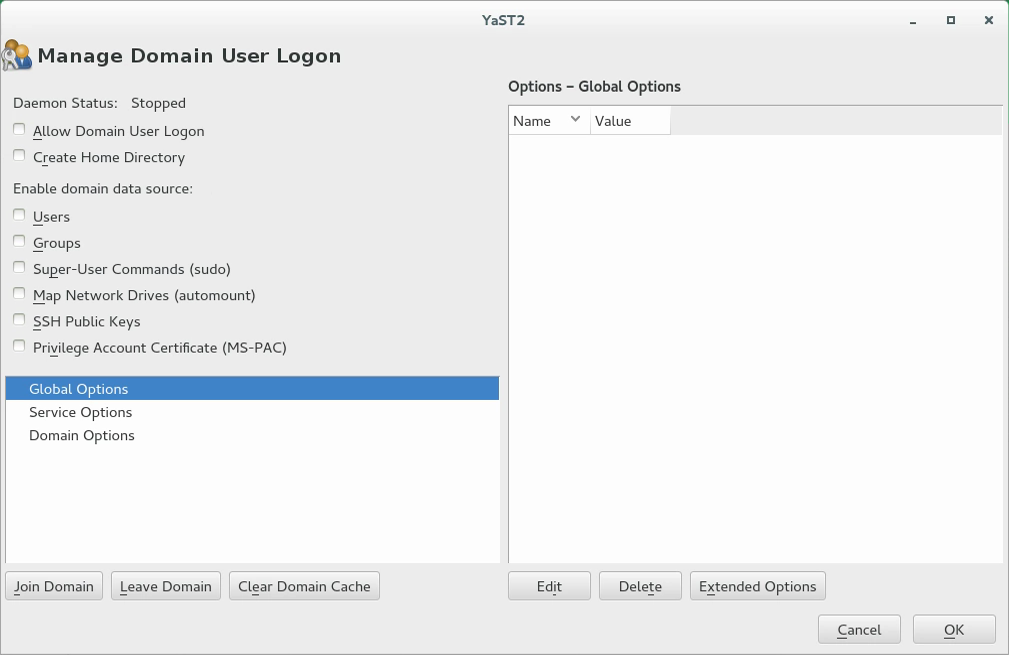
Figure 7.4: Configuration window of #
To allow logging in to the computer using login data provided by Active Directory, activate .
(Optional) Optionally, under , activate additional data sources such as information on which users are allowed to use
sudoor which network drives are available.To allow Active Directory users to have home directories, activate . The path for home directories can be set in multiple ways—on the client, on the server, or both ways:
To configure the home directory paths on the Domain Controller, set an appropriate value for the attribute
UnixHomeDirectoryfor each user. Additionally, make sure that this attribute replicated to the global catalog. For information on achieving that under Windows, see https://support.microsoft.com/en-us/kb/248717.To configure home directory paths on the client in such a way that precedence is given to the path set on the domain controller, use the option
fallback_homedir.To configure home directory paths on the client in such a way that the client setting overrides the server setting, use
override_homedir.
As settings on the Domain Controller are outside of the scope of this documentation, only the configuration of the client-side options is described in the following.
From the side bar, select › , then click . From that window, select either
fallback_homediroroverride_homedir, then click .Specify a value. To have home directories follow the format
/home/USER_NAME, use/home/%u. For more information about possible variables, see the man pagesssd.conf(man 5 sssd.conf), section override_homedir.Click .
Save the changes by clicking . Then make sure that the values displayed now are correct. To leave the dialog, click .
7.3.3 Joining Active Directory using #Edit source
To join an Active Directory domain using winbind and the
module of YaST, proceed as
follows:
Procedure 7.2: Joining an Active Directory domain using #
Log in as
rootand start YaST.Start › .
Enter the domain to join at in the screen (see Figure 7.5, “Determining Windows domain membership”). If the DNS settings on your host are properly integrated with the Windows DNS server, enter the Active Directory domain name in its DNS format (
mydomain.mycompany.com). If you enter the short name of your domain (also known as the pre–Windows 2000 domain name), YaST must rely on NetBIOS name resolution instead of DNS to find the correct domain controller.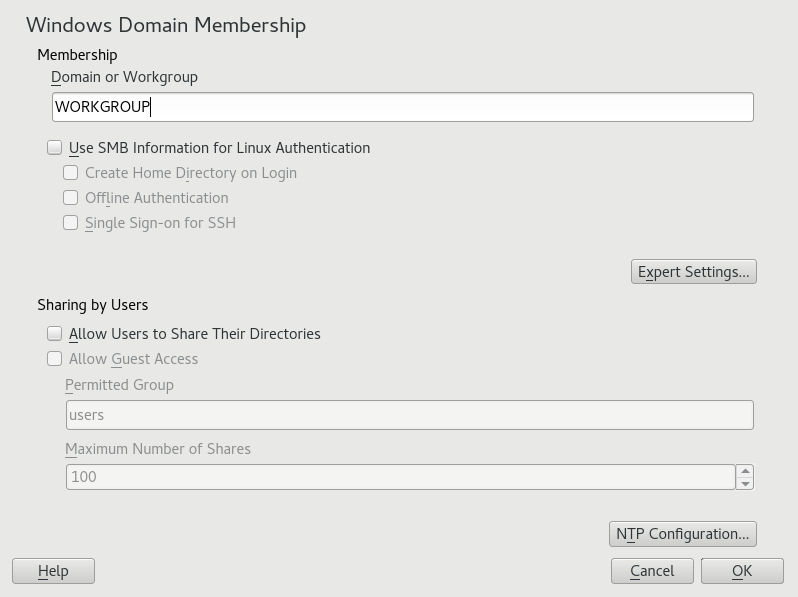
Figure 7.5: Determining Windows domain membership #
To use the SMB source for Linux authentication, activate .
To automatically create a local home directory for Active Directory users on the Linux machine, activate .
Check to allow your domain users to log in even if the Active Directory server is temporarily unavailable, or if you do not have a network connection.
To change the UID and GID ranges for the Samba users and groups, select . Let DHCP retrieve the WINS server only if you need it. This is the case when certain machines are resolved only by the WINS system.
Configure NTP time synchronization for your Active Directory environment by selecting and entering an appropriate server name or IP address. This step is obsolete if you have already entered the appropriate settings in the stand-alone YaST NTP configuration module.
Click and confirm the domain join when prompted for it.
Provide the password for the Windows administrator on the Active Directory server and click (see Figure 7.6, “Providing administrator credentials”).

Figure 7.6: Providing administrator credentials #
After you have joined the Active Directory domain, you can log in to it from your workstation using the display manager of your desktop or the console.
Important: Domain name
Joining a domain may not succeed if the domain name ends with
.local. Names ending in .local
cause conflicts with Multicast DNS (MDNS) where
.local is reserved for link-local host names.
Note: Only administrators can enroll a computer
Only a domain administrator account, such as
Administrator, can join openSUSE Leap into Active
Directory.
7.3.4 Checking Active Directory connection status #Edit source
To check whether you are successfully enrolled in an Active Directory domain, use the following commands:
klistshows whether the current user has a valid Kerberos ticket.getent passwdshows published LDAP data for all users.
7.4 Logging in to an Active Directory domain #Edit source
Provided your machine has been configured to authenticate against Active Directory and you have a valid Windows user identity, you can log in to your machine using the Active Directory credentials. Login is supported for GNOME, the console, SSH and any other PAM-aware application.
Important: Offline authentication
openSUSE Leap supports offline authentication, allowing you to log in to your client machine even when it is offline. See Section 7.2.3, “Offline service and policy support” for details.
7.4.1 GDM #Edit source
To authenticate a GNOME client machine against an Active Directory server, proceed as follows:
Click .
In the text box , enter the domain name and the Windows user name in this form:
DOMAIN_NAME\USER_NAME.Enter your Windows password.
If configured to do so, openSUSE Leap creates a user home directory on the local machine on the first login of each user authenticated via Active Directory. This allows you to benefit from the Active Directory support of openSUSE Leap while still having a fully functional Linux machine at your disposal.
7.4.2 Console login #Edit source
Besides logging in to the Active Directory client machine using a graphical front-end, you can log in using the text-based console or even remotely using SSH.
To log in to your Active Directory client from a console, enter
DOMAIN_NAME\USER_NAME
at the login: prompt and provide the password.
To remotely log in to your Active Directory client machine using SSH, proceed as follows:
At the login prompt, enter:
>ssh DOMAIN_NAME\\USER_NAME@HOST_NAMEThe
\domain and login delimiter is escaped with another\sign.Provide the user's password.
7.5 Changing passwords #Edit source
openSUSE Leap helps the user choose a suitable new password that meets the corporate security policy. The underlying PAM module retrieves the current password policy settings from the domain controller and informs the user by a message on login about the specific password quality requirements a user account typically has. Like its Windows counterpart, openSUSE Leap presents a message describing:
Password history settings
Minimum password length requirements
Minimum password age
Password complexity
The password change process cannot succeed unless all requirements have been successfully met. Feedback about the password status is given both through the display managers and the console.
GDM provides feedback about password expiration and the prompt for new passwords in an interactive mode. To change passwords in the display managers, provide the password information when prompted.
To change your Windows password, you can use the standard Linux utility,
passwd, instead of having to manipulate this data on
the server. To change your Windows password, proceed as follows:
Log in at the console.
Enter
passwd.Enter your current password when prompted.
Enter the new password.
Reenter the new password for confirmation. If your new password does not comply with the policies on the Windows server, this feedback is given to you and you are prompted for another password.
To change your Windows password from the GNOME desktop, proceed as follows:
Click the icon on the left edge of the panel.
Select .
From the section, select › .
Enter your old password.
Enter and confirm the new password.
Leave the dialog with to apply your settings.
7.6 Active Directory certificate auto-enrollment #Edit source
Certificate auto-enrollment enables network devices to automatically
enroll certificates from Active Directory Certificate Services, including
openSUSE Leap devices, with no user intervention. This is managed by Active Directory's
Group Policy, using Samba's samba-gpupdate command.
7.6.1 Configuring certificate auto-enrollment on the server #Edit source
The Windows server roles Certification Authority,
Certificate Enrollment Policy Web Service,
Certificate Enrollment Web Service and
Network Device Enrollment Service all must be installed
and configured on the Active Directory server.
Configure Group Policy auto-enrollment as described in this Microsoft documentation: https://docs.microsoft.com/en-us/windows-server/networking/core-network-guide/cncg/server-certs/configure-server-certificate-autoenrollment#configure-server-certificate-auto-enrollment.
7.6.2 Enable certificate auto-enrollment on the client #Edit source
Follow the steps in the following procedure to enable certificate on your clients.
Install the samba-gpupdate package. This automatically installs the certmonger, cepces and sscep dependencies. Samba uses
sscepto download the Certificate Authority root chain, then uses thecertmongerpaired withcepcesto monitor the host certificate templates.Join to an Active Directory domain (one where the CA has been previously configured as explained in Section 7.6.1, “Configuring certificate auto-enrollment on the server”).
On Winbind-joined machines, set the
smb.confglobal parameter by adding the lineapply group policies = yes.For SSSD-joined machines, install oddjob-gpupdate from https://github.com/openSUSE/oddjob-gpupdate.
Then verify that certificate auto-enrollment is correctly configured by running the following command on the client:
>/usr/sbin/samba-gpupdate --rsopIf you see output like the following example, it is correctly configured:
Resultant Set of Policy
Computer Policy
GPO: Default Domain Policy
==========================================================
CSE: gp_cert_auto_enroll_ext
-----------------------------------------------------------
Policy Type: Auto Enrollment Policy
-----------------------------------------------------------
[ <CA NAME> ] =
[ CA Certificate ] =
----BEGIN CERTIFICATE----
<CERTIFICATE>
----END CERTIFICATE----
[ Auto Enrollment Server ] = <DNS NAME>
Use the following command to display installed certificates:
>getcert listNumber of certificates and requests being tracked: 1. Request ID 'Machine': status: MONITORING stuck: no key pair storage: type=FILE,location='/var/lib/samba/private/certs/Machine.key' certificate: type=FILE,location='/var/lib/samba/certs/Machine.crt' CA: <CA NAME> issuer: CN=<CA NAME> subject: CN=<HOSTNAME> expires: 2017-08-15 17:37:02 UTC dns: <hostname> key usage: digitalSignature,keyEncipherment eku: id-kp-clientAuth,id-kp-serverAuth certificate template/profile: Machine
Certificates are installed in /var/lib/samba/certs
and private keys are installed in
/var/lib/samba/private/certs.
For more information, see man samba-gpupdate.
8 Setting up a freeRADIUS server #Edit source
The RADIUS (Remote Authentication Dial-In User Service) protocol has long been a standard service for manage network access. It provides authentication, authorization and accounting (AAA) for large businesses such as Internet service providers and cellular network providers, and is also popular for small networks. It authenticates users and devices, authorizes those users and devices for certain network services, and tracks use of services for billing and auditing. You do not have to use all three of the AAA protocols, but only the ones you need. For example, you may not need accounting but only client authentication, or if all you want is accounting, and client authorization is managed by something else.
It is efficient and manages thousands of requests on modest hardware. It works for all network protocols and not just dial-up, but the name remains the same.
RADIUS operates in a distributed architecture, sitting separately from the Network Access Server (NAS). User access data is stored on a central RADIUS server that is available to multiple NAS. The NAS provides the physical access to the network, such as a managed Ethernet switch, or wireless access point.
FreeRADIUS is the open source RADIUS implementation, and is the most widely used RADIUS server. In this chapter you learn how to install and test a FreeRADIUS server. Because of the numerous use cases, after your initial setup is working correctly, your next stop is the official documentation, which is detailed and thorough (see https://freeradius.org/documentation/).
8.1 Installation and testing on openSUSE Leap #Edit source
The following steps set up a simple test system. When you have verified that the server is operating correctly and you are ready to create a production configuration, you have several undo steps to perform before starting your production configuration.
First install the freeradius-server and
freeradius-server-utils
packages. Then enter /etc/raddb/certs and run
the bootstrap script to create a set of test
certificates:
#zypper in freeradius-server freeradius-server-utils#cd /etc/raddb/certs#./bootstrap
The README in the certs directory contains a
great deal of useful information. When the
bootstrap script has completed, start the server
in debugging mode:
#radiusd -X[...] Listening on auth address * port 1812 bound to server default Listening on acct address * port 1813 bound to server default Listening on auth address :: port 1812 bound to server default Listening on acct address :: port 1813 bound to server default Listening on auth address 127.0.0.1 port 18120 bound to server inner-tunnel Listening on proxy address * port 54435 Listening on proxy address :: port 58415 Ready to process requests
When you see the Listening and Ready to process requests lines,
your server has started correctly. If it does not start, read the
output carefully because it tells you what went wrong. You may direct
the output to a text file with tee:
>radiusd -X | tee radiusd.text
The next step is to test authentication with a test client and user.
The client is a client of the RADIUS server, such as a wireless
access point or switch. Clients are configured in
/etc/raddb/client.conf. Human users are
configured in
/etc/raddb/mods-config/files/authorize.
Open
/etc/raddb/mods-config/files/authorize and
uncomment the following lines:
bob   Cleartext-Password := "hello"
Reply-Message := "Hello, %{User-Name}"
A test client, client localhost, is provided in
/etc/raddb/client.conf, with a secret of
testing123. Open a second terminal, and as an
unprivileged user use the radtest command to log
in as bob:
>radtest bob hello 127.0.0.1 0 testing123Sent Access-Request Id 241 from 0.0.0.0:35234 to 127.0.0.1:1812 length 73 User-Name = "bob" User-Password = "hello" NAS-IP-Address = 127.0.0.1 NAS-Port = 0 Message-Authenticator = 0x00 Cleartext-Password = "hello" Received Access-Accept Id 241 from 127.0.0.1:1812 to 0.0.0.0:0 length 20
In your radius -X terminal, a successful login looks
like this:
(3) pap: Login attempt with password
(3) pap: Comparing with "known good" Cleartext-Password
(3) pap: User authenticated successfully
(3)     [pap] = ok
[...]
(3) Sent Access-Accept Id 241 from 127.0.0.1:1812 to 127.0.0.1:35234 length 0
(3) Finished request
Waking up in 4.9 seconds.
(3) Cleaning up request packet ID 241 with timestamp +889
Now run one more login test from a different computer on your
network. Create a client configuration on your server by uncommenting
and modifying the following entry in
clients.conf, using the IP address of your test
machine:
client private-network-1 }
  ipaddr          = 192.0.2.0/24
  secret          = testing123-1
  {
On the client machine, install
freeradius-server-utils. Try logging in from the client as bob, using the radtest command. It
is better to use the IP address of the RADIUS server rather than the
hostname because it is faster:
>radtest bob hello 192.168.2.100 0 testing123-1
If your test logins fail, review all the output to learn what went
wrong. There are several test users and test clients provided. The
configuration files are full of useful information, and we recommend
studying them. When you are satisfied with your testing and ready to
create a production configuration, remove all the test certificates
in /etc/raddb/certs and replace them with your
own certificates, comment out all the test users and clients, and
stop radiusd by pressing
Ctrl–C. Manage
the radiusd.service with
systemctl, just like any other service.
To learn how to fit a FreeRADIUS server in your network, see https://freeradius.org/documentation/ and https://networkradius.com/freeradius-documentation/ for in-depth references and howtos.
Part II Local security #Edit source
- 9 Physical security
Physical security is important. Linux production servers should be in locked data centers accessible to people that have passed security checks. Depending on the environment and circumstances, you can also consider boot loader passwords.
- 10 Software management
An important step in securing a Linux system is to determine the primary functions or roles of the Linux server. Otherwise, it can be difficult to understand what needs to be secured and securing these Linux systems can prove ineffective. Therefore, it is critical to look at the default list of soft…
- 11 File management
Servers should have separate file systems for at least
/,/boot,/var,/tmp, and/home. This prevents, for example, logging space and temporary space under/varand/tmpfrom filling up the root partition. Third-party applications should be on separate file systems as well, for example under/opt.- 12 Encrypting partitions and files
Encrypting files, partitions, and entire disks prevents unauthorized access to your data and protects your confidential files and documents.
- 13 Storage encryption for hosted applications with cryptctl
Databases and similar applications are often hosted on external servers that are serviced by third-party staff. Certain data center maintenance tasks require third-party staff to directly access affected systems. In such cases, privacy requirements necessitate disk encryption.
- 14 User management
It is important that all system and vendor accounts that are not used for logins are locked. To get a list of unlocked accounts on your system, you can check for accounts that do not have an encrypted password string starting with ! or * in the /etc/shadow file. If you lock an account using either p…
- 15 Restricting
cronandat This chapter explains how to restrict access to the
cronandatdaemons to improve the security of a system.- 16 Spectre/Meltdown checker
spectre-meltdown-checkeris a shell script to test if your system is vulnerable to the several speculative execution vulnerabilities that are in nearly all CPUs manufactured in the past 20 years. This is a hardware flaw that potentially allows an attacker to read all data on the system. On cloud computing services, where multiple virtual machines are on a single physical host, an attacker can gain access to all virtual machines. Fixing these vulnerabilities requires redesigning and replacing CPUs. Until this happens, there are several software patches that mitigate these vulnerabilities. If you have kept your SUSE systems updated, all these patches should already be installed.spectre-meltdown-checkergenerates a detailed report. It is impossible to guarantee that your system is secure, but it shows you which mitigations are in place, and potential vulnerabilities.- 17 Configuring security settings with YaST
The YaST module provides a central control panel for configuring security-related settings for openSUSE Leap. Use it to configure security aspects such as settings for the login procedure and for password creation, for boot permissions, user creation, or for default file permissions. Launch it from the YaST control center with › . The dialog opens to the , with additional configuration dialogs in the left and right panes.
- 18 The Polkit authentication framework
Polkit is an authentication framework used in graphical Linux desktop environments, for fine-grained management of access rights on the system. Traditionally, there is a strong separation of privileges on Linux between the
rootuser as the fully authorized administrator account, and all other accounts and groups on the system. These non-administrator accounts may have certain additional privileges, like accessing sound hardware through anaudiogroup. However, this kind of privilege is fixed and cannot be granted in certain specific situations, or for a certain duration of time.Instead of fully switching to the
rootuser (using programs such assudo) for gaining higher privileges, Polkit grants specific privileges to a user or group on an as-needed basis. This is controlled by configuration files that describe individual actions that need to be authorized in a dynamic context.- 19 Access control lists in Linux
POSIX ACLs (access control lists) can be used as an expansion of the traditional permission concept for file system objects. With ACLs, permissions can be defined more flexibly than with the traditional permission concept.
- 20 Intrusion detection with AIDE
Securing your systems is a mandatory task for any mission-critical system administrator. Because it is impossible to always guarantee that the system is not compromised, it is important to do extra checks regularly (for example with
cron) to ensure that the system is still under your control. This is where AIDE, the Advanced Intrusion Detection Environment, comes into play.
9 Physical security #Edit source
Physical security is important. Linux production servers should be in locked data centers accessible to people that have passed security checks. Depending on the environment and circumstances, you can also consider boot loader passwords.
Additionally, consider questions like:
Who has direct physical access to the host?
Of those that do, should they?
Can the host be protected from tampering and should it be?
The amount of physical security needed on a particular system depends on the situation, and can also vary widely depending on available funds.
9.1 System locks #Edit source
Most server racks in data centers include a locking feature. This is a hasp/cylinder lock on the front of the rack that allows you to turn an included key to a locked or unlocked position—granting or denying entry. Cage locks can help prevent someone from tampering or stealing devices/media from the servers, or opening the cases and directly manipulating/sabotaging the hardware. Preventing system reboots or the booting from alternate devices is also important (for example CD, DVDs, flash disks, etc.).
Some servers also have case locks. These locks can do different things according to the designs of the system vendor and construction. Many systems are designed to self-disable if attempts are made to open the system without unlocking. Others have device covers that do not let you plug in or unplug keyboards or mice. While locks are sometimes a useful feature, they are lower quality and easily defeated by attackers with ill intent.
9.2 Locking down the BIOS #Edit source
Tip: Secure boot
This section describes basic methods to secure the boot process. To find out about more advanced boot protection using UEFI and the secure boot feature, see Book “Reference”, Chapter 14 “UEFI (Unified Extensible Firmware Interface)”, Section 14.1 “Secure boot”.
The BIOS (Basic Input/Output System) or its successor UEFI (Unified Extensible Firmware Interface) is the lowest level of software/firmware on PC class systems. Other hardware types (POWER, IBM Z) that run Linux have low-level firmware that performs similar functions as the PC BIOS. When this document references the BIOS, it means BIOS and/or UEFI. The BIOS dictates system configuration, puts the system into a well defined state and provides routines for accessing low-level hardware. The BIOS executes the configured Linux boot loader (like GRUB 2) to boot the host.
Most BIOS implementations can be configured to prevent unauthorized users from manipulating system and boot settings. This is typically done by setting a BIOS administrator or boot password. The administrator password needs to be entered for changing the system configuration but the boot password is required during every normal boot. For most use cases, it is enough to set an administrator password and restrict booting to the built-in hard disk. This way an attacker is not able to simply boot a Linux live CD or flash drive, for example. Although this does not provide a high level of security (a BIOS can be reset, removed or modified—assuming case access), it can be another deterrent.
Many BIOS firmware implementations have other security-related settings. Check with the system vendor, the system documentation, or examine the BIOS during a system boot to find out more.
Important: Booting when a BIOS boot password is set
If a system has been set up with a boot password, the host does not boot up unattended (for example, in case of a system reboot or power failure). This is a trade-off.
Important: Losing the BIOS administrator password
Once a system is set up for the first time, the BIOS administrator password is not required often. Do not forget the password or you may need to clear the BIOS memory via hardware manipulation to get access again.
9.3 Security via the boot loaders #Edit source
The Linux boot loader GRUB 2, which is used by default in openSUSE Leap can have a boot password set. It also provides a password feature, so that only administrators can start the interactive operations (for example editing menu entries and entering the command line interface). If a password is specified, GRUB 2 disallows any interactive control until you press the key C and E and enter a correct password.
You can refer to the GRUB 2 man page for examples.
It is important to keep in mind that when setting these passwords they need to be remembered. Also, enabling these passwords can merely slow an intrusion, not necessarily prevent it. Again, someone could boot from a removable device, and mount your root partition. If you are using BIOS-level security and a boot loader, it is a good practice to disable the ability to boot from removable devices in your computer's BIOS, and then password-protect the BIOS itself.
Also keep in mind that the boot loader configuration files need to be
protected by changing their mode to 600 (read/write for
root only), or others can read your passwords or hashes.
9.4 Retiring Linux servers with sensitive data #Edit source
Security policies contain certain procedures for the treatment of
storage media that is going to be retired or disposed of. Disk and media
wipe procedures are frequently prescribed, as is complete destruction of
the media. You can find several free tools on the Internet. A search for
“dod disk wipe utility” yields several variants. To
retire servers with sensitive data, it is important to ensure that data
cannot be recovered from the hard disks. To ensure that all traces of data
are removed, a wipe utility—such as
scrub—can be used. Many wipe utilities overwrite
the data several times. This assures that even sophisticated methods are
not able to retrieve any parts of the wiped data. Some tools can even be
operated from a bootable removable device and remove data according to the
U.S. Department of Defense (DoD) standards. Many government
agencies specify their own standards for data security. Some standards are
stronger than others, yet may require more time to implement.
Important: Wiping wear leveling devices
Some devices, like SSDs, use wear leveling and do not necessarily write new data in the same physical locations. Such devices provide their own erasing functionality.
9.4.1 scrub: disk overwrite utility #Edit source
scrub overwrites hard disks, files and other devices
with repeating patterns intended to make recovering data from these
devices more difficult. It operates in three basic modes: on a character
or block device, on a file, or on a specified directory. For more
information, see the manual page man 1 scrub.
Supported scrub methods #
- nnsa
4-pass NNSA Policy Letter NAP-14.1-C (XVI-8) for sanitizing removable and non-removable hard disks, which requires overwriting all locations with a pseudo-random pattern twice and then with a known pattern: random (x2), 0x00, verify.
- dod
4-pass DoD 5220.22-M section 8-306 procedure (d) for sanitizing removable and non-removable rigid disks. This requires overwriting all addressable locations with a character, its complement, a random character and then verifying. Note: scrub performs the random pass first to make verification easier: random, 0x00, 0xff, verify.
- bsi
9-pass method recommended by the German Center of Security in Information Technologies (https://www.bsi.bund.de): 0xff, 0xfe, 0xfd, 0xfb, 0xf7, 0xef, 0xdf, 0xbf, 0x7f.
- gutmann
The canonical 35-pass sequence described in Gutmann's paper cited below.
- schneier
7-pass method described by Bruce Schneier in "Applied Cryptography" (1996): 0x00, 0xff, random (x5)
- pfitzner7
Roy Pfitzner's 7-random-pass method: random (x7).
- pfitzner33
Roy Pfitzner's 33-random-pass method: random (x33).
- usarmy
US Army AR380-19 method: 0x00, 0xff, random. (Note: identical to DoD 522.22-M section 8-306 procedure (e) for sanitizing magnetic core memory).
- fillzero
1-pass pattern: 0x00.
- fillff
1-pass pattern: 0xff.
- random
1-pass pattern: random (x1).
- random2
2-pass pattern: random (x2).
- old
6-pass pre-version 1.7 scrub method: 0x00, 0xff, 0xaa, 0x00, 0x55, verify.
- fastold
5-pass pattern: 0x00, 0xff, 0xaa, 0x55 and verify.
- custom=string
1-pass custom pattern. String may contain C-style numerical escapes: \nnn (octal) or \xnn (hex).
9.5 Restricting access to removable media #Edit source
In certain environments, it is required to restrict access to removable
media such as USB storage or optical devices. The tools included with the
udisks2 package help with such a
configuration.
Create a user group whose users are allowed to mount and eject removable devices, for example mmedia_all:
>sudogroupadd mmedia_allAdd a specific user
tuxto the new group:>sudousermod -a -G mmedia_alltuxCreate the
/etc/polkit-1/rules.d/10-mount.rulesfile with the following content:>cat /etc/polkit-1/rules.d/10-mount.rules polkit.addRule(function(action, subject) { if (action.id =="org.freedesktop.udisks2.eject-media" && subject.isInGroup("mmedia_all")) { return polkit.Result.YES; } }); polkit.addRule(function(action, subject) { if (action.id =="org.freedesktop.udisks2.filesystem-mount" && subject.isInGroup("mmedia_all")) { return polkit.Result.YES; } });Important: Naming of the rules file
The name of a rules file must start with a digit, otherwise it is ignored.
Rules files are processed in alphabetical order. Functions are called in the order they were added until one of the functions returns a value. Therefore, to add an authorization rule that is processed before other rules, put it in a file in /etc/polkit-1/rules.d with a name that sorts before other rules files, for example
/etc/polkit-1/rules.d/10-mount.rules. Each function should return a value frompolkit.Result.Restart
udisks2:#systemctl restart udisks2Restart
polkit#systemctl restart polkit
9.6 System protection with enforced USB device authorization via USBGuard #Edit source
The USBGuard software framework helps to protect your system with enforced USB device authorization. It implements allowlist and blocklist capabilities based on the device attributes.
The USBGuard provides the following features:
A command-line interface to interact with a running USBGuard daemon
The daemon component with an inter-process communication (IPC) interface for dynamic interaction and policy enforcement
The rule language for writing USB device authorization policies
The C++ API for interacting with the daemon component implemented in a shared library
9.6.1 Installing USBGuard #Edit source
The USBGuard daemon decides which USB device to authorize based on a set of rules defined in the policy. To install and configure USBGuard, use the following commands:
To install USBGuard:
>sudozypper install usbguardUSBGuard and the required dependencies are installed. If you want to interact with the USBGuard service, you can install
usbguard-tools.To generate a rule set based on currently connected USB devices, switch to
root:#usbguard generate-policy > /etc/usbguard/rules.confNote
You can customize USBGuard by editing the
/etc/usbguard/rules.conffile.You can start the USBGuard daemon or ensure automatic enablement at system start by switching to
root:#systemctl enable --now usbguard.serviceYou can either authorize or deauthorize a device from interacting with the system. This depends on the value of the
ImplicitPolicyTargetoption in theusbguard-daemon.conffile. This option is used to treat devices that do not match any rule in the policy.usbguard allow-device 6
usbguard block-device 6
You can also use the
reject-deviceoption to deauthorize and remove a device from the system.Note
Use the
usbguard --helpcommand to see all the options.
9.6.2 How to use USBGuard #Edit source
You can configure a security policy to protect your system with enforced USB device authorization by implementing allow and block lists based on the device attributes.
9.6.2.1 The USBGuard configuration file #Edit source
The USBGuard daemon loads the usbguard-daemon.conf file after the command-line
options are parsed and are used to configure the runtime parameters of the daemon. The file is by default, located at
/etc/usbguard/usbguard-daemon.conf. Some options in the file include:
Options #
RuleFile=PATHThe USBGuard daemon uses this file to load the policy rule set from it and to write new rules received through the IPC (inter-process communication) interface. The default is
%sysconfdir%/usbguard/rules.conf.ImplicitPolicyTarget= TARGETHow to treat devices that do not match any rule in the policy, for example:
allow - authorize every present device
block - deauthorize every present device
reject - logically remove the device node from the system
PresentDevicePolicy= POLICYHow to treat devices that are already connected when the daemon starts.
allow - authorize every present device
block - deauthorize every present device
reject - remove every present device
keep - sync the internal state
apply-policy - evaluate the rule set for all present devices
IPCAllowedUsers= USERNAMEA space-delimited list of user names that the daemon accepts IPC connections from.
IPCAllowedGroups= GROUPNAMEA space-delimited list of group names that the daemon accepts IPC connections from.
IPCAccessControlFiles= PATHPath to files that are interpreted by the daemon as IPC access control definition files.
Example 9.1: Configuration #
IPCAllowedUsers=root joe
IPCAllowedGroups=wheel
The example allows full IPC access to the users root,joe
and to the members of the group wheel.
9.6.3 More information #Edit source
To know more about USBGuard, see:
The upstream documentation at https://usbguard.github.io/
man usbguard
man usbguard-rules.conf
man usbguard-daemon
man usbguard-daemon.conf
10 Software management #Edit source
10.1 Removing unnecessary software packages (RPMs) #Edit source
An important step in securing a Linux system is to determine the primary functions or roles of the Linux server. Otherwise, it can be difficult to understand what needs to be secured and securing these Linux systems can prove ineffective. Therefore, it is critical to look at the default list of software packages and remove any unnecessary packages or packages that do not comply with your defined security policies.
Generally, an RPM software package consists of the following:
The package's metadata that is written to the RPM database upon installation.
The package's files and directories.
Scripts that are being executed before and after installation and removal.
Packages generally do not impose any security risk to the system unless they contain:
setuid or setgid bits on any of the installed files
group- or world-writable files or directories
a service that is activated upon installation, or by default
Assuming that none of the three conditions above apply, a package is merely a collection of files. Neither installation nor uninstallation of such packages has any influence on the security value of the system.
Nevertheless, it is useful to restrict the installed packages in your system to a minimum. Doing this results in fewer packages that require updates and simplifies maintenance efforts when security alerts and patches are released. It is a best practice not to install, among others, development packages or desktop software packages (for example, an X Server) on production servers. If you do not need them, you should also not install, for example, the Apache Web server or Samba file sharing server.
Important: Requirements of third-party installers
Many third-party vendors like Oracle and IBM require a desktop environment and development libraries to run installers. To prevent this from having an impact on the security of their production servers, many organizations work around this by creating a silent installation (response file) in a development lab.
Also, other packages like FTP and Telnet daemons should not be installed
unless there is a justified business reason for it.
ssh, scp or sftp
should be used as replacements.
One of the first action items should be to create a Linux image that only contains RPMs needed by the system and applications, and those needed for maintenance and troubleshooting purposes. A good approach is to start with a minimum list of RPMs and then add packages as needed.
To generate a list of all installed packages, use the following command:
# zypper packages -iTo retrieve details about a particular package, run:
# zypper info PACKAGE_NAMETo check for and report potential conflicts and dependencies when deleting a package, run:
# zypper rm -D PACKAGE_NAMEThis can be useful, as running the removal command without a test can often yield a lot of complaints and require manual recursive dependency hunting.
Important: Removal of essential system packages
When removing packages, be careful not to remove any essential system packages. This could put your system into a broken state in which it can no longer be booted or repaired. If you are uncertain about this, then it is best to do a complete backup of your system before you start to remove any packages.
For the final removal of one or more packages use the following
zypper command with the added “-u”
switch, which removes any unused dependencies:
# zypper rm -u PACKAGE_NAME10.2 Patching Linux systems #Edit source
Building an infrastructure for patch management is another important part of a proactive and secure Linux production environment.
It is recommended to have a written security policy and procedure to handle Linux security updates and issues. For example, a security policy should detail the time frame for assessment, testing and roll out of patches. Network related security vulnerabilities should get the highest priority and should be addressed immediately within a short time frame. The assessment phase should occur within a testing lab, and initial rollout should occur on development systems first.
A separate security log file should contain details on which Linux security announcements have been received, which patches have been researched and assessed, when patches were applied, and so on.
SUSE releases patches in three categories: security, recommended and optional. There are a few options that can be used to keep systems patched, up to date, and secure. Each system can register and then retrieve updates via the SUSE Update Web site using the included YaST tool—YaST Online Update. SUSE has also created the Repository Mirroring Tool (RMT), an efficient way to maintain a local repository of available/released patches/updates/fixes that systems can then pull from (reducing Internet traffic). SUSE also offers SUSE Manager for the maintenance, patching, reporting and centralized management of Linux systems, not only SUSE, but other distributions as well.
10.2.1 YaST Online Update #Edit source
On a per-server basis, installation of important updates and improvements is possible using the YaST Online Update tool. Current updates for openSUSE Leap are available from the product specific update catalogs containing patches. Installation of updates and improvements is accomplished using YaST and selecting in the group. All new patches (except the optional ones) that are currently available for your system are marked for installation. Clicking automatically installs these patches.
10.2.2 Automatic Online Update #Edit source
YaST also offers the possibility to set up an automatic update. Select › . Configure a Daily or a Weekly update. Some patches, such as kernel updates, require user interaction, which would cause the automatic update procedure to stop. Check for the update procedure to proceed automatically.
In this case, run a manual Online Update from time to install patches that require interaction.
When is checked, the patches are
downloaded at the specified time but not installed. They must be
installed manually using rpmor
zypper.
11 File management #Edit source
11.1 Disk partitions #Edit source
Servers should have separate file systems for at least
/, /boot,
/var,
/tmp, and /home. This prevents,
for example, logging space and temporary space under
/var and /tmp from filling up
the root partition. Third-party applications should be on separate file
systems as well, for example under /opt.
Another advantage of separate file systems is the possibility of choosing special mount options that are suitable for certain regions in the file system hierarchy. The mount options are:
noexec: prevents execution of files.nodev: prevents character or block special devices from being usable.nosuid: prevents theset-user-IDorset-group-IDbits from being effective.ro: mounts the file systemread-only.
Each of these options needs to be carefully considered before applying
it to a partition mount. Applications may stop working, or the support
status may be violated. When applied correctly, mount options can help
against certain types of security attacks or misconfigurations. For
example, there should be no need for set-user-ID
binaries to be placed in /tmp.
It is important to understand the
need to separate the partitions that could impact a running system (for
example, log files filling up /var/log are a good
reason to separate /var from the
/ partition). Another thing to keep in mind is that
you need to use LVM or another volume manager or at the least the extended
partition type to work around the limit of four primary partitions on PC
class systems.
Another capability in openSUSE Leap is encrypting a partition or even a single directory or file as a container. Refer to Chapter 12, Encrypting partitions and files for details.
11.2 Modifying permissions of certain system files #Edit source
Many files—especially in the /etc
directory—are world-readable, which means that unprivileged users can
read their contents. Normally this is not a problem, but to take
extra care, you can remove the world-readable or group-readable bits for
sensitive files.
openSUSE Leap provides the permissions package to easily apply file permissions. The package comes with three pre-defined system profiles:
- easy
Profile for systems that require user-friendly graphical user interaction. This is the default profile.
- secure
Profile for server systems without fully fledged graphical user interfaces.
- paranoid
Profile for maximum security. In addition to the
secureprofile, it removes all special permissions like setuid/setgid and capability bits.Warning: Unusable system for non-privileged users
Except for simple tasks like changing passwords, a system without special permissions may be unusable for non-privileged users.
Do not use the
paranoidprofile is as-is, but as a template for custom permissions. More information can be found in thepermissions.paranoidfile.
To define custom file permissions, edit
/etc/permissions.local or create a drop-in file in the
/etc/permissions.d/ directory.
# Additional custom hardening
/etc/security/access.conf       root:root       0400
/etc/sysctl.conf                root:root       0400
/root/                          root:root       0700
The first column specifies the file name. The directory names must end with a
slash. The second column specifies the owner and group, and the third column
specifies the mode.
For more information about the configuration file format, refer to
man permissions.
Select the profile in /etc/sysconfig/security. To use
the easy profile and custom permissions from
/etc/permissions.local, set:
PERMISSION_SECURITY="easy local"
To apply the setting, run chkstat --system --set.
The permissions are also applied during package updates via
zypper. You could also call chkstat
regularly via cron or a systemd
timer.
Important: Custom file permissions
While the system profiles are well tested, custom permissions can break standard applications. SUSE cannot provide support for such scenarios.
Always test custom file permissions before applying them with
chkstat to make sure everything works as desired.
11.3 Changing home directory permissions from 755 to 700 #Edit source
By default, home directories of users are accessible (read, execute) by all users on the system. As this is a potential information leak, home directories should be accessible by their owners.
The following commands set the permissions to 700
(directory accessible for the owner) for all existing home directories
in /home:
>sudochmod 755 /home>sudobash -c 'for dir in /home/*; do \ echo "Changing permissions of directory $dir"; chmod 700 "$dir"; done'
To ensure newly created home directories are created with secure
permissions, edit /etc/login.defs and set
HOME_MODE to 700.
# HOME_MODE is used by useradd(8) and newusers(8) to set the mode for new
# home directories.
# If HOME_MODE is not set, the value of UMASK is used to create the mode.
HOME_MODE      0700
If you do not set HOME_MODE, permissions are calculated
from the default umask. HOME_MODE
specifies the permissions used, not a mask used to remove access like umask.
For more information about umask, refer to Section 11.4, “Default umask”.
You can verify the configuration change by creating a new user with
useradd -m testuser. Check the permissions of the
directories with ls -l /home. Afterwards, remove the user
created for this test.
Important: Test permission changes
Users are no longer allowed to access other users' home directories. This may be unexpected for users and software.
Test this change before using it in production and notify users affected by the change.
11.4 Default umask #Edit source
The umask (user file-creation mode mask) command is a
shell built-in command that determines the default file permissions for
newly created files and directories. This can be overwritten by system calls
but many programs and utilities use umask.
By default, umask is set to 022.
This umask is subtracted from the access mode 777 if at
least one bit is set.
To determine the active umask, use the umask
command:
> umask
022
With the default umask, you see the behavior most users expect to see on a Linux system.
>touch a>mkdir b>ls -on total 16 -rw-r--r--. 1 17086 0 Nov 29 15:05 a drwxr-xr-x. 2 17086 4096 Nov 29 15:05 b
You can specify arbitrary umask values, depending on your needs.
>umask 111>touch c>mkdir d>ls -on total 16 -rw-rw-rw-. 1 17086 0 Nov 29 15:05 c drw-rw-rw-. 2 17086 4096 Nov 29 15:05 d
Based on your threat model, you can use a stricter umask such as
037 to prevent accidental data leakage.
>umask 037>touch e>mkdir f>ls -on total 16 -rw-r-----. 1 17086 0 Nov 29 15:06 e drwxr-----. 2 17086 4096 Nov 29 15:06 f
Tip: Maximum security
For maximum security, use a umask of 077. This
forces newly created files and directories to be created with no
permissions for the group and other users.
This can be unexpected for users and software and may cause additional load for your support team.
11.4.1 Adjusting the default umask #Edit source
You can modify the umask globally for all users by changing the
UMASK value in /etc/login.defs.
# Default initial "umask" value used by login(1) on non-PAM enabled systems.
# Default "umask" value for pam_umask(8) on PAM enabled systems.
# UMASK is also used by useradd(8) and newusers(8) to set the mode for new
# home directories.
# 022 is the default value, but 027, or even 077, could be considered
# for increased privacy. There is no One True Answer here: each sysadmin
# must make up their mind.
UMASK           022
For individual users, add the umask to the 'gecos' field in
/etc/passwd like this:
tux:x:1000:100:Tux Linux,UMASK=022:/home/tux:/bin/bash
You can do the same with yast users by adding
UMASK=022 to a user's
› .
The settings made in /etc/login.defs and
/etc/passwd are applied by the PAM module
pam_umask.so. For additional configuration options,
refer to man pam_umask.
For the changes to take effect, users need to log out and back in
again. Afterwards, use the umask command to verify the
umask is set correctly.
11.5 SUID/SGID files #Edit source
When the SUID (set user ID) or SGID (set group ID) bits are set on an
executable, it executes with the UID or GID of the owner of the executable
rather than that of the person executing it. This means that, for example,
all executables that have the SUID bit set and are owned by root are
executed with the UID of root. A good example is the passwd command that
allows ordinary users to update the password field in the /etc/shadow file,
which is owned by root.
SUID/SGID bits can be misused when the executable has a security hole. Therefore, you should search the entire system for SUID/SGID executables and document them. To search the entire system for SUID or SGID files, you can run the following command:
# find /bin /boot /etc /home /lib /lib64 /opt /root /sbin \
  /srv /tmp /usr /var -type f -perm '/6000' -ls
You may need to extend the list of directories that are searched if you have a different file system structure.
SUSE sets the SUID/SGID bit on binary if it is really necessary. Ensure that code developers do not set SUID/SGID bits on their programs if it is not an absolute requirement. You can often use workarounds like removing the executable bit for world/others. However, a better approach is to change the design of the software or use capabilities.
openSUSE Leap supports file capabilities to allow more fine-grained
privileges to be given to programs rather than the full power of root:
# getcap -v /usr/bin/ping
/usr/bin/ping = cap_new_raw+eip
The previous command grants the CAP_NET_RAW capability
to whoever executes ping. In case of vulnerabilities
inside ping, an attacker can gain, at most, this
capability in contrast with full root. Whenever possible, file
capabilities should be chosen in favor of the SUID bit. But this
applies when the binary is SUID to root, not to other users such as
news, lp and similar.
11.6 World-writable files #Edit source
World-writable files are a security risk since they can be modified by any user on the system. Additionally, world-writable directories allow anyone to add or delete files. To locate world-writable files and directories, you can use the following command:
# find /bin /boot /etc /home /lib /lib64 /opt /root /sbin \
  /srv /tmp /usr /var -type f -perm -2 ! -type l -ls
You may need to extend the list of directories that are searched if you have a different file system structure.
The ! -type l parameter skips all symbolic links since
symbolic links are always world-writable. However, this is not a problem
if the target of the link is not world-writable, which is checked
by the above find command.
World-writable directories with the sticky bit such as the /tmp
directory do not allow anyone except the owner of a file to delete or rename it in
this directory.
The sticky bit makes files stick to the user who created them, and
prevents other users from deleting or renaming the files. Therefore,
depending on the purpose of the directory, world-writable directories with
the sticky bit are not an issue. An example is the
/tmp directory:
> ls -ld /tmp
drwxrwxrwt 18 root root 16384 Dec 23 22:20 /tmp
The t mode bit in the output denotes the sticky bit.
11.7 Orphaned or unowned files #Edit source
Files not owned by any user or group may not necessarily be a security problem in itself. However, unowned files could pose a security problem in the future. For example, if a new user is created and the new user happens to get the same UID as the unowned files have, then this new user automatically becomes the owner of these files.
To locate files not owned by any user or group, use the following command:
# find /bin /boot /etc /home /lib /lib64 /opt /root /sbin /srv /tmp /usr /var -nouser -o -nogroupYou may need to extend the list of directories that are searched if you have a different file system structure.
A different problem is files that were not installed via the packaging system and therefore do not receive updates. You can check for such files with the following command:
> find /bin /lib /lib64 /usr -path /usr/local -prune -o -type f -a -exec /bin/sh -c "rpm -qf {} &> /dev/null || echo {}" \;
Run this command as an untrusted user (for example, nobody) since crafted
file names may lead to command
execution. This should not be a problem since these directories should be writeable by root, but
it is still a good security precaution.
This shows you all files under /bin,
/lib, /lib64 and
/usr (with the
exception of files in /usr/local) that are not tracked
by the package manager. These files may not represent a security issue, but
you should be aware of what is not tracked and take the necessary precautions to
keep these files up to date.
12 Encrypting partitions and files #Edit source
Encrypting files, partitions, and entire disks prevents unauthorized access to your data and protects your confidential files and documents.
You can choose between the following encryption options:
- Encrypting a hard disk partition
It is possible to create an encrypted partition with YaST during installation or in an already installed system. For further info, see Section 12.1.1, “Creating an encrypted partition during installation” and Section 12.1.2, “Creating an encrypted partition on a running system”. This option can also be used for removable media, such as external hard disks, as described in Section 12.1.3, “Encrypting the content of removable media”.
- Encrypting single files with GPG
To quickly encrypt one or more files, you can use the GPG tool. See Section 12.2, “Encrypting files with GPG” for more information.
- Encrypting single files with Rage
You can use the Rage encryption tool to encrypt one or more files. See Section 12.3, “Encrypting files with Rage” for more information.
Warning: Encryption offers limited protection
Encryption methods described in this chapter cannot protect your running system from being compromised. After the encrypted volume is successfully mounted, everybody with appropriate permissions can access it. However, encrypted media are useful in case of loss or theft of your computer, or to prevent unauthorized individuals from reading your confidential data.
12.1 Setting up an encrypted file system with YaST #Edit source
Use YaST to encrypt partitions or parts of your file system during installation or in an already installed system. However, encrypting a partition in an already-installed system is more difficult, because you need to resize and change existing partitions. In such cases, it may be more convenient to create an encrypted file of a defined size, in which to store other files or parts of your file system. To encrypt an entire partition, dedicate a partition for encryption in the partition layout. The standard partitioning proposal, as suggested by YaST, does not include an encrypted partition by default. Add an encrypted partition manually in the partitioning dialog.
12.1.1 Creating an encrypted partition during installation #Edit source
Warning: Password input
Make sure to memorize the password for your encrypted partitions well. Without that password, you cannot access or restore the encrypted data.
The YaST expert dialog for partitioning offers the options needed for creating an encrypted partition. To create a new encrypted partition proceed as follows:
Run the YaST Expert Partitioner with › .
Select a hard disk, click , and select a primary or an extended partition.
Select the partition size or the region to use on the disk.
Select the file system, and mount point of this partition.
Activate the check box.
Note: Additional software required
After checking , a pop-up window asking for installing additional software may appear. Confirm to install all the required packages to ensure that the encrypted partition works well.
If the encrypted file system needs to be mounted when necessary, enable in the . Otherwise enable and enter the mount point.
Click and enter a password which is used to encrypt this partition. This password is not displayed. To prevent typing errors, you need to enter the password twice.
Complete the process by clicking . The newly encrypted partition is now created.
During the boot process, the operating system asks for the password
before mounting any encrypted partition which is set to be auto-mounted
in /etc/fstab. Such a partition is then available
to all users when it has been mounted.
To skip mounting the encrypted partition during start-up, press Enter when prompted for the password. Then decline the offer to enter the password again. In this case, the encrypted file system is not mounted and the operating system continues booting, blocking access to your data.
To mount an encrypted partition which is not mounted during the boot process, open a file manager and click the partition entry in the pane listing common places on your file system. You are prompted for a password and the partition is mounted.
When you are installing your system on a machine where partitions already exist, you can also decide to encrypt an existing partition during installation. In this case follow the description in Section 12.1.2, “Creating an encrypted partition on a running system” and be aware that this action destroys all data on the existing partition.
12.1.2 Creating an encrypted partition on a running system #Edit source
Warning: Activating encryption on a running system
It is also possible to create encrypted partitions on a running system. However, encrypting an existing partition destroys all data on it, and requires re-sizing and restructuring of existing partitions.
On a running system, select › in the YaST control center. Click to proceed. In the , select the partition to encrypt and click . The rest of the procedure is the same as described in Section 12.1.1, “Creating an encrypted partition during installation”.
12.1.3 Encrypting the content of removable media #Edit source
YaST treats removable media (like external hard disks or flash disks) the same as any other storage device. Virtual disks or partitions on external media can be encrypted as described above. However, you should disable mounting at boot time, because removable media is connected when the system is up and running.
If you encrypted your removable device with YaST, the GNOME desktop
automatically recognizes the encrypted partition and prompts for the
password when the device is detected. If you plug in a FAT-formatted
removable device when running GNOME, the desktop user entering the
password automatically becomes the owner of the device.
For devices with a file system other than FAT, change the
ownership explicitly for users other than root to give them
read-write access to the device.
12.2 Encrypting files with GPG #Edit source
GNU Privacy Guard (GPG) encryption software can be used to encrypt individual files and documents.
To encrypt a file with GPG, you need to generate a key pair first. To do
this, run the gpg --gen-key and follow the on-screen
instructions. When generating the key pair, GPG creates a user ID (UID) to
identify the key based on your real name, comments and email address. You
need this UID (or just a part of it like your first name or email address)
to specify the key you want to use to encrypt a file. To find the UID of
an existing key, use the gpg --list-keys command. To
encrypt a file use the following command:
> gpg -e -a --cipher-algo AES256 -r UID FILEReplace UID with part of the UID (for example, your first name) and FILE with the file you want to encrypt. For example:
> gpg -e -a --cipher-algo AES256 -r Tux secret.txt
This command creates an encrypted version of the specified file
recognizable by the .asc file extension (in
this example, it is secret.txt.asc).
-a formats the file as ASCII text, if you want the
contents to be copy-able. Omit -a to create a binary
file, which in the above example would be secret.txt.gpg.
To decrypt an encrypted file, use the following command:
> gpg -d -o DECRYPTED_FILE ENCRYPTED_FILEReplace DECRYPTED_FILE with the desired name for the decrypted file and ENCRYPTED_FILE with the encrypted file you want to decrypt.
Keep in mind that the encrypted file can be decrypted using the same key that was used for encryption. To share an encrypted file with another person, you have to use that person's public key to encrypt the file.
12.3 Encrypting files with Rage #Edit source
Rage is a secure file encryption software to encrypt files. It has keys that are easy to exchange with other people, and has secure defaults to prevent accidental misuse or leaks of sensitive data. We recommend Rage to encrypt files.
You can install Rage with:
>sudozypper install rage-encryption
The recipient must first generate a key pair to encrypt a file with Rage:
> rage-keygen -o ~/rage.key 2 ~/rage.pubTwo files are created; rage.pub and rage.key.
rage.pub example>cat file.pub Public key: age17e4g67cs07jk3lmylyq6gduv26uf7tz7nm9jrsaxn8xxx9uc9amsdg4a5erage.key example>cat file.key # created: 2023-05-30T16:29:20+05:30 # public key: age17e4g67cs07jk3lmylyq6gduv26uf7tz7nm9jrsaxn8xxx9uc9amsdg4a5e
Important
file.key is a private key and should be kept confidential.
- Encrypt
To encrypt a file, you need the generated public key:
>rage -e -r PUBLIC_KEY -o ENCRYPTED_FILE FILEFor example:
>rage -e -r age17e4g67cs07jk3lmylyq6gduv26uf7tz7nm9jrsaxn8xxx9uc9amsdg4a5e -o test.txt.age test.txt- Decrypt
The encrypted file can be decrypted by the recipient who has the corresponding private key. To share an encrypted file with another person, you have to use that person's public key to encrypt the file.
>rage -d -i ~/rage.key -o DECRYPTED_FILE ENCRYPTED_FILE FILEFor example:
>rage -d -i ~/rage.key -o test.txt.decrypted test.txt.age- Passphrases
You can encrypt files with passphrases with the
-por--passphrasearguments. By default, Rage automatically generates a secure passphrase, but you also have the option to enter a passphrase.>rage -e -p -o ENCRYPTED_FILE FILEFor example:
>rage -e -p -o test.txt.age test.txt- SSH
You can encrypt files with SSH (Secure Socket Shell) keys instead of Rage keys. Rage supports ssh-rsa and ssh-ed25519 public keys,and decrypting with the respective private key file. ssh-agent and ssh-sk(FIDO) are not supported.
>rage -e -p -o ENCRYPTED_FILE FILEFor example:
>rage -e -p -o test.txt.age test.txtFor example:
>ssh-keygen -t ed25519To encrypt:
>rage -e -a -R PUBLIC_KEY_FILE -o ENCRYPTED_FILE FILEFor example:
>rage -e -a -R id_ed25519.pub -o test.txt.age test.txtTo decrypt:
>rage -d -i SSH_PRIVATE_KEY_FILE -o DECRYPTED_FILEENCRYPTED_FILEFor example:
>rage -d -i id_ed25519 -o test.txt.decrypted test.txt.ageImportant
You must enter the path to the key and files.
- Multiple identities
Rage can encrypt to multiple identities at the same time. Any of the recipient's private keys can be used to decrypt the file.
rage -e -a -R FIRST_SSH_PUBLIC_KEY-r FIRST_RAGE_PUBLIC_KEY... -o ENCRYPTED_FILE FILE
For example:
rage -e -a -R id_ed25519.pub -r age1h8equ4vs5pyp8ykw0z8m9n8m3psy6swme52ztth0v66frgu65ussm8gq0t -o -r age1y2lc7x59jcqvrpf3ppmnj3f93ytaegfkdnl5vrdyv83l8ekcae4sexgwkg test.txt.age test.txt
Tip
You can use the -h or --help argument to list all the Rage command arguments.
12.3.1 Additional Resources #Edit source
https://github.com/str4d/rage Rage Encryption GitHub repository
https://github.com/C2SP/C2SP/blob/main/age.md Age Encryption GitHub repository
13 Storage encryption for hosted applications with cryptctl #Edit source
- 13.1 Setting up a
cryptctlserver - 13.2 Setting up a
cryptctlclient - 13.3 Configuring /etc/fstab for LUKS volumes
- 13.4 Checking partition unlock status using server-side commands
- 13.5 Unlocking encrypted partitions manually
- 13.6 Maintenance downtime procedure
- 13.7 Setting up an HA environment for cryptctl-server service
- 13.8 More information
Databases and similar applications are often hosted on external servers that are serviced by third-party staff. Certain data center maintenance tasks require third-party staff to directly access affected systems. In such cases, privacy requirements necessitate disk encryption.
cryptctl allows encrypting sensitive directories using
LUKS and offers the following additional features:
Encryption keys are located on a central server, which can be located on customer premises.
Encrypted partitions are automatically remounted after an unplanned reboot.
cryptctl consists of two components:
A client is a machine that has one or more encrypted partitions but does not permanently store the necessary key to decrypt those partitions. For example, clients can be cloud or otherwise hosted machines.
The server holds encryption keys that can be requested by clients to unlock encrypted partitions.
You can also set up the
cryptctlserver to store encryption keys on a KMIP 1.3-compatible (Key Management Interoperability Protocol) server. In that case, thecryptctlserver does not store the encryption keys of clients and is dependent upon the KMIP-compatible server to provide these.
Warning: cryptctl Server maintenance
Since the cryptctl server manages timeouts for the
encrypted disks and, depending on the configuration, can also hold
encryption keys, it
should be under your direct control and managed by trusted
personnel.
Additionally, it should be backed up regularly. Losing the server's data means losing access to encrypted partitions on the clients.
To handle encryption, cryptctl uses LUKS with
aes-xts-256 encryption and 512-bit keys. Encryption keys are transferred
using TLS with certificate verification.
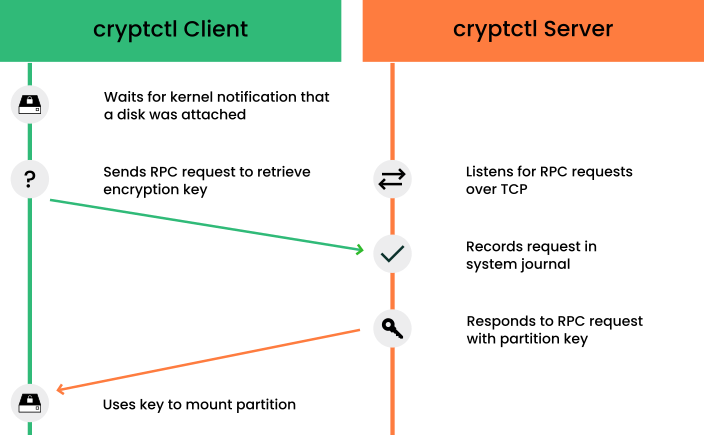
Figure 13.1: Key retrieval with cryptctl (model without connection to KMIP server) #
Note: Install cryptctl
Before continuing, make sure the package cryptctl is installed on all machines you intend to set up as servers or clients.
13.1 Setting up a cryptctl server #Edit source
Before you can define a machine as a cryptctl client,
you need to set up a machine as a cryptctl server.
Before beginning, choose whether to use a self-signed certificate to secure communication between the server and clients. If not, generate a TLS certificate for the server and have it signed by a certificate authority.
Additionally, you can have clients authenticate to the server using certificates signed by a certificate authority. To use this extra security measure, make sure to have a CA certificate at hand before starting this procedure.
As
root, run:#cryptctl init-serverAnswer each of the following prompts and press Enter after every answer. If there is a default answer, it is shown in square brackets at the end of the prompt.
Create a strong password, and protect it well. This password unlocks all partitions that are registered on the server.
Specify the path to a PEM-encoded TLS certificate or certificate chain file or leave the field empty to create a self-signed certificate. If you specify a path, use an absolute path.
If you want the server to be identified by a host name other than the default shown, specify a host name.
cryptctlgenerates certificates which include the host name.Specify the IP address that belongs to the network interface that you want to listen on for decryption requests from the clients, then set a port number (the default is port 3737).
The default IP address setting,
0.0.0.0means thatcryptctllistens on all network interfaces for client requests using IPv4.Specify a directory on the server that holds the decryption keys for clients.
Specify whether clients need to authenticate to the server using a TLS certificate. If you choose , this means that clients authenticate using disk UUIDs. (However, communication is encrypted using the server certificate in any case.)
If you choose , pick a PEM-encoded certificate authority to use for signing client certificates.
Specify whether to use a KMIP 1.3-compatible server (or multiple such servers) to store encryption keys of clients. If you choose this option, provide the host names and ports for one or multiple KMIP-compatible servers.
Additionally, provide a user name, password, a CA certificate for the KMIP server, and a client identity certificate for the
cryptctlserver.Important: No easy reconfiguration of KMIP setting
The setting to use a KMIP server cannot easily be changed later. To change this setting, both the
cryptctlserver and its clients need to be configured afresh.Finally, configure an SMTP server for e-mail notifications for encryption and decryption requests or leave the prompt empty to skip setting up e-mail notifications.
Note: Password-protected servers
cryptctlcurrently cannot send e-mail using authentication-protected SMTP servers. If that is necessary, set up a local SMTP proxy.When asked whether to start the
cryptctlserver, entery.
To check the status of the service
cryptctl-server, use:#systemctl status cryptctl-server
To reconfigure the server later, do either of the following:
Run the command
cryptctl init-serveragain.cryptctlproposes the existing settings as the defaults, so that you only need to specify the values that you want to change.Make changes directly in the configuration file
/etc/sysconfig/cryptctl-server.However, to avoid issues, do not change the settings
AUTH_PASSWORD_HASHandAUTH_PASSWORD_SALTmanually. The values of these options need to be calculated correctly.
13.2 Setting up a cryptctl client #Edit source
The following interactive setup of cryptctl is
currently the only setup method.
Make sure the following preconditions are fulfilled:
A
cryptctlserver is available over the network.There is a directory to encrypt.
The client machine has an empty partition available that is large enough to fit the directory to encrypt.
When using a self-signed certificate, the certificate (
*.crtfile) generated on the server is available locally on the client. Otherwise, the certificate authority of the server certificate must be trusted by the client.If you set up the server to require clients to authenticate using a client certificate, prepare a TLS certificate for the client which is signed by the CA certificate you chose for the server.
As
root, run:#cryptctl encryptAnswer each of the following prompts and press Enter after every answer. If there is a default answer, it is shown in square brackets at the end of the prompt.
Specify the host name and port to connect to on the
cryptctlserver.If you configured the server to have clients authenticate to it using a TLS certificate, specify a certificate and a key file for the client. The client certificate must be signed by the certificate authority chosen when setting up the server.
Specify the absolute path to the server certificate (the
*.crtfile).Enter the encryption password that you specified when setting up the server.
Specify the path to the directory to encrypt. Specify the path to the empty partition that contains the encrypted content of the directory.
Specify the number of machines that are allowed to decrypt the partition simultaneously.
Then specify the timeout in seconds before additional machines are allowed to decrypt the partition after the last vital sign was received from the client or clients.
When a machine unexpectedly stops working and then reboots, it needs to be able to unlock its partitions again. That means this timeout should be set to a time slightly shorter than the reboot time of the client.
Important: Timeout length
If the time is set too long, the machine cannot decrypt encrypted partitions on the first try.
cryptctlthen continues to periodically check whether the encryption key has become available. However, this introduces a delay.If the timeout is set too short, machines with a copy of the encrypted partition have an increased chance of unlocking the partition first.
To start encryption, enter
yes.cryptctlencrypts the specified directory to the previously empty partition and then mounts the newly encrypted partition. The file system type is the same type as the original unencrypted file system.Before creating the encrypted partition,
cryptctlmoves the unencrypted content of the original directory to a location prefixed withcryptctl-moved-.To check that the directory is indeed mounted correctly, use:
>lsblk -o NAME,MOUNTPOINT,UUIDNAME MOUNTPOINT UUID [...] sdc └─sdc1 PARTITION_UUID └─cryptctl-unlocked-sdc1 /secret-partition UNLOCKED_UUIDcryptctlidentifies the encrypted partition by its UUID. For the previous example, that is the UUID displayed next tosdc1.On the server, you can check whether the directory was decrypted using
cryptctl.#cryptctl list-keysFor a successfully decrypted partition, you see output like:
2019/06/06 15:50:00 ReloadDB: successfully loaded database of 1 records
Total: 1 records (date and time are in zone EDT)
Used By     When                 UUID  Max.Users  Num.Users  Mount Point
IP_ADDRESS  2019-06-06 15:00:50  UUID  1          1          /secret-partition
For a partition not decrypted successfully, you see output like:
2019/06/06 15:50:00 ReloadDB: successfully loaded database of 1 records
Total: 1 records (date and time are in zone EDT)
Used By      When                 UUID  Max.Users  Num.Users  Mount Point
             2019-06-06 15:00:50  UUID  1          1          /secret-partition
See the difference in the empty
Used bycolumn.Verify that the UUID shown is that of the previously encrypted partition.
After verifying that the encrypted partition works, delete the unencrypted content from the client. For example, use
rm. For more safety, overwrite the content of the files before deleting them, for example, usingshred -u.Important:
shreddoes not guarantee that data is erasedDepending on the type of storage media, using
shredis not a guarantee that all data is removed. In particular, SSDs employ wear leveling strategies that rendershredineffective.
The configuration for the connection from client to server is stored in
/etc/sysconfig/cryptctl-client and can be edited
manually.
The server stores an encryption key for the client partition in
/var/lib/cryptctl/keydb/PARTITION_UUID.
13.3 Configuring /etc/fstab for LUKS volumes #Edit source
When configuring the mount point for a new file system encrypted with
LUKS, YaST uses, by default, the name of the encrypted device
in /etc/fstab.
(For example, /dev/mapper/cr_sda1.) Using the
device name, rather than the UUID or volume label, results in a more robust
operation of systemd generators and other related tools.
You have the option to adjust that default behavior for each device, either with the Expert Partitioner in the installer, or via AutoYaST.
This change does not affect upgrades or any other scenario in which the
mount points are already defined in /etc/fstab.
Newly created mount points are affected, such as during the
installation of a new system, or creating new partitions on running
systems.
13.4 Checking partition unlock status using server-side commands #Edit source
When a cryptctl client is active, it sends a
“heartbeat” to the cryptctl server every
10 seconds. If the server does not receive a heartbeat from the client
for the length of the timeout configured during the client setup, the
server assumes that the client is offline. It then allows another
client to connect (or allow the same client to reconnect after a reboot).
To see the usage status of all keys, use:
#cryptctl list-keys
The information under Num. Users shows whether the key
is currently in use. To see more detail on a single key, use:
#cryptctl show-key UUID
This command shows information about mount point, mount options, usage options, the last retrieval of the key and the last three heartbeats from clients.
Additionally, you can use journalctl to find logs of
when keys were retrieved.
13.5 Unlocking encrypted partitions manually #Edit source
There are two ways of unlocking a partition manually, both of which are run on a client:
Online unlocking. Online unlocking allows circumventing timeout or user limitations. This method can be used when there is a network connection between client and server but the client could not (yet) unlock the partition automatically. This method unlocks all encrypted partitions on a machine.
To use it, run
cryptctl online-unlock. Be prepared to enter the password specified when setting up the server.Offline unlocking. This method can be used when a client cannot or must not be brought online to communicate with its server. The encryption key from the server must still be available. This method is meant as a last resort and can only unlock a single partition at a time.
To use it, run
cryptctl offline-unlock. The server's key file for the requisite partition (/var/lib/cryptctl/keydb/PARTITION_UUID) needs to be available on the client.
13.6 Maintenance downtime procedure #Edit source
To ensure that partitions cannot be decrypted during a maintenance
downtime, turn off the client and disable the
cryptctl server. You can do so by either:
Stopping the service
cryptctl-server:#systemctl stop cryptctl-serverUnplugging the
cryptctlserver from the network.
13.7 Setting up an HA environment for cryptctl-server service #Edit source
To avoid downtimes when the cryptctl-server needs to be stopped for maintenance or suffers a damage, it is strongly recommended to set up the cryptctl-server in an HA environment. You need at least a two-node High Availability cluster for this. The following setup shows how to create a two-node HA cluster for cryptctl-server using self-signed certificates.
Make sure the following preconditions are fulfilled:
At least two servers which have SUSE Linux Enterprise Server and the High Availability extension installed are available. All servers must also have the cryptctl package installed. All servers can reach each other via SSH.
If you set up a new cluster, you need an additional IP address for the HA Web Console of the cluster (AdminIP).
A separate IP address (CrypServerIP) is reserved for the cryptctl-server.
A separate dns-name (CrypServerHostName) is reserved for the cryptctl-server and is resolved to the above IP address.
An HA-enabled block device or NFS share is available to store the keys.
In our example, we use an NFS share:
nfs-server.example.org/data/cryptctl-keys. It is mounted to the standard location/var/lib/cryptctl/keydb.It is strongly recommended to use an SBD device.
Procedure 13.1: Setting up a cryptctl two-node HA cluster #
Log in to Node1 as
root.Set up a cryptctl-server as described in Section 13.1, “Setting up a
cryptctlserver”. Use the following parameters:To create the certificate, use the dedicated hostname CrypServerHostName of the cryptctl server. Do not use the host name of the host.
Use the dedicated IP address CrypServerIP of the cryptctl server. Do not use the default IP address setting.
Do not configure a KMIP server.
When asked whether to start the
cryptctlserver, entern.
Set up a two-node HA cluster:
Important
Node1 must be the server where you have configured the cryptctl server.
On the machine where you have configured the cryptctl server, set up the first node as follows:
#crm cluster init -i NetDev -A AdminIP -n ClusterNameLog in via SSH to Node2 and join the cluster from there:
#ssh Node2#crm cluster join -y Node1For more information, also see the Installation and Setup Quick Start.
Set up the resource group for the cryptctl server:
You can set up all needed resource agents and copy all files to all nodes with the cryptcl crm-shell-script in one step. We strongly recommend that you verify the setup in the first step:
#crm script verify cryptctl \ cert-path=/etc/cryptctl/servertls/CertificateFileName \ cert-key-path=/etc/cryptctl/servertls/CertificateKeyFileName \ virtual-ip:ip=CrypServerIP \ filesystem:device=DevicePath filesystem:fstype=FileSystemTypeIf the check was successful, set up the cluster group by running the script as follows:
#crm script verify cryptctl \ cert-path=/etc/cryptctl/servertls/CertificateFileName \ cert-key-path=/etc/cryptctl/servertls/CertificateKeyFileName \ virtual-ip:ip=CrypServerIP \ filesystem:device=DevicePath filesystem:fstype=FileSystemType
Table 13.1: List of all parameters to define the resource group with the cryptctl crm script. #
|
Name |
Mandatory |
Default Value |
Description |
|---|---|---|---|
| id | no | cryptctl | Name of the resource group. |
| cert-path | yes | The full path to the created certificate. | |
| cert-key-path | yes | The full path to the created certificate key. | |
| virtual-ip:id | no | cryptctl-vip | The ID of the virtual IP resource for the cryptctl server. |
| virtual-ip:ip | yes | The IP address of the cryptctl server. | |
| virtual-ip:nic | no | Detected by the virtual-ip resource agent. | The network device the cryptctl server should be listening on. Only required if the device cannot be detected from the IP address. |
| virtual-ip:cidr_netmask | no | Detected by the virtual-ip resource agent. | The numeric netmask of the IP address of the cryptctl server. Only required if the netmask cannot be detected from the IP address. |
| virtual-ip:broadcast | no | Detected by the virtual-ip resource agent. | The broadcast address of the IP address of the cryptctl server. Only required if this cannot be detected from the IP address. |
| filesystem:id | no | cryptctl-filesystem | The ID of the file system resource containing the disk encryption keys and records. |
| filesystem:device | yes |
The device containing the file system. This can be a block device
like /dev/sda... or an NFS share path
server:/path.
| |
| filesystem:directory | no | /var/lib/cryptctl/keydb |
The directory where the device containing the file system is located. This can be a block device
like /dev/sda... or an NFS share path
server:/path.
|
| filesystem:fstype | yes | The file system type (for example, NFS, XFS, EXT4). | |
| filesystem:options | no | The default options of the selected file system. | Mount options for the file system. |
13.8 More information #Edit source
For more information, also see the project home page https://github.com/SUSE/cryptctl/.
14 User management #Edit source
- 14.1 Various account checks
- 14.2 Enabling password aging
- 14.3 Stronger password enforcement
- 14.4 Password and login management with PAM
- 14.5 Restricting
rootlogins - 14.6 Restricting
sudousers - 14.7 Setting an inactivity timeout for interactive shell sessions
- 14.8 Preventing accidental denial of service
- 14.9 Displaying login banners
- 14.10 Connection accounting utilities
14.1 Various account checks #Edit source
14.1.1 Unlocked accounts #Edit source
It is important that all system and vendor accounts that are not used for
logins are locked. To get a list of unlocked accounts on your system, you
can check for accounts that do not have an encrypted
password string starting with ! or
* in the /etc/shadow file. If you
lock an account using either passwd -l or
usermod -L, it
puts a ! in front of the encrypted password,
effectively disabling the password. Many system and
shared accounts are locked by default by having a
* ,!! or !* as the password field which
renders the encrypted password into an invalid string. Hence, to get a
list of all unlocked (encryptable) accounts, run the following command:
# egrep -v ':\*|:\!' /etc/shadow | awk -F: '{print $1}'
Also make sure all accounts have an x in the password
field in /etc/passwd. The following command lists
all accounts that do not have a x in the password
field:
# grep -v ':x:' /etc/passwd
An x in the password field means that the password
has been shadowed, for example, the encrypted password needs to be looked
up in the /etc/shadow file. If the password field in
/etc/passwd is empty, then the system does not look
up the shadow file and it prompts the user for a password at the
login prompt.
14.1.2 Unused accounts #Edit source
All system or vendor accounts that are not being used by users, applications, by the system or by daemons should be removed from the system. You can use the following command to find out if there are any files owned by a specific account:
# find / -path /proc -prune -o -user ACCOUNT -ls
The -prune option in this example is used to skip the
/proc file system. If you are sure that an account can be deleted, you
can remove the account using the following command:
# userdel -r ACCOUNT
Without the -r option, userdel does
not delete the user's home directory and mail spool
(/var/spool/mail/USER).
Many system accounts do not have a home directory.
14.2 Enabling password aging #Edit source
Password expiration is a general best practice, but might need to be excluded for certain system and shared accounts (for example, Oracle). Expiring passwords on those accounts could lead to system outages if the application account expires.
Typically a corporate policy should be developed that dictates rules/procedures regarding password changes for system and shared accounts. However, normal user account passwords should expire automatically. The following example shows how password expiration can be set up for individual user accounts.
The following files and parameters in the table can be used when a new
account is created with the useradd command. Settings
such as these are stored for each user account in the
/etc/shadow file. If using the YaST tool
() to add users, the settings
are available on a per-user basis. Here are the various
settings, some of which can also be system-wide (for example,
modification of /etc/login.defs and
/etc/default/useradd):
|
|
|
Maximum number of days a password is valid. |
|
|
|
Minimum number of days before a user can change the password since the last change. |
|
|
|
Number of days between the last password change and the next password change reminder. |
|
|
|
Number of days after password expiration until the account is disabled. |
|
|
|
Account expiration date in the format YYYY-MM-DD. |
Note: Existing users not affected
Users created before these modifications are not affected.
Ensure that the above parameters are changed in the
/etc/login.defs and
/etc/default/useradd files. A review of the
/etc/shadow file shows how these settings are
stored after adding a user.
To create a new user account, execute the following command:
# useradd -c "TEST_USER" -g USERS TEST
The -g option specifies the primary group for this
account:
# id TEST
uid=509(test) gid=100(users) groups=100(users)
The settings in /etc/login.defs and
/etc/default/useradd are recorded for the test user
in the /etc/shadow file as follows:
# grep TEST /etc/shadow
test:!!:12742:7:60:7:14::
Password aging can be modified at any time by use of the
chage command. To disable password aging for system and
shared accounts, you can run the following chage
command:
# chage -M -1 SYSTEM_ACCOUNT_NAMETo get password expiration information:
# chage -l SYSTEM_ACCOUNT_NAMEFor example:
# chage -l TEST
Minimum: 7
Maximum: 60
Warning: 7
Inactive: 14
Last Change: Jan 11, 2015
Password Expires: Mar 12, 2015
Password Inactive: Mar 26, 2015
Account Expires: Never
14.3 Stronger password enforcement #Edit source
On an audited system, it is important to restrict people from using simple passwords that can be cracked too easily. Writing down complex passwords is all right if stored securely. Some argue that strong passwords protect you against dictionary attacks, and those types of attacks can be defeated by locking accounts after a few failed attempts. However, this is not always an option. If set up like this, locking system accounts could bring down your applications and systems, which would be nothing short of a denial-of-service attack—another issue.
At any rate, it is important to practice effective password management security. Most companies require that passwords have at least a number, one lowercase letter, and one uppercase letter. Policies vary, but maintaining a balance between password strength/complexity and management can be difficult.
Password and login management with PAM #Edit source
Linux-PAM (Pluggable Authentication Modules for Linux) is a suite of shared libraries that enable the local system administrator to choose how applications authenticate users.
It is strongly recommended to familiarize oneself with the capabilities of PAM and how this architecture can be leveraged to provide the best authentication setup for an environment. This configuration can be done once, and implemented across all systems (a standard), or can be enhanced for individual hosts (enhanced security—by host/service/application). The key is to realize how flexible the architecture is.
To learn more about the PAM architecture, find PAM documentation in
the /usr/share/doc/packages/pam directory (in
a variety of formats).
The following discussions are examples of how to modify the default PAM stacks—specifically around password policies—for example password strength, password re-use, and account locking. While these are only a few of the possibilities, they serve as a good start and demonstrate PAM's flexibility.
Important: pam-config limitations
The pam-config tool can be used to configure the
common-{account,auth,password,session} PAM configuration files, which
contain global options. These files include the following comment:
# This file is autogenerated by pam-config. All changes
# will be overwritten.
Individual service files, such as login, password, sshd,
and su must be edited directly. You can elect to edit
all files directly, and not use pam-config, though
pam-config includes useful features such as converting
an older configuration, updating your current configuration, and sanity checks.
For more information, see man 8 pam-config.
14.4.1 Password strength #Edit source
openSUSE Leap can leverage the
pam_cracklib library to test
for weak passwords—and to suggest using a stronger one if it
determines obvious weakness. The following parameters represent an
example that could be part of a corporate password policy or something
required because of audit constraints.
The PAM libraries follow a defined flow. The best way to design the perfect stack usually is to consider all of the requirements and policies and draw out a flow chart.
Table 14.1: Sample rules/constraints for password enforcement #
|
|
|
Minimum length of password is 8 |
|
|
|
Minimum number of lowercase letters is 1 |
|
|
|
Minimum number of uppercase letters is 1 |
|
|
|
Minimum number of digits is 1 |
|
|
|
Minimum number of other characters is 1 |
To set up these password restrictions, use the
pam-config tool to specify the parameters you want
to configure. For example, the minimum length parameter could be
modified like this:
>sudopam-config -a --cracklib-minlen=8 --cracklib-retry=3 \ --cracklib-lcredit=-1 --cracklib-ucredit=-1 --cracklib-dcredit=-1 \ --cracklib-ocredit=-1 --cracklib
Now verify that the new password restrictions work for new passwords.
Log in to a non-root account and change the password using the
passwd command. Note that the above requirements
are not enforced if you run the passwd command
under root.
14.4.2 Restricting use of previous passwords #Edit source
The pam_pwhistory module can be used to configure the number of previous passwords that cannot be reused. The following command implements password restrictions on a system so that a password cannot be reused for at least six months:
>sudopam-config -a --pwhistory --pwhistory-remember=26
Recall that in the section
Section 14.2, “Enabling password aging” we set
PASS_MIN_DAYS to 7, which
specifies the minimum number of days allowed between password changes.
Therefore, if pam_unix is configured to
remember 26 passwords, then the previously used
passwords cannot be reused for at least six months (26*7 days).
The PAM configuration (/etc/pam.d/common-password)
resulting from the pam-config command looks like the
following:
auth      required   pam_env.so
auth      required   pam_unix.so     try_first_pass
account   required   pam_unix.so     try_first_pass
password  requisite   pam_cracklib.so
password  required   pam_pwhistory.so        remember=26
password  optional   pam_gnome_keyring.so    use_authtok
password  required   pam_unix.so     use_authtok nullok shadow try_first_pass
session   required   pam_limits.so
session   required   pam_unix.so     try_first_pass
session   optional   pam_umask.so
14.4.3 Locking user accounts after too many login failures #Edit source
Locking accounts after a defined number of failed ssh, login, su, or sudo
attempts is a common security practice. However, this could lead to
outages if an application, admin, or root user is locked out.
Important: Denial-of-service attacks
Password failure counts can easily be abused to cause denial-of-service attacks by deliberately creating login failures.
Only use password failure counts if you have to. Restrict locking to the necessary minimum, and do not lock critical accounts. Keep in mind that locking not only applies to human users but also to system accounts used to provide services.
openSUSE Leap does not lock accounts by default, but provides PAM module
pam_tally2 to easily implement password failure counts.
Add the following line to the top of /etc/pam.d/login
to lock out all users (except for root) after six failed logins, and
to automatically unlock the accounts after ten minutes:
auth required pam_tally2.so deny=6 unlock_time=600
This is an example of a complete /etc/pam.d/login file:
#%PAM-1.0
auth     requisite      pam_nologin.so
auth     include        common-auth
auth     required       pam_tally2.so deny=6 unlock_time=600
account  include        common-account
account  required       pam_tally2.so
password include        common-password
session  required       pam_loginuid.so
session  include        common-session
#session  optional       pam_lastlog.so nowtmp showfailed
session  optional       pam_mail.so standard
You can also lock out root, though obviously you must be very
certain you want to do this:
auth required pam_tally2.so deny=6 even_deny_root unlock_time=600
You can define a different lockout time for root:
auth required pam_tally2.so deny=6 root_unlock_time=120 unlock_time=600
If you want to require the administrator to unlock accounts, leave out the
unlock_time option. The next two example commands
display the number of failed login attempts and how to unlock a user
account:
>sudopam_tally2 -u usernameLogin Failures Latest failure From username 6 12/17/19 13:49:43 pts/1>sudopam_tally2 -r -u username
The default location for attempted accesses is recorded in
/var/log/tallylog.
If the user succeeds in logging in after the login timeout expires, or after the administrator resets their account, the counter resets to 0.
Configure other login services to use pam_tally2 in
their individual configuration files in /etc/pam.d/:
sshd, su, sudo, sudo-i, and su-l.
14.5 Restricting root logins #Edit source
By default, the root user is assigned a password
and can log in using various methods—for example, on a local
terminal, in a graphical session, or remotely via SSH. These methods
should be restricted as far as possible. Shared usage of the root account
should be avoided. Instead, individual administrators should use tools such as
su or sudo (for more information,
type man 1 su or man 8 sudo) to obtain elevated
privileges. This allows associating root logins with particular
users. This also adds another layer of security; not only the root
password, but both the root and the password of
an administrator's regular account would need to be compromised to gain full root
access. This section explains how to limit direct root logins on the different
levels of the system.
14.5.1 Restricting local text console logins #Edit source
TTY devices provide text-mode system access via the console. For desktop
systems these are accessed via the local keyboard or—in case of server
systems—via input devices connected to a KVM switch or a remote
management card (for example, ILO and DRAC).
By default, Linux offers six different consoles, which can be switched to
via the key combinations
Alt–F1 to
Alt–F6, when
running in text mode, or
Ctrl–Alt–F1 to
Ctrl–Alt–F6
when running in a graphical session. The
associated terminal devices are named tty1 to tty6.
The following steps restrict root access to the first TTY. Even this access method is only meant for emergency access to the system and should never be used for everyday system administration tasks.
Note
The steps shown here are tailored towards PC architectures (x86 and
AMD64/Intel 64). On architectures such as POWER, different terminal
device names than tty1 can be used. Be careful not to
lock yourself out by specifying wrong terminal device names.
You can determine the device name of the terminal you are currently
logged in to by running the tty command. Be careful
not to do this in a virtual terminal, such as via SSH or in a graphical
session (device names /dev/pts/N),
but only from an actual login terminal reachable via
Alt–FN.
Procedure 14.1: Restricting root logins on local TTYs #
Ensure that the PAM stack configuration file
/etc/pam.d/logincontains thepam_securettymodule in theauthblock:auth requisite pam_nologin.so auth [user_unknown=ignore success=ok ignore=ignore auth_err=die default=bad] pam_securetty.so noconsole auth include common-auth
This includes the
pam_securettymodule during the authentication process on local consoles, which restrictsrootto logging in only on TTY devices that are listed in the file/etc/securetty.Remove all entries from
/etc/securettyexcept one. This limits the access to TTY devices for root.# # This file contains the device names of tty lines (one per line, # without leading /dev/) on which root is allowed to login. # tty1
Check whether logins to other terminals are rejected for
root. A login ontty2, for example, should be rejected immediately, without even querying the account password. Also make sure that you can still successfully log in totty1and thus thatrootis not locked out of the system.
Important: Do not add pam_securetty module
Do not add the pam_securetty module to the
/etc/pam.d/common-auth file. This would
break the su and sudo commands,
because these tools would then also reject root authentications.
Important
These configuration changes also cause root logins on serial
consoles such as /dev/ttyS0 to be denied. In case you
require such use cases, you need to list the respective TTY devices
additionally in the /etc/securetty file.
14.5.2 Restricting graphical session logins #Edit source
To improve security on your server, avoid using graphical
environments at all. Graphical programs are often
not designed to be run as root and can
contain security issues than console programs. If you require a graphical
login, use a non-root login. Configure your system to disallow
root from logging in to graphical sessions.
To prevent root from logging in to graphical sessions, you
can apply the same basic steps as outlined in
Section 14.5.1, “Restricting local text console logins”.
Just add the pam_securetty module to the PAM
stack file belonging to the display manager—for example,
/etc/pam.d/gdm for GDM. The graphical
session also runs on a TTY device: by default, tty7.
Therefore, if you restrict root logins to tty1,
then root is denied login in the graphical session.
14.5.3 Restricting SSH logins #Edit source
By default, the root user is also allowed to log
in to a machine remotely via the SSH network protocol (if the SSH port is
not blocked by the firewall). To restrict this, make the following
change to the OpenSSH configuration:
Edit
/etc/ssh/sshd_configand adjust the following parameter:PermitRootLogin no
Restart the
sshdservice to make the changes effective:systemctl restart sshd.service
Note
Using the PAM pam_securetty module is not suitable in
case of OpenSSH, because not all SSH logins go through the PAM
stack during authorization (for example, when using SSH public-key authentication).
Additionally, an attacker could differentiate between a wrong password
and a successful login that was only rejected later on by policy.
14.6 Restricting sudo users #Edit source
The sudo command allows users to execute commands in the
context of another user, typically the root user. The
sudo configuration consists of a rule-set that defines
the mappings between commands to execute and their allowed source and target
users and groups. The configuration is stored in the file
/etc/sudoers.
By default, sudo asks for the root password on
SUSE systems. Unlike su however,
sudo remembers the password and allows further commands
to be executed as root without asking for the password again for five
minutes. Therefore, sudo should be enabled for selected
administrator users only.
Procedure 14.2: Restricting sudo for normal users #
Edit file
/etc/sudoers, for example by executingvisudo.Comment out the line that allows every user to run every command as long as they know the password of the user they want to use. Afterwards, it should look like this:
#ALL ALL=(ALL) ALL # WARNING! Only use this together with 'Defaults targetpw'!
Uncomment the following line:
%wheel ALL=(ALL) ALL
This limits the functionality described above to members of the group
wheel. You can use a different group aswheelmight have other implications that might not be suitable depending on your setup.Add users that should be allowed to use
sudoto the chosen group. To add the usertuxto the groupwheel, use:usermod -aG wheel tuxTo get the new group membership, users have to log out and back in again.
Verify the change by running a command with a user not in the group you have chosen for access control. You should see the error message:
wilber is not in the sudoers file. This incident will be reported.
Next, try the same with a member of the group. They should still be able to execute commands via
sudo.
This configuration only limits the sudo
functionality. The su command is still available to all
users. If there are other ways to access the system, users with knowledge of
the root password can easily execute commands via this vector.
14.7 Setting an inactivity timeout for interactive shell sessions #Edit source
It can be a good idea to terminate an interactive shell session after a certain period of inactivity. For example, to prevent open, unguarded sessions, or to avoid wasting system resources.
By default, there is no inactivity timeout for shells. Nothing happens if a shell stays open and unused for days or even years. However, it is possible to configure most shells so that idle sessions terminate automatically after a certain amount of time. The following example shows how to set an inactivity timeout for several common types of shells.
The inactivity timeout can be configured for login shells only or for all interactive shells. In the latter case, the inactivity timeout runs individually for each shell instance. This means that timeouts accumulate. When a sub- or child-shell is started, a new timeout begins for the sub- or child-shell, and only afterwards the timeout of the parent continues running.
The following table contains configuration details for a selection of common shells shipped with openSUSE Leap:
| package | shell personalities | shell variable | time unit | readonly setting | config path (only login shell) | config path (all shells) |
|---|---|---|---|---|---|---|
|
|
| seconds |
|
|
|
|
|
| seconds |
|
|
|
|
|
| minutes |
|
|
|
|
|
| seconds |
|
|
|
Every listed shell supports an internal timeout shell variable that can be set to a specific time value to cause the inactivity timeout. If you want to prevent users from overriding the timeout setting, you can mark the corresponding shell timeout variable as read-only. The corresponding variable declaration syntax is also found in the table above.
Note: No protection from hostile users
This feature is only helpful for avoiding risks if a user is forgetful or follows unsafe practices. It does not protect against hostile users. The timeout only applies to interactive wait states of a shell. A malicious user can always find ways to circumvent the timeout and keep their session open regardless.
To configure the inactivity timeout, you need to add the matching timeout
variable declaration to each shell's start-up script. Use either the path for
login shells only, or the one for all shells, as listed in the table. The
following example uses paths and settings that are suitable for
bash and ksh
to set up a read-only login shell timeout that cannot be overridden by users.
Create the file /etc/profile.d/timeout.sh with the
following content:
# /etc/profile.d/timeout.sh for SUSE Linux
#
# Timeout in seconds until the bash/ksh session is terminated
# in case of inactivity.
# 24h = 86400 sec
readonly TMOUT=86400
Tip
We recommend using the screen tool to
detach sessions before logging out. screen sessions
are not terminated and can be re-attached whenever required. An active
session can be locked without logging out (read about Ctrl–A–X / lockscreen in
man screen for details).
14.8 Preventing accidental denial of service #Edit source
Linux allows you to set limits on the amount of system resources that users and groups can consume. This is also useful if bugs in programs cause them to use up too many resources (for example, memory leaks), slow down the machine, or even render the system unusable. Incorrect settings can allow programs to use too many resources, which might make the server unresponsive to new connections or even local logins (for example, if a program uses up all available file handles on the host). This can also be a security concern if someone is allowed to consume all system resources and therefore cause a denial-of-service attack—either unplanned, or worse, planned. Setting resource limits for users and groups might be an effective way to protect systems, depending on the environment.
14.8.1 Example for restricting system resources #Edit source
The following example demonstrates the practical usage of setting or
restricting system resource consumption for an Oracle user account. For a
list of system resource settings, see
/etc/security/limits.conf or man
limits.conf.
Most shells, such as Bash, provide control over various resources (for example, the maximum allowable number of open file descriptors or the maximum number of processes) that are available on a per-user basis. To examine all current limits in the shell, execute:
# ulimit -a
For more information on ulimit for the Bash shell,
examine the Bash man pages.
Important: Setting limits for SSH sessions
Setting “hard” and “soft” limits might not have
the expected results when using an SSH session. To see valid behavior, it
might be necessary to log in as root, and then su to the
ID with limits (for example, Oracle in these examples).
Resource limits should also work assuming the application was started
automatically during the boot process. It might be necessary to set
UsePrivilegeSeparation in
/etc/ssh/sshd_config to no and
restart the SSH daemon (systemctl restart sshd)
if it seems that the changes to resource limits are not working (via
SSH). However, this is not generally recommended, as it weakens a system's
security.
Tip: Disabling password logins via ssh
You can add extra security to your server by disabling password
authentication for SSH. Remember that you need to have SSH keys
configured, otherwise you cannot access the server. To disable password
login, add the following lines to
/etc/ssh/sshd_config:
UseLogin no
UsePAM no
PasswordAuthentication no
PubkeyAuthentication yes
In this example, a change to the number of file handles or open files
that the user oracle can use is made by editing
/etc/security/limits.conf as root making the
following changes:
oracle           soft    nofile          4096
oracle           hard    nofile          63536
The soft limit in the first line defines the limit on the number of file
handles (open files) that the
oracle user has after
login. If the user sees error messages about running out of file handles,
then the user can increase the number of file handles like in this
example up to the hard limit (in this example 63536) by executing:
# ulimit -n 63536You can set the soft and hard limits higher if necessary.
Note: Caution with using ulimits
It is important to be judicious with the usage of ulimits. Allowing a
“hard” limit for nofile for a user that
is equal to the kernel limit (/proc/sys/fs/file-max)
is bad. If the user consumes all the available file handles, the
system cannot initiate new logins, since it is not possible to access
the PAM modules required to perform a login.
You also need to ensure that pam_limits is either
configured globally in /etc/pam.d/common-auth, or
for individual services like SSH, su, login and telnet in:
/etc/pam.d/sshd (for SSH) |
/etc/pam.d/su (for su) |
/etc/pam.d/login (local logins and telnet) |
If you do not want to enable it for all logins, there is a specific PAM
module that reads the /etc/security/limits.conf
file. Entries in PAM configuration directives have entries like:
session     required      /lib/security/pam_limits.so
session     required      /lib/security/pam_unix.so
Changes are not immediate and require a new login session:
#su - oracle>ulimit -n 4096
These examples are specific to the Bash shell;
ulimit options are different for other shells. The
default limit for the user oracle is
4096. To increase the number of file handles the user
oracle can use to 63536, execute:
#su - oracle>ulimit -n 4096>ulimit -n 63536>ulimit -n 63536
Making this permanent requires the addition of the setting,
ulimit -n 63536, (again, for Bash) to the user's
profile (~/.bashrc or
~/.profile file), which is the user start-up file for
the Bash shell on openSUSE Leap (to verify your shell, run:
echo $SHELL). To do this you could run the following commands for the
Bash shell of the user oracle:
#su - oracle>cat >> ~oracle/.bash_profile << EOF ulimit -n 63536 EOF
14.9 Displaying login banners #Edit source
It is often necessary to place a banner on login screens on all servers for legal/audit policy reasons or to give security instructions to users.
To print a login banner after a user
logs in on a text based terminal, for example, using SSH or on a local
console, you can use the file /etc/motd (motd =
message of the day). The file exists by default on openSUSE Leap, but
it is empty. Simply add content to the file that is applicable/required
by the organization.
Note: Banner length
Try to keep the login banner content to a single terminal page (or less), as it scrolls the screen if it does not fit, making it more difficult to read.
You can also have a login banner printed before a
user logs in on a text based terminal. For local console
logins, you can edit the /etc/issue file, which
causes the banner to be displayed before the login prompt. For logins via
SSH, you can edit the “Banner” parameter in the
/etc/ssh/sshd_config file, which then
appropriately displays the banner text before the SSH login prompt.
For graphical logins via GDM, you can follow
the GNOME admin guide to set up a login banner. Furthermore,
you can make the following changes to require a user to acknowledge the
legal banner by selecting or .
Edit the /etc/gdm/Xsession file and add the
following lines at the beginning of the script:
if ! /usr/bin/gdialog --yesno '\nThis system is classified...\n' 10 10; then
    /usr/bin/gdialog --infobox 'Aborting login'
    exit 1;
fi
The text This system is classified... needs to be replaced with the desired banner text. This dialog does not prevent a login from progressing. For more information about GDM scripting, refer to the GDM Admin Manual.
14.10 Connection accounting utilities #Edit source
Here is a list of commands you can use to get data about user logins:
who.
Lists currently logged in users.
w.
Shows who is logged in and what they are doing.
last.
Shows a list of the most recent logged in users, including login time, logout time,
login IP address, etc.
lastb.
Same as last, except that by default it shows
/var/log/btmp, which contains all the bad login
attempts.
lastlog.
This command reports data maintained in
/var/log/lastlog, which is a record of the last
time a user logged in.
ac.
Available after installing the acct package.
Prints the connect time in hours on a per-user basis or daily basis,
etc. This command reads /var/log/wtmp.
dump-utmp.
Converts raw data from /var/run/utmp or
/var/log/wtmp into ASCII-parseable format.
Also check the /var/log/messages file, or the output
of journalctl if no logging facility is running. See
Book “Reference”, Chapter 11 “journalctl: query the systemd journal” for more information on the systemd
journal.
15 Restricting cron and at #Edit source
Abstract#
This chapter explains how to restrict access to the cron and at daemons to improve the security of a system.
15.1 Restricting the cron daemon #Edit source
The cron system is used to automatically run commands in the background at
predefined times. For more information about cron, refer to the Book “Reference”, Chapter 15 “Special system features”, Section 15.1.2 “The cron package”.
The cron.allow file specifies a list of users that are
allowed to execute jobs via cron. The file does not exist by default, so
all users can create cron jobs—except for those listed in
cron.deny.
To prevent users except for root from creating cron jobs, perform
the following steps.
Create an empty file
/etc/cron.allow:tux >sudotouch/etc/cron.allowAllow users to create
cronjobs by adding their user names to the file:tux >sudoecho"tux" >> /etc/cron.allowTo verify, try creating a
cronjob as non-root user listed incron.allow. You should see the message:tux >crontab -eno crontab for tux - using an empty oneQuit the crontab editor and try the same with a user not listed in the file (or before adding them in step 2 of this procedure):
wilber >crontab -eYou (wilber) are not allowed to use this program (crontab) See crontab(1) for more information
Important: Existing cron jobs
Implementing cron.allow prevents users from
creating new cron jobs. Existing jobs run, even for users
listed in cron.deny. To prevent this, create the file
as described and remove existing user crontabs from the directory
/var/spool/cron/tabs to ensure they are not run
anymore.
Note: Switching to systemd timer units
You should also consider switching to systemd timer units, as they allow
for more powerful and reliable task execution. By default, users cannot use
them to run code when they are not logged in. This limits the way users can
interact with the system while not being connected to it.
For more information about systemd timer units, refer to Book “Reference”, Chapter 10 “The systemd daemon”, Section 10.7 “systemd timer units”.
15.2 Restricting the at scheduler #Edit source
The at job execution system allows
users to scheduled one-time running jobs. The at.allow
file specifies a list of users that are allowed to schedule jobs via
at. The file does not exist by
default, so all users can schedule at
jobs—except for those listed in at.deny)
To prevent users except for root from scheduling jobs with at, perform the following steps.
Create an empty file
/etc/at.allow:tux >sudotouch/etc/at.allowAllow users to schedule jobs with
atby adding their user names to the file:tux >sudoecho"tux" >> /etc/at.allowTo verify, try scheduling a job as non-root user listed in
at.allow:tux >at 00:00at>Quit the
atprompt with Ctrl–C and try the same with a user not listed in the file (or before adding them in step 2 of this procedure):wilber >at 00:00You do not have permission to use at.
Note: Uninstalling at
at is not widely used anymore.
If you do not have valid use cases, consider uninstalling the daemon instead
of just restricting its access.
16 Spectre/Meltdown checker #Edit source
Abstract#
spectre-meltdown-checker is a shell script to test if
your system is vulnerable to the several speculative execution
vulnerabilities that are in nearly all CPUs manufactured in the
past 20 years. This is a hardware flaw that potentially allows an attacker
to read all data on the system. On cloud computing services, where multiple
virtual machines are on a single physical host, an attacker can gain access
to all virtual machines. Fixing these vulnerabilities requires redesigning
and replacing CPUs. Until this happens, there are several software patches
that mitigate these vulnerabilities. If you have kept your SUSE systems
updated, all these patches should already be installed.
spectre-meltdown-checker generates a detailed report. It
is impossible to guarantee that your system is secure, but it shows you
which mitigations are in place, and potential vulnerabilities.
16.1 Using spectre-meltdown-checker #Edit source
Install the script, and then run it as root without any options:
#zypper in spectre-meltdown-checker#spectre-meltdown-checker.sh
You see colorful output like Figure 16.1, “Output from spectre-meltdown-checker”:
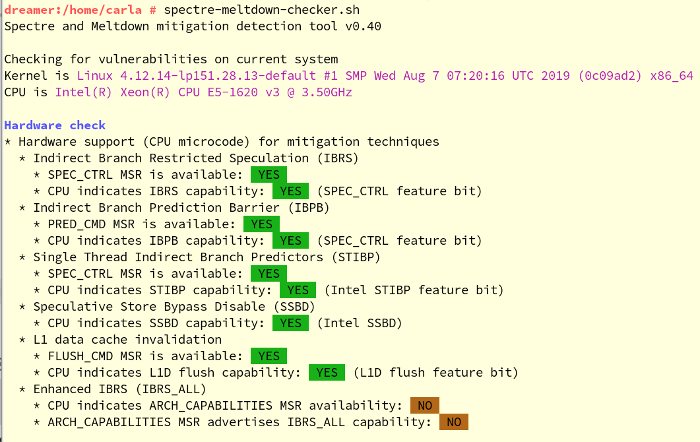
Figure 16.1: Output from spectre-meltdown-checker #
spectre-meltdown-checker.sh --help lists all options. It
is useful to pipe plain text output, with no colors, to a file:
# spectre-meltdown-checker.sh --no-color| tee filename.txt
The previous examples are on a running system, which is the default. You may
also run spectre-meltdown-checker offline by specifying
the paths to the kernel, config and System.map files:
#cd /boot#spectre-meltdown-checker.sh \ --no-color \ --kernel vmlinuz-6.4.0-150600.9-default \ --config config-6.4.0-150600.9-default \ --map System.map-6.4.0-150600.9-default| tee filename.txt
Other useful options are:
- --verbose, -v
Increase verbosity; repeat for more verbosity, for example
-v -v -v- --explain
Print human-readable explanations
- --batch [short] [json] [nrpe] [prometheus]
Format output in various machine-readable formats
Important: --disclaimer option
spectre-meltdown-checker.sh --disclaimer provides
important information about what the script does, and does not do.
16.2 More information #Edit source
For more information, see the following references:
SUSE Knowledge Base article #7022937, Security Vulnerability: Spectre Variant 4 (Speculative Store Bypass) aka CVE-2018-3639: https://www.suse.com/support/kb/doc/?id=7022937
speed47/spectre-meltdown-checker source code on GitHub, with detailed references to relevant Common Vulnerabilities and Exposures (CVE): https://github.com/speed47/spectre-meltdown-checker
SUSE Blog article, Meltdown and Spectre Performance: https://www.suse.com/c/meltdown-spectre-performance/
SUSE Knowledge Base article #7022512, providing information on architectures, CVEs, and mitigations: https://www.suse.com/support/kb/doc/?id=7022512
17 Configuring security settings with YaST #Edit source
Abstract#
The YaST module provides a central control panel for configuring security-related settings for openSUSE Leap. Use it to configure security aspects such as settings for the login procedure and for password creation, for boot permissions, user creation, or for default file permissions. Launch it from the YaST control center with › . The dialog opens to the , with additional configuration dialogs in the left and right panes.
17.1 #Edit source
The displays a comprehensive list of the most important security settings for your system. The security status of each entry in the list is visible. A green check mark indicates a secure setting while a red cross indicates an entry as being insecure. Click to open an overview of the setting and information on how to make it secure. To change a setting, click the corresponding link in the Status column. Depending on the setting, the following entries are available:
- /
Click this entry to toggle the status of the setting to either enabled or disabled.
Click this entry to launch another YaST module for configuration. You are returned to the Security Overview when leaving the module.
A setting's status is set to unknown when the associated service is not installed. Such a setting does not represent a potential security risk.
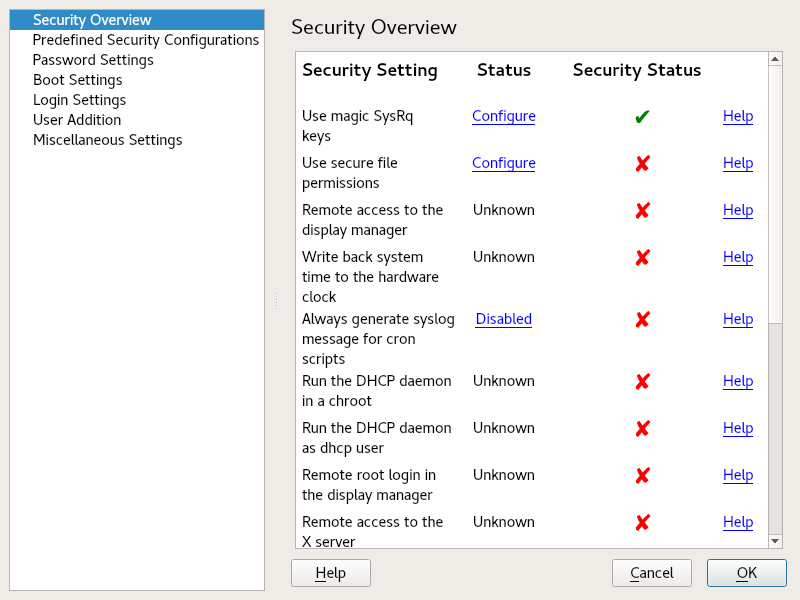
Figure 17.1: YaST security center and hardening: security overview #
17.2 #Edit source
openSUSE Leap includes three . These configurations affect all the settings available in the module. Click in the left pane to see the predefined configurations. Click the one you want to apply, then the module closes. If you wish to modify the predefined settings, re-open the module, click , then click in the right pane. Any changes you make are applied to your selected predefined configuration.
A configuration for a workstation with any kind of network connection (including a connection to the Internet).
This setting is designed for a laptop or tablet that connects to different networks.
Security settings designed for a machine providing network services such as a Web server, file server, name server, etc. This set provides the most secure configuration of the predefined settings.
Select to modify any of the three predefined configurations after they have been applied.
17.3 #Edit source
Passwords that are easy to guess are a major security issue. The dialog provides the means to ensure that only secure passwords can be used.
By activating this option, a warning is issued if new passwords appear in a dictionary, or if they are proper names (proper nouns).
If the user chooses a password with a length shorter than specified here, a warning is issued.
When password expiration is activated (via ), this setting stores the given number of a user's previous passwords, preventing their reuse.
Choose a password encryption algorithm. Normally there is no need to change the default (Blowfish).
Activate password expiration by specifying a minimum and a maximum time limit (in days). By setting the minimum age to a value greater than
0days, you can prevent users from immediately changing their passwords again (and in doing so circumventing the password expiration). Use the values0and99999to deactivate password expiration.When a password expires, the user receives a warning in advance. Specify the number of days before the expiration date that the warning should be issued.
17.4 #Edit source
Configure which users can shut down the machine via the graphical login manager in this dialog. You can also specify how Ctrl–Alt–Del is interpreted and who can hibernate the system.
17.5 #Edit source
This dialog lets you configure security-related login settings:
To make it difficult to guess a user's password by repeatedly logging in, it is recommended to delay the display of the login prompt that follows an incorrect login. Specify the value in seconds. Make sure that users who have mistyped their passwords do not need to wait too long.
When checked, the graphical login manager (GDM) can be accessed from the network. This is a potential security risk.
17.6 #Edit source
Set minimum and maximum values for user and group IDs. These default settings would rarely need to be changed.
17.7 #Edit source
Other security settings that do not fit the above-mentioned categories are listed here:
openSUSE Leap comes with three predefined sets of file permissions for system files. These permission sets define whether a regular user can read log files or start certain programs. file permissions are suitable for stand-alone machines. These settings allow regular users to, for example, read most system files. See the file
/etc/permissions.easyfor the complete configuration. The file permissions are designed for multiuser machines with network access. A thorough explanation of these settings can be found in/etc/permissions.secure. The settings are the most restrictive ones and should be used with care. See/etc/permissions.paranoidfor more information.The program
updatedbscans the system and creates a database of all files, which can be queried with the commandlocate. Whenupdatedbis run as user nobody, only world-readable files are added to the database. When run as userroot, almost all files (except the ones root is not allowed to read) are added.The magic SysRq key is a key combination that enables you to have certain control over the system even when it has crashed. The complete documentation can be found at https://www.kernel.org/doc/html/latest/admin-guide/sysrq.html.
18 The Polkit authentication framework #Edit source
Abstract#
Polkit is an authentication framework used in graphical Linux desktop
environments, for fine-grained management of access rights on the
system. Traditionally, there is a strong separation of
privileges on Linux between the root user as the fully authorized
administrator account, and all other accounts and groups on the
system. These non-administrator accounts may have certain additional
privileges, like accessing sound hardware through an
audio group. However, this kind of
privilege is fixed and cannot be granted in certain
specific situations, or for a certain duration of time.
Instead of fully switching to the root user (using programs
such as sudo) for gaining higher privileges,
Polkit grants specific privileges to a user or group on an
as-needed basis. This is controlled by configuration files that
describe individual actions that need to be authorized
in a dynamic context.
18.1 Conceptual overview #Edit source
Polkit consists of multiple components. polkitd is a
privileged central background service that performs authentication checks
based on the existing Polkit configuration. Polkit-enabled applications
forward specific authentication requests to the
polkitd daemon. A Polkit authentication agent running in
the unprivileged user context is responsible for displaying
authentication requests on behalf of the polkitd
daemon, and providing the credentials that have been entered interactively by
the user.
A Polkit action represents a single activity that is
subject to Polkit's authorization rules. For example, the intent to reboot the
computer can be modeled as a single action in Polkit. Each action has a unique
identifier, for the reboot example the action is called
org.freedesktop.login1.reboot.
18.1.1 The authentication agent #Edit source
When a user starts a graphical session in a fully featured desktop environment, an authentication agent is typically started automatically, running in the background. You notice it when an authentication prompt appears in response to an application requesting authorization for a certain action. Using Polkit in text mode or via SSH is not easily possible, therefore this document focuses on its use in a graphical session context.
18.1.2 Configuration of Polkit #Edit source
Polkit's configuration consists of actions and authorization rules:
- Actions (file extension
*.policy) Actions are defined in XML files that are located in
/usr/share/polkit-1/actions. Each file defines one or more actions for a certain application domain, and each action contains human-readable descriptions and its default authorization settings. Although a system administrator can write their own rules, these default policy files must not be edited directly.- Authorization rules (file extension
*.rules) Rules are written in the JavaScript programming language, and are located in two places:
/usr/share/polkit-1/rules.dis used by system packages, and/etc/polkit-1/rules.dis for locally administered configurations. The rule files contain more complex logic on top of the default action authorization settings. For example, a rule file could overrule a restrictive action and allow certain users to use it even without authorization.
18.1.3 Polkit Utilities #Edit source
Polkit provides utilities for specific tasks (see also their respective man pages for further details):
pkactionGet details about a defined action. See Section 18.3, “Querying Privileges” for more information.
pkcheckChecks whether a process is authorized for a specific Polkit action.
pkexecAllows programs to be executed as a different user based on Polkit authorization settings. This is similar to
suorsudo.pkttyagentStarts a textual authentication agent. This agent is used if a desktop environment does not have its own authentication agent.
18.2 Authorization types #Edit source
Every time a Polkit-enabled application carries out a privileged operation,
Polkit is asked whether the user is entitled to do so. The answer can be
yes, no or
authentication needed. In the latter case, an authentication
dialog is displayed for the user to enter the necessary credentials.
18.2.1 Implicit Authorizations #Edit source
When no dedicated Polkit JavaScript rules exist for a given action, the outcome
depends on the implicit authorizations settings that are defined for each
action in a Polkit policy file. There are three authorization categories:
allow_active,
allow_inactive and allow_any.
allow_active is applied to users in an active session. An
active session is a local login on the text mode console or in a graphical
user environment. The session becomes inactive when you switch to another
console, for example, in which case the category
allow_inactive is relevant. allow_any
is used for all other contexts, for example for remote users logged in via
SSH or VNC. Each of these categories has one of the following authorization
settings assigned:
- no
The user is never granted authorization of the desired action.
- yes
The user is always granted authorization without the need to enter any credentials.
- auth_self
The user needs to enter their own password for the action to be authorized.
- auth_self_keep
Like
auth_self, but the authorization is cached for a certain duration, for example, if the same action is executed by the same application again, then it is not necessary to re-enter the password.- auth_admin
The user needs to enter the administrator (
root) password for the action to be authorized.- auth_admin_keep
Similar to
auth_self_keep, requiring the administrator (root) password.
18.2.2 SUSE default privileges #Edit source
The implicit authorization settings found in Polkit policy files described so far are from the upstream developers of the respective applications. We call these settings the upstream defaults. These upstream defaults are not necessarily the same defaults that are used on SUSE systems. openSUSE Leap comes with a predefined set of privileges that override the upstream defaults. These settings come in three different flavors (profiles) of which only one can be active at any time:
/etc/polkit-default-privs.easyAuthorization settings tailored towards single-user desktop systems where the administrator is also the active interactive user. It offers reduced security in favor of improved user experience.
/etc/polkit-default-privs.standardBalanced settings suitable for most systems.
/etc/polkit-default-privs.restrictiveMore conservative authorization settings that reduce possible attack surface at the expense of user experience in certain areas.
To switch the active polkit profile, edit
/etc/sysconfig/security
and adjust the value of POLKIT_DEFAULT_PRIVS to one of
easy, standard or
restrictive.
Then run the command set_polkit_default_privs as root.
Do not modify the profile settings in the files listed above. To define your
own custom Polkit settings, use
/etc/polkit-default-privs.local. For details, refer to
Section 18.4.3, “Modifying the SUSE default privileges”.
18.3 Querying Privileges #Edit source
To query privileges, use the command pkaction included
in Polkit.
Polkit comes with command-line tools for changing privileges and
executing commands as another user (see
Section 18.1.3, “Polkit Utilities” for a short
overview). Each existing policy has a unique name with which it
can be identified. List all available policies with the command
pkaction. See man pkaction for more
information.
To display the needed authorization for a given policy (for
example, org.freedesktop.login1.reboot), use
pkaction as follows:
>pkaction -v --action-id=org.freedesktop.login1.rebootorg.freedesktop.login1.reboot: description: Reboot the system message: Authentication is required to allow rebooting the system vendor: The systemd Project vendor_url: http://www.freedesktop.org/wiki/Software/systemd icon: implicit any: auth_admin_keep implicit inactive: auth_admin_keep implicit active: yes
Note: Restrictions of pkaction on openSUSE Leap
pkaction only takes the upstream defaults into account.
It is not aware of the SUSE default privileges that are overriding the
upstream defaults. Therefore, be careful about interpreting this output.
18.4 Modifying Polkit Configuration #Edit source
Adjusting Polkit settings is useful when you want to deploy the same set of
policies to different machines, for example, to the computers of a specific
team. Customization of Polkit authorization settings can also be used to harden
security for specific actions, or to improve the user experience by reducing
the amount of password prompts for frequently used actions. However,
granting certain Polkit actions without authentication
can be a security hazard that may grant a regular user full root
privileges. Lower Polkit authentication requirements when you are certain
it does not violate the system security in your specific environment.
18.4.1 Overriding Polkit policy files #Edit source
The list of available Polkit actions depends on the packages that you have
installed on your system. For a quick overview, use
pkaction to list all actions Polkit knows about.
For the purposes of this example, we show how the command
gparted (“GNOME Partition Editor”)
is integrated into Polkit.
The file
/usr/share/polkit-1/actions/org.opensuse.policykit.gparted.policy
has the following content:
<?xml version="1.0" encoding="UTF-8"?>
<!DOCTYPE policyconfig PUBLIC
 "-//freedesktop//DTD PolicyKit Policy Configuration 1.0//EN"
 "http://www.freedesktop.org/standards/PolicyKit/1.0/policyconfig.dtd">
<policyconfig> 1

  <action id="org-opensuse-polkit-gparted"> 2
    <message>Authentication is required to run the GParted Partition Editor</message>
    <icon_name>gparted</icon_name>
    <defaults> 3
      <allow_any>auth_admin</allow_any>
      <allow_inactive>auth_admin</allow_inactive>
     < allow_active>auth_admin</allow_active>
    </defaults>
    <annotate 4
      key="org.freedesktop.policykit.exec.path">/usr/sbin/gparted</annotate>
    <annotate 4
      key="org.freedesktop.policykit.exec.allow_gui">true</annotate>
  </action>

</policyconfig>
Root XML element of the policy file. | |
Start of the definition of the only action in this policy. | |
Here the implicit authorization settings as described above are found. | |
The |
To add your own policy, create a .policy file with
the structure above, add the appropriate action name into the
id attribute, and define the desired override implicit
authorization settings.
Note: Deprecated name PolicyKit
The Polkit authorization framework was formerly named PolicyKit. In certain places, like the XML document preamble above, this old name still appears.
18.4.2 Adding JavaScript authorization rules #Edit source
Authorization rules overrule the implicit authorization settings.
To add your own rules, store your files under /etc/polkit-1/rules.d/.
The files in this directory start with a two-digit number, a dash, a
descriptive name, and end with .rules. Functions
inside these files are executed in the lexicographical order of the file names
in the directory. For example, 00-foo.rules is ordered
(and hence executed) before 60-bar.rules or even
90-default-privs.rules.
Inside the rule file, the script typically checks for the action ID to be
authorized. For example, to allow the command
gparted to be executed by
any member of the admin
group, check for the action ID org.opensuse.policykit.gparted:
/* Allow users in admin group to run GParted without authentication */
polkit.addRule(function(action, subject) {
    if (action.id == "org.opensuse.policykit.gparted" &&
        subject.isInGroup("admin")) {
        return polkit.Result.YES;
    }
});
Find the description of all classes and methods of the functions in the Polkit API at https://www.freedesktop.org/software/polkit/docs/latest/ref-api.html.
18.4.3 Modifying the SUSE default privileges #Edit source
As described in Section 18.2.2, “SUSE default privileges”,
SUSE ships different override profiles for the Polkit implicit authorization
settings defined by the upstream developers. Custom privileges can be defined
in /etc/polkit-default-privs.local. Privileges defined
here always take precedence over the predefined profile settings.
To add a custom privilege setting, do the following:
Procedure 18.1: Modifying default privileges #
Edit
/etc/polkit-default-privs.local. To define a privilege, add a line for each action in the following format:<action-id> <auth_any>:<auth_inactive>:<auth_active>
Alternatively, if all three categories receive the same value, you can also specify a single value:
<action-id> <auth_all>
For example:
org.freedesktop.color-manager.modify-profile auth_admin_keep
Run this tool as
rootfor the changes to take effect:#/sbin/set_polkit_default_privs
Refer to man polkit-default-privs for the full
documentation of the SUSE Polkit default privileges.
18.5 Restoring the SUSE default privileges #Edit source
To restore the SUSE default authorization settings follow these steps:
Procedure 18.2: Restoring the openSUSE Leap defaults #
Choose the desired profile as described in Section 18.2.2, “SUSE default privileges”
Remove any overrides from
/etc/polkit-default-privs.local.Run
set_polkit_default_privsto regenerate the default rules.
19 Access control lists in Linux #Edit source
Abstract#
POSIX ACLs (access control lists) can be used as an expansion of the traditional permission concept for file system objects. With ACLs, permissions can be defined more flexibly than with the traditional permission concept.
The term POSIX ACL suggests that this is a true POSIX (portable operating system interface) standard. The respective draft standards POSIX 1003.1e and POSIX 1003.2c have been withdrawn for several reasons. Nevertheless, ACLs (as found on many systems belonging to the Unix family) are based on these drafts and the implementation of file system ACLs (as described in this chapter) follows these two standards.
19.1 Traditional file permissions #Edit source
The permissions of all files included in openSUSE Leap are
carefully chosen. When installing additional software or files,
take great care when setting the permissions. Always use the
-l option with the command ls
to detect any incorrect file permissions immediately. An incorrect
file attribute does not only mean that files could be changed or
deleted. Modified files could be executed by root or
services could be hijacked by modifying configuration files. This
increases the danger of an attack.
A openSUSE® Leap system includes the files
permissions,
permissions.easy,
permissions.secure, and
permissions.paranoid, all in the directory
/etc. The purpose of these files is to define
special permissions, such as world-writable directories or, for
files, the setuser ID bit. Programs with the setuser ID bit set do
not run with the permissions of the user that launched it, but
with the permissions of the file owner, root. An
administrator can use the file
/etc/permissions.local to add their own
settings.
To define one of the available profiles, select in the
section of YaST. To learn more about the topic, read the
comments in /etc/permissions or consult
man chmod.
Find detailed information about the traditional file permissions in the
GNU Coreutils Info page, Node File permissions
(info coreutils "File permissions"). More advanced
features are the setuid, setgid and sticky bit.
19.1.1 The setuid bit #Edit source
In certain situations, the access permissions may be too restrictive.
Therefore, Linux has additional settings that enable the temporary
change of the current user and group identity for a specific action. For
example, the passwd program normally requires root
permissions to access /etc/passwd. This file
contains important information, like the home directories of users
and user and group IDs. Thus, a normal user would not be able to change
passwd, because it would be too dangerous to grant
all users direct access to this file. A possible solution to this
problem is the setuid mechanism. setuid (set user
ID) is a special file attribute that instructs the system to execute
programs marked accordingly under a specific user ID. Consider the
passwd command:
-rwsr-xr-x 1 root shadow 80036 2004-10-02 11:08 /usr/bin/passwd
You can see the s that denotes that the setuid bit is
set for the user permission. Through the setuid bit, all users
starting the passwd command execute it as
root.
19.1.2 The setgid bit #Edit source
The setuid bit applies to users. However, there is also an equivalent property for groups: the setgid bit. A program for which this bit was set runs under the group ID under which it was saved, no matter which user starts it. Therefore, in a directory with the setgid bit, all newly created files and subdirectories are assigned to the group to which the directory belongs. Consider the following example directory:
drwxrws--- 2 tux archive 48 Nov 19 17:12 backup
You can see the s that denotes that the setgid bit is
set for the group permission. The owner of the directory and members of
the group archive can access
this directory. Users that are not members of this group are
“mapped” to the respective group. The effective group ID of
all written files is
archive. For example, a
backup program that runs with the group ID
archive can access
this directory even without root privileges.
19.1.3 The sticky bit #Edit source
There is also the sticky bit. It makes a difference
whether it belongs to an executable program or a directory. If it
belongs to a program, a file marked in this way is loaded to RAM to
avoid needing to get it from the hard disk each time it is used. This
attribute is used rarely, because modern hard disks are fast enough. If
this bit is assigned to a directory, it prevents users from deleting
each other's files. Typical examples include the
/tmp and /var/tmp directories:
drwxrwxrwt 2 root root 1160 2002-11-19 17:15 /tmp
19.2 Advantages of ACLs #Edit source
Traditionally, three permission sets are defined for each file object on
a Linux system. These sets include the read (r), write
(w), and execute (x) permissions
for each of three types of users—the file owner, the group, and
other users. Additionally, it is possible to set the set
user id, the set group id, and the
sticky bit. This lean concept is fully adequate for
most practical cases. However, for more complex scenarios or advanced
applications, system administrators formerly needed to use several
workarounds to circumvent the limitations of the traditional permission
concept.
ACLs can be used as an extension of the traditional file permission concept. They allow the assignment of permissions to individual users or groups even if these do not correspond to the original owner or the owning group. Access control lists are a feature of the Linux kernel and are currently supported by Ext2, Ext3, Ext4, JFS and XFS. Using ACLs, complex scenarios can be realized without implementing complex permission models on the application level.
The advantages of ACLs are evident if you want to replace a Windows
server with a Linux server. Some connected workstations may
continue to run under Windows even after the migration. The Linux system
offers file and print services to the Windows clients with Samba. With
Samba supporting access control lists, user permissions can be configured
both on the Linux server and in Windows with a graphical user interface
(only Windows NT and later). With winbindd, part of
the Samba suite, it is even possible to assign permissions to users only
existing in the Windows domain without any account on the Linux server.
19.3 Definitions #Edit source
- User class
The conventional POSIX permission concept uses three classes of users for assigning permissions in the file system: the owner, the owning group, and other users. Three permission bits can be set for each user class, giving permission to read (
r), write (w), and execute (x).- ACL
The user and group access permissions for all kinds of file system objects (files and directories) are determined through ACLs.
- Default ACL
Default ACLs can only be applied to directories. They determine the permissions a file system object inherits from its parent directory when it is created.
- ACL entry
Each ACL consists of a set of ACL entries. An ACL entry contains a type, a qualifier for the user or group to which the entry refers, and a set of permissions. For certain entry types, the qualifier for the group or users is undefined.
19.4 Handling ACLs #Edit source
Table 19.1, “ACL entry types” summarizes the six possible types of ACL
entries, each defining permissions for a user or a group of users. The
owner entry defines the permissions of the user
owning the file or directory. The owning group entry
defines the permissions of the file's owning group. The superuser can
change the owner or owning group with chown or
chgrp, in which case the owner and owning group
entries refer to the new owner and owning group. Each named
user entry defines the permissions of the user specified in
the entry's qualifier field. Each named group entry
defines the permissions of the group specified in the entry's qualifier
field. Only the named user and named group entries have a qualifier field
that is not empty. The other entry defines the
permissions of all other users.
The mask entry further limits the permissions granted by named user, named group, and owning group entries by defining which of the permissions in those entries are effective and which are masked. If permissions exist in one of the mentioned entries and in the mask, they are effective. Permissions contained only in the mask or only in the actual entry are not effective—meaning the permissions are not granted. All permissions defined in the owner and owning group entries are always effective. The example in Table 19.2, “Masking access permissions” demonstrates this mechanism.
There are two basic classes of ACLs: A minimum ACL contains only the entries for the types owner, owning group, and other, which correspond to the conventional permission bits for files and directories. An extended ACL goes beyond this. It must contain a mask entry and may contain several entries of the named user and named group types.
Table 19.1: ACL entry types #
|
Type |
Text Form |
|---|---|
|
owner |
|
|
named user |
|
|
owning group |
|
|
named group |
|
|
mask |
|
|
other |
|
Table 19.2: Masking access permissions #
|
Entry Type |
Text Form |
Permissions |
|---|---|---|
|
named user |
|
|
|
mask |
|
|
|
effective permissions: |
|
19.4.1 ACL entries and file mode permission bits #Edit source
Figure 19.1, “Minimum ACL: ACL entries compared to permission bits” and
Figure 19.2, “Extended ACL: ACL entries compared to permission bits” illustrate the two cases of a minimum
ACL and an extended ACL. The figures are structured in three
blocks—the left block shows the type specifications of the ACL
entries, the center block displays an example ACL, and the right block
shows the respective permission bits according to the conventional
permission concept (for example, as displayed by ls
-l). In both cases, the owner
class permissions are mapped to the ACL entry owner.
Other class permissions are mapped to the
respective ACL entry. However, the mapping of the group
class permissions is different in the two cases.

Figure 19.1: Minimum ACL: ACL entries compared to permission bits #
For a minimum ACL—without mask—the group class permissions are mapped to the ACL entry owning group. This is shown in Figure 19.1, “Minimum ACL: ACL entries compared to permission bits”. For an extended ACL—with mask—the group class permissions are mapped to the mask entry. This is shown in Figure 19.2, “Extended ACL: ACL entries compared to permission bits”.
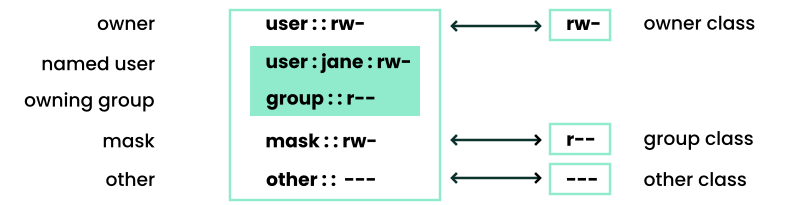
Figure 19.2: Extended ACL: ACL entries compared to permission bits #
This mapping approach ensures the smooth interaction of applications, regardless of whether they have ACL support. The access permissions that were assigned through the permission bits represent the upper limit for all other “fine adjustments” made with an ACL. Changes made to the permission bits are reflected by the ACL and vice versa.
19.4.2 A directory with an ACL #Edit source
With getfacl and setfacl on the
command line, you can access ACLs. The usage of these commands is
demonstrated in the following example.
Before creating the directory, use the umask command
to define which access permissions should be masked each time a file
object is created. The command umask
027 sets the default permissions by giving the owner
the full range of permissions (0), denying the group
write access (2), and giving other users no
permissions (7). umask
masks the corresponding permission bits or turns them off. For
details, refer to Section 11.4, “Default umask” or the
umask man page.
mkdir mydir creates the mydir
directory with the default permissions as set by
umask. Use ls -dl
mydir to check whether all permissions were assigned correctly.
The output for this example is:
drwxr-x--- ... tux project3 ... mydir
With getfacl mydir, check the
initial state of the ACL. This gives information like:
# file: mydir # owner: tux # group: project3 user::rwx group::r-x other::---
The first three output lines display the name, owner and
owning group of the directory. The next three lines contain the three
ACL entries owner, owning group, and other. Specifically for the
minimum ACL, the getfacl command does not produce any
information you could not have obtained with ls.
Modify the ACL to assign read, write and execute permissions to an
additional user geeko and an additional group
mascots with:
# setfacl -m user:geeko:rwx,group:mascots:rwx mydir
The option -m prompts setfacl to
modify the existing ACL. The following argument indicates the ACL
entries to modify (multiple entries are separated by commas). The final
part specifies the name of the directory to which these modifications
should be applied. Use the getfacl command to take a
look at the resulting ACL.
# file: mydir # owner: tux # group: project3 user::rwx user:geeko:rwx group::r-x group:mascots:rwx mask::rwx other::---
Besides the entries initiated for the user
geeko and the group mascots, a
mask entry has been generated. This mask entry is set automatically so
that all permissions are effective. setfacl
automatically adapts existing mask entries to the settings modified,
unless you deactivate this feature with -n. The mask
entry defines the maximum effective access permissions for all entries
in the group class. This includes named user, named group, and owning
group. The group class permission bits displayed by
ls -dl mydir now correspond to the
mask entry.
drwxrwx---+ ... tux project3 ... mydir
The first column of the output contains an additional
+ to indicate that there is an
extended ACL for this item.
According to the output of the ls command, the
permissions for the mask entry include write access. Traditionally, such
permission bits would mean that the owning group (here
project3) also has write access to the directory
mydir.
However, the effective access permissions for the owning group
correspond to the overlapping portion of the permissions defined for the
owning group and for the mask—which is r-x
in our example (see Table 19.2, “Masking access permissions”). As far as the effective
permissions of the owning group in this example are concerned, nothing
has changed even after the addition of the ACL entries.
Edit the mask entry with setfacl or
chmod. For example, use chmod
g-w mydir. ls -dl
mydir then shows:
drwxr-x---+ ... tux project3 ... mydir
getfacl mydir provides the following
output:
# file: mydir # owner: tux # group: project3 user::rwx user:geeko:rwx # effective: r-x group::r-x group:mascots:rwx # effective: r-x mask::r-x other::---
After executing chmod to remove the write
permission from the group class bits, the output of
ls is sufficient to see that the mask bits
must have changed accordingly: Write permission is again limited to the
owner of mydir. The output of the
getfacl confirms this. This output includes a comment
for all those entries in which the effective permission bits do not
correspond to the original permissions, because they are filtered
according to the mask entry. The original permissions can be restored at
any time with chmod g+w mydir.
19.4.3 A directory with a default ACL #Edit source
Directories can have a default ACL, which is a special kind of ACL defining the access permissions that objects in the directory inherit when they are created. A default ACL affects both subdirectories and files.
19.4.3.1 Effects of a default ACL #Edit source
There are two ways in which the permissions of a directory's default ACL are passed to the files and subdirectories:
A subdirectory inherits the default ACL of the parent directory both as its default ACL and as an ACL.
A file inherits the default ACL as its ACL.
All system calls that create file system objects use a
mode parameter that defines the access permissions
for the newly created file system object. If the parent directory does
not have a default ACL, the permission bits as defined by the
umask are subtracted from the permissions as passed
by the mode parameter, with the result being
assigned to the new object. If a default ACL exists for the parent
directory, the permission bits assigned to the new object correspond to
the overlapping portion of the permissions of the
mode parameter and those that are defined in the
default ACL. The umask is disregarded in this case.
19.4.3.2 Application of default ACLs #Edit source
The following three examples show the main operations for directories and default ACLs:
Add a default ACL to the existing directory
mydirwith:>setfacl -d -m group:mascots:r-x mydirThe option
-dof thesetfaclcommand promptssetfaclto perform the following modifications (option-m) in the default ACL.Take a closer look at the result of this command:
>getfacl mydir # file: mydir # owner: tux # group: project3 user::rwx user:geeko:rwx group::r-x group:mascots:rwx mask::rwx other::--- default:user::rwx default:group::r-x default:group:mascots:r-x default:mask::r-x default:other::---getfaclreturns both the ACL and the default ACL. The default ACL is formed by all lines that start withdefault. Although you merely executed thesetfaclcommand with an entry for themascotsgroup for the default ACL,setfaclautomatically copied all other entries from the ACL to create a valid default ACL. Default ACLs do not have an immediate effect on access permissions. They only come into play when file system objects are created. These new objects inherit permissions only from the default ACL of their parent directory.In the next example, use
mkdirto create a subdirectory inmydir, which inherits the default ACL.>mkdir mydir/mysubdir getfacl mydir/mysubdir # file: mydir/mysubdir # owner: tux # group: project3 user::rwx group::r-x group:mascots:r-x mask::r-x other::--- default:user::rwx default:group::r-x default:group:mascots:r-x default:mask::r-x default:other::---As expected, the newly created subdirectory
mysubdirhas the permissions from the default ACL of the parent directory. The ACL ofmysubdiris an exact reflection of the default ACL ofmydir. The default ACL that this directory hands down to its subordinate objects is also the same.Use
touchto create a file in themydirdirectory, for example,touchmydir/myfile.ls-l mydir/myfilethen shows:-rw-r-----+ ... tux project3 ... mydir/myfile
The output of
getfaclmydir/myfileis:# file: mydir/myfile # owner: tux # group: project3 user::rw- group::r-x # effective:r-- group:mascots:r-x # effective:r-- mask::r-- other::---
touchuses amodewith the value0666when creating new files, which means that the files are created with read and write permissions for all user classes, provided no other restrictions exist inumaskor in the default ACL (see Section 19.4.3.1, “Effects of a default ACL”). In effect, this means that all access permissions not contained in themodevalue are removed from the respective ACL entries. Although no permissions were removed from the ACL entry of the group class, the mask entry was modified to mask permissions not set inmode.This approach ensures the smooth interaction of applications (such as compilers) with ACLs. You can create files with restricted access permissions and subsequently mark them as executable. The
maskmechanism guarantees that the right users and groups can execute them as desired.
19.4.4 The ACL check algorithm #Edit source
A check algorithm is applied before any process or application is granted access to an ACL-protected file system object. As a basic rule, the ACL entries are examined in the following sequence: owner, named user, owning group or named group, and other. The access is handled in accordance with the entry that best suits the process. Permissions do not accumulate.
Things are more complicated if a process belongs to more than one group and would potentially suit several group entries. An entry is randomly selected from the suitable entries with the required permissions. It is irrelevant which of the entries triggers the final result “access granted”. Likewise, if none of the suitable group entries contain the required permissions, a randomly selected entry triggers the final result “access denied”.
19.5 ACL support in applications #Edit source
ACLs can be used to implement complex permission scenarios that meet
the requirements of modern applications. The traditional permission
concept and ACLs can be combined in a smart manner. The basic file
commands (cp, mv,
ls, etc.) support ACLs, as do Samba and Nautilus.
Vi/Vim and emacs both fully support ACLs by preserving the permissions on
writing files including backups. Many editors and file
managers still lack ACL support. When modifying files with an editor, the
ACLs of files are sometimes preserved and sometimes not, depending on the
backup mode of the editor used. If the editor writes the changes to the
original file, the ACL is preserved. If the editor saves the updated
contents to a new file that is subsequently renamed to the old file name,
the ACLs may be lost, unless the editor supports ACLs. Except for the
star archiver, there are currently no backup applications
that preserve ACLs.
19.6 More information #Edit source
For more information about ACLs, see the man pages for
getfacl(1), acl(5), and
setfacl(1).
20 Intrusion detection with AIDE #Edit source
Abstract#
Securing your systems is a mandatory task for any mission-critical
system administrator. Because it is impossible to always guarantee that
the system is not compromised, it is important to do extra checks
regularly (for example with
cron) to ensure that the system
is still under your control. This is where AIDE, the
Advanced Intrusion Detection Environment, comes
into play.
20.1 Why use AIDE? #Edit source
An easy check that often can reveal unwanted changes can be done by means
of RPM. The package manager has a built-in verify function that checks
all the managed files in the system for changes. To verify all files,
run the command rpm -Va. However, this command also
displays changes in configuration files, and you need to do some
filtering to detect important changes.
An additional problem to the method with RPM is that an intelligent
attacker can modify rpm itself to hide any changes
that might have been done by some kind of root-kit, which allows the
attacker to mask the intrusion and gain root privilege. To solve this,
you should implement a secondary check that can also be run
independent of the installed system.
20.2 Setting up an AIDE database #Edit source
Important: Initialize AIDE database after installation
Before you install your system, verify the checksum of your medium (see Book “Start-Up”, Chapter 4 “Troubleshooting”, Section 4.1 “Checking media”) to make sure you do not use a compromised source. After you have installed the system, initialize the AIDE database. To make sure that all went well during and after the installation, do an installation directly on the console, without any network attached to the computer. Do not leave the computer unattended or connected to any network before AIDE creates its database.
AIDE is not installed by default on openSUSE Leap. To install it,
either use › , or enter zypper install
aide on the command line as root.
To tell AIDE which attributes of which files should be checked, use
the /etc/aide.conf configuration file. It must be
modified to become the actual configuration. The first section handles
general parameters like the location of the AIDE database file. More
relevant for local configurations are the Custom
Rules and the Directories and Files
sections. A typical rule looks like the following:
Binlib = p+i+n+u+g+s+b+m+c+md5+sha1
After defining the variable Binlib, the respective
check boxes are used in the files section. Important options include the
following:
Table 20.1: Important AIDE check boxes #
|
Option |
Description |
|---|---|
|
p |
Check for the file permissions of the selected files or directories. |
|
i |
Check for the inode number. Every file name has a unique inode number that should not change. |
|
n |
Check for the number of links pointing to the relevant file. |
|
u |
Check if the owner of the file has changed. |
|
g |
Check if the group of the file has changed. |
|
s |
Check if the file size has changed. |
|
b |
Check if the block count used by the file has changed. |
|
m |
Check if the modification time of the file has changed. |
|
c |
Check if the files access time has changed. |
|
S |
Check for a changed file size. |
|
I |
Ignore changes of the file name. |
|
md5 |
Check if the md5 checksum of the file has changed. We recommend to use sha256 or sha512. |
|
sha1 |
Check if the sha1 (160 Bit) checksum of the file has changed. We recommend to use sha256 or sha512. |
|
sha256 |
Check if the sha256 checksum of the file has changed. |
|
sha512 |
Check if the sha512 checksum of the file has changed. |
This is a configuration that checks for all files in
/sbin with the options defined in
Binlib but omits the
/sbin/conf.d/ directory:
/sbin Binlib !/sbin/conf.d
To create the AIDE database, proceed as follows:
Open
/etc/aide.conf.Define which files should be checked with which check boxes. For a complete list of available check boxes, see
/usr/share/doc/packages/aide/manual.html. The definition of the file selection needs certain knowledge about regular expressions. Save your modifications.To check whether the configuration file is valid, run:
#aide --config-checkAny output of this command is a hint that the configuration is not valid. For example, if you get the following output:
#aide --config-check 35:syntax error:! 35:Error while reading configuration:! Configuration errorThe error is to be expected in line 36 of
/etc/aide.conf. The error message contains the last successfully read line of the configuration file.Initialize the AIDE database. Run the command:
#aide -iCopy the generated database to a save location like a CD-R or DVD-R, a remote server or a flash disk for later use.
Important
This step is essential as it avoids compromising your database. It is recommended to use a medium which can be written once to prevent the database being modified. Never leave the database on the computer which you want to monitor.
20.3 Local AIDE checks #Edit source
To perform a file system check, proceed as follows:
Rename the database:
#mv /var/lib/aide/aide.db.new /var/lib/aide/aide.dbAfter any configuration change, you always need to re-initialize the AIDE database and subsequently move the newly generated database. It is also a good idea to make a backup of this database. See Section 20.2, “Setting up an AIDE database” for more information.
Perform the check with the following command:
#aide --check
If the output is empty, everything is fine. If AIDE found changes, it displays a summary of changes, for example:
# aide --check
AIDE found differences between database and file system!!
Summary:
Total number of files: 1992
Added files: 0
Removed files: 0
Changed files: 1
To learn about the actual changes, increase the verbose level of the
check with the parameter -V. For the previous example,
this could look like the following:
# aide --check -V
AIDE found differences between database and file system!!
Start timestamp: 2009-02-18 15:14:10
Summary:
Total number of files: 1992
Added files: 0
Removed files: 0
Changed files: 1
---------------------------------------------------
Changed files:
---------------------------------------------------
changed: /etc/passwd
--------------------------------------------------
Detailed information about changes:
---------------------------------------------------
File: /etc/passwd
Mtime : 2009-02-18 15:11:02 , 2009-02-18 15:11:47
Ctime : 2009-02-18 15:11:02 , 2009-02-18 15:11:47
In this example, the file /etc/passwd was touched to
demonstrate the effect.
20.4 System independent checking #Edit source
To avoid risk, it is advisable to also run the AIDE binary from a trusted source. This excludes the risk that attackers also modified the aide binary to hide its traces.
To accomplish this task, AIDE must be run from a rescue system that is independent of the installed system. With openSUSE Leap it is easy to extend the rescue system with arbitrary programs, and thus add the needed functionality.
Before you can start using the rescue system, you need to provide two packages to the system. These are included with the same syntax as you would add a driver update disk to the system. For a detailed description about the possibilities of linuxrc that are used for this purpose, see https://en.opensuse.org/SDB:Linuxrc. In the following, one possible way to accomplish this task is discussed.
Procedure 20.1: Starting a rescue system with AIDE #
Provide an FTP server as a second machine.
Copy the packages
aideandmhashto the FTP server directory, in our case/srv/ftp/. Replace the placeholders ARCH and VERSION with the corresponding values:#cp DVD1/suse/ARCH/aideVERSION.ARCH.rpm /srv/ftp#cp DVD1/suse/ARCH/mhashVERSION.ARCH.rpm /srv/ftpCreate an info file
/srv/ftp/info.txtthat provides the needed boot parameters for the rescue system:dud:ftp://ftp.example.com/aideVERSION.ARCH.rpm dud:ftp://ftp.example.com/mhashVERSION.ARCH.rpm
Replace your FTP domain name, VERSION and ARCH with the values used on your system.
Restart the server that needs to go through an AIDE check with the Rescue system from your DVD. Add the following string to the boot parameters:
info=ftp://ftp.example.com/info.txt
This parameter tells
linuxrcto also read in all information from theinfo.txtfile.
After the rescue system has booted, the AIDE program is ready for use.
20.5 More information #Edit source
Information about AIDE is available at the following places:
The home page of AIDE: https://aide.sourceforge.net
In the documented template configuration
/etc/aide.conf.In several files below
/usr/share/doc/packages/aideafter installing theaidepackage.On the AIDE user mailing list at https://www.ipi.fi/mailman/listinfo/aide.
Part III Network security #Edit source
- 21 X Window System and X authentication
Network transparency is one of the central characteristics of a Unix system. X, the windowing system of Unix operating systems, can use this feature in an impressive way. With X, it is no problem to log in to a remote host and start a graphical program that is then sent over the network to be displa…
- 22 Securing network operations with OpenSSH
OpenSSH is the SSH (secure shell) implementation that ships with openSUSE Leap, for securing network operations such as remote administration, file transfers, and tunneling insecure protocols. SSH encrypts all traffic between two hosts, including authentication, to protect against eavesdropping and connection hijacking. This chapter covers basic operations, plus host key rotation and certificate authentication, which are useful for managing larger SSH deployments.
- 23 Masquerading and firewalls
Whenever Linux is used in a network environment, you can use the kernel functions that allow the manipulation of network packets to maintain a separation between internal and external network areas. The Linux netfilter framework provides the means to establish an effective firewall that keeps differ…
- 24 Configuring a VPN server
Internet connections are easily available and affordable. However, not all connections are secure. Using a Virtual Private Network (VPN), you can create a secure network within an insecure network such as the Internet or Wi-Fi. It can be implemented in different ways and serves several purposes. In this chapter, we focus on the OpenVPN implementation to link branch offices via secure wide area networks (WANs).
- 25 Managing a PKI with XCA, X certificate and key manager
Managing your own public key infrastructure (PKI) is traditionally done with the
opensslutility. For admins who prefer a graphical tool, openSUSE Leap 15.6 includes XCA, the X Certificate and Key management tool (https://hohnstaedt.de/xca).XCA creates and manages X.509 certificates, certificate requests, RSA, DSA and EC private keys, Smartcards and certificate revocation lists (CRLs). XCA supports everything you need to create and manage your own certificate authority (CA). XCA includes customizable templates that can be used for certificate or request generation. This chapter describes a basic setup.
- 26 Improving network security with
sysctlvariables Sysctl (system control) variables control certain kernel parameters that influence the behavior of different parts of the operating system, for example the Linux network stack. These parameters can be looked up in the proc file system, in /proc/sys. Many kernel parameters can be changed directly by …
21 X Window System and X authentication #Edit source
Network transparency is one of the central characteristics of a Unix system. X, the windowing system of Unix operating systems, can use this feature in an impressive way. With X, it is no problem to log in to a remote host and start a graphical program that is then sent over the network to be displayed on your computer.
When an X client needs to be displayed remotely using an X server,
the latter should protect the resource managed by it (the display)
from unauthorized access. In more concrete terms, certain permissions
must be given to the client program. With the X Window System, there
are two ways to do this, called host-based access control and
cookie-based access control. The former relies on the IP address of
the host where the client should run. The program to control this is
xhost. xhost enters the IP
address of a legitimate client into a database belonging to the X
server. However, relying on IP addresses for authentication is not
secure. For example, if there were a second user working on the
host sending the client program, that user would have access to the X
server as well—like someone spoofing the IP address. Because of
these shortcomings, this authentication method is not described in
more detail here, but you can learn about it with
man xhost.
For cookie-based access control, a character string is
generated that is only known to the X server and to the legitimate
user, like an ID card. This cookie is stored on login in
the file .Xauthority in the user's home directory
and is available to any X client wanting to use the X server to display
a window. The file .Xauthority can be examined by
the user with the tool xauth. If you rename
.Xauthority, or if you delete the file from your
home directory by accident, you cannot open any new
windows or X clients.
SSH (secure shell) can be used to encrypt a network connection and forward it to an X server transparently. This is also called X forwarding. X forwarding is achieved by simulating an X server on the server side and setting a DISPLAY variable for the shell on the remote host. Further details about SSH can be found in Chapter 22, Securing network operations with OpenSSH.
Warning: X forwarding can be insecure
If you do not consider the computer where you log in to be a secure host, do not use X forwarding. If X forwarding is enabled, an attacker could authenticate via your SSH connection. The attacker could then intrude on your X server and, for example, read your keyboard input.
22 Securing network operations with OpenSSH #Edit source
Abstract#
OpenSSH is the SSH (secure shell) implementation that ships with openSUSE Leap, for securing network operations such as remote administration, file transfers, and tunneling insecure protocols. SSH encrypts all traffic between two hosts, including authentication, to protect against eavesdropping and connection hijacking. This chapter covers basic operations, plus host key rotation and certificate authentication, which are useful for managing larger SSH deployments.
- 22.1 OpenSSH overview
- 22.2 Server hardening
- 22.3 Password authentication
- 22.4 Managing user and host encryption keys
- 22.5 Rotating host keys
- 22.6 Public key authentication
- 22.7 Passphrase-less public key authentication
- 22.8 OpenSSH certificate authentication
- 22.9 Automated public key logins with gnome-keyring
- 22.10 Automated public key logins with ssh-agent
- 22.11 Changing an SSH private key passphrase
- 22.12 Retrieving a key fingerprint
- 22.13 Starting X11 applications on a remote host
- 22.14 Agent forwarding
- 22.15
scp—secure copy - 22.16
sftp—secure file transfer - 22.17 Port forwarding (SSH tunneling)
- 22.18 More information
- 22.19 Stopping SSH Brute Force Attacks with Fail2Ban
22.1 OpenSSH overview #Edit source
SSH is a network protocol that provides end-to-end protection for communications between the computers on your network, or between computers on your network and systems outside your network. You may open an SSH session to any other computer, if you have a login and the correct authentication methods for the remote computer.
SSH is a client-server protocol. Any host running the
sshd
daemon can accept SSH connections from any other host. Every host running
sshd can have their own
custom configurations, such as limiting who can have access, and which
authentication methods are allowed.
Authentication and encryption are provided by encryption key pairs. Each key pair has a public key and a private key. Public keys encrypt, and private keys decrypt. Public keys are meant to be freely shared, while private keys must be protected and not shared. When a private key is compromised, anyone who has possession of it can masquerade as the original key owner.
SSH provides strong protection, because the server and client
must both authenticate to each other. When a client first attempts to
open an SSH session, the server presents its public host key. If the
client already possesses a copy of this key (stored in
~/.ssh/known_hosts on the client machine), the
client knows to trust the server. If the client does not have the
appropriate host key, it is asked whether it should trust the server:
The authenticity of host '192.168.22.219 (192.168.22.219)' can't be established. ECDSA key fingerprint is SHA256:yXf6pjV26N0fegvEYIt3HgG95s3Q1X6WYRhtHLF99pUo. Are you sure you want to continue connecting (yes/no/[fingerprint])?
The user can type yes or no, or paste their copy of the host key
fingerprint for comparison.
Note: Matching host key fingerprints
Distributing copies of your host key fingerprints to your users
enables them to verify that they are receiving the correct host
keys. When they paste their copy of a host key fingerprint,
ssh compares the fingerprints, and accepts the
offered host key when the fingerprints match. This ensures a more
accurate match than a visual comparison.
You cannot rely on users to use correct verification methods. If the
fingerprints do not match, the user can still type
yes, or copy the fingerprint in the message, and
complete the connection. A stronger alternative is to use
certificate authentication, which provides a global authentication
mechanism, and does not require perfect behavior from users
(see Section 22.8, “OpenSSH certificate authentication”).
If the public keys of a host have changed, the connection is denied with an alarming warning:
@@@@@@@@@@@@@@@@@@@@@@@@@@@@@@@@@@@@@@@@@@@@@@@@@@@@@@@@@@@ @ WARNING: REMOTE HOST IDENTIFICATION HAS CHANGED! @ @@@@@@@@@@@@@@@@@@@@@@@@@@@@@@@@@@@@@@@@@@@@@@@@@@@@@@@@@@@ IT IS POSSIBLE THAT SOMEONE IS DOING SOMETHING NASTY! Someone could be eavesdropping on you right now (man-in-the-middle attack)! It is also possible that a host key has just been changed. The fingerprint for the ECDSA key sent by the remote host is SHA256:keNu/rJFWmpQu9B0SjIuo8NLjbeDY/x3Tktpl7oDJqo. Please contact your system administrator. Add correct host key in /home/geeko/.ssh/known_hosts to get rid of this message. Offending ECDSA key in /home/geeko/.ssh/known_hosts:210 You can use following command to remove the offending key: ssh-keygen -R 192.168.121.219 -f /home/geeko/.ssh/known_hosts ECDSA host key for 192.168.121.219 has changed and you have requested strict checking. Host key verification failed.
The remedy is to delete the offending key from
~/.ssh/known_hosts with the command given
in the warning, then reconnect and accept the new host key.
The openssh package installs the server, client, file transfer commands, and certain utilities.
OpenSSH supports several different types of authentication:
- Password authentication
Uses any system login and password on the remote machine. This is the simplest and most flexible authentication because you can open an SSH session from anywhere, on any machine. It is also the least secure, because it is vulnerable to password-cracking and keystroke logging.
- Public key authentication
Authenticates with your personal SSH keys, rather than a login and password. This is less flexible than password authentication, because you can open SSH sessions only from a machine that holds your private identity key. It is much stronger because it is not vulnerable to password cracking or keystroke logging; an attacker must possess your private key and know its passphrase.
See Section 22.9, “Automated public key logins with gnome-keyring” to learn how to use
gnome-keyringfor automated public key authentication in GNOME sessions.See Section 22.10, “Automated public key logins with ssh-agent” to learn how to use
ssh-agentfor automated public key authentication in console sessions.- Passphrase-less public key authentication
Public key authentication, paired with private identity keys that do not have passphrases. This is useful for automated services, like scripts and cron jobs. You must protect private keys, because anyone who gains access to them can easily masquerade as the key owner.
- Certificate authentication
OpenSSH supports certification authentication, for easier key management, stronger authentication, and large-scale SSH deployments.
openSUSE Leap installs the OpenSSH package by default, providing the following commands:
sshThe client command for initiating an SSH connection to a remote host.
scpSecure file copy from or to a remote host.
sftpSecure file transfer between a client and an SFTP server. (The SFTP protocol (SSH FTP) is not related to FTPS or FTPES (FTP over SSL/TLS), but was written independently.)
ssh-addAdd private key identities to the authentication agent,
ssh-agent.ssh-agentManages a user's private identity keys and their passphrases, for public key authentication.
ssh-agentholds the passphrases in memory and applies them as needed, so that users do not have to re-type their passphrases to authenticate.ssh-copy-idSecurely transfer a public key to a remote host, to set up public key authentication.
22.2 Server hardening #Edit source
OpenSSH ships with a usable default server configuration, but there are additional steps you can take to secure your server.
Important: Maintaining access to a remote SSH server
When you make changes to any SSH server, either have physical access to the machine, or keep an active root SSH session open until you have tested your changes, and everything works correctly. Then you can revert or correct your changes if something goes wrong.
The default server configuration file, /etc/ssh/sshd_config,
contains the default configuration, and all the defaults are commented
out. Override any default item by entering your own configuration item,
uncommented, like the following example that sets a different listening
port, and specifies the listening IPv4 address on a multi-homed host:
#Port 22 Port 2022 #ListenAddress 0.0.0.0 ListenAddress 192.168.10.100
Important: Update /etc/services
When you use non-standard listening ports, first check the
/etc/services file for unused ports.
Select any unused port above 1024. Then document the ports you are using
in /etc/services.
It is a best practice to disallow root logins. Instead, log into the
remote machine as an unprivileged user, then use sudo
to run commands as root. If you really want to allow root logins, the
following server configuration example shows how to configure the server
to accept only public-key authentication
(Section 22.6, “Public key authentication”) for the root user with the
PermitRootLogin prohibit-password and
PasswordAuthentication options.
The following settings for /etc/ssh/sshd_config
strengthen access controls:
Example 22.1: Example sshd_config #
# Check if the file modes and ownership of the user’s files and # home directory are correct before allowing them to login StrictModes yes # If your machine has more than one IP address, define which address or # addresses it listens on ListenAddress 192.168.10.100 # Allow only members of the listed groups to log in AllowGroups ldapadmins backupadmins # Or, deny certain groups. If you use both, DenyGroups is read first DenyGroups users # Allow or deny certain users. If you use both, DenyUsers is read first AllowUsers user1 user2@example.com user3 DenyUsers user4 user5@192.168.10.10 # Allow root logins only with public key authentication PermitRootLogin prohibit-password # Disable password authentication and allow only public key authentication # for all users PasswordAuthentication no # Length of time the server waits for a user to log in and complete the # connection. The default is 120 seconds: LoginGraceTime 60 # Limit the number of failed connection attempts. The default is 6 MaxAuthTries 4
After changing /etc/ssh/sshd_config, run the syntax
checker:
>sudosshd -t
The syntax checker only checks for correct syntax, and does not find configuration errors. When you are finished, reload the configuration:
>sudosystemctl reload sshd.service
Check the server's key directories for correct permissions.
/etc/ssh should be mode 0755/drwxr-xr-x, owned by
root:root.
Private keys should be 0600/-rw-------, owned by root:root.
Public keys should be 0644/-rw-r--r--, owned by root:root.
22.3 Password authentication #Edit source
With password authentication, all you need is the login and password of
a user on the remote machine, and
sshd set up and running on the
remote machine. You do not need any personal SSH keys. In the following
example, user suzanne opens an SSH session to the host
sun:
>ssh suzanne@sun
suzanne is prompted to enter the remote password.
Type exit and press Enter to close an
SSH session.
If the user name is the same on both machines, you can omit it, and then
using ssh HOST_NAME is
sufficient. After a successful authentication, you can work on the
command line or use interactive applications, such as YaST in text
mode.
You may also run non-interactive commands (log in, run the command, then
the session closes all in one command) on remote systems using the
ssh USER_NAME HOST COMMAND
syntax.
COMMAND must be properly quoted. Multiple
commands can be concatenated as on a local shell:
>ssh suzanne@sun "df -h && du -sh /home">ssh suzanne@sun "sudo nano /etc/ssh/sshd_config"
When you run sudo on the remote machine, you are
prompted for the sudo password.
22.4 Managing user and host encryption keys #Edit source
There are several key types to choose from: DSA, RSA, ECDSA, ECDSA-SK, Ed25519, and Ed25519-SK. DSA was deprecated several years ago, and was disabled in OpenSSH 7.0 and should not be used. RSA is the most universal as it is older, and more widely used. (As of OpenSSH 8.2, RSA is deprecated for host keys. Use ECDSA or Ed25519 for host keys.)
Ed25519 and ECDSA are stronger and faster. Ed25519 is considered to be the strongest. If you must support older clients that do not support Ed25519 or ECDSA, create host keys in all three formats.
Note: Older clients are unsafe
Some older SSH clients do not support ECDSA and ED25519. ECDSA and ED25519 were released with OpenSSH 6.5 in 2014. It is important to keep security services updated, and, if possible, to not allow unsafe old clients.
SSH keys serve two purposes: authenticating servers to clients, and
authenticating clients to servers (see
Section 22.6, “Public key authentication”). Server host keys are stored
in /etc/ssh. Users' personal keys are stored in
/home/user/.ssh.
/home/user/.ssh is
created when the user creates a new SSH key.
Host keys must not have passphrases.
In most cases, private user keys should have strong passphrases.
22.4.1 Creating user SSH key pairs #Edit source
The following procedure shows how to create user OpenSSH encryption keys.
Procedure 22.1: Creating default and customized keys #
To generate a user key pair with the default parameters (RSA, 3072 bits), use the
ssh-keygencommand with no options. Protect your private key with a strong passphrase:>ssh-keygenGenerating public/private rsa key pair. Enter file in which to save the key (/home/tux/.ssh/id_rsa): Enter passphrase (empty for no passphrase): Enter same passphrase again: Your identification has been saved in id_rsa Your public key has been saved in id_rsa.pub The key fingerprint is: SHA256:z0uJIuc7Doy07bFTe1ppZHLVrkD/bWWlBAF/PcHjblU user@host2 The key's randomart image is: +---[RSA 3072]----+ | ..o... | | o . +E| | . . o +.=| | . o . o o+| | . . S . . o +| | . = .= * + . = | | o *.o.= * . + | | ..Bo+.. . . | | oo== . | +----[SHA256]-----+Create an RSA key pair with a longer bit length:
>ssh-keygen -b 4096OpenSSH RSA keys can be a maximum of 16,384 bits. However, longer bit lengths are not necessarily more desirable. See the GnuPG FAQ for more information, https://www.gnupg.org/faq/gnupg-faq.html#no_default_of_rsa4096.
You may create as many user keys as you want, for accessing different servers. Each key pair must have a unique name, and optionally, a comment. These help you remember what each key pair is for. Create an RSA key pair with a custom name and a comment:
>ssh-keygen -f backup-server-key -C "infrastructure backup server"Create an Ed25519 key pair with a custom name and a comment:
>ssh-keygen -t ed25519 -f ldap-server-key -C "Internal LDAP server"Ed25519 keys are fixed at 256 bits, which is equivalent in cryptographic strength to RSA 4096.
22.4.2 Creating SSH server host keys #Edit source
Host keys are managed a little differently. A host key must not
have a passphrase, and the key pairs are stored in
/etc/ssh.
OpenSSH automatically generates a set of host keys when it is
installed, like the following example:
>ls -l /etc/sshtotal 608 -rw------- 1 root root 577834 2021-05-06 04:48 moduli -rw-r--r-- 1 root root 2403 2021-05-06 04:48 ssh_config -rw-r----- 1 root root 3420 2021-05-06 04:48 sshd_config -rw------- 1 root root 1381 2022-02-10 06:55 ssh_host_dsa_key -rw-r--r-- 1 root root 604 2022-02-10 06:55 ssh_host_dsa_key.pub -rw------- 1 root root 505 2022-02-10 06:55 ssh_host_ecdsa_key -rw-r--r-- 1 root root 176 2022-02-10 06:55 ssh_host_ecdsa_key.pub -rw------- 1 root root 411 2022-02-10 06:55 ssh_host_ed25519_key -rw-r--r-- 1 root root 96 2022-02-10 06:55 ssh_host_ed25519_key.pub -rw------- 1 root root 2602 2022-02-10 06:55 ssh_host_rsa_key -rw-r--r-- 1 root root 568 2022-02-10 06:55 ssh_host_rsa_key.pub
ssh-keygen has a special option, -A,
for creating new host keys. This creates new keys for each of the key
types for which host keys do not exist, with the default key file
path, an empty passphrase, default bit size for the key type, and an
empty comment. The following example creates a complete new
set of host keys by first deleting the existing keys, then creating a
new set:
>sudorm /etc/ssh/ssh_host*>sudossh-keygen -A
You can replace selected key pairs by first deleting only the
keys you want to replace, because ssh-keygen -A
does not replace existing keys.
Important: Do not use DSA keys
ssh-keygen -A creates DSA keys, even though
they have been deprecated as unsafe for several years. In OpenSSH
7.0 they are still created, but disabled by not being listed in
sshd_config. You may safely delete DSA keys.
When you want to rotate host keys (see Section 22.5, “Rotating host keys”), you must create the new keys individually, because they must exist at the same time as your old host keys. Your users authenticate with the old keys, and then receive the list of new keys. They need unique names, to not conflict with the old keys. The following example creates new RSA and Ed25519 host keys, labeled with the year and month they were created. Remember, the new host keys must not have passphrases:
>cd /etc/ssh>sudossh-keygen -b 4096 -f "SSH_HOST_RSA_2022_02">sudossh-keygen -t ed25519 -f "SSH_HOST_ED25519_2022_02"
You may name your new keys whatever you want.
22.5 Rotating host keys #Edit source
As of version 6.8, OpenSSH includes a protocol extension that
supports host key rotation. SSH server admins must periodically
retire old host keys and create new keys, for example if a key has been
compromised, or it is time to upgrade to stronger keys. Before OpenSSH
6.8, if StrictHostKeyChecking
was set to yes in ssh_config
on user machines, users would see a warning that the host key had
changed, and were not allowed to connect. Then the users would have to
manually delete the server's public key from their
known_hosts file, reconnect and manually accept the
new key. Any automated SSH connections, such as scheduled backups, would
fail.
The new host key rotation scheme provides a method to distribute new
keys without service interruptions. When clients connect, the server
sends them a list of new keys. Then the next time they log in they are
asked if they wish to accept the changes. Give users a few days to
connect and receive the new keys, and then you can remove the old keys.
The users' known_hosts files are automatically
updated, with new keys added and the old keys removed.
Setting up host key rotations requires creating new keys on the server,
certain changes to /etc/ssh/sshd_config on the
server, and to /etc/ssh/ssh_config on the clients.
First, create your new key or keys. The following example creates a new RSA key and a new Ed25519 key, with unique names and comments. A useful convention is to name them with the creation date. Remember, a host key must not have a passphrase:
#ssh-keygen -t rsa -f ssh_host_rsa_2022-01 -C "main server"Generating public/private rsa key pair. Enter passphrase (empty for no passphrase): Enter same passphrase again: Your identification has been saved in ssh_host_rsa_2022-01 Your public key has been saved in ssh_host_rsa_2022-01.pub The key fingerprint is: SHA256:F1FIF2aqOz7D3mGdsjzHpH/kjUWZehBN3uG7FM4taAQ main server The key's randomart image is: +---[RSA 3072]----+ | .Eo*.oo | | .B .o.o| | o . .++| | . o ooo=| | S . o +*.| | o o.oooo| | .o ++oo.= | | .+=o+o + .| | .oo++.. | +----[SHA256]-----+#ssh-keygen -t ed25519 -f ssh_host_ed25519_2022-01 -C "main server"Generating public/private ed25519 key pair. Enter passphrase (empty for no passphrase): Enter same passphrase again: Your identification has been saved in ssh_host_ed25519_2022-01 Your public key has been saved in ssh_host_ed25519_2022-01.pub The key fingerprint is: SHA256:2p9K0giXv7WsRnLjwjs4hJ8EFcoX1FWR4nQz6fxnjxg main server The key's randomart image is: +--[ED25519 256]--+ | .+o ...o+ | | . .... o * | | o.. o = o | | .. .. o | | o. o S . | | . oo.*+ E o | | + ++==.. = o | | = +oo= o. . .| | ..=+o= | +----[SHA256]-----+
Record the fingerprints, for users to verify the new keys.
Add the new key names to /etc/ssh/sshd_config, and
uncomment any existing keys that are in use:
## Old keys HostKey /etc/ssh/ssh_host_rsa_key HostKey /etc/ssh/ssh_host_ed25519_key HostKey /etc/ssh/ssh_host_ecdsa_key ## New replacement keys HostKey /etc/ssh/ssh_host_rsa_2022-01 HostKey /etc/ssh/ssh_host_ed25519_2022-01
Save your changes, then restart sshd:
#systemctl restart sshd.service
The /etc/ssh/ssh_config file on user machines must
include the following settings:
UpdateHostKeys ask StrictHostKeyChecking yes
Test connecting from a client by opening an SSH session to the server to receive the new keys list. Log out, then log back in. When you log back in you should see something like the following message:
The server has updated its host keys. These changes were verified by the server's existing trusted key. Deprecating obsolete hostkey: ED25519 SHA256:V28d3VpHgjsCoV04RBCZpLo5c0kEslCZDVdIUnCvqPI Deprecating obsolete hostkey: RSA SHA256:+NR4DVdbsUNsqJPIhISzx+eqD4x/awCCwijZ4a9eP8I Accept updated hostkeys? (yes/no):yes
You may set UpdateHostKeys ask to
UpdateHostKeys yes to apply the changes
automatically, and avoid asking users to approve the changes.
For more information:
http://blog.djm.net.au/2015/02/key-rotation-in-openssh-68.html
man 5 ssh_config, man 5 sshd_config
22.6 Public key authentication #Edit source
Public key authentication uses your own personal identity key to authenticate, rather than a user account password.
The following example shows how to create a new personal
RSA key pair with a comment, so you know what it is for. First change to
your ~/.ssh directory (or create it if it does not
exist), then create the new key pair. Give it a strong passphrase, and
write the passphrase in a safe place:
>cd ~/.ssh>ssh-keygen -C "web server1" -f id-web1 -t rsa -b 4096
Next, copy your new public key to the machine you want access to. You must already have a user account on this machine, and SSH access to copy it over the network:
>ssh-copy-id -i id-web1 user@web1
Then try logging in with your new key:
>ssh -i id-web1 user@web1Enter passphrase for key 'id-web1': Last login: Sat Jul 11 11:09:53 2022 from 192.168.10.122 Have a lot of fun...
You should be asked for your private key passphrase, and not the password for your user account.
To be effective, public key authentication should be enforced on
the remote machine, and password authentication not allowed (see
Example 22.1, “Example sshd_config”). If you do not have public key
authentication access on the remote machine already, you cannot copy your
new public key with ssh-copy-id, and must use other
means, such as manually copying it from a USB stick to the
~/.ssh/authorized_keys file of the remote
user account.
22.7 Passphrase-less public key authentication #Edit source
This is public key authentication without a passphrase. Create your new private identity keys without a passphrase, and then use them the same way as passphrase-protected keys. This is useful for automated services, such as scripts and cron jobs. However, anyone who succeeds in stealing the private key can easily masquerade as you, so you need to be protective of a passphrase-less private key.
An alternative to using keys without passphrases is
gnome-keyring, which
remembers and applies your private keys and passphrases for you.
gnome-keyring is for GNOME desktop sessions
(Section 22.9, “Automated public key logins with gnome-keyring”).
For console sessions, use ssh-agent
(Section 22.10, “Automated public key logins with ssh-agent”).
22.8 OpenSSH certificate authentication #Edit source
OpenSSH introduced certificate authentication in OpenSSH 5.4. Certificate authentication is similar to public key authentication, except hosts and users authenticate to each other with digitally signed encryption certificates instead of encryption keys. Certificate authentication provides central management for server and user certificates, eliminating the need to manually copy user public keys to multiple hosts. It increases security by giving more control to administrators, and less to users.
Certificates consist of a public encryption key, a user-defined identity string, zero or more user names or host names, and other options. User and host public keys are signed by a Certificate Authority (CA) private signing key to create an encryption certificate. Users and hosts trust the public CA key, rather than trusting individual user and host public encryption keys.
Traditional OpenSSH public key authentication requires copying user
public keys to every SSH server they need access to (to the appropriate
~/.ssh/authorized_keys files), and relying on
users to verify new SSH server host keys before accepting them (stored
in ~/.ssh/known_hosts). This is
error-prone and complicated to manage. Another disadvantage is OpenSSH
keys never expire. When you need to revoke a particular public key, you
have to find and remove all its copies on your network.
Automating the whole process (for example, with Ansible) is virtually a necessity. Large organizations, such as Meta (see https://engineering.fb.com/2016/09/12/security/scalable-and-secure-access-with-ssh/), automate the process completely, so they can revoke and replace certificates, and even certificate authorities, as often as they want without disrupting operations.
A prerequisite is the ability to open SSH sessions to all hosts on your
network, and perform tasks like editing configuration files and restarting sshd.
Setting up an OpenSSH certificate authority involves the following steps:
Set up a secure trusted server to host your certificate authority, for signing host and user keys. Create a new key pair for signing keys. The private key signs user and host keys, and the public key is copied to all users who are allowed access to the server.
Receive and sign host public keys, then distribute the new host certificates to their respective hosts. Host certificates go in
/etc/ssh, just like host keys.Receive and sign user public keys, then distribute the new user certificates to their owners. User certificates go in
~/.ssh, just like user keys.Edit configuration files on servers and users' machines, and stop and start
sshdon hosts as necessary.Revoke certificates as needed, for example when you suspect a certificate has been compromised, a user has left your organization, or a server has been retired. Revoking a certificate is considerably simpler than finding and removing all relevant public key copies.
Users and server admins create and protect their own OpenSSH keys. It is safe to freely share public keys. It is safe to transfer the new certificates by insecure methods, such as email, because they require their private keys to validate.
SSH certificates follow the OpenPGP standard, rather than SSL/TLS, and that the certificate format is OpenPGP, not X.509.
22.8.1 Setting up a new certificate authority #Edit source
This section describes how to set up a new certificate authority (CA). Give careful consideration to organizing your CA, to keep it manageable and efficient.
Important: Protect your certificate authority
It is important to protect the machine that hosts your certificate authority. Your CA is literally the key to your entire network. Anyone who gains access to your CA can create their own certificates and freely access your network resources, or even compromise your servers and the CA itself. A common practice is to use a dedicated machine that is started only when you need to sign keys.
It is a best practice to create one signing key for servers,
and another signing key for clients. If you have a large number of
certificates to manage, it can be helpful to create your
CAs for hosts and clients on separate machines. If you prefer
using a single machine, give each CA its own directory.
The examples in this section use /ca-ssh-hosts
and /ca-ssh-users. The example machine is
ca.example.com.
If your security policy requires keeping copies of users' and host's public keys, store them in their own subdirectories, for easier tracking and avoiding key name collisions.
Important: RSA signing keys deprecated
OpenSSH 8.2, released February 2020, deprecates RSA signing keys. Use Ed25519 or ECDSA.
The following examples create two signing keys, one for signing host keys, and one for user keys. Give them strong passphrases:
>sudossh-keygen -t ed25519 -f /ca-ssh-hosts/ca-host-sign-key -C "signing key for host certificates"Generating public/private ed25519 key pair. Enter passphrase (empty for no passphrase): Enter same passphrase again: Your identification has been saved in ca-host-sign-key Your public key has been saved in ca-host-sign-key.pub The key fingerprint is: SHA256:STuQ7HgDrPcEa7ybNIW0n6kPbj28X5HN8GgwllBbAt0 signing key for host certificates The key's randomart image is: +--[ED25519 256]--+ | o+o.. | | . . o.=E | | = + B . | | + O + = B | | . O * S = + | | o B + o . | | =o= . | | o.*+ . | | .=.o+. | +----[SHA256]-----+
>sudossh-keygen -t ed25519 -f /ca-ssh-users/ca-user-sign-key -C "signing key for user certificates"Generating public/private ed25519 key pair. Enter passphrase (empty for no passphrase): Enter same passphrase again: Your identification has been saved in ca-user-sign-key Your public key has been saved in ca-user-sign-key.pub The key fingerprint is: SHA256:taYj8tTnjkzgfHRvQ6HTj8a37PY6rwv96V1x+GHRjIk signing key for user certificates The key's randomart image is: +--[ED25519 256]--+ | | | . +.| | . E o.o| | . + . ..| | . S * o .+.| | o + + = +..+| | . = * . O + o| | + = = o =oo+| | . o.o oOX=| +----[SHA256]-----+
Copy your public user signing key (be sure you are copying the PUBLIC
key) to /etc/ssh on all hosts running SSH servers.
Then enter the full path of the public user signing key to
/etc/ssh/sshd_config on the hosts:
TrustedUserCAKeys /etc/ssh/ca-user-sign-key.pub
Then restart sshd.
22.8.2 Creating host certificates #Edit source
The following example signs a host public key to create a host certificate for a database server:
>sudossh-keygen -s /ca-ssh-hosts/ca-host-sign-key\-n venus,venus.example.com -I "db-server host cert"\-h -V +4w /etc/ssh/ssh_host_ed25519_key.pubEnter passphrase: Signed host key /etc/ssh/ssh_host_ed25519_key-cert.pub: id "db-server host cert" serial 0 for venus,venus.example.com valid from 2022-08-08T14:20:00 to 2022-09-05T15:21:19
If there is more than one host key on a server, sign them all.
-sis your private signing key.-nis your list of principals. For host certificates, the principals are the machine's host name and fully qualified domain name.-Iis the identity string. This is any comment or description you want. The string is logged, to help you quickly find relevant log entries.-hcreates a host certificate.-Vsets the expiration date for the certificate. In the example, the certificate expires in four weeks. (See the "-V validity_interval" section ofman 1 ssh-keygenfor allowed time formats.)
Verify that your new certificate is built the way you want:
>ssh-keygen -Lf /etc/ssh/ssh_host_ed25519_key-cert.pub/etc/ssh/ssh_host_ed25519_key-cert.pub: Type: ssh-ed25519-cert-v01@openssh.com host certificate Public key: ED25519-CERT SHA256:/ U7C+qABXYyuvueUuhFKzzVINq3d7IULRLwBstvVC+Q Signing CA: ED25519 SHA256: STuQ7HgDrPcEa7ybNIW0n6kPbj28X5HN8GgwllBbAt0 (using ssh-ed25519) Key ID: "db-server host cert" Serial: 0 Valid: from 2022-08-08T14:20:00 to 2022-09-05T15:21:19 Principals: venus venus.example.com Critical Options: (none) Extensions: (none)
Add the full path of the new host certificate to
/etc/ssh/sshd_config, to make it
available to clients:
HostCertificate /etc/ssh/ssh_host_ed25519_key-cert.pub
Restart sshd to load your
changes:
>sudosystemctl restart sshd.service
See Section 22.8.3, “CA configuration for users” to learn how to configure clients to accept host certificates.
22.8.3 CA configuration for users #Edit source
The following example shows how to configure clients to trust your CA
rather than individual keys. The example grants access to a single
server. This entry must be on a single unbroken line in your users'
~/.ssh/known_hosts files. Move the original
~/.ssh/known_hosts file, and create a new
file that contains only the CA configuration. Or, create a global
configuration in /etc/ssh/ssh_known_hosts, which
has the advantage of being un-editable by unprivileged users:
@cert-authority db,db.example.com ssh-ed25519 AAAAC3NzaC1lZDI1NTE5AAAAIH1pF6DN4BdsfUKWuyiGt/leCvuZ/fPu YxY7+4V68Fz0 signing key for user certificates
List each server the user is allowed to access in a comma-delimited
list, for example
venus,venus.example.com,saturn,saturn.example.com. You may also
grant access to all servers in domains with wildcards, for example
*.example.com,*.example2.com.
Try connecting to the server. You should be prompted for the password of the remote account, without being prompted to verify the host certificate.
22.8.4 Creating user certificates #Edit source
Sign the user's public key:
>sudossh-keygen /ca-ssh-hosts/ca-user-sign-key -I "suzanne's cert" -n suzanne -V +52w user-key.pubSigned user key .ssh/ed25519key-cert.pub: id "suzanne's cert" serial 0 for suzanne valid from 2022-09-14T12:57:00 to 2023-09-13T12:58:21
The principal on user certificates is always the username. Store the
user's certificate in ~/.ssh on the user's machine.
User certificates replace the ~/.ssh/authorized_keys files. Remove this file from a user account on the remote
machine, then try opening an SSH session to that account. You should be
able to log in without being prompted for a password. (Remember, the
server should have a
TrustedUserCAKeys /etc/ssh/ca-user-sign-key.pub
line in its
/etc/ssh/sshd_config file, so that the server
knows to trust your certificate authority.)
Additionally, look for Accepted publickey for
suzanne messages in
your log files.
22.8.5 Revoking host keys #Edit source
When you need to revoke a certificate because a server has been
compromised or retired, add the certificate's corresponding
public key to a file on every client, for example
/etc/ssh/revoked_keys:
ssh-ed25519-cert-v01@openssh.com
AAAAIHNzaC1lZDI1NTE5LWNlcnQtdjAxQG9wZW5zc2guY29tAAAAIK6hyvFAhFI+0hkKehF/
506fD1VdcW29ykfFJn1CPK9lAAAAIAawaXbbEFiQOAe5LGclrCHSLWbEeUauK5+CAuhTJyz0
AAAAAAAAAAAAAAACAAAAE2RiLXNlcnZlciBob3N0IGNlcnQAAAAeAAAABXZlbnVzAAAAEXZl
bnVzLmV4YW1wbGUuY29tAAAAAGMabhQAAAAAYz9YgQAAAAAAAAAAAAAAAAAAADMAAAALc3No
LWVkMjU1MTkAAAAgfWkXoM3gF2x9Qpa7KIa3+V4K+5n98+5jFjv7hXrwXPQAAABTAAAAC3Nz
aC1lZDI1NTE5AAAAQI+mbJsQjt/9bLiURse8DF3yTa6Yk3HpoE2uf9FW/
KeLsw2wPeDv0d6jv49Wgr5T3xHYPf+VPJQW35ntFiHTlQg= root@db
This file must be named in /etc/ssh/sshd_config:
RevokedKeys /etc/ssh/revoked_keys
22.9 Automated public key logins with gnome-keyring #Edit source
The gnome-keyring package is installed and enabled
by default when the GNOME desktop environment is installed.
gnome-keyring is integrated with your
system login, automatically unlocking your secrets storage at login.
When you change your login password, gnome-keyring
automatically updates itself with your new password.
gnome-keyring automatically loads all key pairs in
~/.ssh, for each pair that has a
*.pub file. You may manually load other keys with
the ssh-add command, for example:
>ssh-add ~/.otherkeys/my_key
List all loaded keys:
>ssh-add -L
When you start up your system and then open an SSH session, you are prompted for your private key passphrase.
gnome-keyring remembers the passphrase for the rest of your
session. You do not have to re-enter the passphrase until after a system
restart.
22.10 Automated public key logins with ssh-agent #Edit source
The openssh package
provides the ssh-agent utility, which retains your
private keys and passphrases, and automatically applies your passphrases
for you during the current session.
Configure ssh-agent to start automatically and load
your keys by entering the following lines in your
~/.profile file:
eval "$(ssh-agent)" ssh-add
The first line starts ssh-agent, and the second line
loads all the keys in your ~/.ssh folder.
When you open an SSH session that requires public key authentication,
you are prompted for the passphrase. After the passphrase has been
provided once, you do not have to enter it again, until after you
restart your system.
You may configure ~/.profile to load only
specific keys, like the following example that loads
id_rsa and id_ed25519:
> ssh-add id_rsa id_ed2551922.10.1 Using ssh-agent in an X session #Edit source
On openSUSE Leap, ssh-agent is automatically
started by the GNOME display manager. To also invoke
ssh-add to add your keys to the agent at the
beginning of an X session, do the following:
Log in as the desired user and check whether the file
~/.xinitrcexists.If it does not exist, use an existing template or copy it from
/etc/skel:if [ -f ~/.xinitrc.template ]; then mv ~/.xinitrc.template ~/.xinitrc; \ else cp /etc/skel/.xinitrc.template ~/.xinitrc; fi
If you have copied the template, search for the following lines and uncomment them. If
~/.xinitrcalready existed, add the following lines (without comment signs).# if test -S "$SSH_AUTH_SOCK" -a -x "$SSH_ASKPASS"; then # ssh-add < /dev/null # fi
When starting a new X session, you are prompted for your SSH passphrase.
22.11 Changing an SSH private key passphrase #Edit source
You may change or remove the passphrase from a private key with
ssh-keygen:
>ssh-keygen -pf ~/.ssh/server1Enter old passphrase: Key has comment 'shared videos server1' Enter new passphrase (empty for no passphrase): Enter same passphrase again: Your identification has been saved with the new passphrase.
22.12 Retrieving a key fingerprint #Edit source
Use the ssh-keygen to display the public key
fingerprint. The following example prints the SHA256 hash for a
ED25519 key:
>ssh-keygen -lf ldap-server256 SHA256:W45lbmj24ZoASbrqW0q9+NhF04muvfKZ+FkRa2cCiqo comment (ED25519)
Add the -v flag to display the ASCII art
representation of the key:
>ssh-keygen -lvf ldap-server256 SHA256:W45lbmj24ZoASbrqW0q9+NhF04muvfKZ+FkRa2cCiqo comment (ED25519) +--[ED25519 256]--+ | | | | | .. . | | .o..+ + | | ...o+ BSo+ | |. ..o.o =X | |...o o..* = | |o.*.* =+ = . | |E*o*+O. o.o | +----[SHA256]-----+
22.13 Starting X11 applications on a remote host #Edit source
You can run graphical applications that are installed on a
remote machine on your local computer.
X11Forwarding Yes must be set in the
/etc/ssh/sshd_config file on the remote machine.
Then, when you run ssh with the -X
option, the DISPLAY variable is automatically set on the
remote machine, and all X output is exported to the local machine over
the SSH connection. At the same time, X applications started remotely
cannot be intercepted by unauthorized users.
A quick test is to run a simple game from the remote machine, such as GNOME Mines:
>ssh wilber@sunPassword: Last login: Tue May 10 11:29:06 2022 from 192.168.163.13 Have a lot of fun... wilber@sun>gnome-mines
The remote application should appear on your local machine just as though it were installed locally. (Network lag affects performance.) Close the remote application in the usual way, such as clicking the close button. This closes only the application, and your SSH session remains open.
Important: X11 forwarding does not work on Wayland
X11 forwarding requires the X Window System running on the remote host. The X Window System has built-in networking, while Wayland does not. Therefore Wayland does not support X11 forwarding.
Use the following command to learn if your system runs X or Wayland:
>echo $XDG_SESSION_TYPEx11
If Wayland is in use, it looks like the following example:
>echo $XDG_SESSION_TYPEwayland
The systemd way is to query with loginctl:
>loginctl show-session "$XDG_SESSION_ID" -p TypeType=x11>loginctl show-session "$XDG_SESSION_ID" -p TypeType=wayland
22.14 Agent forwarding #Edit source
By adding the -A option, the ssh-agent authentication
mechanism is carried over to the next machine. This way, you can work
from different machines without having to enter a password, but only if
you have distributed your public key to the destination hosts and
properly saved it there. (Refer to
Section 22.6, “Public key authentication” to learn how
to copy your public keys to other hosts.)
AllowAgentForwarding yes is the default in
/etc/ssh/sshd_config. Change it to
No to disable it.
22.15 scp—secure copy #Edit source
scp copies files to or from a remote machine. If
the user name on jupiter is different than the user name on
sun, specify the latter using the
USER_NAME&host format. If
the file should be copied into a directory other than the remote
user's home directory, specify it as
sun:DIRECTORY. The following
examples show how to copy a file from a local to a remote machine and
vice versa.
>scp ~/MyLetter.tex tux@sun:/tmp 1>scp tux@sun:/tmp/MyLetter.tex ~ 2
Tip: The -l option
With the ssh command, the option
-l can be used to specify a remote user (as an
alternative to the
USER_NAME&host
format). With scp the option -l
is used to limit the bandwidth consumed by scp.
After the correct password is entered, scp starts the
data transfer. It displays a progress bar and the time remaining for each
file that is copied. Suppress all output with the -q
option.
scp also provides a recursive copying feature for
entire directories. The command
> scp -r src/ sun:backup/
copies the entire contents of the directory src
including all subdirectories to the ~/backup
directory on the host sun. If this subdirectory does not
exist, it is created automatically.
The -p option tells scp to leave the
time stamp of files unchanged. -C compresses the data
transfer. This minimizes the data volume to transfer, but creates a
heavier burden on the processors of both machines.
22.16 sftp—secure file transfer #Edit source
22.16.1 Using sftp #Edit source
To copy several files from or to different locations,
sftp is a convenient alternative to
scp. It opens a shell with a set of commands similar
to a regular FTP shell. Type help at the sftp-prompt
to get a list of available commands. More details are available from the
sftp man page.
> sftp sun
Enter passphrase for key '/home/tux/.ssh/id_rsa':
Connected to sun.
sftp> help
Available commands:
bye Quit sftp
cd path Change remote directory to 'path'
[...]22.16.2 Setting permissions for file uploads #Edit source
As with a regular FTP server, a user can download and upload files to a
remote machine running an SFTP server
by using the put command. By default the
files are uploaded to the remote host with the same
permissions as on the local host. There are two options to
automatically alter these permissions:
- Setting a umask
A umask works as a filter against the permissions of the original file on the local host. It can only withdraw permissions:
permissions original
umask
permissions uploaded
0666
0002
0664
0600
0002
0600
0775
0025
0750
To apply a umask on an SFTP server, edit the file
/etc/ssh/sshd_configuration. Search for the line beginning withSubsystem sftpand add the-uparameter with the desired setting, for example:Subsystem sftp /usr/lib/ssh/sftp-server -u 0002
- Explicitly setting the permissions
Explicitly setting the permissions sets the same permissions for all files uploaded via SFTP. Specify a three-digit pattern such as
600,644, or755with-u. When both-mand-uare specified,-uis ignored.To apply explicit permissions for uploaded files on an SFTP server, edit the file
/etc/ssh/sshd_config. Search for the line beginning withSubsystem sftpand add the-mparameter with the desired setting, for example:Subsystem sftp /usr/lib/ssh/sftp-server -m 600
Tip: Viewing the SSH daemon log file
To watch the log entries from the sshd use the following command:
>sudojournalctl -u sshd
22.17 Port forwarding (SSH tunneling) #Edit source
ssh can also be used to redirect TCP/IP connections.
This feature, also called SSH tunneling, redirects TCP
connections to a certain port to another machine via an encrypted
channel.
With the following command, any connection directed to jupiter port 25 (SMTP) is redirected to the SMTP port on sun. This is especially useful for those using SMTP servers without SMTP-AUTH or POP-before-SMTP features. From any arbitrary location connected to a network, e-mail can be transferred to the “home” mail server for delivery.
# ssh -L 25:sun:25 jupiterSimilarly, all POP3 requests (port 110) on jupiter can be forwarded to the POP3 port of sun with this command:
# ssh -L 110:sun:110 jupiter
Both commands must be executed as root, because the connection
is made to privileged local ports. E-mail is sent and retrieved by
normal users in an existing SSH connection. The SMTP and POP3 host
must be set to localhost for this to
work. Additional information can be found in the manual pages for
each of the programs described above and in the OpenSSH package
documentation under
/usr/share/doc/packages/openssh.
22.18 More information #Edit source
- https://www.openssh.com
The home page of OpenSSH
- https://en.wikibooks.org/wiki/OpenSSH
The OpenSSH Wikibook
man sshdThe man page of the OpenSSH daemon
man ssh_configThe man page of the OpenSSH SSH client configuration files
man scp,man sftp,man ssh,man ssh-add,man ssh-copy-id,man ssh-keygenMan pages of several binary files to securely copy files (
scp,sftp), to log in (slogin,ssh), and to manage keys.-
/usr/share/doc/packages/openssh-common/README.SUSE SUSE package specific documentation; changes in defaults with respect to upstream etc.
22.19 Stopping SSH Brute Force Attacks with Fail2Ban #Edit source
An SSH brute force attack involves repeat trials of user name and password combinations until the attacker gains access to the remote server. The attacker uses automated tools that test various user name and password combinations to compromise a server.
You can use Fail2Ban software to limit intrusion attempts. Fail2Ban scans the system logs to detect attacks and trigger an action, such as blocking the IPs via the firewall. Fail2Ban is used only to protect services that require a user name and password authentication.
22.19.1 What is Fail2Ban? #Edit source
Fail2Ban scans the log files in /var/log/apache/error_log
and bans the IPs that indicate malicious signs, such as too many password attempts etc.
You can then use Fail2Ban to update firewall rules to reject the IP addresses
for a specified amount of time.
Fail2Ban comes with filters for various services, such as Apache,SSH,Courier etc. You can use Fail2Ban to minimize the rate of incorrect authentication attempts.
22.19.2 Using Fail2Ban to stop an SSH brute force attack #Edit source
You can install and configure Fail2Ban to protect the server against SSH brute force attacks.
Procedure 22.2: Using Fail2Ban to stop an SSH brute force attack #
To install Fail2Ban, execute:
#sudo zypper -n in fail2ban firewalldWhen you install Fail2Ban, a default configuration file
jail.confis also installed. This file gets overwritten when you upgrade Fail2Ban. To retain any customizations you make to the file, you can add the modifications to a file called jail.local. Fail2Ban automatically reads both files.#cp /etc/fail2ban/jail.conf /etc/fail2ban/jail.localOpen the file in your editor.
vi /etc/fail2ban/jail.local
Take a look at the four settings that you need to know about.
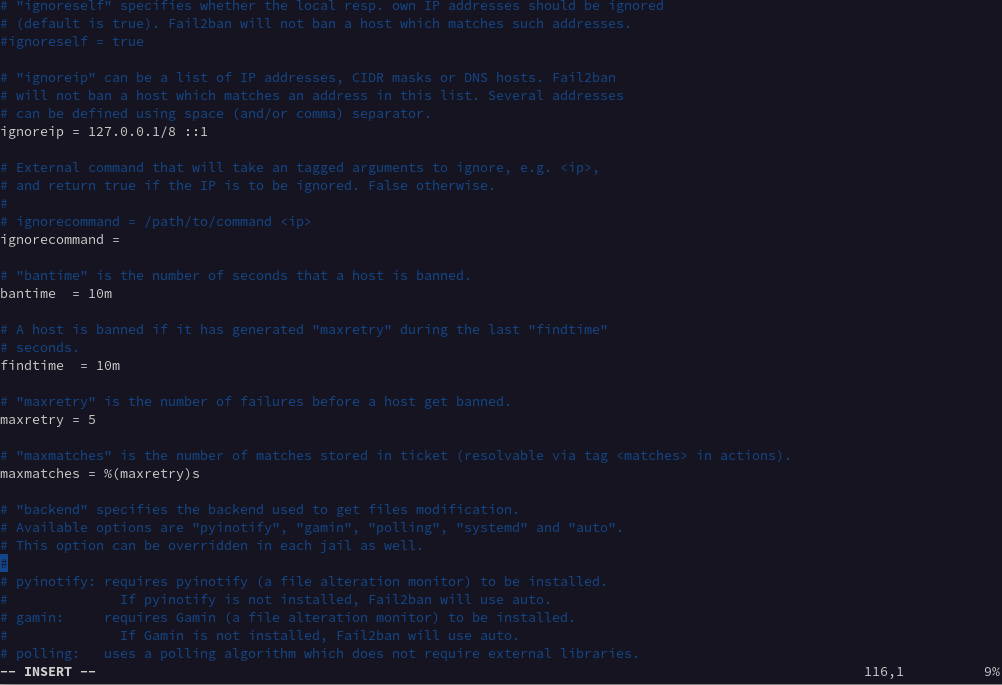
Figure 22.1: jail.local file settings #
- ignoreip
A list of whitelisted IPs that are never banned. The local host IP address 127.0.0.1 is in the list by default, along with the IPv6 equivalent ::1. You can use this setting to add a list of IP addresses that you know should not be banned.
- bantime
The duration in minutes for which an IP address is banned. When you do not enter a value ending in m or h, it is treated as seconds. If you enter a value of -1, an IP address is permanently banned.
- findtime
The duration of time where too many failed connection attempts result in an IP being banned.
- maxretry
The limit for the number of failed attempts.
Note
If a connection from the same IP address makes maxretry failed connection attempts within the findtime period, they are banned for the duration of the bantime. The only exceptions are the IP addresses in the ignoreip list.
Fail2Ban supports different types of jails and each jail has different settings for the connection types.
You can use the Fail2Ban service with the following:
To enable:
#systemctl enable fail2banTo start:
#systemctl start fail2banTo check the service status:
#systemctl status fail2ban.serviceImportant
You must restart Fail2Ban each time you make a configuration change.
23 Masquerading and firewalls #Edit source
Whenever Linux is used in a network environment, you can use the
kernel functions that allow the manipulation of network packets to
maintain a separation between internal and external network areas. The
Linux netfilter framework provides the means
to establish an effective firewall that keeps different networks
apart. Using iptables—a generic table structure for the
definition of rule sets—precisely controls the packets allowed to
pass a network interface. Such a packet filter can be set up using
firewalld and its graphical interface firewall-config.
openSUSE Leap 15.0
introduces firewalld as the new default software firewall, replacing
SuSEfirewall2.
This chapter provides guidance for configuring firewalld, and migrating
from SuSEfirewall2 for users who have upgraded from older openSUSE Leap
releases.
23.1 Packet filtering with iptables #Edit source
This section discusses the low-level details of packet filtering. The
components netfilter and
iptables are responsible for the filtering and
manipulation of network packets and for network address translation (NAT).
The filtering criteria and any actions associated with them are stored in
chains, which must be matched one after another by individual network
packets as they arrive. The chains to match are stored in tables. The
iptables command allows you to alter these tables and
rule sets.
The Linux kernel maintains three tables, each for a particular category of functions of the packet filter:
- filter
This table holds the bulk of the filter rules, because it implements the packet filtering mechanism in the stricter sense, which determines whether packets are let through (
ACCEPT) or discarded (DROP), for example.- nat
This table defines any changes to the source and target addresses of packets. Using these functions also allows you to implement masquerading, which is a special case of NAT used to link a private network with the Internet.
- mangle
The rules held in this table make it possible to manipulate values stored in IP headers (such as the type of service).
These tables contain several predefined chains to match packets:
- PREROUTING
This chain is applied to all incoming packets.
- INPUT
This chain is applied to packets destined for the system's internal processes.
- FORWARD
This chain is applied to packets that are routed through the system.
- OUTPUT
This chain is applied to packets originating from the system itself.
- POSTROUTING
This chain is applied to all outgoing packets.
Figure 23.1, “iptables: a packet's possible paths” illustrates the paths along which a network packet may travel on a given system. For the sake of simplicity, the figure lists tables as parts of chains, but in reality these chains are held within the tables themselves.
In the simplest case, an incoming packet destined for the system itself
arrives at the eth0 interface. The packet is first
referred to the PREROUTING chain of the
mangle table then to the PREROUTING
chain of the nat table. The following step, concerning
the routing of the packet, determines that the actual target of the
packet is a process of the system itself. After passing the
INPUT chains of the mangle and the
filter table, the packet finally reaches its target,
provided that the rules of the filter table allow this.
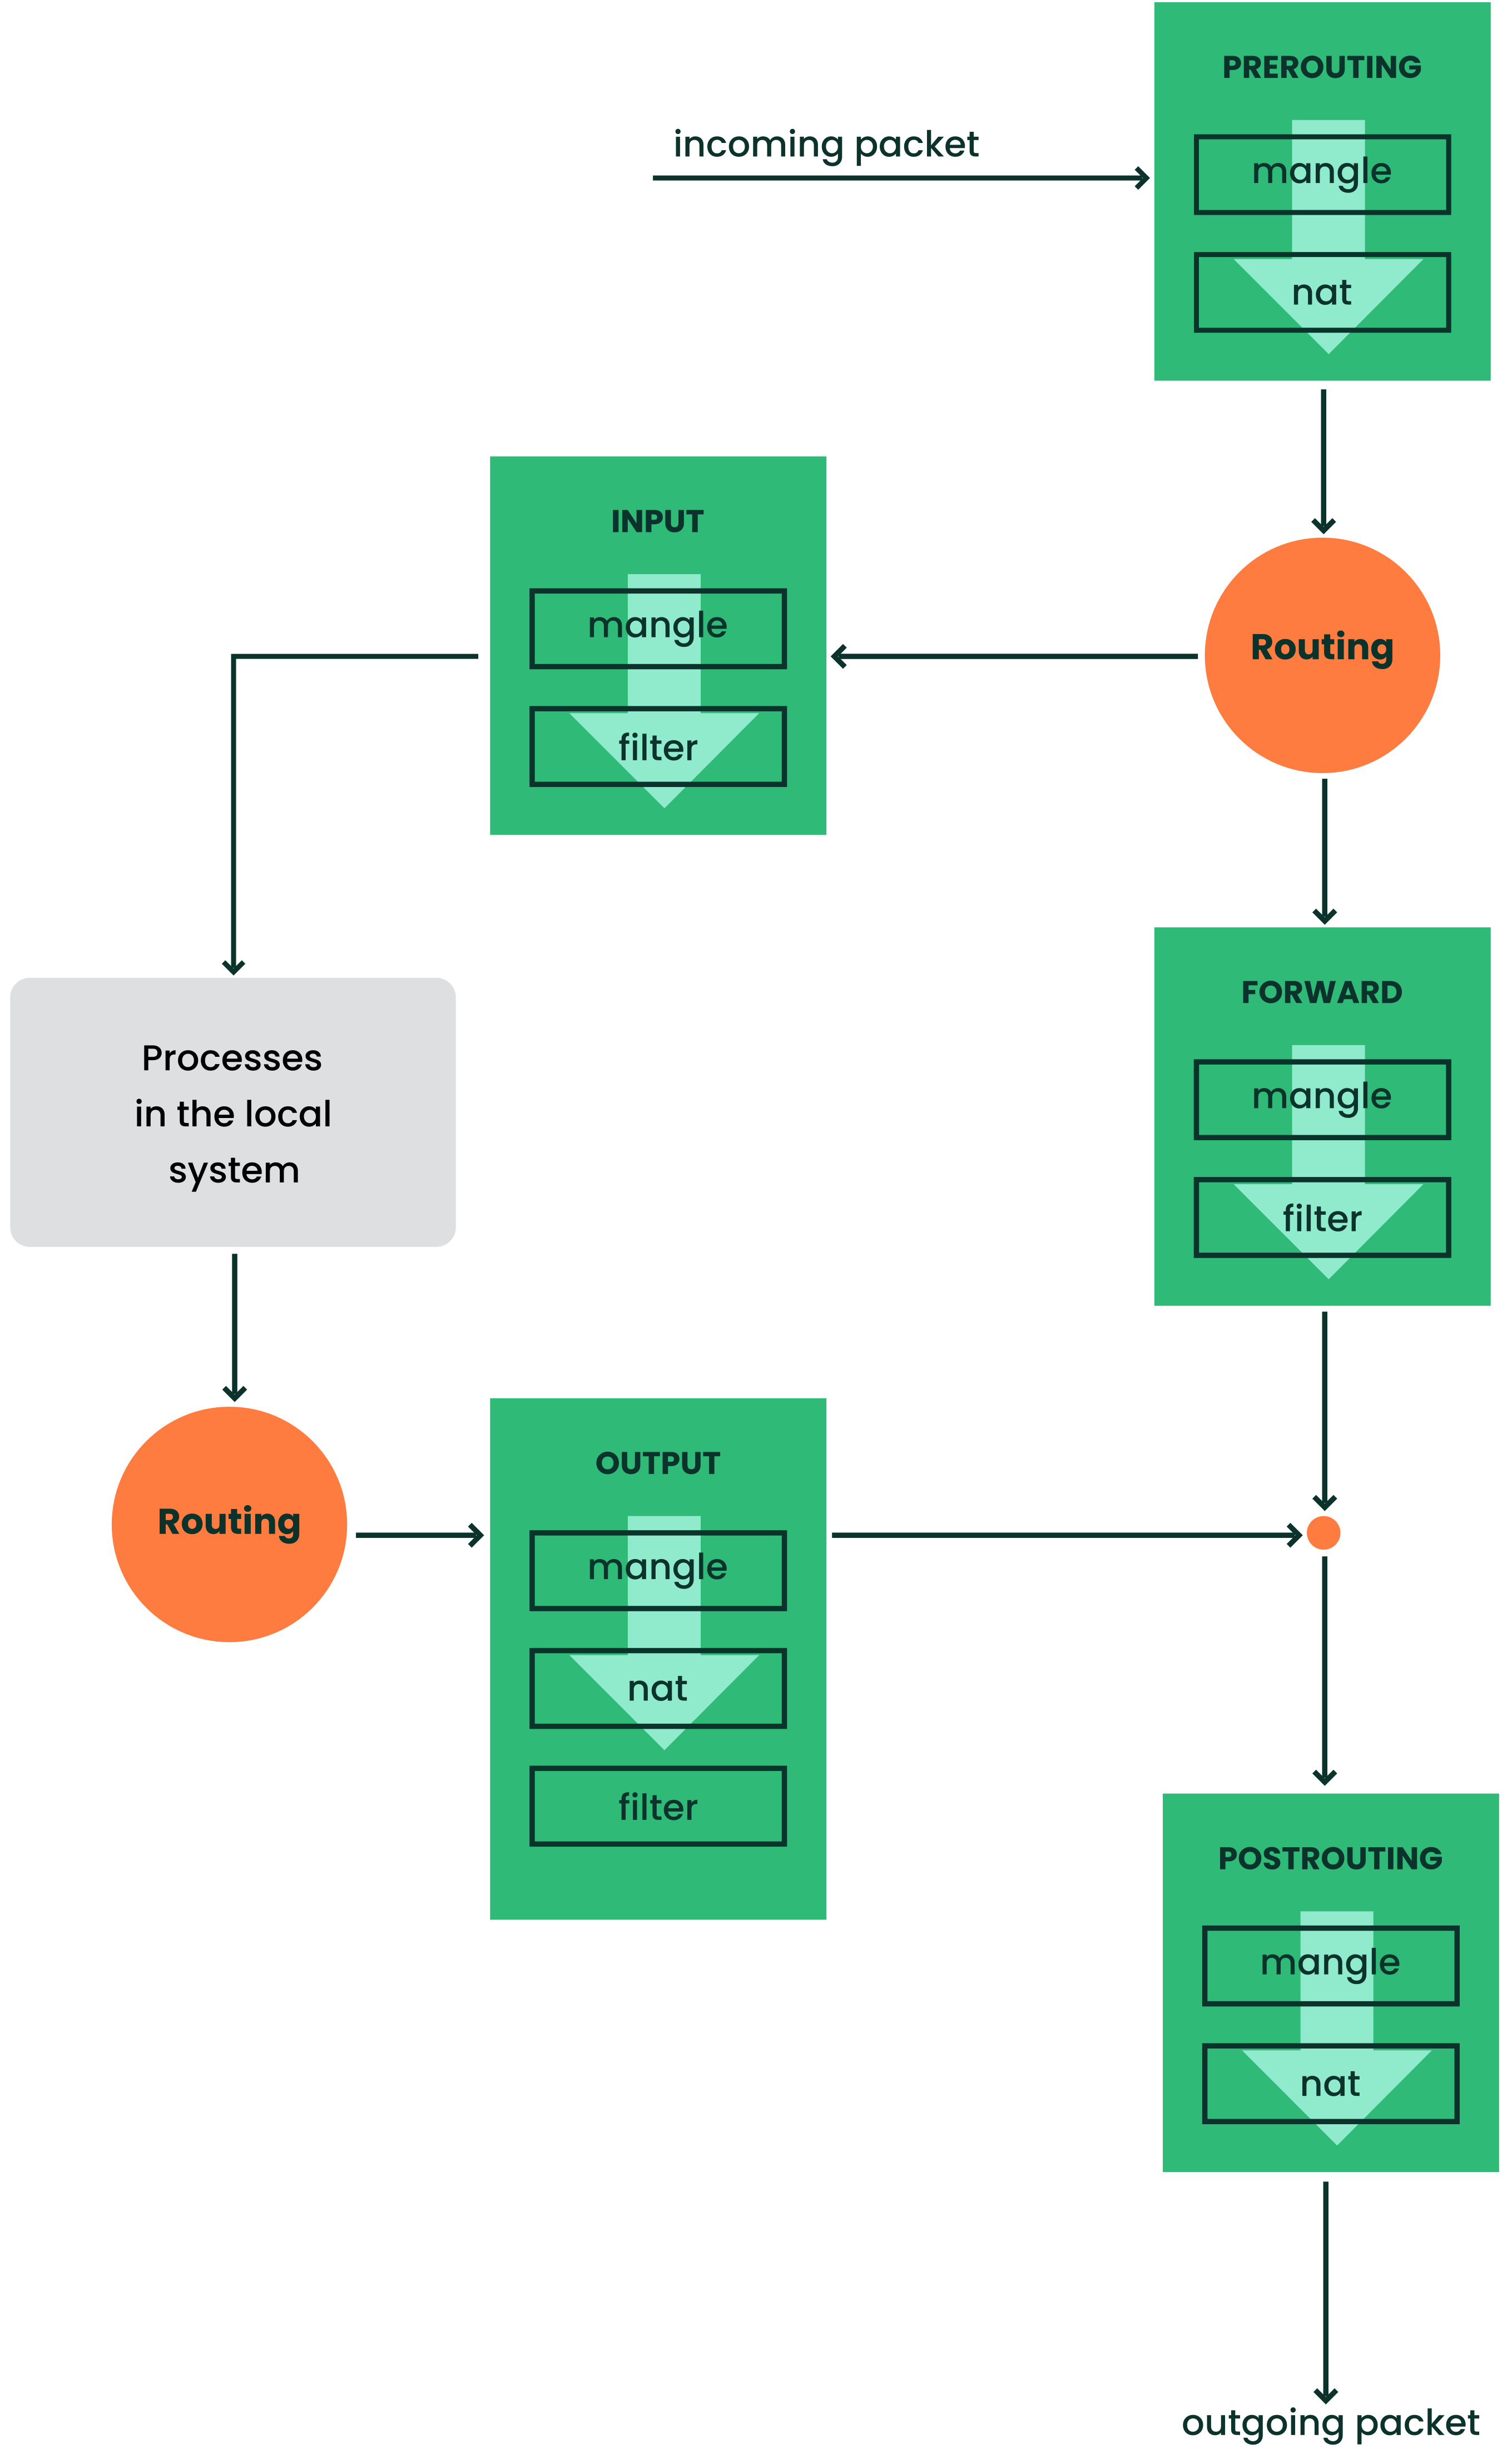
Figure 23.1: iptables: a packet's possible paths #
23.2 Masquerading basics #Edit source
Masquerading is the Linux-specific form of NAT (network address
translation) and can be used to connect a small LAN with the
Internet. LAN hosts use IP
addresses from the private range (see
Book “Reference”, Chapter 13 “Basic networking”, Section 13.1.2 “Netmasks and routing”) and on the Internet
official IP addresses are used. To be able to connect
to the Internet, a LAN host's private address is translated to an official
one. This is done on the router, which acts as the gateway between the
LAN and the Internet. The underlying principle is a simple one: The
router has more than one network interface, typically a network card and
a separate interface connecting with the Internet. While the latter links
the router with the outside world, one or several others link it with the
LAN hosts. With these hosts in the local network connected to the network
card (such as eth0) of the router, they can send any
packets not destined for the local network to their default gateway or
router.
Important: Using the correct network mask
When configuring your network, make sure both the broadcast address and the netmask are the same for all local hosts. Failing to do so prevents packets from being routed properly.
As mentioned, whenever one of the LAN hosts sends a packet destined for
an Internet address, it goes to the default router. However, the router
must be configured before it can forward such packets. For security
reasons, this is not enabled in a default installation. To enable it, add
the line net.ipv4.ip_forward = 1 in the file
/etc/sysctl.conf. Alternatively do this via YaST,
for example by calling yast routing ip-forwarding on.
The target host of the connection can see your router, but knows nothing about the host in your internal network where the packets originated. This is why the technique is called masquerading. Because of the address translation, the router is the first destination of any reply packets. The router must identify these incoming packets and translate their target addresses, so packets can be forwarded to the correct host in the local network.
With the routing of inbound traffic depending on the masquerading table, there is no way to open a connection to an internal host from the outside. For such a connection, there would be no entry in the table. In addition, any connection already established has a status entry assigned to it in the table, so the entry cannot be used by another connection.
As a consequence of all this, you might experience some problems with several application protocols, such as ICQ, cucme, IRC (DCC, CTCP), and FTP (in PORT mode). Web browsers, the standard FTP program, and many other programs use the PASV mode. This passive mode is much less problematic as far as packet filtering and masquerading are concerned.
23.3 Firewalling basics #Edit source
Firewall is probably the term most widely used to describe a mechanism that controls the data flow between networks. Strictly speaking, the mechanism described in this section is called a packet filter. A packet filter regulates the data flow according to certain criteria, such as protocols, ports, and IP addresses. This allows you to block packets that, according to their addresses, are not supposed to reach your network. To allow public access to your Web server, for example, explicitly open the corresponding port. However, a packet filter does not scan the contents of packets with legitimate addresses, such as those directed to your Web server. For example, if incoming packets were intended to compromise a CGI program on your Web server, the packet filter would still let them through.
A more effective but more complex mechanism is the combination of several types of systems, such as a packet filter interacting with an application gateway or proxy. In this case, the packet filter rejects any packets destined for disabled ports. Packets that are directed to the application gateway are accepted. This gateway or proxy pretends to be the actual client of the server. In a sense, such a proxy could be considered a masquerading host on the protocol level used by the application. One example for such a proxy is Squid, an HTTP and FTP proxy server. To use Squid, the browser must be configured to communicate via the proxy. Any HTTP pages or FTP files requested are served from the proxy cache and objects not found in the cache are fetched from the Internet by the proxy.
The following section focuses on the packet filter that comes with openSUSE Leap. For further information about packet filtering and firewalling, read the Firewall HOWTO.
23.4 firewalld #Edit source
Note: firewalld replaces SuSEfirewall2
openSUSE Leap 15.0
introduces firewalld as the new default software firewall, replacing
SuSEfirewall2. If you are upgrading from a release older than openSUSE Leap
15.0,
SuSEfirewall2 will be unchanged and you must manually upgrade to
firewalld (see Section 23.5, “Migrating from SuSEfirewall2”).
firewalld is a daemon that maintains the system's
iptables rules and offers a D-Bus interface for
operating on them. It comes with a command line utility
firewall-cmd and a graphical user interface
firewall-config for interacting with it. Since
firewalld is running in the background and provides a well defined
interface it allows other applications to request changes to the iptables
rules, for example to set up virtual machine networking.
firewalld implements different security zones. Several predefined
zones like internal and public exist.
The administrator can define additional custom zones if desired. Each
zone contains its own set of iptables rules. Each network interface is a
member of exactly one zone. Individual connections can also be assigned to
a zone based on the source addresses.
Each zone represents a certain level of trust. For example the
public zone is not trusted, because other computers in
this network are not under your control (suitable for Internet or wireless
hotspot connections). On the other hand the internal zone
is used for networks that are under your control, like a
home or company network. By utilizing zones this way, a host can offer
different kinds of services to trusted networks and untrusted networks in a
defined way.
For more information about the predefined zones and their meaning in
firewalld, refer to its manual at
https://www.firewalld.org/documentation/zone/predefined-zones.html.
Note: No zone assigned behavior
The initial state for network interfaces is to be assigned to no zone at
all. In this case the network interface will be implicitly handled in the
default zone, which can be determined by calling firewall-cmd
--get-default-zone. If not configured otherwise, the default
zone is the public zone.
The firewalld packet filtering model allows any outgoing connections to
pass. Outgoing connections are connections that are actively established by
the local host. Incoming connections that are established by remote hosts are
blocked if the respective service is not allowed in the zone in
question. Therefore, each of the interfaces with incoming traffic must be
placed in a suitable zone to allow for the desired services to be
accessible. For each of the zones, define the services or protocols you
need.
An important concept of firewalld is the distinction between two separate
configurations: the runtime and the
permanent configuration. The runtime configuration
represents the currently active rules, while the permanent configuration
represents the saved rules that will be applied when restarting
firewalld. This allows to add temporary rules that will be discarded after
restarting firewalld, or to experiment with new rules while being able to
revert back to the original state. When you are changing the configuration,
you need to be aware of which configuration you are editing. How this is done
is discussed in Section 23.4.1.2, “Runtime versus permanent configuration”.
To perform the firewalld configuration using the graphical
user interface firewall-config refer to its documentation.
In the following section we will be looking at how to perform typical
firewalld configuration tasks using firewall-cmd on the
command line.
23.4.1 Configuring the firewall on the command line #Edit source
23.4.1.1 Firewall start-up #Edit source
firewalld will be installed and enabled by default. It is a regular
systemd service that can be configured via systemctl
or the YaST Services Manager.
Important: Automatic firewall configuration
After the installation, YaST automatically starts firewalld and
leaves all interfaces in the default public zone. If a
server application is configured and activated on the system, YaST can
adjust the firewall rules via the options or in the server configuration modules. Some server module
dialogs include a button for
activating additional services and ports.
23.4.1.2 Runtime versus permanent configuration #Edit source
By default, all firewall-cmd commands operate on the
runtime configuration. You can apply most operations to the permanent
configuration only by adding the
--permanent parameter. When doing so, the change affects
the permanent configuration and will not be effective
immediately in the runtime configuration. There is currently no way to add
a rule to both runtime and permanent configurations in a single invocation.
To achieve this you can apply all necessary changes to the runtime
configuration and when all is working as expected issue the following
command:
#firewall-cmd --runtime-to-permanent
This writes all current runtime rules into the permanent configuration.
Any temporary modifications you or other programs may have made to the
firewall in other contexts are made permanent this way. If you are unsure
about this, you can also take the opposite approach to be on the safe side:
Add new rules to the permanent configuration and reload firewalld to
make them active.
Note
Some configuration items, like the default zone, are shared by both the runtime and permanent configurations. Changing them reflects in both configurations at once.
To revert the runtime configuration to the permanent configuration and
thereby discard any temporary changes, two possibilities exist, either via
the firewalld command line interface or via systemd:
#firewall-cmd --reload
#systemctl reload firewalld
For brevity the examples in the following sections will always operate on the runtime configuration, if applicable. Adjust them accordingly to make them permanent.
23.4.1.3 Assignment of interfaces to zones #Edit source
You can list all network interfaces currently assigned to a zone like this:
#firewall-cmd --zone=public --list-interfaceseth0
Similarly you can query which zone a specific interface is assigned to:
#firewall-cmd --get-zone-of-interface=eth0public
The following command lines assign an interface to a zone. The variant
using --add-interface works if
eth0 is not already assigned to another zone. The
variant using --change-interface always works,
removing eth0 from its current zone if necessary:
#firewall-cmd --zone=internal --add-interface=eth0#firewall-cmd --zone=internal --change-interface=eth0
Any operations without an explicit --zone argument will
implicitly operate on the default zone. This pair of commands can be used
for getting and setting the default zone assignment:
#firewall-cmd --get-default-zonedmz#firewall-cmd --set-default-zone=public
Important
Any network interfaces not explicitly assigned to a zone are
automatically part of the default zone. Changing the default zone
reassigns all those network interfaces immediately for the permanent and
runtime configurations. You should never use a trusted zone like
internal as the default zone, to avoid unexpected
exposure to threats. For example, hotplugged network interfaces like USB
Ethernet interfaces would automatically become part of the trusted zone in
such cases.
Interfaces that are not explicitly part of any zone do not appear in the zone interface list. There is currently no command to list unassigned interfaces. Due to this it is best to avoid unassigned network interfaces during regular operation.
23.4.1.4 Making network services accessible #Edit source
firewalld has a concept of services. A service
consists of definitions of ports and protocols. These definitions
logically belong together in the context of a given network service like
a Web or mail server protocol. The following commands can be used to get
information about predefined services and their details:
#firewall-cmd --get-services[...] dhcp dhcpv6 dhcpv6-client dns docker-registry [...]#firewall-cmd --info-service dhcpdhcp ports: 67/udp protocols: source-ports: modules: destination:
These service definitions can be used for easily making the associated network functionality accessible in a zone. This command line opens the HTTP Web server port in the internal zone, for example:
#firewall-cmd --add-service=http --zone=internal
The removal of a service from a zone is performed using the counterpart
command --remove-service. You can also define custom
services using the --new-service subcommand. Refer to
https://www.firewalld.org/documentation/howto/add-a-service.html
for more details on how to do this.
If you just want to open a single port by number, you can use the following approach. This will open TCP port 8000 in the internal zone:
#firewall-cmd --add-port=8000/tcp --zone=internal
For removal use the counterpart command --remove-port.
Tip: Temporarily opening a service or port
firewalld supports a --timeout parameter that allows
to open a service or port for a limited time duration. This can be helpful
for quick testing and making sure that closing the service or port is not
forgotten. To allow the imap service in the
internal zone for 5 minutes, you would call
#firewall-cmd --add-service=imap --zone=internal --timeout=5m
23.4.1.5 Lockdown mode #Edit source
firewalld offers a lockdown mode that prevents
changes to the firewall rules while it is active. Since applications can
automatically change the firewall rules via the D-Bus interface, and
depending on the PolicyKit rules regular users may be able to do the same,
it can be helpful to prevent changes in some situations. You can find more
information about this at
https://fedoraproject.org/wiki/Features/FirewalldLockdown.
It is important to understand that the lockdown mode feature
provides no real security, but merely protection against accidental or
benign attempts to change the firewall. The way the lockdown mode is
currently implemented in firewalld provides no security against malicious
intent, as is pointed out at
https://seclists.org/oss-sec/2017/q3/139.
23.4.1.6 Adding custom iptables rules #Edit source
firewalld claims exclusive control over the host's
netfilter rules. You should never modify
firewall rules using other tools like iptables. Doing
so could confuse firewalld and break security or functionality.
If you need to add custom firewall rules that aren't covered by
firewalld features then there are two ways to do so. To directly pass
raw iptables syntax you can use the
--direct option. It expects the table, chain, and
priority as initial arguments and the rest of the command line is passed
as is to iptables. The following example adds a
connection tracking rule for the forwarding filter table:
#firewall-cmd --direct --add-rule ipv4 filter FORWARD 0 -i eth0 -o eth1 \ -p tcp --dport 80 -m state --state NEW,RELATED,ESTABLISHED -j ACCEPT
Additionally, firewalld implements so called rich
rules, an extended syntax for specifying
iptables rules in an easier way. You can find the
syntax specification at
https://www.firewalld.org/documentation/man-pages/firewalld.richlanguage.html.
The following example drops all IPv4 packets originating from a certain
source address:
#firewall-cmd --zone=public --add-rich-rule='rule family="ipv4" \ source address="192.168.2.4" drop'
23.4.1.7 Routing, forwarding, and masquerading #Edit source
firewalld is not designed to run as a fully fledged router. The
basic functionality for typical home router setups is available. For a
corporate production router you should not use firewalld, however, but
use dedicated router and firewall devices instead. The following provides
just a few pointers on what to look for to utilize routing in firewalld:
First of all IP forwarding needs to be enabled as outlined in Section 23.2, “Masquerading basics”.
To enable IPv4 masquerading, for example in the
internalzone, issue the following command.#firewall-cmd --zone=internal --add-masqueradefirewalldcan also enable port forwarding. The following command forwards local TCP connections on port 80 to another host:#firewall-cmd --zone=public \ --add-forward-port=port=80:proto=tcp:toport=80:toaddr=192.168.1.10
23.4.2 Accessing services listening on dynamic ports #Edit source
Some network services do not listen on predefined port numbers. Instead
they operate based on the portmapper or
rpcbind protocol. We will use the term
rpcbind from here on. When one of these services
starts, it chooses a random local port and talks to
rpcbind to make the port number known.
rpcbind itself is listening on a well known port.
Remote systems can then query rpcbind about the network
services it knows about and on which ports they are listening. Not many
programs use this approach anymore today. Popular examples are
Network Information Services (NIS; ypserv and
ypbind) and the Network File System (NFS) version 3.
Note: About NFSv4
The newer NFSv4 requires the single well-known
TCP port 2049. For protocol version 4.0, the kernel parameter
fs.nfs.nfs_callback_tcpport may need to be set
to a static port (see Example 23.1, “Callback port configuration for the nfs kernel module in /etc/modprobe.d/60-nfs.conf”).
Starting with protocol version 4.1 this setting has also become
unnecessary.
The dynamic nature of the rpcbind protocol makes
it difficult to make the affected services behind the firewall accessible.
firewalld does not support these services by itself. For manual configuration,
see Section 23.4.2.1, “Configuring static ports”.
Alternatively, openSUSE Leap provides a helper script. For details, see
Section 23.4.2.2, “Using firewall-rpcbind-helper for configuring static ports”.
23.4.2.1 Configuring static ports #Edit source
One possibility is to configure all involved network services to use
fixed port numbers. Once this is done, the fixed ports can be opened in
firewalld and everything should work. The actual port numbers used are
at your discretion but should not clash with any well-known port numbers
assigned to other services. See Table 23.1, “Important sysconfig variables for static port configuration”
for a list of the available configuration items for NIS and NFSv3
services. Depending on your actual NIS or NFS configuration,
not all of these ports may be required for your setup.
Table 23.1: Important sysconfig variables for static port configuration #
|
File Path |
Variable Name |
Example Value |
|---|---|---|
/etc/sysconfig/nfs
| MOUNTD_PORT | 21001 |
| STATD_PORT | 21002 | |
| LOCKD_TCPPORT | 21003 | |
| LOCKD_UDPPORT | 21003 | |
| RQUOTAD_PORT | 21004 | |
/etc/sysconfig/ypbind
| YPBIND_OPTIONS | -p 24500 |
/etc/sysconfig/ypserv
| YPXFRD_ARGS | -p 24501 |
| YPSERV_ARGS | -p 24502 | |
| YPPASSWDD_ARGS | --port 24503 |
You need to restart any related services that are affected by these
static port configurations for the changes to take effect. You can see
the currently assigned rpcbind ports by using the command
rpcinfo -p. On success, the statically configured
ports should show up there.
Apart from the port configuration for network services running in
userspace there are also ports that are used by the Linux kernel directly
when it comes to NFS. One of these ports is
nfs_callback_tcpport. It is only required for NFS
protocol versions older than 4.1. There is a sysctl named
fs.nfs.nfs_callback_tcpport to configure this port.
This sysctl node only appears dynamically when NFS mounts are active.
Therefore it is best to configure the port via kernel module
parameters. This can be achieved by creating a file as shown in
Example 23.1, “Callback port configuration for the nfs kernel module in /etc/modprobe.d/60-nfs.conf”.
Example 23.1: Callback port configuration for the nfs kernel module in /etc/modprobe.d/60-nfs.conf #
options nfs callback_tcpport=21005
To make this change effective it is easiest to reboot the machine.
Otherwise all NFS services need to be stopped and the
nfs kernel module needs to be reloaded. To verify the
active NFS callback port, check the output of
cat /sys/module/nfs/parameters/callback_tcpport.
For easy handling of the now statically configured RPC ports, it is useful
to create a new firewalld service definition. This service definition
groups all related ports and, for example, makes it easy to make them
accessible in a specific zone. In
Example 23.2, “Commands to define a new firewalld RPC service for NFS” this is done for the
NFS ports as they have been configured in the accompanying examples.
Example 23.2: Commands to define a new firewalld RPC service for NFS #
#firewall-cmd --permanent --new-service=nfs-rpc#firewall-cmd --permanent --service=nfs-rpc --set-description="NFS related, statically configured RPC ports"# add UDP and TCP ports for the given sequence#for port in 21001 21002 21003 21004; do firewall-cmd --permanent --service=nfs-rpc --add-port ${port}/udp --add-port ${port}/tcp done# the callback port is TCP only#firewall-cmd --permanent --service=nfs-rpc --add-port 21005/tcp# show the complete definition of the new custom service#firewall-cmd --info-service=nfs-rpc --permanent -vnfs-rpc summary: description: NFS and related, statically configured RPC ports ports: 4711/tcp 21001/udp 21001/tcp 21002/udp 21002/tcp 21003/udp 21003/tcp 21004/udp 21004/tcp protocols: source-ports: modules: destination: # reload firewalld to make the new service definition available#firewall-cmd --reload# the new service definition can now be used to open the ports for example in the internal zone#firewall-cmd --add-service=nfs-rpc --zone=internal
23.4.2.2 Using firewall-rpcbind-helper for configuring static ports #Edit source
The steps to configure static ports as shown in the previous section can
be simplified by using the SUSE helper tool
firewall-rpc-helper.py. Install it with
zypper in firewalld-rpcbind-helper.
The tool allows interactive configuration of the service patterns
discussed in the previous section. It can also display current port
assignments and can be used for scripting. For details, see
firewall-rpc-helper.py --help.
23.5 Migrating from SuSEfirewall2 #Edit source
Note: Creating a firewalld configuration for AutoYaST
See the Firewall Configuration section of the
AutoYaST Guide to learn how to create a firewalld configuration for AutoYaST.
When upgrading from
any version of openSUSE Leap before 15.0
to openSUSE Leap 15.6, SuSEfirewall2
is not changed and remains active. There is no automatic migration, so you must
migrate to firewalld manually. firewalld includes a helper migration
script, susefirewall2-to-firewalld. Depending on the
complexity of your SuSEfirewall2 configuration, the script may perform a
perfect migration, or it may fail. Most likely it will partially succeed and you
have to review your new firewalld configuration and make adjustments.
The resulting configuration makes firewalld behave somewhat like
SuSEfirewall2. To take full advantage of firewalld's features, you may elect to
create a new configuration, rather than trying to migrate your old configuration.
It is safe to run the susefirewall2-to-firewalld script
with no options, as it makes no permanent changes to your system. However, if
you are administering the system remotely you could get locked out.
Install and run susefirewall2-to-firewalld:
#zypper in susefirewall2-to-firewalld#susefirewall2-to-firewalld INFO: Reading the /etc/sysconfig/SuSEfirewall2 file INFO: Ensuring all firewall services are in a well-known state. INFO: This will start/stop/restart firewall services and it's likely INFO: to cause network disruption. INFO: If you do not wish for this to happen, please stop the script now! 5...4...3...2...1...Lets do it! INFO: Stopping firewalld INFO: Restarting SuSEfirewall2_init INFO: Restarting SuSEfirewall2 INFO: DIRECT: Adding direct rule="ipv4 -t filter -A INPUT -p udp -m udp --dport 5353 -m pkttype --pkt-type multicast -j ACCEPT" [...] INFO: Enabling direct rule=ipv6 -t filter -A INPUT -p udp -m udp --dport 546 -j ACCEPT INFO: Enabling direct rule=ipv6 -t filter -A INPUT -p udp -m udp --dport 5353 -m pkttype --pkt-type multicast -j ACCEPT INFO: Enable logging for denied packets INFO: ########################################################## INFO: INFO: The dry-run has been completed. Please check the above output to ensure INFO: that everything looks good. INFO: INFO: ########################################################### INFO: Stopping firewalld INFO: Restarting SuSEfirewall2_init INFO: Restarting SuSEfirewall2
This results in a lot of output, which you may wish to direct to a file for easier review:
# susefirewall2-to-firewalld | tee newfirewallrules.txtThe script supports these options:
-cCommit changes. The script makes changes to the system, so make sure you only use this option if you are really happy with the proposed changes. This will reset your current
firewalldconfiguration, so make sure you make backups!-dSuper noisy. Use it to file bug reports but be careful to mask sensitive information.
-hThis message.
-qNo output. Errors will not be printed either!
-vVerbose mode. It will print warnings and other informative messages.
23.6 More information #Edit source
The most up-to-date information and other documentation about the firewalld
package is found in /usr/share/doc/packages/firewalld.
The home page of the netfilter and iptables project, https://www.netfilter.org, provides a large collection of
documents about iptables in general in many languages.
24 Configuring a VPN server #Edit source
Abstract#
Internet connections are easily available and affordable. However, not all connections are secure. Using a Virtual Private Network (VPN), you can create a secure network within an insecure network such as the Internet or Wi-Fi. It can be implemented in different ways and serves several purposes. In this chapter, we focus on the OpenVPN implementation to link branch offices via secure wide area networks (WANs).
24.1 Conceptual overview #Edit source
This section defines some terms regarding VPN and gives a brief overview of some scenarios.
24.1.1 Terminology #Edit source
- Endpoint
The two “ends” of a tunnel, the source or destination client.
- Tap device
A tap device simulates an Ethernet device (layer 2 packets in the OSI model, such as Ethernet frames). A tap device is used for creating a network bridge. It works with Ethernet frames.
- Tun device
A tun device simulates a point-to-point network (layer 3 packets in the OSI model, such as IP packets). A tun device is used with routing and works with IP frames.
- Tunnel
Linking two locations through a primarily public network. From a more technical viewpoint, it is a connection between the client's device and the server's device. A tunnel is encrypted, but it does need to be by definition.
24.1.2 VPN scenarios #Edit source
Whenever you set up a VPN connection, your IP packets are transferred over a secured tunnel. A tunnel can use either a tun or tap device. They are virtual network kernel drivers which implement the transmission of Ethernet frames or IP frames/packets.
Any user space program, such as OpenVPN, can attach itself to a tun or tap device to receive packets sent by your operating system. The program is also able to write packets to the device.
There are many solutions to set up and build a VPN connection. This section focuses on the OpenVPN package. Compared to other VPN software, OpenVPN can be operated in two modes:
- Routed VPN
Routing is an easy solution to set up. It is more efficient and scales better than a bridged VPN. Furthermore, it allows the user to tune MTU (Maximum Transfer Unit) to raise efficiency. However, in a heterogeneous environment, if you do not have a Samba server on the gateway, NetBIOS broadcasts do not work. If you need IPv6, the drivers for the tun devices on both ends must support this protocol explicitly. This scenario is depicted in Figure 24.1, “Routed VPN”.
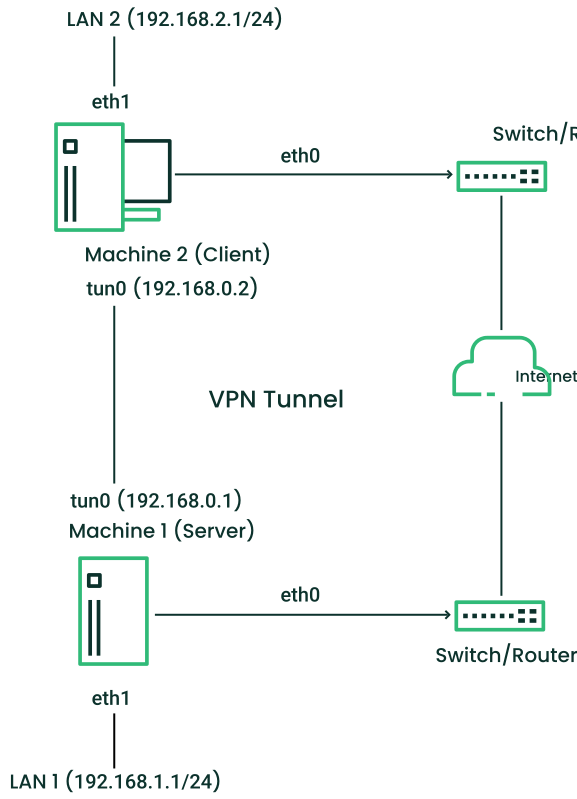
Figure 24.1: Routed VPN #
- Bridged VPN
Bridging is a more complex solution. It is recommended when you need to browse Windows file shares across the VPN without setting up a Samba or WINS server. Bridged VPN is also needed to use non-IP protocols (such as IPX) or applications relying on network broadcasts. However, it is less efficient than routed VPN. Another disadvantage is that it does not scale well. This scenario is depicted in the following figures.
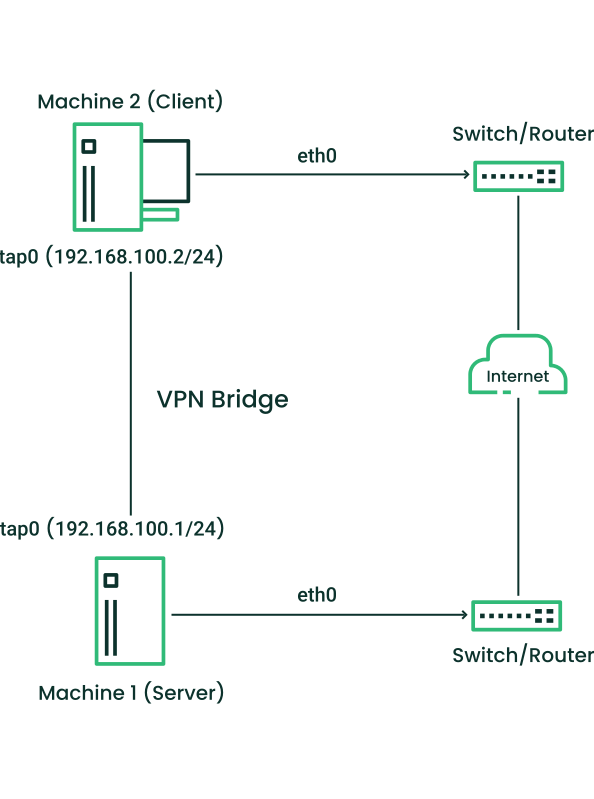
Figure 24.2: Bridged VPN - scenario 1 #
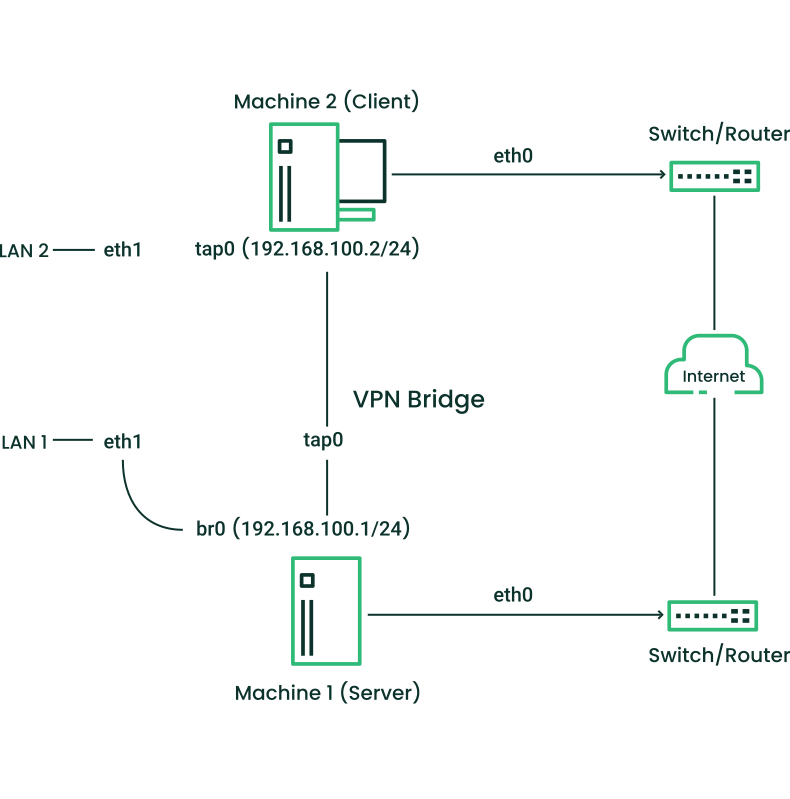
Figure 24.3: Bridged VPN - scenario 2 #
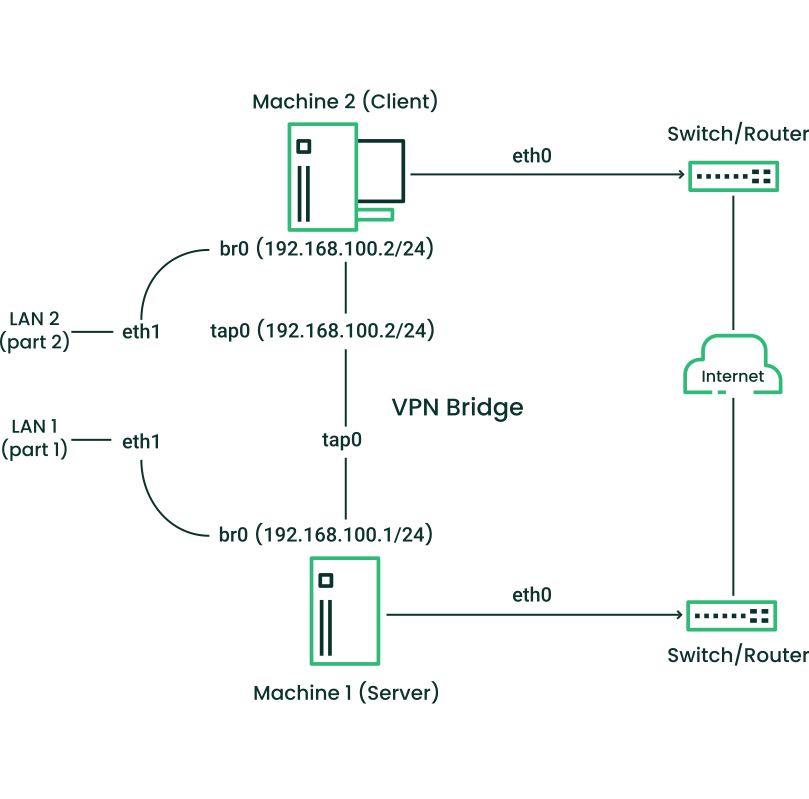
Figure 24.4: Bridged VPN - scenario 3 #
The major difference between bridging and routing is that a routed VPN cannot IP-broadcast while a bridged VPN can.
24.2 Setting up a simple test scenario #Edit source
In the following example, we create a point-to-point VPN tunnel. The
example demonstrates how to create a VPN tunnel between one client and a
server. It is assumed that your VPN server uses private IP addresses
like IP_OF_SERVER
and your client uses the IP address
IP_OF_CLIENT.
Make sure you select addresses which do not conflict with other IP addresses.
Warning: Use only for testing
This following scenario is provided as an example meant for familiarizing yourself with VPN technology. Do not use this as a real world scenario, as it can compromise the security and safety of your IT infrastructure.
Tip: Names for configuration file
To simplify working with OpenVPN configuration files, we recommend the following:
Place your OpenVPN configuration files in the directory
/etc/openvpn.Name your configuration files
MY_CONFIGURATION.conf.If there are multiple files that belong to the same configuration, place them in a subdirectory like
/etc/openvpn/MY_CONFIGURATION.
24.2.1 Configuring the VPN server #Edit source
To configure a VPN server, proceed as follows:
Procedure 24.1: VPN server configuration #
Install the package
openvpnon the machine that later becomes your VPN server.Open a shell, become
rootand create the VPN secret key:#openvpn --genkey secret /etc/openvpn/secret.keyCopy the secret key to your client:
#scp /etc/openvpn/secret.key root@IP_OF_CLIENT:/etc/openvpn/Create the file
/etc/openvpn/server.confwith the following content:dev tun ifconfig IP_OF_SERVER IP_OF_CLIENT secret secret.key
Set up a tun device configuration by creating a file called
/etc/sysconfig/network/ifcfg-tun0with the following content:STARTMODE='manual' BOOTPROTO='static' TUNNEL='tun' TUNNEL_SET_OWNER='nobody' TUNNEL_SET_GROUP='nobody' LINK_REQUIRED=no PRE_UP_SCRIPT='systemd:openvpn@server' PRE_DOWN_SCRIPT='systemd:openvpn@service'
The notation
openvpn@serverpoints to the OpenVPN server configuration file located at/etc/openvpn/server.conf. For more information, see/usr/share/doc/packages/openvpn/README.SUSE.If you use a firewall, start YaST and open UDP port 1194 ( › › ).
Start the OpenVPN server service by setting the tun device to
up:>sudowicked ifup tun0You should see the confirmation:
tun0 up
24.2.2 Configuring the VPN clients #Edit source
To configure the VPN client, do the following:
Procedure 24.2: VPN client configuration #
Install the package
openvpnon your client VPN machine.Create
/etc/openvpn/client.confwith the following content:remote DOMAIN_OR_PUBLIC_IP_OF_SERVER dev tun ifconfig IP_OF_CLIENT IP_OF_SERVER secret secret.key
Replace the placeholder IP_OF_CLIENT in the first line with either the domain name, or the public IP address of your server.
Set up a tun device configuration by creating a file called
/etc/sysconfig/network/ifcfg-tun0with the following content:STARTMODE='manual' BOOTPROTO='static' TUNNEL='tun' TUNNEL_SET_OWNER='nobody' TUNNEL_SET_GROUP='nobody' LINK_REQUIRED=no PRE_UP_SCRIPT='systemd:openvpn@client' PRE_DOWN_SCRIPT='systemd:openvpn@client'
If you use a firewall, start YaST and open UDP port 1194 as described in Step 6 of Procedure 24.1, “VPN server configuration”.
Start the OpenVPN server service by setting the tun device to
up:>sudowicked ifup tun0You should see the confirmation:
tun0 up
24.2.3 Testing the VPN example scenario #Edit source
After OpenVPN has successfully started, test the availability of the tun device with the following command:
ip addr show tun0
To verify the VPN connection, use ping on both client
and server side to see if they can reach each other. Ping the server
from the client:
ping -I tun0 IP_OF_SERVER
Ping the client from the server:
ping -I tun0 IP_OF_CLIENT
24.3 Setting up your VPN server using a certificate authority #Edit source
The example in Section 24.2 is useful for testing, but not for daily work. This section explains how to build a VPN server that allows more than one connection at the same time. This is done with a public key infrastructure (PKI). A PKI consists of a pair of public and private keys for the server and each client, and a certificate authority (CA), which is used to sign every server and client certificate.
This setup involves the following basic steps:
24.3.1 Creating certificates #Edit source
Before a VPN connection can be established, the client must authenticate the server certificate. Conversely, the server must also authenticate the client certificate. This is called mutual authentication.
Creating certificates is not supported on openSUSE Leap. The following assumes you have created a CA certificate, a server certificate, and a client certificate on another system.
The server certificate is required in the PEM and unencrypted
key in PEM formats. Copy the PEM version to
/etc/openvpn/server_crt.pem on the VPN server. The
unencrypted version needs to go to
/etc/openvpn/server_key.pem.
Client certificates need to be of the format PKCS12 (preferred) or PEM. The
certificate in PKCS12 format needs to contain the CA chain and needs to be
copied to
/etc/openvpn/CLIENT.p12. In
case you have client certificates in PEM format containing the CA chain,
copy them to
/etc/openvpn/CLIENT.pem. In
case you have split the PEM certificates into client certificate
(*.ca), client key (*.key), and
the CA certificate (*.ca), copy these files to
/etc/openvpn/ on each client.
The CA certificate needs to be copied to
/etc/openvpn/vpn_ca.pem on the server and each client.
Important: Splitting client certificates
If you split client certificates into client certificate, client key, and the CA certificate, you need to provide the respective file names in the OpenVPN configuration file on the respective clients (see Example 24.1, “VPN server configuration file”).
24.3.2 Configuring the VPN server #Edit source
As the basis of your configuration file, copy
/usr/share/doc/packages/openvpn/sample-config-files/server.conf
to /etc/openvpn/. Then customize it to your needs.
Example 24.1: VPN server configuration file #
# /etc/openvpn/server.conf port 1194 1 proto udp 2 dev tun0 3 # Security 4 ca vpn_ca.pem cert server_crt.pem key server_key.pem # ns-cert-type server remote-cert-tls client 5 dh server/dh2048.pem 6 server 192.168.1.0 255.255.255.0 7 ifconfig-pool-persist /var/run/openvpn/ipp.txt 8 # Privileges 9 user nobody group nobody # Other configuration 10 keepalive 10 120 comp-lzo persist-key persist-tun # status /var/log/openvpn-status.tun0.log 11 # log-append /var/log/openvpn-server.log 12 verb 4
The TCP/UDP port on which OpenVPN listens. You need to open the port in the firewall, see Chapter 23, Masquerading and firewalls. The standard port for VPN is 1194, so you can leave that as it is. | |
The protocol, either UDP or TCP. | |
The tun or tap device. For the difference between these, see Section 24.1.1, “Terminology”. | |
The following lines contain the relative or absolute path to the root
server CA certificate ( | |
Require that peer certificates have been signed with an explicit key usage and extended key usage based on RFC3280 TLS rules. | |
The Diffie-Hellman parameters. Create the required file with the following command: openssl dhparam -out /etc/openvpn/dh2048.pem 2048 | |
Supplies a VPN subnet. The server can be reached by
| |
Records a mapping of clients and its virtual IP address in the given file. Useful when the server goes down and (after the restart) the clients get their previously assigned IP address. | |
For security reasons, run the OpenVPN daemon with reduced privileges. To
do so, specify that it should use the group and user
| |
Several configuration options—see the comment in the
example configuration file:
| |
Enable this option to write short status updates with statistical data (“operational status dump”) to the named file. By default, this is not enabled.
All output is written to the system journal, which can be displayed with
| |
By default, log messages go to syslog. Overwrite this behavior by
removing the hash character. In that case, all messages go to
|
After having completed this configuration, you can see log messages of
your OpenVPN server under /var/log/openvpn.log.
After having started it for the first time, it should finish with:
... Initialization Sequence Completed
If you do not see this message, check the log carefully for any hints of what is wrong in your configuration file.
24.3.3 Configuring the VPN clients #Edit source
As the basis of your configuration file, copy
/usr/share/doc/packages/openvpn/sample-config-files/client.conf
to /etc/openvpn/. Then customize it to your needs.
Example 24.2: VPN client configuration file #
# /etc/openvpn/client.conf client 1 dev tun 2 proto udp 3 remote IP_OR_HOST_NAME 1194 4 resolv-retry infinite nobind remote-cert-tls server 5 # Privileges 6 user nobody group nobody # Try to preserve some state across restarts. persist-key persist-tun # Security 7 pkcs12 client1.p12 comp-lzo 8
Specifies that this machine is a client. | |
The network device. Both clients and server must use the same device. | |
The protocol. Use the same settings as on the server. | |
This is security option for clients which ensures that the host they connect to is a designated server. | |
Replace the placeholder IP_OR_HOST_NAME
with the respective host name or IP address of your VPN server. After
the host name, the port of the server is given. You can have multiple
lines of | |
For security reasons, run the OpenVPN daemon with reduced privileges. To
do so, specify that it should use the group and user
| |
Contains the client files. For security reasons, use a separate pair of files for each client. | |
Turn on compression. Only use this parameter if compression is enabled on the server as well. |
Setting up a VPN server or client using YaST #Edit source
You can also use YaST to set up a VPN server. However, the YaST module does not support OpenVPN. Instead, it provides support for the IPsec protocol (as implemented in the software StrongSwan). Like OpenVPN, IPsec is a widely supported VPN scheme.
Procedure 24.3: Setting up an IPsec server #
To start the YaST VPN module, select › .
Under , activate .
To create a new VPN, click , then enter a name for the connection.
Under , select .
Then choose the scenario:
The scenarios and are best suited to Linux client setups.
The scenario sets up a configuration that is natively supported by modern versions of Android, iOS, and macOS. It is based on a pre-shared key setup with an additional user name and password authentication.
The scenario is a configuration that is natively supported by Windows and BlackBerry devices. It is based on a certificate setup with an additional user name and password authentication.
For this example, choose .
To specify the key, click . Activate , then type the secret key. Confirm with .
Choose whether and how to limit access within your VPN under . To enable only certain IP ranges, specify these in CIDR format, separated by commas in . For more information about the CIDR format, see https://en.wikipedia.org/wiki/Classless_Inter-Domain_Routing.
Under , specify the format of IP addresses your VPN should provide to its clients.
To finish, click . The YaST VPN module automatically adds and enables firewall rules to allow clients to connect to the new VPN.
To view the connection status, in the following confirmation window, click . You can see the output of
systemctl statusfor your VPN, which allows you to check if the VPN is running and configured correctly.
24.5 More information #Edit source
For more information on setting up a VPN connection using NetworkManager, see Book “Reference”, Chapter 28 “Using NetworkManager”, Section 28.3.4 “NetworkManager and VPN”.
For more information about VPN, see:
https://openvpn.net: the OpenVPN home page
manopenvpn/usr/share/doc/packages/openvpn/sample-config-files/: example configuration files for different scenarios./usr/src/linux/Documentation/networking/tuntap.txt, to install thekernel-sourcepackage.
25 Managing a PKI with XCA, X certificate and key manager #Edit source
Abstract#
Managing your own public key infrastructure (PKI) is traditionally
done with the openssl utility. For admins who
prefer a graphical tool, openSUSE Leap 15.6 includes XCA,
the X Certificate and Key management tool
(https://hohnstaedt.de/xca).
XCA creates and manages X.509 certificates, certificate requests, RSA, DSA and EC private keys, Smartcards and certificate revocation lists (CRLs). XCA supports everything you need to create and manage your own certificate authority (CA). XCA includes customizable templates that can be used for certificate or request generation. This chapter describes a basic setup.
25.2 Creating a new PKI #Edit source
XCA stores all cryptographic data in a database. When you are using XCA for the first time, and creating a new PKI, you must first create a new database by clicking (Figure 25.1, “Create a new XCA database”).
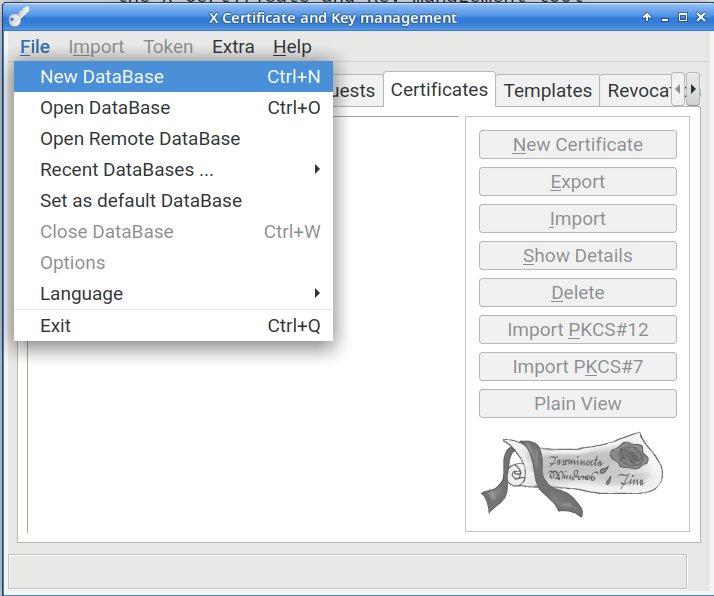
Figure 25.1: Create a new XCA database #
25.2.1 Creating a new root CA #Edit source
The following steps describe how to create a new root CA.
Click the tab.
Click the button.
Click the tab. At the bottom of the window, under , select the template, then click .
Click the tab. Create an , which identifies your new root CA internally, in XCA only.
Complete the fields in the section. Use the button to add any additional elements, if you require any.
In the drop-down, select your preferred private key if you have one, or generate a new key.
Click the tab. Edit any attributes as necessary. The default is 10 years. The certificate revocation list distribution point is part of the issued certificates, and it is a good practice to use a common URL for all your certificates, for example, http://www.example.com/crl/crl.der. When you are finished click the button.
25.2.2 Creating a signed host certificate #Edit source
The next step is to create a host certificate signed by your new certificate authority.
Click the tab, then click the button.
On the tab, select the and click the button. This enters the appropriate values in the , , and tabs. In the section, select the certificate that you created in Section 25.2.1, “Creating a new root CA”.
Click the tab. Create an internal name, which is for display purposes in XCA. A good practice is to use the host name, or the fully qualified domain name. Then fill in the fields in the section. For host certificates, the common name must be the FQDN that your users use. This can be the canonical name of the host, or an alias. For example, if jupiter.example.com is your web server and it has a DNS CNAME entry of www.example.com, then you want the value in the certificate to be www.example.com. To add any additional parts to the distinguished name, use the drop-down box and Add button. Select the desired private key or generate a new one.
Click the tab. The default is one year. If you change this, click the button.
It is a good practice to designate a certificate revocation list location. The location must be unique for this root certificate. XCA exports CRLs in either PEM or DER format with appropriate suffixes, so this should be considered when selecting the URL, for example something like http://www.example.com/crl/crl.der. On the line click the button. Type in your URI, then click . Click and .
Click the button.
25.2.3 Revoking a Certificate #Edit source
Click the tab.
Right-click the certificate that you want to revoke, then click .
Right-click the CA certificate that signed the certificate you want to revoke. Click .
Click the button in the dialog.
Click the tab in the main window. Right-click the CRL you just generated and select t. Select the desired format (DER) and click .
Copy the exported CRL to the location published in the issued certificate's .
26 Improving network security with sysctl variables #Edit source
Sysctl (system control) variables control certain kernel parameters that
influence the behavior of different parts of the operating system, for example
the Linux network stack. These parameters can be looked up in the
proc file system, in /proc/sys. Many
kernel parameters can be changed directly by writing a new value into a
parameter pseudo file. However, these changes are not persisted and are lost
after a system reboot. Therefore, we recommend configuring all changes in
a sysctl configuration file to have them applied at every system start.
In this chapter, several networking related variables are configured
that improve the security features of Linux. Depending on the presence of a
firewall and its settings, certain variables listed here already
have the safe values by default. You can check the current value of a setting
by using the sysctl utility like this:
> /sbin/sysctl net.ipv4.conf.all.rp_filter
net.ipv4.conf.all.rp_filter = 2
To apply the following settings, create a configuration file
/etc/sysctl.d/. The file needs to end with a
.conf suffix, for example
/etc/sysctl.d/network.conf. For details, refer to
man 5 sysctl.d.
Set the variables from the following list as appropriate for your environment.
# the default setting for this is 2 (loose mode) net.ipv4.conf.default.rp_filter = 1 net.ipv4.conf.all.rp_filter = 1
This setting enables the IPv4 reverse path filter in strict mode. It ensures that answers to incoming IP packets are always sent out via the interface from that the packets have been received. If the system would direct answer packets to a different outgoing interface according to the routing table, these packets would be discarded. The setting prevents certain kinds of IP spoofing attacks that are, for example, used for distributed denial-of-service (DDoS) attacks.
# the default setting for this should already be 0 net.ipv4.conf.default.accept_source_route = 0 net.ipv4.conf.all.accept_source_route = 0
This setting disables the acceptance of packets with the
SSRoption set in the IPv4 packet header. Packets that use Source Routing are rejected. This prevents IP packet redirection, that is redirection to a host behind a firewall, that is not directly reachable otherwise.# the default setting for this should already be 1 net.ipv4.tcp_syncookies = 1
This enables TCP SYN Cookie Protection for IPv4 and IPv6. It addresses a specific denial-of-service attack on the TCP protocol level. The protection involves a small CPU trade-off in favor of avoiding memory exhaustion caused by attackers. The protection mechanism consists of a fallback algorithm that only comes into play when no further TCP connections can be accepted the normal way. The mechanism is not fully TCP protocol compliant and can thus cause protocol issues in certain TCP contexts. The alternative would be to drop additional connections in overload scenarios. This also needs a differentiation between legitimate high TCP load and a TCP denial-of-service attack. If you expect a high load of TCP connections on your system, then this setting could be counterproductive.
# default is 128 net.ipv4.tcp_max_syn_backlog = 4096
The TCP SYN backlog defines the number of SYN packets that are queued for further processing. Once the queue limit is exceeded, all new incoming SYN-packets are dropped and new TCP connections are not possible (or the SYN cookie protection kicks in). Increasing this value improves the protection against TCP SYN flood attacks.
# the default setting for this should already be 1 net.ipv4.icmp_echo_ignore_broadcasts = 1
ICMP echo requests (ping) can be sent to an IPv4 broadcast address in order to scan a network for existing hosts / IP addresses or to perform an ICMP flood within a network segment. This setting causes the networking stack to ignore ICMP echo packets sent to a broadcast address.
# the default setting for this should already be 1 net.ipv4.icmp_ignore_bogus_error_responses = 1
This setting avoids filling up log files with unnecessary error messages coming from invalid responses to broadcast frames. Refer to RFC 1122 Requirements for Internet Hosts -- Communication Layers Section 3.2.2 for more information.
# default should already be 0 net.ipv4.conf.default.accept_redirects = 0 net.ipv4.conf.all.accept_redirects = 0 net.ipv6.conf.default.accept_redirects = 0 net.ipv6.conf.all.accept_redirects = 0
Disables the acceptance of ICMP redirect messages. These messages are sent by gateways to inform a host about a better route to an outside network. These redirects can be misused for man-in-the-middle attacks.
net.ipv4.conf.default.secure_redirects = 0 net.ipv4.conf.all.secure_redirects = 0
Accepting 'secure' ICMP redirects (from those gateways listed as default gateways) has few legitimate uses. It should be disabled unless it is absolutely required.
net.ipv4.conf.default.send_redirects = 0 net.ipv4.conf.all.send_redirects = 0
A node should not send IPv4 ICMP redirects, unless it acts as a router.
# default should already be 0 net.ipv4.ip_forward = 0 net.ipv6.conf.all.forwarding = 0 net.ipv6.conf.default.forwarding = 0
IP forwarding should only be enabled on systems acting as routers.
Part IV Confining privileges with AppArmor #Edit source
- 27 Introducing AppArmor
Many security vulnerabilities result from bugs in trusted programs. A trusted program runs with privileges that attackers want to possess. The program fails to keep that trust if there is a bug in the program that allows the attacker to acquire said privilege.
- 28 Getting started
Prepare a successful deployment of AppArmor on your system by carefully considering the following items:
- 29 Immunizing programs
Effective hardening of a computer system requires minimizing the number of programs that mediate privilege, then securing the programs as much as possible. With AppArmor, you need to profile the programs that are exposed to attack in your environment, which drastically reduces the amount of work req…
- 30 Profile components and syntax
Building AppArmor profiles to confine an application is straightforward and intuitive. AppArmor ships with several tools that assist in profile creation. It does not require you to do any programming or script handling. The only task that is required of the administrator is to determine a policy of …
- 31 AppArmor profile repositories
AppArmor ships with a set of profiles enabled by default. These are created by the AppArmor developers, and are stored in /etc/apparmor.d. In addition to these profiles, openSUSE Leap ships profiles for individual applications together with the relevant application. These profiles are not enabled by…
- 32 Building and managing profiles with YaST
YaST provides a basic way to build profiles and manage AppArmor® profiles. It provides two interfaces: a graphical one and a text-based one. The text-based interface consumes less resources and bandwidth, making it a better choice for remote administration, or for times when a local graphical enviro…
- 33 Building profiles from the command line
AppArmor® provides the user the ability to use a command line interface rather than a graphical interface to manage and configure the system security. Track the status of AppArmor and create, delete or modify AppArmor profiles using the AppArmor command line tools.
- 34 Profiling your Web applications using ChangeHat
An AppArmor® profile represents the security policy for an individual program instance or process. It applies to an executable program, but if a portion of the program needs different access permissions than other portions, the program can “change hats” to use a different security context, distincti…
- 35 Confining users with
pam_apparmor An AppArmor profile applies to an executable program; if a portion of the program needs different access permissions than other portions need, the program can change hats via change_hat to a different role, also known as a subprofile. The pam_apparmor PAM module allows applications to confine authen…
- 36 Managing profiled applications
After creating profiles and immunizing your applications, openSUSE® Leap becomes more efficient and better protected if you perform AppArmor® profile maintenance (which involves analyzing log files, refining your profiles, backing up your set of profiles and keeping it up-to-date). You can deal with…
- 37 Support
This chapter outlines maintenance-related tasks. Learn how to update AppArmor® and get a list of available man pages providing basic help for using the command line tools provided by AppArmor. Use the troubleshooting section to learn about common problems encountered with AppArmor and their solution…
- 38 AppArmor glossary
See profile foundation classes below.
27 Introducing AppArmor #Edit source
Many security vulnerabilities result from bugs in trusted programs. A trusted program runs with privileges that attackers want to possess. The program fails to keep that trust if there is a bug in the program that allows the attacker to acquire said privilege.
AppArmor® is an application security solution designed specifically to apply privilege confinement to suspect programs. AppArmor allows the administrator to specify the domain of activities the program can perform by developing a security profile. A security profile is a listing of files that the program may access and the operations the program may perform. AppArmor secures applications by enforcing good application behavior without relying on attack signatures, so it can prevent attacks even if previously unknown vulnerabilities are being exploited.
27.1 AppArmor components #Edit source
AppArmor consists of:
A library of AppArmor profiles for common Linux* applications, describing what files the program needs to access.
A library of AppArmor profile foundation classes (profile building blocks) needed for common application activities, such as DNS lookup and user authentication.
A tool suite for developing and enhancing AppArmor profiles, so that you can change the existing profiles to suit your needs and create new profiles for your own local and custom applications.
Several specially modified applications that are AppArmor enabled to provide enhanced security in the form of unique subprocess confinement (including Apache).
The AppArmor-related kernel code and associated control scripts to enforce AppArmor policies on your openSUSE® Leap system.
27.2 Background information on AppArmor profiling #Edit source
For more information about the science and security of AppArmor, refer to the following papers:
- SubDomain: Parsimonious Server Security by Crispin Cowan, Steve Beattie, Greg Kroah-Hartman, Calton Pu, Perry Wagle, and Virgil Gligor
Describes the initial design and implementation of AppArmor. Published in the proceedings of the USENIX LISA Conference, December 2000, New Orleans, LA. This paper is now out of date, describing syntax and features that are different from the current AppArmor product. This paper should be used only for background, and not for technical documentation.
- Defcon Capture the Flag: Defending Vulnerable Code from Intense Attack by Crispin Cowan, Seth Arnold, Steve Beattie, Chris Wright, and John Viega
A good guide to strategic and tactical use of AppArmor to solve severe security problems in a short period of time. Published in the Proceedings of the DARPA Information Survivability Conference and Expo (DISCEX III), April 2003, Washington, DC.
- AppArmor for Geeks by Seth Arnold
This document tries to convey a better understanding of the technical details of AppArmor. It is available at https://en.opensuse.org/SDB:AppArmor_geeks.
28 Getting started #Edit source
Prepare a successful deployment of AppArmor on your system by carefully considering the following items:
Determine the applications to profile. Read more on this in Section 28.3, “Choosing applications to profile”.
Build the needed profiles as roughly outlined in Section 28.4, “Building and modifying profiles”. Check the results and adjust the profiles when necessary.
Update your profiles whenever your environment changes or you need to react to security events logged by the reporting tool of AppArmor. Refer to Section 28.5, “Updating your profiles”.
28.1 Installing AppArmor #Edit source
AppArmor is installed and running on any installation of openSUSE® Leap by default, regardless of what patterns are installed. The packages listed below are needed for a fully functional instance of AppArmor:
apparmor-docsapparmor-parserapparmor-profilesapparmor-utilsauditlibapparmor1perl-libapparmoryast2-apparmor
Tip
If AppArmor is not installed on your system, install the pattern
apparmor for a complete
AppArmor installation. Either use the YaST Software Management
module for installation, or use Zypper on the command line:
>sudozypper in -t pattern apparmor
28.2 Enabling and disabling AppArmor #Edit source
AppArmor is configured to run by default on any fresh installation of openSUSE Leap. There are two ways of toggling the status of AppArmor:
- Using YaST services manager
Disable or enable AppArmor by removing or adding its boot script to the sequence of scripts executed on system boot. Status changes are applied on reboot.
- Using AppArmor configuration window
Toggle the status of AppArmor in a running system by switching it off or on using the YaST AppArmor Control Panel. Changes made here are applied instantaneously. The Control Panel triggers a stop or start event for AppArmor and removes or adds its boot script in the system's boot sequence.
To disable AppArmor permanently (by removing it from the sequence of scripts executed on system boot) proceed as follows:
Start YaST.
Select › .
Mark
apparmorby clicking its row in the list of services, then click in the lower part of the window. Check that changed to in theapparmorrow.Confirm with .
AppArmor is not initialized on reboot and stays inactive until you re-enable it. Re-enabling a service using the YaST tool is similar to disabling it.
Toggle the status of AppArmor in a running system by using the AppArmor Configuration window. These changes take effect when you apply them and survive a reboot of the system. To toggle the status of AppArmor, proceed as follows:
Start YaST, select , and click in the main window.
Enable AppArmor by checking or disable AppArmor by deselecting it.
Click in the window.
28.3 Choosing applications to profile #Edit source
You need to protect the programs that are exposed to attacks in your particular setup, so use profiles for those applications you run. Use the following list to determine the candidates:
| Network Agents |
| Web Applications |
| Cron Jobs |
To find out which processes are currently running with open network ports
and might need a profile to confine them, run
aa-unconfined as root.
Example 28.1: Output of aa-unconfined #
19848 /usr/sbin/cupsd not confined 19887 /usr/sbin/sshd not confined 19947 /usr/lib/postfix/master not confined 1328 /usr/sbin/smbd confined by '/usr/sbin/smbd (enforce)'
Each of the processes in the above example labeled not
confined might need a custom profile to confine it. Those
labeled confined by are already protected by AppArmor.
Tip: More information
For more information about choosing the right applications to profile, refer to Section 29.2, “Determining programs to immunize”.
28.4 Building and modifying profiles #Edit source
AppArmor on openSUSE Leap ships with a preconfigured set of profiles for the most important applications. Additionally, you can use AppArmor to create your own profiles for any application you want.
There are two ways of managing profiles. One is to use the graphical front-end provided by the YaST AppArmor modules and the other is to use the command-line tools provided by the AppArmor suite itself. The main difference is that YaST supports basic functionality for AppArmor profiles, while the command-line tools let you update/tune the profiles in a more fine-grained way.
For each application, perform the following steps to create a profile:
As
root, let AppArmor create a rough outline of the application's profile by runningaa-genprofPROGRAM_NAME.or
Outline the basic profile by running › › › and specifying the complete path to the application you want to profile.
A new basic profile is outlined and put into learning mode, which means that it logs any activity of the program you are executing, but does not yet restrict it.
Run the full range of the application's actions to let AppArmor get a specific picture of its activities.
Let AppArmor analyze the log files generated in Step 2 by typing S in aa-genprof.
AppArmor scans the logs it recorded during the application's run and asks you to set the access rights for each event that was logged. Either set them for each file or use globbing.
Depending on the complexity of your application, it might be necessary to repeat Step 2 and Step 3. Confine the application, exercise it under the confined conditions, and process any new log events. To properly confine the full range of an application's capabilities, you might be required to repeat this procedure often.
When you finish
aa-genprof, your profile is set to enforce mode. The profile is applied and AppArmor restricts the application according to it.If you started
aa-genprofon an application that had an existing profile that was in complain mode, this profile remains in learning mode upon exit of this learning cycle. For more information about changing the mode of a profile, refer to Section 33.7.3.2, “aa-complain—entering complain or learning mode” and Section 33.7.3.6, “aa-enforce—entering enforce mode”.
Test your profile settings by performing every task you need with the application you confined. Normally, the confined program runs smoothly and you do not notice AppArmor activities. If you notice certain misbehavior with your application, check the system logs and see if AppArmor is too tightly confining your application. Depending on the log mechanism used on your system, there are several places to look for AppArmor log entries:
/var/log/audit/audit.log
|
The command journalctl | grep -i apparmor
|
The command dmesg -T
|
To adjust the profile, analyze the log messages relating to this application again as described in Section 33.7.3.9, “aa-logprof—scanning the system log”. Determine the access rights or restrictions when prompted.
Tip: More information
For more information about profile building and modification, refer to Chapter 30, Profile components and syntax, Chapter 32, Building and managing profiles with YaST, and Chapter 33, Building profiles from the command line.
28.5 Updating your profiles #Edit source
Software and system configurations change over time. As a result, your
profile setup for AppArmor might need certain fine-tuning from time to time.
AppArmor checks your system log for policy violations or other AppArmor
events and lets you adjust your profile set accordingly. Any application
behavior that is outside of any profile definition can be addressed by
aa-logprof. For more information, see
Section 33.7.3.9, “aa-logprof—scanning the system log”.
29 Immunizing programs #Edit source
Effective hardening of a computer system requires minimizing the number of programs that mediate privilege, then securing the programs as much as possible. With AppArmor, you need to profile the programs that are exposed to attack in your environment, which drastically reduces the amount of work required to harden your computer. AppArmor profiles enforce policies to make sure that programs do what they are supposed to do, but nothing else.
AppArmor provides immunization technologies that protect applications from the inherent vulnerabilities they possess. After installing AppArmor, setting up AppArmor profiles, and rebooting the computer, your system becomes immunized because it begins to enforce the AppArmor security policies. Protecting programs with AppArmor is called immunizing.
Administrators should concern themselves with the applications that are vulnerable to attacks, and generate profiles for these. Hardening a system thus comes down to building and maintaining the AppArmor profile set and monitoring any policy violations or exceptions logged by AppArmor's reporting facility.
Users should not notice AppArmor. It runs “behind the scenes” and does not require any user interaction. Performance is not noticeably affected by AppArmor. If certain activity of the application is not covered by an AppArmor profile or if some activity of the application is prevented by AppArmor, the administrator needs to adjust the profile of this application.
AppArmor sets up a collection of default application profiles to protect standard Linux services. To protect other applications, use the AppArmor tools to create profiles for the applications that you want protected. This chapter introduces the philosophy of immunizing programs. Proceed to Chapter 30, Profile components and syntax, Chapter 32, Building and managing profiles with YaST, or Chapter 33, Building profiles from the command line if you are ready to build and manage AppArmor profiles.
AppArmor provides streamlined access control for network services by specifying which files each program is allowed to read, write and execute, and which type of network it is allowed to access. This ensures that each program does what it is supposed to do, and nothing else. AppArmor quarantines programs to protect the rest of the system from being damaged by a compromised process.
AppArmor is a host intrusion prevention or mandatory access control scheme. Previously, access control schemes were centered around users because they were built for large timeshare systems. Alternatively, modern network servers do not permit users to log in, but instead provide a variety of network services for users (such as Web, mail, file and print servers). AppArmor controls the access given to network services and other programs to prevent weaknesses from being exploited.
Tip: Background information for AppArmor
To get a more in-depth overview of AppArmor and the overall concept behind it, refer to Section 27.2, “Background information on AppArmor profiling”.
29.1 Introducing the AppArmor framework #Edit source
This section provides a very basic understanding of what is happening “behind the scenes” (and under the hood of the YaST interface) when you run AppArmor.
An AppArmor profile is a plain text file containing path entries and access permissions. See Section 30.1, “Breaking an AppArmor profile into its parts” for a detailed reference profile. The directives contained in this text file are then enforced by the AppArmor routines to quarantine the process or program.
The following tools interact in the building and enforcement of AppArmor profiles and policies:
aa-statusaa-statusreports various aspects of the current state of the running AppArmor confinement.aa-unconfinedaa-unconfineddetects any application running on your system that listens for network connections and is not protected by an AppArmor profile. Refer to Section 33.7.3.12, “aa-unconfined—identifying unprotected processes” for detailed information about this tool.aa-autodepaa-autodepcreates a basic framework of a profile that needs to be fleshed out before it is put to use in production. The resulting profile is loaded and put into complain mode, reporting any behavior of the application that is not (yet) covered by AppArmor rules. Refer to Section 33.7.3.1, “aa-autodep—creating approximate profiles” for detailed information about this tool.aa-genprofaa-genprofgenerates a basic profile and asks you to refine this profile by executing the application and generating log events that need to be taken care of by AppArmor policies. You are guided through a series of questions to deal with the log events that have been triggered during the application's execution. After the profile has been generated, it is loaded and put into enforce mode. Refer to Section 33.7.3.8, “aa-genprof—generating profiles” for detailed information about this tool.aa-logprofaa-logprofinteractively scans and reviews the log entries generated by an application that is confined by an AppArmor profile in both complain and enforced modes. It assists you in generating new entries in the profile concerned. Refer to Section 33.7.3.9, “aa-logprof—scanning the system log” for detailed information about this tool.aa-easyprofaa-easyprofprovides an easy-to-use interface for AppArmor profile generation.aa-easyprofsupports the use of templates and policy groups to quickly profile an application. While this tool can help with policy generation, its utility is dependent on the quality of the templates, policy groups and abstractions used.aa-easyprofmay create a profile that is less restricted than creating the profile withaa-genprofandaa-logprof.aa-complainaa-complaintoggles the mode of an AppArmor profile from enforce to complain. Violations to rules set in a profile are logged, but the profile is not enforced. Refer to Section 33.7.3.2, “aa-complain—entering complain or learning mode” for detailed information about this tool.aa-enforceaa-enforcetoggles the mode of an AppArmor profile from complain to enforce. Violations to rules set in a profile are logged and not permitted—the profile is enforced. Refer to Section 33.7.3.6, “aa-enforce—entering enforce mode” for detailed information about this tool.aa-disableaa-disabledisables the enforcement mode for one or more AppArmor profiles. This command unloads the profile from the kernel and prevent it from being loaded on AppArmor start-up. Theaa-enforceandaa-complainutilities may be used to change this behavior.aa-execaa-execlaunches a program confined by the specified AppArmor profile and/or namespace. If both a profile and namespace are specified, the command is confined by the profile in the new policy namespace. If a namespace is specified, the profile name of the current confinement is used. If neither a profile or namespace is specified, the command runs using standard profile attachment—as if run withoutaa-exec.aa-notifyaa-notifyis a handy utility that displays AppArmor notifications in your desktop environment. You can also configure it to display a summary of notifications for the specified number of recent days. For more information, see Section 33.7.3.13, “aa-notify”.
29.2 Determining programs to immunize #Edit source
Now that you have familiarized yourself with AppArmor, start selecting the applications for which to build profiles. Programs that need profiling are those that mediate privilege. The following programs have access to resources that the person using the program does not have, so they grant the privilege to the user when used:
cronJobsPrograms that are run periodically by
cron. Such programs read input from a variety of sources and can run with special privileges, sometimes with as much asrootprivilege. For example,croncan run/usr/sbin/logrotatedaily to rotate, compress or even mail system logs. For instructions for finding these types of programs, refer to Section 29.3, “Immunizingcronjobs”.- Web applications
Programs that can be invoked through a Web browser, including CGI Perl scripts, PHP pages, and more complex Web applications. For instructions for finding these types of programs, refer to Section 29.4.1, “Immunizing web applications”.
- Network agents
Programs (servers and clients) that have open network ports. User clients, such as mail clients and Web browsers mediate privilege. These programs run with the privilege to write to the user's home directory and they process input from potentially hostile remote sources, such as hostile Web sites and e-mailed malicious code. For instructions for finding these types of programs, refer to Section 29.4.2, “Immunizing network agents”.
Conversely, unprivileged programs do not need to be profiled. For
example, a shell script might invoke the cp
program to copy a file. Because cp does not by
default have its own profile or subprofile, it inherits the profile
of the parent shell script. Thus cp can copy any
files that the parent shell script's profile can read and write.
29.3 Immunizing cron jobs #Edit source
To find programs that are run by
cron, inspect your local
cron configuration.
cron configuration
is rather complex, so there are many files to inspect. Periodic
cron jobs are run from these
files:
/etc/crontab /etc/cron.d/* /etc/cron.daily/* /etc/cron.hourly/* /etc/cron.monthly/* /etc/cron.weekly/*
The crontab command lists/edits the current user's
crontab. To manipulate root's
cron jobs, first become
root, and then edit the tasks with crontab -e
or list them with crontab -l.
29.4 Immunizing network applications #Edit source
An automated method for finding network server daemons that should be
profiled is to use the aa-unconfined tool.
The aa-unconfined tool uses the command
netstat -nlp to inspect open ports from inside your
computer, detect the programs associated with those ports, and inspect
the set of AppArmor profiles that you have loaded.
aa-unconfined then reports these programs along with
the AppArmor profile associated with each program, or reports
“none” (if the program is not confined).
Note
If you create a new profile, you must restart the program that has been profiled to have it be effectively confined by AppArmor.
Below is a sample aa-unconfined output:
37021 /usr/sbin/sshd2 confined by '/usr/sbin/sshd3 (enforce)' 4040 /usr/sbin/smbd confined by '/usr/sbin/smbd (enforce)' 4373 /usr/lib/postfix/master confined by '/usr/lib/postfix/master (enforce)' 4505 /usr/sbin/httpd2-prefork confined by '/usr/sbin/httpd2-prefork (enforce)' 646 /usr/lib/wicked/bin/wickedd-dhcp4 not confined 647 /usr/lib/wicked/bin/wickedd-dhcp6 not confined 5592 /usr/bin/ssh not confined 7146 /usr/sbin/cupsd confined by '/usr/sbin/cupsd (complain)'
The first portion is a number. This number is the process ID number (PID) of the listening program. | |
The second portion is a string that represents the absolute path of the listening program | |
The final portion indicates the profile confining the program, if any. |
Note
aa-unconfined requires root privileges and
should not be run from a shell that is confined by an AppArmor profile.
aa-unconfined does not distinguish between one network
interface and another, so it reports all unconfined processes, even those
that might be listening to an internal LAN interface.
Finding user network client applications is dependent on your user
preferences. The aa-unconfined tool detects and
reports network ports opened by client applications, but only those
client applications that are running at the time the
aa-unconfined analysis is performed. This is a problem
because network services run all the time, while network
client applications run when the user is interested in them.
Applying AppArmor profiles to user network client applications is also dependent on user preferences. Therefore, we leave the profiling of user network client applications as an exercise for the user.
To aggressively confine desktop applications, the
aa-unconfined command supports a
--paranoid option, which reports all processes running
and the corresponding AppArmor profiles that might or might not be
associated with each process. The user can then decide whether each of
these programs needs an AppArmor profile.
If you have new or modified profiles, you can submit them to the <apparmor@lists.ubuntu.com> mailing list along with a use case for the application behavior that you exercised. The AppArmor team reviews and may submit the work into openSUSE Leap. We cannot guarantee that every profile is included, but we make a sincere effort to include as much as possible.
29.4.1 Immunizing web applications #Edit source
To find Web applications, investigate your Web server configuration. The
Apache Web server is highly configurable and Web applications can be
stored in many directories, depending on your local configuration.
openSUSE Leap, by default, stores Web applications in
/srv/www/cgi-bin/. To the maximum extent possible,
each Web application should have an AppArmor profile.
Once you find these programs, you can use the
aa-genprof and aa-logprof tools to
create or update their AppArmor profiles.
Because CGI programs are executed by the Apache Web server, the profile
for Apache itself, usr.sbin.httpd2-prefork for
Apache2 on openSUSE Leap, must be modified to add execute permissions
to each of these programs. For example, adding the line
/srv/www/cgi-bin/my_hit_counter.pl rPx grants Apache
permission to execute the Perl script
my_hit_counter.pl and requires that there be a
dedicated profile for my_hit_counter.pl. If
my_hit_counter.pl does not have a dedicated profile
associated with it, the rule should say
/srv/www/cgi-bin/my_hit_counter.pl rix to cause
my_hit_counter.pl to inherit the
usr.sbin.httpd2-prefork profile.
Some users might find it inconvenient to specify execute permission for
every CGI script that Apache might invoke. Instead, the administrator
can grant controlled access to collections of CGI scripts. For example,
adding the line /srv/www/cgi-bin/*.{pl,py,pyc} rix
allows Apache to execute all files in
/srv/www/cgi-bin/ ending in .pl
(Perl scripts) and .py or .pyc
(Python scripts). As above, the ix part of the rule
causes Python scripts to inherit the Apache profile, which is
appropriate if you do not want to write individual profiles for each CGI
script.
Note
If you want the subprocess confinement module
(apache2-mod-apparmor) functionality when Web
applications handle Apache modules (mod_perl and
mod_php), use the ChangeHat features when you add
a profile in YaST or at the command line. To take advantage of the
subprocess confinement, refer to
Section 34.2, “Managing ChangeHat-aware applications”.
Profiling Web applications that use mod_perl and
mod_php requires slightly different handling. In
this case, the “program” is a script interpreted directly
by the module within the Apache process, so no exec happens. Instead,
the AppArmor version of Apache calls change_hat()
using a subprofile (a “hat”) corresponding to the name of
the URI requested.
Note
The name presented for the script to execute might not be the URI, depending on how Apache has been configured for where to look for module scripts. If you have configured your Apache to place scripts in a different place, the different names appear in the log file when AppArmor complains about access violations. See Chapter 36, Managing profiled applications.
For mod_perl and mod_php
scripts, this is the name of the Perl script or the PHP page requested.
For example, adding this subprofile allows the
localtime.php page to execute and access to the
local system time and locale files:
/usr/bin/httpd2-prefork {
# ...
^/cgi-bin/localtime.php {
/etc/localtime r,
/srv/www/cgi-bin/localtime.php r,
/usr/lib/locale/** r,
}
}
If no subprofile has been defined, the AppArmor version of Apache applies
the DEFAULT_URI hat. This subprofile is
sufficient to display a Web page. The
DEFAULT_URI hat that AppArmor provides by
default is the following:
^DEFAULT_URI {
/usr/sbin/suexec2 mixr,
/var/log/apache2/** rwl,
@{HOME}/public_html r,
@{HOME}/public_html/** r,
/srv/www/htdocs r,
/srv/www/htdocs/** r,
/srv/www/icons/*.{gif,jpg,png} r,
/srv/www/vhosts r,
/srv/www/vhosts/** r,
/usr/share/apache2/** r,
/var/lib/php/sess_* rwl
}
To use a single AppArmor profile for all Web pages and CGI scripts served
by Apache, a good approach is to edit the
DEFAULT_URI subprofile. For more information on
confining Web applications with Apache, see
Chapter 34, Profiling your Web applications using ChangeHat.
29.4.2 Immunizing network agents #Edit source
To find network server daemons and network clients (such as
fetchmail or Firefox) that need to be profiled,
you should inspect the open ports on your machine. Also, consider
the programs that are answering on those ports, and provide profiles
for as many of those programs as possible. If you provide profiles
for all programs with open network ports, an attacker cannot get to
the file system on your machine without passing through an AppArmor
profile policy.
Scan your server for open network ports manually from outside the
machine using a scanner (such as nmap), or from inside the machine using
the netstat --inet -n -p command as root.
Then, inspect the machine to determine which programs are answering on
the discovered open ports.
Tip
Refer to the man page of the netstat command for a
detailed reference of all possible options.
30 Profile components and syntax #Edit source
- 30.1 Breaking an AppArmor profile into its parts
- 30.2 Profile types
- 30.3 Include statements
- 30.4 Capability entries (POSIX.1e)
- 30.5 Network access control
- 30.6 Profile names, flags, paths, and globbing
- 30.7 File permission access modes
- 30.8 Mount rules
- 30.9 Pivot root rules
- 30.10 PTrace rules
- 30.11 Signal rules
- 30.12 Execute modes
- 30.13 Resource limit control
- 30.14 Auditing rules
Building AppArmor profiles to confine an application is straightforward and intuitive. AppArmor ships with several tools that assist in profile creation. It does not require you to do any programming or script handling. The only task that is required of the administrator is to determine a policy of strictest access and execute permissions for each application that needs to be hardened.
Updates or modifications to the application profiles are only required if the software configuration or the desired range of activities changes. AppArmor offers intuitive tools to handle profile updates and modifications.
You are ready to build AppArmor profiles after you select the programs to profile. To do so, it is important to understand the components and syntax of profiles. AppArmor profiles contain several building blocks that help build simple and reusable profile code:
- Include files
Include statements are used to pull in parts of other AppArmor profiles to simplify the structure of new profiles.
- Abstractions
Abstractions are include statements grouped by common application tasks.
- Program chunks
Program chunks are include statements that contain chunks of profiles that are specific to program suites.
- Capability entries
Capability entries are profile entries for any of the POSIX.1e https://en.wikipedia.org/wiki/POSIX#POSIX.1 Linux capabilities allowing a fine-grained control over what a confined process is allowed to do through system calls that require privileges.
- Network access control entries
Network Access Control Entries mediate network access based on the address type and family.
- Local variable definitions
Local variables define shortcuts for paths.
- File access control entries
File Access Control Entries specify the set of files an application can access.
- rlimit entries
rlimit entries set and control an application's resource limits.
For help determining the programs to profile, refer to Section 29.2, “Determining programs to immunize”. To start building AppArmor profiles with YaST, proceed to Chapter 32, Building and managing profiles with YaST. To build profiles using the AppArmor command line interface, proceed to Chapter 33, Building profiles from the command line.
For more details about creating AppArmor profiles, see
man 5 apparmor.
30.1 Breaking an AppArmor profile into its parts #Edit source
The easiest way of explaining what a profile consists of and how to
create one is to show the details of a sample profile, in this case for a
hypothetical application called /usr/bin/foo:
#include <tunables/global>1 # a comment naming the application to confine /usr/bin/foo2 {3 #include <abstractions/base>4 capability setgid5, network inet tcp6, link /etc/sysconfig/foo -> /etc/foo.conf,7 /bin/mount ux, /dev/{,u}8random r, /etc/ld.so.cache r, /etc/foo/* r, /lib/ld-*.so* mr, /lib/lib*.so* mr, /proc/[0-9]** r, /usr/lib/** mr, /tmp/ r,9 /tmp/foo.pid wr, /tmp/foo.* lrw, /@{HOME}10/.foo_file rw, /@{HOME}/.foo_lock kw, owner11 /shared/foo/** rw, /usr/bin/foobar Cx,12 /bin/** Px -> bin_generic,13 # a comment about foo's local (children) profile for /usr/bin/foobar. profile /usr/bin/foobar14 { /bin/bash rmix, /bin/cat rmix, /bin/more rmix, /var/log/foobar* rwl, /etc/foobar r, } # foo's hat, bar. ^bar15 { /lib/ld-*.so* mr, /usr/bin/bar px, /var/spool/* rwl, } }
This loads a file containing variable definitions. | |
The normalized path to the program that is confined. | |
The curly braces ( | |
This directive pulls in components of AppArmor profiles to simplify profiles. | |
Capability entry statements enable each of the 29 POSIX.1e draft capabilities. | |
A directive determining the kind of network access allowed to the application. For details, refer to Section 30.5, “Network access control”. | |
A link pair rule specifying the source and the target of a link. See Section 30.7.6, “Link pair” for more information. | |
The curly braces ( | |
A path entry specifying what areas of the file system the program can
access. The first part of a path entry specifies the absolute path of a
file (including regular expression globbing) and the second part
indicates permissible access modes (for example | |
This variable expands to a value that can be changed without changing the entire profile. | |
An owner conditional rule, granting read and write permission on files owned by the user. Refer to Section 30.7.8, “Owner conditional rules” for more information. | |
This entry defines a transition to the local profile
| |
A named profile transition to the profile bin_generic located in the global scope. See Section 30.12.7, “Named profile transitions” for details. | |
The local profile | |
This section references a “hat” subprofile of the application. For more details on AppArmor's ChangeHat feature, refer to Chapter 34, Profiling your Web applications using ChangeHat. |
When a profile is created for a program, the program can access only the files, modes and POSIX capabilities specified in the profile. These restrictions are in addition to the Linux access controls.
Example:
To gain the capability CAP_CHOWN, the
program must have both access to CAP_CHOWN
under conventional Linux access controls (typically, be a
root-owned process) and have the capability
chown in its profile. Similarly, to be able
to write to the file /foo/bar the program must
have both the correct user ID and mode bits set in the files
attributes and have /foo/bar w in its profile.
Attempts to violate AppArmor rules are recorded in
/var/log/audit/audit.log if the
audit package is installed, or
in /var/log/messages, or only in
journalctl if no traditional syslog is
installed. Often AppArmor rules prevent an attack from working
because necessary files are not accessible and, in all cases, AppArmor
confinement restricts the damage that the attacker can do to the set of
files permitted by AppArmor.
30.2 Profile types #Edit source
AppArmor knows four different types of profiles: standard profiles,
unattached profiles, local profiles and hats. Standard and unattached
profiles are stand-alone profiles, each stored in a file under
/etc/apparmor.d/. Local profiles and hats are
children profiles embedded inside of a parent profile used to provide
tighter or alternate confinement for a subtask of an application.
30.2.1 Standard profiles #Edit source
The default AppArmor profile is attached to a program by its name, so a profile name must match the path to the application it is to confine.
/usr/bin/foo {
...
}
This profile is automatically used whenever an unconfined process
executes /usr/bin/foo.
30.2.2 Unattached profiles #Edit source
Unattached profiles do not reside in the file system namespace and
therefore are not automatically attached to an application. The name of
an unattached profile is preceded by the keyword
profile. You can freely choose a profile name, except
for the following limitations: the name must not begin with a
: or . character. If it contains a
whitespace, it must be quoted. If the name begins with a
/, the profile is considered to be a standard
profile, so the following two profiles are identical:
profile /usr/bin/foo {
...
}
/usr/bin/foo {
...
}
Unattached profiles are never used automatically, nor can they be
transitioned to through a Px rule. They need to be
attached to a program by either using a named profile transition (see
Section 30.12.7, “Named profile transitions”) or with the
change_profile rule (see
Section 30.2.5, “Change rules”).
Unattached profiles are useful for specialized profiles for system
utilities that generally should not be confined by a system-wide profile
(for example, /bin/bash). They can also be used to
set up roles or to confine a user.
30.2.3 Local profiles #Edit source
Local profiles provide a convenient way to provide specialized
confinement for utility programs launched by a confined application.
They are specified like standard profiles, except that they are embedded
in a parent profile and begin with the profile
keyword:
/parent/profile {
...
profile /local/profile {
...
}
}
To transition to a local profile, either use a cx
rule (see Section 30.12.2, “Discrete local profile execute mode (cx)”) or a named
profile transition (see
Section 30.12.7, “Named profile transitions”).
30.2.4 Hats #Edit source
AppArmor "hats" are a local profiles with certain additional restrictions
and an implicit rule allowing for change_hat to be
used to transition to them. Refer to Chapter 34, Profiling your Web applications using ChangeHat
for a detailed description.
30.2.5 Change rules #Edit source
AppArmor provides change_hat and
change_profile rules that control domain
transitioning. change_hat are specified by defining
hats in a profile, while change_profile rules refer
to another profile and start with the keyword
change_profile:
change_profile -> /usr/bin/foobar,
Both change_hat and change_profile
provide for an application directed profile transition, without having
to launch a separate application. change_profile
provides a generic one way transition between any of the loaded
profiles. change_hat provides for a returnable parent
child transition where an application can switch from the parent profile
to the hat profile and if it provides the correct secret key return to
the parent profile at a later time.
change_profile is best used in situations where an
application goes through a trusted setup phase and then can lower its
privilege level. Any resources mapped or opened during the start-up
phase may still be accessible after the profile change, but the new
profile restricts the opening of new resources, and limits
certain resources opened before the switch. Specifically, memory
resources are still available while capability and file resources
(if they are not memory mapped) can be limited.
change_hat is best used in situations where an
application runs a virtual machine or an interpreter that does not
provide direct access to the applications resources (for example
Apache's mod_php). Since
change_hat stores the return secret key in the
application's memory the phase of reduced privilege should not have
direct access to memory. It is also important that file access is
properly separated, since the hat can restrict accesses to a file handle
but does not close it. If an application does buffering and provides
access to the open files with buffering, the accesses to these files
might not be seen by the kernel and hence not restricted by the new
profile.
Warning: Safety of domain transitions
The change_hat and change_profile
domain transitions are less secure than a domain transition done
through an exec because they do not affect a process's memory mappings,
nor do they close resources that have already been opened.
30.3 Include statements #Edit source
Include statements are directives that pull in components of other AppArmor profiles to simplify profiles. Include files retrieve access permissions for programs. By using an include, you can give the program access to directory paths or files that are also required by other programs. Using includes can reduce the size of a profile.
Include statements normally begin with a hash (#)
sign. This is confusing because the same hash sign is used for comments
inside profile files. Because of this, #include is
treated as an include only if there is no preceding #
(##include is a comment) and there is no whitespace
between # and include (#
include is a comment).
You can also use include without the leading
#.
include "/etc/apparmor.d/abstractions/foo"
is the same as using
#include "/etc/apparmor.d/abstractions/foo"
Note: No trailing ','
Because includes follow the C pre-processor syntax, they do not have a trailing ',' like most AppArmor rules.
By slight changes in syntax, you can modify the behavior of
include. If you use "" around the
including path, you instruct the parser to do an absolute or relative
path lookup.
include "/etc/apparmor.d/abstractions/foo" # absolute path include "abstractions/foo" # relative path to the directory of current file
When using relative path includes, when the file is included,
it is considered the new current file for its includes. For example,
suppose you are in the /etc/apparmor.d/bar file,
then
include "abstractions/foo"
includes the file /etc/apparmor.d/abstractions/foo.
If then there is
include "example"
inside the /etc/apparmor.d/abstractions/foo file, it
includes /etc/apparmor.d/abstractions/example.
The use of <> specifies to try the include
path (specified by -I, defaults to the
/etc/apparmor.d directory) in an ordered way. So
assuming the include path is
-I /etc/apparmor.d/ -I /usr/share/apparmor/
then the include statement
include <abstractions/foo>
tries /etc/apparmor.d/abstractions/foo, and if
that file does not exist, the next try is
/usr/share/apparmor/abstractions/foo.
Tip
The default include path can be overridden manually by passing
-I to the apparmor_parser, or by
setting the include paths in
/etc/apparmor/parser.conf:
Include /usr/share/apparmor/ Include /etc/apparmor.d/
Multiple entries are allowed, and they are taken in the same order as
when they are when using -I or
--Include from the apparmor_parser
command line.
If an include ends with '/', this is considered a directory include, and all files within the directory are included.
To assist you in profiling your applications, AppArmor provides three classes of includes: abstractions, program chunks and tunables.
30.3.1 Abstractions #Edit source
Abstractions are includes that are grouped by common application tasks.
These tasks include access to authentication mechanisms, access to name
service routines, common graphics requirements, and system accounting.
Files listed in these abstractions are specific to the named task.
Programs that require one of these files also requires
other files listed in the abstraction file (depending on the local
configuration and the specific requirements of the program). Find
abstractions in /etc/apparmor.d/abstractions.
30.3.2 Program chunks #Edit source
The program-chunks directory
(/etc/apparmor.d/program-chunks) contains certain
chunks of profiles that are specific to program suites and not generally
useful outside of the suite, thus are never suggested for use in
profiles by the profile wizards (aa-logprof and
aa-genprof). Currently, program chunks are only
available for the postfix program suite.
30.3.3 Tunables #Edit source
The tunables directory (/etc/apparmor.d/tunables)
contains global variable definitions. When used in a profile, these
variables expand to a value that can be changed without changing the
entire profile. Add all the tunables definitions that should be
available to every profile to
/etc/apparmor.d/tunables/global.
30.4 Capability entries (POSIX.1e) #Edit source
Capability rules are simply the word capability
followed by the name of the POSIX.1e capability as defined in the
capabilities(7) man page. You can list multiple
capabilities in a single rule, or grant all implemented capabilities with
the bare keyword capability.
capability dac_override sys_admin, # multiple capabilities capability, # grant all capabilities
30.5 Network access control #Edit source
AppArmor allows mediation of network access based on the address type and family. The following illustrates the network access rule syntax:
network [[<domain>1][<type2>][<protocol3>]]
Supported domains: | |
Supported types: | |
Supported protocols: |
The AppArmor tools support only family and type specification. The AppArmor
module emits only network DOMAIN
TYPE in “ACCESS DENIED”
messages. And only these are output by the profile generation tools, both
YaST and command line.
The following examples illustrate possible network-related rules to be used in AppArmor profiles. The syntax of the last two are not currently supported by the AppArmor tools.
network1, network inet2, network inet63, network inet stream4, network inet tcp5, network tcp6,
Allow all networking. No restrictions applied with regard to domain, type, or protocol. | |
Allow general use of IPv4 networking. | |
Allow general use of IPv6 networking. | |
Allow the use of IPv4 TCP networking. | |
Allow the use of IPv4 TCP networking, paraphrasing the rule above. | |
Allow the use of both IPv4 and IPv6 TCP networking. |
30.6 Profile names, flags, paths, and globbing #Edit source
A profile is attached to a program by specifying a full path to the program's executable. For example, a standard profile (see Section 30.2.1, “Standard profiles”), the profile is defined by
/usr/bin/foo { ... }The following sections describe several useful techniques that can be applied when naming a profile or putting a profile in the context of other existing ones, or specifying file paths.
AppArmor explicitly distinguishes directory path names from path
names. Use a trailing / for any directory path that
needs to be explicitly distinguished:
/some/random/example/* rAllow read access to files in the
/some/random/exampledirectory./some/random/example/ rAllow read access to the directory only.
/some/**/ rGive read access to any directories below
/some(but not /some/ itself)./some/random/example/** rGive read access to files and directories under
/some/random/example(but not /some/random/example/ itself)./some/random/example/**[^/] rGive read access to files under
/some/random/example. Explicitly exclude directories ([^/]).
Globbing (or regular expression matching) is when you modify the directory path using wild cards to include a group of files or subdirectories. File resources can be specified with a globbing syntax similar to that used by popular shells, such as csh, Bash and zsh.
|
|
Substitutes for any number of any characters, except
Example: An arbitrary number of path elements. |
|
|
Substitutes for any number of characters, including
Example: An arbitrary number of path elements, including entire directories. |
|
|
Substitutes for any single character, except |
|
|
Substitutes for the single character
Example: a rule that matches |
|
|
Substitutes for the single character |
|
|
Expands to one rule to match
Example: a rule that matches |
|
|
Substitutes for any character except |
30.6.1 Profile flags #Edit source
Profile flags control the behavior of the related profile. You can add profile flags to the profile definition by editing it manually, see the following syntax:
/path/to/profiled/binary flags=(list_of_flags) {
[...]
}You can use multiple flags separated by a comma ',' or space ' '. There are three basic types of profile flags: mode, relative, and attach flags.
Mode flag is complain (illegal
accesses are allowed and logged). If it is omitted, the profile is in
enforce mode (enforces the policy).
Tip
A more flexible way of setting the whole profile into complain mode is
to create a symbolic link from the profile file inside the
/etc/apparmor.d/force-complain/ directory.
ln -s /etc/apparmor.d/bin.ping /etc/apparmor.d/force-complain/bin.ping
Relative flags are
chroot_relative (states that the profile is relative
to the chroot instead of namespace) or
namespace_relative (the default, with the path being
relative to outside the chroot). They are mutually exclusive.
Attach flags consist of two pairs of mutually
exclusive flags: attach_disconnected or
no_attach_disconnected (determine if path names
resolved to be outside of the namespace are attached to the root, which
means they have the '/' character at the beginning), and
chroot_attach or chroot_no_attach
(control path name generation when in a chroot environment while a file
is accessed that is external to the chroot but within the namespace).
30.6.2 Using variables in profiles #Edit source
AppArmor allows to use variables holding paths in profiles. Use global variables to make your profiles portable and local variables to create shortcuts for paths.
A typical example of when global variables come in handy are network
scenarios in which user home directories are mounted in different
locations. Instead of rewriting paths to home directories in all
affected profiles, you only need to change the value of a variable.
Global variables are defined under
/etc/apparmor.d/tunables and need to be made
available via an include statement. Find the variable definitions for
this use case (@{HOME} and @{HOMEDIRS}) in
the /etc/apparmor.d/tunables/home file.
Local variables are defined at the head of a profile. This is useful to provide the base of for a chrooted path, for example:
@{CHROOT_BASE}=/tmp/foo
/sbin/rsyslogd {
...
# chrooted applications
@{CHROOT_BASE}/var/lib/*/dev/log w,
@{CHROOT_BASE}/var/log/** w,
...
}In the following example, while @{HOMEDIRS} lists where all the user home directories are stored, @{HOME} is a space-separated list of home directories. Later on, @{HOMEDIRS} is expanded by two new specific places where user home directories are stored.
@{HOMEDIRS}=/home/
@{HOME}=@{HOMEDIRS}/*/ /root/
[...]
@{HOMEDIRS}+=/srv/nfs/home/ /mnt/home/Note
With the current AppArmor tools, variables can only be used when manually editing and maintaining a profile.
30.6.3 Pattern matching #Edit source
Profile names can contain globbing expressions allowing the profile to match against multiple binaries.
The following example is valid for systems where the
foo binary resides either in
/usr/bin or /bin.
/{usr/,}bin/foo { ... }
In the following example, when matching against the executable
/bin/foo, the /bin/foo profile
is an exact match so it is chosen. For the executable
/bin/fat, the profile /bin/foo
does not match, and because the /bin/f* profile is
more specific (less general) than /bin/**, the
/bin/f* profile is chosen.
/bin/foo { ... }
/bin/f* { ... }
/bin/** { ... }
For more information on profile name globbing examples, see the man page
of AppArmor, man 5 apparmor.d,, section
Globbing.
30.6.4 Namespaces #Edit source
Namespaces are used to provide different profiles sets. Say one for the
system, another for a chroot environment or container. Namespaces are
hierarchical—a namespace can see its children but a child
cannot see its parent. Namespace names start with a colon
: followed by an alphanumeric string, a trailing
colon : and an optional double slash
//, such as
:childNameSpace://
Profiles loaded to a child namespace are prefixed with their namespace name (viewed from a parent's perspective):
:childNameSpace://apache
Namespaces can be entered via the change_profile API,
or named profile transitions:
/path/to/executable px -> :childNameSpace://apache
30.6.5 Profile naming and attachment specification #Edit source
Profiles can have a name, and an attachment specification. This allows for profiles with a logical name that can be more meaningful to users/administrators than a profile name that contains pattern matching (see Section 30.6.3, “Pattern matching”). For example, the default profile
/** { ... }can be named
profile default /** { ... }Also, a profile with pattern matching can be named. For example:
/usr/lib64/firefox*/firefox-*bin { ... }can be named
profile firefox /usr/lib64/firefox*/firefox-*bin { ... }30.6.6 Alias rules #Edit source
Alias rules provide an alternative way to manipulate profile path mappings to site specific layouts. They are an alternative form of path rewriting to using variables, and are done post variable resolution. The alias rule says to treat rules that have the same source prefix as if the rules are at target prefix.
alias /home/ -> /usr/home/
All the rules that have a prefix match to /home/
provide access to /usr/home/. For example:
/home/username/** r,
allows as well access to
/usr/home/username/** r,
Aliases provide a quick way of remapping rules without the need to
rewrite them. They keep the source path still accessible—in our
example, the alias rule keeps the paths under
/home/ still accessible.
With the alias rule, you can point to multiple
targets at the same time.
alias /home/ -> /usr/home/ alias /home/ -> /mnt/home/
Note
With the current AppArmor tools, alias rules can only be used when manually editing and maintaining a profile.
Tip
Insert global alias definitions in the file
/etc/apparmor.d/tunables/alias.
30.7 File permission access modes #Edit source
File permission access modes consist of combinations of the following modes:
|
|
Read mode |
|
|
Write mode (mutually exclusive to |
|
|
Append mode (mutually exclusive to |
|
|
File locking mode |
|
|
Link mode |
|
|
Link pair rule (cannot be combined with other access modes) |
30.7.1 Read mode (r) #Edit source
Allows the program to have read access to the resource. Read access is required for shell scripts and other interpreted content and determines if an executing process can core dump.
30.7.2 Write mode (w) #Edit source
Allows the program to have write access to the resource. Files must have this permission if they are to be unlinked (removed).
30.7.3 Append mode (a) #Edit source
Allows a program to write to the end of a file. In contrast to the
w mode, the append mode does not include the ability
to overwrite data, to rename, or to remove a file. The append permission
is typically used with applications who need to be able to write to log
files, but which should not be able to manipulate any existing data in
the log files. As the append permission is a subset of the permissions
associated with the write mode, the w and
a permission flags cannot be used together and are
mutually exclusive.
30.7.4 File locking mode (k) #Edit source
The application can take file locks. Former versions of AppArmor allowed files to be locked if an application had access to them. By using a separate file locking mode, AppArmor makes sure locking is restricted only to those files which need file locking and tightens security as locking can be used in several denial-of-service attack scenarios.
30.7.5 Link mode (l) #Edit source
The link mode mediates access to hard links. When a link is created, the target file must have the same access permissions as the link created (but the destination does not need link access).
30.7.6 Link pair #Edit source
The link mode grants permission to link to arbitrary files, provided the link has a subset of the permissions granted by the target (subset permission test).
/srv/www/htdocs/index.html rl,
By specifying origin and destination, the link pair rule provides greater control over how hard links are created. Link pair rules by default do not enforce the link subset permission test that the standard rules link permission requires.
link /srv/www/htdocs/index.html -> /var/www/index.html
To force the rule to require the test, the subset
keyword is used. The following rules are equivalent:
/var/www/index.html l, link subset /var/www/index.html -> /**,
Note
Currently link pair rules are not supported by YaST and the command-line tools. Manually edit your profiles to use them. Updating such profiles using the tools is safe, because the link pair entries are not touched.
30.7.7 Optional allow and file rules #Edit source
The allow prefix is optional, and it is idiomatically
implied if not specified and the deny (see
Section 30.7.9, “Deny rules”) keyword is not used.
allow file /example r, allow /example r, allow network,
You can also use the optional file keyword. If you
omit it and there are no other rule types that start with a keyword,
such as network or mount, it is
automatically implied.
file /example/rule r,
is equivalent to
/example/rule r,
The following rule grants access to all files:
file,
which is equal to
/** rwmlk,
File rules can use leading or trailing permissions. The permissions should not be specified as a trailing permission, but rather used at the start of the rule. This is important in that it makes file rules behave like any other rule types.
/path rw, # old style rw /path, # leading permission file rw /path, # with explicit 'file' keyword allow file rw /path, # optional 'allow' keyword added
30.7.8 Owner conditional rules #Edit source
The file rules can be extended so that they can be conditional upon
the user being the owner of the file (the fsuid needs to match the
file's uid). For this purpose the owner keyword
is put in front of the rule. Owner conditional rules accumulate like
regular file rules do.
owner /home/*/** rw
When using file ownership conditions with link rules the ownership test is done against the target file so the user must own the file to be able to link to it.
Note: Precedence of regular file rules
Owner conditional rules are considered a subset of regular file rules. If a regular file rule overlaps with an owner conditional file rule, the rules are merged. Consider the following example.
/foo r, owner /foo rw, # or w,
The rules are merged—it results in r for
everybody, and w for the owner only.
Tip
To address everybody but the owner of the file,
use the keyword other.
owner /foo rw, other /foo r,
30.7.9 Deny rules #Edit source
Deny rules can be used to annotate or quiet known rejects. The
profile generating tools do not ask about a known reject treated
with a deny rule. Such a reject does not show up in the audit
logs when denied, keeping the log files lean. If this is not
desired, put the keyword audit in front of the
deny entry.
It is also possible to use deny rules in combination with allow rules.
This allows you to specify a broad allow rule, and then subtract a few
known files that should not be allowed. Deny rules can also be combined
with owner rules, to deny files owned by the user. The following example
allows read/write access to everything in a users directory except write
access to the .ssh/ files:
deny /home/*/.ssh/** w, owner /home/*/** rw,
The extensive use of deny rules is generally not encouraged, because it makes it much harder to understand what a profile does. However a judicious use of deny rules can simplify profiles. Therefore the tools only generate profiles denying specific files and do not use globbing in deny rules. Manually edit your profiles to add deny rules using globbing. Updating such profiles using the tools is safe, because the deny entries are not touched.
30.8 Mount rules #Edit source
AppArmor can limit mount and unmount operations, including file system
types and mount flags. The rule syntax is based on the
mount command syntax and starts with one of the
keywords mount, remount, or
umount. Conditions are optional and unspecified
conditionals are assumed to match all entries. For example, not
specifying a file system means that all file systems are matched.
Conditionals can be specified by specifying conditionals with
options= or options in.
options= specifies conditionals that have to be met
exactly. The rule
mount options=ro /dev/foo -E /mnt/,
matches
#mount -o ro /dev/foo /mnt
but does not match
#mount -o ro,atime /dev/foo /mnt#mount -o rw /dev/foo /mnt
options in requires that at least one of the
listed mount options is used. The rule
mount options in (ro,atime) /dev/foo -> /mnt/,
matches
#mount -o ro /dev/foo /mnt#mount -o ro,atime /dev/foo /mnt#mount -o atime /dev/foo /mnt
but does not match
#mount -o ro,sync /dev/foo /mnt#mount -o ro,atime,sync /dev/foo /mnt#mount -o rw /dev/foo /mnt#mount -o rw,noatime /dev/foo /mnt#mount /dev/foo /mnt
With multiple conditionals, the rule grants permission for each set of options. The rule
mount options=ro options=atime
matches
#mount -o ro /dev/foo /mnt#mount -o atime /dev/foo /mnt
but does not match
#mount -o ro,atime /dev/foo /mnt
Separate mount rules are distinct and the options do not accumulate. The rules
mount options=ro, mount options=atime,
are not equivalent to
mount options=(ro,atime), mount options in (ro,atime),
The following rule allows mounting /dev/foo on
/mnt/ read only and using inode access times or
allows mounting /dev/foo on
/mnt/ with some combination of 'nodev' and
'user'.
mount options=(ro, atime) options in (nodev, user) /dev/foo -> /mnt/,
allows
#mount -o ro,atime /dev/foo /mnt#mount -o nodev /dev/foo /mnt#mount -o user /dev/foo /mnt#mount -o nodev,user /dev/foo /mnt
30.9 Pivot root rules #Edit source
AppArmor can limit changing the root file system. The syntax is
pivot_root [oldroot=OLD_ROOT] NEW_ROOT
The paths specified in 'pivot_root' rules must end with '/' since they are directories.
# Allow any pivot pivot_root, # Allow pivoting to any new root directory and putting the old root # directory at /mnt/root/old/ pivot_root oldroot=/mnt/root/old/, # Allow pivoting the root directory to /mnt/root/ pivot_root /mnt/root/, # Allow pivoting to /mnt/root/ and putting the old root directory at # /mnt/root/old/ pivot_root oldroot=/mnt/root/old/ /mnt/root/, # Allow pivoting to /mnt/root/, putting the old root directory at # /mnt/root/old/ and transition to the /mnt/root/sbin/init profile pivot_root oldroot=/mnt/root/old/ /mnt/root/ -> /mnt/root/sbin/init,
30.10 PTrace rules #Edit source
AppArmor supports limiting ptrace system calls. ptrace rules are accumulated so that the granted ptrace permissions are the union of all the listed ptrace rule permissions. If a rule does not specify an access list, permissions are implicitly granted.
The trace and tracedby
permissions control ptrace(2); read and
readby control proc(5) file system access,
kcmp(2), futexes (get_robust_list(2)) and perf trace events.
For a ptrace operation to be allowed, the tracing and traced
processes need the correct permissions. This means that the tracing
process needs the trace permission and the traced
process needs the tracedby permission.
Example AppArmor PTrace rules:
# Allow all PTrace access ptrace, # Explicitly allow all PTrace access, ptrace (read, readby, trace, tracedby), # Explicitly deny use of ptrace(2) deny ptrace (trace), # Allow unconfined processes (eg, a debugger) to ptrace us ptrace (readby, tracedby) peer=unconfined, # Allow ptrace of a process running under the /usr/bin/foo profile ptrace (trace) peer=/usr/bin/foo,
30.11 Signal rules #Edit source
AppArmor supports limiting inter-process signals. AppArmor signal rules are accumulated so that the granted signal permissions are the union of all the listed signal rule permissions. AppArmor signal permissions are implied when a rule does not explicitly state an access list.
The sending and receiving process must both have the correct permissions.
Example signal rules:
# Allow all signal access
signal,
# Explicitly deny sending the HUP and INT signals
deny signal (send) set=(hup, int),
# Allow unconfined processes to send us signals
signal (receive) peer=unconfined,
# Allow sending of signals to a process running under the /usr/bin/foo
# profile
signal (send) peer=/usr/bin/foo,
# Allow checking for PID existence
signal (receive, send) set=("exists"),
# Allow us to signal ourselves using the built-in @{profile_name} variable
signal peer=@{profile_name},
# Allow two real-time signals
signal set=(rtmin+0 rtmin+32),30.12 Execute modes #Edit source
Execute modes, also named profile transitions, consist of the following modes:
|
|
Discrete profile execute mode |
|
|
Discrete local profile execute mode |
|
|
Unconfined execute mode |
|
|
Inherit execute mode |
|
|
Allow |
30.12.1 Discrete profile execute mode (px) #Edit source
This mode requires that a discrete security profile is defined for a resource executed at an AppArmor domain transition. If there is no profile defined, the access is denied.
Incompatible with Ux, ux,
px, and ix.
30.12.2 Discrete local profile execute mode (cx) #Edit source
As Px, but instead of searching the global profile
set, Cx only searches the local profiles of the
current profile. This profile transition provides a way for an
application to have alternate profiles for helper applications.
Note: Limitations of the discrete local profile execute mode (cx)
Currently, Cx transitions are limited to top level profiles and cannot be used in hats and children profiles. This restriction will be removed in the future.
Incompatible with Ux, ux,
Px, px, cx, and
ix.
30.12.3 Unconfined execute mode (ux) #Edit source
Allows the program to execute the resource without any AppArmor profile
applied to the executed resource. This mode is useful when a confined
program needs to be able to perform a privileged operation, such as
rebooting the machine. By placing the privileged section in another
executable and granting unconfined execution rights, it is possible to
bypass the mandatory constraints imposed on all confined processes.
Allowing a root process to go unconfined means it can change AppArmor
policy itself. For more information about what is constrained, see the
apparmor(7) man page.
This mode is incompatible with ux,
px, Px, and ix.
30.12.4 Unsafe exec modes #Edit source
Use the lowercase versions of exec modes—px,
cx, ux—only in
special cases. They do not scrub the environment of variables such as
LD_PRELOAD. As a result, the calling domain may have an
undue amount of influence over the called resource. Use these modes only
if the child absolutely must be run unconfined and
LD_PRELOAD must be used. Any profile using such modes
provides negligible security. Use at your own risk.
30.12.5 Inherit execute mode (ix) #Edit source
ix prevents the normal AppArmor domain transition on
execve(2) when the profiled program executes the
named program. Instead, the executed resource inherits the current
profile.
This mode is useful when a confined program needs to call another
confined program without gaining the permissions of the target's profile
or losing the permissions of the current profile. There is no version to
scrub the environment because ix executions do not
change privileges.
Incompatible with cx, ux, and
px. Implies m.
30.12.6 Allow executable mapping (m) #Edit source
This mode allows a file to be mapped into memory using
mmap(2)'s PROT_EXEC flag. This flag
marks the pages executable. It is used on certain architectures to provide
non executable data pages, which can complicate exploit attempts.
AppArmor uses this mode to limit which files a well-behaved program (or
all programs on architectures that enforce non executable memory access
controls) may use as libraries, to limit the effect of invalid
-L flags given to ld(1) and
LD_PRELOAD, LD_LIBRARY_PATH, given to
ld.so(8).
30.12.7 Named profile transitions #Edit source
By default, the px and cx (and
their clean exec variants, too) transition to a profile whose name
matches the executable name. With named profile transitions, you can
specify a profile to be transitioned to. This is useful if multiple
binaries need to share a single profile, or if they need to use a
different profile than their name would specify. Named profile
transitions can be used with cx,
Cx, px and Px.
Currently there is a limit of twelve named profile transitions per
profile.
Named profile transitions use -> to indicate the
name of the profile that needs to be transitioned to:
/usr/bin/foo
{
/bin/** px -> shared_profile,
...
/usr/*bash cx -> local_profile,
...
profile local_profile
{
...
}
}Note: Difference between normal and named transitions
When used with globbing, normal transitions provide a “one to
many” relationship—/bin/** px transitions
to /bin/ping,
/bin/cat, etc, depending on the program being run.
Named transitions provide a “many to one” relationship—all programs that match the rule regardless of their name transition to the specified profile.
Named profile transitions show up in the log as having the mode
Nx. The name of the profile to be changed to is
listed in the name2 field.
30.12.8 Fallback modes for profile transitions #Edit source
The px and cx transitions specify
a hard dependency—if the specified profile does not exist, the
exec fails. With the inheritance fallback, the execution
succeeds but inherits the current profile. To specify inheritance
fallback, ix is combined with cx,
Cx, px and Px
into the modes cix, Cix,
pix and Pix.
/path Cix -> profile_name,
or
Cix /path -> profile_name,
where -> profile_name is optional.
The same applies if you add the unconfined ux mode,
where the resulting modes are cux,
CUx, pux and
PUx. These modes allow falling back to
“unconfined” when the specified profile is not found.
/path PUx -> profile_name,
or
PUx /path -> profile_name,
where -> profile_name is optional.
The fallback modes can be used with named profile transitions, too.
30.12.9 Variable settings in execution modes #Edit source
When choosing one of the Px, Cx or Ux execution modes, take into account that the following environment variables are removed from the environment before the child process inherits it. As a consequence, applications or processes relying on any of these variables do not work anymore if the profile applied to them carries Px, Cx or Ux flags:
GCONV_PATHGETCONF_DIRHOSTALIASESLD_AUDITLD_DEBUGLD_DEBUG_OUTPUTLD_DYNAMIC_WEAKLD_LIBRARY_PATHLD_ORIGIN_PATHLD_PRELOADLD_PROFILELD_SHOW_AUXVLD_USE_LOAD_BIASLOCALDOMAINLOCPATHMALLOC_TRACENLSPATHRESOLV_HOST_CONFRES_OPTIONSTMPDIRTZDIR
30.12.10 safe and unsafe keywords #Edit source
You can use the safe and unsafe
keywords for rules instead of using the case modifier of execution
modes. For example
/example_rule Px,
is the same as any of the following
safe /example_rule px, safe /example_rule Px, safe px /example_rule, safe Px /example_rule,
and the rule
/example_rule px,
is the same as any of
unsafe /example_rule px, unsafe /example_rule Px, unsafe px /example_rule, unsafe Px /example_rule,
The safe/unsafe keywords are
mutually exclusive and can be used in a file rule after the
owner keyword, so the order of rule keywords is
[audit] [deny] [owner] [safe|unsafe] file_rule
30.13 Resource limit control #Edit source
AppArmor can set and control an application's resource
limits (rlimits, also known as ulimits). By default, AppArmor does not
control an application's rlimits, and it controls those limits
specified in the confining profile. For more information about resource
limits, refer to the setrlimit(2),
ulimit(1), or ulimit(3)
man pages.
AppArmor leverages the system's rlimits and as such does not provide an additional auditing that would normally occur. It also cannot raise rlimits set by the system, AppArmor rlimits can only reduce an application's current resource limits.
The values are inherited by the children of a process and remain even if a new profile is transitioned to or the application becomes unconfined. So when an application transitions to a new profile, that profile can further reduce the application's rlimits.
AppArmor's rlimit rules provide mediation of setting an application's hard limits, should it try to raise them. The application cannot raise its hard limits any further than specified in the profile. The mediation of raising hard limits is not inherited as the set value is, so that when the application transitions to a new profile it is free to raise its limits as specified in the profile.
AppArmor's rlimit control does not affect an application's soft limits beyond ensuring that they are less than or equal to the application's hard limits.
AppArmor's hard limit rules have the general form of:
set rlimit RESOURCE <= value,
where RESOURCE and VALUE are to be replaced with the following values:
cpuCPU time limit in seconds.
fsize,data,stack,core,rss,as,memlock,msgqueuea number in bytes, or a number with a suffix where the suffix can be K/KB (kilobytes), M/MB (megabytes), G/GB (gigabytes), for example
rlimit data <= 100M,
fsize,nofile,locks,sigpending,nproc,rtprioa number greater or equal to 0
nicea value between -20 and 19
Note
The nproc rlimit is handled different than all the other rlimits. Instead of indicating the standard process rlimit, it controls the maximum number of processes that can be running under the profile at any time. When the limit is exceeded, the creation of new processes under the profile fails until the number of currently running processes is reduced.
Note
Currently the tools cannot be used to add rlimit rules to profiles. The only way to add rlimit controls to a profile is to manually edit the profile with a text editor. The tools still work with profiles containing rlimit rules and will not remove them, so it is safe to use the tools to update profiles containing them.
30.14 Auditing rules #Edit source
AppArmor provides the ability to audit given rules so that when they are
matched, an audit message appears in the audit log. To enable audit
messages for a given rule, the audit keyword is
put in front of the rule:
audit /etc/foo/* rw,
If it is desirable to audit only a given permission, the rule can be split into two rules. The following example results in audit messages when files are opened for writing, but not when they are opened for reading:
audit /etc/foo/* w, /etc/foo/* r,
Note
Audit messages are not generated for every read or write of a file but only when a file is opened for reading or writing.
Audit control can be combined with
owner/other conditional file rules
to provide auditing when users access files they own/do not own:
audit owner /home/*/.ssh/** rw, audit other /home/*/.ssh/** r,
31 AppArmor profile repositories #Edit source
AppArmor ships with a set of profiles enabled by default. These are created
by the AppArmor developers, and are stored in
/etc/apparmor.d. In addition to these profiles,
openSUSE Leap ships profiles for individual applications together with
the relevant application. These profiles are not enabled by default, and
reside under another directory than the standard AppArmor profiles,
/usr/share/apparmor/extra-profiles.
The AppArmor tools (YaST, aa-genprof and
aa-logprof) support the use of a local repository.
Whenever you start to create a new profile from scratch, and there
already is an inactive profile in your local repository, you are asked
whether you want to use the existing inactive one from
/usr/share/apparmor/extra-profiles and whether you want
to base your efforts on it. If you decide to use this profile, it gets
copied over to the directory of profiles enabled by default
(/etc/apparmor.d) and loaded whenever AppArmor is
started. Any further adjustments will be done to the active profile under
/etc/apparmor.d.
32 Building and managing profiles with YaST #Edit source
YaST provides a basic way to build profiles and manage AppArmor® profiles. It provides two interfaces: a graphical one and a text-based one. The text-based interface consumes less resources and bandwidth, making it a better choice for remote administration, or for times when a local graphical environment is inconvenient. Although the interfaces have differing appearances, they offer the same functionality in similar ways. Another alternative is to use AppArmor commands, which can control AppArmor from a terminal window or through remote connections. The command line tools are described in Chapter 33, Building profiles from the command line.
Start YaST from the main menu and enter your root password
when prompted for it. Alternatively, start YaST by opening a terminal
window, logging in as root, and entering yast2
for the graphical mode or yast for the text-based mode.
In the section, there is an icon. Click it to launch the AppArmor YaST module.
32.1 Manually adding a profile #Edit source
AppArmor enables you to create an AppArmor profile by manually adding entries into the profile. Select the application for which to create a profile, then add entries.
Start YaST, select , and click in the main window.
Browse your system to find the application for which to create a profile.
When you find the application, select it and click . A basic, empty profile appears in the window.
In , add, edit, or delete AppArmor profile entries by clicking the corresponding buttons and referring to Section 32.2.1, “Adding an entry”, Section 32.2.2, “Editing an entry”, or Section 32.2.3, “Deleting an entry”.
When finished, click .
32.2 Editing profiles #Edit source
Tip
YaST offers basic manipulation for AppArmor profiles, such
as creating or editing. However, the most straightforward way
to edit an AppArmor
profile is to use a text editor such as vi:
>sudovi /etc/apparmor.d/usr.sbin.httpd2-prefork
Tip
The vi editor also includes syntax (error)
highlighting and syntax error highlighting, which visually warns you
when the syntax of the edited AppArmor profile is wrong.
AppArmor enables you to edit AppArmor profiles manually by adding, editing or deleting entries. To edit a profile, proceed as follows:
Start YaST, select , and click in the main window.
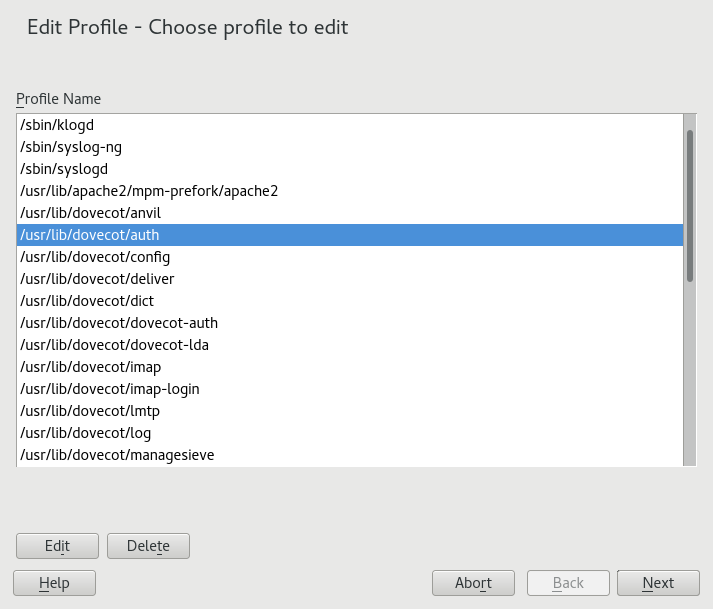
From the list of profiled applications, select the profile to edit.
Click . The window displays the profile.
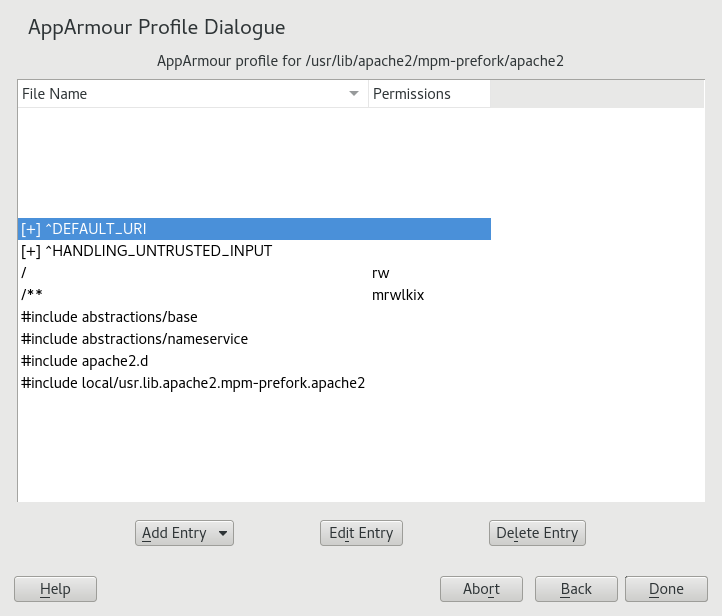
In the window, add, edit, or delete AppArmor profile entries by clicking the corresponding buttons and referring to Section 32.2.1, “Adding an entry”, Section 32.2.2, “Editing an entry”, or Section 32.2.3, “Deleting an entry”.
When you are finished, click .
In the pop-up that appears, click to confirm your changes to the profile and reload the AppArmor profile set.
Tip: Syntax checking in AppArmor
AppArmor contains a syntax check that notifies you of any syntax errors
in profiles you are trying to process with the YaST AppArmor tools.
If an error occurs, edit the profile manually as root and
reload the profile set with systemctl reload
apparmor.
32.2.1 Adding an entry #Edit source
The button in the lists types of entries you can add to the AppArmor profile.
From the list, select one of the following:
- File
In the pop-up window, specify the absolute path of a file, including the type of access permitted. When finished, click .
You can use globbing if necessary. For globbing information, refer to Section 30.6, “Profile names, flags, paths, and globbing”. For file access permission information, refer to Section 30.7, “File permission access modes”.
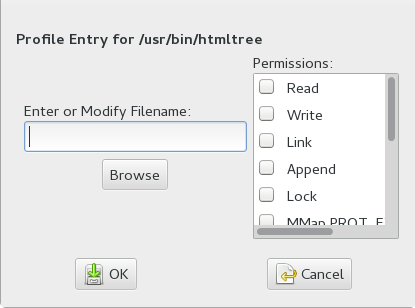
- Directory
In the pop-up window, specify the absolute path of a directory, including the type of access permitted. You can use globbing if necessary. When finished, click .
For globbing information, refer to Section 30.6, “Profile names, flags, paths, and globbing”. For file access permission information, refer to Section 30.7, “File permission access modes”.
- Network rule
In the pop-up window, select the appropriate network family and the socket type. For more information, refer to Section 30.5, “Network access control”.
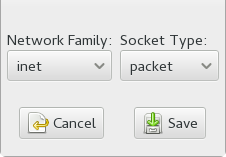
- Capability
In the pop-up window, select the appropriate capabilities. These are statements that enable each of the 32 POSIX.1e capabilities. Refer to Section 30.4, “Capability entries (POSIX.1e)” for more information about capabilities. When finished making your selections, click .
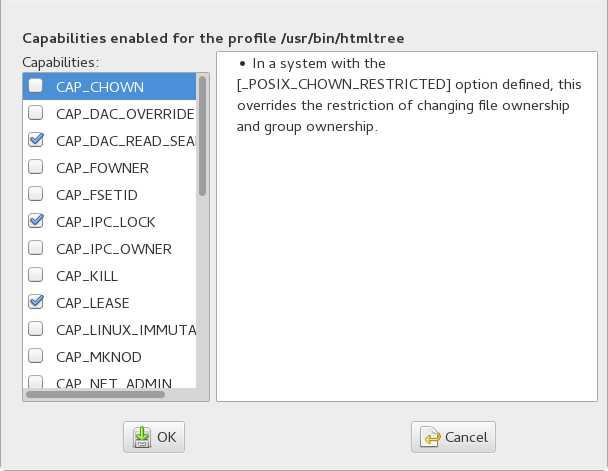
- Include file
In the pop-up window, browse to the files to use as includes. Includes are directives that pull in components of other AppArmor profiles to simplify profiles. For more information, refer to Section 30.3, “Include statements”.
- Hat
In the pop-up window, specify the name of the subprofile (hat) to add to your current profile and click . For more information, refer to Chapter 34, Profiling your Web applications using ChangeHat.
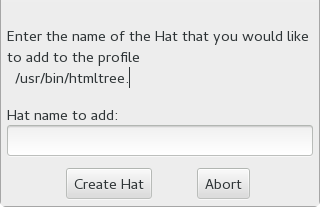
32.2.2 Editing an entry #Edit source
When you select , a pop-up window opens. From here, edit the selected entry.
In the pop-up window, edit the entry you need to modify. You can use globbing if necessary. When finished, click .
For globbing information, refer to Section 30.6, “Profile names, flags, paths, and globbing”. For access permission information, refer to Section 30.7, “File permission access modes”.
32.2.3 Deleting an entry #Edit source
To delete an entry in a given profile, select . AppArmor removes the selected profile entry.
32.3 Deleting a profile #Edit source
AppArmor enables you to delete an AppArmor profile manually. Simply select the application for which to delete a profile then delete it as follows:
Start YaST, select , and click in the main window.
Select the profile to delete.
Click .
In the pop-up that opens, click to delete the profile and reload the AppArmor profile set.
32.4 Managing AppArmor #Edit source
You can change the status of AppArmor by enabling or disabling it. Enabling AppArmor protects your system from potential program exploitation. Disabling AppArmor, even if your profiles have been set up, removes protection from your system. To change the status of AppArmor, start YaST, select , and click in the main window.
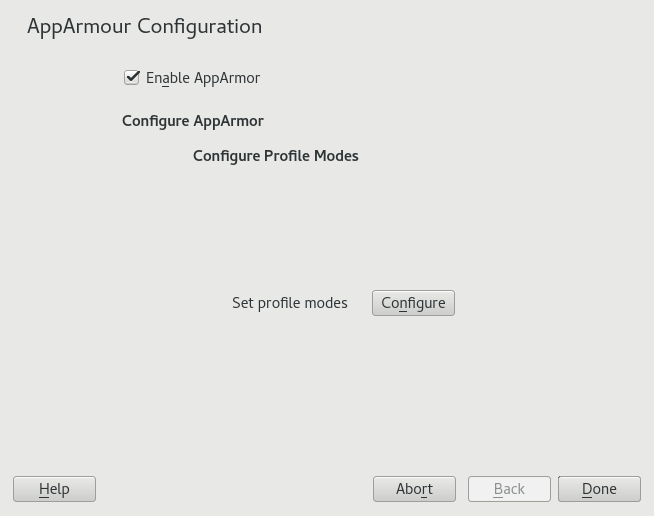
To change the status of AppArmor, continue as described in Section 32.4.1, “Changing AppArmor status”. To change the mode of individual profiles, continue as described in Section 32.4.2, “Changing the mode of individual profiles”.
32.4.1 Changing AppArmor status #Edit source
When you change the status of AppArmor, set it to enabled or disabled. When AppArmor is enabled, it is installed, running and enforcing the AppArmor security policies.
Start YaST, select , and click in the main window.
Enable AppArmor by checking or disable AppArmor by deselecting it.
Click in the window.
Tip
You always need to restart running programs to apply the profiles to them.
32.4.2 Changing the mode of individual profiles #Edit source
AppArmor can apply profiles in two different modes. In
complain mode, violations of AppArmor profile rules,
such as the profiled program accessing files not permitted by the
profile, are detected. The violations are permitted, but also logged.
This mode is convenient for developing profiles and is used by the
AppArmor tools for generating profiles. Loading a profile in
enforce mode enforces the policy defined in the
profile, and reports policy violation attempts to
rsyslogd (or
auditd or
journalctl, depending on system
configuration).
The dialog allows you to view and edit the mode of currently loaded AppArmor profiles. This feature is useful for determining the status of your system during profile development. During systemic profiling (see Section 33.7.2, “Systemic profiling”), you can use this tool to adjust and monitor the scope of the profiles for which you are learning behavior.
To edit an application's profile mode, proceed as follows:
Start YaST, select , and click in the main window.
In the section, select .
Select the profile for which to change the mode.
Select to set this profile to complain mode or to enforce mode.
Apply your settings and leave YaST with .
To change the mode of all profiles, use or .
Tip: Listing the profiles available
By default, only active profiles are listed (any profile that has a matching application installed on your system). To set up a profile before installing the respective application, click and select the profile to configure from the list that appears.
33 Building profiles from the command line #Edit source
AppArmor® provides the user the ability to use a command line interface rather than a graphical interface to manage and configure the system security. Track the status of AppArmor and create, delete or modify AppArmor profiles using the AppArmor command line tools.
Tip: Background information
Before starting to manage your profiles using the AppArmor command line tools, check out the general introduction to AppArmor given in Chapter 29, Immunizing programs and Chapter 30, Profile components and syntax.
33.1 Checking the AppArmor status #Edit source
AppArmor can be in any one of three states:
- Unloaded
AppArmor is not activated in the kernel.
- Running
AppArmor is activated in the kernel and is enforcing AppArmor program policies.
- Stopped
AppArmor is activated in the kernel, but no policies are enforced.
Detect the state of AppArmor by inspecting
/sys/kernel/security/apparmor/profiles. If
cat /sys/kernel/security/apparmor/profiles reports a
list of profiles, AppArmor is running. If it is empty and returns nothing,
AppArmor is stopped. If the file does not exist, AppArmor is unloaded.
Manage AppArmor with systemctl. It lets you perform the
following operations:
sudo systemctl start apparmorBehavior depends on the state of AppArmor. If it is not activated,
startactivates and starts it, putting it in the running state. If it is stopped,startcauses the re-scan of AppArmor profiles found in/etc/apparmor.dand puts AppArmor in the running state. If AppArmor is already running,startreports a warning and takes no action.Note: Already running processes
Already running processes need to be restarted to apply the AppArmor profiles on them.
sudo systemctl stop apparmorStops AppArmor if it is running by removing all profiles from kernel memory, effectively disabling all access controls, and putting AppArmor into the stopped state. If the AppArmor is already stopped,
stoptries to unload the profiles again, but nothing happens.sudo systemctl reload apparmorCauses the AppArmor module to re-scan the profiles in
/etc/apparmor.dwithout unconfining running processes. Freshly created profiles are enforced and recently deleted ones are removed from the/etc/apparmor.ddirectory.
33.2 Building AppArmor profiles #Edit source
The AppArmor module profile definitions are stored in the
/etc/apparmor.d directory as plain text files. For a
detailed description of the syntax of these files, refer to
Chapter 30, Profile components and syntax.
All files in the /etc/apparmor.d directory are
interpreted as profiles and are loaded as such. Renaming files in that
directory is not an effective way of preventing profiles from being
loaded. You must remove profiles from this directory to prevent them from
being read and evaluated effectively, or call
aa-disable on the profile, which creates a
symbolic link in /etc/apparmor.d/disabled/.
You can use a text editor, such as vi, to access and
make changes to these profiles. The following sections contain detailed
steps for building profiles:
- Adding or creating AppArmor profiles
Refer to Section 33.3, “Adding or creating an AppArmor profile”
- Editing AppArmor profiles
- Deleting AppArmor profiles
33.3 Adding or creating an AppArmor profile #Edit source
To add or create an AppArmor profile for an application, you can use a systemic or stand-alone profiling method, depending on your needs. Learn more about these two approaches in Section 33.7, “Two methods of profiling”.
33.4 Editing an AppArmor profile #Edit source
The following steps describe the procedure for editing an AppArmor profile:
If you are not currently logged in as
root, entersuin a terminal window.Enter the
rootpassword when prompted.Go to the profile directory with
cd /etc/apparmor.d/.Enter
lsto view all profiles currently installed.Open the profile to edit in a text editor, such as vim.
Make the necessary changes, then save the profile.
Restart AppArmor by entering
systemctl reload apparmorin a terminal window.
33.5 Unloading unknown AppArmor profiles #Edit source
Warning: Danger of unloading wanted profiles
aa-remove-unknown unloads all profiles that
are not stored in /etc/apparmor.d, for example
automatically generated LXD profiles. This may compromise the
security of the system. Use the -n parameter to
list all profiles that are unloaded.
To unload all AppArmor profiles that are no longer in
/etc/apparmor.d/, run:
>sudoaa-remove-unknown
You can print a list of profiles that are removed:
>sudoaa-remove-unknown -n
33.6 Deleting an AppArmor profile #Edit source
The following steps describe the procedure for deleting an AppArmor profile.
Remove the AppArmor definition from the kernel:
>sudoapparmor_parser -R /etc/apparmor.d/PROFILERemove the definition file:
>sudorm /etc/apparmor.d/PROFILE>sudorm /var/lib/apparmor/cache/PROFILE
33.7 Two methods of profiling #Edit source
Given the syntax for AppArmor profiles in Chapter 30, Profile components and syntax, you could create profiles without using the tools. However, the effort involved would be substantial. To avoid such a situation, use the AppArmor tools to automate the creation and refinement of profiles.
There are two ways to approach AppArmor profile creation. Tools are available for both methods.
- Stand-alone profiling
A method suitable for profiling small applications that have a finite runtime, such as user client applications like mail clients. For more information, refer to Section 33.7.1, “Stand-alone profiling”.
- Systemic profiling
A method suitable for profiling many programs at once and for profiling applications that may run for days, weeks or continuously across reboots, such as network server applications like Web servers and mail servers. For more information, refer to Section 33.7.2, “Systemic profiling”.
Automated profile development becomes more manageable with the AppArmor tools:
Decide which profiling method suits your needs.
Perform a static analysis. Run either
aa-genproforaa-autodep, depending on the profiling method chosen.Enable dynamic learning. Activate learning mode for all profiled programs.
33.7.1 Stand-alone profiling #Edit source
Stand-alone profile generation and improvement is managed by a program
called aa-genprof. This method is easy because
aa-genprof takes care of everything, but is limited
because it requires aa-genprof to run for the entire
duration of the test run of your program (you cannot reboot the machine
while you are still developing your profile).
To use aa-genprof for the stand-alone method of
profiling, refer to
Section 33.7.3.8, “aa-genprof—generating profiles”.
33.7.2 Systemic profiling #Edit source
This method is called systemic profiling because it
updates all the profiles on the system at once, rather than focusing
on the one or few targeted by aa-genprof or
stand-alone profiling. With systemic profiling, profile construction and
improvement are less automated, but more flexible. This method
is suitable for profiling long-running applications whose behavior
continues after rebooting, or many programs at once.
Build an AppArmor profile for a group of applications as follows:
Create profiles for the individual programs that make up your application.
Although this approach is systemic, AppArmor monitors those programs with profiles and their children. To get AppArmor to consider a program, you must at least have
aa-autodepcreate an approximate profile for it. To create this approximate profile, refer to Section 33.7.3.1, “aa-autodep—creating approximate profiles”.Put relevant profiles into learning or complain mode.
Activate learning or complain mode for all profiled programs by entering
>sudoaa-complain /etc/apparmor.d/*in a terminal window while logged in as
root. This functionality is also available through the YaST Profile Mode module, described in Section 32.4.2, “Changing the mode of individual profiles”.When in learning mode, access requests are not blocked, even if the profile dictates that they should be. This enables you to run through several tests (as shown in Step 3) and learn the access needs of the program so it runs properly. With this information, you can decide how secure to make the profile.
Refer to Section 33.7.3.2, “aa-complain—entering complain or learning mode” for more detailed instructions for using learning or complain mode.
Exercise your application.
Run your application and exercise its functionality. How much to exercise the program is up to you, but you need the program to access each file representing its access needs. Because the execution is not being supervised by
aa-genprof, this step can go on for days or weeks and can span complete system reboots.Analyze the log.
In systemic profiling, run
aa-logprofdirectly instead of lettingaa-genprofrun it (as in stand-alone profiling). The general form ofaa-logprofis:>sudoaa-logprof [ -d /path/to/profiles ] [ -f /path/to/logfile ]Refer to Section 33.7.3.9, “aa-logprof—scanning the system log” for more information about using
aa-logprof.This generates optimal profiles. An iterative approach captures smaller data sets that can be trained and reloaded into the policy engine. Subsequent iterations generate fewer messages and run faster.
Edit the profiles.
You should review the profiles that have been generated. You can open and edit the profiles in
/etc/apparmor.d/using a text editor.Return to enforce mode.
This is when the system goes back to enforcing the rules of the profiles, not only logging information. This can be done manually by removing the
flags=(complain)text from the profiles or automatically by using theaa-enforcecommand, which works identically to theaa-complaincommand, except it sets the profiles to enforce mode. This functionality is also available through the YaST Profile Mode module, described in Section 32.4.2, “Changing the mode of individual profiles”.To ensure that all profiles are taken out of complain mode and put into enforce mode, enter
aa-enforce /etc/apparmor.d/*.Re-scan all profiles.
To have AppArmor re-scan all the profiles and change the enforcement mode in the kernel, enter
systemctl reload apparmor.
33.7.3 Summary of profiling tools #Edit source
All of the AppArmor profiling utilities are provided by the
apparmor-utils RPM package and are stored in
/usr/sbin. Each tool has a different purpose.
33.7.3.1 aa-autodep—creating approximate profiles #Edit source
This creates an approximate profile for the program or application
selected. You can generate approximate profiles for binary executables
and interpreted script programs. The resulting profile is called
“approximate” because it does not necessarily contain all
of the profile entries that the program needs to be properly confined
by AppArmor. The minimum aa-autodep approximate
profile has, at minimum, a base include directive, which contains basic
profile entries needed by most programs. For certain types of programs,
aa-autodep generates a more expanded profile. The
profile is generated by recursively calling ldd(1)
on the executables listed on the command line.
To generate an approximate profile, use the
aa-autodep program. The program argument can be
either the simple name of the program, which
aa-autodep finds by searching your shell's path
variable, or it can be a fully qualified path. The program itself can
be of any type (ELF binary, shell script, Perl script, etc.).
aa-autodep generates an approximate profile to
improve through the dynamic profiling that follows.
The resulting approximate profile is written to the
/etc/apparmor.d directory using the AppArmor
profile naming convention of naming the profile after the absolute path
of the program, replacing the forward slash (/)
characters in the path with period (.) characters.
The general syntax of aa-autodep is to enter the
following in a terminal window:
>sudoaa-autodep [ -d /PATH/TO/PROFILES ] [PROGRAM1 PROGRAM2...]
If you do not enter the program name or names, you are prompted for
them. /path/to/profiles overrides the
default location of /etc/apparmor.d, should you
keep profiles in a location other than the default.
To begin profiling, you must create profiles for each main executable service that is part of your application (anything that might start without being a child of another program that already has a profile). Finding all such programs depends on the application in question. Here are several strategies for finding such programs:
- Directories
If all the programs to profile are in one directory and there are no other programs in that directory, the simple command
aa-autodep/path/to/your/programs/* creates basic profiles for all programs in that directory.- pstree -p
You can run your application and use the standard Linux
pstreecommand to find all processes running. Then manually hunt down the location of these programs and run theaa-autodepfor each one. If the programs are in your path,aa-autodepfinds them for you. If they are not in your path, the standard Linux commandfindmight be helpful in finding your programs. Executefind / -name 'MY_APPLICATION' -print to determine an application's path (MY_APPLICATION being an example application). You may use wild cards if appropriate.
33.7.3.2 aa-complain—entering complain or learning mode #Edit source
The complain or learning mode tool (aa-complain)
detects violations of AppArmor profile rules, such as the profiled
program accessing files not permitted by the profile. The violations
are permitted, but also logged. To improve the profile, turn complain
mode on, run the program through a suite of tests to generate log
events that characterize the program's access needs, then postprocess
the log with the AppArmor tools to transform log events into improved
profiles.
Manually activating complain mode (using the command line) adds a flag
to the top of the profile so that /bin/foo becomes
/bin/foo flags=(complain). To use complain mode,
open a terminal window and enter one of the following lines as
root:
If the example program (PROGRAM1) is in your path, use:
>sudoaa-complain [PROGRAM1 PROGRAM2 ...]If the program is not in your path, specify the entire path as follows:
>sudoaa-complain /sbin/PROGRAM1If the profiles are not in
/etc/apparmor.d, use the following to override the default location:>sudoaa-complain /path/to/profiles/PROGRAM1Specify the profile for /sbin/program1 as follows:
>sudoaa-complain /etc/apparmor.d/sbin.PROGRAM1
Each of the above commands activates the complain mode for the profiles
or programs listed. If the program name does not include its entire
path, aa-complain searches $PATH for
the program. For example, aa-complain /usr/sbin/*
finds profiles associated with all the programs in
/usr/sbin and puts them into complain mode.
aa-complain /etc/apparmor.d/* puts all the
profiles in /etc/apparmor.d into complain mode.
Tip: Toggling profile mode with YaST
YaST offers a graphical front-end for toggling complain and enforce mode. See Section 32.4.2, “Changing the mode of individual profiles” for information.
33.7.3.3 aa-decode—decoding hex-encoded strings in AppArmor log files #Edit source
aa-decode decodes hex-encoded strings in the
AppArmor log output. It can also process the audit log on standard
input, convert any hex-encoded AppArmor log entries, and display them on
standard output.
33.7.3.4 aa-disable—disabling an AppArmor security profile #Edit source
Use aa-disable to disable the enforcement mode for
one or more AppArmor profiles. This command unloads the profile from
the kernel and prevents the profile from being loaded on AppArmor
start-up. Use aa-enforce or
aa-complain utilities to change this behavior.
33.7.3.5 aa-easyprof—easy profile generation #Edit source
aa-easyprof provides an easy-to-use interface for
AppArmor profile generation. aa-easyprof supports the
use of templates and profile groups to quickly profile an application.
While aa-easyprof can help with profile generation,
its utility is dependent on the quality of the templates, profile
groups and abstractions used. Also, this tool may create a profile that
is less restricted than when creating a profile manually or with
aa-genprof and aa-logprof.
For more information, see the man page of
aa-easyprof (8).
33.7.3.6 aa-enforce—entering enforce mode #Edit source
The enforce mode detects violations of AppArmor profile rules, such as the profiled program accessing files not permitted by the profile. The violations are logged and not permitted. The default is for enforce mode to be enabled. To log the violations, but still permit them, use complain mode.
Manually activating enforce mode (using the command line) removes the
complain flag from the top of the profile so that /bin/foo
flags=(complain) becomes /bin/foo. To use
enforce mode, open a terminal window and enter one of the following
lines.
If the example program (PROGRAM1) is in your path, use:
>sudoaa-enforce [PROGRAM1 PROGRAM2 ...]If the program is not in your path, specify the entire path, as follows:
>sudoaa-enforce /sbin/PROGRAM1If the profiles are not in /etc/apparmor.d, use the following to override the default location:
>sudoaa-enforce -d /path/to/profiles/ program1Specify the profile for /sbin/program1 as follows:
>sudoaa-enforce /etc/apparmor.d/sbin.PROGRAM1
Each of the above commands activates the enforce mode for the profiles and programs listed.
If you do not enter the program or profile names, you are prompted to
enter one. /path/to/profiles overrides the
default location of /etc/apparmor.d.
The argument can be either a list of programs or a list of profiles. If
the program name does not include its entire path,
aa-enforce searches $PATH for the
program.
Tip: Toggling profile mode with YaST
YaST offers a graphical front-end for toggling complain and enforce mode. See Section 32.4.2, “Changing the mode of individual profiles” for information.
33.7.3.7 aa-exec—confining a program with the specified profile #Edit source
Use aa-exec to launch a program confined by a
specified profile and/or profile namespace. If both a profile and
namespace are specified, the program is confined by the profile in
the new namespace. If a profile namespace is specified, the
profile name of the current confinement is used. If neither a
profile nor namespace is specified, the command runs using the
standard profile attachment—as if you did not use the
aa-exec command.
For more information on the command's options, see its manual page
man 8 aa-exec.
33.7.3.8 aa-genprof—generating profiles #Edit source
aa-genprof is AppArmor's profile generating utility.
It runs aa-autodep on the specified program,
creating an approximate profile (if a profile does not already exist
for it), sets it to complain mode, reloads it into AppArmor, marks the
log, and prompts the user to execute the program and exercise its
functionality. Its syntax is as follows:
>sudoaa-genprof [ -d /path/to/profiles ] PROGRAM
To create a profile for the Apache Web server program httpd2-prefork,
do the following as root:
Enter
systemctl stop apache2.Next, enter
aa-genprof httpd2-prefork.Now
aa-genprofdoes the following:Resolves the full path of httpd2-prefork using your shell's path variables. You can also specify a full path. On openSUSE Leap, the default full path is
/usr/sbin/httpd2-prefork.Checks to see if there is an existing profile for httpd2-prefork. If there is one, it updates it. If not, it creates one using the
aa-autodepas described in Section 33.7.3, “Summary of profiling tools”.Puts the profile for this program into learning or complain mode so that profile violations are logged, but are permitted to proceed. A log event looks like this (see
/var/log/audit/audit.log):type=APPARMOR_ALLOWED msg=audit(1189682639.184:20816): \ apparmor="DENIED" operation="file_mmap" parent=2692 \ profile="/usr/sbin/httpd2-prefork//HANDLING_UNTRUSTED_INPUT" \ name="/var/log/apache2/access_log-20140116" pid=28730 comm="httpd2-prefork" \ requested_mask="::r" denied_mask="::r" fsuid=30 ouid=0
If you are not running the audit daemon, the AppArmor events are logged directly to
systemdjournal (see Book “Reference”, Chapter 11 “journalctl: query thesystemdjournal”):Sep 13 13:20:30 K23 kernel: audit(1189682430.672:20810): \ apparmor="DENIED" operation="file_mmap" parent=2692 \ profile="/usr/sbin/httpd2-prefork//HANDLING_UNTRUSTED_INPUT" \ name="/var/log/apache2/access_log-20140116" pid=28730 comm="httpd2-prefork" \ requested_mask="::r" denied_mask="::r" fsuid=30 ouid=0
They also can be viewed using the
dmesgcommand:audit(1189682430.672:20810): apparmor="DENIED" \ operation="file_mmap" parent=2692 \ profile="/usr/sbin/httpd2-prefork//HANDLING_UNTRUSTED_INPUT" \ name="/var/log/apache2/access_log-20140116" pid=28730 comm="httpd2-prefork" \ requested_mask="::r" denied_mask="::r" fsuid=30 ouid=0
Marks the log with a beginning marker of log events to consider. For example:
Sep 13 17:48:52 figwit root: GenProf: e2ff78636296f16d0b5301209a04430d
When prompted by the tool, run the application to profile in another terminal window and perform as many of the application functions as possible. Thus, the learning mode can log the files and directories to which the program requires access to function properly. For example, in a new terminal window, enter
systemctl start apache2.Select from the following options that are available in the
aa-genprofterminal window after you have executed the program function:S runs
aa-genprofon the system log from where it was marked whenaa-genprofwas started and reloads the profile. If system events exist in the log, AppArmor parses the learning mode log files. This generates a series of questions that you must answer to guideaa-genprofin generating the security profile.F exits the tool.
Note
If requests to add hats appear, proceed to Chapter 34, Profiling your Web applications using ChangeHat.
Answer two types of questions:
A resource is requested by a profiled program that is not in the profile (see Example 33.1, “Learning mode exception: controlling access to specific resources”).
A program is executed by the profiled program and the security domain transition has not been defined (see Example 33.2, “Learning mode exception: defining permissions for an entry”).
Each of these categories results in a series of questions that you must answer to add the resource or program to the profile. Example 33.1, “Learning mode exception: controlling access to specific resources” and Example 33.2, “Learning mode exception: defining permissions for an entry” provide examples of each one. Subsequent steps describe your options in answering these questions.
Dealing with execute accesses is complex. You must decide how to proceed with this entry regarding which execute permission type to grant to this entry:
Example 33.1: Learning mode exception: controlling access to specific resources #
Reading log entries from /var/log/audit/audit.log. Updating AppArmor profiles in /etc/apparmor.d. Profile: /usr/sbin/cupsd Program: cupsd Execute: /usr/lib/cups/daemon/cups-lpd Severity: unknown (I)nherit / (P)rofile / (C)hild / (N)ame / (U)nconfined / (X)ix / (D)eny / Abo(r)t / (F)inish
- Inherit (ix)
The child inherits the parent's profile, running with the same access controls as the parent. This mode is useful when a confined program needs to call another confined program without gaining the permissions of the target's profile or losing the permissions of the current profile. This mode is often used when the child program is a helper application, such as the
/usr/bin/mailclient usinglessas a pager.- Profile (px/px)
The child runs using its own profile, which must be loaded into the kernel. If the profile is not present, attempts to execute the child fail with permission denied. This is most useful if the parent program is invoking a global service, such as DNS lookups or sending mail with your system's MTA.
Choose the (Px) option to scrub the environment of environment variables that could modify execution behavior when passed to the child process.
- Child (cx/cx)
Sets up a transition to a subprofile. It is like px/Px transition, except to a child profile.
Choose the (Cx) option to scrub the environment of environment variables that could modify execution behavior when passed to the child process.
- Unconfined (ux/ux)
The child runs unconfined without any AppArmor profile applied to the executed resource.
Choose the (Ux) option to scrub the environment of environment variables that could modify execution behavior when passed to the child process. Running unconfined profiles introduces a security vulnerability that could be used to evade AppArmor. Use it as a last resort.
- mmap (m)
This permission denotes that the program running under the profile can access the resource using the mmap system call with the flag
PROT_EXEC. This means that the data mapped in it can be executed. You are prompted to include this permission if it is requested during a profiling run.- Deny
Adds a
denyrule to the profile, and permanently prevents the program from accessing the specified directory path entries. AppArmor then continues to the next event.- Abort
Aborts
aa-logprof, losing all rule changes entered so far and leaving all profiles unmodified.- Finish
Closes
aa-logprof, saving all rule changes entered so far and modifying all profiles.
Example 33.2, “Learning mode exception: defining permissions for an entry” shows AppArmor suggest allowing a globbing pattern
/var/run/nscd/*for reading, then using an abstraction to cover common Apache-related access rules.Example 33.2: Learning mode exception: defining permissions for an entry #
Profile: /usr/sbin/httpd2-prefork Path: /var/run/nscd/dbSz9CTr Mode: r Severity: 3 1 - /var/run/nscd/dbSz9CTr [2 - /var/run/nscd/*] (A)llow / [(D)eny] / (G)lob / Glob w/(E)xt / (N)ew / Abo(r)t / (F)inish / (O)pts Adding /var/run/nscd/* r to profile. Profile: /usr/sbin/httpd2-prefork Path: /proc/11769/attr/current Mode: w Severity: 9 [1 - #include <abstractions/apache2-common>] 2 - /proc/11769/attr/current 3 - /proc/*/attr/current (A)llow / [(D)eny] / (G)lob / Glob w/(E)xt / (N)ew / Abo(r)t / (F)inish / (O)pts Adding #include <abstractions/apache2-common> to profile.
AppArmor provides one or more paths or includes. By entering the option number, select the desired options then proceed to the next step.
Note
Not all these options are always presented in the AppArmor menu.
#includeThis is the section of an AppArmor profile that refers to an include file, which procures access permissions for programs. By using an include, you can give the program access to directory paths or files that are also required by other programs. Using includes can reduce the size of a profile. It is good practice to select includes when suggested.
- Globbed version
This is accessed by selecting as described in the next step. For information about globbing syntax, refer to Section 30.6, “Profile names, flags, paths, and globbing”.
- Actual path
This is the literal path to which the program needs access so that it can run properly.
After you select the path or include, process it as an entry into the AppArmor profile by selecting or . If you are not satisfied with the directory path entry as it is displayed, you can also it.
The following options are available to process the learning mode entries and build the profile:
- Select Enter
Allows access to the selected directory path.
- Allow
Allows access to the specified directory path entries. AppArmor suggests file permission access. For more information, refer to Section 30.7, “File permission access modes”.
- Deny
Prevents the program from accessing the specified directory path entries. AppArmor then continues to the next event.
- New
Prompts you to enter your own rule for this event, allowing you to specify a regular expression. If the expression does not actually satisfy the event that prompted the question in the first place, AppArmor asks for confirmation and lets you reenter the expression.
- Glob
Select a specific path or create a general rule using wild cards that match a broader set of paths. To select any of the offered paths, enter the number that is printed in front of the path then decide how to proceed with the selected item.
For more information about globbing syntax, refer to Section 30.6, “Profile names, flags, paths, and globbing”.
- Glob w/ext
This modifies the original directory path while retaining the file name extension. For example,
/etc/apache2/file.extbecomes/etc/apache2/*.ext, adding the wild card (asterisk) in place of the file name. This allows the program to access all files in the suggested directory that end with the.extextension.- Abort
Aborts
aa-logprof, losing all rule changes entered so far and leaving all profiles unmodified.- Finish
Closes
aa-logprof, saving all rule changes entered so far and modifying all profiles.
To view and edit your profile using
vi, entervi /etc/apparmor.d/PROFILENAME in a terminal window. To enable syntax highlighting when editing an AppArmor profile in vim, use the commands:syntax onthen:set syntax=apparmor. For more information about vim and syntax highlighting, refer to Section 33.7.3.14, “apparmor.vim”.Restart AppArmor and reload the profile set including the newly created one using the
systemctl reload apparmorcommand.
Like the graphical front-end for building AppArmor profiles, the
YaST Add Profile Wizard, aa-genprof also
supports the use of the local profile repository under
/usr/share/apparmor/extra-profiles.
To use a profile from the local repository, proceed as follows:
Start
aa-genprofas described above.If
aa-genproffinds an inactive local profile, the following lines appear on your terminal window:Profile: /usr/bin/opera [1 - Inactive local profile for /usr/bin/opera] [(V)iew Profile] / (U)se Profile / (C)reate New Profile / Abo(r)t / (F)inish
To use this profile, press U () and follow the profile generation procedure outlined above.
To examine the profile before activating it, press V ().
To ignore the existing profile, press C () and follow the profile generation procedure outlined above to create the profile from scratch.
Leave
aa-genprofby pressing F () when you are done and save your changes.
33.7.3.9 aa-logprof—scanning the system log #Edit source
aa-logprof is an interactive tool used to review the
complain and enforce mode events found in the log entries in
/var/log/audit/audit.log, or directly in the
systemd journal (see Book “Reference”, Chapter 11 “journalctl: query the systemd journal”), and
generate new entries in AppArmor security profiles.
When you run aa-logprof, it begins to scan the log
files produced in complain and enforce mode and, if there are new
security events that are not covered by the existing profile set, it
gives suggestions for modifying the profile.
aa-logprof uses this information to observe program
behavior.
If a confined program forks and executes another program,
aa-logprof sees this and asks the user which
execution mode should be used when launching the child process. The
execution modes ix, px,
Px, ux,
Ux, cx,
Cx, and named profiles, are options for starting
the child process. If a separate profile exists for the child process,
the default selection is Px. If one does not
exist, the profile defaults to ix. Child processes
with separate profiles have aa-autodep run on them
and are loaded into AppArmor, if it is running.
When aa-logprof exits, profiles are updated with the
changes. If AppArmor is active, the updated profiles are reloaded and,
if any processes that generated security events are still running in
the null-XXXX profiles (unique profiles temporarily created in complain
mode), those processes are set to run under their proper profiles.
To run aa-logprof, enter
aa-logprof into a terminal window while logged in as
root. The following options can be used for
aa-logprof:
aa-logprof -d/path/to/profile/directory/Specifies the full path to the location of the profiles if the profiles are not located in the standard directory,
/etc/apparmor.d/.aa-logprof -f/path/to/logfile/Specifies the full path to the location of the log file if the log file is not located in the default directory or
/var/log/audit/audit.log.aa-logprof -m "string marker in logfile"Marks the starting point for
aa-logprofto look in the system log.aa-logprofignores all events in the system log before the specified mark. If the mark contains spaces, it must be surrounded by quotes to work correctly. For example:#aa-logprof -m "17:04:21"or
#aa-logprof -m e2ff78636296f16d0b5301209a04430d
aa-logprof scans the log, asking you how to handle
each logged event. Each question presents a numbered list of AppArmor
rules that can be added by pressing the number of the item on the list.
By default, aa-logprof looks for profiles in
/etc/apparmor.d/. Often running
aa-logprof as root is enough to update the
profile. However, there might be times when you need to search archived
log files, such as if the program exercise period exceeds the log
rotation window (when the log file is archived and a new log file is
started). If this is the case, you can enter zcat -f `ls
-1tr /path/to/logfile*` |
aa-logprof -f -.
33.7.3.10 aa-logprof example 1 #Edit source
The following is an example of how aa-logprof
addresses httpd2-prefork accessing the file
/etc/group. [] indicates the
default option.
In this example, the access to /etc/group is part of
httpd2-prefork accessing name services. The appropriate response is
1, which includes a predefined set of AppArmor rules.
Selecting 1 to #include the name
service package resolves all of the future questions pertaining to DNS
lookups and makes the profile less brittle in that any changes to
DNS configuration and the associated name service profile package can
be made once, rather than needing to revise many profiles.
Profile: /usr/sbin/httpd2-prefork Path: /etc/group New Mode: r [1 - #include <abstractions/nameservice>] 2 - /etc/group [(A)llow] / (D)eny / (N)ew / (G)lob / Glob w/(E)xt / Abo(r)t / (F)inish
Select one of the following responses:
- Select Enter
Triggers the default action, which is, in this example, allowing access to the specified directory path entry.
- Allow
Allows access to the specified directory path entries. AppArmor suggests file permission access. For more information about this, refer to Section 30.7, “File permission access modes”.
- Deny
Permanently prevents the program from accessing the specified directory path entries. AppArmor then continues to the next event.
- New
Prompts you to enter your own rule for this event, allowing you to specify whatever form of regular expression you want. If the expression entered does not satisfy the event that prompted the question in the first place, AppArmor asks for confirmation and lets you reenter the expression.
- Glob
Select either a specific path or create a general rule using wild cards that matches on a broader set of paths. To select any of the offered paths, enter the number that is printed in front of the paths then decide how to proceed with the selected item.
For more information about globbing syntax, refer to Section 30.6, “Profile names, flags, paths, and globbing”.
- Glob w/ext
This modifies the original directory path while retaining the file name extension. For example,
/etc/apache2/file.extbecomes/etc/apache2/*.ext, adding the wild card (asterisk) in place of the file name. This allows the program to access all files in the suggested directory that end with the.extextension.- Abort
Aborts
aa-logprof, losing all rule changes entered so far and leaving all profiles unmodified.- Finish
Closes
aa-logprof, saving all rule changes entered so far and modifying all profiles.
33.7.3.11 aa-logprof example 2 #Edit source
For example, when profiling vsftpd, see this question:
Profile: /usr/sbin/vsftpd Path: /y2k.jpg New Mode: r [1 - /y2k.jpg] (A)llow / [(D)eny] / (N)ew / (G)lob / Glob w/(E)xt / Abo(r)t / (F)inish
Several items of interest appear in this question. First,
vsftpd is asking for a path entry at the top of the tree, even though
vsftpd on openSUSE Leap
serves FTP files from /srv/ftp by default. This is
because vsftpd uses chroot and, for the portion of the code inside the
chroot jail, AppArmor sees file accesses regarding the chroot
environment rather than the global absolute path.
The second item of interest is that you should grant FTP read
access to all JPEG files in the directory, so you could use
and use the suggested path of
/*.jpg. Doing so collapses all previous rules
granting access to individual .jpg files and
forestalls any future questions pertaining to access to
.jpg files.
Finally, you should grant more general access to FTP files. If
you select in the last entry,
aa-logprof replaces the suggested path of
/y2k.jpg with /*.
Alternatively, you should grant even more access to the entire
directory tree, in which case you could use the
path option and enter /**.jpg (which would grant
access to all .jpg files in the entire directory
tree) or /** (which would grant access to all
files in the directory tree).
These items deal with read accesses. Write accesses are similar, except that it is good policy to be more conservative in your use of regular expressions for write accesses. Dealing with execute accesses is more complex. Find an example in Example 33.1, “Learning mode exception: controlling access to specific resources”.
In the following example, the /usr/bin/mail mail
client is being profiled and aa-logprof has
discovered that /usr/bin/mail executes
/usr/bin/less as a helper application to
“page” long mail messages. Consequently, it presents this
prompt:
/usr/bin/nail -> /usr/bin/less (I)nherit / (P)rofile / (C)hild / (N)ame / (U)nconfined / (X)ix / (D)eny
Note
The actual executable file for /usr/bin/mail
turns out to be /usr/bin/nail, which is not a
typographical error.
The program /usr/bin/less appears to be a
simple one for scrolling through text that is more than one screen
long and that is in fact what /usr/bin/mail is
using it for. However, less is actually a large
and powerful program that uses many other helper applications, such
as tar and rpm.
Tip
Run less on a tar file or an RPM file and it shows
you the inventory of these containers.
You do not want to run rpm automatically when
reading mail messages (that leads directly to a Microsoft*
Outlook–style virus attack, because RPM has the power to
install and modify system programs), so, in this case, the best choice
is to use . This results in the less program
executed from this context running under the profile for
/usr/bin/mail. This has two consequences:
You need to add all the basic file accesses for
/usr/bin/lessto the profile for/usr/bin/mail.You can avoid adding the helper applications, such as
tarandrpm, to the/usr/bin/mailprofile so that when/usr/bin/mailruns/usr/bin/lessin this context, the less program is far less dangerous than it would be without AppArmor protection. Another option is to use the Cx execute modes. For more information on execute modes, see Section 30.12, “Execute modes”.
In other circumstances, you might instead want to use the
option. This has the following effects on
aa-logprof:
The rule written into the profile uses px/Px, which forces the transition to the child's own profile.
aa-logprofconstructs a profile for the child and starts building it, in the same way that it built the parent profile, by assigning events for the child process to the child's profile and asking theaa-logprofuser questions. The profile is applied if you run the child as a stand-alone program.
If a confined program forks and executes another program,
aa-logprof sees this and asks the user which
execution mode should be used when launching the child process. The
execution modes of inherit, profile, unconfined, child, named profile,
or an option to deny the execution are presented.
If a separate profile exists for the child process, the default
selection is profile. If a profile does not exist, the default is
inherit. The inherit option, or ix, is described in
Section 30.7, “File permission access modes”.
The profile option indicates that the child program should run in its
own profile. A secondary question asks whether to sanitize the
environment that the child program inherits from the parent. If you
choose to sanitize the environment, this places the execution modifier
Px in your AppArmor profile. If you select not to
sanitize, px is placed in the profile and no
environment sanitizing occurs. The default for the execution mode is
Px if you select profile execution mode.
The unconfined execution mode is not recommended and should be
used in cases where there is no other option to generate a profile for
a program reliably. Selecting unconfined opens a warning dialog asking
for confirmation of the choice. If you are sure and choose
, a second dialog ask whether to sanitize the
environment. To use the execution mode Ux in your
profile, select . To use the execution mode
ux in your profile instead, select
. The default value selected is
Ux for unconfined execution mode.
Important: Running unconfined
Selecting ux or Ux is dangerous and provides
no enforcement of policy (from a security perspective) of the
resulting execution behavior of the child program.
33.7.3.12 aa-unconfined—identifying unprotected processes #Edit source
The aa-unconfined command examines open network
ports on your system, compares that to the set of profiles loaded on
your system, and reports network services that do not have AppArmor
profiles. It requires root privileges and that it not be
confined by an AppArmor profile.
aa-unconfined must be run as root to
retrieve the process executable link from the
/proc file system. This program is susceptible to
the following race conditions:
An unlinked executable is mishandled
A process that dies between
netstat(8)and further checks is mishandled
Note
This program lists processes using TCP and UDP. In short, this program is unsuitable for forensics use and is provided as an aid to profiling all network-accessible processes in the lab.
33.7.3.13 aa-notify #Edit source
aa-notify is a handy utility that displays AppArmor
notifications in your desktop environment. This is convenient if
you do not want to inspect the AppArmor log file, but rather let the
desktop inform you about events that violate the policy. To enable
AppArmor desktop notifications, run aa-notify:
>sudoaa-notify -p -u USERNAME --display DISPLAY_NUMBER
where USERNAME is your user name under which
you are logged in, and DISPLAY_NUMBER is the
X Window display number you are currently using, such as
:0. The process is run in the background, and shows
a notification each time a deny event happens.
Tip
The active X Window display number is saved in the
$DISPLAY variable, so you can use
--display $DISPLAY to avoid finding out the current
display number.
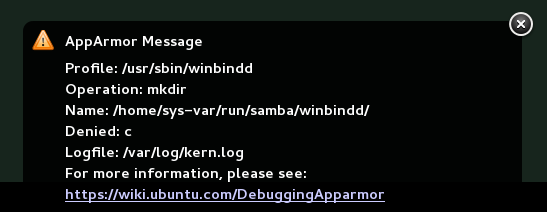
Figure 33.1: aa-notify Message in GNOME #
With the -s DAYS option,
you can also configure aa-notify to display a
summary of notifications for the specified number of past days. For
more information on aa-notify, see its man page
man 8 aa-notify.
33.7.3.14 apparmor.vim #Edit source
A syntax highlighting file for the vim text editor highlights various features of an AppArmor profile with colors. Using vim and the AppArmor syntax mode for vim, you can see the semantic implications of your profiles with color highlighting. Use vim to view and edit your profile by typing vim at a terminal window.
To enable the syntax coloring when you edit an AppArmor profile in vim,
use the commands :syntax on then :set
syntax=apparmor. To make sure vim recognizes the edited file
type correctly as an AppArmor profile, add
# vim:ft=apparmor
at the end of the profile.
Tip
vim comes with AppArmor highlighting automatically
enabled for files in /etc/apparmor.d/.
When you enable this feature, vim colors the lines of the profile for you:
- Blue
Comments
- White
Ordinary read access lines
- Brown
Capability statements and complain flags
- Yellow
Lines that grant write access
- Green
Lines that grant execute permission (either ix or px)
- Red
Lines that grant unconfined access (ux)
- Red background
Syntax errors that do not load properly into the AppArmor modules
Use the apparmor.vim and
vim man pages and the :help
syntax from within the vim editor for further vim help about
syntax highlighting. The AppArmor syntax is stored in
/usr/share/vim/current/syntax/apparmor.vim.
33.8 Important file names and directories #Edit source
The following list contains the most important files and directories used by the AppArmor framework. If you intend to manage and troubleshoot your profiles manually, make sure that you know about these files and directories:
/sys/kernel/security/apparmor/profilesVirtualized file representing the currently loaded set of profiles.
/etc/apparmor/Location of AppArmor configuration files.
/usr/share/apparmor/extra-profilesA local repository of profiles shipped with AppArmor, but not enabled by default.
/etc/apparmor.d/Location of profiles, named with the convention of replacing the
/in paths with.(not for the root/) so profiles are easier to manage. For example, the profile for the program/usr/sbin/smbdis namedusr.sbin.smbd./etc/apparmor.d/abstractions/Location of abstractions.
/etc/apparmor.d/program-chunks/Location of program chunks.
/proc/*/attr/currentCheck this file to review the confinement status of a process and the profile that is used to confine the process. The
psauxZcommand retrieves this information automatically.
34 Profiling your Web applications using ChangeHat #Edit source
An AppArmor® profile represents the security policy for an individual program instance or process. It applies to an executable program, but if a portion of the program needs different access permissions than other portions, the program can “change hats” to use a different security context, distinctive from the access of the main program. This is known as a hat or subprofile.
ChangeHat enables programs to change to or from a hat within an AppArmor profile. It enables you to define security at a finer level than the process. This feature requires that each application be made “ChangeHat-aware”, meaning that it is modified to make a request to the AppArmor module to switch security domains at specific times during the application execution. One example of a ChangeHat-aware application is the Apache Web server.
A profile can have an arbitrary number of subprofiles, but there are only
two levels: a subprofile cannot have further child profiles. A subprofile
is written as a separate profile. Its name consists of the name of the
containing profile followed by the subprofile name, separated by a
^.
Subprofiles are either stored in the same file as the parent profile, or in a separate file. The latter case is recommended on sites with many hats—it allows the policy caching to handle changes at the per hat level. If all the hats are in the same file as the parent profile, then the parent profile and all hats must be recompiled.
An external subprofile that is going to be used as a hat, must begin with
the word hat or the ^ character.
The following two subprofiles cannot be used as a hat:
/foo//bar { }or
profile /foo//bar { }While the following two are treated as hats:
^/foo//bar { }or
hat /foo//bar { } # this syntax is not highlighted in vimThe security of hats is considerably weaker than that of full profiles. Using certain types of bugs in a program, an attacker may be able to escape from a hat into the containing profile. This is because the security of hats is determined by a secret key handled by the containing process, and the code running in the hat must not have access to the key. Thus, change_hat is most useful with application servers, where a language interpreter (such as PERL, PHP or Java) is isolating pieces of code such that they do not have direct access to the memory of the containing process.
The rest of this chapter describes using change_hat with
Apache, to contain Web server components run using mod_perl and mod_php.
Similar approaches can be used with any application server by providing an
application module similar to the mod_apparmor described next in
Section 34.1.2, “Location and directory directives”.
Tip: More information
For more information, see the change_hat man page.
34.1 Configuring Apache for mod_apparmor #Edit source
AppArmor provides a mod_apparmor module (package apache2-mod-apparmor) for the Apache
program. This module
makes the Apache Web server ChangeHat aware. Install it along with Apache.
When Apache is ChangeHat-aware, it checks for the following customized AppArmor security profiles in the order given for every URI request that it receives.
URI-specific hat. For example,
^www_app_name/templates/classic/images/bar_left.gifDEFAULT_URIHANDLING_UNTRUSTED_INPUT
Note: Apache configuration
If you install
apache2-mod-apparmor, make
sure the module is enabled, and then restart Apache by executing the
following command:
> a2enmod apparmor && sudo systemctl reload apache2
Apache is configured by placing directives in plain text configuration
files. The main configuration file is
/etc/apache2/httpd.conf. When you compile Apache,
you can indicate the location of this file. Directives can be placed in
any of these configuration files to alter the way Apache behaves. When
you make changes to the main configuration files, you need to reload
Apache with sudo systemctl reload apache2, so
the changes are recognized.
34.1.1 Virtual host directives #Edit source
<VirtualHost> and </VirtualHost> directives are used to enclose a group of directives that applies only to a particular virtual host. For more information on Apache virtual host directives, refer to https://httpd.apache.org/docs/2.4/en/mod/core.html#virtualhost.
The ChangeHat-specific configuration keyword is
AADefaultHatName. It is used similarly to
AAHatName, for example, AADefaultHatName
My_Funky_Default_Hat.
It allows you to specify a default hat to be used for virtual hosts and
other Apache server directives, so that you can have different defaults
for different virtual hosts. This can be overridden by the
AAHatName directive and is checked for only if there
is not a matching AAHatName or hat named by the URI.
If the AADefaultHatName hat does not exist, it falls
back to the DEFAULT_URI hat if it exists/
If none of those are matched, it goes back to the “parent” Apache hat.
34.1.2 Location and directory directives #Edit source
Location and directory directives specify hat names in the program configuration file so the Apache calls the hat regarding its security. For Apache, you can find documentation about the location and directory directives at https://httpd.apache.org/docs/2.4/en/sections.html.
The location directive example below specifies that, for a given
location, mod_apparmor should use a specific hat:
<Location /foo/> AAHatName MY_HAT_NAME </Location>
This tries to use MY_HAT_NAME for any URI beginning
with /foo/ (/foo/,
/foo/bar,
/foo/cgi/path/blah_blah/blah, etc.).
The directory directive works similarly to the location directive, except it refers to a path in the file system as in the following example:
<Directory "/srv/www/www.example.org/docs"> # Note lack of trailing slash AAHatName example.org </Directory>
34.2 Managing ChangeHat-aware applications #Edit source
In the previous section you learned about mod_apparmor
and the way it helps you to secure a specific Web application. This
section walks you through a real-life example of creating a hat for a Web
application, and using AppArmor's change_hat feature to secure it.
This chapter focuses on AppArmor's command-line tools, as
YaST's AppArmor module has limited functionality.
34.2.1 With AppArmor's command line tools #Edit source
For illustration purposes, let us choose the Web application called Adminer (https://www.adminer.org/en/). It is a full-featured SQL database management tool written in PHP, yet consisting of a single PHP file. For Adminer to work, you need to set up an Apache Web server, PHP and its Apache module, and one of the database drivers available for PHP—MariaDB in this example. You can install the required packages with
zypper in apache2 apache2-mod_apparmor apache2-mod_php5 php5 php5-mysql
To set up the Web environment for running Adminer, follow these steps:
Procedure 34.1: Setting up a web server environment #
Make sure
apparmorandphp5modules are enabled for Apache. To enable the modules in any case, use:>a2enmod apparmor php5and then restart Apache with
>sudosystemctl restart apache2Make sure MariaDB is running. If unsure, restart it with
>sudosystemctl restart mariadbDownload Adminer from https://www.adminer.org, copy it to
/srv/www/htdocs/adminer/, and rename it toadminer.php, so that its full path is/srv/www/htdocs/adminer/adminer.php.Test Adminer in your Web browser by entering
http://localhost/adminer/adminer.phpin its URI address field. If you installed Adminer to a remote server, replacelocalhostwith the real host name of the server.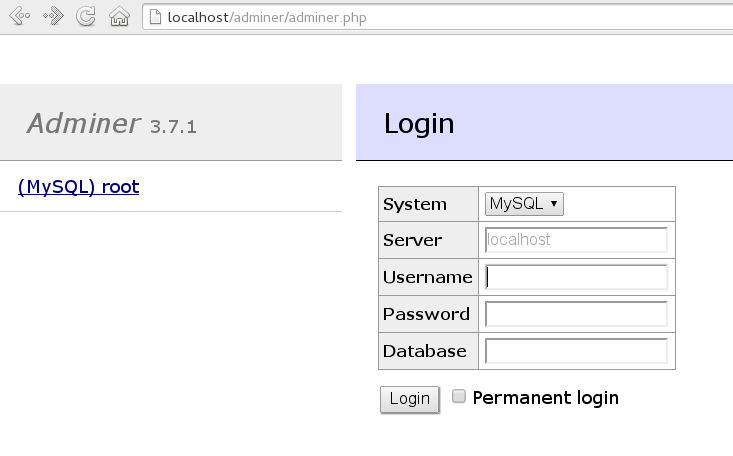
Figure 34.1: Adminer login page #
Tip
If you encounter problems viewing the Adminer login page, try to look for help in the Apache error log
/var/log/apache2/error.log. Another reason you cannot access the Web page may be that your Apache is already under AppArmor control and its AppArmor profile is too tight to permit viewing Adminer. Check it withaa-status, and if needed, set Apache temporarily in complain mode with#sudo aa-complain usr.sbin.httpd2-prefork
After the Web environment for Adminer is ready, you need to configure
Apache's mod_apparmor, so that AppArmor can detect accesses to Adminer and
change to the specific “hat”.
Procedure 34.2: Configuring mod_apparmor #
Apache has several configuration files under
/etc/apache2/and/etc/apache2/conf.d/. Choose your preferred one and open it in a text editor. In this example, thevimeditor is used to create a new configuration file/etc/apache2/conf.d/apparmor.conf.>sudovim /etc/apache2/conf.d/apparmor.confCopy the following snippet into the edited file.
<Directory /srv/www/htdocs/adminer> AAHatName adminer </Directory>
It tells Apache to let AppArmor know about a change_hat event when the Web user accesses the directory
/adminer(and any file/directory inside) in Apache's document root. Remember, we placed theadminer.phpapplication there.Save the file, close the editor, and restart Apache with
>sudosystemctl restart apache2
Apache now knows about our Adminer and changing a “hat” for
it. It is time to create the related hat for Adminer in the AppArmor
configuration. If you do not have an AppArmor profile yet, create one
before proceeding. Remember that if your Apache's main binary is
/usr/sbin/httpd2-prefork, then the related profile
is named /etc/apparmor.d/usr.sbin.httpd2-prefork.
Procedure 34.3: Creating a hat for Adminer #
Open (or create one if it does not exist) the file
/etc/apparmor.d/usr.sbin.httpd2-preforkin a text editor. Its contents should be similar to the following:#include <tunables/global> /usr/sbin/httpd2-prefork { #include <abstractions/apache2-common> #include <abstractions/base> #include <abstractions/php5> capability kill, capability setgid, capability setuid, /etc/apache2/** r, /run/httpd.pid rw, /usr/lib{,32,64}/apache2*/** mr, /var/log/apache2/** rw, ^DEFAULT_URI { #include <abstractions/apache2-common> /var/log/apache2/** rw, } ^HANDLING_UNTRUSTED_INPUT { #include <abstractions/apache2-common> /var/log/apache2/** w, } }Before the last closing curly bracket (
}), insert the following section:^adminer flags=(complain) { }Note the
(complain)addition after the hat name—it tells AppArmor to leave theadminerhat in complain mode. That is because we need to learn the hat profile by accessing Adminer later on.Save the file, and then restart AppArmor, then Apache.
>sudosystemctl reload apparmor apache2Check if the
adminerhat really is in complain mode.>sudoaa-status apparmor module is loaded. 39 profiles are loaded. 37 profiles are in enforce mode. [...] /usr/sbin/httpd2-prefork /usr/sbin/httpd2-prefork//DEFAULT_URI /usr/sbin/httpd2-prefork//HANDLING_UNTRUSTED_INPUT [...] 2 profiles are in complain mode. /usr/bin/getopt /usr/sbin/httpd2-prefork//adminer [...]As we can see, the
httpd2-prefork//admineris loaded in complain mode.
Our last task is to find out the right set of rules for the
adminer hat. That is why we set the
adminer hat into complain mode—the
logging facility collects useful information about the access
requirements of adminer.php as we use it via the Web
browser. aa-logprof then helps us with creating the
hat's profile.
Procedure 34.4: Generating rules for the adminer hat #
Open Adminer in the Web browser. If you installed it locally, then the URI is
http://localhost/adminer/adminer.php.Choose the database engine you want to use (MariaDB in our case), and log in to Adminer using the existing database user name and password. You do not need to specify the database name as you can do so after logging in. Perform any operations with Adminer you like—create a new database, create a new table for it, set user privileges, and so on.
After the short testing of Adminer's user interface, switch back to console and examine the log for collected data.
>sudoaa-logprof Reading log entries from /var/log/audit/audit.log. Updating AppArmor profiles in /etc/apparmor.d. Complain-mode changes: Profile: /usr/sbin/httpd2-prefork^adminer Path: /dev/urandom Mode: r Severity: 3 1 - #include <abstractions/apache2-common> [...] [8 - /dev/urandom] [(A)llow] / (D)eny / (G)lob / Glob w/(E)xt / (N)ew / Abo(r)t / (F)inish / (O)ptsFrom the
aa-logprofmessage, it is clear that our newadminerhat was correctly detected:Profile: /usr/sbin/httpd2-prefork^adminer
The
aa-logprofcommand asks you to pick the right rule for each discovered AppArmor event. Specify the one you want to use, and confirm with . For more information on working with theaa-genprofandaa-logprofinterface, see Section 33.7.3.8, “aa-genprof—generating profiles”.Tip
aa-logprofoffers several valid rules for the examined event. Some are abstractions—predefined sets of rules affecting a specific common group of targets. Sometimes it is useful to include such an abstraction instead of a direct URI rule:1 - #include <abstractions/php5> [2 - /var/lib/php5/sess_3jdmii9cacj1e3jnahbtopajl7p064ai242]
In the example above, it is recommended hitting and confirming with to allow the abstraction.
After the last change, you are asked to save the changed profile.
The following local profiles were changed. Would you like to save them? [1 - /usr/sbin/httpd2-prefork] (S)ave Changes / [(V)iew Changes] / Abo(r)t
Hit to save the changes.
Set the profile to enforce mode with
aa-enforce>sudoaa-enforce usr.sbin.httpd2-preforkand check its status with
aa-status>sudoaa-status apparmor module is loaded. 39 profiles are loaded. 38 profiles are in enforce mode. [...] /usr/sbin/httpd2-prefork /usr/sbin/httpd2-prefork//DEFAULT_URI /usr/sbin/httpd2-prefork//HANDLING_UNTRUSTED_INPUT /usr/sbin/httpd2-prefork//adminer [...]As you can see, the
//adminerhat jumped from complain to enforce mode.Try to run Adminer in the Web browser, and if you encounter problems running it, switch it to the complain mode, repeat the steps that previously did not work well, and update the profile with
aa-logprofuntil you are satisfied with the application's functionality.
Note: Hat and parent profile relationship
The profile ^adminer is only available in the
context of a process running under the parent profile
usr.sbin.httpd2-prefork.
34.2.2 Adding hats and entries to hats in YaST #Edit source
When you use the dialog (for instructions, refer to Section 32.2, “Editing profiles”) or when you add a new profile using (for instructions, refer to Section 32.1, “Manually adding a profile”), you are given the option of adding hats (subprofiles) to your AppArmor profiles. Add a ChangeHat subprofile from the window as in the following.

From the window, click then select . The dialog opens:
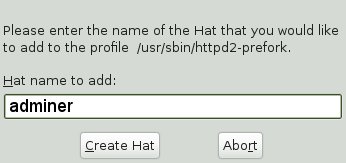
Enter the name of the hat to add to the AppArmor profile. The name is the URI that, when accessed, receives the permissions set in the hat.
Click . You are returned to the screen.
After adding the new hat, click .
35 Confining users with pam_apparmor #Edit source
An AppArmor profile applies to an executable program; if a portion of the
program needs different access permissions than other portions need, the
program can change hats via change_hat to a different role, also known as
a subprofile. The pam_apparmor PAM module allows
applications to confine authenticated users into subprofiles based on
group names, user names, or a default profile. To accomplish this,
pam_apparmor needs to be registered as a PAM
session module.
The package pam_apparmor is not installed by
default, you can install it using YaST or zypper.
Details about how to set up and configure
pam_apparmor can be found in
/usr/share/doc/packages/pam_apparmor/README after the
package has been installed. For details on PAM, refer to
Chapter 2, Authentication with PAM.
36 Managing profiled applications #Edit source
After creating profiles and immunizing your applications, openSUSE® Leap becomes more efficient and better protected if you perform AppArmor® profile maintenance (which involves analyzing log files, refining your profiles, backing up your set of profiles and keeping it up-to-date). You can deal with these issues before they become a problem by setting up event notification by e-mail, updating profiles from system log entries by running the aa-logprof tool, and dealing with maintenance issues.
36.1 Reacting to security event rejections #Edit source
When you receive a security event rejection, examine the access violation
and determine if that event indicated a threat or was part of normal
application behavior. Application-specific knowledge is required to make
the determination. If the rejected action is part of normal application
behavior, run aa-logprof at the command line.
If the rejected action is not part of normal application behavior, this access should be considered a possible intrusion attempt (that was prevented) and this notification should be passed to the person responsible for security within your organization.
36.2 Maintaining your security profiles #Edit source
In a production environment, you should plan on maintaining profiles for all the deployed applications. The security policies are an integral part of your deployment. You should plan on taking steps to back up and restore security policy files, plan for software changes, and allow any needed modification of security policies that your environment dictates.
36.2.1 Backing up your security profiles #Edit source
Backing up profiles might save you from having to re-profile all your programs after a disk crash. Also, if profiles are changed, you can easily restore previous settings by using the backed up files.
Back up profiles by copying the profile files to a specified directory.
You should first archive the files into one file. To do this, open a terminal window and enter the following as
root:>sudotar zclpf profiles.tgz /etc/apparmor.dThe simplest method to ensure that your security policy files are regularly backed up is to include the directory
/etc/apparmor.din the list of directories that your backup system archives.You can also use
scpor a file manager like Nautilus to store the files on certain kind of storage media, the network, or another computer.
36.2.2 Changing your security profiles #Edit source
Maintenance of security profiles includes changing them if you decide that your system requires security for its applications. To change your profiles in AppArmor, refer to Section 32.2, “Editing profiles”.
36.2.3 Introducing new software into your environment #Edit source
When you add a new application version or patch to your system, you should always update the profile to fit your needs. You have several options, depending on your company's software deployment strategy. You can deploy your patches and upgrades into a test or production environment. The following explains how to do this with each method.
If you intend to deploy a patch or upgrade in a test environment, the
best method for updating your profiles is to run
aa-logprof in a terminal as root. For
detailed instructions, refer to
Section 33.7.3.9, “aa-logprof—scanning the system log”.
If you intend to deploy a patch or upgrade directly into a production
environment, the best method for updating your profiles is to monitor
the system frequently to determine if any new rejections should be added
to the profile and update as needed using aa-logprof.
For detailed instructions, refer to
Section 33.7.3.9, “aa-logprof—scanning the system log”.
37 Support #Edit source
This chapter outlines maintenance-related tasks. Learn how to update AppArmor® and get a list of available man pages providing basic help for using the command line tools provided by AppArmor. Use the troubleshooting section to learn about common problems encountered with AppArmor and their solutions. Report defects or enhancement requests for AppArmor following the instructions in this chapter.
37.1 Updating AppArmor online #Edit source
Updates for AppArmor packages are provided in the same way as any other update for openSUSE Leap. Retrieve and apply them exactly like for any other package that ships as part of openSUSE Leap.
37.2 Using the man pages #Edit source
There are man pages available for your use. In a terminal, enter
man apparmor to open the AppArmor man page. Man pages
are distributed in sections numbered 1 through 8. Each section is
specific to a category of documentation:
Table 37.1: Man pages: sections and categories #
|
Section |
Category |
|---|---|
|
1 |
User commands |
|
2 |
System calls |
|
3 |
Library functions |
|
4 |
Device driver information |
|
5 |
Configuration file formats |
|
6 |
Games |
|
7 |
High level concepts |
|
8 |
Administrator commands |
The section numbers are used to distinguish man pages from each other.
For example, exit(2) describes the exit system
call, while exit(3) describes the exit C library
function.
The AppArmor man pages are:
aa-audit(8)aa-autodep(8)aa-complain(8)aa-decode(8)aa-disable(8)aa-easyprof(8)aa-enforce(8)aa-enxec(8)aa-genprof(8)aa-logprof(8)aa-notify(8)aa-status(8)aa-unconfined(8)aa_change_hat(8)logprof.conf(5)apparmor.d(5)apparmor.vim(5)apparmor(7)apparmor_parser(8)apparmor_status(8)
37.3 More information #Edit source
Find more information about the AppArmor product at:
https://wiki.apparmor.net. Find the product
documentation for AppArmor in the installed system at
/usr/share/doc/manual.
There is a mailing list for AppArmor that users can post to or join to communicate with developers. See https://lists.ubuntu.com/mailman/listinfo/apparmor for details.
37.4 Troubleshooting #Edit source
This section lists the most common problems and error messages that may occur using AppArmor.
37.4.1 How to react to odd application behavior? #Edit source
If you notice odd application behavior or any other type of application
problem, you should first check the reject messages in the log files to
see if AppArmor is too closely constricting your application. If you
detect reject messages that indicate that your application or service is
too closely restricted by AppArmor, update your profile to properly
handle your use case of the application. Do this with
aa-logprof
(Section 33.7.3.9, “aa-logprof—scanning the system log”).
If you decide to run your application or service without AppArmor
protection, remove the application's profile from
/etc/apparmor.d or move it to another location.
37.4.2 My profiles do not work anymore … #Edit source
If you have been using previous versions of AppArmor and have updated your system (but kept your old set of profiles) you might notice applications which seemed to work perfectly before you updated behaving strangely, or not working.
This version of AppArmor introduces a set of new features to the profile syntax and the AppArmor tools that might cause trouble with older versions of the AppArmor profiles. Those features are:
File Locking
Network Access Control
The
SYS_PTRACECapabilityDirectory Path Access
The current version of AppArmor mediates file locking and introduces a
new permission mode (k) for this. Applications
requesting file locking permission might misbehave or fail altogether if
confined by older profiles which do not explicitly contain permissions
to lock files. If you suspect this being the case, check the log file
under /var/log/audit/audit.log for entries like the
following:
type=AVC msg=audit(1389862802.727:13939): apparmor="DENIED" \ operation="file_lock" parent=2692 profile="/usr/bin/opera" \ name="/home/tux/.qt/.qtrc.lock" pid=28730 comm="httpd2-prefork" \ requested_mask="::k" denied_mask="::k" fsuid=30 ouid=0
Update the profile using the aa-logprof command as
outlined below.
The new network access control syntax based on the network family and
type specification, described in
Section 30.5, “Network access control”, might cause application
misbehavior or even stop applications from working. If you notice a
network-related application behaving strangely, check the log file under
/var/log/audit/audit.log for entries like the
following:
type=AVC msg=audit(1389864332.233:13947): apparmor="DENIED" \ operation="socket_create" family="inet" parent=29985 profile="/bin/ping" \ sock_type="raw" pid=30251 comm="ping"
This log entry means that our example application,
/bin/ping in this case, failed to get AppArmor's
permission to open a network connection. This permission needs to be
explicitly stated to make sure that an application has network access.
To update the profile to the new syntax, use the
aa-logprof command as outlined below.
The current kernel requires the SYS_PTRACE
capability, if a process tries to access files in
/proc/PID/fd/*. New
profiles need an entry for the file and the capability, where old
profiles only needed the file entry. For example:
/proc/*/fd/** rw,
in the old syntax would translate to the following rules in the new syntax:
capability SYS_PTRACE, /proc/*/fd/** rw,
To update the profile to the new syntax, use the YaST Update
Profile Wizard or the aa-logprof command as outlined
below.
With this version of AppArmor, a few changes have been made to the profile rule syntax to better distinguish directory from file access. Therefore, certain rules matching both file and directory paths in the previous version might now match a path only. This could lead to AppArmor not being able to access a crucial directory, and thus trigger misbehavior of your application and various log messages. The following examples highlight the most important changes to the path syntax.
Using the old syntax, the following rule would allow access to files and
directories in /proc/net. It would allow directory
access only to read the entries in the directory, but not give access to
files or directories under the directory, for example
/proc/net/dir/foo would be matched by the asterisk
(*), but as foo is a file or directory under
dir, it cannot be accessed.
/proc/net/* r,
To get the same behavior using the new syntax, you need two rules
instead of one. The first allows access to the file under
/proc/net and the second allows access to
directories under /proc/net. Directory access can
only be used for listing the contents, not accessing files or
directories underneath the directory.
/proc/net/* r, /proc/net/*/ r,
The following rule works similarly both under the old and the new
syntax, and allows access to both files and directories under
/proc/net (but does not allow a directory listing
of /proc/net/ itself):
/proc/net/** r,
To distinguish file access from directory access using the above
expression in the new syntax, use the following two rules. The first one
only allows to recursively access directories under
/proc/net while the second one explicitly allows
for recursive file access only.
/proc/net/**/ r, /proc/net/**[^/] r,
The following rule works similarly both under the old and the new syntax
and allows access to both files and directories beginning with
foo under /proc/net:
/proc/net/foo** r,
To distinguish file access from directory access in the new syntax and
use the ** globbing pattern, use the following two
rules. The first one would have matched both files and directories in
the old syntax, but only matches files in the new syntax because of the
missing trailing slash. The second rule matched neither file nor
directory in the old syntax, but matches directories only in the new
syntax:
/proc/net/**foo r, /proc/net/**foo/ r,
The following rules illustrate how the use of the ?
globbing pattern has changed. In the old syntax, the first rule would
have matched both files and directories (four characters, last character
could be any but a slash). In the new syntax, it matches only files
(trailing slash is missing). The second rule would match nothing in the
old profile syntax, but matches directories only in the new syntax. The
last rule matches explicitly matches a file called
bar under /proc/net/foo?.
Using the old syntax, this rule would have applied to both files and
directories:
/proc/net/foo? r, /proc/net/foo?/ r, /proc/net/foo?/bar r,
To find and resolve issues related to syntax changes, take some time after the update to check the profiles you want to keep and proceed as follows for each application you kept the profile for:
Put the application's profile into complain mode:
>sudoaa-complain/path/to/applicationLog entries are made for any actions violating the current profile, but the profile is not enforced and the application's behavior not restricted.
Run the application covering all the tasks you need this application to be able to perform.
Update the profile according to the log entries made while running the application:
>sudoaa-logprof/path/to/applicationPut the resulting profile back into enforce mode:
>sudoaa-enforce/path/to/application
37.4.3 Resolving issues with Apache #Edit source
After installing additional Apache modules (like
apache2-mod_apparmor) or making configuration changes
to Apache, profile Apache again to find out if additional rules need to
be added to the profile. If you do not profile Apache again, it could be
unable to start properly or be unable to serve Web pages.
37.4.4 How to exclude certain profiles from the list of profiles used? #Edit source
Run aa-disable
PROGRAMNAME to disable the
profile for PROGRAMNAME. This command creates
a symbolic link to the profile in
/etc/apparmor.d/disable/. To reactivate
the profile, delete the link, and run systemctl reload
apparmor.
37.4.5 Can I manage profiles for applications not installed on my system? #Edit source
Managing profiles with AppArmor requires you to have access to the log of
the system on which the application is running. So you do not need to
run the application on your profile build host if you have
access to the machine that runs the application. You can run the
application on one system, transfer the logs
(/var/log/audit.log or, if
audit is not installed, journalctl | grep
-i apparmor > path_to_logfile) to your profile build host
and run aa-logprof -f
PATH_TO_LOGFILE.
37.4.6 How to spot and fix AppArmor syntax errors #Edit source
Manually editing AppArmor profiles can introduce syntax errors. If you attempt to start or restart AppArmor with syntax errors in your profiles, error results are shown. This example shows the syntax of the entire parser error.
# systemctl start apparmor.service
Loading AppArmor profiles AppArmor parser error in /etc/apparmor.d/usr.sbin.squid \
at line 410: syntax error, unexpected TOK_ID, expecting TOK_MODE
Profile /etc/apparmor.d/usr.sbin.squid failed to loadUsing the AppArmor YaST tools, a graphical error message indicates which profile contained the error and requests you to fix it.
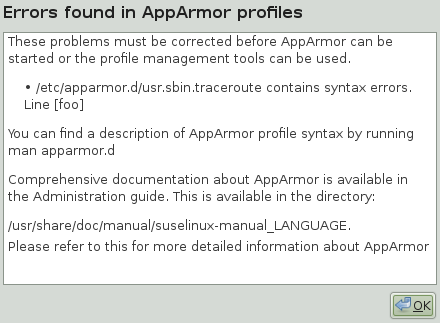
To fix a syntax error, log in to a terminal window as root,
open the profile, and correct the syntax. Reload the profile set with
systemctl reload apparmor.
Tip: AppArmor syntax highlighting in vi
The editor vi on openSUSE Leap supports syntax
highlighting for AppArmor profiles. Lines containing syntax errors are displayed
with a red background.
37.5 Reporting bugs for AppArmor #Edit source
The developers of AppArmor are eager to deliver products of the highest quality. Your feedback and your bug reports help us keep the quality high. Whenever you encounter a bug in AppArmor, file a bug report against this product:
Use your Web browser to go to https://bugzilla.opensuse.org/ and click .
Enter the account data of your SUSE account and click . If you do not have a SUSE account, click and provide the required data.
If your problem has already been reported, check this bug report and add extra information to it, if necessary.
If your problem has not been reported yet, select from the top navigation bar and proceed to the page.
Select the product against which to file the bug. In your case, this would be your product's release. Click .
Select the product version, component (AppArmor in this case), hardware platform, and severity.
Enter a brief headline describing your problem and add a more elaborate description including log files. You may create attachments to your bug report for screenshots, log files, or test cases.
Click after you have entered all the details to send your report to the developers.
38 AppArmor glossary #Edit source
- Abstraction
See profile foundation classes below.
- Apache
Apache is a freely available Unix-based Web server. It is currently the most commonly used Web server on the Internet. Find more information about Apache at the Apache Web site at https://www.apache.org.
- application fire-walling
AppArmor confines applications and limits the actions they are permitted to take. It uses privilege confinement to prevent attackers from using malicious programs on the protected server and even using trusted applications in unintended ways.
- attack signature
Pattern in system or network activity that alerts of a possible virus or hacker attack. Intrusion detection systems might use attack signatures to distinguish between legitimate and potentially malicious activity.
By not relying on attack signatures, AppArmor provides "proactive" instead of "reactive" defense from attacks. This is better because there is no window of vulnerability where the attack signature must be defined for AppArmor as it does for products using attack signatures.
- GUI
Graphical user interface. Refers to a software front-end meant to provide an attractive and easy-to-use interface between a computer user and application. Its elements include windows, icons, buttons, cursors and scrollbars.
- globbing
File name substitution. Instead of specifying explicit file name paths, you can use helper characters
*(substitutes any number of characters except special ones such as/or?) and?(substitutes exactly one character) to address multiple files/directories at once.**is a special substitution that matches any file or directory below the current directory.- HIP
Host intrusion prevention. Works with the operating system kernel to block abnormal application behavior in the expectation that the abnormal behavior represents an unknown attack. Blocks malicious packets on the host at the network level before they can “hurt” the application they target.
- mandatory access control
A means of restricting access to objects that is based on fixed security attributes assigned to users, files and other objects. The controls are mandatory in the sense that they cannot be modified by users or their programs.
- profile
AppArmor profile completely defines what system resources an individual application can access, and with what privileges.
- profile foundation classes
Profile building blocks needed for common application activities, such as DNS lookup and user authentication.
- RPM
The RPM Package Manager. An open packaging system available for anyone to use. It works on Red Hat Linux, openSUSE Leap, and other Linux and Unix systems. It is capable of installing, uninstalling, verifying, querying and updating computer software packages. See https://rpm.org/ for more information.
- SSH
Secure Shell. A service that allows you to access your server from a remote computer and issue text commands through a secure connection.
- streamlined access control
AppArmor provides streamlined access control for network services by specifying which files each program is allowed to read, write and execute. This ensures that each program does what it is supposed to do and nothing else.
- URI
Universal resource identifier. The generic term for all types of names and addresses that refer to objects on the World Wide Web. A URL is one kind of URI.
- URL
Uniform Resource Locator. The global address of documents and other resources on the Web.
The first part of the address indicates what protocol to use and the second part specifies the IP address or the domain name where the resource is located.
For example, when you visit
http://www.opensuse.org, you are using the HTTP protocol, as the beginning of the URL indicates.- vulnerabilities
An aspect of a system or network that leaves it open to attack. Characteristics of computer systems that allow an individual to keep it from correctly operating or that allows unauthorized users to take control of the system. Design, administrative or implementation weaknesses or flaws in hardware, firmware or software. If exploited, a vulnerability could lead to an unacceptable impact in the form of unauthorized access to information or the disruption of critical processing.
Part V SELinux #Edit source
- 39 Configuring SELinux
In this chapter, you learn how to set up and manage SELinux on openSUSE Leap. The following topics are covered:
39 Configuring SELinux #Edit source
In this chapter, you learn how to set up and manage SELinux on openSUSE Leap. The following topics are covered:
Why Use SELinux?
Understanding SELinux
Setting Up SELinux
Managing SELinux
39.1 Why use SELinux? #Edit source
SELinux was developed as an additional Linux security solution that uses the security framework in the Linux kernel. The purpose was to allow for a more granular security policy that goes beyond the standard Discretionary Access Controls (DAC), the traditional file permissions of owner/group/world, and read/write/execute.
An example explains why a solution such as SELinux (or its counterpart AppArmor) is needed:
“One morning, I found out that my server was hacked. The server was
running a fully patched openSUSE Leap installation. A firewall was configured on
it and no unnecessary services were offered by this server. Further
analysis revealed that the hacker had come in through a vulnerable PHP script
that was a part of one of the Apache virtual hosts that were running on
this server. The intruder had managed to get access to a shell, using the
wwwrun account that was used by
the Apache Web server. As this
wwwrun user, the intruder had
created several scripts in the /var/tmp and the
/tmp directories, which were a part of a botnet that
was launching a Distributed Denial of Service attack against several
servers.”
The interesting thing about this hack is that it occurred on a server where nothing was really wrong. All file permissions were set correctly, but the intruder still managed to get into the system. This example demonstrates that in certain cases, additional security is needed.
SELinux uses labels attached to objects (for example, files and network sockets) and uses them for access control decision.
39.1.1 Support status #Edit source
The SELinux framework is supported on openSUSE Leap 15.6. openSUSE Leap offers all binaries and libraries you need to use SELinux on your server.
A policy is not included, and you must build your own. Third-party policies are not supported. See Section 39.3, “Installing SELinux packages” and Section 39.4, “Installing an SELinux policy” for information on installing an openSUSE policy for testing.
39.1.2 Understanding SELinux components #Edit source
Before starting the configuration of SELinux, you should know a bit about how SELinux is organized. Three components play a role:
The security framework in the Linux kernel
The SELinux libraries and binaries
The SELinux policy
The default kernel of openSUSE Leap supports SELinux and the tools that are needed to manage it. The most important part of the work of the administrator with regard to SELinux is managing the policy.
In the SELinux policy, security labels are applied to different objects on a Linux server. These objects typically are users, ports, processes and files. Using these security labels, rules are created that define what is and what is not allowed on a server. By default, SELinux denies everything, and by creating the appropriate rules you can allow the access that is strictly necessary. Rules should therefore exist for all programs that you want to use on a system.
Alternatively, you could configure parts of a system to run in unconfined mode, which means that specific ports, programs, users, files and directories are not protected by SELinux. This mode is useful if you want to use SELinux to protect some essential services. This leaves your system incompletely protected, and it is better to apply SELinux to the whole system.
To ensure the appropriate protection of your system, you need an SELinux policy. This must be a tailor-made policy in which all files are provided with a label, and all services and users have a security label as well to express which files and directories can be accessed by which user and processes on the server. Developing such a policy is a tremendous amount of work.
A freely available SELinux policy might work on your server, but it may not offer the same protection as a custom policy. SUSE does not support third-party policies.
39.2 SELinux policy overview #Edit source
The policy is the key component in SELinux.
Your SELinux policy defines rules that specify which objects can access which files, directories,
ports and processes on a system. To do this, a security context is
defined for these. On an SELinux system where the policy has been
applied to label the file system, you can use the ls
-Z command on any directory to find the security context for
the files in that directory.
Example 39.1: “Security context settings using ls -Z”
shows the security context settings for the directories in the
/ directory of a openSUSE Leap system with an
SELinux-labeled file system.
Example 39.1: Security context settings using ls -Z #
> ls -Z /
system_u:object_r:bin_t bin
system_u:object_r:boot_t boot
system_u:object_r:device_t dev
system_u:object_r:etc_t etc
system_u:object_r:home_root_t home
system_u:object_r:lib_t lib
system_u:object_r:lib_t lib64
system_u:object_r:lost_found_t lost+found
system_u:object_r:mnt_t media
system_u:object_r:mnt_t mnt
system_u:object_r:usr_t opt
system_u:object_r:proc_t proc
system_u:object_r:default_t root
system_u:object_r:bin_t sbin
system_u:object_r:security_t selinux
system_u:object_r:var_t srv
system_u:object_r:sysfs_t sys
system_u:object_r:tmp_t tmp
system_u:object_r:usr_t usr
system_u:object_r:var_t var
The most important line in the security context is the context type. This
is the part of the security context that often ends in _t.
It tells SELinux
which kind of access the object is allowed. In the policy, rules are
specified to define which type of user or which type of role has access
to which type of context. For example, this can happen by using a rule
like the following:
allow user_t bin_t:file {read execute gettattr};
This example rule states that the user who has the context type
user_t (this user is called
the source object) is allowed to access objects of class "file"
with the context type bin_t (the target), using the
permissions read, execute, and getattr.
An SELinux policy contains a vast number of rules. To make it more manageable, policies are often split into modules. This allows administrator to switch protection on or off for different parts of the system.
When compiling the policy for your system, you have a choice to either work with a modular policy, or a monolithic policy, where one vast policy is used to protect everything on your system. It is strongly recommended to use a modular policy and not a monolithic policy. Modular policies are much easier to manage.
39.3 Installing SELinux packages #Edit source
From the command line, install the following packages:
>sudozypper in restorecond policycoreutils setools-console
This does not install a policy. See Section 39.4, “Installing an SELinux policy” for information on installing an openSUSE policy for testing.
39.4 Installing an SELinux policy #Edit source
The policy is an essential component of SELinux. openSUSE Leap 15.6
does not include a default policy, and you must build a
policy that is customized for your installation.
SELinux policies should be customized for your particular needs. Contact SUSE
consulting services for assistance.
We recommend slemicro for customers and partners who are looking for a containerized or virtualized
host with full SELinux support, including a supported policy.
For testing purposes you can obtain policies from https://download.opensuse.org/repositories/security:/SELinux_legacy/. This provides repositories for openSUSE Leap with several additional packages, including policies.
Copy the repository link that matches your openSUSE Leap version, and add it with Zypper:
>sudozypper ar -f \ https://download.opensuse.org/repositories/security:/SELinux_legacy/15.6/ \ SELinux-LegacyInstall the following packages:
>sudozypper in selinux-policy-targeted selinux-policy-devel
39.5 Putting SELinux into permissive mode #Edit source
In permissive mode, SELinux does not protect your system but it still logs everything that happens. Use this mode for testing and configuring your system.
In /etc/selinux/config, SELinux is set to permissive mode
by default.
To enable the use of SELinux for your system, modify the GRUB 2 boot
loader. In /etc/default/grub, search for the line
GRUB_CMDLINE_LINUX_DEFAULT=. Add the following two parameters:
security=selinux selinux=1
The first parameter tells the kernel to use SELinux and not AppArmor. The second parameter enables SELinux. After adding the parameters, rebuild your GRUB 2 configuration with the following command:
grub2-mkconfig -o /boot/grub2/grub.cfg
Now you can reboot. At this point you have a functional SELinux system, and it is time to further configure it. In the current status, SELinux does not limit any activities and logs everything that it should be doing if it were in enforcing mode. Review the log files to learn what activities are not allowed.
39.6 Putting SELinux into enforcing mode #Edit source
When systems run SELinux in permissive mode, users and processes might label various file system objects incorrectly. This can cause problems when switching to enforcing mode because SELinux relies on correct labels of file system objects.
Before switching into enforcing mode, make sure to first reset the security context (extended attributes):
>sudorestorecon -R /
Now you can put SELinux into enforcing mode. For this, edit
/etc/selinux/config and set
SELINUX=enforcing.
Reboot your server and see if it still comes up the way you expect it to and if you can still log in.
After logging in, run the sestatus -v command.
It should give you an output similar to
Example 39.2: “Verifying that SELinux is functional”.
Example 39.2: Verifying that SELinux is functional #
>sudosestatus -vSELinux status: enabled SELinuxfs mount: /sys/fs/selinux SELinux root directory: /etc/selinux Loaded policy name: targeted Current mode: enforcing Mode from config file: enforcing Policy MLS status: enabled Policy deny_unknown status: allowed Memory protection checking: requested(insecure) Max kernel policy version: 33 Process contexts: Current context: unconfined_u:unconfined_r:unconfined_t:s0-s0:c0.c1023 Init context: system_u:system_r:init_t:s0 /usr/sbin/sshd system_u:system_r:sshd_t:s0-s0:c0.c1023 File contexts: Controlling terminal: unconfined_u:object_r:user_tty_device_t:s0 /etc/passwd system_u:object_r:passwd_file_t:s0 /etc/shadow system_u:object_r:shadow_t:s0 /bin/bash system_u:object_r:shell_exec_t:s0 \ -> system_u:object_r:shell_exec_t:s0 /bin/login system_u:object_r:login_exec_t:s0 /bin/sh system_u:object_r:bin_t:s0 \ -> system_u:object_r:shell_exec_t:s0 /sbin/agetty system_u:object_r:bin_t:s0 \ -> system_u:object_r:getty_exec_t:s0 /sbin/init system_u:object_r:bin_t:s0 -> \ system_u:object_r:init_exec_t:s0 /usr/sbin/sshd system_u:object_r:sshd_exec_t:s0
If you are not able to boot the server properly with SELinux
in enforcing mode, switch back to permissive mode. Check the log files with
less /var/log/audit/audit.log. For more details, see
Section 39.9, “Troubleshooting”.
39.7 Configuring SELinux #Edit source
Before you start tuning your server, verify the SELinux installation.
You have already used the command sestatus -v to view
the current mode, process and file contexts. Next, run
>sudosemanage boolean -l
which lists all Boolean switches that are available, and at the same time verifies that you can access the policy. Example 39.3, “Getting a list of booleans and verifying policy access” shows part of the output of this command.
Example 39.3: Getting a list of booleans and verifying policy access #
>sudosemanage boolean -lSELinux boolean Description ftp_home_dir -> off ftp_home_dir mozilla_read_content -> off mozilla_read_content spamassassin_can_network -> off spamassassin_can_network httpd_can_network_relay -> off httpd_can_network_relay openvpn_enable_homedirs -> off openvpn_enable_homedirs gpg_agent_env_file -> off gpg_agent_env_file allow_httpd_awstats_script_anon_write -> off allow_httpd_awstats_script_anon_write httpd_can_network_connect_db -> off httpd_can_network_connect_db allow_ftpd_full_access -> off allow_ftpd_full_access samba_domain_controller -> off samba_domain_controller httpd_enable_cgi -> off httpd_enable_cgi virt_use_nfs -> off virt_use_nfs
Another command that outputs useful information at this stage is
>sudosemanage fcontext -l
It shows the default file context settings as provided by the policy (see Example 39.4: “Getting file context information” for partial output of this command).
Example 39.4: Getting file context information #
>sudosemanage fcontext -l/var/run/usb(/.*)? all files system_u:object_r:hotplug_var_run_t /var/run/utmp regular file system_u:object_r:initrc_var_run_t /var/run/vbe.* regular file system_u:object_r:hald_var_run_t /var/run/vmnat.* socket system_u:object_r:vmware_var_run_t /var/run/vmware.* all files system_u:object_r:vmware_var_run_t /var/run/watchdog\.pid regular file system_u:object_r:watchdog_var_run_t /var/run/winbindd(/.*)? all files system_u:object_r:winbind_var_run_t /var/run/wnn-unix(/.*) all files system_u:object_r:canna_var_run_t /var/run/wpa_supplicant(/.*)? all files system_u:object_r:NetworkManager_var_run_t /var/run/wpa_supplicant-global socket system_u:object_r:NetworkManager_var_run_t /var/run/xdmctl(/.*)? all files system_u:object_r:xdm_var_run_t /var/run/yiff-[0-9]+\.pid regular file system_u:object_r:soundd_var_run_t
39.8 Managing SELinux #Edit source
The base SELinux configuration is now operational and it can now be configured to secure your server. In SELinux, an additional set of rules is used to define exactly which process or user can access which files, directories, or ports. To do this, SELinux applies a context to every file, directory, process and port. This context is a security label that defines how this file, directory, process or port should be treated. These context labels are used by the SELinux policy, which defines exactly what should be done with the context labels. By default, the policy blocks all non-default access, which means that, as an administrator, you need to enable all features that are non-default on your server.
39.8.1 Viewing the security context #Edit source
As already mentioned, files, directories and ports can be labeled.
Within each label, different contexts are used. To be able to perform
your daily administration work, the type context is what you are most
interested in. As an administrator, you work with the type
context. Many commands allow you to use the -Z option
to list current context settings. In
Example 39.5: “The default context for directories in the root directory”
you can see what the context settings are for the directories in the
root directory.
Example 39.5: The default context for directories in the root directory #
>sudols -Zdr-xr-xr-x. root root system_u:object_r:bin_t:s0 bin dr-xr-xr-x. root root system_u:object_r:boot_t:s0 boot drwxr-xr-x. root root system_u:object_r:cgroup_t:s0 cgroup drwxr-xr-x+ root root unconfined_u:object_r:default_t:s0 data drwxr-xr-x. root root system_u:object_r:device_t:s0 dev drwxr-xr-x. root root system_u:object_r:etc_t:s0 etc drwxr-xr-x. root root system_u:object_r:home_root_t:s0 home dr-xr-xr-x. root root system_u:object_r:lib_t:s0 lib dr-xr-xr-x. root root system_u:object_r:lib_t:s0 lib64 drwx------. root root system_u:object_r:lost_found_t:s0 lost+found drwxr-xr-x. root root system_u:object_r:mnt_t:s0 media drwxr-xr-x. root root system_u:object_r:autofs_t:s0 misc drwxr-xr-x. root root system_u:object_r:mnt_t:s0 mnt drwxr-xr-x. root root unconfined_u:object_r:default_t:s0 mnt2 drwxr-xr-x. root root unconfined_u:object_r:default_t:s0 mounts drwxr-xr-x. root root system_u:object_r:autofs_t:s0 net drwxr-xr-x. root root system_u:object_r:usr_t:s0 opt dr-xr-xr-x. root root system_u:object_r:proc_t:s0 proc drwxr-xr-x. root root unconfined_u:object_r:default_t:s0 repo dr-xr-x---. root root system_u:object_r:admin_home_t:s0 root dr-xr-xr-x. root root system_u:object_r:bin_t:s0 sbin drwxr-xr-x. root root system_u:object_r:security_t:s0 selinux drwxr-xr-x. root root system_u:object_r:var_t:s0 srv -rw-r--r--. root root unconfined_u:object_r:swapfile_t:s0 swapfile drwxr-xr-x. root root system_u:object_r:sysfs_t:s0 sys drwxrwxrwt. root root system_u:object_r:tmp_t:s0 tmp -rw-r--r--. root root unconfined_u:object_r:etc_runtime_t:s0 tmp2.tar -rw-r--r--. root root unconfined_u:object_r:etc_runtime_t:s0 tmp.tar drwxr-xr-x. root root system_u:object_r:usr_t:s0 usr drwxr-xr-x. root root system_u:object_r:var_t:s0 var
In the listing above, you can see the complete context for all
directories. It consists of a user, a role, and a type. The s0 setting
indicates the security level in Multi Level Security environments. These
environments are not discussed here. In such an environment, make sure
that s0 is set. The Context Type defines what kind of activity is
permitted in the directory. Compare, for example, the
/root directory, which has the
admin_home_t context type, and the
/home directory, which has the
home_root_t context type. In the SELinux policy,
different kinds of access are defined for these context types.
Security labels are not only associated with files, but also with other
items, such as ports and processes. In
Example 39.6: “Showing SELinux settings for processes with ps Zaux”
for example you can see the context settings for processes on your
server.
Example 39.6: Showing SELinux settings for processes with ps Zaux #
>sudops ZauxLABEL USER PID %CPU %MEM VSZ RSS TTY STAT START TIME COMMAND system_u:system_r:init_t root 1 0.0 0.0 10640 808 ? Ss 05:31 0:00 init [5] system_u:system_r:kernel_t root 2 0.0 0.0 0 0 ? S 05:31 0:00 [kthreadd] system_u:system_r:kernel_t root 3 0.0 0.0 0 0 ? S 05:31 0:00 [ksoftirqd/0] system_u:system_r:kernel_t root 6 0.0 0.0 0 0 ? S 05:31 0:00 [migration/0] system_u:system_r:kernel_t root 7 0.0 0.0 0 0 ? S 05:31 0:00 [watchdog/0] system_u:system_r:sysadm_t root 2344 0.0 0.0 27640 852 ? Ss 05:32 0:00 /usr/sbin/mcelog --daemon --config-file /etc/mcelog/mcelog.conf system_u:system_r:sshd_t root 3245 0.0 0.0 69300 1492 ? Ss 05:32 0:00 /usr/sbin/sshd -o PidFile=/var/run/sshd.init.pid system_u:system_r:cupsd_t root 3265 0.0 0.0 68176 2852 ? Ss 05:32 0:00 /usr/sbin/cupsd system_u:system_r:nscd_t root 3267 0.0 0.0 772876 1380 ? Ssl 05:32 0:00 /usr/sbin/nscd system_u:system_r:postfix_master_t root 3334 0.0 0.0 38320 2424 ? Ss 05:32 0:00 /usr/lib/postfix/master system_u:system_r:postfix_qmgr_t postfix 3358 0.0 0.0 40216 2252 ? S 05:32 0:00 qmgr -l -t fifo -u system_u:system_r:crond_t root 3415 0.0 0.0 14900 800 ? Ss 05:32 0:00 /usr/sbin/cron system_u:system_r:fsdaemon_t root 3437 0.0 0.0 16468 1040 ? S 05:32 0:00 /usr/sbin/smartd system_u:system_r:sysadm_t root 3441 0.0 0.0 66916 2152 ? Ss 05:32 0:00 login -- root system_u:system_r:sysadm_t root 3442 0.0 0.0 4596 800 tty2 Ss+ 05:32 0:00 /sbin/mingetty tty2
39.8.2 Selecting the SELinux mode #Edit source
In SELinux, three different modes can be used:
- Enforcing:
This is the default mode. SELinux protects your server according to the rules in the policy, and SELinux logs all its activity to the audit log.
- Permissive:
This mode is useful for troubleshooting. If set to Permissive, SELinux does not protect your server, but it still logs everything that happens to the log files.
- Disabled:
In this mode, SELinux is switched off and no logging occurs. The file system labels are not removed from the file system.
You have already read how you can set the current SELinux mode from GRUB 2 while booting using the enforcing boot parameter.
39.8.3 Modifying SELinux context types #Edit source
An important part of the work of an administrator is setting context types on files to ensure appropriate working of SELinux.
If a file is created within a specific directory, it inherits the context type of the parent directory by default. If a file is moved from one location to another location, it retains the context type that it had in the old location.
To set the context type for files, you can use the semanage
fcontext command. With this command, you write the new context
type to the policy, but it does not change the actual context type
immediately. To apply the context types that are in the policy, you need
to run the restorecon command afterward.
The challenge when working with semanage fcontext is
to find out which context you need. You can use
>sudosemanage fcontext -l
to list all contexts in the policy, but it may be a bit hard to find out the actual context you need from that list as it is rather long (see Example 39.7: “Viewing default file contexts”).
Example 39.7: Viewing default file contexts #
>sudosemanage fcontext -l | lessSELinux fcontext type Context / directory system_u:object_r:root_t:s0 /.* all files system_u:object_r:default_t:s0 /[^/]+ regular file system_u:object_r:etc_runtime_t:s0 /\.autofsck regular file system_u:object_r:etc_runtime_t:s0 /\.autorelabel regular file system_u:object_r:etc_runtime_t:s0 /\.journal all files X:>>None>> /\.suspended regular file system_u:object_r:etc_runtime_t:s0 /a?quota\.(user|group) regular file system_u:object_r:quota_db_t:s0 /afs directory system_u:object_r:mnt_t:s0 /bin directory system_u:object_r:bin_t:s0 /bin/.* all files system_u:object_r:bin_t:s0
There are three ways to find out which context settings are available for your services:
Install the service and look at the default context settings that are used. This is the easiest and recommended option.
Consult the man page for the specific service. Some services have a man page that ends in
_selinux, which contains all the information you need to find the correct context settings.When you have found the right context setting, apply it using
semanage fcontext. This command takes-tcontext type as its first argument, followed by the name of the directory or file to which you want to apply the context settings. To apply the context to everything that already exists in the directory where you want to apply the context, you add the regular expression(/.*)?to the name of the directory. This means: optionally, match a slash followed by any character. The examples section of thesemanageman page has some useful usage examples forsemanage. For more information on regular expressions, see for example the tutorial at https://www.regular-expressions.info/.Display a list of all context types that are available on your system:
>sudoseinfo -tSince the command by itself outputs an overwhelming amount of information, it should be used in combination with
grepor a similar command for filtering.
39.8.4 Applying file contexts #Edit source
To help you apply the SELinux context properly, the following
procedure shows how to set a context using semanage
fcontext and restorecon. You
notice that at first attempt, the Web server with a non-default
document root does not work. After changing the SELinux context,
it does:
Create the
/webdirectory and then change to it:>sudomkdir /web && cd /webUse a text editor to create the file
/web/index.htmlthat contains the text welcome to my Web site.Open the file
/etc/apache2/default-server.confwith an editor, and change the DocumentRoot line toDocumentRoot /webStart the Apache Web server:
>sudosystemctl start apache2Open a session to your local Web server:
>w3m localhostYou receive a Connection refused message. Press Enter, and then
qto quit w3m.Find the current context type for the default Apache
DocumentRoot, which is/srv/www/htdocs. It should be set tohttpd_sys_content_t:>sudols -Z /srv/wwwSet the new context in the policy and press Enter:
>sudosemanage fcontext -a -f "" -t httpd_sys_content_t '/web(/.*) ?'Apply the new context type:
>sudorestorecon /webShow the context of the files in the directory
/web. You can see that the new context type has been set properly to the/webdirectory, but not to its contents.>sudols -Z /webApply the new context recursively to the
/webdirectory. The type context has now been set correctly.>sudorestorecon -R /webRestart the Web server:
>sudosystemctl restart apache2You should now be able to access the contents of the
/webdirectory.
39.8.5 Configuring SELinux policies #Edit source
The easiest way to change the behavior of the policy is by working with Booleans. These are on-off switches that you can use to change the settings in the policy. To find out which Booleans are available, run
>sudosemanage boolean -l
It shows a long list of Booleans, with a short description of
what each of these Booleans does for you. When you have found the
Boolean you want to set, you can use setsebool -P,
followed by the name of the Boolean that you want to change. It is
important to use the -P option at all times when using
setsebool. This option writes the setting to the
policy file on disk, and this is the only way to make sure that the
Boolean is applied automatically after a reboot.
The procedure below gives an example of changing Boolean settings
List Booleans that are related to FTP servers.
>sudosemanage boolean -l | grep ftpTurn the Boolean off:
>sudosetsebool allow_ftpd_anon_write offIt does not take much time to write the change. Then verify that the Boolean is indeed turned off:
>sudosemanage boolean -l|grep ftpd_anonReboot your server.
Check again to see if the
allow_ftpd_anon_writeBoolean is still turned on. As it has not yet been written to the policy, you notice that it is off.Switch the Boolean and write the setting to the policy:
>sudosetsebool -P allow_ftpd_anon_write
39.8.6 Working with SELinux modules #Edit source
By default, SELinux uses a modular policy. This means that the
policy that implements SELinux features is not just one huge policy, but
it consists of many smaller modules. Each module covers a specific part
of the SELinux configuration. The concept of the SELinux module was
introduced to make it easier for third party vendors to make their
services compatible with SELinux. To get an overview of the SELinux
modules, you can use the semodule -l command. This
command lists all current modules in use by SELinux and their
version numbers.
As an administrator, you can switch modules on or off. This can be useful to disable only a part of SELinux and not everything to run a specific service without SELinux protection. Especially in the case of openSUSE Leap, where there is not a completely supported SELinux policy yet, it can make sense to switch off all modules that you do not need so that you can focus on the services that really do need SELinux protection. To switch off an SELinux module, use
>sudosemodule -d MODULENAME
To switch it on again, you can use
>sudosemodule -e modulename
39.9 Troubleshooting #Edit source
By default, if SELinux is the reason something is not working, a log
message to this effect is sent to the
/var/log/audit/audit.log file. That is, if the
auditd service is running. If you see an empty
/var/log/audit, start the auditd service using
>sudosystemctl start auditd
and enable it in the targets of your system, using
>sudosystemctl enable auditd
You can see a partial example of the contents of
/var/log/audit/audit.log below:
Example 39.8: Example lines from /var/log/audit/audit.log #
type=DAEMON_START msg=audit(1348173810.874:6248): auditd start, ver=1.7.7 format=raw kernel=6.4.0-150600.9-default auid=0 pid=4235 subj=system_u:system_r:auditd_t res=success
type=AVC msg=audit(1348173901.081:292): avc: denied { write } for pid=3426 comm="smartd" name="smartmontools" dev=sda6 ino=581743 scontext=system_u:system_r:fsdaemon_t tcontext=system_u:object_r:var_lib_t tclass=dir
type=AVC msg=audit(1348173901.081:293): avc: denied { remove_name } for pid=3426 comm="smartd" name="smartd.WDC_WD2500BEKT_75PVMT0-WD_WXC1A21E0454.ata.state~" dev=sda6 ino=582390 scontext=system_u:system_r:fsdaemon_t tcontext=system_u:object_r:var_lib_t tclass=dir
type=AVC msg=audit(1348173901.081:294): avc: denied { unlink } for pid=3426 comm="smartd" name="smartd.WDC_WD2500BEKT_75PVMT0-WD_WXC1A21E0454.ata.state~" dev=sda6 ino=582390 scontext=system_u:system_r:fsdaemon_t tcontext=system_u:object_r:var_lib_t tclass=file
type=AVC msg=audit(1348173901.081:295): avc: denied { rename } for pid=3426 comm="smartd" name="smartd.WDC_WD2500BEKT_75PVMT0-WD_WXC1A21E0454.ata.state" dev=sda6 ino=582373 scontext=system_u:system_r:fsdaemon_t tcontext=system_u:object_r:var_lib_t tclass=file
type=AVC msg=audit(1348173901.081:296): avc: denied { add_name } for pid=3426 comm="smartd" name="smartd.WDC_WD2500BEKT_75PVMT0-WD_WXC1A21E0454.ata.state~" scontext=system_u:system_r:fsdaemon_t tcontext=system_u:object_r:var_lib_t tclass=dir
type=AVC msg=audit(1348173901.081:297): avc: denied { create } for pid=3426 comm="smartd" name="smartd.WDC_WD2500BEKT_75PVMT0-WD_WXC1A21E0454.ata.state" scontext=system_u:system_r:fsdaemon_t tcontext=system_u:object_r:var_lib_t tclass=file
type=AVC msg=audit(1348173901.081:298): avc: denied { write open } for pid=3426 comm="smartd" name="smartd.WDC_WD2500BEKT_75PVMT0-WD_WXC1A21E0454.ata.state" dev=sda6 ino=582390 scontext=system_u:system_r:fsdaemon_t tcontext=system_u:object_r:var_lib_t tclass=file
type=AVC msg=audit(1348173901.081:299): avc: denied { getattr } for pid=3426 comm="smartd" path="/var/lib/smartmontools/smartd.WDC_WD2500BEKT_75PVMT0-WD_WXC1A21E0454.ata.state" dev=sda6 ino=582390 scontext=system_u:system_r:fsdaemon_t tcontext=system_u:object_r:var_lib_t tclass=file
type=AVC msg=audit(1348173901.309:300): avc: denied { append } for pid=1316
At first look, the lines in audit.log are a bit hard
to read. However, on closer examination they are not that hard to
understand. Every line can be broken down into sections. For example, the
sections in the last line are:
type=AVC:every SELinux-related audit log line starts with the type identification
type=AVCmsg=audit(1348173901.309:300):This is the time stamp, which unfortunately is written in epoch time, the number of seconds that have passed since Jan 1, 1970. You can use
date -don the part up to the dot in the epoch time notation to find out when the event has happened:>date -d @1348173901Thu Sep 20 16:45:01 EDT 2012avc: denied { append }:the specific action that was denied. In this case the system has denied the appending of data to a file. While browsing through the audit log file, you can see other system actions, such as write open, getattr and more.
for pid=1316:the process ID of the command or process that initiated the action
comm="rsyslogd":the specific command that was associated with that PID
name="smartmontools":the name of the subject of the action
dev=sda6 ino=582296:the block device and inode number of the file that was involved
scontext=system_u:system_r:syslogd_t:the source context, which is the context of the initiator of the action
tclass=file:a class identification of the subject
Instead of interpreting the events in audit.log yourself, there is
another approach. You can use the audit2allow command,
which helps analyze the cryptic log messages in
/var/log/audit/audit.log. An audit2allow
troubleshooting session always consists of three different commands.
First, you would use audit2allow -w -a to present the
audit information in a more readable way. The audit2allow -w
-a by default works on the audit.log file. If you want to
analyze a specific message in the audit.log file, copy it to a temporary
file and analyze the file with:
>sudoaudit2allow -w -i FILENAME
Example 39.9: Analyzing audit messages #
>sudoaudit2allow -w -i testfiletype=AVC msg=audit(1348173901.309:300): avc: denied { append } for pid=1316 comm="rsyslogd" name="acpid" dev=sda6 ino=582296 scontext=system_u:system_r:syslogd_t tcontext=system_u:object_r:apmd_log_t tclass=file
- This was caused by:
Missing type enforcement (TE) allow rule.
To generate a loadable module to allow this access, run
>sudoaudit2allow
To find out which specific rule has denied access, you can use
audit2allow -a to show the enforcing rules from all
events that were logged to the audit.log file, or
audit2allow -i FILENAME to
show it for messages that you have stored in a specific file:
Example 39.10: Viewing which lines deny access #
>sudoaudit2allow -i testfile#============= syslogd_t ============== allow syslogd_t apmd_log_t:file append;
To create an SELinux module with the name mymodule
that you can load to allow the access that was previously denied, run
>sudoaudit2allow -a -R -M mymodule
If you want to do this for all events that have been logged to the
audit.log, use the -a -M command arguments. To do it
for specific messages that are in a specific file, use -i
-M as in the example below:
Example 39.11: Creating a policy module allowing an action previously denied #
>sudoaudit2allow -i testfile -M example******************** IMPORTANT *********************** To make this policy package active, execute: semodule -i example.pp
As indicated by the audit2allow command, you can now
run this module by using the semodule -i command,
followed by the name of the module that audit2allow
has created for you (example.pp in the above
example).
Part VI The Linux Audit Framework #Edit source
- 40 Understanding Linux audit
The Linux audit framework as shipped with this version of openSUSE Leap provides a CAPP-compliant (Controlled Access Protection Profiles) auditing system that reliably collects information about any security-relevant event. The audit records can be examined to determine whether any violation of the security policies has been committed, and by whom.
Providing an audit framework is an important requirement for a CC-CAPP/EAL (Common Criteria-Controlled Access Protection Profiles/Evaluation Assurance Level) certification. Common Criteria (CC) for Information Technology Security Information is an international standard for independent security evaluations. Common Criteria helps customers judge the security level of any IT product they intend to deploy in mission-critical setups.
Common Criteria security evaluations have two sets of evaluation requirements, functional and assurance requirements. Functional requirements describe the security attributes of the product under evaluation and are summarized under the Controlled Access Protection Profiles (CAPP). Assurance requirements are summarized under the Evaluation Assurance Level (EAL). EAL describes any activities that must take place for the evaluators to be confident that security attributes are present, effective and implemented. Examples for activities of this kind include documenting the developers' search for security vulnerabilities, the patch process, and testing.
This guide provides a basic understanding of how audit works and how it can be set up. For more information about Common Criteria itself, refer to the Common Criteria Web site.
- 41 Setting up the Linux audit framework
This chapter shows how to set up a simple audit scenario. Every step involved in configuring and enabling audit is explained in detail. After you have learned to set up audit, consider a real-world example scenario in Chapter 42, Introducing an audit rule set.
- 42 Introducing an audit rule set
The following example configuration illustrates how audit can be used to monitor your system. It highlights the most important items that need to be audited to cover the list of auditable events specified by Controlled Access Protection Profile (CAPP).
- 43 Useful resources
There are other resources available containing valuable information about the Linux audit framework:
40 Understanding Linux audit #Edit source
Abstract#
The Linux audit framework as shipped with this version of openSUSE Leap provides a CAPP-compliant (Controlled Access Protection Profiles) auditing system that reliably collects information about any security-relevant event. The audit records can be examined to determine whether any violation of the security policies has been committed, and by whom.
Providing an audit framework is an important requirement for a CC-CAPP/EAL (Common Criteria-Controlled Access Protection Profiles/Evaluation Assurance Level) certification. Common Criteria (CC) for Information Technology Security Information is an international standard for independent security evaluations. Common Criteria helps customers judge the security level of any IT product they intend to deploy in mission-critical setups.
Common Criteria security evaluations have two sets of evaluation requirements, functional and assurance requirements. Functional requirements describe the security attributes of the product under evaluation and are summarized under the Controlled Access Protection Profiles (CAPP). Assurance requirements are summarized under the Evaluation Assurance Level (EAL). EAL describes any activities that must take place for the evaluators to be confident that security attributes are present, effective and implemented. Examples for activities of this kind include documenting the developers' search for security vulnerabilities, the patch process, and testing.
This guide provides a basic understanding of how audit works and how it can be set up. For more information about Common Criteria itself, refer to the Common Criteria Web site.
- 40.1 Introducing the components of Linux audit
- 40.2 Configuring the audit daemon
- 40.3 Controlling the audit system using
auditctl - 40.4 Passing parameters to the audit system
- 40.5 Understanding the audit logs and generating reports
- 40.6 Querying the audit daemon logs with
ausearch - 40.7 Analyzing processes with
autrace - 40.8 Visualizing audit data
- 40.9 Relaying audit event notifications
Linux audit helps make your system more secure by providing you with a means to analyze what is happening on your system in great detail. It does not, however, provide additional security itself—it does not protect your system from code malfunctions or any kind of exploits. Instead, audit is useful for tracking these issues and helps you take additional security measures, like AppArmor, to prevent them.
Audit consists of several components, each contributing crucial
functionality to the overall framework. The audit kernel module intercepts
the system calls and records the relevant events. The
auditd daemon writes the audit
reports to disk. Various command-line utilities take care of displaying,
querying and archiving the audit trail.
Audit enables you to do the following:
- Associate users with processes
Audit maps processes to the user ID that started them. This makes it possible for the administrator or security officer to exactly trace which user owns which process and is potentially doing malicious operations on the system.
Important: Renaming user IDs
Audit does not handle the renaming of UIDs. Therefore avoid renaming UIDs (for example, changing
tuxfromuid=1001touid=2000) and obsolete UIDs rather than renaming them. Otherwise you would need to changeauditctldata (audit rules) and would have problems retrieving old data correctly.- Review the audit trail
Linux audit provides tools that write the audit reports to disk and translate them into human readable format.
- Review particular audit events
Audit provides a utility that allows you to filter the audit reports for certain events of interest. You can filter for:
User
Group
Audit ID
Remote Host Name
Remote Host Address
System Call
System Call Arguments
File
File Operations
Success or Failure
- Apply a selective audit
Audit provides the means to filter the audit reports for events of interest and to tune audit to record selected events. You can create your own set of rules and have the audit daemon record those of interest to you.
- Guarantee the availability of the report data
Audit reports are owned by
rootand removable byroot. Unauthorized users cannot remove the audit logs.- Prevent audit data loss
If the kernel runs out of memory, the audit daemon's backlog is exceeded, or its rate limit is exceeded, audit can trigger a shutdown of the system to keep events from escaping audit's control. This shutdown would be an immediate halt of the system triggered by the audit kernel component without synchronizing the latest logs to disk. The default configuration is to log a warning to syslog rather than to halt the system.
If the system runs out of disk space when logging, the audit system can be configured to perform clean shutdown. The default configuration tells the audit daemon to stop logging when it runs out of disk space.
40.1 Introducing the components of Linux audit #Edit source
Important: audispd merged into auditd
In openSUSE Leap 15.4 the code for audispd has been merged into auditd. All audispd configurations are now in
/etc/audit/auditd.conf and
/etc/audit/plugins.d.
The following figure illustrates how the various components of audit interact with each other:
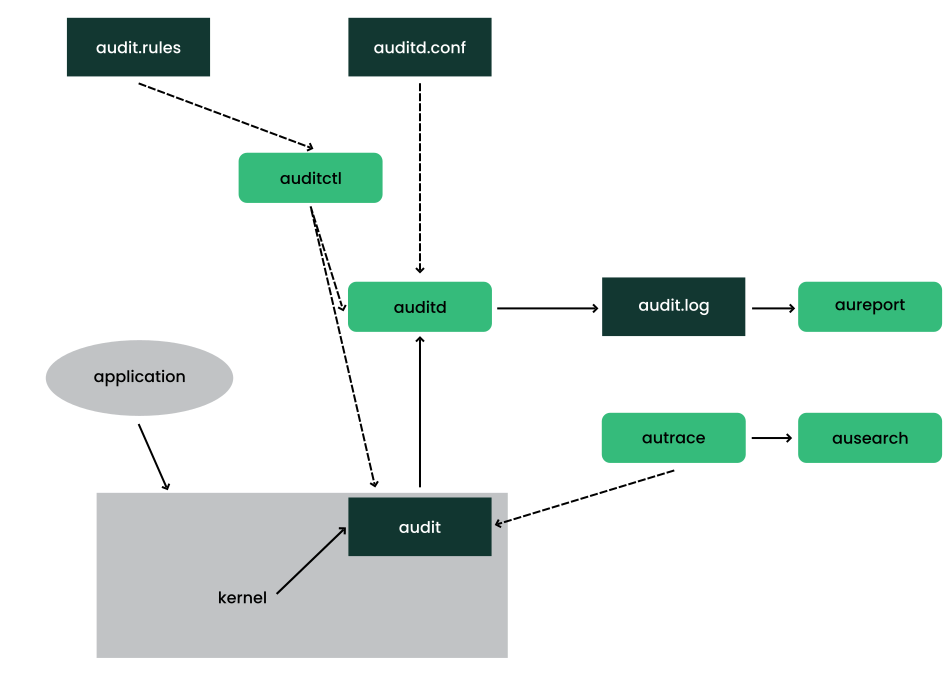
Figure 40.1: Introducing the components of Linux audit #
Straight arrows represent the data flow between components while dashed arrows represent lines of control between components.
- auditd
The audit daemon writes the audit messages that were generated through the audit kernel interface and triggered by application and system activity to disk. The way the audit daemon is started is controlled by
systemd. The audit system functions (when started) are controlled by/etc/audit/auditd.conf. For more information aboutauditdand its configuration, refer to Section 40.2, “Configuring the audit daemon”.auditctlThe
auditctlutility controls the audit system. It controls the log generation parameters and kernel settings of the audit interface and the rule sets that determine which events are tracked. For more information aboutauditctl, refer to Section 40.3, “Controlling the audit system usingauditctl”.- audit rules
The file
/etc/audit/audit.rulescontains a sequence ofauditctlcommands that are loaded at system boot time immediately after the audit daemon is started. For more information about audit rules, refer to Section 40.4, “Passing parameters to the audit system”.- aureport
The
aureportutility allows you to create custom reports from the audit event log. This report generation can easily be scripted, and the output can be used by various other applications, for example, to plot these results. For more information aboutaureport, refer to Section 40.5, “Understanding the audit logs and generating reports”.- ausearch
The
ausearchutility can search the audit log file for certain events using various keys or other characteristics of the logged format. For more information aboutausearch, refer to Section 40.6, “Querying the audit daemon logs withausearch”.- autrace
The
autraceutility traces individual processes in a fashion similar tostrace. The output ofautraceis logged to the audit log. For more information aboutautrace, refer to Section 40.7, “Analyzing processes withautrace”.- aulast
Prints a list of the last logged-in users, similarly to
last.aulastsearches back through the audit logs (or the given audit log file) and displays a list of all users logged in and out based on the range of time in the audit logs.- aulastlog
Prints the last login for all users of a machine similar to the way
lastlogdoes. The login name, port and last login time are printed.
40.2 Configuring the audit daemon #Edit source
Before you can start generating audit logs and processing them,
configure the audit daemon itself.
The /etc/audit/auditd.conf configuration file
determines how the audit system functions when the daemon has been
started. For most use cases, the default settings shipped with
openSUSE Leap should suffice. For CAPP environments, most of these
parameters need tweaking. The following example is the default
configuration:
Example 40.1: Default /etc/audit/auditd.conf #
local_events = yes write_logs = yes log_file = /var/log/audit/audit.log log_group = audit log_format = RAW flush = INCREMENTAL_ASYNC freq = 50 max_log_file = 8 num_logs = 5 priority_boost = 4 name_format = NONE ##name = mydomain max_log_file_action = ROTATE space_left = 75 space_left_action = SYSLOG verify_email = yes action_mail_acct = root admin_space_left = 50 admin_space_left_action = SUSPEND disk_full_action = SUSPEND disk_error_action = SUSPEND use_libwrap = yes ##tcp_listen_port = 60 tcp_listen_queue = 5 tcp_max_per_addr = 1 ##tcp_client_ports = 1024-65535 tcp_client_max_idle = 0 transport = TCP distribute_network = no q_depth = 1200 overflow_action = SYSLOG max_restarts = 10 plugin_dir = /etc/audit/plugins.d end_of_event_timeout = 2
Refer to man 5 auditd.conf for an explanation of these
options.
Depending on whether you want your environment to satisfy the requirements of CAPP, you need to be extra restrictive when configuring the audit daemon. Where you need to use particular settings to meet the CAPP requirements, a “CAPP Environment” note tells you how to adjust the configuration.
When the daemon configuration in
/etc/audit/auditd.conf is complete, the next step is
to focus on controlling the amount of auditing the daemon does, and to
assign sufficient resources and limits to the daemon so it can operate
smoothly.
40.3 Controlling the audit system using auditctl #Edit source
auditctl controls the status and
basic system parameters of the audit daemon. It controls the amount
of auditing performed on the system. Using audit rules,
auditctl controls which components of your system are
subjected to the audit and to what extent they are audited. Audit rules
can be passed to the audit daemon on the auditctl
command line or by composing a rule set and instructing the audit
daemon to process this file. By default, the
auditd daemon is configured to
check for audit rules under /etc/audit/audit.rules.
For more details on audit rules, refer to
Section 40.4, “Passing parameters to the audit system”.
The main auditctl commands to control basic audit
system parameters are:
auditctl-eto enable or disable auditauditctl-fto control the failure flagauditctl-rto control the rate limit for audit messagesauditctl-bto control the backlog limitauditctl-sto query the current status of the audit daemonauditctl-Sspecifies which system call to audit. Before runningauditctl -Son your system, add-F arch=b64to prevent the architecture mismatch warning.
The -e, -f, -r, and
-b options can also be specified in the
audit.rules file to avoid having to enter them each
time the audit daemon is started.
Any time you query the status of the audit daemon with
auditctl -s or change the status flag
with auditctl
-eFLAG, a status message
(including information on each of the above-mentioned parameters) is
printed. The following example highlights the typical audit status
message.
Example 40.2: Example output of auditctl -s #
enabled 1 failure 1 pid 790 rate_limit 0 backlog_limit 64 lost 0 backlog 0 backlog_wait_time 15000 loginuid_immutable 0 unlocked
Table 40.1: Audit status flags #
|
Flag |
Meaning [Possible Values] |
Command |
|---|---|---|
|
|
Set the enable flag. [0..2] 0=disable, 1=enable, 2=enable and lock
down the configuration. Note that this disables logging syscalls,
and other events may still be logged. (See
|
|
|
|
Set the failure flag. [0..2] 0=silent, 1=printk, 2=panic (immediate halt without synchronizing pending data to disk) |
|
|
|
Process ID under which
|
— |
|
|
Set a limit in messages per second. If the rate is not zero and is exceeded, the action specified in the failure flag is triggered. |
|
|
|
Specify the maximum number of outstanding audit buffers allowed. If all buffers are full, the action specified in the failure flag is triggered. |
|
|
|
Count the current number of lost audit messages. |
— |
|
|
Count the current number of outstanding audit buffers. |
— |
40.4 Passing parameters to the audit system #Edit source
Commands to control the audit system can be invoked individually from the
shell using auditctl or batch read from a file using
auditctl - R. This latter method is
used by the init scripts to load rules from the file
/etc/audit/audit.rules after the audit daemon has
been started. The rules are executed in order from top to bottom. Each of
these rules would expand to a separate auditctl
command. The syntax used in the rules file is the same as that used for
the auditctl command.
Changes made to the running audit system by executing
auditctl on the command line are not persistent across
system restarts. For changes to persist, add them to the
/etc/audit/audit.rules file and, if they are not
currently loaded into audit, restart the audit system to load the
modified rule set by using the systemctl restart
auditd command.
Example 40.3: Example audit rules—audit system parameters #
-b 10001 -f 12 -r 103 -e 14
Specify the maximum number of outstanding audit buffers. Depending on the level of logging activity, you might need to adjust the number of buffers to avoid causing too heavy an audit load on your system. | |
Specify the failure flag to use. See Table 40.1, “Audit status flags” for possible values. | |
Specify the maximum number of messages per second that may be issued by the kernel. See Table 40.1, “Audit status flags” for details. | |
Enable or disable the audit subsystem. |
Using audit, you can track any kind of file system access to important files, configurations or resources. You can add watches on these and assign keys to each kind of watch for better identification in the logs.
Example 40.4: Example audit rules—file system auditing #
-w /etc/shadow1 -w /etc -p rx2 -w /etc/passwd -k fk_passwd -p rwxa3
The | |
This rule adds a watch to the | |
This rule adds a file watch to |
System call auditing lets you track your system's behavior on a level even below the application level. When designing these rules, consider that auditing a great many system calls may increase your system load and cause you to run out of disk space. Consider carefully which events need tracking and how they can be filtered to be even more specific.
Example 40.5: Example audit rules—system call auditing #
-a exit,always -S mkdir1 -a exit,always -S access -F a1=42 -a exit,always -S ipc -F a0=23 -a exit,always -S open -F success!=04 -a task,always -F auid=05 -a task,always -F uid=0 -F auid=501 -F gid=wheel6
This rule activates auditing for the | |
This rule adds auditing to the access system call, but only if the
second argument of the system call ( | |
This rule adds an audit context to the IPC multiplexed system call. The
specific | |
This rule audits failed attempts to call open. | |
This rule is an example of a task rule (keyword:
| |
This last rule makes heavy use of filters. All filter options are
combined with a logical AND operator, meaning that this rule applies to
all tasks that carry the audit ID of |
Tip: Filtering system call arguments
For more details on filtering system call arguments, refer to Section 42.6, “Filtering system call arguments”.
You cannot only add rules to the audit system, but also remove them. There are different methods for deleting the entire rule set at once or for deleting system call rules or file and directory watches:
Example 40.6: Deleting audit rules and events #
-D1 -d exit,always -S mkdir2 -W /etc3
Clear the queue of audit rules and delete any preexisting rules. This
rule is used as the first rule in
| |
This rule deletes a system call rule. The | |
This rule tells audit to discard the rule with the directory watch on
|
To get an overview of which rules are currently in use in your audit
setup, run auditctl -l. This command
displays all rules with one rule per line.
Example 40.7: Listing rules with auditctl -l #
exit,always watch=/etc perm=rx exit,always watch=/etc/passwd perm=rwxa key=fk_passwd exit,always watch=/etc/shadow perm=rwxa exit,always syscall=mkdir exit,always a1=4 (0x4) syscall=access exit,always a0=2 (0x2) syscall=ipc exit,always success!=0 syscall=open
Note: Creating filter rules
You can build sophisticated audit rules by using the various filter
options. Refer to the auditctl(8) man page for more
information about the options available for building audit filter rules
and audit rules.
40.5 Understanding the audit logs and generating reports #Edit source
To understand what the aureport utility does, it is
vital to know how the logs generated by the audit daemon are structured,
and what exactly is recorded for an event. Then you can decide which
report types are most appropriate for your needs.
40.5.1 Understanding the audit logs #Edit source
The following examples highlight two typical events that are logged by
audit and how their trails in the audit log are read. The audit log or
logs (if log rotation is enabled) are stored in the
/var/log/audit directory.
The logs record two types of information: record types and event
fields. The record types are identified by type= in
each log entry. Event fields are all other items on the left side of
the equals signs. In the following examples,
type=SYSCALL and type=CWDare
record types, and arch=c000003e and
syscall=2 are event fields, followed by their values.
Refer to the /usr/include/libaudit.h file (from the
audit-devel package) to see
a complete list of record types and their definitions.
Run the ausyscall --dump command to see a table of
syscall numbers, and what they represent:
> ausyscall --dump
Using x86_64 syscall table:
0 read
1 write
2 open
3 close
4 stat
5 fstat
[...]
The first example is a simple less command. The second
example covers a great deal of PAM activity in the logs when a user tries
to remotely log in to a machine running audit.
Example 40.8: A simple audit event—viewing the audit log #
type=SYSCALL msg=audit(1234874638.599:5207): arch=c000003e syscall=2 success=yes exit=4 a0=62fb60 a1=0 a2=31 a3=0 items=1 ppid=25400 pid =25616 auid=0 uid=0 gid=0 euid=0 suid=0 fsuid=0 egid=0 sgid=0 fsgid=0 tty=pts1 ses=1164 comm="less" exe="/usr/bin/less" key="doc_log" type=CWD msg=audit(1234874638.599:5207): cwd="/root" type=PATH msg=audit(1234874638.599:5207): item=0 name="/var/log/audit/ audit.log" inode=1219041 dev=08:06 mode=0100644 ouid=0 ogid=0 rdev=00:00
The above event, a simple less
/var/log/audit/audit.log, wrote three messages to the log. All
of them are closely linked together and you would not be able to make
sense of one of them without the others. The first message reveals the
following information:
typeThe type of event recorded. In this case, it assigns the
SYSCALLtype to an event triggered by a system call. TheCWDevent was recorded to record the current working directory at the time of the syscall. APATHevent is generated for each path passed to the system call. The open system call takes one path argument and generates onePATHevent. It is important to understand that thePATHevent reports the path name string argument without any further interpretation, so a relative path requires manual combination with the path reported by theCWDevent to determine the object accessed.msgA message ID enclosed in brackets. The ID splits into two parts. All characters before the
:represent a Unix epoch time stamp. The number after the colon represents the actual event ID. All events that are logged from one application's system call have the same event ID. If the application makes a second system call, it gets another event ID.archReferences the CPU architecture of the system call. Decode this information using the
-ioption on any of yourausearchcommands when searching the logs.syscallThe type of system call as it would have been printed by an
straceon this particular system call. This data is taken from the list of system calls under/usr/include/asm/unistd.hand may vary depending on the architecture. In this case,syscall=2refers to the open system call (seeman open(2)) invoked by the less application.successWhether the system call succeeded or failed.
exitThe exit value returned by the system call. For the
opensystem call used in this example, this is the file descriptor number. This varies by system call.a0toa3The first four arguments to the system call in numeric form. The values of these are system call dependent. In this example (an
opensystem call), the following are used:a0=62fb60 a1=8000 a2=31 a3=0
a0is the start address of the passed path.a1is the flags.8000in hex notation translates to100000in octal notation, which in turn translates toO_LARGEFILE.a2is the mode, which, becauseO_CREATwas not specified, is unused.a3is not passed by theopensystem call. Check the manual page of the relevant system call to find out which arguments are used with it.itemsThe number of strings passed to the application.
ppidThe process ID of the parent of the process analyzed.
pidThe process ID of the process analyzed.
auidThe audit ID. A process is given an audit ID on user login. This ID is then handed down to any child process started by the initial process of the user. Even if the user changes their identity (for example, becomes
root), the audit ID stays the same. Thus you can always trace actions to the original user who logged in.uidThe user ID of the user who started the process. In this case,
0forroot.gidThe group ID of the user who started the process. In this case,
0forroot.euid,suid,fsuidEffective user ID, set user ID, and file system user ID of the user that started the process.
egid,sgid,fsgidEffective group ID, set group ID, and file system group ID of the user that started the process.
ttyThe terminal from which the application was started. In this case, a pseudo-terminal used in an SSH session.
sesThe login session ID. This process attribute is set when a user logs in and can tie any process to a particular user login.
commThe application name under which it appears in the task list.
exeThe resolved path to the binary program.
subjauditdrecords whether the process is subject to any security context, such as AppArmor.unconstrained, as in this case, means that the process is not confined with AppArmor. If the process had been confined, the binary path plus the AppArmor profile mode would have been logged.keyIf you are auditing many directories or files, assign key strings to each of these watches. You can use these keys with
ausearchto search the logs for events of this type.
The second message triggered by the example less call
does not reveal anything apart from the current working directory when
the less command was executed.
The third message reveals the following (the type and
message flags have already been introduced):
itemIn this example,
itemreferences thea0argument—a path—that is associated with the originalSYSCALLmessage. Had the original call had more than one path argument (such as acpormvcommand), an additionalPATHevent would have been logged for the second path argument.nameRefers to the path passed as an argument to the open system call.
inodeRefers to the inode number corresponding to
name.devSpecifies the device on which the file is stored. In this case,
08:06, which stands for/dev/sda1or “first partition on the first IDE device.”modeNumerical representation of the file's access permissions. In this case,
roothas read and write permissions and their group (root) has read access while the entire rest of the world cannot access the file.ouidandogidRefer to the UID and GID of the inode itself.
rdevNot applicable for this example. The
rdeventry applies to block or character devices, not to files.
Example 40.9, “An advanced audit event—login via SSH” highlights the audit events triggered by an incoming SSH connection. Most of the messages are related to the PAM stack and reflect the different stages of the SSH PAM process. Several of the audit messages carry nested PAM messages in them that signify that a particular stage of the PAM process has been reached. Although the PAM messages are logged by audit, audit assigns its own message type to each event:
Example 40.9: An advanced audit event—login via SSH #
type=USER_AUTH msg=audit(1234877011.791:7731): user pid=26127 uid=0 1 auid=4294967295 ses=4294967295 msg='op=PAM:authentication acct="root" exe="/usr/sbin/sshd" (hostname=jupiter.example.com, addr=192.168.2.100, terminal=ssh res=success)' type=USER_ACCT msg=audit(1234877011.795:7732): user pid=26127 uid=0 2 auid=4294967295 ses=4294967295 msg='op=PAM:accounting acct="root" exe="/usr/sbin/sshd" (hostname=jupiter.example.com, addr=192.168.2.100, terminal=ssh res=success)' type=CRED_ACQ msg=audit(1234877011.799:7733): user pid=26125 uid=0 3 auid=4294967295 ses=4294967295 msg='op=PAM:setcred acct="root" exe="/usr/sbin/sshd" (hostname=jupiter.example.com, addr=192.168.2.100, terminal=/dev/pts/0 res=success)' type=LOGIN msg=audit(1234877011.799:7734): login pid=26125 uid=0 old auid=4294967295 new auid=0 old ses=4294967295 new ses=1172 type=USER_START msg=audit(1234877011.799:7735): user pid=26125 uid=0 4 auid=0 ses=1172 msg='op=PAM:session_open acct="root" exe="/usr/sbin/sshd" (hostname=jupiter.example.com, addr=192.168.2.100, terminal=/dev/pts/0 res=success)' type=USER_LOGIN msg=audit(1234877011.823:7736): user pid=26128 uid=0 5 auid=0 ses=1172 msg='uid=0: exe="/usr/sbin/sshd" (hostname=jupiter.example.com, addr=192.168.2.100, terminal=/dev/pts/0 res=success)' type=CRED_REFR msg=audit(1234877011.828:7737): user pid=26128 uid=0 6 auid=0 ses=1172 msg='op=PAM:setcred acct="root" exe="/usr/sbin/sshd" (hostname=jupiter.example.com, addr=192.168.2.100, terminal=/dev/pts/0 res=success)'
PAM reports that is has successfully requested user authentication for
| |
PAM reports that it has successfully determined whether the user is authorized to log in. | |
PAM reports that the appropriate credentials to log in have been
acquired and that the terminal changed to a normal terminal
( | |
PAM reports that it has successfully opened a session for
| |
The user has successfully logged in. This event is the one used by
| |
PAM reports that the credentials have been successfully reacquired. |
40.5.2 Generating custom audit reports #Edit source
The raw audit reports stored in the /var/log/audit
directory tend to become bulky and hard to understand. To more
easily find relevant messages, use the aureport
utility and create custom reports.
The following use cases highlight a few of the possible report types
that you can generate with aureport:
- Read audit logs from another file
When the audit logs have moved to another machine or when you want to analyze the logs of several machines on your local machine without wanting to connect to each of these individually, move the logs to a local file and have
aureportanalyze them locally:>sudoaureport -if myfileSummary Report ====================== Range of time in logs: 03/02/09 14:13:38.225 - 17/02/09 14:52:27.971 Selected time for report: 03/02/09 14:13:38 - 17/02/09 14:52:27.971 Number of changes in configuration: 13 Number of changes to accounts, groups, or roles: 0 Number of logins: 6 Number of failed logins: 13 Number of authentications: 7 Number of failed authentications: 573 Number of users: 1 Number of terminals: 9 Number of host names: 4 Number of executables: 17 Number of files: 279 Number of AVC's: 0 Number of MAC events: 0 Number of failed syscalls: 994 Number of anomaly events: 0 Number of responses to anomaly events: 0 Number of crypto events: 0 Number of keys: 2 Number of process IDs: 1211 Number of events: 5320The above command,
aureportwithout any arguments, provides the standard general summary report generated from the logs contained inmyfile. To create more detailed reports, combine the-ifoption with any of the options below. For example, generate a login report that is limited to a certain time frame:>sudoaureport -l -ts 14:00 -te 15:00 -if myfileLogin Report ============================================ # date time auid host term exe success event ============================================ 1. 17/02/09 14:21:09 root: 192.168.2.100 sshd /usr/sbin/sshd no 7718 2. 17/02/09 14:21:15 0 jupiter /dev/pts/3 /usr/sbin/sshd yes 7724- Convert numeric entities to text
Some information, such as user IDs, are printed in numeric form. To convert these into a human-readable text format, add the
-ioption to youraureportcommand.- Create a rough summary report
If you are interested in the current audit statistics (events, logins, processes, etc.), run
aureportwithout any other option.- Create a summary report of failed events
To break down the overall statistics of plain
aureportto the statistics of failed events, useaureport--failed:>sudoaureport --failedFailed Summary Report ====================== Range of time in logs: 03/02/09 14:13:38.225 - 17/02/09 14:57:35.183 Selected time for report: 03/02/09 14:13:38 - 17/02/09 14:57:35.183 Number of changes in configuration: 0 Number of changes to accounts, groups, or roles: 0 Number of logins: 0 Number of failed logins: 13 Number of authentications: 0 Number of failed authentications: 574 Number of users: 1 Number of terminals: 5 Number of host names: 4 Number of executables: 11 Number of files: 77 Number of AVC's: 0 Number of MAC events: 0 Number of failed syscalls: 994 Number of anomaly events: 0 Number of responses to anomaly events: 0 Number of crypto events: 0 Number of keys: 2 Number of process IDs: 708 Number of events: 1583- Create a summary report of successful events
If you want to break down the overall statistics of a plain
aureportto the statistics of successful events, useaureport--success:>sudoaureport --successSuccess Summary Report ====================== Range of time in logs: 03/02/09 14:13:38.225 - 17/02/09 15:00:01.535 Selected time for report: 03/02/09 14:13:38 - 17/02/09 15:00:01.535 Number of changes in configuration: 13 Number of changes to accounts, groups, or roles: 0 Number of logins: 6 Number of failed logins: 0 Number of authentications: 7 Number of failed authentications: 0 Number of users: 1 Number of terminals: 7 Number of host names: 3 Number of executables: 16 Number of files: 215 Number of AVC's: 0 Number of MAC events: 0 Number of failed syscalls: 0 Number of anomaly events: 0 Number of responses to anomaly events: 0 Number of crypto events: 0 Number of keys: 2 Number of process IDs: 558 Number of events: 3739- Create summary reports
In addition to the dedicated summary reports (main summary and failed and success summary), use the
--summaryoption with most of the other options to create summary reports for a particular area of interest. Not all reports support this option, however. This example creates a summary report for user login events:>sudoaureport -u -i --summaryUser Summary Report =========================== total auid =========================== 5640 root 13 tux 3 wilber- Create a report of events
To get an overview of the events logged by audit, use the
aureport-ecommand. This command generates a numbered list of all events including date, time, event number, event type, and audit ID.>sudoaureport -e -ts 14:00 -te 14:21 Event Report =================================== # date time event type auid success =================================== 1. 17/02/09 14:20:27 7462 DAEMON_START 0 yes 2. 17/02/09 14:20:27 7715 CONFIG_CHANGE 0 yes 3. 17/02/09 14:20:57 7716 USER_END 0 yes 4. 17/02/09 14:20:57 7717 CRED_DISP 0 yes 5. 17/02/09 14:21:09 7718 USER_LOGIN -1 no 6. 17/02/09 14:21:15 7719 USER_AUTH -1 yes 7. 17/02/09 14:21:15 7720 USER_ACCT -1 yes 8. 17/02/09 14:21:15 7721 CRED_ACQ -1 yes 9. 17/02/09 14:21:15 7722 LOGIN 0 yes 10. 17/02/09 14:21:15 7723 USER_START 0 yes 11. 17/02/09 14:21:15 7724 USER_LOGIN 0 yes 12. 17/02/09 14:21:15 7725 CRED_REFR 0 yes- Create a report from all process events
To analyze the log from a process's point of view, use the
aureport-pcommand. This command generates a numbered list of all process events including date, time, process ID, name of the executable, system call, audit ID, and event number.aureport -pProcess ID Report ====================================== # date time pid exe syscall auid event ====================================== 1. 13/02/09 15:30:01 32742 /usr/sbin/cron 0 0 35 2. 13/02/09 15:30:01 32742 /usr/sbin/cron 0 0 36 3. 13/02/09 15:38:34 32734 /usr/lib/gdm/gdm-session-worker 0 -1 37- Create a report from all system call events
To analyze the audit log from a system call's point of view, use the
aureport-scommand. This command generates a numbered list of all system call events including date, time, number of the system call, process ID, name of the command that used this call, audit ID, and event number.>sudoaureport -sSyscall Report ======================================= # date time syscall pid comm auid event ======================================= 1. 16/02/09 17:45:01 2 20343 cron -1 2279 2. 16/02/09 17:45:02 83 20350 mktemp 0 2284 3. 16/02/09 17:45:02 83 20351 mkdir 0 2285- Create a report from all executable events
To analyze the audit log from an executable's point of view, use the
aureport-xcommand. This command generates a numbered list of all executable events including date, time, name of the executable, the terminal it is run in, the host executing it, the audit ID, and event number.aureport -xExecutable Report ==================================== # date time exe term host auid event ==================================== 1. 13/02/09 15:08:26 /usr/sbin/sshd sshd 192.168.2.100 -1 12 2. 13/02/09 15:08:28 /usr/lib/gdm/gdm-session-worker :0 ? -1 13 3. 13/02/09 15:08:28 /usr/sbin/sshd ssh 192.168.2.100 -1 14- Create a report about files
To generate a report from the audit log that focuses on file access, use the
aureport-fcommand. This command generates a numbered list of all file-related events including date, time, name of the accessed file, number of the system call accessing it, success or failure of the command, the executable accessing the file, audit ID, and event number.>sudoaureport -fFile Report =============================================== # date time file syscall success exe auid event =============================================== 1. 16/02/09 17:45:01 /etc/shadow 2 yes /usr/sbin/cron -1 2279 2. 16/02/09 17:45:02 /tmp/ 83 yes /bin/mktemp 0 2284 3. 16/02/09 17:45:02 /var 83 no /bin/mkdir 0 2285- Create a report about users
To generate a report from the audit log that illustrates which users are running what executables on your system, use the
aureport-ucommand. This command generates a numbered list of all user-related events including date, time, audit ID, terminal used, host, name of the executable, and an event ID.aureport -uUser ID Report ==================================== # date time auid term host exe event ==================================== 1. 13/02/09 15:08:26 -1 sshd 192.168.2.100 /usr/sbin/sshd 12 2. 13/02/09 15:08:28 -1 :0 ? /usr/lib/gdm/gdm-session-worker 13 3. 14/02/09 08:25:39 -1 ssh 192.168.2.101 /usr/sbin/sshd 14- Create a report about logins
To create a report that focuses on login attempts to your machine, run the
aureport-lcommand. This command generates a numbered list of all login-related events including date, time, audit ID, host and terminal used, name of the executable, success or failure of the attempt, and an event ID.>sudoaureport -l -iLogin Report ============================================ # date time auid host term exe success event ============================================ 1. 13/02/09 15:08:31 tux: 192.168.2.100 sshd /usr/sbin/sshd no 19 2. 16/02/09 12:39:05 root: 192.168.2.101 sshd /usr/sbin/sshd no 2108 3. 17/02/09 15:29:07 geeko: ? tty3 /bin/login yes 7809- Limit a report to a certain time frame
To analyze the logs for a particular time frame, such as the working hours of Feb 16, 2009, first find out whether this data is contained in the current
audit.logor whether the logs have been rotated in by runningaureport-t:aureport -tLog Time Range Report ===================== /var/log/audit/audit.log: 03/02/09 14:13:38.225 - 17/02/09 15:30:01.636The current
audit.logcontains all the desired data. Otherwise, use the-ifoption to point theaureportcommands to the log file that contains the needed data.Then, specify the start date and time and the end date and time of the desired time frame and combine it with the report option needed. This example focuses on login attempts:
>sudoaureport -ts 02/16/09 8:00 -te 02/16/09 18:00 -lLogin Report ============================================ # date time auid host term exe success event ============================================ 1. 16/02/09 12:39:05 root: 192.168.2.100 sshd /usr/sbin/sshd no 2108 2. 16/02/09 12:39:12 0 192.168.2.100 /dev/pts/1 /usr/sbin/sshd yes 2114 3. 16/02/09 13:09:28 root: 192.168.2.100 sshd /usr/sbin/sshd no 2131 4. 16/02/09 13:09:32 root: 192.168.2.100 sshd /usr/sbin/sshd no 2133 5. 16/02/09 13:09:37 0 192.168.2.100 /dev/pts/2 /usr/sbin/sshd yes 2139The start date and time are specified with the
-tsoption. Any event that has a time stamp equal to or after your given start time appears in the report. If you omit the date,aureportassumes that you meant today. If you omit the time, it assumes that the start time should be midnight of the date specified.Specify the end date and time with the
-teoption. Any event that has a time stamp equal to or before your given event time appears in the report. If you omit the date,aureportassumes that you meant today. If you omit the time, it assumes that the end time should be now. Use the same format for the date and time as for-ts.
All reports except the summary ones are printed in column format and sent to STDOUT, which means that this data can be written to other commands easily. The visualization scripts introduced in Section 40.8, “Visualizing audit data” are examples of how to further process the data generated by audit.
40.6 Querying the audit daemon logs with ausearch #Edit source
The aureport tool helps you to create overall
summaries of what is happening on the system, but if you are interested
in the details of a particular event, ausearch is the
tool to use.
ausearch allows you to search the audit logs using
special keys and search phrases that relate to most of the flags that
appear in event messages in
/var/log/audit/audit.log. Not all record types
contain the same search phrases. There are no hostname
or uid entries in a PATH record,
for example.
When searching, make sure that you choose appropriate search criteria to
catch all records you need. Otherwise, you could be searching for
a specific type of record and still get various other related records
along with it. This is caused by different parts of the kernel
contributing additional records for events that are related to the one to
find. For example, you would always get a PATH record
along with the SYSCALL record for an
open system call.
Tip: Using multiple search options
Any of the command line options can be combined with logical AND operators to narrow down your search.
- Read audit logs from another file
When the audit logs have moved to another machine or when you want to analyze the logs of several machines on your local machine without wanting to connect to each of these individually, move the logs to a local file and have
ausearchsearch them locally:>sudoausearch -option -if myfile- Convert numeric results into text
Some information, such as user IDs are printed in numeric form. To convert these into human readable text format, add the
-ioption to yourausearchcommand.- Search by audit event ID
If you have previously run an audit report or done an
autrace, you should analyze the trail of a particular event in the log. Most of the report types described in Section 40.5, “Understanding the audit logs and generating reports” include audit event IDs in their output. An audit event ID is the second part of an audit message ID, which consists of a Unix epoch time stamp and the audit event ID separated by a colon. All events that are logged from one application's system call have the same event ID. Use this event ID withausearchto retrieve this event's trail from the log.Use a command similar to the following:
>sudoausearch -a 5207---- time->Tue Feb 17 13:43:58 2009 type=PATH msg=audit(1234874638.599:5207): item=0 name="/var/log/audit/audit.log" inode=1219041 dev=08:06 mode=0100644 ouid=0 ogid=0 rdev=00:00 type=CWD msg=audit(1234874638.599:5207): cwd="/root" type=SYSCALL msg=audit(1234874638.599:5207): arch=c000003e syscall=2 success=yes exit=4 a0=62fb60 a1=0 a2=31 a3=0 items=1 ppid=25400 pid=25616 auid=0 uid=0 gid=0 euid=0 suid=0 fsuid=0 egid=0 sgid=0 fsgid=0 tty=pts1 ses=1164 comm="less" exe="/usr/bin/less" key="doc_log"The
ausearch-acommand grabs all records in the logs that are related to the audit event ID provided and displays them. This option can be combined with any other option.- Search by message type
To search for audit records of a particular message type, use the
ausearch-m MESSAGE_TYPEcommand. Examples of valid message types includePATH,SYSCALL, andUSER_LOGIN. Runningausearch-mwithout a message type displays a list of all message types.- Search by login ID
To view records associated with a particular login user ID, use the
ausearch-ulcommand. It displays any records related to the user login ID specified provided that user had been able to log in successfully.- Search by user ID
View records related to any of the user IDs (both user ID and effective user ID) with
ausearch-ua. View reports related to a particular user ID withausearch-ui UID. Search for records related to a particular effective user ID, use theausearch-ue EUID. Searching for a user ID means the user ID of the user creating a process. Searching for an effective user ID means the user ID and privileges that are required to run this process.- Search by group ID
View records related to any of the group IDs (both group ID and effective group ID) with the
ausearch-gacommand. View reports related to a particular user ID withausearch-gi GID. Search for records related to a particular effective group ID, useausearch-ge EGID.- Search by command line name
View records related to a certain command, using the
ausearch-c COMM_NAMEcommand, for example,ausearch-c lessfor all records related to thelesscommand.- Search by executable name
View records related to a certain executable with the
ausearch-x EXEcommand, for exampleausearch-x /usr/bin/lessfor all records related to the/usr/bin/lessexecutable.- Search by system call name
View records related to a certain system call with the
ausearch-sc SYSCALLcommand, for example,ausearch -sc openfor all records related to theopensystem call.- Search by process ID
View records related to a certain process ID with the
ausearch-p PIDcommand, for exampleausearch-p 13368for all records related to this process ID.- Search by event or system call success value
View records containing a certain system call success value with
ausearch-sv SUCCESS_VALUE, for example,ausearch-sv yesfor all successful system calls.- Search by file name
View records containing a certain file name with
ausearch-f FILE_NAME, for example,ausearch-f /foo/barfor all records related to the/foo/barfile. Using the file name alone would work as well, but using relative paths does not work.- Search by terminal
View records of events related to a certain terminal with
ausearch-tm TERM, for example,ausearch-tm sshto view all records related to events on the SSH terminal andausearch-tm ttyto view all events related to the console.- Search by host name
View records related to a certain remote host name with
ausearch-hn HOSTNAME, for example,ausearch-hn jupiter.example.com. You can use a host name, fully qualified domain name, or numeric network address.- Search by key field
View records that contain a certain key assigned in the audit rule set to identify events of a particular type. Use the
ausearch-k KEY_FIELD, for example,ausearch-k CFG_etcto display any records containing theCFG_etckey.- Search by word
View records that contain a certain string assigned in the audit rule set to identify events of a particular type. The whole string is matched on file name, host name, and terminal. Use the
ausearch-w WORD.- Limit a search to a certain time frame
Use
-tsand-teto limit the scope of your searches to a certain time frame. The-tsoption is used to specify the start date and time and the-teoption is used to specify the end date and time. These options can be combined with any of the above. The use of these options is similar to use withaureport.
40.7 Analyzing processes with autrace #Edit source
Other than monitoring your system using the rules you set up, you can
also perform dedicated audits of individual processes using the
autrace command. autrace works
similarly to the strace command, but gathers slightly
different information. The output of autrace is
written to /var/log/audit/audit.log and does not
look any different from the standard audit log entries.
When performing an autrace on a process, make sure
that any audit rules are purged from the queue to avoid these rules
clashing with the ones autrace adds itself. Delete the
audit rules with the auditctl -D
command. This stops all normal auditing.
>sudoauditctl -DNo rulesautrace /usr/bin/lessWaiting to execute: /usr/bin/less Cleaning up... No rules Trace complete. You can locate the records with 'ausearch -i -p 7642'
Always use the full path to the executable to track with
autrace. After the trace is complete,
autrace provides the event ID of the trace, so you can
analyze the entire data trail with ausearch. To
restore the audit system to use the audit rule set again, restart the
audit daemon with systemctl restart auditd.
40.8 Visualizing audit data #Edit source
Neither the data trail in /var/log/audit/audit.log
nor the different report types generated by aureport,
described in Section 40.5.2, “Generating custom audit reports”, provide an
intuitive reading experience to the user. The aureport
output is formatted in columns and thus easily available to any sed,
Perl or awk scripts that users might connect to the audit framework to
visualize the audit data.
The visualization scripts (see Section 41.6, “Configuring log visualization”) are one example of how to use standard Linux tools available with openSUSE Leap or any other Linux distribution to create easy-to-read audit output. The following examples help you understand how the plain audit reports can be transformed into human readable graphics.
The first example illustrates the relationship of programs and system
calls. To get to this kind of data, you need to determine the appropriate
aureport command that delivers the source data from
which to generate the final graphic:
>sudoaureport -s -iSyscall Report ======================================= # date time syscall pid comm auid event ======================================= 1. 16/02/09 17:45:01 open 20343 cron unset 2279 2. 16/02/09 17:45:02 mkdir 20350 mktemp root 2284 3. 16/02/09 17:45:02 mkdir 20351 mkdir root 2285 ...
The first thing that the visualization script needs to do on this report
is to extract those columns that are of interest. In this example, they are
the syscall and the comm columns.
The output is sorted and duplicates removed; then the final output is
written into the visualization program itself:
LC_ALL=C aureport -s -i | awk '/^[0-9]/ { print $6" "$4 }' | sort | uniq | mkgraph
Figure 40.2: Flow graph—program versus system call relationship #
The second example illustrates the different types of events and how many
of each type have been logged. The appropriate
aureport command to extract this kind of information
is aureport -e:
>sudoaureport -e -i --summary Event Summary Report ====================== total type ====================== 2434 SYSCALL 816 USER_START 816 USER_ACCT 814 CRED_ACQ 810 LOGIN 806 CRED_DISP 779 USER_END 99 CONFIG_CHANGE 52 USER_LOGIN
Because this type of report already contains a two-column output, it is fed into the visualization script and transformed into a bar chart.
>sudoaureport -e -i --summary | mkbar events
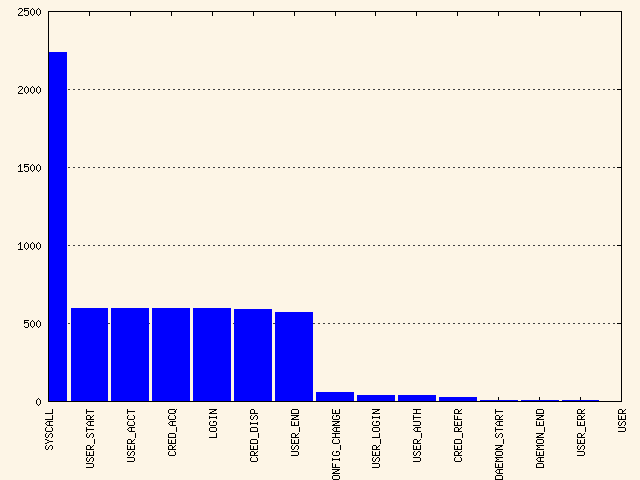
Figure 40.3: Bar chart—common event types #
For background information about the visualization of audit data, refer to the Web site of the audit project at https://people.redhat.com/sgrubb/audit/visualize/index.html.
40.9 Relaying audit event notifications #Edit source
The auditing system also allows external applications to access and
use the auditd daemon in real
time. This feature is provided by so called audit
dispatcher which allows, for example, intrusion detection
systems to use auditd to receive
enhanced detection information.
The configuration of auditd is
stored in /etc/audit/auditd.conf. The file includes
the following options:
q_depthSpecifies the size of the event dispatcher internal queue. If syslog complains about audit events getting dropped, increase this value. Default is 250.
overflow_actionSpecifies the way the audit daemon reacts to the internal queue overflow. Possible values are
ignore(nothing happens),syslog(issues a warning to syslog),suspend(stop processing events),single(the computer system is put in single user mode), orhalt(shuts the system down).priority_boostSpecifies the priority for the audit event dispatcher (in addition to the audit daemon priority itself). Default is 4 which means no change in priority.
name_formatSpecifies the way the computer node name is inserted into the audit event. Possible values are
none(no computer name is inserted),hostname(name returned by thegethostnamesystem call),fqd(fully qualified domain name of the machine),numeric(IP address of the machine), oruser(user defined string from thenameoption). Default isnone.nameSpecifies a user-defined string which identifies the machine. The
name_formatoption must be set touser, otherwise this option is ignored.max_restartsA non-negative number that tells the audit event dispatcher how many times it can try to restart a crashed plug-in. The default is 10.
Example 40.10: Example /etc/audit/auditd.conf #
q_depth = 250 overflow_action = SYSLOG priority_boost = 4 name_format = HOSTNAME #name = mydomain
The plug-in programs install their configuration files in a special
directory, /etc/audit/plugins.d.
The plug-in configuration files have the following options:
activeSpecifies if the program uses
auditd. Possible values areyesorno.directionSpecifies the way the plug-in was designed to communicate with audit. It informs the event dispatcher in which directions the events flow. Possible values are
inorout.pathSpecifies the absolute path to the plug-in executable. In case of internal plug-ins, this option specifies the plug-in name.
typeSpecifies the way the plug-in is to be run. Possible values are
builtinoralways. Usebuiltinfor internal plug-ins (af_unixandsyslog) andalwaysfor most (if not all) other plug-ins. Default isalways.argsSpecifies the argument that is passed to the plug-in program. Normally, plug-in programs read their arguments from their configuration file and do not need to receive any arguments. There is a limit of two arguments.
formatSpecifies the format of data that the audit dispatcher passes to the plug-in program. Valid options are
binaryorstring.binarypasses the data exactly as the event dispatcher receives them from the audit daemon.stringinstructs the dispatcher to change the event into a string that is parsable by the audit parsing library. Default isstring.
Example 40.11: Example /etc/audit/plugins.d/syslog.conf #
active = no direction = out path = /sbin/audisp-syslog type = builtin args = LOG_INFO format = string
41 Setting up the Linux audit framework #Edit source
This chapter shows how to set up a simple audit scenario. Every step involved in configuring and enabling audit is explained in detail. After you have learned to set up audit, consider a real-world example scenario in Chapter 42, Introducing an audit rule set.
To set up audit on openSUSE Leap, you need to complete the following steps:
Procedure 41.1: Setting up the Linux audit framework #
Install the
auditpackage. To use the log visualization as described in Section 41.6, “Configuring log visualization”, installgnuplotandgraphviz.Determine the components to audit. Refer to Section 41.1, “Determining the components to audit” for details.
Check or modify the basic audit daemon configuration. Refer to Section 41.2, “Configuring the audit daemon” for details.
Enable auditing for system calls. Refer to Section 41.3, “Enabling audit for system calls” for details.
Compose audit rules to suit your scenario. Refer to Section 41.4, “Setting up audit rules” for details.
Generate logs and configure tailor-made reports. Refer to Section 41.5, “Configuring audit reports” for details.
Configure optional log visualization. Refer to Section 41.6, “Configuring log visualization” for details.
Important: Controlling the audit daemon
Before configuring any of the components of the audit system, make sure
that the audit daemon is not running by entering systemctl
status auditd as root. On a default
openSUSE Leap system, audit is started on boot, so you need to turn it
off by entering systemctl stop auditd. Start
the daemon after configuring it with systemctl start
auditd.
41.1 Determining the components to audit #Edit source
Before starting to create your own audit configuration, determine to which degree you want to use it. Check the following general rules to determine which use case best applies to you and your requirements:
If you require a full security audit for CAPP/EAL certification, enable full audit for system calls and configure watches on various configuration files and directories, similar to the rule set featured in Chapter 42, Introducing an audit rule set.
If you need to trace a process based on the audit rules, use
autrace.If you require file and directory watches to track access to important or security-sensitive data, create a rule set matching these requirements. Enable audit as described in Section 41.3, “Enabling audit for system calls” and proceed to Section 41.4, “Setting up audit rules”.
41.2 Configuring the audit daemon #Edit source
The basic setup of the audit daemon is done by editing
/etc/audit/auditd.conf. You may also use YaST
to configure the basic settings by calling › › . Use the
tabs and for
configuration.
log_file = /var/log/audit/audit.log log_format = RAW log_group = root priority_boost = 4 flush = INCREMENTAL freq = 20 num_logs = 5 disp_qos = lossy dispatcher = /sbin/audispd name_format = NONE ##name = mydomain max_log_file = 6 max_log_file_action = ROTATE space_left = 75 space_left_action = SYSLOG action_mail_acct = root admin_space_left = 50 admin_space_left_action = SUSPEND disk_full_action = SUSPEND disk_error_action = SUSPEND ##tcp_listen_port = tcp_listen_queue = 5 tcp_max_per_addr = 1 ##tcp_client_ports = 1024-65535 tcp_client_max_idle = 0 cp_client_max_idle = 0
The default settings work reasonably well for many setups. Some values,
such as num_logs, max_log_file,
space_left, and admin_space_left
depend on the size of your deployment. If disk space is limited, you
should reduce the number of log files to keep if they are rotated
and you should get an earlier warning if disk space is running out.
For a CAPP-compliant setup, adjust the values for
log_file, flush,
max_log_file, max_log_file_action,
space_left, space_left_action,
admin_space_left,
admin_space_left_action,
disk_full_action, and
disk_error_action, as described in
Section 40.2, “Configuring the audit daemon”. An example CAPP-compliant
configuration looks like this:
log_file = PATH_TO_SEPARATE_PARTITION/audit.log log_format = RAW priority_boost = 4 flush = SYNC ### or DATA freq = 20 num_logs = 4 dispatcher = /sbin/audispd disp_qos = lossy max_log_file = 5 max_log_file_action = KEEP_LOGS space_left = 75 space_left_action = EMAIL action_mail_acct = root admin_space_left = 50 admin_space_left_action = SINGLE ### or HALT disk_full_action = SUSPEND ### or HALT disk_error_action = SUSPEND ### or HALT
The ### precedes comments where you can choose from
several options. Do not add the comments to your actual configuration
files.
Tip: More information
Refer to Section 40.2, “Configuring the audit daemon” for detailed background
information about the auditd.conf configuration
parameters.
41.3 Enabling audit for system calls #Edit source
If the audit framework is not installed, install the
audit package. A standard openSUSE Leap
system does not have auditd running by default. Enable it with:
>sudosystemctl enable auditd
There are different levels of auditing activity available:
- Basic logging
Out of the box (without any further configuration) auditd logs only events concerning its own configuration changes to
/var/log/audit/audit.log. No events (file access, system call, etc.) are generated by the kernel audit component until requested byauditctl. However, other kernel components and modules may log audit events outside of the control ofauditctland these appear in the audit log. By default, the only module that generates audit events is AppArmor.- Advanced logging with system call auditing
To audit system calls and get meaningful file watches, you need to enable audit contexts for system calls.
As you need system call auditing capabilities even when you are
configuring plain file or directory watches, you need to enable audit
contexts for system calls. To enable audit contexts for the duration of
the current session, execute auditctl -e 1 as
root. To disable this feature, execute auditctl -e
0 as root.
The audit contexts are enabled by default. To turn this feature off
temporarily, use auditctl -e 0.
41.4 Setting up audit rules #Edit source
Using audit rules, determine which aspects of the system should be analyzed by audit. Normally this includes important databases and security-relevant configuration files. You may also analyze various system calls in detail if a broad analysis of your system is required. A detailed example configuration that includes most of the rules that are needed in a CAPP compliant environment is available in Chapter 42, Introducing an audit rule set.
Audit rules can be passed to the audit daemon on the
auditctl command line and by composing a rule
set in /etc/audit/audit.rules which is processed
whenever the audit daemon is started. To customize
/etc/audit/audit.rules either edit it directly, or
use YaST: › › . Rules passed on the command line are
not persistent and need to be re-entered when the audit daemon is
restarted.
A simple rule set for basic auditing on a few important files and directories could look like this:
# basic audit system parameters -D -b 8192 -f 1 -e 1 # some file and directory watches with keys -w /var/log/audit/ -k LOG_audit -w /etc/audit/auditd.conf -k CFG_audit_conf -p rxwa -w /etc/audit/audit.rules -k CFG_audit_rules -p rxwa -w /etc/passwd -k CFG_passwd -p rwxa -w /etc/sysconfig/ -k CFG_sysconfig # an example system call rule -a entry,always -S umask ### add your own rules
When configuring the basic audit system parameters (such as the backlog
parameter -b) test these settings with your intended
audit rule set to determine whether the backlog size is appropriate for
the level of logging activity caused by your audit rule set. If your
chosen backlog size is too small, your system might not be able to handle
the audit load and consult the failure flag (-f) when
the backlog limit is exceeded.
Important: Choosing the failure flag
When choosing the failure flag, -f 2 tells
your system to perform an immediate shutdown without flushing any
pending data to disk when the limits of your audit system are exceeded.
Because this shutdown is not a clean shutdown, restrict the use of
-f 2 to the most security-conscious environments
and use -f 1 (system continues to run, issues a warning
and audit stops) for any other setup to avoid loss of data or data
corruption.
Directory watches produce less verbose output than separate file watches
for the files under these directories. To get detailed logging for your
system configuration in /etc/sysconfig, for example,
add watches for each file. Audit does not support globbing,
which means you cannot create a rule that says -w
/etc/* and watches all files and directories below
/etc.
For better identification in the log file, a key has been added to each
of the file and directory watches. Using the key, it is easier to comb
the logs for events related to a certain rule. When creating keys,
distinguish between mere log file watches and configuration file watches
by using an appropriate prefix with the key, in this case
LOG for a log file watch and CFG
for a configuration file watch. Using the file name as part of the key
also makes it easier for you to identify events of this type in the log
file.
Another thing to keep in mind when creating file and directory watches is that audit cannot deal with files that do not exist when the rules are created. Any file that is added to your system while audit is already running is not watched unless you extend the rule set to watch this new file.
For more information about creating custom rules, refer to Section 40.4, “Passing parameters to the audit system”.
Important: Changing audit rules
After you change audit rules, always restart the audit daemon with
systemctl restart auditd to reread the
changed rules.
41.5 Configuring audit reports #Edit source
To avoid having to dig through the raw audit logs to get an impression of what your system is currently doing, run custom audit reports at certain intervals. Custom audit reports enable you to focus on areas of interest and get meaningful statistics on the nature and frequency of the events you are monitoring. To analyze individual events in detail, use the ausearch tool.
Before setting up audit reporting, consider the following:
What types of events do you want to monitor by generating regular reports? Select the appropriate aureport command lines as described in Section 40.5.2, “Generating custom audit reports”.
What do you want to do with the audit reports? Decide whether to create graphical charts from the data accumulated or whether it should be transferred into any sort of spreadsheet or database. Set up the aureport command line and further processing similar to the examples shown in Section 41.6, “Configuring log visualization” to visualize your reports.
When and at which intervals should the reports run? Set up appropriate automated reporting using cron.
For this example, assume that you are interested in finding out about any attempts to access your audit, PAM and system configuration. Proceed as follows to find out about file events on your system:
Generate a full summary report of all events and check for any anomalies in the summary report, for example, have a look at the “failed syscalls” record, because these might have failed because of insufficient permissions to access a file or a file not being there:
>sudoaureportSummary Report ====================== Range of time in logs: 03/02/09 14:13:38.225 - 17/02/09 16:30:10.352 Selected time for report: 03/02/09 14:13:38 - 17/02/09 16:30:10.352 Number of changes in configuration: 24 Number of changes to accounts, groups, or roles: 0 Number of logins: 9 Number of failed logins: 15 Number of authentications: 19 Number of failed authentications: 578 Number of users: 3 Number of terminals: 15 Number of host names: 4 Number of executables: 20 Number of files: 279 Number of AVC's: 0 Number of MAC events: 0 Number of failed syscalls: 994 Number of anomaly events: 0 Number of responses to anomaly events: 0 Number of crypto events: 0 Number of keys: 2 Number of process IDs: 1238 Number of events: 5435Run a summary report for failed events and check the “files” record for the number of failed file access events:
>sudoaureport--failedFailed Summary Report ====================== Range of time in logs: 03/02/09 14:13:38.225 - 17/02/09 16:30:10.352 Selected time for report: 03/02/09 14:13:38 - 17/02/09 16:30:10.352 Number of changes in configuration: 0 Number of changes to accounts, groups, or roles: 0 Number of logins: 0 Number of failed logins: 15 Number of authentications: 0 Number of failed authentications: 578 Number of users: 1 Number of terminals: 7 Number of host names: 4 Number of executables: 12 Number of files: 77 Number of AVC's: 0 Number of MAC events: 0 Number of failed syscalls: 994 Number of anomaly events: 0 Number of responses to anomaly events: 0 Number of crypto events: 0 Number of keys: 2 Number of process IDs: 713 Number of events: 1589To list the files that could not be accessed, run a summary report of failed file events:
>sudoaureport-f -i --failed --summaryFailed File Summary Report =========================== total file =========================== 80 /var 80 spool 80 cron 80 lastrun 46 /usr/lib/locale/en_GB.UTF-8/LC_CTYPE 45 /usr/lib/locale/locale-archive 38 /usr/lib/locale/en_GB.UTF-8/LC_IDENTIFICATION 38 /usr/lib/locale/en_GB.UTF-8/LC_MEASUREMENT 38 /usr/lib/locale/en_GB.UTF-8/LC_TELEPHONE 38 /usr/lib/locale/en_GB.UTF-8/LC_ADDRESS 38 /usr/lib/locale/en_GB.UTF-8/LC_NAME 38 /usr/lib/locale/en_GB.UTF-8/LC_PAPER 38 /usr/lib/locale/en_GB.UTF-8/LC_MESSAGES 38 /usr/lib/locale/en_GB.UTF-8/LC_MONETARY 38 /usr/lib/locale/en_GB.UTF-8/LC_COLLATE 38 /usr/lib/locale/en_GB.UTF-8/LC_TIME 38 /usr/lib/locale/en_GB.UTF-8/LC_NUMERIC 8 /etc/magic.mgc ...To focus this summary report on a few files or directories of interest, such as
/etc/audit/auditd.conf,/etc/pam.d, and/etc/sysconfig, use a command similar to the following:>sudoaureport -f -i --failed --summary |grep -e "/etc/audit/auditd.conf" -e "/etc/pam.d/" -e "/etc/sysconfig"1 /etc/sysconfig/displaymanagerFrom the summary report, then proceed to isolate these items of interest from the log and find out their event IDs for further analysis:
>sudoaureport -f -i --failed |grep -e "/etc/audit/auditd.conf" -e "/etc/pam.d/" -e "/etc/sysconfig"993. 17/02/09 16:47:34 /etc/sysconfig/displaymanager readlink no /bin/vim-normal root 7887 994. 17/02/09 16:48:23 /etc/sysconfig/displaymanager getxattr no /bin/vim-normal root 7889Use the event ID to get a detailed record for each item of interest:
>sudoausearch -a7887 -i ---- time->Tue Feb 17 16:48:23 2009 type=PATH msg=audit(1234885703.090:7889): item=0 name="/etc/sysconfig/displaymanager" inode=369282 dev=08:06 mode=0100644 ouid=0 ogid=0 rdev=00:00 type=CWD msg=audit(1234885703.090:7889): cwd="/root" type=SYSCALL msg=audit(1234885703.090:7889): arch=c000003e syscall=191 success=no exit=-61 a0=7e1e20 a1=7f90e4cf9187 a2=7fffed5b57d0 a3=84 items=1 ppid=25548 pid=23045 auid=0 uid=0 gid=0 euid=0 suid=0 fsuid=0 egid=0 sgid=0 fsgid=0 tty=pts2 ses=1166 comm="vim" exe="/bin/vim-normal" key=(null)
Tip: Focusing on a certain time frame
If you are interested in events during a particular period of time, trim
down the reports by using start and end dates and times with your
aureport commands (-ts and
-te). For more information, refer to
Section 40.5.2, “Generating custom audit reports”.
All steps (except for the last one) can be run automatically and would
easily be scriptable and configured as cron jobs. Any of the
--failed --summary reports could be transformed easily
into a bar chart that plots files versus failed access attempts. For more
information about visualizing audit report data, refer to
Section 41.6, “Configuring log visualization”.
41.6 Configuring log visualization #Edit source
Using the scripts mkbar and mkgraph
you can illustrate your audit statistics with various graphs and charts.
As with any other aureport command, the plotting
commands are scriptable and can easily be configured to run as cron jobs.
mkbar and mkgraph were created by
Steve Grubb at Red Hat. They are available from
https://people.redhat.com/sgrubb/audit/visualize/.
Because the current version of audit in openSUSE Leap does not ship
with these scripts, proceed as follows to make them available on your
system:
Warning: Downloaded content is dangerous
Use mkbar and mkgraph at your own
risk. Any content downloaded from the Web is potentially dangerous
to your system, even more so when run with root privileges.
Download the scripts to
root's~/bindirectory:>sudowget http://people.redhat.com/sgrubb/audit/visualize/mkbar -O ~/bin/mkbar>sudowget http://people.redhat.com/sgrubb/audit/visualize/mkgraph -O ~/bin/mkgraphAdjust the file permissions to read, write, and execute for
root:>sudochmod 744 ~/bin/mk{bar,graph}
To plot summary reports, such as the ones discussed in
Section 41.5, “Configuring audit reports”, use the script
mkbar. Some example commands could look like the
following:
- Create a summary of events
>sudoaureport -e -i --summary | mkbar events- Create a summary of file events
>sudoaureport -f -i --summary | mkbar files- Create a summary of login events
>sudoaureport -l -i --summary | mkbar login- Create a summary of user events
>sudoaureport -u -i --summary | mkbar users- Create a summary of system call events
>sudoaureport -s -i --summary | mkbar syscalls
To create a summary chart of failed events of any of the above event
types, add the --failed option to the respective
aureport command. To cover a certain period of time,
use the -ts and -te options on
aureport. Any of these commands can be tweaked further by narrowing down
its scope using grep or egrep and regular expressions. See the comments
in the mkbar script for an example. Any of the above
commands produces a PNG file containing a bar chart of the requested
data.
To illustrate the relationship between different kinds of audit objects,
such as users and system calls, use the script
mkgraph. Some example commands could look like the
following:
- Users versus executables
>sudoLC_ALL=C aureport -u -i | awk '/^[0-9]/ { print $4" "$7 }' | sort | uniq | mkgraph users_vs_exec- Users versus files
>sudoLC_ALL=C aureport -f -i | awk '/^[0-9]/ { print $8" "$4 }' | sort | uniq | mkgraph users_vs_files- System calls versus commands
>sudoLC_ALL=C aureport -s -i | awk '/^[0-9]/ { print $4" "$6 }' | sort | uniq | mkgraph syscall_vs_com- System calls versus files
>sudoLC_ALL=C aureport -s -i | awk '/^[0-9]/ { print $5" "$4 }' | sort | uniq | mkgraph | syscall_vs_file
Graphs can also be combined to illustrate complex relationships. See the
comments in the mkgraph script for further information
and an example. The graphs produced by this script are created in
PostScript format by default, but you can change the output format by
changing the EXT variable in the script from
ps to png or
jpg.
42 Introducing an audit rule set #Edit source
- 42.1 Adding basic audit configuration parameters
- 42.2 Adding watches on audit log files and configuration files
- 42.3 Monitoring file system objects
- 42.4 Monitoring security configuration files and databases
- 42.5 Monitoring miscellaneous system calls
- 42.6 Filtering system call arguments
- 42.7 Managing audit event records using keys
The following example configuration illustrates how audit can be used to monitor your system. It highlights the most important items that need to be audited to cover the list of auditable events specified by Controlled Access Protection Profile (CAPP).
The example rule set is divided into the following sections:
Basic audit configuration (see Section 42.1, “Adding basic audit configuration parameters”)
Watches on audit log files and configuration files (see Section 42.2, “Adding watches on audit log files and configuration files”)
Monitoring operations on file system objects (see Section 42.3, “Monitoring file system objects”)
Monitoring security databases (see Section 42.4, “Monitoring security configuration files and databases”)
Monitoring miscellaneous system calls (Section 42.5, “Monitoring miscellaneous system calls”)
Filtering system call arguments (see Section 42.6, “Filtering system call arguments”)
To transform this example into a configuration file to use in your live setup, proceed as follows:
Choose the appropriate settings for your setup and adjust them.
Adjust the file
/etc/audit/audit.rulesby adding rules from the examples below or by modifying existing rules.
Note: Adjusting the level of audit logging
Do not copy the example below into your audit setup without adjusting it to your needs. Determine what and to what extent to audit.
The entire audit.rules is a collection of
auditctl commands. Every line in this file expands to a
full auditctl command line. The syntax used in the rule
set is the same as that of the auditctl command.
42.1 Adding basic audit configuration parameters #Edit source
-D1 -b 81922 -f 23
Delete any preexisting rules before starting to define new ones. | |
Set the number of buffers to take the audit messages. Depending on the level of audit logging on your system, increase or decrease this figure. | |
Set the failure flag to use when the kernel needs to handle critical
errors. Possible values are |
By emptying the rule queue with the -D option, you make
sure that audit does not use any other rule set than what you are
offering it via this file. Choosing an appropriate buffer number
(-b) is vital to avoid having your system fail because
of too high an audit load. Choosing the panic failure flag -f
2 ensures that your audit records are complete even if the
system is encountering critical errors. By shutting down the system on a
critical error, audit makes sure that no process escapes from its control
as it otherwise might if level 1 (printk) were chosen.
Important: Choosing the failure flag
Before using your audit rule set on a live system, make sure that the
setup has been thoroughly evaluated on test systems using the
worst case production workload. It is even more
critical that you do this when specifying the -f 2
flag, because this instructs the kernel to panic (perform an immediate
halt without flushing pending data to disk) if any thresholds are
exceeded. Consider the use of the -f 2 flag for only
the most security-conscious environments.
42.2 Adding watches on audit log files and configuration files #Edit source
Adding watches on your audit configuration files and the log files themselves ensures that you can track any attempt to tamper with the configuration files or detect any attempted accesses to the log files.
Note: Creating directory and file watches
Creating watches on a directory is not necessarily sufficient if you need events for file access. Events on directory access are only triggered when the directory's inode is updated with metadata changes. To trigger events on file access, add watches for each file to monitor.
-w /var/log/audit/ 1 -w /var/log/audit/audit.log -w /var/log/audit/audit_log.1 -w /var/log/audit/audit_log.2 -w /var/log/audit/audit_log.3 -w /var/log/audit/audit_log.4 -w /etc/audit/auditd.conf -p wa2 -w /etc/audit/audit.rules -p wa -w /etc/libaudit.conf -p wa
Set a watch on the directory where the audit log is located. Trigger an event for any type of access attempt to this directory. If you are using log rotation, add watches for the rotated logs as well. | |
Set a watch on an audit configuration file. Log all write and attribute change attempts to this file. |
42.3 Monitoring file system objects #Edit source
Auditing system calls helps track your system's activity well beyond the application level. By tracking file system–related system calls, get an idea of how your applications are using these system calls and determine whether that use is appropriate. By tracking mount and unmount operations, track the use of external resources (removable media, remote file systems, etc.).
Important: Auditing system calls
Auditing system calls results in a high logging activity. This activity, in turn, puts a heavy load on the kernel. With a kernel less responsive than usual, the system's backlog and rate limits might be exceeded. Carefully evaluate which system calls to include in your audit rule set and adjust the log settings accordingly. See Section 40.2, “Configuring the audit daemon” for details on how to tweak the relevant settings.
-a entry,always -S chmod -S fchmod -S chown -S chown32 -S fchown -S fchown32 -S lchown -S lchown321 -a entry,always -S creat -S open -S truncate -S truncate64 -S ftruncate -S ftruncate642 -a entry,always -S mkdir -S rmdir3 -a entry,always -S unlink -S rename -S link -S symlink4 -a entry,always -S setxattr5 -a entry,always -S lsetxattr -a entry,always -S fsetxattr -a entry,always -S removexattr -a entry,always -S lremovexattr -a entry,always -S fremovexattr -a entry,always -S mknod6 -a entry,always -S mount -S umount -S umount27
Enable an audit context for system calls related to changing file
ownership and permissions. Depending on the hardware architecture of
your system, enable or disable the | |
Enable an audit context for system calls related to file content modification. Depending on the hardware architecture of your system, enable or disable the *64 rules. 64-bit systems, like AMD64/Intel 64, require the *64 rules to be removed. | |
Enable an audit context for any directory operation, like creating or removing a directory. | |
Enable an audit context for any linking operation, such as creating a symbolic link, creating a link, unlinking, or renaming. | |
Enable an audit context for any operation related to extended file system attributes. | |
Enable an audit context for the | |
Enable an audit context for any mount or umount operation. For the
x86 architecture, disable the |
42.4 Monitoring security configuration files and databases #Edit source
To make sure that your system is not made to do undesired things, track
any attempts to change the cron and
at configurations or the lists of scheduled
jobs. Tracking any write access to the user, group, password and login
databases and logs helps you identify any attempts to manipulate your
system's user database.
Tracking changes to your system configuration (kernel, services, time, etc.) helps you spot any attempts of others to manipulate essential functionality of your system. Changes to the PAM configuration should also be monitored in a secure environment, because changes in the authentication stack should not be made by anyone other than the administrator, and it should be logged which applications are using PAM and how it is used. The same applies to any other configuration files related to secure authentication and communication.
1 -w /var/spool/atspool -w /etc/at.allow -w /etc/at.deny -w /etc/cron.allow -p wa -w /etc/cron.deny -p wa -w /etc/cron.d/ -p wa -w /etc/cron.daily/ -p wa -w /etc/cron.hourly/ -p wa -w /etc/cron.monthly/ -p wa -w /etc/cron.weekly/ -p wa -w /etc/crontab -p wa -w /var/spool/cron/root 2 -w /etc/group -p wa -w /etc/passwd -p wa -w /etc/shadow -w /etc/login.defs -p wa -w /etc/securetty -w /var/log/lastlog 3 -w /etc/hosts -p wa -w /etc/sysconfig/ w /etc/init.d/ w /etc/ld.so.conf -p wa w /etc/localtime -p wa w /etc/sysctl.conf -p wa w /etc/modprobe.d/ w /etc/modprobe.conf.local -p wa w /etc/modprobe.conf -p wa 4 w /etc/pam.d/ 5 -w /etc/aliases -p wa -w /etc/postfix/ -p wa 6 -w /etc/ssh/sshd_config -w /etc/stunnel/stunnel.conf -w /etc/stunnel/stunnel.pem -w /etc/vsftpd.ftpusers -w /etc/vsftpd.conf 7 -a exit,always -S sethostname -w /etc/issue -p wa -w /etc/issue.net -p wa
Set watches on the | |
Set watches on the user, group, password, and login databases and logs and set labels to better identify any login-related events, such as failed login attempts. | |
Set a watch and a label on the static host name configuration in
| |
Set watches on the PAM configuration directory. If you are interested in particular files below the directory level, add explicit watches to these files as well. | |
Set watches to the postfix configuration to log any write attempt or attribute change and use labels for better tracking in the logs. | |
Set watches and labels on the SSH,
| |
Perform an audit of the |
42.5 Monitoring miscellaneous system calls #Edit source
Apart from auditing file system related system calls, as described in
Section 42.3, “Monitoring file system objects”, you can also track various other
system calls. Tracking task creation helps you understand your
applications' behavior. Auditing the umask
system call lets you track how processes modify creation mask. Tracking
any attempts to change the system time helps you identify anyone or any
process trying to manipulate the system time.
1 -a entry,always -S clone -S fork -S vfork 2 -a entry,always -S umask 3 -a entry,always -S adjtimex -S settimeofday
42.6 Filtering system call arguments #Edit source
In addition to the system call auditing introduced in Section 42.3, “Monitoring file system objects” and Section 42.5, “Monitoring miscellaneous system calls”, you can track application behavior to an even higher degree. Applying filters helps you focus audit on areas of primary interest to you. This section introduces filtering system call arguments for non-multiplexed system calls like access and for multiplexed ones like socketcall or ipc. Whether system calls are multiplexed depends on the hardware architecture used. Both socketcall and ipc are not multiplexed on 64-bit architectures, such as AMD64/Intel 64.
Important: Auditing system calls
Auditing system calls results in high logging activity, which in turn puts a heavy load on the kernel. With a kernel less responsive than usual, the system's backlog and rate limits might well be exceeded. Carefully evaluate which system calls to include in your audit rule set and adjust the log settings accordingly. See Section 40.2, “Configuring the audit daemon” for details on how to tweak the relevant settings.
The access system call checks whether a process would be allowed to read,
write or test for the existence of a file or file system object. Using
the -F filter flag, build rules matching specific access
calls in the format-F
a1=ACCESS_MODE. Check
/usr/include/fcntl.h for a list of possible
arguments to the access system call.
-a entry,always -S access -F a1=41 -a entry,always -S access -F a1=62 -a entry,always -S access -F a1=73
Audit the access system call, but only if the second argument of the
system call ( | |
Audit the access system call, but only if the second argument of the
system call ( | |
Audit the access system call, but only if the second argument of the
system call ( |
The socketcall system call is a multiplexed system call. Multiplexed
means that there is only one system call for all possible calls and that
libc passes the actual system call to use as the first argument
(a0). Check the manual page of socketcall for possible
system calls and refer to
/usr/src/linux/include/linux/net.h for a list of
possible argument values and system call names. Audit supports filtering
for specific system calls using a -F
a0=SYSCALL_NUMBER.
-a entry,always -S socketcall -F a0=1 -F a1=101 ## Use this line on x86_64, ia64 instead #-a entry,always -S socket -F a0=10 -a entry,always -S socketcall -F a0=52 ## Use this line on x86_64, ia64 instead #-a entry, always -S accept
Audit the socket(PF_INET6) system call. The | |
Audit the socketcall system call. The filter flag is set to filter for
|
The ipc system call is another example of multiplexed system calls. The
actual call to invoke is determined by the first argument passed to the
ipc system call. Filtering for these arguments helps you focus on those
IPC calls of interest to you. Check
/usr/include/linux/ipc.h for possible argument
values.
1 ## msgctl -a entry,always -S ipc -F a0=14 ## msgget -a entry,always -S ipc -F a0=13 ## Use these lines on x86_64, ia64 instead #-a entry,always -S msgctl #-a entry,always -S msgget 2 ## semctl -a entry,always -S ipc -F a0=3 ## semget -a entry,always -S ipc -F a0=2 ## semop -a entry,always -S ipc -F a0=1 ## semtimedop -a entry,always -S ipc -F a0=4 ## Use these lines on x86_64, ia64 instead #-a entry,always -S semctl #-a entry,always -S semget #-a entry,always -S semop #-a entry,always -S semtimedop 3 ## shmctl -a entry,always -S ipc -F a0=24 ## shmget -a entry,always -S ipc -F a0=23 ## Use these lines on x86_64, ia64 instead #-a entry,always -S shmctl #-a entry,always -S shmget
Audit system calls related to IPC SYSV message queues. In this case,
the | |
Audit system calls related to IPC SYSV message semaphores. In this
case, the | |
Audit system calls related to IPC SYSV shared memory. In this case, the
|
42.7 Managing audit event records using keys #Edit source
After configuring a few rules generating events and populating the logs,
you need to find a way to tell one event from the other. Using the
ausearch command, you can filter the logs for various
criteria. Using ausearch -m
MESSAGE_TYPE, you can at least filter
for events of a certain type. To be able to filter for events
related to a particular rule, you need to add a key to this rule in the
/etc/audit/audit.rules file. This key is then added
to the event record every time the rule logs an event. To retrieve these
log entries, simply run ausearch -k
YOUR_KEY to get a list of records
related to the rule carrying this particular key.
As an example, assume you have added the following rule to your rule file:
-w /etc/audit/audit.rules -p wa
Without a key assigned to it, you would need to filter for
SYSCALL or PATH events then use
grep or similar tools to isolate any events related to the above rule.
Now, add a key to the above rule, using the -k option:
-w /etc/audit/audit.rules -p wa -k CFG_audit.rules
You can specify any text string as key. Distinguish watches related to
different types of files (configuration files or log files) from one
another using different key prefixes (CFG,
LOG, etc.) followed by the file name. Finding any
records related to the above rule now comes down to the following:
ausearch -k CFG_audit.rules
----
time->Thu Feb 19 09:09:54 2009
type=PATH msg=audit(1235030994.032:8649): item=3 name="audit.rules~" inode=370603 dev=08:06 mode=0100640 ouid=0 ogid=0 rdev=00:00
type=PATH msg=audit(1235030994.032:8649): item=2 name="audit.rules" inode=370603 dev=08:06 mode=0100640 ouid=0 ogid=0 rdev=00:00
type=PATH msg=audit(1235030994.032:8649): item=1 name="/etc/audit" inode=368599 dev=08:06 mode=040750 ouid=0 ogid=0 rdev=00:00
type=PATH msg=audit(1235030994.032:8649): item=0 name="/etc/audit" inode=368599 dev=08:06 mode=040750 ouid=0 ogid=0 rdev=00:00
type=CWD msg=audit(1235030994.032:8649): cwd="/etc/audit"
type=SYSCALL msg=audit(1235030994.032:8649): arch=c000003e syscall=82 success=yes exit=0 a0=7deeb0 a1=883b30 a2=2 a3=ffffffffffffffff items=4 ppid=25400 pid=32619 auid=0 uid=0 gid=0 euid=0 suid=0 fsuid=0 egid=0 sgid=0 fsgid=0 tty=pts1 ses=1164 comm="vim" exe="/bin/vim-normal" key="CFG_audit.rules"43 Useful resources #Edit source
There are other resources available containing valuable information about the Linux audit framework:
- The audit manual pages
There are several man pages installed along with the audit tools that provide valuable and detailed information:
auditd(8)The Linux audit daemon
auditd.conf(5)The Linux audit daemon configuration file
auditctl(8)A utility to assist controlling the kernel's audit system
autrace(8)A program similar to
straceausearch(8)A tool to query audit daemon logs
aureport(8)A tool that produces summary reports of audit daemon logs
- https://people.redhat.com/sgrubb/audit/index.html
The home page of the Linux audit project. This site contains several specifications relating to different aspects of Linux audit, and a short FAQ.
/usr/share/doc/packages/auditThe audit package itself contains a README with basic design information and sample
.rulesfiles for different scenarios:capp.rules: Controlled Access Protection Profile (CAPP)lspp.rules: Labeled Security Protection Profile (LSPP)nispom.rules: National Industrial Security Program Operating Manual Chapter 8(NISPOM)stig.rules: Secure Technical Implementation Guide (STIG)- https://www.commoncriteriaportal.org/
The official Web site of the Common Criteria project. Learn all about the Common Criteria security certification initiative and which role audit plays in this framework.
A GNU licenses #Edit source
This appendix contains the GNU Free Documentation License version 1.2.
GNU Free Documentation License #Edit source
Copyright (C) 2000, 2001, 2002 Free Software Foundation, Inc. 51 Franklin St, Fifth Floor, Boston, MA 02110-1301 USA. Everyone is permitted to copy and distribute verbatim copies of this license document, but changing it is not allowed.
0. PREAMBLE #Edit source
The purpose of this License is to make a manual, textbook, or other functional and useful document "free" in the sense of freedom: to assure everyone the effective freedom to copy and redistribute it, with or without modifying it, either commercially or non-commercially. Secondarily, this License preserves for the author and publisher a way to get credit for their work, while not being considered responsible for modifications made by others.
This License is a kind of "copyleft", which means that derivative works of the document must themselves be free in the same sense. It complements the GNU General Public License, which is a copyleft license designed for free software.
We have designed this License to use it for manuals for free software, because free software needs free documentation: a free program should come with manuals providing the same freedoms that the software does. But this License is not limited to software manuals; it can be used for any textual work, regardless of subject matter or whether it is published as a printed book. We recommend this License principally for works whose purpose is instruction or reference.
1. APPLICABILITY AND DEFINITIONS #Edit source
This License applies to any manual or other work, in any medium, that contains a notice placed by the copyright holder saying it can be distributed under the terms of this License. Such a notice grants a world-wide, royalty-free license, unlimited in duration, to use that work under the conditions stated herein. The "Document", below, refers to any such manual or work. Any member of the public is a licensee, and is addressed as "you". You accept the license if you copy, modify or distribute the work in a way requiring permission under copyright law.
A "Modified Version" of the Document means any work containing the Document or a portion of it, either copied verbatim, or with modifications and/or translated into another language.
A "Secondary Section" is a named appendix or a front-matter section of the Document that deals exclusively with the relationship of the publishers or authors of the Document to the Document's overall subject (or to related matters) and contains nothing that could fall directly within that overall subject. (Thus, if the Document is in part a textbook of mathematics, a Secondary Section may not explain any mathematics.) The relationship could be a matter of historical connection with the subject or with related matters, or of legal, commercial, philosophical, ethical or political position regarding them.
The "Invariant Sections" are certain Secondary Sections whose titles are designated, as being those of Invariant Sections, in the notice that says that the Document is released under this License. If a section does not fit the above definition of Secondary then it is not allowed to be designated as Invariant. The Document may contain zero Invariant Sections. If the Document does not identify any Invariant Sections then there are none.
The "Cover Texts" are certain short passages of text that are listed, as Front-Cover Texts or Back-Cover Texts, in the notice that says that the Document is released under this License. A Front-Cover Text may be at most 5 words, and a Back-Cover Text may be at most 25 words.
A "Transparent" copy of the Document means a machine-readable copy, represented in a format whose specification is available to the general public, that is suitable for revising the document straightforwardly with generic text editors or (for images composed of pixels) generic paint programs or (for drawings) some widely available drawing editor, and that is suitable for input to text formatters or for automatic translation to a variety of formats suitable for input to text formatters. A copy made in an otherwise Transparent file format whose markup, or absence of markup, has been arranged to thwart or discourage subsequent modification by readers is not Transparent. An image format is not Transparent if used for any substantial amount of text. A copy that is not "Transparent" is called "Opaque".
Examples of suitable formats for Transparent copies include plain ASCII without markup, Texinfo input format, LaTeX input format, SGML or XML using a publicly available DTD, and standard-conforming simple HTML, PostScript or PDF designed for human modification. Examples of transparent image formats include PNG, XCF and JPG. Opaque formats include proprietary formats that can be read and edited only by proprietary word processors, SGML or XML for which the DTD and/or processing tools are not generally available, and the machine-generated HTML, PostScript or PDF produced by some word processors for output purposes only.
The "Title Page" means, for a printed book, the title page itself, plus such following pages as are needed to hold, legibly, the material this License requires to appear in the title page. For works in formats which do not have any title page as such, "Title Page" means the text near the most prominent appearance of the work's title, preceding the beginning of the body of the text.
A section "Entitled XYZ" means a named subunit of the Document whose title either is precisely XYZ or contains XYZ in parentheses following text that translates XYZ in another language. (Here XYZ stands for a specific section name mentioned below, such as "Acknowledgements", "Dedications", "Endorsements", or "History".) To "Preserve the Title" of such a section when you modify the Document means that it remains a section "Entitled XYZ" according to this definition.
The Document may include Warranty Disclaimers next to the notice which states that this License applies to the Document. These Warranty Disclaimers are considered to be included by reference in this License, but only as regards disclaiming warranties: any other implication that these Warranty Disclaimers may have is void and has no effect on the meaning of this License.
2. VERBATIM COPYING #Edit source
You may copy and distribute the Document in any medium, either commercially or non-commercially, provided that this License, the copyright notices, and the license notice saying this License applies to the Document are reproduced in all copies, and that you add no other conditions whatsoever to those of this License. You may not use technical measures to obstruct or control the reading or further copying of the copies you make or distribute. However, you may accept compensation in exchange for copies. If you distribute a large enough number of copies you must also follow the conditions in section 3.
You may also lend copies, under the same conditions stated above, and you may publicly display copies.
3. COPYING IN QUANTITY #Edit source
If you publish printed copies (or copies in media that commonly have printed covers) of the Document, numbering more than 100, and the Document's license notice requires Cover Texts, you must enclose the copies in covers that carry, clearly and legibly, all these Cover Texts: Front-Cover Texts on the front cover, and Back-Cover Texts on the back cover. Both covers must also clearly and legibly identify you as the publisher of these copies. The front cover must present the full title with all words of the title equally prominent and visible. You may add other material on the covers in addition. Copying with changes limited to the covers, as long as they preserve the title of the Document and satisfy these conditions, can be treated as verbatim copying in other respects.
If the required texts for either cover are too voluminous to fit legibly, you should put the first ones listed (as many as fit reasonably) on the actual cover, and continue the rest onto adjacent pages.
If you publish or distribute Opaque copies of the Document numbering more than 100, you must either include a machine-readable Transparent copy along with each Opaque copy, or state in or with each Opaque copy a computer-network location from which the general network-using public has access to download using public-standard network protocols a complete Transparent copy of the Document, free of added material. If you use the latter option, you must take reasonably prudent steps, when you begin distribution of Opaque copies in quantity, to ensure that this Transparent copy will remain thus accessible at the stated location until at least one year after the last time you distribute an Opaque copy (directly or through your agents or retailers) of that edition to the public.
It is requested, but not required, that you contact the authors of the Document well before redistributing any large number of copies, to give them a chance to provide you with an updated version of the Document.
4. MODIFICATIONS #Edit source
You may copy and distribute a Modified Version of the Document under the conditions of sections 2 and 3 above, provided that you release the Modified Version under precisely this License, with the Modified Version filling the role of the Document, thus licensing distribution and modification of the Modified Version to whoever possesses a copy of it. In addition, you must do these things in the Modified Version:
Use in the Title Page (and on the covers, if any) a title distinct from that of the Document, and from those of previous versions (which should, if there were any, be listed in the History section of the Document). You may use the same title as a previous version if the original publisher of that version gives permission.
List on the Title Page, as authors, one or more persons or entities responsible for authorship of the modifications in the Modified Version, together with at least five of the principal authors of the Document (all of its principal authors, if it has fewer than five), unless they release you from this requirement.
State on the Title page the name of the publisher of the Modified Version, as the publisher.
Preserve all the copyright notices of the Document.
Add an appropriate copyright notice for your modifications adjacent to the other copyright notices.
Include, immediately after the copyright notices, a license notice giving the public permission to use the Modified Version under the terms of this License, in the form shown in the Addendum below.
Preserve in that license notice the full lists of Invariant Sections and required Cover Texts given in the Document's license notice.
Include an unaltered copy of this License.
Preserve the section Entitled "History", Preserve its Title, and add to it an item stating at least the title, year, new authors, and publisher of the Modified Version as given on the Title Page. If there is no section Entitled "History" in the Document, create one stating the title, year, authors, and publisher of the Document as given on its Title Page, then add an item describing the Modified Version as stated in the previous sentence.
Preserve the network location, if any, given in the Document for public access to a Transparent copy of the Document, and likewise the network locations given in the Document for previous versions it was based on. These may be placed in the "History" section. You may omit a network location for a work that was published at least four years before the Document itself, or if the original publisher of the version it refers to gives permission.
For any section Entitled "Acknowledgements" or "Dedications", Preserve the Title of the section, and preserve in the section all the substance and tone of each of the contributor acknowledgements and/or dedications given therein.
Preserve all the Invariant Sections of the Document, unaltered in their text and in their titles. Section numbers or the equivalent are not considered part of the section titles.
Delete any section Entitled "Endorsements". Such a section may not be included in the Modified Version.
Do not retitle any existing section to be Entitled "Endorsements" or to conflict in title with any Invariant Section.
Preserve any Warranty Disclaimers.
If the Modified Version includes new front-matter sections or appendices that qualify as Secondary Sections and contain no material copied from the Document, you may at your option designate some or all of these sections as invariant. To do this, add their titles to the list of Invariant Sections in the Modified Version's license notice. These titles must be distinct from any other section titles.
You may add a section Entitled "Endorsements", provided it contains nothing but endorsements of your Modified Version by various parties--for example, statements of peer review or that the text has been approved by an organization as the authoritative definition of a standard.
You may add a passage of up to five words as a Front-Cover Text, and a passage of up to 25 words as a Back-Cover Text, to the end of the list of Cover Texts in the Modified Version. Only one passage of Front-Cover Text and one of Back-Cover Text may be added by (or through arrangements made by) any one entity. If the Document already includes a cover text for the same cover, previously added by you or by arrangement made by the same entity you are acting on behalf of, you may not add another; but you may replace the old one, on explicit permission from the previous publisher that added the old one.
The author(s) and publisher(s) of the Document do not by this License give permission to use their names for publicity for or to assert or imply endorsement of any Modified Version.
5. COMBINING DOCUMENTS #Edit source
You may combine the Document with other documents released under this License, under the terms defined in section 4 above for modified versions, provided that you include in the combination all of the Invariant Sections of all of the original documents, unmodified, and list them all as Invariant Sections of your combined work in its license notice, and that you preserve all their Warranty Disclaimers.
The combined work need only contain one copy of this License, and multiple identical Invariant Sections may be replaced with a single copy. If there are multiple Invariant Sections with the same name but different contents, make the title of each such section unique by adding at the end of it, in parentheses, the name of the original author or publisher of that section if known, or else a unique number. Make the same adjustment to the section titles in the list of Invariant Sections in the license notice of the combined work.
In the combination, you must combine any sections Entitled "History" in the various original documents, forming one section Entitled "History"; likewise combine any sections Entitled "Acknowledgements", and any sections Entitled "Dedications". You must delete all sections Entitled "Endorsements".
6. COLLECTIONS OF DOCUMENTS #Edit source
You may make a collection consisting of the Document and other documents released under this License, and replace the individual copies of this License in the various documents with a single copy that is included in the collection, provided that you follow the rules of this License for verbatim copying of each of the documents in all other respects.
You may extract a single document from such a collection, and distribute it individually under this License, provided you insert a copy of this License into the extracted document, and follow this License in all other respects regarding verbatim copying of that document.
7. AGGREGATION WITH INDEPENDENT WORKS #Edit source
A compilation of the Document or its derivatives with other separate and independent documents or works, in or on a volume of a storage or distribution medium, is called an "aggregate" if the copyright resulting from the compilation is not used to limit the legal rights of the compilation's users beyond what the individual works permit. When the Document is included in an aggregate, this License does not apply to the other works in the aggregate which are not themselves derivative works of the Document.
If the Cover Text requirement of section 3 is applicable to these copies of the Document, then if the Document is less than one half of the entire aggregate, the Document's Cover Texts may be placed on covers that bracket the Document within the aggregate, or the electronic equivalent of covers if the Document is in electronic form. Otherwise they must appear on printed covers that bracket the whole aggregate.
8. TRANSLATION #Edit source
Translation is considered a kind of modification, so you may distribute translations of the Document under the terms of section 4. Replacing Invariant Sections with translations requires special permission from their copyright holders, but you may include translations of some or all Invariant Sections in addition to the original versions of these Invariant Sections. You may include a translation of this License, and all the license notices in the Document, and any Warranty Disclaimers, provided that you also include the original English version of this License and the original versions of those notices and disclaimers. In case of a disagreement between the translation and the original version of this License or a notice or disclaimer, the original version will prevail.
If a section in the Document is Entitled "Acknowledgements", "Dedications", or "History", the requirement (section 4) to Preserve its Title (section 1) will typically require changing the actual title.
9. TERMINATION #Edit source
You may not copy, modify, sublicense, or distribute the Document except as expressly provided for under this License. Any other attempt to copy, modify, sublicense or distribute the Document is void, and will automatically terminate your rights under this License. However, parties who have received copies, or rights, from you under this License will not have their licenses terminated so long as such parties remain in full compliance.
10. FUTURE REVISIONS OF THIS LICENSE #Edit source
The Free Software Foundation may publish new, revised versions of the GNU Free Documentation License from time to time. Such new versions will be similar in spirit to the present version, but may differ in detail to address new problems or concerns. See https://www.gnu.org/copyleft/.
Each version of the License is given a distinguishing version number. If the Document specifies that a particular numbered version of this License "or any later version" applies to it, you have the option of following the terms and conditions either of that specified version or of any later version that has been published (not as a draft) by the Free Software Foundation. If the Document does not specify a version number of this License, you may choose any version ever published (not as a draft) by the Free Software Foundation.
ADDENDUM: How to use this License for your documents #Edit source
Copyright (c) YEAR YOUR NAME. Permission is granted to copy, distribute and/or modify this document under the terms of the GNU Free Documentation License, Version 1.2 or any later version published by the Free Software Foundation; with no Invariant Sections, no Front-Cover Texts, and no Back-Cover Texts. A copy of the license is included in the section entitled “GNU Free Documentation License”.
If you have Invariant Sections, Front-Cover Texts and Back-Cover Texts, replace the “with...Texts.” line with this:
with the Invariant Sections being LIST THEIR TITLES, with the Front-Cover Texts being LIST, and with the Back-Cover Texts being LIST.
If you have Invariant Sections without Cover Texts, or some other combination of the three, merge those two alternatives to suit the situation.
If your document contains nontrivial examples of program code, we recommend releasing these examples in parallel under your choice of free software license, such as the GNU General Public License, to permit their use in free software.