- Preface
- I Introduction
- II Managing virtual machines with
libvirt - III Hypervisor-independent features
- IV Managing virtual machines with Xen
- 22 Setting up a virtual machine host
- 23 Virtual networking
- 24 Managing a virtualization environment
- 25 Block devices in Xen
- 26 Virtualization: configuration options and settings
- 27 Administrative tasks
- 28 XenStore: configuration database shared between domains
- 29 Xen as a high-availability virtualization host
- 30 Xen: converting a paravirtual (PV) guest into a fully virtual (FV/HVM) guest
- V Managing virtual machines with QEMU
- VI Troubleshooting
- Glossary
- A Configuring GPU Pass-Through for NVIDIA cards
- B GNU licenses
openSUSE Leap 15.5
Virtualization Guide
Abstract#
This guide describes virtualization technology in general. It introduces libvirt—the unified interface to virtualization—and provides detailed information on specific hypervisors.
- Preface
- I Introduction
- II Managing virtual machines with
libvirt - 7
libvirtdaemons - 8 Preparing the VM Host Server
- 9 Guest installation
- 10 Basic VM Guest management
- 11 Connecting and authorizing
- 12 Advanced storage topics
- 13 Configuring virtual machines with Virtual Machine Manager
- 13.1 Machine setup
- 13.2 Storage
- 13.3 Controllers
- 13.4 Networking
- 13.5 Input devices
- 13.6 Video
- 13.7 USB redirectors
- 13.8 Miscellaneous
- 13.9 Adding a CD/DVD-ROM device with Virtual Machine Manager
- 13.10 Adding a floppy device with Virtual Machine Manager
- 13.11 Ejecting and changing floppy or CD/DVD-ROM media with Virtual Machine Manager
- 13.12 Assigning a host PCI device to a VM Guest
- 13.13 Assigning a host USB device to a VM Guest
- 14 Configuring virtual machines with
virsh - 14.1 Editing the VM configuration
- 14.2 Changing the machine type
- 14.3 Configuring hypervisor features
- 14.4 Configuring CPU
- 14.5 Changing boot options
- 14.6 Configuring memory allocation
- 14.7 Adding a PCI device
- 14.8 Adding a USB device
- 14.9 Adding SR-IOV devices
- 14.10 Listing attached devices
- 14.11 Configuring storage devices
- 14.12 Configuring controller devices
- 14.13 Configuring video devices
- 14.14 Configuring network devices
- 14.15 Using macvtap to share VM Host Server network interfaces
- 14.16 Disabling a memory balloon device
- 14.17 Configuring multiple monitors (dual head)
- 14.18 Crypto adapter pass-through to KVM guests on IBM Z
- 15 Xen to KVM migration guide
- 7
- III Hypervisor-independent features
- IV Managing virtual machines with Xen
- 22 Setting up a virtual machine host
- 23 Virtual networking
- 24 Managing a virtualization environment
- 25 Block devices in Xen
- 26 Virtualization: configuration options and settings
- 27 Administrative tasks
- 28 XenStore: configuration database shared between domains
- 29 Xen as a high-availability virtualization host
- 30 Xen: converting a paravirtual (PV) guest into a fully virtual (FV/HVM) guest
- V Managing virtual machines with QEMU
- 31 QEMU overview
- 32 Setting up a KVM VM Host Server
- 33 Guest installation
- 34 Running virtual machines with qemu-system-ARCH
- 35 Virtual machine administration using QEMU monitor
- 35.1 Accessing monitor console
- 35.2 Getting information about the guest system
- 35.3 Changing VNC password
- 35.4 Managing devices
- 35.5 Controlling keyboard and mouse
- 35.6 Changing available memory
- 35.7 Dumping virtual machine memory
- 35.8 Managing virtual machine snapshots
- 35.9 Suspending and resuming virtual machine execution
- 35.10 Live migration
- 35.11 QMP - QEMU machine protocol
- VI Troubleshooting
- Glossary
- A Configuring GPU Pass-Through for NVIDIA cards
- B GNU licenses
- 3.1 Xen virtualization architecture
- 4.1 KVM virtualization architecture
- 6.1 System Role screen
- 8.1 Connection details
- 8.2 Create virtual network
- 9.1 Specifying default options for new VMs
- 13.1 view of a VM Guest
- 13.2 Overview details
- 13.3 VM Guest title and description
- 13.4 Performance
- 13.5 Statistics charts
- 13.6 Processor view
- 13.7 Memory view
- 13.8 Boot options
- 13.9 Add a new storage
- 13.10 Add a new controller
- 13.11 Add a new network interface
- 13.12 Add a new input device
- 13.13 Add a new video device
- 13.14 Add a new USB redirector
- 13.15 Adding a PCI device
- 13.16 Adding a USB device
- 16.1 Caching mechanism
- 27.1 Boot loader settings
- 32.1 Installing the KVM hypervisor and tools
- 32.2 Network bridge
- 34.1 QEMU window with SLES as VM Guest
- 34.2 QEMU VNC session
- 34.3 Authentication dialog in Remmina
- 8.1 NAT-based network
- 8.2 Routed network
- 8.3 Isolated network
- 8.4 Using an existing bridge on VM Host Server
- 9.1 Loading kernel and initrd from HTTP server
- 9.2 Example of a
virt-installcommand line - 10.1 Typical output of
kvm_stat - 14.1 Example XML configuration file
- 24.1 Guest domain configuration file for SLED 12:
/etc/xen/sled12.cfg - 32.1 Exporting host's file system with VirtFS
- 34.1 Restricted user-mode networking
- 34.2 User-mode networking with custom IP range
- 34.3 User-mode networking with network-boot and TFTP
- 34.4 User-mode networking with host port forwarding
- 34.5 Password authentication
- 34.6 x509 certificate authentication
- 34.7 x509 certificate and password authentication
- 34.8 SASL authentication
Copyright © 2006–2023 SUSE LLC and contributors. All rights reserved.
Permission is granted to copy, distribute and/or modify this document under the terms of the GNU Free Documentation License, Version 1.2 or (at your option) version 1.3; with the Invariant Section being this copyright notice and license. A copy of the license version 1.2 is included in the section entitled “GNU Free Documentation License”.
For SUSE trademarks, see http://www.suse.com/company/legal/. All third-party trademarks are the property of their respective owners. Trademark symbols (®, ™ etc.) denote trademarks of SUSE and its affiliates. Asterisks (*) denote third-party trademarks.
All information found in this book has been compiled with utmost attention to detail. However, this does not guarantee complete accuracy. Neither SUSE LLC, its affiliates, the authors nor the translators shall be held liable for possible errors or the consequences thereof.
Preface #Edit source
1 Available documentation #Edit source
- Online documentation
Our documentation is available online at https://doc.opensuse.org. Browse or download the documentation in various formats.

Note: Latest updates
The latest updates are usually available in the English-language version of this documentation.
- In your system
For offline use, the release notes are also available under
/usr/share/doc/release-noteson your system. The documentation for individual packages is available at/usr/share/doc/packages.Many commands are also described in their manual pages. To view them, run
man, followed by a specific command name. If themancommand is not installed on your system, install it withsudo zypper install man.
2 Improving the documentation #Edit source
Your feedback and contributions to this documentation are welcome. The following channels for giving feedback are available:
- Bug reports
Report issues with the documentation at https://bugzilla.opensuse.org/.
To simplify this process, click the icon next to a headline in the HTML version of this document. This preselects the right product and category in Bugzilla and adds a link to the current section. You can start typing your bug report right away.
A Bugzilla account is required.
- Contributions
To contribute to this documentation, click the icon next to a headline in the HTML version of this document. This will take you to the source code on GitHub, where you can open a pull request.
A GitHub account is required.
Note: only available for English
The icons are only available for the English version of each document. For all other languages, use the icons instead.
For more information about the documentation environment used for this documentation, see the repository's README at https://github.com/SUSE/doc-sle.
You can also report errors and send feedback concerning the documentation to <doc-team@suse.com>. Include the document title, the product version, and the publication date of the document. Additionally, include the relevant section number and title (or provide the URL) and provide a concise description of the problem.
- Help
If you need further help on openSUSE Leap, see https://en.opensuse.org/Portal:Support.
3 Documentation conventions #Edit source
The following notices and typographic conventions are used in this document:
/etc/passwd: Directory names and file namesPLACEHOLDER: Replace PLACEHOLDER with the actual value
PATH: An environment variablels,--help: Commands, options, and parametersuser: The name of a user or grouppackage_name: The name of a software package
Alt, Alt–F1: A key to press or a key combination. Keys are shown in uppercase as on a keyboard.
, › : menu items, buttons
Chapter 1, “Example chapter”: A cross-reference to another chapter in this guide.
Commands that must be run with
rootprivileges. Often you can also prefix these commands with thesudocommand to run them as non-privileged user.#command>sudocommandCommands that can be run by non-privileged users.
>commandNotices

Warning: Warning notice
Vital information you must be aware of before proceeding. Warns you about security issues, potential loss of data, damage to hardware, or physical hazards.

Important: Important notice
Important information you should be aware of before proceeding.
Note: Note notice
Additional information, for example about differences in software versions.

Tip: Tip notice
Helpful information, like a guideline or a piece of practical advice.
Compact Notices
Additional information, for example about differences in software versions.
Helpful information, like a guideline or a piece of practical advice.
Part I Introduction #Edit source
- 1 Virtualization technology
Virtualization is a technology that provides a way for a machine (Host) to run another operating system (guest virtual machines) on top of the host operating system.
- 2 Virtualization scenarios
Virtualization provides several useful capabilities to your organization, for example:
more efficient hardware usage
support for legacy software
operating system isolation
live migration
disaster recovery
load balancing
- 3 Introduction to Xen virtualization
This chapter introduces and explains the components and technologies you need to understand to set up and manage a Xen-based virtualization environment.
- 4 Introduction to KVM virtualization
- 5 Virtualization tools
libvirtis a library that provides a common API for managing popular virtualization solutions, among them KVM and Xen. The library provides a normalized management API for these virtualization solutions, allowing a stable, cross-hypervisor interface for higher-level management tools. The library also provides APIs for management of virtual networks and storage on the VM Host Server. The configuration of each VM Guest is stored in an XML file.With
libvirt, you can also manage your VM Guests remotely. It supports TLS encryption, x509 certificates and authentication with SASL. This enables managing VM Host Servers centrally from a single workstation, alleviating the need to access each VM Host Server individually.Using the
libvirt-based tools is the recommended way of managing VM Guests. Interoperability betweenlibvirtandlibvirt-based applications has been tested and is an essential part of SUSE's support stance.- 6 Installation of virtualization components
To run a virtualization server (VM Host Server) that can host one or more guest systems (VM Guests), you need to install required virtualization components on the server. These components vary depending on which virtualization technology you want to use.
1 Virtualization technology #Edit source
Abstract#
Virtualization is a technology that provides a way for a machine (Host) to run another operating system (guest virtual machines) on top of the host operating system.
1.1 Overview #Edit source
openSUSE Leap includes the latest open source virtualization technologies, Xen and KVM. With these hypervisors, openSUSE Leap can be used to provision, de-provision, install, monitor and manage multiple virtual machines (VM Guests) on a single physical system (for more information see Hypervisor). openSUSE Leap can create virtual machines running both modified, highly tuned, paravirtualized operating systems and fully virtualized unmodified operating systems.
The primary component of the operating system that enables virtualization is a hypervisor (or virtual machine manager), which is a layer of software that runs directly on server hardware. It controls platform resources, sharing them among multiple VM Guests and their operating systems by presenting virtualized hardware interfaces to each VM Guest.
openSUSE is a Linux server operating system that offers two types of hypervisors: Xen and KVM.
openSUSE Leap with Xen or KVM acts as a virtualization host server (VHS) that supports VM Guests with its own guest operating systems. The SUSE VM Guest architecture consists of a hypervisor and management components that constitute the VHS, which runs many application-hosting VM Guests.
In Xen, the management components run in a privileged VM Guest often called Dom0. In KVM, where the Linux kernel acts as the hypervisor, the management components run directly on the VHS.
1.2 Virtualization benefits #Edit source
Virtualization brings a lot of advantages while providing the same service as a hardware server.
First, it reduces the cost of your infrastructure. Servers are mainly used to provide a service to a customer, and a virtualized operating system can provide the same service, with:
Less hardware: you can run several operating systems on a single host, therefore all hardware maintenance is reduced.
Less power/cooling: less hardware means you do not need to invest more in electric power, backup power, and cooling if you need more service.
Save space: your data center space is saved because you do not need more hardware servers (less servers than service running).
Less management: using a VM Guest simplifies the administration of your infrastructure.
Agility and productivity: Virtualization provides migration capabilities, live migration and snapshots. These features reduce downtime, and bring an easy way to move your service from one place to another without any service interruption.
1.3 Virtualization modes #Edit source
Guest operating systems are hosted on virtual machines in either full virtualization (FV) mode or paravirtual (PV) mode. Each virtualization mode has advantages and disadvantages.
Full virtualization mode lets virtual machines run unmodified operating systems, such as Windows* Server 2003. It can use either Binary Translation or hardware-assisted virtualization technology, such as AMD* Virtualization or Intel* Virtualization Technology. Using hardware assistance allows for better performance on processors that support it.
To be able to run under paravirtual mode, guest operating systems normally need to be modified for the virtualization environment. However, operating systems running in paravirtual mode have better performance than those running under full virtualization.
Operating systems currently modified to run in paravirtual mode are called paravirtualized operating systems and include openSUSE Leap.
1.4 I/O virtualization #Edit source
VM Guests not only share CPU and memory resources of the host system, but also the I/O subsystem. Because software I/O virtualization techniques deliver less performance than bare metal, hardware solutions that deliver almost “native” performance have been developed recently. openSUSE Leap supports the following I/O virtualization techniques:
- Full virtualization
Fully Virtualized (FV) drivers emulate widely supported real devices, which can be used with an existing driver in the VM Guest. The guest is also called Hardware Virtual Machine (HVM). Since the physical device on the VM Host Server may differ from the emulated one, the hypervisor needs to process all I/O operations before handing them over to the physical device. Therefore all I/O operations need to traverse two software layers, a process that not only significantly impacts I/O performance, but also consumes CPU time.
- Paravirtualization
Paravirtualization (PV) allows direct communication between the hypervisor and the VM Guest. With less overhead involved, performance is much better than with full virtualization. However, paravirtualization requires either the guest operating system to be modified to support the paravirtualization API or paravirtualized drivers.
- PVHVM
This type of virtualization enhances HVM (see Full virtualization) with paravirtualized (PV) drivers, and PV interrupt and timer handling.
- VFIO
VFIO stands for Virtual Function I/O and is a new user-level driver framework for Linux. It replaces the traditional KVM PCI Pass-Through device assignment. The VFIO driver exposes direct device access to user space in a secure memory (IOMMU) protected environment. With VFIO, a VM Guest can directly access hardware devices on the VM Host Server (pass-through), avoiding performance issues caused by emulation in performance critical paths. This method does not allow to share devices—each device can only be assigned to a single VM Guest. VFIO needs to be supported by the VM Host Server CPU, chipset and the BIOS/EFI.
Compared to the legacy KVM PCI device assignment, VFIO has the following advantages:
Resource access is compatible with UEFI Secure Boot.
Device is isolated and its memory access protected.
Offers a user space device driver with more flexible device ownership model.
Is independent of KVM technology, and not bound to x86 architecture only.
In openSUSE Leap the USB and PCI pass-through methods of device assignment are considered deprecated and are superseded by the VFIO model.
- SR-IOV
The latest I/O virtualization technique, Single Root I/O Virtualization SR-IOV combines the benefits of the aforementioned techniques—performance and the ability to share a device with several VM Guests. SR-IOV requires special I/O devices, that are capable of replicating resources so they appear as multiple separate devices. Each such “pseudo” device can be directly used by a single guest. However, for network cards for example the number of concurrent queues that can be used is limited, potentially reducing performance for the VM Guest compared to paravirtualized drivers. On the VM Host Server, SR-IOV must be supported by the I/O device, the CPU and chipset, the BIOS/EFI and the hypervisor—for setup instructions see Section 13.12, “Assigning a host PCI device to a VM Guest”.
Important: Requirements for VFIO and SR-IOV
To be able to use the VFIO and SR-IOV features, the VM Host Server needs to fulfill the following requirements:
IOMMU needs to be enabled in the BIOS/EFI.
For Intel CPUs, the kernel parameter
intel_iommu=onneeds to be provided on the kernel command line. For more information, see https://github.com/torvalds/linux/blob/master/Documentation/admin-guide/kernel-parameters.txt#L1951.The VFIO infrastructure needs to be available. This can be achieved by loading the kernel module
vfio_pci. For more information, see Book “Reference”, Chapter 10 “Thesystemddaemon”, Section 10.6.4 “Loading kernel modules”.
2 Virtualization scenarios #Edit source
Abstract#
Virtualization provides several useful capabilities to your organization, for example:
more efficient hardware usage
support for legacy software
operating system isolation
live migration
disaster recovery
load balancing
2.1 Server consolidation #Edit source
Many servers can be replaced by one big physical server, so that hardware is consolidated, and guest operating systems are converted to virtual machines. This also supports running legacy software on new hardware.
Better usage of resources that were not running at 100%
Fewer server locations needed
More efficient use of computer resources: multiple workloads on the same server
Simplification of data center infrastructure
Simplifies moving workloads to other hosts, avoiding service downtime
Faster and agile virtual machine provisioning
Multiple guest operating systems can run on a single host
Important
Server consolidation requires special attention to the following points:
Maintenance windows should be carefully planned
Storage is key: it must be able to support migration and growing disk usage
You must verify that your servers can support the additional workloads
2.2 Isolation #Edit source
Guest operating systems are fully isolated from the host running them. Therefore, if there are problems inside virtual machines, the host is not harmed. Also, problems inside one VM do not affect other VMs. No data is shared between VMs.
UEFI Secure Boot can be used for VMs.
KSM should be avoided. For more details on KSM, refer to KSM.
Individual CPU cores can be assigned to VMs.
Hyper-threading (HT) should be disabled to avoid potential security issues.
VM should not share network, storage, or network hardware.
Use of advanced hypervisor features such as PCI pass-through or NUMA adversely affects VM migration capabilities.
Use of paravirtualization and
virtiodrivers improves VM performance and efficiency.
AMD provides specific features regarding the security of virtualization.
2.3 Disaster recovery #Edit source
The hypervisor can make snapshots of VMs, enabling restoration to a known good state, or to any desired earlier state. Since Virtualized OSes are less dependent on hardware configuration than those running directly on bare metal, these snapshots can be restored onto different server hardware so long as it is running the same hypervisor.
2.4 Dynamic load balancing #Edit source
Live migration provides a simple way to load-balance your services across your infrastructure, by moving VMs from busy hosts to those with spare capacity, on demand.
3 Introduction to Xen virtualization #Edit source
This chapter introduces and explains the components and technologies you need to understand to set up and manage a Xen-based virtualization environment.
3.1 Basic components #Edit source
The basic components of a Xen-based virtualization environment are the following:
Xen hypervisor
Dom0
any number of other VM Guests
tools, commands and configuration files to manage virtualization
Collectively, the physical computer running all these components is called a VM Host Server because together these components form a platform for hosting virtual machines.
- The Xen hypervisor
The Xen hypervisor, sometimes simply called a virtual machine monitor, is an open source software program that coordinates the low-level interaction between virtual machines and physical hardware.
- The Dom0
The virtual machine host environment, also called Dom0 or controlling domain, is composed of several components, such as:
openSUSE Leap provides a graphical and a command line environment to manage the virtual machine host components and its virtual machines.
Note
The term “Dom0” refers to a special domain that provides the management environment. This may be run either in graphical or in command line mode.
The xl tool stack based on the xenlight library (libxl). Use it to manage Xen guest domains.
QEMU—an open source software that emulates a full computer system, including a processor and multiple peripherals. It provides the ability to host operating systems in both full virtualization or paravirtualization mode.
- Xen-based virtual machines
A Xen-based virtual machine, also called a VM Guest or DomU, consists of the following components:
At least one virtual disk that contains a bootable operating system. The virtual disk can be based on a file, partition, volume, or other type of block device.
A configuration file for each guest domain. It is a text file following the syntax described in the manual page
man 5 xl.conf.Several network devices, connected to the virtual network provided by the controlling domain.
- Management tools, commands, and configuration files
There is a combination of GUI tools, commands and configuration files to help you manage and customize your virtualization environment.
3.2 Xen virtualization architecture #Edit source
The following graphic depicts a virtual machine host with four virtual machines. The Xen hypervisor is shown as running directly on the physical hardware platform. Note that the controlling domain is also a virtual machine, although it has several additional management tasks compared to all the other virtual machines.
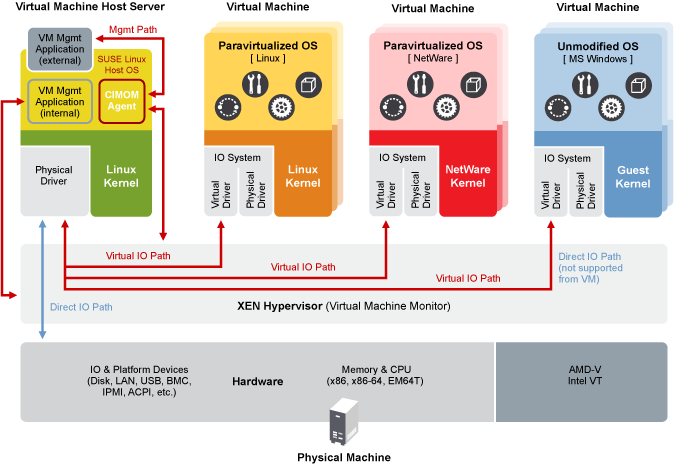
Figure 3.1: Xen virtualization architecture #
On the left, the virtual machine host’s Dom0 is shown running the openSUSE Leap operating system. The two virtual machines shown in the middle are running paravirtualized operating systems. The virtual machine on the right shows a fully virtual machine running an unmodified operating system, such as the latest version of Microsoft Windows/Server.
4 Introduction to KVM virtualization #Edit source
4.1 Basic components #Edit source
KVM is a full virtualization solution for hardware architectures that support hardware virtualization.
VM Guests (virtual machines), virtual storage and virtual networks can
be managed with QEMU tools directly or with the libvirt-based stack.
The QEMU tools include qemu-system-ARCH, the QEMU
monitor, qemu-img, and qemu-ndb. A
libvirt-based stack includes libvirt itself, along with
libvirt-based applications such as virsh,
virt-manager, virt-install, and
virt-viewer.
4.2 KVM virtualization architecture #Edit source
This full virtualization solution consists of two main components:
A set of kernel modules (
kvm.ko,kvm-intel.ko, andkvm-amd.ko) that provides the core virtualization infrastructure and processor-specific drivers.A user space program (
qemu-system-ARCH) that provides emulation for virtual devices and control mechanisms to manage VM Guests (virtual machines).
The term KVM more properly refers to the kernel level virtualization functionality, but is in practice more commonly used to refer to the user space component.

Figure 4.1: KVM virtualization architecture #
5 Virtualization tools #Edit source
Abstract#
libvirt is a library that provides a common API for managing popular
virtualization solutions, among them KVM and Xen. The library
provides a normalized management API for these virtualization
solutions, allowing a stable, cross-hypervisor interface for
higher-level management tools. The library also provides APIs for
management of virtual networks and storage on the VM Host Server. The
configuration of each VM Guest is stored in an XML file.
With libvirt, you can also manage your VM Guests remotely. It
supports TLS encryption, x509 certificates and authentication with
SASL. This enables managing VM Host Servers centrally from a single
workstation, alleviating the need to access each VM Host Server individually.
Using the libvirt-based tools is the recommended way of managing
VM Guests. Interoperability between libvirt and libvirt-based
applications has been tested and is an essential part of SUSE's
support stance.
5.1 Virtualization console tools #Edit source
libvirt includes several command-line utilities to manage virtual
machines. The most important ones are:
virsh(Package: libvirt-client)A command-line tool to manage VM Guests with similar functionality as the Virtual Machine Manager.
virshallows you to change a VM Guest's status, set up new guests and devices, or edit existing configurations.virshis also useful to script VM Guest management operations.virshtakes the first argument as a command and further arguments as options to this command:virsh [-c URI] COMMAND DOMAIN-ID [OPTIONS]
Like
zypper,virshcan also be called without a command. In this case it starts a shell waiting for your commands. This mode is useful when having to run subsequent commands:~> virsh -c qemu+ssh://wilber@mercury.example.com/system Enter passphrase for key '/home/wilber/.ssh/id_rsa': Welcome to virsh, the virtualization interactive terminal. Type: 'help' for help with commands 'quit' to quit virsh # hostname mercury.example.comvirt-install(Package: virt-install)A command-line tool for creating new VM Guests using the
libvirtlibrary. It supports graphical installations via VNC or SPICE protocols. Given suitable command-line arguments,virt-installcan run unattended. This allows for easy automation of guest installs.virt-installis the default installation tool used by the Virtual Machine Manager.remote-viewer(Package: virt-viewer)A simple viewer of a remote desktop. It supports SPICE and VNC protocols.
virt-clone(Package: virt-install)A tool for cloning existing virtual machine images using the
libvirthypervisor management library.virt-host-validate(Package: libvirt-client)A tool that validates whether the host is configured in a suitable way to run
libvirthypervisor drivers.
5.2 Virtualization GUI tools #Edit source
The following libvirt-based graphical tools are available on openSUSE Leap. All tools are provided by packages carrying the tool's name.
- Virtual Machine Manager (package: virt-manager)
The Virtual Machine Manager is a desktop tool for managing VM Guests. It provides the ability to control the lifecycle of existing machines (start/shutdown, pause/resume, save/restore) and create new VM Guests. It allows managing multiple types of storage and virtual networks. It provides access to the graphical console of VM Guests with a built-in VNC viewer and can be used to view performance statistics.
virt-managersupports connecting to a locallibvirtd, managing a local VM Host Server, or a remotelibvirtdmanaging a remote VM Host Server.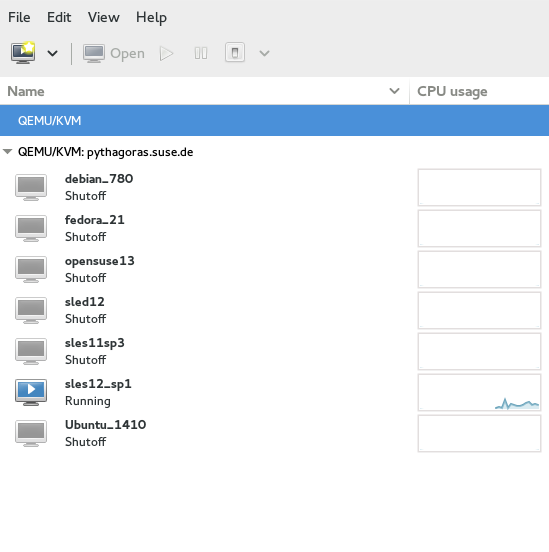
To start the Virtual Machine Manager, enter
virt-managerat the command prompt.Note
To disable automatic USB device redirection for VM Guest using spice, either launch
virt-managerwith the--spice-disable-auto-usbredirparameter or run the following command to persistently change the default behavior:>dconf write /org/virt-manager/virt-manager/console/auto-redirect falsevirt-viewer(Package: virt-viewer)A viewer for the graphical console of a VM Guest. It uses SPICE (configured by default on the VM Guest) or VNC protocols and supports TLS and x509 certificates. VM Guests can be accessed by name, ID or UUID. If the guest is not already running, the viewer can be told to wait until the guest starts, before attempting to connect to the console.
virt-vieweris not installed by default and is available after installing the packagevirt-viewer.Note
To disable automatic USB device redirection for VM Guest using spice, add an empty filter using the
--spice-usbredir-auto-redirect-filter=''parameter.yast2 vm(Package: yast2-vm)A YaST module that simplifies the installation of virtualization tools and can set up a network bridge:
6 Installation of virtualization components #Edit source
6.1 Introduction #Edit source
To run a virtualization server (VM Host Server) that can host one or more guest systems (VM Guests), you need to install required virtualization components on the server. These components vary depending on which virtualization technology you want to use.
6.2 Installing virtualization components #Edit source
You can install the virtualization tools required to run a VM Host Server in one of the following ways:
By selecting a specific system role during openSUSE Leap installation on the VM Host Server
By running the YaST Virtualization module on an already installed and running openSUSE Leap.
By installing specific installation patterns on an already installed and running openSUSE Leap.
6.2.1 Specifying a system role #Edit source
You can install all the tools required for virtualization during the installation of openSUSE Leap on the VM Host Server. During the installation, you are presented with the screen.
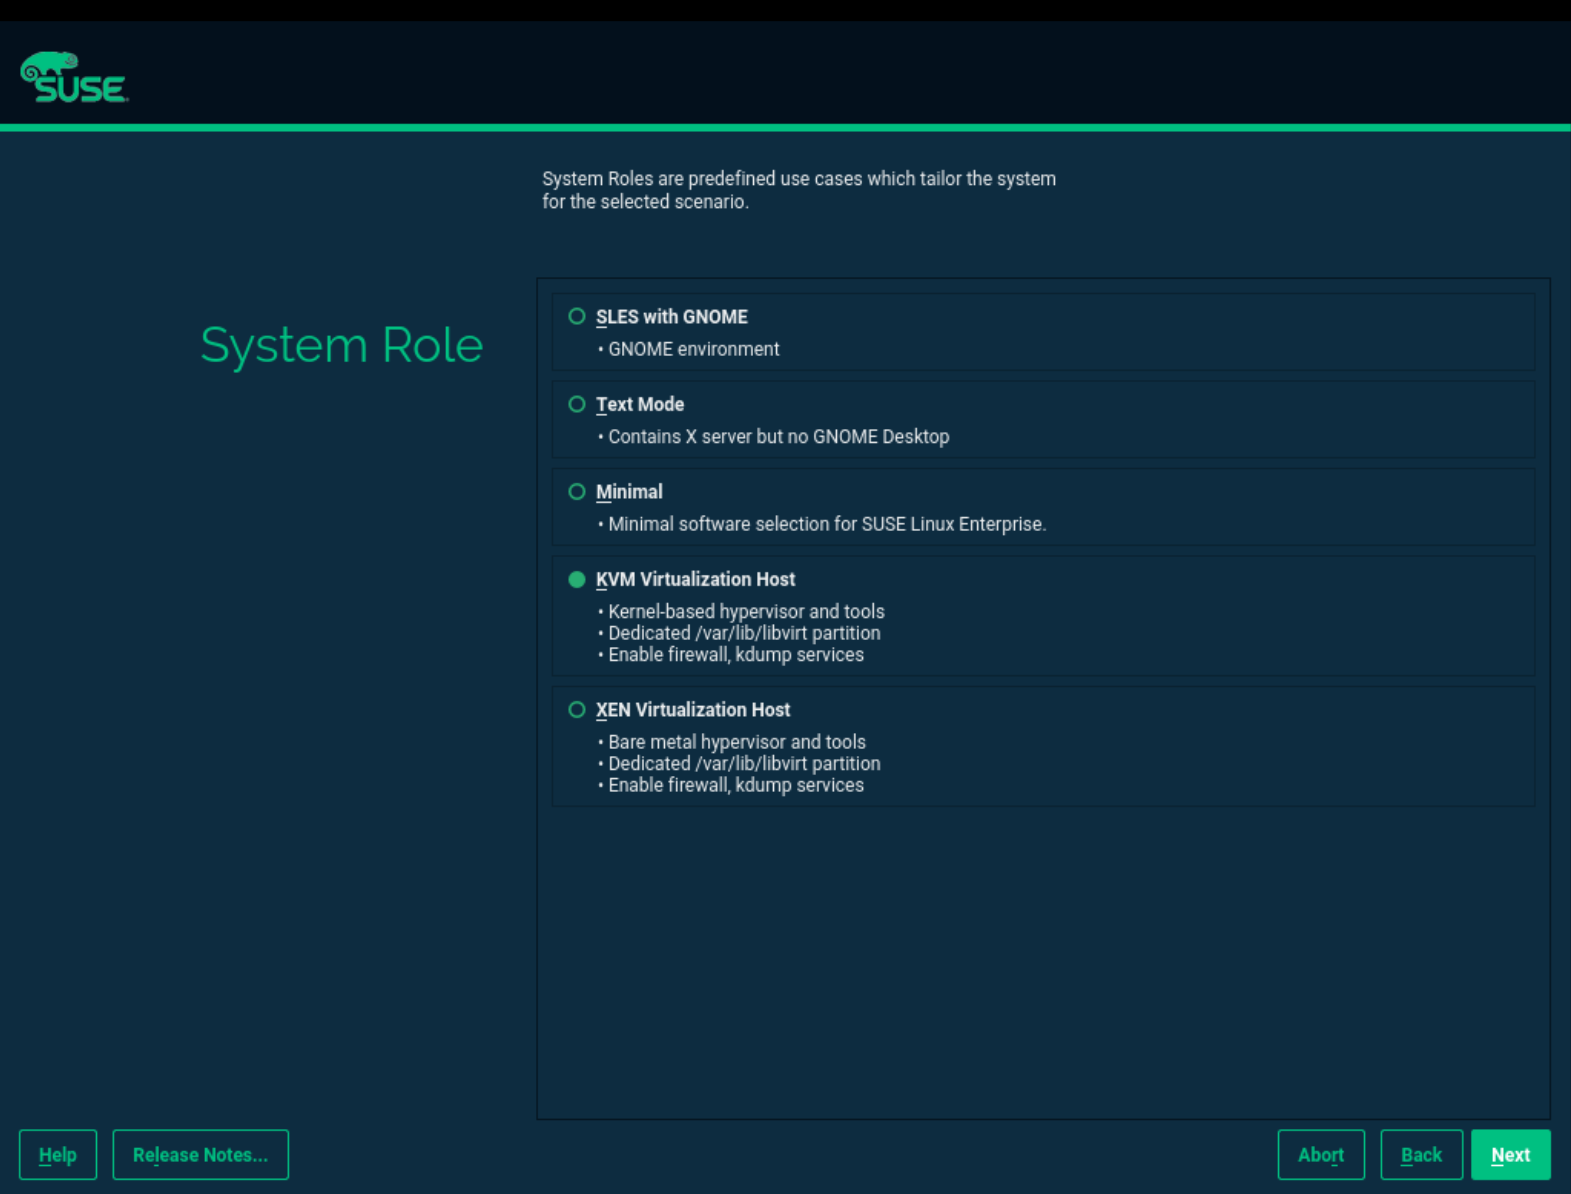
Figure 6.1: System Role screen #
Here you can select either the or the roles. The appropriate software selection and setup is automatically performed during openSUSE Leap installation.
Tip
Both virtualization system roles create a dedicated
/var/lib/libvirt partition, and enable the
firewalld and Kdump services.
6.2.2 Running the YaST Virtualization module #Edit source
Depending on the scope of openSUSE Leap installation on the VM Host Server, none of the virtualization tools may be installed on your system. They are automatically installed when configuring the hypervisor with the YaST Virtualization module.
Tip
The YaST Virtualization module is included in the yast2-vm package. Verify it is installed on the VM Host Server before installing virtualization components.
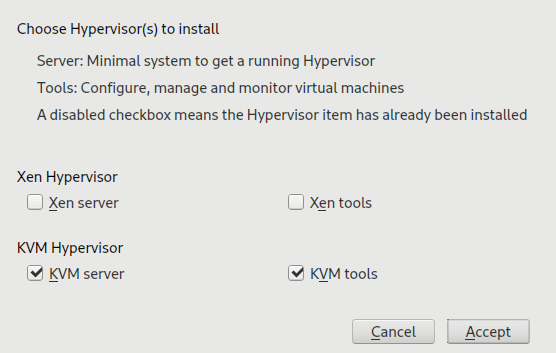
Procedure 6.1: Installing the KVM environment #
To install the KVM virtualization environment and related tools, proceed as follows:
Start YaST and select › .
Select for a minimal installation of QEMU and KVM environment. Select if you want to use the
libvirt-based management stack as well. Confirm with .YaST offers to automatically configure a network bridge on the VM Host Server. It ensures proper networking capabilities of the VM Guest. Agree to do so by selecting , otherwise choose .
After the setup has been finished, you can start creating and configuring VM Guests. Rebooting the VM Host Server is not required.
Procedure 6.2: Installing the Xen environment #
To install the Xen virtualization environment, proceed as follows:
Start YaST and select › .
Select for a minimal installation of Xen environment. Select to use the
libvirt-based management stack as well. Confirm with .YaST offers to automatically configure a network bridge on the VM Host Server. It ensures proper networking capabilities of the VM Guest. Agree to do so by selecting , otherwise choose .
After the setup has been finished, you need to reboot the machine with the Xen kernel.
Tip: Default boot kernel
If everything works as expected, change the default boot kernel with YaST and make the Xen-enabled kernel the default. For more information about changing the default kernel, see Book “Reference”, Chapter 12 “The boot loader GRUB 2”, Section 12.3 “Configuring the boot loader with YaST”.
6.2.3 Installing specific installation patterns #Edit source
Related software packages from openSUSE Leap software repositories are
organized into installation patterns. You can use
these patterns to install specific virtualization components on an
already running openSUSE Leap. Use zypper to install
them:
zypper install -t pattern PATTERN_NAME
To install the KVM environment, consider the following patterns:
kvm_serverInstalls basic VM Host Server with the KVM and QEMU environments.
kvm_toolsInstalls
libvirttools for managing and monitoring VM Guests in KVM environment.
To install the Xen environment, consider the following patterns:
xen_serverInstalls a basic Xen VM Host Server.
xen_toolsInstalls
libvirttools for managing and monitoring VM Guests in Xen environment.
6.3 Installing UEFI support #Edit source
Note
We support UEFI Secure Boot on AMD64/Intel 64 guests only. KVM guests support UEFI Secure Boot by using the OVMF firmware. Xen HVM guests support booting from the OVMF firmware as well, but they do not support UEFI Secure Boot.
UEFI support is provided by OVMF (Open Virtual Machine Firmware). To enable UEFI boot, first install the qemu-ovmf-x86_64 or qemu-uefi-aarch64 package depending on the architecture of the guest.
The firmware used by virtual machines is auto-selected. The
auto-selection is based on the JSON files in the firmware package
described above. The libvirt QEMU driver parses those files during
loading to know the capabilities of multiple types of firmware. Then when
the user selects the type of firmware and any desired features (for
example, support for UEFI Secure Boot), libvirt can find a firmware file
that satisfies the user's requirements.
For example, to specify EFI with UEFI Secure Boot, use the following configuration:
<os firmware='efi'>
 <loader secure='yes'/>
</os>
The qemu-ovmf-x86_64 package contains the following important UEFI firmware images. They provide UEFI Secure Boot capability for VM Guests:
#rpm -ql qemu-ovmf-x86_64[...] /usr/share/qemu/ovmf-x86_64-smm-ms-code.bin /usr/share/qemu/ovmf-x86_64-smm-ms-vars.bin /usr/share/qemu/ovmf-x86_64-smm-opensuse-code.bin /usr/share/qemu/ovmf-x86_64-smm-opensuse-vars.bin /usr/share/qemu/ovmf-x86_64-smm-suse-code.bin /usr/share/qemu/ovmf-x86_64-smm-suse-vars.bin [...]
To use UEFI Secure Boot for SUSE Linux Enterprise guests, use the
ovmf-x86_64-smm-suse-code.binfirmware.To use UEFI Secure Boot for openSUSE guests, use the
ovmf-x86_64-smm-opensuse-code.binfirmware.To use UEFI Secure Boot for Microsoft Windows guests, use the
ovmf-x86_64-smm-ms-code.binfirmware.
For the AArch64 architecture, the package is named qemu-uefi-aarch32:
#rpm -ql qemu-uefi-aarch32[...] /usr/share/qemu/aavmf-aarch32-code.bin /usr/share/qemu/aavmf-aarch32-vars.bin /usr/share/qemu/firmware /usr/share/qemu/firmware/60-aavmf-aarch32.json /usr/share/qemu/qemu-uefi-aarch32.bin
The *-code.bin files are the UEFI firmware files.
The *-vars.bin files are corresponding variable
store images that can be used as a template for a per-VM non-volatile
store. libvirt copies the specified vars template to
a per-VM path under /var/lib/libvirt/qemu/nvram/
when first creating the VM. Files without code or
vars in the name can be used as a single UEFI image.
They are not as useful since no UEFI variables persist across power
cycles of the VM.
The *-ms*.bin files contain UEFI CA keys as found on
real hardware. Therefore, they are configured as the default in
libvirt. Likewise, the *-suse*.bin files contain
preinstalled SUSE keys. There is also a set of files with no
preinstalled keys.
For details, see Using UEFI Secure Boot and http://www.linux-kvm.org/downloads/lersek/ovmf-whitepaper-c770f8c.txt.
6.4 Enable nested virtualization in KVM #Edit source
Important: Technology preview
KVM's nested virtualization is still a technology preview. It is provided for testing purposes and is not supported.
Nested guests are KVM guests run in a KVM guest. When describing nested guests, we use the following virtualization layers:
- L0
A bare metal host running KVM.
- L1
A virtual machine running on L0. Because it can run another KVM, it is called a guest hypervisor.
- L2
A virtual machine running on L1. It is called a nested guest.
Nested virtualization has many advantages. You can benefit from it in the following scenarios:
Manage your own virtual machines directly with your hypervisor of choice in cloud environments.
Enable the live migration of hypervisors and their guest virtual machines as a single entity.
Note
Live migration of a nested VM Guest is not supported.
Use it for software development and testing.
To enable nesting temporarily, remove the module and reload it with the
nested KVM module parameter:
For Intel CPUs, run:
>sudomodprobe -r kvm_intel && modprobe kvm_intel nested=1For AMD CPUs, run:
>sudomodprobe -r kvm_amd && modprobe kvm_amd nested=1
To enable nesting permanently, enable the nested KVM
module parameter in the /etc/modprobe.d/kvm_*.conf
file, depending on your CPU:
For Intel CPUs, edit
/etc/modprobe.d/kvm_intel.confand add the following line:options kvm_intel nested=1
For AMD CPUs, edit
/etc/modprobe.d/kvm_amd.confand add the following line:options kvm_amd nested=1
When your L0 host is capable of nesting, you can start an L1 guest in one of the following ways:
Use the
-cpu hostQEMU command line option.Add the
vmx(for Intel CPUs) or thesvm(for AMD CPUs) CPU feature to the-cpuQEMU command line option, which enables virtualization for the virtual CPU.
6.4.1 VMware ESX as a guest hypervisor #Edit source
If you use VMware ESX as a guest hypervisor on top of a KVM bare metal hypervisor, you may experience unstable network communication. This problem occurs especially between nested KVM guests and the KVM bare metal hypervisor or external network. The following default CPU configuration of the nested KVM guest is causing the problem:
<cpu mode='host-model' check='partial'/>
To fix it, modify the CPU configuration as follow:
[...]
<cpu mode='host-passthrough' check='none'>
 <cache mode='passthrough'/>
</cpu>
[...]
Part II Managing virtual machines with libvirt #Edit source
- 7
libvirtdaemons A libvirt deployment for accessing KVM or Xen requires one or more daemons to be installed and active on the host. libvirt provides two daemon deployment options: monolithic or modular daemons. libvirt has always provided the single monolithic daemon libvirtd. It includes the primary hypervisor driv…
- 8 Preparing the VM Host Server
Before you can install guest virtual machines, you need to prepare the VM Host Server to provide the guests with the resources that they need for their operation. Specifically, you need to configure:
- 9 Guest installation
A VM Guest consists of an image containing an operating system and data files and a configuration file describing the VM Guest's virtual hardware resources. VM Guests are hosted on and controlled by the VM Host Server. This section provides generalized instructions for installing a VM Guest.
- 10 Basic VM Guest management
Most management tasks, such as starting or stopping a VM Guest, can either be done using the graphical application Virtual Machine Manager or on the command line using
virsh. Connecting to the graphical console via VNC is only possible from a graphical user interface.- 11 Connecting and authorizing
Managing several VM Host Servers, each hosting multiple VM Guests, quickly becomes difficult. One benefit of
libvirtis the ability to connect to several VM Host Servers at once, providing a single interface to manage all VM Guests and to connect to their graphical console.- 12 Advanced storage topics
This chapter introduces advanced topics about manipulating storage from the perspective of the VM Host Server.
- 13 Configuring virtual machines with Virtual Machine Manager
Virtual Machine Manager's view offers in-depth information about the VM Guest's complete configuration and hardware equipment. Using this view, you can also change the guest configuration or add and modify virtual hardware. To access this view, open the guest's console in Virtual Machine Manager and either choose › from the menu, or click in the toolbar.
- 14 Configuring virtual machines with
virsh You can use
virshto configure virtual machines (VM) on the command line as an alternative to using the Virtual Machine Manager. Withvirsh, you can control the state of a VM, edit the configuration of a VM or even migrate a VM to another host. The following sections describe how to manage VMs by usingvirsh.- 15 Xen to KVM migration guide
As the KVM virtualization solution is becoming more and more popular among server administrators, many of them need a path to migrate their existing Xen based environments to KVM. As of now, there are no mature tools to automatically convert Xen VMs to KVM. There is, however, a technical solution th…
7 libvirt daemons #Edit source
A libvirt deployment for accessing KVM or Xen requires one or more
daemons to be installed and active on the host. libvirt provides two
daemon deployment options: monolithic or modular daemons. libvirt has
always provided the single monolithic daemon libvirtd. It includes the
primary hypervisor drivers and all supporting secondary drivers needed for
storage, such as networking, node device and management. The
monolithic libvirtd also provides secure remote access for external
clients. With modular daemons, each driver runs in its own daemon, allowing
users to customize their libvirt deployment. By default, the monolithic
daemon is enabled, but a deployment can be switched to modular daemons by
managing the corresponding systemd service files.
The modular daemon deployment is useful in scenarios where minimal
libvirt support is needed. For example, if virtual machine storage and
networking is not provided by libvirt, the
libvirt-daemon-driver-storage and
libvirt-daemon-driver-network type of packages are not
required. Kubernetes is an example of an extreme case, where it handles all
networking, storage, cgroups and namespace integration, etc. Only the
libvirt-daemon-driver-QEMU package, providing
virtqemud, needs to be installed.
Modular daemons allow configuring a custom libvirt deployment containing
only the components required for the use case.
7.1 Starting and stopping the monolithic daemon #Edit source
The monolithic daemon is known as libvirtd and is configured via
/etc/libvirt/libvirtd.conf. libvirtd is managed
with several systemd unit files:
libvirtd.service - The main
systemdunit file for launchinglibvirtd. We recommend configuringlibvirtd.serviceto start on boot if VMs are also configured to start on host boot.libvirtd.socket - The unit file corresponding to the main read-write UNIX socket
/var/run/libvirt/libvirt-sock. We recommend enabling this unit on boot.libvirtd-ro.socket - The unit file corresponding to the main read-only UNIX socket
/var/run/libvirt/libvirt-sock-ro. We recommend enabling this unit on boot.libvirtd-admin.socket - The unit file corresponding to the administrative UNIX socket
/var/run/libvirt/libvirt-admin-sock. We recommend enabling this unit on boot.libvirtd-tcp.socket - The unit file corresponding to the TCP 16509 port for non-TLS remote access. This unit should not be configured to start on boot until the administrator has configured a suitable authentication mechanism.
libvirtd-tls.socket - The unit file corresponding to the TCP 16509 port for TLS remote access. This unit should not be configured to start on boot until the administrator has deployed x509 certificates and optionally configured a suitable authentication mechanism.
When systemd socket activation is used, certain configuration settings
in libvirtd.conf are no longer honored. Instead,
these settings must be controlled via the system unit files:
listen_tcp - TCP socket usage is enabled by starting the
libvirtd-tcp.socketunit file.listen_tls - TLS socket usage is enabled by starting the
libvirtd-tls.socketunit file.tcp_port - Port for the non-TLS TCP socket, controlled via the
ListenStreamparameter in thelibvirtd-tcp.socketunit file.tls_port - Port for the TLS TCP socket, controlled via the
ListenStreamparameter in thelibvirtd-tls.socketunit file.listen_addr - IP address to listen on, independently controlled via the
ListenStreamparameter in thelibvirtd-tcp.socketorlibvirtd-tls.socketunit files.unix_sock_group - UNIX socket group owner, controlled via the
SocketGroupparameter in thelibvirtd.socketandlibvirtd-ro.socketunit files.unix_sock_ro_perms - Read-only UNIX socket permissions, controlled via the
SocketModeparameter in thelibvirtd-ro.socketunit file.unix_sock_rw_perms - Read-write UNIX socket permissions, controlled via the
SocketModeparameter in thelibvirtd.socketunit file.unix_sock_admin_perms - Admin UNIX socket permissions, controlled via the
SocketModeparameter in thelibvirtd-admin.socketunit file.unix_sock_dir - Directory in which all UNIX sockets are created, independently controlled via the
ListenStreamparameter in any of thelibvirtd.socket,libvirtd-ro.socketandlibvirtd-admin.socketunit files.
Important: Conflicting services: libvirtd and xendomains
If libvirtd fails to start, check if the service
xendomains is loaded:
> systemctl is-active xendomains active
If the command returns active, you need to stop
xendomains before you can start
the libvirtd daemon. If you want libvirtd to also start after
rebooting, additionally prevent
xendomains from starting
automatically. Disable the service:
>sudosystemctl stop xendomains>sudosystemctl disable xendomains>sudosystemctl start libvirtd
xendomains and libvirtd
provide the same service and when used in parallel, may interfere with
one another. As an example,
xendomains may attempt to start
a domU already started by libvirtd.
7.2 Starting and stopping the modular daemons #Edit source
The modular daemons are named after the driver which they are running,
with the pattern “virtDRIVERd”.
They are configured via the files
/etc/libvirt/virtDRIVERd.conf.
SUSE supports the virtqemud and virtxend hypervisor daemons, along with
all the supporting secondary daemons:
virtnetworkd - The virtual network management daemon which provides
libvirt's virtual network management APIs. For example, virtnetworkd can be used to create a NAT virtual network on the host for use by virtual machines.virtnodedevd - The host physical device management daemon which provides
libvirt's node device management APIs. For example, virtnodedevd can be used to detach a PCI device from the host for use by a virtual machine.virtnwfilterd - The host firewall management daemon which provides
libvirt's firewall management APIs. For example, virtnwfilterd can be used to configure network traffic filtering rules for virtual machines.virtsecretd - The host secret management daemon which provides
libvirt's secret management APIs. For example, virtsecretd can be used to store a key associated with a LUKs volume.virtstoraged - The host storage management daemon which provides
libvirt's storage management APIs. virtstoraged can be used to create storage pools and create volumes from those pools.virtinterfaced - The host NIC management daemon which provides
libvirt's host network interface management APIs. For example, virtinterfaced can be used to create a bonded network device on the host. SUSE discourages the use oflibvirt's interface management APIs in favor of default networking tools like wicked or NetworkManager. It is recommended to disable virtinterfaced.virtproxyd - A daemon to proxy connections between the traditional
libvirtdsockets and the modular daemon sockets. With a modularlibvirtdeployment, virtproxyd allows remote clients to access thelibvirtAPIs similar to the monolithiclibvirtd. It can also be used by local clients that connect to the monolithiclibvirtdsockets.virtlogd - A daemon to manage logs from virtual machine consoles. virtlogd is also used by the monolithic
libvirtd. The monolithic daemon and virtqemudsystemdunit files require virtlogd, so it is not necessary to explicitly start virtlogd.virtlockd - A daemon to manage locks held against virtual machine resources such as disks. virtlockd is also used by the monolithic
libvirtd. The monolithic daemon, virtqemud, and virtxendsystemdunit files require virtlockd, so it is not necessary to explicitly start virtlockd.
libvirt contains two modular daemons that are also used by the
monolithic libvirtd, virtlockd and virtlogd.
By default, the modular daemons listen for connections on the
/var/run/libvirt/virtDRIVERd-sock
and
/var/run/libvirt/virtDRIVERd-sock-ro
Unix Domain Sockets. The client library prefers these sockets over the
traditional /var/run/libvirt/libvirtd-sock. The
virtproxyd daemon is available for remote clients or local clients
expecting the traditional libvirtd socket.
Like the monolithic daemon, the modular daemons are managed with several
systemd unit files:
virtDRIVERd.service - The main unit file for launching the virtDRIVERd daemon. We recommend configuring the service to start on boot if VMs are also configured to start on host boot.
virtDRIVERd.socket - The unit file corresponding to the main read-write UNIX socket
/var/run/libvirt/virtDRIVERd-sock. We recommend starting this socket on boot by default.virtDRIVERd-ro.socket - The unit file corresponding to the main read-only UNIX socket
/var/run/libvirt/virtDRIVERd-sock-ro. We recommend starting this socket on boot by default.virtDRIVERd-admin.socket - The unit file corresponding to the administrative UNIX socket
/var/run/libvirt/virtDRIVERd-admin-sock. We recommend starting this socket on boot by default.
When systemd socket activation is used, several configuration settings
in virtDRIVERd.conf are no longer honored.
Instead, these settings must be controlled via the system unit files:
unix_sock_group - UNIX socket group owner, controlled via the
SocketGroupparameter in thevirtDRIVERd.socketandvirtDRIVERd-ro.socketunit files.unix_sock_ro_perms - Read-only UNIX socket permissions, controlled via the
SocketModeparameter in thevirtDRIVERd-ro.socketunit file.unix_sock_rw_perms - Read-write UNIX socket permissions, controlled via the
SocketModeparameter in thevirtDRIVERd.socketunit file.unix_sock_admin_perms - Admin UNIX socket permissions, controlled via the
SocketModeparameter in thevirtDRIVERd-admin.socketunit file.unix_sock_dir - Directory in which all UNIX sockets are created, independently controlled via the
ListenStreamparameter in any of thevirtDRIVERd.socket,virtDRIVERd-ro.socketandvirtDRIVERd-admin.socketunit files.
7.3 Switching to modular daemons #Edit source
Several services need to be changed when switching from the monolithic to modular daemons. It is recommended to stop or evict any running virtual machines before switching between the daemon options.
Stop the monolithic daemon and its sockets
>sudosystemctl stop libvirtd.service>sudosystemctl stop libvirtd{,-ro,-admin}.socketDisable future start of the monolithic daemon
>sudosystemctl disable libvirtd.service>sudosystemctl disable libvirtd{,-ro,-admin}.socketEnable the new daemons for KVM or Xen, including the required secondary drivers. The following example enables the QEMU driver for KVM and all the required secondary drivers:
for drv in qemu network nodedev nwfilter secret storage do
>sudosystemctl enable virt${drv}d.service>sudosystemctl enable virt${drv}d{,-ro,-admin}.socket doneStart the sockets for the same set of daemons
for drv in qemu network nodedev nwfilter secret storage do
>sudosystemctl start virt${drv}d{,-ro,-admin}.socket doneIf connections from remote hosts need to be supported, the virtproxyd daemon must be enabled and started:
>sudosystemctl enable virtproxyd.service>sudosystemctl enable virtproxyd{,-ro,-admin}.socket>sudosystemctl start virtproxyd{,-ro,-admin}.socket
8 Preparing the VM Host Server #Edit source
Before you can install guest virtual machines, you need to prepare the VM Host Server to provide the guests with the resources that they need for their operation. Specifically, you need to configure:
Networking so that guests can make use of the network connection provided the host.
A storage pool reachable from the host so that the guests can store their disk images.
8.1 Configuring networks #Edit source
There are two common network configurations to provide a VM Guest with a network connection:
A network bridge. This is the default and recommended way of providing the guests with network connection.
A virtual network with forwarding enabled.
8.1.1 Network bridge #Edit source
The network bridge configuration provides a Layer 2 switch for VM Guests, switching Layer 2 Ethernet packets between ports on the bridge based on MAC addresses associated with the ports. This gives the VM Guest Layer 2 access to the VM Host Server's network. This configuration is analogous to connecting the VM Guest's virtual Ethernet cable into a hub that is shared with the host and other VM Guests running on the host. The configuration is often referred to as shared physical device.
The network bridge configuration is the default configuration of openSUSE Leap when configured as a KVM or Xen hypervisor. It is the preferred configuration when you simply want to connect VM Guests to the VM Host Server's LAN.
Which tool to use to create the network bridge depends on the service you use to manage the network connection on the VM Host Server:
If a network connection is managed by
wicked, use either YaST or the command line to create the network bridge.wickedis the default on server hosts.If a network connection is managed by NetworkManager, use the NetworkManager command line tool
nmclito create the network bridge. NetworkManager is the default on desktop and laptops.
8.1.1.1 Managing network bridges with YaST #Edit source
This section includes procedures to add or remove network bridges with YaST.
8.1.1.1.1 Adding a network bridge #Edit source
To add a network bridge on VM Host Server, follow these steps:
Start › › .
Activate the tab and click .
Select from the list and enter the bridge device interface name in the entry. Click the button to proceed.
In the tab, specify networking details such as DHCP/static IP address, subnet mask or host name.
Using is only useful when also assigning a device to a bridge that is connected to a DHCP server.
If you intend to create a virtual bridge that has no connection to a real network device, use . In this case, it is a good idea to use addresses from the private IP address ranges, for example,
192.168.0.0/16,172.16.0.0/12, or10.0.0.0/8.To create a bridge that should only serve as a connection between the different guests without connection to the host system, set the IP address to
0.0.0.0and the subnet mask to255.255.255.255. The network scripts handle this special address as an unset IP address.Activate the tab and activate the network devices you want to include in the network bridge.
Click to return to the tab and confirm with . The new network bridge should now be active on VM Host Server.
8.1.1.1.2 Deleting a network bridge #Edit source
To delete an existing network bridge, follow these steps:
Start › › .
Select the bridge device you want to delete from the list in the tab.
Delete the bridge with and confirm with .
8.1.1.2 Managing network bridges from the command line #Edit source
This section includes procedures to add or remove network bridges using the command line.
8.1.1.2.1 Adding a network bridge #Edit source
To add a new network bridge device on VM Host Server, follow these steps:
Log in as
rooton the VM Host Server where you want to create a new network bridge.Choose a name for the new bridge—virbr_test in our example—and run
#ip link add name VIRBR_TEST type bridgeCheck if the bridge was created on VM Host Server:
#bridge vlan [...] virbr_test 1 PVID Egress Untaggedvirbr_testis present, but is not associated with any physical network interface.Bring the network bridge up and add a network interface to the bridge:
#ip link set virbr_test up#ip link set eth1 master virbr_testImportant: Network interface must be unused
You can only assign a network interface that is not yet used by another network bridge.
Optionally, enable STP (see Spanning Tree Protocol):
#bridge link set dev virbr_test cost 4
8.1.1.2.2 Deleting a network bridge #Edit source
To delete an existing network bridge device on VM Host Server from the command line, follow these steps:
Log in as
rooton the VM Host Server where you want to delete an existing network bridge.List existing network bridges to identify the name of the bridge to remove:
#bridge vlan [...] virbr_test 1 PVID Egress UntaggedDelete the bridge:
#ip link delete dev virbr_test
8.1.1.3 Adding a network bridge with nmcli #Edit source
This section includes procedures to add a network bridge with NetworkManager's
command line tool nmcli.
List active network connections:
>sudonmcli connection show --active NAME UUID TYPE DEVICE Ethernet connection 1 84ba4c22-0cfe-46b6-87bb-909be6cb1214 ethernet eth0Add a new bridge device named
br0and verify its creation:>sudonmcli connection add type bridge ifname br0 Connection 'bridge-br0' (36e11b95-8d5d-4a8f-9ca3-ff4180eb89f7) \ successfully added.>sudonmcli connection show --active NAME UUID TYPE DEVICE bridge-br0 36e11b95-8d5d-4a8f-9ca3-ff4180eb89f7 bridge br0 Ethernet connection 1 84ba4c22-0cfe-46b6-87bb-909be6cb1214 ethernet eth0Optionally, you can view the bridge settings:
>sudonmcli -f bridge connection show bridge-br0 bridge.mac-address: -- bridge.stp: yes bridge.priority: 32768 bridge.forward-delay: 15 bridge.hello-time: 2 bridge.max-age: 20 bridge.ageing-time: 300 bridge.group-forward-mask: 0 bridge.multicast-snooping: yes bridge.vlan-filtering: no bridge.vlan-default-pvid: 1 bridge.vlans: --Link the bridge device to the physical Ethernet device
eth0:>sudonmcli connection add type bridge-slave ifname eth0 master br0Disable the
eth0interface and enable the new bridge:>sudonmcli connection down "Ethernet connection 1">sudonmcli connection up bridge-br0 Connection successfully activated (master waiting for slaves) \ (D-Bus active path: /org/freedesktop/NetworkManager/ActiveConnection/9)
8.1.1.4 Using VLAN interfaces #Edit source
Sometimes it is necessary to create a private connection either between two VM Host Servers or between VM Guest systems. For example, to migrate a VM Guest to hosts in a different network segment. Or to create a private bridge that only VM Guest systems may connect to (even when running on different VM Host Server systems). An easy way to build such connections is to set up VLAN networks.
VLAN interfaces are commonly set up on the VM Host Server. They either interconnect the different VM Host Server systems, or they may be set up as a physical interface to an otherwise virtual-only bridge. It is even possible to create a bridge with a VLAN as a physical interface that has no IP address in the VM Host Server. That way, the guest systems have no possibility to access the host over this network.
Run the YaST module › . Follow this procedure to set up the VLAN device:
Procedure 8.1: Setting up VLAN interfaces with YaST #
Click to create a new network interface.
In the , select .
Change the value of to the ID of your VLAN. Be aware VLAN ID
1is commonly used for management purposes.Click .
Select the interface that the VLAN device should connect to below . If the desired interface does not appear in the list, first set up this interface without an IP address.
Select the desired method for assigning an IP address to the VLAN device.
Click to finish the configuration.
It is also possible to use the VLAN interface as a physical interface of a bridge. This makes it possible to connect several VM Host Server-only networks and allows live migration of VM Guest systems that are connected to such a network.
YaST does not always allow setting no IP address. However, this may
be a desired feature, especially if VM Host Server-only networks should be
connected. In this case, use the special address
0.0.0.0 with netmask
255.255.255.255. The system scripts handle this
address as no IP address set.
8.1.2 Virtual networks #Edit source
libvirt-managed virtual networks are similar to bridged networks, but
typically have no Layer 2 connection to the VM Host Server. Connectivity to
the VM Host Server's physical network is accomplished with Layer 3
forwarding, which introduces additional packet processing on the
VM Host Server as compared to a Layer 2 bridged network. Virtual networks
also provide DHCP and DNS services for VM Guests. For more information
on libvirt virtual networks, see the Network XML
format documentation at
https://libvirt.org/formatnetwork.html.
A standard libvirt installation on openSUSE Leap already comes with a
predefined virtual network named default. It
provides DHCP and DNS services for the network, along with connectivity
to the VM Host Server's physical network using the network address
translation (NAT) forwarding mode. Although it is predefined, the
default virtual network needs to be explicitly
enabled by the administrator. For more information on the forwarding
modes supported by libvirt, see the
Connectivity section of the Network
XML format documentation at
https://libvirt.org/formatnetwork.html#elementsConnect.
libvirt-managed virtual networks can be used to satisfy a wide range
of use cases, but are commonly used on VM Host Servers that have a wireless
connection or dynamic/sporadic network connectivity, such as laptops.
Virtual networks are also useful when the VM Host Server's network has
limited IP addresses, allowing forwarding of packets between the
virtual network and the VM Host Server's network. However, most server use
cases are better suited for the network bridge configuration, where
VM Guests are connected to the VM Host Server's LAN.
Warning: Enabling forwarding mode
Enabling forwarding mode in a libvirt virtual network enables
forwarding in the VM Host Server by setting
/proc/sys/net/ipv4/ip_forward and
/proc/sys/net/ipv6/conf/all/forwarding to 1,
which turns the VM Host Server into a router. Restarting the VM Host Server's
network may reset the values and disable forwarding. To avoid this
behavior, explicitly enable forwarding in the VM Host Server by editing the
/etc/sysctl.conf file and adding:
net.ipv4.ip_forward = 1
net.ipv6.conf.all.forwarding = 1
8.1.2.1 Managing virtual networks with Virtual Machine Manager #Edit source
You can define, configure and operate virtual networks with Virtual Machine Manager.
8.1.2.1.1 Defining virtual networks #Edit source
Start Virtual Machine Manager. In the list of available connections, right-click the name of the connection for which you need to configure the virtual network, and then select .
In the window, click the tab. You can see the list of all virtual networks available for the current connection. On the right, there are details of the selected virtual network.

Figure 8.1: Connection details #
To add a new virtual network, click .
Specify a name for the new virtual network.
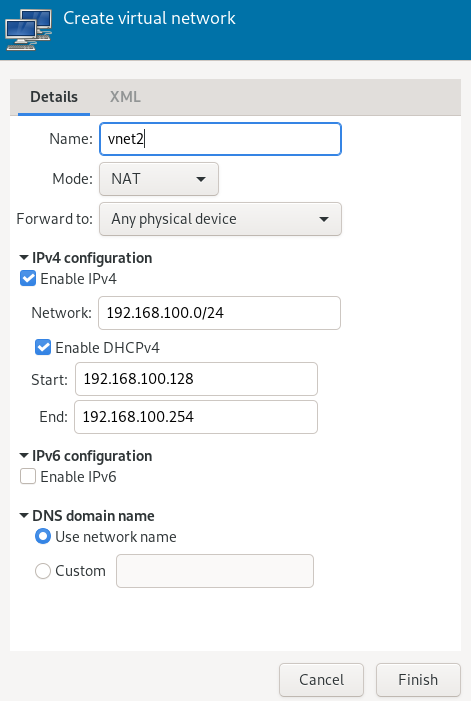
Figure 8.2: Create virtual network #
Specify the networking mode. For the and types, you can specify to which device to forward network communications. While (network address translation) remaps the virtual network address space and allows sharing a single IP address, forwards packets from the virtual network to the VM Host Server's physical network with no translation.
If you need IPv4 networking, activate and specify the IPv4 network address. If you need a DHCP server, activate and specify the assignable IP address range.
If you need IPv6 networking, activate and specify the IPv6 network address. If you need a DHCP server, activate and specify the assignable IP address range.
To specify a different domain name than the name of the virtual network, select under and enter it here.
Click to create the new virtual network. On the VM Host Server, a new virtual network bridge
virbrXis available, which corresponds to the newly created virtual network. You can check withbridge link.libvirtautomatically adds iptables rules to allow traffic to/from guests attached to the new virbrX device.
8.1.2.1.2 Starting virtual networks #Edit source
To start a virtual network that is temporarily stopped, follow these steps:
Start Virtual Machine Manager. In the list of available connections, right-click the name of the connection for which you need to configure the virtual network, and then select .
In the window, click the tab. You can see the list of all virtual networks available for the current connection.
To start the virtual network, click .
8.1.2.1.3 Stopping virtual networks #Edit source
To stop an active virtual network, follow these steps:
Start Virtual Machine Manager. In the list of available connections, right-click the name of the connection for which you need to configure the virtual network, and then select .
In the window, click the tab. You can see the list of all virtual networks available for the current connection.
Select the virtual network to be stopped, then click .
8.1.2.1.4 Deleting virtual networks #Edit source
To delete a virtual network from VM Host Server, follow these steps:
Start Virtual Machine Manager. In the list of available connections, right-click the name of the connection for which you need to configure the virtual network, and then select .
In the window, click the tab. You can see the list of all virtual networks available for the current connection.
Select the virtual network to be deleted, then click .
8.1.2.1.5 Obtaining IP addresses with nsswitch for NAT networks (in KVM) #Edit source
On VM Host Server, install libvirt-nss, which provides NSS support for libvirt:
>sudozypper in libvirt-nssAdd
libvirtto/etc/nsswitch.conf:... hosts: files libvirt mdns_minimal [NOTFOUND=return] dns ...
If NSCD is running, restart it:
>sudosystemctl restart nscd
Now you can reach the guest system by name from the host.
The NSS module has limited functionality. It reads
/var/lib/libvirt/dnsmasq/*.status files to
find the host name and corresponding IP addresses in a JSON record
describing each lease provided by dnsmasq. Host
name translation can only be done on those VM Host Servers using a
libvirt-managed bridged network backed by
dnsmasq.
8.1.2.2 Managing virtual networks with virsh #Edit source
You can manage libvirt-provided virtual networks with the
virsh command line tool. To view all network
related virsh commands, run
>sudovirsh help network Networking (help keyword 'network'): net-autostart autostart a network net-create create a network from an XML file net-define define (but don't start) a network from an XML file net-destroy destroy (stop) a network net-dumpxml network information in XML net-edit edit XML configuration for a network net-event Network Events net-info network information net-list list networks net-name convert a network UUID to network name net-start start a (previously defined) inactive network net-undefine undefine an inactive network net-update update parts of an existing network's configuration net-uuid convert a network name to network UUID
To view brief help information for a specific
virsh command, run virsh help
VIRSH_COMMAND:
>sudovirsh help net-create NAME net-create - create a network from an XML file SYNOPSIS net-create <file> DESCRIPTION Create a network. OPTIONS [--file] <string> file containing an XML network description
8.1.2.2.1 Creating a network #Edit source
To create a new running virtual network, run
>sudovirsh net-create VNET_DEFINITION.xml
The VNET_DEFINITION.xml XML file
includes the definition of the virtual network that libvirt
accepts.
To define a new virtual network without activating it, run
>sudovirsh net-define VNET_DEFINITION.xml
The following examples illustrate definitions of different types of virtual networks.
Example 8.1: NAT-based network #
The following configuration allows VM Guests outgoing connectivity if it is available on the VM Host Server. Without VM Host Server networking, it allows guests to talk directly to each other.
<network>
<name>vnet_nated</name>1
<bridge name="virbr1"/>2
 <forward mode="nat"/>3
 <ip address="192.168.122.1" netmask="255.255.255.0">4
  <dhcp>
   <range start="192.168.122.2" end="192.168.122.254"/>5
   <host mac="52:54:00:c7:92:da" name="host1.testing.com" \
    ip="192.168.1.101"/>6
   <host mac="52:54:00:c7:92:db" name="host2.testing.com" \
    ip="192.168.1.102"/>
   <host mac="52:54:00:c7:92:dc" name="host3.testing.com" \
    ip="192.168.1.103"/>
  </dhcp>
 </ip>
</network>
The name of the new virtual network. | |
The name of the bridge device used to construct the virtual
network. When defining a new network with a <forward>
mode of | |
Inclusion of the <forward> element indicates that the
virtual network is connected to the physical LAN. The
| |
The IP address and netmask for the network bridge. | |
Enable DHCP server for the virtual network, offering IP
addresses ranging from the specified | |
The optional <host> elements specify hosts that are
given names and predefined IP addresses by the built-in DHCP
server. Any IPv4 host element must specify the following: the
MAC address of the host to be assigned a given name, the IP
to be assigned to that host, and the name to be given to that
host by the DHCP server. An IPv6 host element differs
slightly from that for IPv4: there is no
|
Example 8.2: Routed network #
The following configuration routes traffic from the virtual network to the LAN without applying any NAT. The IP address range must be preconfigured in the routing tables of the router on the VM Host Server network.
<network>
 <name>vnet_routed</name>
 <bridge name="virbr1"/>
 <forward mode="route" dev="eth1"/>1
 <ip address="192.168.122.1" netmask="255.255.255.0">
  <dhcp>
   <range start="192.168.122.2" end="192.168.122.254"/>
  </dhcp>
 </ip>
</network>
The guest traffic may only go out via the
|
Example 8.3: Isolated network #
This configuration provides an isolated private network. The guests can talk to each other, and to VM Host Server, but cannot reach any other machines on the LAN, as the <forward> element is missing in the XML description.
<network>
 <name>vnet_isolated</name>
 <bridge name="virbr3"/>
 <ip address="192.168.152.1" netmask="255.255.255.0">
  <dhcp>
   <range start="192.168.152.2" end="192.168.152.254"/>
  </dhcp>
 </ip>
 </network>
Example 8.4: Using an existing bridge on VM Host Server #
This configuration shows how to use an existing VM Host Server's
network bridge br0. VM Guests are directly
connected to the physical network. Their IP addresses are all on
the subnet of the physical network, and there are no restrictions
on incoming or outgoing connections.
<network>
        <name>host-bridge</name>
        <forward mode="bridge"/>
        <bridge name="br0"/>
</network>
8.1.2.2.2 Listing networks #Edit source
To list all virtual networks available to libvirt, run:
>sudovirsh net-list --all Name State Autostart Persistent ---------------------------------------------------------- crowbar active yes yes vnet_nated active yes yes vnet_routed active yes yes vnet_isolated inactive yes yes
To list available domains, run:
>sudovirsh list Id Name State ---------------------------------------------------- 1 nated_sles12sp3 running ...
To get a list of interfaces of a running domain, run
domifaddr DOMAIN, or
optionally specify the interface to limit the output to this
interface. By default, it additionally outputs their IP and MAC
addresses:
>sudovirsh domifaddr nated_sles12sp3 --interface vnet0 --source lease Name MAC address Protocol Address ------------------------------------------------------------------------------- vnet0 52:54:00:9e:0d:2b ipv6 fd00:dead:beef:55::140/64 - - ipv4 192.168.100.168/24
To print brief information of all virtual interfaces associated with the specified domain, run:
>sudovirsh domiflist nated_sles12sp3 Interface Type Source Model MAC --------------------------------------------------------- vnet0 network vnet_nated virtio 52:54:00:9e:0d:2b
8.1.2.2.3 Getting details about a network #Edit source
To get detailed information about a network, run:
>sudovirsh net-info vnet_routed Name: vnet_routed UUID: 756b48ff-d0c6-4c0a-804c-86c4c832a498 Active: yes Persistent: yes Autostart: yes Bridge: virbr5
8.1.2.2.4 Starting a network #Edit source
To start an inactive network that was already defined, find its name (or unique identifier, UUID) with:
>sudovirsh net-list --inactive Name State Autostart Persistent ---------------------------------------------------------- vnet_isolated inactive yes yes
Then run:
>sudovirsh net-start vnet_isolated Network vnet_isolated started
8.1.2.2.5 Stopping a network #Edit source
To stop an active network, find its name (or unique identifier, UUID) with:
>sudovirsh net-list --inactive Name State Autostart Persistent ---------------------------------------------------------- vnet_isolated active yes yes
Then run:
>sudovirsh net-destroy vnet_isolated Network vnet_isolated destroyed
8.1.2.2.6 Removing a network #Edit source
To remove the definition of an inactive network from VM Host Server permanently, run:
>sudovirsh net-undefine vnet_isolated Network vnet_isolated has been undefined
8.2 Configuring a storage pool #Edit source
When managing a VM Guest on the VM Host Server itself, you can access the
complete file system of the VM Host Server to attach or create virtual hard
disks or to attach existing images to the VM Guest. However, this is not
possible when managing VM Guests from a remote host. For this reason,
libvirt supports so called “Storage Pools”, which can be
accessed from remote machines.
Tip: CD/DVD ISO images
To be able to access CD/DVD ISO images on the VM Host Server from remote clients, they also need to be placed in a storage pool.
libvirt knows two different types of storage: volumes and pools.
- Storage volume
A storage volume is a storage device that can be assigned to a guest—a virtual disk or a CD/DVD/floppy image. Physically, it can be a block device—for example, a partition or a logical volume—or a file on the VM Host Server.
- Storage pool
A storage pool is a storage resource on the VM Host Server that can be used for storing volumes, similar to network storage for a desktop machine. Physically it can be one of the following types:
- File system directory ()
A directory for hosting image files. The files can be either one of the supported disk formats (raw or qcow2), or ISO images.
- Physical disk device ()
Use a complete physical disk as storage. A partition is created for each volume that is added to the pool.
- Pre-formatted block device ()
Specify a partition to be used in the same way as a file system directory pool (a directory for hosting image files). The only difference to using a file system directory is that
libvirttakes care of mounting the device.- iSCSI target (iscsi)
Set up a pool on an iSCSI target. You need to have been logged in to the volume once before to use it with
libvirt. Use the YaST to detect and log in to a volume. Volume creation on iSCSI pools is not supported; instead, each existing Logical Unit Number (LUN) represents a volume. Each volume/LUN also needs a valid (empty) partition table or disk label before you can use it. If missing, usefdiskto add it:>sudofdisk -cu /dev/disk/by-path/ip-192.168.2.100:3260-iscsi-iqn.2010-10.com.example:[...]-lun-2 Device contains neither a valid DOS partition table, nor Sun, SGI or OSF disklabel Building a new DOS disklabel with disk identifier 0xc15cdc4e. Changes will remain in memory only, until you decide to write them. After that, of course, the previous content won't be recoverable. Warning: invalid flag 0x0000 of partition table 4 will be corrected by w(rite) Command (m for help): w The partition table has been altered! Calling ioctl() to re-read partition table. Syncing disks.- LVM volume group (logical)
Use an LVM volume group as a pool. You can either use a predefined volume group, or create a group by specifying the devices to use. Storage volumes are created as partitions on the volume.
Warning: Deleting the LVM-based pool
When the LVM-based pool is deleted in the Storage Manager, the volume group is deleted as well. This results in a non-recoverable loss of all data stored on the pool.
- Multipath devices ()
At the moment, multipathing support is limited to assigning existing devices to the guests. Volume creation or configuring multipathing from within
libvirtis not supported.- Network exported directory ()
Specify a network directory to be used in the same way as a file system directory pool (a directory for hosting image files). The only difference to using a file system directory is that
libvirttakes care of mounting the directory. The supported protocol is NFS.- SCSI host adapter ()
Use an SCSI host adapter in almost the same way as an iSCSI target. We recommend to use a device name from
/dev/disk/by-*rather than/dev/sdX. The latter can change (for example, when adding or removing hard disks). Volume creation on iSCSI pools is not supported. Instead, each existing LUN (Logical Unit Number) represents a volume.
Warning: Security considerations
To avoid data loss or data corruption, do not attempt to use resources
such as LVM volume groups, iSCSI targets, etc., that are also used to
build storage pools on the VM Host Server. There is no need to connect to
these resources from the VM Host Server or to mount them on the
VM Host Server—libvirt takes care of this.
Do not mount partitions on the VM Host Server by label. Under certain circumstances it is possible that a partition is labeled from within a VM Guest with a name existing on the VM Host Server.
8.2.1 Managing storage with virsh #Edit source
Managing storage from the command line is also possible by using
virsh. However, creating storage pools is currently
not supported by SUSE. Therefore, this section is restricted to
documenting functions such as starting, stopping and deleting pools,
and volume management.
A list of all virsh subcommands for managing pools
and volumes is available by running virsh help pool
and virsh help volume, respectively.
8.2.1.1 Listing pools and volumes #Edit source
List all pools currently active by executing the following command.
To also list inactive pools, add the option --all:
> virsh pool-list --details
Details about a specific pool can be obtained with the
pool-info subcommand:
> virsh pool-info POOLBy default, volumes can only be listed per pool. To list all volumes from a pool, enter the following command.
> virsh vol-list --details POOL
At the moment virsh offers no tools to show
whether a volume is used by a guest or not. The following procedure
describes a way to list volumes from all pools that are currently
used by a VM Guest.
Procedure 8.2: Listing all storage volumes currently used on a VM Host Server #
Create an XSLT stylesheet by saving the following content to a file, for example, ~/libvirt/guest_storage_list.xsl:
<?xml version="1.0" encoding="UTF-8"?> <xsl:stylesheet version="1.0" xmlns:xsl="http://www.w3.org/1999/XSL/Transform"> <xsl:output method="text"/> <xsl:template match="text()"/> <xsl:strip-space elements="*"/> <xsl:template match="disk"> <xsl:text> </xsl:text> <xsl:value-of select="(source/@file|source/@dev|source/@dir)[1]"/> <xsl:text> </xsl:text> </xsl:template> </xsl:stylesheet>Run the following commands in a shell. It is assumed that the guest's XML definitions are all stored in the default location (
/etc/libvirt/qemu).xsltprocis provided by the packagelibxslt.SSHEET="$HOME/libvirt/guest_storage_list.xsl" cd /etc/libvirt/qemu for FILE in *.xml; do basename $FILE .xml xsltproc $SSHEET $FILE done
8.2.1.2 Starting, stopping, and deleting pools #Edit source
Use the virsh pool subcommands to start, stop or
delete a pool. Replace POOL with the
pool's name or its UUID in the following examples:
- Stopping a pool
>virsh pool-destroy POOLNote: A pool's state does not affect attached volumes
Volumes from a pool attached to VM Guests are always available, regardless of the pool's state ( (stopped) or (started)). The state of the pool solely affects the ability to attach volumes to a VM Guest via remote management.
- Deleting a pool
>virsh pool-delete POOL- Starting a pool
>virsh pool-start POOL- Enable autostarting a pool
>virsh pool-autostart POOLOnly pools that are marked to autostart are automatically started if the VM Host Server reboots.
- Disable autostarting a pool
>virsh pool-autostart POOL --disable
8.2.1.3 Adding volumes to a storage pool #Edit source
virsh offers two ways to add volumes to storage
pools: either from an XML definition with
vol-create and vol-create-from
or via command line arguments with vol-create-as.
The first two methods are currently not supported by SUSE,
therefore this section focuses on the subcommand
vol-create-as.
To add a volume to an existing pool, enter the following command:
> virsh vol-create-as POOL1NAME2 12G --format3raw|qcow24 --allocation 4G5Name of the pool to which the volume should be added | |
Name of the volume | |
Size of the image, in this example 12 gigabytes. Use the suffixes k, M, G, T for kilobyte, megabyte, gigabyte, and terabyte, respectively. | |
Format of the volume. SUSE currently supports
| |
Optional parameter. By default,
When not specifying this parameter, a sparse image file with no
allocation is generated. To create a non-sparse volume, specify
the whole image size with this parameter (would be
|
8.2.1.3.1 Cloning existing volumes #Edit source
Another way to add volumes to a pool is to clone an existing volume. The new instance is always created in the same pool as the original.
> virsh vol-clone NAME_EXISTING_VOLUME1NAME_NEW_VOLUME2 --pool POOL38.2.1.4 Deleting volumes from a storage pool #Edit source
To permanently delete a volume from a pool, use the subcommand
vol-delete:
> virsh vol-delete NAME --pool POOL
--pool is optional. libvirt tries to locate the
volume automatically. If that fails, specify this parameter.
Warning: No checks upon volume deletion
A volume is deleted in any case, regardless of whether it is currently used in an active or inactive VM Guest. There is no way to recover a deleted volume.
Whether a volume is used by a VM Guest can only be detected by using by the method described in Procedure 8.2, “Listing all storage volumes currently used on a VM Host Server”.
8.2.1.5 Attaching volumes to a VM Guest #Edit source
After you create a volume as described in Section 8.2.1.3, “Adding volumes to a storage pool”, you can attach it to a virtual machine and use it as a hard disk:
> virsh attach-disk DOMAIN SOURCE_IMAGE_FILE TARGET_DISK_DEVICEFor example:
> virsh attach-disk sles12sp3 /virt/images/example_disk.qcow2 sda2
To check if the new disk is attached, inspect the result of the
virsh dumpxml command:
# virsh dumpxml sles12sp3
[...]
<disk type='file' device='disk'>
 <driver name='qemu' type='raw'/>
 <source file='/virt/images/example_disk.qcow2'/>
 <backingStore/>
 <target dev='sda2' bus='scsi'/>
 <alias name='scsi0-0-0'/>
 <address type='drive' controller='0' bus='0' target='0' unit='0'/>
</disk>
[...]
8.2.1.5.1 Hotplug or persistent change #Edit source
You can attach disks to both active and inactive domains. The
attachment is controlled by the --live and
--config options:
--liveHotplugs the disk to an active domain. The attachment is not saved in the domain configuration. Using
--liveon an inactive domain is an error.--configChanges the domain configuration persistently. The attached disk is then available after the next domain start.
--live--configHotplugs the disk and adds it to the persistent domain configuration.
Tip: virsh attach-device
virsh attach-device is the more generic form
of virsh attach-disk. You can use it to attach
other types of devices to a domain.
8.2.1.6 Detaching volumes from a VM Guest #Edit source
To detach a disk from a domain, use virsh
detach-disk:
# virsh detach-disk DOMAIN TARGET_DISK_DEVICEFor example:
# virsh detach-disk sles12sp3 sda2
You can control the attachment with the --live and
--config options as described in
Section 8.2.1.5, “Attaching volumes to a VM Guest”.
8.2.2 Managing storage with Virtual Machine Manager #Edit source
The Virtual Machine Manager provides a graphical interface—the Storage Manager—to manage storage volumes and pools. To access it, either right-click a connection and choose , or highlight a connection and choose › . Select the tab.

8.2.2.1 Adding a storage pool #Edit source
To add a storage pool, proceed as follows:
Click in the bottom left corner. The dialog appears.
Provide a for the pool (consisting of only alphanumeric characters and
_,-or.) and select a .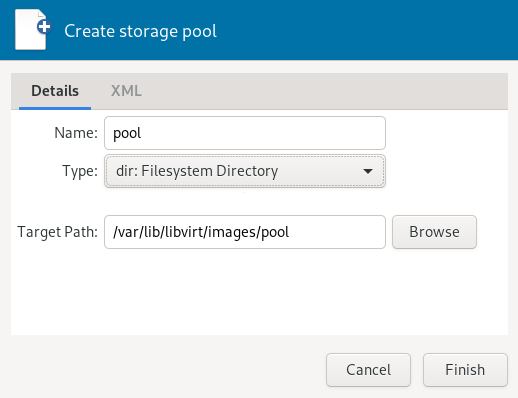
Specify the required details below. They depend on the type of pool you are creating.
Important
ZFS pools are not supported.
- Type
: specify an existing directory.
- Type
: format of the device's partition table. Using should normally work. If not, get the required format by running the command
parted-lon the VM Host Server.: path to the device. It is recommended to use a device name from
/dev/disk/by-*rather than the simple/dev/sdX, since the latter can change (for example, when adding or removing hard disks). You need to specify the path that resembles the whole disk, not a partition on the disk (if existing).
- Type
: mount point on the VM Host Server file system.
file system format of the device. The default value
autoshould work.: path to the device file. It is recommended to use a device name from
/dev/disk/by-*rather than/dev/sdX, because the latter can change (for example, when adding or removing hard disks).
- Type
Get the necessary data by running the following command on the VM Host Server:
>sudoiscsiadm --mode nodeIt returns a list of iSCSI volumes with the following format. The elements in bold text are required:
IP_ADDRESS:PORT,TPGT TARGET_NAME_(IQN)
: the directory containing the device file. Use
/dev/disk/by-path(default) or/dev/disk/by-id.: host name or IP address of the iSCSI server.
: the iSCSI target name (iSCSI Qualified Name).
: the iSCSI initiator name.
- Type
: specify the device path of an existing volume group.
- Type
: support for multipathing is currently limited to making all multipath devices available. Therefore, specify an arbitrary string here. The path is required, otherwise the XML parser fails.
- Type
: mount point on the VM Host Server file system.
: IP address or host name of the server exporting the network file system.
: directory on the server that is being exported.
- Type
: host name of the server with an exported RADOS block device.
: name of the RADOS block device on the server.
- Type
: directory containing the device file. Use
/dev/disk/by-path(default) or/dev/disk/by-id.: name of the SCSI adapter.
Note: File browsing
Using the file browser by clicking is not possible when operating remotely.
Click to add the storage pool.
8.2.2.2 Managing storage pools #Edit source
Virtual Machine Manager's Storage Manager lets you create or delete volumes in a pool. You may also temporarily deactivate or permanently delete existing storage pools. Changing the basic configuration of a pool is currently not supported by SUSE.
8.2.2.2.1 Starting, stopping, and deleting pools #Edit source
The purpose of storage pools is to provide block devices located on the VM Host Server that can be added to a VM Guest when managing it from remote. To make a pool temporarily inaccessible from remote, click in the bottom left corner of the Storage Manager. Stopped pools are marked with and are grayed out in the list pane. By default, a newly created pool is automatically started of the VM Host Server.
To start an inactive pool and make it available from remote again, click in the bottom left corner of the Storage Manager.
Note: A pool's state does not affect attached volumes
Volumes from a pool attached to VM Guests are always available, regardless of the pool's state ( (stopped) or (started)). The state of the pool solely affects the ability to attach volumes to a VM Guest via remote management.
To permanently make a pool inaccessible, click in the bottom left corner of the Storage Manager. You can only delete inactive pools. Deleting a pool does not physically erase its contents on VM Host Server—it only deletes the pool configuration. However, you need to be extra careful when deleting pools, especially when deleting LVM volume group-based tools:
Warning: Deleting storage pools
Deleting storage pools based on local file system directories, local partitions or disks has no effect on the availability of volumes from these pools currently attached to VM Guests.
Volumes located in pools of type iSCSI, SCSI, LVM group or Network Exported Directory become inaccessible from the VM Guest if the pool is deleted. Although the volumes themselves are not deleted, the VM Host Server can no longer access the resources.
Volumes on iSCSI/SCSI targets or Network Exported Directory become accessible again when creating an adequate new pool or when mounting/accessing these resources directly from the host system.
When deleting an LVM group-based storage pool, the LVM group definition is erased and the LVM group no longer exists on the host system. The configuration is not recoverable and all volumes from this pool are lost.
8.2.2.2.2 Adding volumes to a storage pool #Edit source
Virtual Machine Manager lets you create volumes in all storage pools, except in pools
of types Multipath, iSCSI or SCSI. A volume in these pools is
equivalent to a LUN and cannot be changed from within libvirt.
A new volume can either be created using the Storage Manager or while adding a new storage device to a VM Guest. In either case, select a storage pool from the left panel, then click .
Specify a for the image and choose an image format.
SUSE currently only supports
raworqcow2images. The latter option is not available on LVM group-based pools.Next to , specify the maximum size that the disk image is allowed to reach. Unless you are working with a
qcow2image, you can also set an amount for that should be allocated initially. If the two values differ, a sparse image file is created, which grows on demand.For
qcow2images, you can use a (also called “backing file”), which constitutes a base image. The newly createdqcow2image then only records the changes that are made to the base image.Start the volume creation by clicking .
8.2.2.2.3 Deleting volumes from a storage pool #Edit source
Deleting a volume can only be done from the Storage Manager, by selecting a volume and clicking . Confirm with .
Warning: Volumes can be deleted even while in use
Volumes can be deleted even if they are currently used in an active or inactive VM Guest. There is no way to recover a deleted volume.
Whether a volume is used by a VM Guest is indicated in the column in the Storage Manager.
9 Guest installation #Edit source
A VM Guest consists of an image containing an operating system and data files and a configuration file describing the VM Guest's virtual hardware resources. VM Guests are hosted on and controlled by the VM Host Server. This section provides generalized instructions for installing a VM Guest.
Virtual machines have few if any requirements above those required to run the operating system. If the operating system has not been optimized for the virtual machine host environment, it can only run on hardware-assisted virtualization computer hardware, in full virtualization mode, and requires specific device drivers to be loaded. The hardware that is presented to the VM Guest depends on the configuration of the host.
You should be aware of any licensing issues related to running a single licensed copy of an operating system on multiple virtual machines. Consult the operating system license agreement for more information.
9.1 GUI-based guest installation #Edit source
Tip: Changing default options for new virtual machines
You can change default values that are applied when creating new virtual machines. For example, to set UEFI as the default firmware type for new virtual machines, select › from Virtual Machine Manager's main menu, click and set as the firmware default.
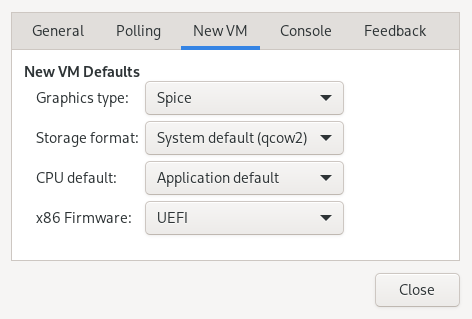
Figure 9.1: Specifying default options for new VMs #
The wizard helps you through the steps required to create a virtual machine and install its operating system. To start it, open the Virtual Machine Manager and select › . Alternatively, start YaST and select › .
Start the wizard either from YaST or Virtual Machine Manager.
Choose an installation source—either a locally available media or a network installation source. To set up your VM Guest from an existing image, choose .
On a VM Host Server running the Xen hypervisor, you can choose whether to install a paravirtualized or a fully virtualized guest. The respective option is available under . Depending on this choice, not all installation options may be available.
Depending on your choice in the previous step, you need to provide the following data:
Specify the path on the VM Host Server to an ISO image containing the installation data. If it is available as a volume in a libvirt storage pool, you can also select it using . For more information, see Chapter 12, Advanced storage topics.
Alternatively, choose a physical CD-ROM or DVD inserted in the optical drive of the VM Host Server.
Provide the pointing to the installation source. Valid URL prefixes are, for example,
ftp://,http://, andhttps://.Under , provide a path to an auto-installation file (AutoYaST or Kickstart, for example) and kernel parameters. Having provided a URL, the operating system should be automatically detected correctly. If this is not the case, deselect and manually select the and .
To set up the VM Guest from an existing image, you need to specify the path on the VM Host Server to the image. If it is available as a volume in a libvirt storage pool, you can also select it using . For more information, see Chapter 12, Advanced storage topics.
This installation method is suitable to create a virtual machine, manually configure its components, and install its OS later. To adjust the VM to a specific product version, start typing its name—for example,
sles—and select the desired version when a match appears.
Choose the memory size and number of CPUs for the new virtual machine.
This step is omitted when is chosen in the first step.
Set up a virtual hard disk for the VM Guest. Either create a new disk image or choose an existing one from a storage pool (for more information, see Chapter 12, Advanced storage topics). If you choose to create a disk, a
qcow2image is created and stored under/var/lib/libvirt/imagesby default.Setting up a disk is optional. If you are running a live system directly from CD or DVD, for example, you can omit this step by deactivating .
On the last screen of the wizard, specify the name for the virtual machine. To be offered the possibility to review and make changes to the virtualized hardware selection, activate . Specify the network device under . When using , the first bridge found on the host is pre-filled. To use a different bridge, manually update the text box with its name.
Click .
(Optional) If you kept the defaults in the previous step, the installation starts. If you selected , a VM Guest configuration dialog opens. For more information about configuring VM Guests, see Chapter 13, Configuring virtual machines with Virtual Machine Manager.
When you are done configuring, click .
Tip: Passing key combinations to virtual machines
The installation starts in a Virtual Machine Manager console window. Some key combinations, such as Ctrl–Alt–F1, are recognized by the VM Host Server but are not passed to the virtual machine. To bypass the VM Host Server, Virtual Machine Manager provides the “sticky key” functionality. Pressing Ctrl, Alt, or Shift three times makes the key sticky, then you can press the remaining keys to pass the combination to the virtual machine.
For example, to pass Ctrl–Alt–F2 to a Linux virtual machine, press Ctrl three times, then press Alt–F2. You can also press Alt three times, then press Ctrl–F2.
The sticky key functionality is available in the Virtual Machine Manager during and after installing a VM Guest.
9.1.1 Configuring the virtual machine for PXE boot #Edit source
PXE boot enables your virtual machine to boot from the installation media via the network, instead of from a physical medium or an installation disk image.
To let your VM boot from a PXE server, follow these steps:
Start the installation wizard as described in Section 9.1, “GUI-based guest installation”.
Select the method.
Proceed to the last step of the wizard and activate . Confirm with .
On the screen, select .
Inspect and activate the box next to .
Under , activate and confirm with .
Start the installation by clicking . If a PXE server is properly configured, the PXE menu screen appears.
9.2 Installing from the command line with virt-install #Edit source
virt-install is a command-line tool that helps you
create new virtual machines using the libvirt library. It is useful if
you cannot use the graphical user interface, or need to automatize the
process of creating virtual machines.
virt-install is a complex script with a lot of command
line switches. The following are required. For more information, see the
man page of virt-install (1).
- General options
--name
                VM_GUEST_NAME
: Specify the name of the new virtual machine. The name must be unique across all guests known to the hypervisor on the same connection. It is used to create and name the guest’s configuration file and you can access the guest with this name fromvirsh. Alphanumeric and_-.:+characters are allowed.--memory REQUIRED_MEMORY: Specify the amount of memory to allocate for the new virtual machine in megabytes.--vcpus NUMBER_OF_CPUS: Specify the number of virtual CPUs. For best performance, the number of virtual processors should be less than or equal to the number of physical processors.
- Virtualization type
--paravirt: set up a paravirtualized guest. This is the default if the VM Host Server supports paravirtualization and full virtualization.--hvm: set up a fully virtualized guest.--virt-type HYPERVISOR: Specify the hypervisor. Supported values arekvmorxen.
- Guest storage
Specify one of
--disk,--filesystemor--nodisksthe type of the storage for the new virtual machine. For example,--disk size=10creates 10 GB disk in the default image location for the hypervisor and uses it for the VM Guest.--filesystem /export/path/on/vmhostspecifies the directory on the VM Host Server to be exported to the guest. And--nodiskssets up a VM Guest without a local storage (good for Live CDs).- Installation method
Specify the installation method using one of
--location,--cdrom,--pxe,--import, or--boot.- Accessing the installation
Use the
--graphics
            VALUE
option to specify how to access the installation. openSUSE Leap supports the valuesvncornone.If using VNC,
virt-installtries to launchvirt-viewer. If it is not installed or cannot be run, connect to the VM Guest manually with your preferred viewer. To explicitly preventvirt-installfrom launching the viewer, use--noautoconsole. To define a password for accessing the VNC session, use the following syntax:--graphics vnc,password=PASSWORD.In case you are using
--graphics none, you can access the VM Guest through operating system supported services, such as SSH or VNC. Refer to the operating system installation manual on how to set up these services in the installation system.- Passing kernel and initrd files
It is possible to directly specify the Kernel and Initrd of the installer, for example, from a network source.
To pass additional boot parameters, use the
--extra-argsoption. This can be used to specify a network configuration. For details, see https://en.opensuse.org/SDB:Linuxrc.Example 9.1: Loading kernel and initrd from HTTP server #
#virt-install--location \ "http://download.opensuse.org/pub/opensuse/distribution/leap/15.0/repo/oss" \ --extra-args="textmode=1" --name "Leap15" --memory 2048 --virt-type kvm \ --connect qemu:///system --disk size=10 --graphics vnc --network \ network=vnet_nated- Enabling the console
By default, the console is not enabled for new virtual machines installed using
virt-install. To enable it, use--extra-args="console=ttyS0 textmode=1"as in the following example:>virt-install --virt-type kvm --name sles12 --memory 1024 \ --disk /var/lib/libvirt/images/disk1.qcow2 --os-variant sles12 --extra-args="console=ttyS0 textmode=1" --graphics noneAfter the installation finishes, the
/etc/default/grubfile in the VM image is updated with theconsole=ttyS0option on theGRUB_CMDLINE_LINUX_DEFAULTline.- Using UEFI Secure Boot
Install OVMF as described in Section 6.3, “Installing UEFI support”. Then add the
--boot uefioption to thevirt-installcommand.UEFI Secure Boot is used automatically when setting up a new VM with OVMF. To use specific firmware, use
--boot loader=PATH_TO_FIRMWARE.For example, for the AArch64 architecture:
--boot loader=/usr/share/qemu/qemu-uefi-aarch32.bin
And for the AMD64/Intel 64; architecture:
--boot loader=/usr/share/qemu/ovmf-x86_64-opensuse.bin
Example 9.2: Example of a virt-install command line #
The following command line example creates a new SUSE Linux Enterprise 15 SP2 virtual machine with a virtio accelerated disk and network card. It creates a new 10 GB qcow2 disk image as a storage, the source installation media being the host CD-ROM drive. It uses VNC graphics, and it automatically launches the graphical client.
- KVM
>virt-install --connect qemu:///system --virt-type kvm \ --name sle15sp2 --memory 1024 --disk size=10 --cdrom /dev/cdrom --graphics vnc \ --os-variant sle15sp2- Xen
>virt-install --connect xen:// --virt-type xen --hvm \ --name sle15sp2 --memory 1024 --disk size=10 --cdrom /dev/cdrom --graphics vnc \ --os-variant sle15sp2
9.3 Advanced guest installation scenarios #Edit source
This section provides instructions for operations exceeding the scope of a normal installation, such as memory ballooning and installing add-on products.
9.3.1 Including add-on products in the installation #Edit source
Some operating systems, such as openSUSE Leap, offer to include add-on products in the installation process. If the add-on product installation source is provided via SUSE Customer Center, no special VM Guest configuration is needed. If it is provided via CD/DVD or ISO image, it is necessary to provide the VM Guest installation system with both the standard installation medium image and the image of the add-on product.
If you are using the GUI-based installation, select in the last step of the wizard and add the add-on product ISO image via › . Specify the path to the image and set the to .
If you are installing from the command line, you need to set up the
virtual CD/DVD drives with the --disk parameter rather
than with --cdrom. The device that is specified first
is used for booting. The following example installs SUSE Linux Enterprise Server 15
together with SUSE Enterprise Storage extension:
> virt-install \
 --name sles15+storage \
 --memory 2048 --disk size=10 \
 --disk /path/to/SLE-15-SP5-Full-ARCH-GM-media1.iso-x86_64-GM-DVD1.iso,device=cdrom \
 --disk /path/to/SUSE-Enterprise-Storage-VERSION-DVD-ARCH-Media1.iso,device=cdrom \
 --graphics vnc --os-variant sle15
10 Basic VM Guest management #Edit source
Most management tasks, such as starting or stopping a VM Guest, can either
be done using the graphical application Virtual Machine Manager or on the command line using
virsh. Connecting to the graphical console via VNC is
only possible from a graphical user interface.
Note: Managing VM Guests on a remote VM Host Server
If started on a VM Host Server, the libvirt tools Virtual Machine Manager,
virsh, and virt-viewer can be used
to manage VM Guests on the host. However, it is also possible to manage
VM Guests on a remote VM Host Server. This requires configuring remote access
for libvirt on the host. For instructions, see
Chapter 11, Connecting and authorizing.
To connect to such a remote host with Virtual Machine Manager, you need to set up a
connection as explained in
Section 11.2.2, “Managing connections with Virtual Machine Manager”. If connecting to a
remote host using virsh or
virt-viewer, you need to specify a connection URI with
the parameter -c (for example, virsh -c
qemu+tls://saturn.example.com/system or virsh -c
xen+ssh://). The form of connection URI depends on the
connection type and the hypervisor—see
Section 11.2, “Connecting to a VM Host Server” for details.
Examples in this chapter are all listed without a connection URI.
10.1 Listing VM Guests #Edit source
The VM Guest listing shows all VM Guests managed by libvirt on a
VM Host Server.
10.1.1 Listing VM Guests with Virtual Machine Manager #Edit source
The main window of the Virtual Machine Manager lists all VM Guests for each VM Host Server it is connected to. Each VM Guest entry contains the machine's name, its status (, , or ) displayed as an icon and literally, and a CPU usage bar.
10.1.2 Listing VM Guests with virsh #Edit source
Use the command virsh list to get a
list of VM Guests:
- List all running guests
>virsh list- List all running and inactive guests
>virsh list --all
For more information and further options, see virsh help
list or man 1 virsh.
10.2 Accessing the VM Guest via console #Edit source
VM Guests can be accessed via a VNC connection (graphical console) or, if supported by the guest operating system, via a serial console.
10.2.1 Opening a graphical console #Edit source
Opening a graphical console to a VM Guest lets you interact with the machine like a physical host via a VNC connection. If accessing the VNC server requires authentication, you are prompted to enter a user name (if applicable) and a password.
When you click into the VNC console, the cursor is “grabbed” and cannot be used outside the console anymore. To release it, press Alt–Ctrl.
Tip: Seamless (absolute) cursor movement
To prevent the console from grabbing the cursor and to enable seamless cursor movement, add a tablet input device to the VM Guest. See Section 13.5, “Input devices” for more information.
Certain key combinations such as Ctrl–Alt–Del are interpreted by the host
system and are not passed to the VM Guest. To pass such key
combinations to a VM Guest, open the menu
from the VNC window and choose the desired key combination entry. The
menu is only available when using Virtual Machine Manager and
virt-viewer. With Virtual Machine Manager, you can alternatively use
the “sticky key” feature as explained in
Tip: Passing key combinations to virtual machines.
Note: Supported VNC viewers
Principally all VNC viewers can connect to the console of a
VM Guest. However, if you are using SASL authentication and/or
TLS/SSL connection to access the guest, the options are limited.
Common VNC viewers such as tightvnc or
tigervnc support neither SASL authentication nor
TLS/SSL. The only supported alternative to Virtual Machine Manager and
virt-viewer is Remmina (refer to
Book “Reference”, Chapter 4 “Remote graphical sessions with VNC”, Section 4.2 “Remmina: the remote desktop client”).
10.2.1.1 Opening a graphical console with Virtual Machine Manager #Edit source
In the Virtual Machine Manager, right-click a VM Guest entry.
Choose from the pop-up menu.
10.2.1.2 Opening a graphical console with virt-viewer #Edit source
virt-viewer is a simple VNC viewer with added
functionality for displaying VM Guest consoles. For example, it can
be started in “wait” mode, where it waits for a
VM Guest to start before it connects. It also supports automatically
reconnecting to a VM Guest that is rebooted.
virt-viewer addresses VM Guests by name, by ID or
by UUID. Use virsh list --all to
get this data.
To connect to a guest that is running or paused, use either the ID, UUID or name. VM Guests that are shut off do not have an ID—you can only connect to them by UUID or name.
- Connect to guest with the ID
8 >virt-viewer 8- Connect to the inactive guest named
sles12; the connection window opens once the guest starts >virt-viewer --wait sles12With the
--waitoption, the connection is upheld even if the VM Guest is not running at the moment. When the guest starts, the viewer is launched.
For more information, see virt-viewer
--help or man 1 virt-viewer.
Note: Password input on remote connections with SSH
When using virt-viewer to open a connection to a
remote host via SSH, the SSH password needs to be entered twice.
The first time for authenticating with libvirt, the second time
for authenticating with the VNC server. The second password needs
to be provided on the command line where virt-viewer was started.
10.2.2 Opening a serial console #Edit source
Accessing the graphical console of a virtual machine requires a
graphical environment on the client accessing the VM Guest. As an
alternative, virtual machines managed with libvirt can also be accessed
from the shell via the serial console and virsh. To
open a serial console to a VM Guest named “sles12”, run
the following command:
> virsh console sles12
virsh console takes two optional flags:
--safe ensures exclusive access to the console,
--force disconnects any existing sessions before
connecting. Both features need to be supported by the guest operating
system.
Being able to connect to a VM Guest via serial console requires that the guest operating system supports serial console access and is properly supported. Refer to the guest operating system manual for more information.
Tip: Enabling serial console access for SUSE Linux Enterprise and openSUSE guests
Serial console access in SUSE Linux Enterprise and openSUSE is disabled by default. To enable it, proceed as follows:
- SLES 12, 15 and openSUSE
Launch the YaST Boot Loader module and switch to the tab. Add
console=ttyS0to the field .- SLES 11
Launch the YaST Boot Loader module and select the boot entry for which to activate serial console access. Choose and add
console=ttyS0to the field . Additionally, edit/etc/inittaband uncomment the line with the following content:#S0:12345:respawn:/sbin/agetty -L 9600 ttyS0 vt102
10.3 Changing a VM Guest's state: start, stop, pause #Edit source
Starting, stopping or pausing a VM Guest can be done with either Virtual Machine Manager
or virsh. You can also configure a VM Guest to be
automatically started when booting the VM Host Server.
When shutting down a VM Guest, you may either shut it down gracefully, or force the shutdown. The latter is equivalent to pulling the power plug on a physical host and is only recommended if there are no alternatives. Forcing a shutdown may cause file system corruption and loss of data on the VM Guest.
Tip: Graceful shutdown
To be able to perform a graceful shutdown, the VM Guest must be configured to support ACPI. If you have created the guest with the Virtual Machine Manager, ACPI should be available in the VM Guest.
Depending on the guest operating system, availability of ACPI may not be sufficient to perform a graceful shutdown. It is strongly recommended to test shutting down and rebooting a guest before using it in production. openSUSE or SUSE Linux Enterprise Desktop, for example, can require Polkit authorization for shutdown and reboot. Make sure this policy is turned off on all VM Guests.
If ACPI was enabled during a Windows XP/Windows Server 2003 guest installation, turning it on in the VM Guest configuration only is not sufficient. For more information, see:
Regardless of the VM Guest's configuration, a graceful shutdown is always possible from within the guest operating system.
10.3.1 Changing a VM Guest's state with Virtual Machine Manager #Edit source
Changing a VM Guest's state can be done either from Virtual Machine Manager's main window, or from a VNC window.
Procedure 10.1: State change from the Virtual Machine Manager window #
Right-click a VM Guest entry.
Choose , , or one of the from the pop-up menu.
Procedure 10.2: State change from the VNC window #
Open a VNC Window as described in Section 10.2.1.1, “Opening a graphical console with Virtual Machine Manager”.
Choose , , or one of the options either from the toolbar or from the menu.
10.3.1.1 Automatically starting a VM Guest #Edit source
You can automatically start a guest when the VM Host Server boots. This feature is not enabled by default and needs to be enabled for each VM Guest individually. There is no way to activate it globally.
Double-click the VM Guest entry in Virtual Machine Manager to open its console.
Choose › to open the VM Guest configuration window.
Choose and check .
Save the new configuration with .
10.3.2 Changing a VM Guest's state with virsh #Edit source
In the following examples, the state of a VM Guest named “sles12” is changed.
- Start
>virsh start sles12- Pause
>virsh suspend sles12- Resume (a suspended VM Guest)
>virsh resume sles12- Reboot
>virsh reboot sles12- Graceful shutdown
>virsh shutdown sles12- Force shutdown
>virsh destroy sles12- Turn on automatic start
>virsh autostart sles12- Turn off automatic start
>virsh autostart --disable sles12
10.4 Saving and restoring the state of a VM Guest #Edit source
Saving a VM Guest preserves the exact state of the guest’s memory. The operation is similar to hibernating a computer. A saved VM Guest can be quickly restored to its previously saved running condition.
When saved, the VM Guest is paused, its current memory state is saved to disk, and then the guest is stopped. The operation does not make a copy of any portion of the VM Guest’s virtual disk. The amount of time taken to save the virtual machine depends on the amount of memory allocated. When saved, a VM Guest’s memory is returned to the pool of memory available on the VM Host Server.
The restore operation loads a VM Guest’s previously saved memory state file and starts it. The guest is not booted but instead resumed at the point where it was previously saved. The operation is similar to coming out of hibernation.
The VM Guest is saved to a state file. Make sure there is enough space on the partition you are going to save to. For an estimation of the file size in megabytes to be expected, issue the following command on the guest:
> free -mh | awk '/^Mem:/ {print $3}'Warning: Always restore saved guests
After using the save operation, do not boot or start the saved VM Guest. Doing so would cause the machine's virtual disk and the saved memory state to get out of synchronization. This can result in critical errors when restoring the guest.
To be able to work with a saved VM Guest again, use the restore
operation. If you used virsh to save a VM Guest,
you cannot restore it using Virtual Machine Manager. In this case, make sure to restore
using virsh.
Important: Synchronize VM Guest's time after restoring it
If you restore the VM Guest after a long pause (hours) since it was
saved, its time synchronization service—for example,
chronyd—may refuse to synchronize its time. In this case,
manually synchronize VM Guest's time. For example, for KVM hosts,
you can use the QEMU guest agent and instruct the guest with the
guest-set-time. Refer to
Chapter 19, QEMU guest agent for more details.
Important: Only for VM Guests with disk types raw, qcow2
Saving and restoring VM Guests is only possible if the VM Guest is
using a virtual disk of the type raw
(.img), or qcow2.
10.4.1 Saving/restoring with Virtual Machine Manager #Edit source
Procedure 10.3: Saving a VM Guest #
Open a VNC connection window to a VM Guest. Make sure the guest is running.
Choose › › .
Procedure 10.4: Restoring a VM Guest #
Open a VNC connection window to a VM Guest. Make sure the guest is not running.
Choose › .
If the VM Guest was previously saved using Virtual Machine Manager, you are not offered an option to the guest. However, note the caveats on machines saved with
virshoutlined in Warning: Always restore saved guests.
10.4.2 Saving and restoring with virsh #Edit source
Save a running VM Guest with the command virsh
save and specify the file which it is saved to.
- Save the guest named
opensuse13 >virsh save opensuse13 /virtual/saves/opensuse13.vmsav- Save the guest with the ID
37 >virsh save 37 /virtual/saves/opensuse13.vmsave
To restore a VM Guest, use virsh
restore:
> virsh restore /virtual/saves/opensuse13.vmsave10.5 Creating and managing snapshots #Edit source
VM Guest snapshots are snapshots of the complete virtual machine including the state of CPU, RAM, devices and the content of all writable disks. To use virtual machine snapshots, all the attached hard disks need to use the qcow2 disk image format, and at least one of them needs to be writable.
Snapshots let you restore the state of the machine at a particular point in time. This is useful when undoing a faulty configuration or the installation of a lot of packages. After starting a snapshot that was created while the VM Guest was shut off, you need to boot it. Any changes written to the disk afterward are lost when starting the snapshot.
Note
Snapshots are supported on KVM VM Host Servers only.
10.5.1 Terminology #Edit source
There are several specific terms used to describe the types of snapshots:
- Internal snapshots
Snapshots that are saved into the qcow2 file of the original VM Guest. The file holds both the saved state of the snapshot and the changes made since the snapshot was taken. The main advantage of internal snapshots is that they are all stored in one file and therefore it is easy to copy or move them across multiple machines.
- External snapshots
When creating an external snapshot, the original qcow2 file is saved and made read-only, while a new qcow2 file is created to hold the changes. The original file is sometimes called a backing or base file, while the new file with all the changes is called an overlay or derived file. External snapshots are useful when performing backups of VM Guests. However, external snapshots are not supported by Virtual Machine Manager, and cannot be deleted by
virshdirectly. For more information on external snapshots in QEMU, refer to Section 33.2.4, “Manipulate disk images effectively”.- Live snapshots
Snapshots created when the original VM Guest is running. Internal live snapshots support saving the devices, and memory and disk states, while external live snapshots with
virshsupport saving either the memory state, or the disk state, or both.- Offline snapshots
Snapshots created from a VM Guest that is shut off. This ensures data integrity as all the guest's processes are stopped and no memory is in use.
10.5.2 Creating and managing snapshots with Virtual Machine Manager #Edit source
Important: Internal snapshots only
Virtual Machine Manager supports only internal snapshots, either live or offline.
To open the snapshot management view in Virtual Machine Manager, open the VNC window as described in Section 10.2.1.1, “Opening a graphical console with Virtual Machine Manager”. Now either choose › or click in the toolbar.
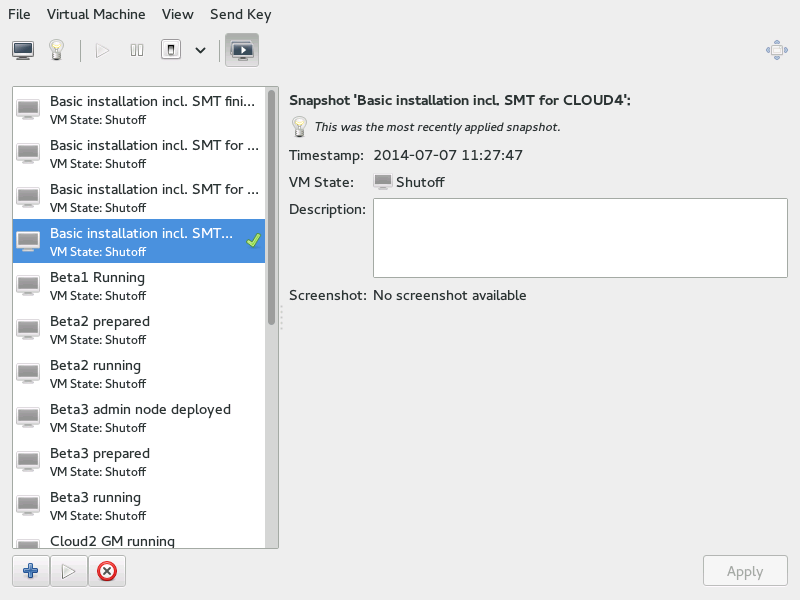
The list of existing snapshots for the chosen VM Guest is displayed in the left-hand part of the window. The snapshot that was last started is marked with a green tick. The right-hand part of the window shows details of the snapshot currently marked in the list. These details include the snapshot's title and time stamp, the state of the VM Guest at the time the snapshot was taken and a description. Snapshots of running guests also include a screenshot. The can be changed directly from this view. Other snapshot data cannot be changed.
10.5.2.1 Creating a snapshot #Edit source
To take a new snapshot of a VM Guest, proceed as follows:
Optionally, shut down the VM Guest to create an offline snapshot.
Click in the bottom left corner of the VNC window.
The window opens.
Provide a and, optionally, a description. The name cannot be changed after the snapshot has been taken. To be able to identify the snapshot later easily, use a “speaking name”.
Confirm with .
10.5.2.2 Deleting a snapshot #Edit source
To delete a snapshot of a VM Guest, proceed as follows:
Click in the bottom left corner of the VNC window.
Confirm the deletion with .
10.5.2.3 Starting a snapshot #Edit source
To start a snapshot, proceed as follows:
Click in the bottom left corner of the VNC window.
Confirm the start with .
10.5.3 Creating and managing snapshots with virsh #Edit source
To list all existing snapshots for a domain
(admin_server in the following), run the
snapshot-list command:
> virsh snapshot-list --domain sle-ha-node1
 Name                 Creation Time             State
------------------------------------------------------------
 sleha_12_sp2_b2_two_node_cluster 2016-06-06 15:04:31 +0200 shutoff
 sleha_12_sp2_b3_two_node_cluster 2016-07-04 14:01:41 +0200 shutoff
 sleha_12_sp2_b4_two_node_cluster 2016-07-14 10:44:51 +0200 shutoff
 sleha_12_sp2_rc3_two_node_cluster 2016-10-10 09:40:12 +0200 shutoff
 sleha_12_sp2_gmc_two_node_cluster 2016-10-24 17:00:14 +0200 shutoff
 sleha_12_sp3_gm_two_node_cluster 2017-08-02 12:19:37 +0200 shutoff
 sleha_12_sp3_rc1_two_node_cluster 2017-06-13 13:34:19 +0200 shutoff
 sleha_12_sp3_rc2_two_node_cluster 2017-06-30 11:51:24 +0200 shutoff
 sleha_15_b6_two_node_cluster 2018-02-07 15:08:09 +0100 shutoff
 sleha_15_rc1_one-node 2018-03-09 16:32:38 +0100 shutoff
The snapshot that was last started is shown with the
snapshot-current command:
> virsh snapshot-current --domain admin_server
Basic installation incl. SMT for CLOUD4
Details about a particular snapshot can be obtained by running the
snapshot-info command:
> virsh snapshot-info --domain admin_server \
   -name  "Basic installation incl. SMT for CLOUD4"
Name:           Basic installation incl. SMT for CLOUD4
Domain:         admin_server
Current:        yes
State:          shutoff
Location:       internal
Parent:         Basic installation incl. SMT for CLOUD3-HA
Children:       0
Descendants:    0
Metadata:       yes
10.5.3.1 Creating internal snapshots #Edit source
To take an internal snapshot of a VM Guest, either a live or
offline, use the snapshot-create-as command as
follows:
> virsh snapshot-create-as --domain admin_server1 --name "Snapshot 1"2 \
--description "First snapshot"310.5.3.2 Creating external snapshots #Edit source
With virsh, you can take external snapshots of the
guest's memory state, disk state, or both.
To take both live and offline external snapshots of the guest's disk,
specify the --disk-only option:
> virsh snapshot-create-as --domain admin_server --name \
 "Offline external snapshot" --disk-only
You can specify the --diskspec option to control how
the external files are created:
> virsh snapshot-create-as --domain admin_server --name \
 "Offline external snapshot" \
 --disk-only --diskspec vda,snapshot=external,file=/path/to/snapshot_file
To take a live external snapshot of the guest's memory, specify the
--live and --memspec options:
> virsh snapshot-create-as --domain admin_server --name \
 "Offline external snapshot" --live \
 --memspec snapshot=external,file=/path/to/snapshot_file
To take a live external snapshot of both the guest's disk and memory
states, combine the --live,
--diskspec, and --memspec options:
> virsh snapshot-create-as --domain admin_server --name \
 "Offline external snapshot" --live \
 --memspec snapshot=external,file=/path/to/snapshot_file
 --diskspec vda,snapshot=external,file=/path/to/snapshot_file
Refer to the SNAPSHOT COMMANDS section in
man 1 virsh for more details.
10.5.3.3 Deleting a snapshot #Edit source
External snapshots cannot be deleted with virsh.
To delete an internal snapshot of a VM Guest and restore the disk
space it occupies, use the snapshot-delete
command:
> virsh snapshot-delete --domain admin_server --snapshotname "Snapshot 2"10.5.3.4 Starting a snapshot #Edit source
To start a snapshot, use the snapshot-revert
command:
> virsh snapshot-revert --domain admin_server --snapshotname "Snapshot 1"
To start the current snapshot (the one the VM Guest was started
off), it is sufficient to use --current rather than
specifying the snapshot name:
> virsh snapshot-revert --domain admin_server --current10.6 Deleting a VM Guest #Edit source
By default, deleting a VM Guest using virsh removes
only its XML configuration. Since attached storage is not deleted by
default, you can reuse it with another VM Guest. With Virtual Machine Manager, you can
also delete a guest's storage files as well.
10.6.1 Deleting a VM Guest with Virtual Machine Manager #Edit source
In the Virtual Machine Manager, right-click a VM Guest entry.
From the context menu, choose .
A confirmation window opens. Clicking permanently erases the VM Guest. The deletion is not recoverable.
You can also permanently delete the guest's virtual disk by activating . The deletion is not recoverable either.
10.6.2 Deleting a VM Guest with virsh #Edit source
To delete a VM Guest, it needs to be shut down first. It is not possible to delete a running guest. For information on shutting down, see Section 10.3, “Changing a VM Guest's state: start, stop, pause”.
To delete a VM Guest with virsh, run
virsh undefine
VM_NAME.
> virsh undefine sles12There is no option to automatically delete the attached storage files. If they are managed by libvirt, delete them as described in Section 8.2.1.4, “Deleting volumes from a storage pool”.
10.7 Migrating VM Guests #Edit source
One of the major advantages of virtualization is that VM Guests are portable. When a VM Host Server needs to go down for maintenance, or when the host gets overloaded, the guests can easily be moved to another VM Host Server. KVM and Xen even support “live” migrations during which the VM Guest is constantly available.
10.7.1 Migration requirements #Edit source
To successfully migrate a VM Guest to another VM Host Server, the following requirements need to be met:
Important
To use the post-copy live migration option, KVM hosts with kernel
version 5.11 or newer require setting the
unprivileged_userfaultfd system value to
1:
>sudosysctl -w vm.unprivileged_userfaultfd=1
Since kernel versions before 5.11 did not require setting
unprivileged_userfaultfd to use the post-copy option, libvirt
provides the setting in
/usr/lib/sysctl.d/60-qemu-postcopy-migration.conf
file to preserve the old behavior.
The source and destination systems must have the same architecture.
Storage devices must be accessible from both machines (for example, via NFS or iSCSI) and must be configured as a storage pool on both machines. For more information, see Chapter 12, Advanced storage topics.
This is also true for CD-ROM or floppy images that are connected during the move. However, you can disconnect them before the move as described in Section 13.11, “Ejecting and changing floppy or CD/DVD-ROM media with Virtual Machine Manager”.
libvirtdneeds to run on both VM Host Servers and you must be able to open a remotelibvirtconnection between the target and the source host (or vice versa). Refer to Section 11.3, “Configuring remote connections” for details.If a firewall is running on the target host, ports need to be opened to allow the migration. If you do not specify a port during the migration process,
libvirtchooses one from the range 49152:49215. Make sure that either this range (recommended) or a dedicated port of your choice is opened in the firewall on the target host.Host and target machine should be in the same subnet on the network, otherwise networking fails after the migration.
All VM Host Servers participating in migration must have the same UID for the qemu user and the same GIDs for the kvm, qemu, and libvirt groups.
No running or paused VM Guest with the same name must exist on the target host. If a shut down machine with the same name exists, its configuration is overwritten.
All CPU models except host cpu model are supported when migrating VM Guests.
SATA disk device type is not migratable.
File system pass-through feature is incompatible with migration.
The VM Host Server and VM Guest need to have proper timekeeping installed. See Chapter 17, VM Guest clock settings.
No physical devices can be passed from host to guest. Live migration is currently not supported when using devices with PCI pass-through or SR-IOV. If live migration needs to be supported, you need to use software virtualization (paravirtualization or full virtualization).
Cache mode setting is an important setting for migration. See: Section 16.6, “Cache modes and live migration”.
The image directory should be located in the same path on both hosts.
All hosts should be on the same level of microcode (especially the spectre microcode updates). This can be achieved by installing the latest updates of openSUSE Leap on all hosts.
10.7.2 Migrating with Virtual Machine Manager #Edit source
When using the Virtual Machine Manager to migrate VM Guests, it does not matter on which machine it is started. You can start Virtual Machine Manager on the source or the target host or even on a third host. In the latter case you need to be able to open remote connections to both the target and the source host.
Start Virtual Machine Manager and establish a connection to the target or the source host. If the Virtual Machine Manager was started neither on the target nor the source host, connections to both hosts need to be opened.
Right-click the VM Guest that you want to migrate and choose . Make sure the guest is running or paused—it is not possible to migrate guests that are shut down.
Tip: Increasing the speed of the migration
To increase the speed of the migration, pause the VM Guest. This is the equivalent of the former so-called “offline migration” option of Virtual Machine Manager.
Choose a for the VM Guest. If the desired target host does not show up, make sure that you are connected to the host.
To change the default options for connecting to the remote host, under , set the , and the target host's (IP address or host name) and . If you specify a , you must also specify an .
Under , choose whether the move should be permanent (default) or temporary, using .
Additionally, there is the option , which allows migrating without disabling the cache of the VM Host Server. This can speed up the migration but only works when the current configuration allows for a consistent view of the VM Guest storage without using
cache="none"/0_DIRECT.Note: Bandwidth option
In recent versions of Virtual Machine Manager, the option of setting a bandwidth for the migration has been removed. To set a specific bandwidth, use
virshinstead.To perform the migration, click .
When the migration is complete, the window closes and the VM Guest is now listed on the new host in the Virtual Machine Manager window. The original VM Guest is still available on the target host (in shut down state).
10.7.3 Migrating with virsh #Edit source
To migrate a VM Guest with virsh
migrate, you need to have direct or remote shell
access to the VM Host Server, because the command needs to be run on the
host. The migration command looks like this:
> virsh migrate [OPTIONS] VM_ID_or_NAME CONNECTION_URI [--migrateuri tcp://REMOTE_HOST:PORT]
The most important options are listed below. See virsh help
migrate for a full list.
--liveDoes a live migration. If not specified, the guest is paused during the migration (“offline migration”).
--suspendDoes an offline migration and does not restart the VM Guest on the target host.
--persistentBy default a migrated VM Guest is migrated temporarily, so its configuration is automatically deleted on the target host if it is shut down. Use this switch to make the migration persistent.
--undefinesourceWhen specified, the VM Guest definition on the source host is deleted after a successful migration (however, virtual disks attached to this guest are not deleted).
--parallel --parallel-connections NUM_OF_CONNECTIONSParallel migration can be used to increase migration data throughput in cases where a single migration thread is not capable of saturating the network link between source and destination hosts. On hosts with 40 GB network interfaces, it may require four migration threads to saturate the link. With parallel migration, the time required to migrate large memory VMs can be significantly reduced.
The following examples use mercury.example.com as the source system and
jupiter.example.com as the target system; the VM Guest's name is
opensuse131 with Id 37.
- Offline migration with default parameters
>virsh migrate 37 qemu+ssh://tux@jupiter.example.com/system- Transient live migration with default parameters
>virsh migrate --live opensuse131 qemu+ssh://tux@jupiter.example.com/system- Persistent live migration; delete VM definition on source
>virsh migrate --live --persistent --undefinesource 37 \ qemu+tls://tux@jupiter.example.com/system- Offline migration using port 49152
>virsh migrate opensuse131 qemu+ssh://tux@jupiter.example.com/system \ --migrateuri tcp://@jupiter.example.com:49152
Note: Transient compared to persistent migrations
By default virsh migrate creates a temporary
(transient) copy of the VM Guest on the target host. A shut down
version of the original guest description remains on the source host.
A transient copy is deleted from the server after it is shut down.
To create a permanent copy of a guest on the target host, use the
switch --persistent. A shut down version of the
original guest description remains on the source host, too. Use the
option --undefinesource together with
--persistent for a “real” move where a
permanent copy is created on the target host and the version on the
source host is deleted.
It is not recommended to use --undefinesource
without the --persistent option, since this results
in the loss of both VM Guest definitions when the guest is shut down
on the target host.
10.7.4 Step-by-step example #Edit source
10.7.4.1 Exporting the storage #Edit source
First you need to export the storage, to share the Guest image
between host. This can be done by an NFS server. In the following
example we want to share the /volume1/VM
directory for all machines that are on the network 10.0.1.0/24. We
are using a SUSE Linux Enterprise NFS server. As root user, edit the
/etc/exports file and add:
/volume1/VM 10.0.1.0/24 (rw,sync,no_root_squash)
You need to restart the NFS server:
>sudosystemctl restart nfsserver>sudoexportfs /volume1/VM 10.0.1.0/24
10.7.4.2 Defining the pool on the target hosts #Edit source
On each host where you want to migrate the VM Guest, the pool must
be defined to be able to access the volume (that contains the Guest
image). Our NFS server IP address is 10.0.1.99, its share is the
/volume1/VM directory, and we want to get it
mounted in the /var/lib/libvirt/images/VM
directory. The pool name is VM. To define this
pool, create a VM.xml file with the following
content:
<pool type='netfs'>
  <name>VM</name>
  <source>
    <host name='10.0.1.99'/>
    <dir path='/volume1/VM'/>
    <format type='auto'/>
  </source>
  <target>
    <path>/var/lib/libvirt/images/VM</path>
    <permissions>
      <mode>0755</mode>
      <owner>-1</owner>
      <group>-1</group>
    </permissions>
  </target>
  </pool>
Then load it into libvirt using the pool-define
command:
# virsh pool-define VM.xml
An alternative way to define this pool is to use the
virsh command:
# virsh pool-define-as VM --type netfs --source-host 10.0.1.99 \
     --source-path /volume1/VM --target /var/lib/libvirt/images/VM
Pool VM created
The following commands assume that you are in the interactive shell
of virsh which can also be reached by using the
command virsh without any arguments. Then the pool
can be set to start automatically at host boot (autostart option):
virsh # pool-autostart VM
Pool VM marked as autostarted
To disable the autostart:
virsh # pool-autostart VM --disable
Pool VM unmarked as autostarted
Check if the pool is present:
virsh #pool-list --all Name State Autostart ------------------------------------------- default active yes VM active yesvirsh #pool-info VM Name: VM UUID: 42efe1b3-7eaa-4e24-a06a-ba7c9ee29741 State: running Persistent: yes Autostart: yes Capacity: 2,68 TiB Allocation: 2,38 TiB Available: 306,05 GiB
Warning: Pool needs to exist on all target hosts
Remember: this pool must be defined on each host where you want to be able to migrate your VM Guest.
10.7.4.3 Creating the volume #Edit source
The pool has been defined—now we need a volume which contains the disk image:
virsh # vol-create-as VM sled12.qcow2 8G --format qcow2
Vol sled12.qcow2 created
The volume names shown are used later to install the guest with virt-install.
10.7.4.4 Creating the VM Guest #Edit source
Let's create a openSUSE Leap VM Guest with the
virt-install command. The VM
pool is specified with the --disk option,
cache=none is recommended if you do not want to
use the --unsafe option while doing the migration.
# virt-install --connect qemu:///system --virt-type kvm --name \
   sled12 --memory 1024 --disk vol=VM/sled12.qcow2,cache=none --cdrom \
   /mnt/install/ISO/SLE-12-Desktop-DVD-x86_64-Build0327-Media1.iso --graphics \
   vnc --os-variant sled12
Starting install...
Creating domain...
10.7.4.5 Migrate the VM Guest #Edit source
Everything is ready to do the migration now. Run the
migrate command on the VM Host Server that is currently
hosting the VM Guest, and choose the destination.
virsh # migrate --live sled12 --verbose qemu+ssh://IP/Hostname/system
Password:
Migration: [ 12 %]
10.8 Monitoring #Edit source
10.8.1 Monitoring with Virtual Machine Manager #Edit source
After starting Virtual Machine Manager and connecting to the VM Host Server, a CPU usage graph of all the running guests is displayed.
It is also possible to get information about disk and network usage with this tool, however, you must first activate this in :
Run
virt-manager.Select › .
Change the tab from to .
Activate the check boxes for the kind of activity you want to see: , , and .
If desired, also change the update interval using .
Close the dialog.
Activate the graphs that should be displayed under › .
Afterward, the disk and network statistics are also displayed in the main window of the Virtual Machine Manager.
More precise data is available from the VNC window. Open a VNC window as described in Section 10.2.1, “Opening a graphical console”. Choose from the toolbar or the menu. The statistics are displayed from the entry of the left-hand tree menu.
10.8.2 Monitoring with virt-top #Edit source
virt-top is a command line tool similar to the
well-known process monitoring tool top.
virt-top uses libvirt and therefore is capable of
showing statistics for VM Guests running on different hypervisors. It
is recommended to use virt-top instead of
hypervisor-specific tools like xentop.
By default virt-top shows statistics for all running
VM Guests. Among the data that is displayed is the percentage of
memory used (%MEM) and CPU (%CPU)
and the uptime of the guest (TIME). The data is
updated regularly (every three seconds by default). The following shows
the output on a VM Host Server with seven VM Guests, four of them inactive:
virt-top 13:40:19 - x86_64 8/8CPU 1283MHz 16067MB 7.6% 0.5%
7 domains, 3 active, 3 running, 0 sleeping, 0 paused, 4 inactive D:0 O:0 X:0
CPU: 6.1%  Mem: 3072 MB (3072 MB by guests)

   ID S RDRQ WRRQ RXBY TXBY %CPU %MEM    TIME   NAME
    7 R  123    1  18K  196  5.8  6.0   0:24.35 sled12_sp1
    6 R    1    0  18K    0  0.2  6.0   0:42.51 sles12_sp1
    5 R    0    0  18K    0  0.1  6.0  85:45.67 opensuse_leap
    -                                           (Ubuntu_1410)
    -                                           (debian_780)
    -                                           (fedora_21)
    -                                           (sles11sp3)
By default the output is sorted by ID. Use the following key combinations to change the sort field:
| Shift–P: CPU usage |
| Shift–M: Total memory allocated by the guest |
| Shift–T: Time |
| Shift–I: ID |
To use any other field for sorting, press Shift–F and select a field from the list. To toggle the sort order, use Shift–R.
virt-top also supports different views on the
VM Guests data, which can be changed on-the-fly by pressing the
following keys:
| 0: default view |
| 1: show physical CPUs |
| 2: show network interfaces |
| 3: show virtual disks |
virt-top supports more hot keys to change the view
of the data and many command line switches that affect the behavior of
the program. For more information, see man 1
virt-top.
10.8.3 Monitoring with kvm_stat #Edit source
kvm_stat can be used to trace KVM performance
events. It monitors /sys/kernel/debug/kvm, so it
needs the debugfs to be mounted. On openSUSE Leap it should be mounted
by default. In case it is not mounted, use the following command:
>sudomount -t debugfs none /sys/kernel/debug
kvm_stat can be used in three different modes:
kvm_stat                    # update in 1 second intervals
kvm_stat -1                 # 1 second snapshot
kvm_stat -l > kvmstats.log  # update in 1 second intervals in log format
                            # can be imported to a spreadsheet
Example 10.1: Typical output of kvm_stat #
kvm statistics

 efer_reload                  0       0
 exits                 11378946  218130
 fpu_reload               62144     152
 halt_exits              414866     100
 halt_wakeup             260358      50
 host_state_reload       539650     249
 hypercalls                   0       0
 insn_emulation         6227331  173067
 insn_emulation_fail          0       0
 invlpg                  227281      47
 io_exits                113148      18
 irq_exits               168474     127
 irq_injections          482804     123
 irq_window               51270      18
 largepages                   0       0
 mmio_exits                6925       0
 mmu_cache_miss           71820      19
 mmu_flooded              35420       9
 mmu_pde_zapped           64763      20
 mmu_pte_updated              0       0
 mmu_pte_write           213782      29
 mmu_recycled                 0       0
 mmu_shadow_zapped       128690      17
 mmu_unsync                  46      -1
 nmi_injections               0       0
 nmi_window                   0       0
 pf_fixed               1553821     857
 pf_guest               1018832     562
 remote_tlb_flush        174007      37
 request_irq                  0       0
 signal_exits                 0       0
 tlb_flush               394182     148
See http://clalance.blogspot.com/2009/01/kvm-performance-tools.html for further information on how to interpret these values.
11 Connecting and authorizing #Edit source
Managing several VM Host Servers, each hosting multiple VM Guests, quickly
becomes difficult. One benefit of libvirt is the ability to connect to
several VM Host Servers at once, providing a single interface to manage all
VM Guests and to connect to their graphical console.
To ensure only authorized users can connect, libvirt offers several
connection types (via TLS, SSH, Unix sockets, and TCP) that can be combined
with different authorization mechanisms (socket, Polkit, SASL and Kerberos).
11.1 Authentication #Edit source
The power to manage VM Guests and to access their graphical console is something that should be restricted to a well-defined circle of persons. To achieve this goal, you can use the following authentication techniques on the VM Host Server:
Access control for Unix sockets with permissions and group ownership. This method is available for
libvirtdconnections only.Access control for Unix sockets with Polkit. This method is available for local
libvirtdconnections only.User name and password authentication with SASL (Simple Authentication and Security Layer). This method is available for both
libvirtdand VNC connections. Using SASL does not require real user accounts on the server, since it uses its own database to store user names and passwords. Connections authenticated with SASL are encrypted.Kerberos authentication. This method, available for
libvirtdconnections only, is not covered in this manual. Refer to https://libvirt.org/auth.html#ACL_server_kerberos for details.Single password authentication. This method is available for VNC connections only.
Important: Authentication for libvirtd and VNC needs to be configured separately
Access to the VM Guest's management functions (via libvirtd) and to
its graphical console always needs to be configured separately. When
restricting access to the management tools, these restrictions do
not automatically apply to VNC connections!
When accessing VM Guests from remote via TLS/SSL connections, access can be indirectly controlled on each client by restricting read permissions to the certificate's key file to a certain group. See Section 11.3.2.5, “Restricting access (security considerations)” for details.
11.1.1 libvirtd authentication #Edit source
libvirtd authentication is configured in
/etc/libvirt/libvirtd.conf. The configuration made
here applies to all libvirt tools such as the Virtual Machine Manager or
virsh.
libvirt offers two sockets: a read-only socket for monitoring
purposes and a read-write socket to be used for management operations.
Access to both sockets can be configured independently. By default,
both sockets are owned by root.root. Default access
permissions on the read-write socket are restricted to the user
root (0700) and fully open on the read-only
socket (0777).
The following instructions describe how to configure access permissions for the read-write socket. The same instructions also apply to the read-only socket. All configuration steps need to be carried out on the VM Host Server.
Note: Default authentication settings on openSUSE Leap
The default authentication method on openSUSE Leap is access control
for Unix sockets. Only the user root may authenticate. When
accessing the libvirt tools as a non-root user directly on the
VM Host Server, you need to provide the root password through Polkit
once. You are then granted access for the current and for future
sessions.
Alternatively, you can configure libvirt to allow
“system” access to non-privileged users. See
Section 11.2.1, ““system” access for non-privileged users” for details.
Recommended authorization methods #
- Local connections
Section 11.1.1.2, “Local access control for Unix sockets with Polkit” Section 11.1.1.1, “Access control for Unix sockets with permissions and group ownership” - Remote tunnel over SSH
Section 11.1.1.1, “Access control for Unix sockets with permissions and group ownership” - Remote TLS/SSL connection
Section 11.1.1.3, “User name and password authentication with SASL” none (access controlled on the client side by restricting access to the certificates)
11.1.1.1 Access control for Unix sockets with permissions and group ownership #Edit source
To grant access for non-root accounts, configure the sockets to
be owned and accessible by a certain group
(libvirt in the following
example). This authentication method can be used for local and remote
SSH connections.
In case it does not exist, create the group that should own the socket:
>sudogroupadd libvirtImportant: Group needs to exist
The group must exist before restarting
libvirtd. If not, the restart fails.Add the desired users to the group:
>sudousermod --append --groups libvirt tuxChange the configuration in
/etc/libvirt/libvirtd.confas follows:unix_sock_group = "libvirt"1 unix_sock_rw_perms = "0770"2 auth_unix_rw = "none"3
Restart
libvirtd:>sudosystemctl start libvirtd
11.1.1.2 Local access control for Unix sockets with Polkit #Edit source
Access control for Unix sockets with Polkit is the default
authentication method on openSUSE Leap for non-remote connections.
Therefore, no libvirt configuration changes are needed. With Polkit
authorization enabled, permissions on both sockets default to
0777 and each application trying to access a
socket needs to authenticate via Polkit.
Important: Polkit authentication for local connections only
Authentication with Polkit can only be used for local connections on the VM Host Server itself, since Polkit does not handle remote authentication.
Two policies for accessing libvirt's sockets exist:
org.libvirt.unix.monitor: accessing the read-only socket
org.libvirt.unix.manage: accessing the read-write socket
By default, the policy for accessing the read-write socket is to
authenticate with the root password once and grant the
privilege for the current and for future sessions.
To grant users access to a socket without having to provide the
root password, you need to create a rule in
/etc/polkit-1/rules.d. Create the file
/etc/polkit-1/rules.d/10-grant-libvirt with the
following content to grant access to the read-write socket to all
members of the group
libvirt:
polkit.addRule(function(action, subject) {
  if (action.id == "org.libvirt.unix.manage" && subject.isInGroup("libvirt")) {
    return polkit.Result.YES;
  }
});
11.1.1.3 User name and password authentication with SASL #Edit source
SASL provides user name and password authentication and data encryption (digest-md5, by default). Since SASL maintains its own user database, the users do not need to exist on the VM Host Server. SASL is required by TCP connections and on top of TLS/SSL connections.
Important: Plain TCP and SASL with digest-md5 encryption
Using digest-md5 encryption on an otherwise not encrypted TCP connection does not provide enough security for production environments. It is recommended to only use it in testing environments.
Tip: SASL authentication on top of TLS/SSL
Access from remote TLS/SSL connections can be indirectly controlled on the client side by restricting access to the certificate's key file. However, this may prove error-prone when dealing with many clients. Using SASL with TLS adds security by additionally controlling access on the server side.
To configure SASL authentication, proceed as follows:
Change the configuration in
/etc/libvirt/libvirtd.confas follows:To enable SASL for TCP connections:
auth_tcp = "sasl"
To enable SASL for TLS/SSL connections:
auth_tls = "sasl"
Restart
libvirtd:>sudosystemctl restart libvirtdThe libvirt SASL configuration file is located at
/etc/sasl2/libvirtd.conf. Normally, there is no need to change the defaults. However, if using SASL on top of TLS, you may turn off session encryption to avoid additional overhead (TLS connections are already encrypted) by commenting the line setting themech_listparameter. Only do this for TLS/SASL. For TCP connections, this parameter must be set to digest-md5.#mech_list: digest-md5
By default, no SASL users are configured, so no logins are possible. Use the following commands to manage users:
- Add the user
tux saslpasswd2 -a libvirt tux
- Delete the user
tux saslpasswd2 -a libvirt -d tux
- List existing users
sasldblistusers2 -f /etc/libvirt/passwd.db
- Add the user
Tip: virsh and SASL authentication
When using SASL authentication, you are prompted for a user name
and password every time you issue a virsh
command. Avoid this by using virsh in shell
mode.
11.1.2 VNC authentication #Edit source
Since access to the graphical console of a VM Guest is not controlled
by libvirt, but by the specific hypervisor, it is always
necessary to additionally configure VNC authentication. The main
configuration file is
/etc/libvirt/<hypervisor>.conf. This section
describes the QEMU/KVM hypervisor, so the target configuration file
is /etc/libvirt/qemu.conf.
Note: VNC authentication for Xen
In contrast with KVM, Xen does not yet offer VNC authentication
more sophisticated than setting a password on a per-VM basis. See the
<graphics type='vnc'... libvirt configuration
option below.
Two authentication types are available: SASL and single-password
authentication. If you are using SASL for libvirt authentication, it
is strongly recommended to use it for VNC authentication as
well—it is possible to share the same database.
A third method to restrict access to the VM Guest is to enable the use of TLS encryption on the VNC server. This requires the VNC clients to have access to x509 client certificates. By restricting access to these certificates, access can indirectly be controlled on the client side. Refer to Section 11.3.2.4.2, “VNC over TLS/SSL: client configuration” for details.
11.1.2.1 User name and password authentication with SASL #Edit source
SASL provides user name and password authentication and data
encryption. Since SASL maintains its own user database, the users do
not need to exist on the VM Host Server. As with SASL authentication for
libvirt, you may use SASL on top of TLS/SSL connections. Refer to
Section 11.3.2.4.2, “VNC over TLS/SSL: client configuration” for
details on configuring these connections.
To configure SASL authentication for VNC, proceed as follows:
Create a SASL configuration file. It is recommended to use the existing
libvirtfile. If you have already configured SASL forlibvirtand are planning to use the same settings, including the same user name and password database, a simple link is suitable:>sudoln -s /etc/sasl2/libvirt.conf /etc/sasl2/qemu.confIf are setting up SASL for VNC only or you are planning to use a different configuration than for
libvirt, copy the existing file to use as a template:>sudocp /etc/sasl2/libvirt.conf /etc/sasl2/qemu.confThen edit it according to your needs.
Change the configuration in
/etc/libvirt/qemu.confas follows:vnc_listen = "0.0.0.0" vnc_sasl = 1 sasldb_path: /etc/libvirt/qemu_passwd.db
The first parameter enables VNC to listen on all public interfaces (rather than to the local host only), and the second parameter enables SASL authentication.
By default, no SASL users are configured, so no logins are possible. Use the following commands to manage users:
- Add the user
tux >saslpasswd2 -f /etc/libvirt/qemu_passwd.db -a qemu tux- Delete the user
tux >saslpasswd2 -f /etc/libvirt/qemu_passwd.db -a qemu -d tux- List existing users
>sasldblistusers2 -f /etc/libvirt/qemu_passwd.db
- Add the user
Restart
libvirtd:>sudosystemctl restart libvirtdRestart all VM Guests that have been running before changing the configuration. VM Guests that have not been restarted cannot use SASL authentication for VNC connects.
Note: Supported VNC viewers
SASL authentication is currently supported by Virtual Machine Manager and
virt-viewer. Both viewers also support
TLS/SSL connections.
11.1.2.2 Single password authentication #Edit source
Access to the VNC server may also be controlled by setting a VNC password. You can either set a global password for all VM Guests or set individual passwords for each guest. The latter requires editing the VM Guest's configuration files.
Note: Always set a global password
If you are using single password authentication, it is good practice to set a global password even if setting passwords for each VM Guest. This protects your virtual machines with a “fallback” password if you forget to set a per-machine password. The global password is only used if no other password is set for the machine.
Procedure 11.1: Setting a global VNC password #
Change the configuration in
/etc/libvirt/qemu.confas follows:vnc_listen = "0.0.0.0" vnc_password = "PASSWORD"
The first parameter enables VNC to listen on all public interfaces (rather than to the local host only), and the second parameter sets the password. The maximum length of the password is eight characters.
Restart
libvirtd:>sudosystemctl restart libvirtdRestart all VM Guests that have been running before changing the configuration. VM Guests that have not been restarted cannot use password authentication for VNC connects.
Procedure 11.2: Setting a VM Guest specific VNC password #
Change the configuration in
/etc/libvirt/qemu.confas follows to enable VNC to listen on all public interfaces (rather than to the local host only).vnc_listen = "0.0.0.0"
Open the VM Guest's XML configuration file in an editor. Replace VM_NAME in the following example with the name of the VM Guest. The editor that is used defaults to
$EDITOR. If that variable is not set,viis used.>virsh edit VM_NAMESearch for the element
<graphics>with the attributetype='vnc', for example:<graphics type='vnc' port='-1' autoport='yes'/>
Add the
passwd=PASSWORDattribute, save the file and exit the editor. The maximum length of the password is eight characters.<graphics type='vnc' port='-1' autoport='yes' passwd='PASSWORD'/>
Restart
libvirtd:>sudosystemctl restart libvirtdRestart all VM Guests that have been running before changing the configuration. VM Guests that have not been restarted cannot use password authentication for VNC connects.
Warning: Security of the VNC protocol
The VNC protocol is not considered to be safe. Although the
password is sent encrypted, it may be vulnerable when an attacker
can sniff both the encrypted password and the encryption key.
Therefore, it is recommended to use VNC with TLS/SSL or tunneled
over SSH. virt-viewer, Virtual Machine Manager and Remmina (refer
to Book “Reference”, Chapter 4 “Remote graphical sessions with VNC”, Section 4.2 “Remmina: the remote desktop client”) support both methods.
11.2 Connecting to a VM Host Server #Edit source
To connect to a hypervisor with libvirt, you need to specify a uniform
resource identifier (URI). This URI is needed with
virsh and virt-viewer (except when
working as root on the VM Host Server) and is optional for the Virtual Machine Manager.
Although the latter can be called with a connection parameter (for
example, virt-manager -c qemu:///system), it also
offers a graphical interface to create connection URIs. See
Section 11.2.2, “Managing connections with Virtual Machine Manager” for details.
HYPERVISOR1+PROTOCOL2://USER@REMOTE3/CONNECTION_TYPE4
Specify the hypervisor. openSUSE Leap currently supports the
following hypervisors: | |
When connecting to a remote host, specify the protocol here. It can
be one of: | |
When connecting to a remote host, specify the user name and the
remote host name. If no user name is specified, the user name that
has called the command ( | |
When connecting to the |
Example hypervisor connection URIs #
test:///defaultConnect to the local dummy hypervisor. Useful for testing.
qemu:///systemorxen:///systemConnect to the QEMU/Xen hypervisor on the local host having full access (type system).
qemu+ssh://tux@mercury.example.com/systemorxen+ssh://tux@mercury.example.com/systemConnect to the QEMU/Xen hypervisor on the remote host mercury.example.com. The connection is established via an SSH tunnel.
qemu+tls://saturn.example.com/systemorxen+tls://saturn.example.com/systemConnect to the QEMU/Xen hypervisor on the remote host mercury.example.com. The connection is established using TLS/SSL.
For more details and examples, refer to the libvirt documentation at
https://libvirt.org/uri.html.
Note: User names in URIs
A user name needs to be specified when using Unix socket authentication (regardless of whether using the user/password authentication scheme or Polkit). This applies to all SSH and local connections.
There is no need to specify a user name when using SASL authentication (for TCP or TLS connections) or when doing no additional server-side authentication for TLS connections. With SASL, the user name is not evaluated—you are prompted for an SASL user/password combination in any case.
11.2.1 “system” access for non-privileged users #Edit source
As mentioned above, a connection to the QEMU hypervisor can be
established using two different protocols: session
and system. A “session” connection is
spawned with the same privileges as the client program. Such a
connection is intended for desktop virtualization, since it is
restricted (for example, no USB/PCI device assignments, no virtual
network setup, limited remote access to libvirtd).
The “system” connection intended for server virtualization
has no functional restrictions but is, by default, only accessible by
root. However, with the addition of the DAC (Discretionary Access
Control) driver to libvirt, it is now possible to grant non-privileged
users “system” access. To grant “system”
access to the user tux, proceed as follows:
Procedure 11.3: Granting “system” access to a regular user #
Enable access via Unix sockets, as described in Section 11.1.1.1, “Access control for Unix sockets with permissions and group ownership”. In that example, access to libvirt is granted to all members of the group
libvirtandtuxmade a member of this group. This ensures thattuxcan connect usingvirshor Virtual Machine Manager.Edit
/etc/libvirt/qemu.confand change the configuration as follows:user = "tux" group = "libvirt" dynamic_ownership = 1
This ensures that the VM Guests are started by
tuxand that resources bound to the guest (for example virtual disks) can be accessed and modified bytux.Make
tuxa member of the groupkvm:>sudousermod --append --groups kvm tuxThis step is needed to grant access to
/dev/kvm, which is required to start VM Guests.Restart
libvirtd:>sudosystemctl restart libvirtd
11.2.2 Managing connections with Virtual Machine Manager #Edit source
The Virtual Machine Manager uses a Connection for every VM Host Server it
manages. Each connection contains all VM Guests on the respective
host. By default, a connection to the local host is already configured
and connected.
All configured connections are displayed in the Virtual Machine Manager main window. Active connections are marked with a small triangle, which you can click to fold or unfold the list of VM Guests for this connection.
Inactive connections are listed gray and are marked with Not
Connected. Either double-click or right-click it and choose
from the context menu. You can also
an existing connection from this menu.
Note: Editing existing connections
It is not possible to edit an existing connection. To change a connection, create a new one with the desired parameters and delete the “old” one.
To add a new connection in the Virtual Machine Manager, proceed as follows:
Choose ›
Choose the host's ( or )
(Optional) To set up a remote connection, choose . For more information, see Section 11.3, “Configuring remote connections”.
In case of a remote connection, specify the of the remote machine in the format
USERNAME@REMOTE _HOST.Important: Specifying a user name
There is no need to specify a user name for TCP and TLS connections: in these cases, it is not evaluated. However, for SSH connections, specifying a user name is necessary when you want to connect as a user other than
root.If you do not want the connection to be automatically started when starting the Virtual Machine Manager, deactivate .
Finish the configuration by clicking .
11.3 Configuring remote connections #Edit source
A major benefit of libvirt is the ability to manage VM Guests on
different remote hosts from a central location. This section gives
detailed instructions on how to configure server and client to allow
remote connections.
11.3.1 Remote tunnel over SSH (qemu+ssh or xen+ssh) #Edit source
Enabling a remote connection that is tunneled over SSH on the VM Host Server
only requires the ability to accept SSH connections. Make sure the SSH
daemon is started (systemctl status sshd) and that
the ports for service SSH are
opened in the firewall.
User authentication for SSH connections can be done using traditional
file user/group ownership and permissions as described in
Section 11.1.1.1, “Access control for Unix sockets with permissions and group ownership”.
Connecting as user tux
(qemu+ssh://tuxsIVname;/system or
xen+ssh://tuxsIVname;/system) works
out of the box and does not require additional configuration on the
libvirt side.
When connecting via SSH
qemu+ssh://USER@SYSTEM
or
xen+ssh://USER@SYSTEM
you need to provide the password for USER.
This can be avoided by copying your public key to
~USER/.ssh/authorized_keys
on the VM Host Server as explained in
Book “Security and Hardening Guide”, Chapter 22 “Securing network operations with OpenSSH”, Section 22.6 “Public key authentication”. Using
gnome-keyring on the machine from which you are
connecting adds even more convenience. For more information, see
Book “Security and Hardening Guide”, Chapter 22 “Securing network operations with OpenSSH”, Section 22.9 “Automated public key logins with gnome-keyring”.
11.3.2 Remote TLS/SSL connection with x509 certificate (qemu+tls or xen+tls) #Edit source
Using TCP connections with TLS/SSL encryption and authentication via x509 certificates is much more complicated to set up than SSH, but it is a lot more scalable. Use this method if you need to manage several VM Host Servers with a varying number of administrators.
11.3.2.1 Basic concept #Edit source
TLS (Transport Layer Security) encrypts the communication between two computers by using certificates. The computer starting the connection is always considered the “client”, using a “client certificate”, while the receiving computer is always considered the “server”, using a “server certificate”. This scenario applies, for example, if you manage your VM Host Servers from a central desktop.
If connections are initiated from both computers, each needs to have a client and a server certificate. This is the case, for example, if you migrate a VM Guest from one host to another.
Each x509 certificate has a matching private key file. Only the combination of certificate and private key file can identify itself correctly. To assure that a certificate was issued by the assumed owner, it is signed and issued by a central certificate called certificate authority (CA). Both the client and the server certificates must be issued by the same CA.
Important: User authentication
Using a remote TLS/SSL connection only ensures that two computers are allowed to communicate in a certain direction. Restricting access to certain users can indirectly be achieved on the client side by restricting access to the certificates. For more information, see Section 11.3.2.5, “Restricting access (security considerations)”.
libvirt also supports user authentication on the server with
SASL. For more information, see
Section 11.3.2.6, “Central user authentication with SASL for TLS sockets”.
11.3.2.2 Configuring the VM Host Server #Edit source
The VM Host Server is the machine receiving connections. Therefore, the
server certificates need to be installed. The CA
certificate needs to be installed, too. When the certificates are in
place, TLS support can be turned on for libvirt.
Create the server certificate and export it together with the respective CA certificate.
Create the following directories on the VM Host Server:
>sudomkdir -p /etc/pki/CA/ /etc/pki/libvirt/private/Install the certificates as follows:
>sudo/etc/pki/CA/cacert.pem>sudo/etc/pki/libvirt/servercert.pem>sudo/etc/pki/libvirt/private/serverkey.pemImportant: Restrict access to certificates
Make sure to restrict access to certificates, as explained in Section 11.3.2.5, “Restricting access (security considerations)”.
Enable TLS support by enabling the relevant socket and restarting
libvirtd:>sudosystemctl stop libvirtd.service>sudosystemctl enable --now libvirtd-tls.socket>sudosystemctl start libvirtd.serviceBy default,
libvirtuses the TCP port 16514 for accepting secure TLS connections. Open this port in the firewall.
Important: Restarting libvirtd with TLS enabled
If you enable TLS for libvirt, the server certificates need to be
in place, otherwise restarting libvirtd fails. You also need to
restart libvirtd in case you change the certificates.
11.3.2.3 Configuring the client and testing the setup #Edit source
The client is the machine initiating connections. Therefore the client certificates need to be installed. The CA certificate needs to be installed, too.
Create the client certificate and export it together with the respective CA certificate.
Create the following directories on the client:
>sudomkdir -p /etc/pki/CA/ /etc/pki/libvirt/private/Install the certificates as follows:
>sudo/etc/pki/CA/cacert.pem>sudo/etc/pki/libvirt/clientcert.pem>sudo/etc/pki/libvirt/private/clientkey.pemImportant: Restrict access to certificates
Make sure to restrict access to certificates, as explained in Section 11.3.2.5, “Restricting access (security considerations)”.
Test the client/server setup by issuing the following command. Replace mercury.example.com with the name of your VM Host Server. Specify the same fully qualified host name as used when creating the server certificate.
#QEMU/KVM
virsh -c qemu+tls://mercury.example.com/system list --all

#Xen
virsh -c xen+tls://mercury.example.com/system list --all
If your setup is correct, you can see a list of all VM Guests registered with
libvirton the VM Host Server.
11.3.2.4 Enabling VNC for TLS/SSL connections #Edit source
Currently, VNC communication over TLS is only supported by a few
tools. Common VNC viewers such as tightvnc or
tigervnc do not support TLS/SSL. The only
supported alternative to Virtual Machine Manager and virt-viewer is
remmina (refer to Book “Reference”, Chapter 4 “Remote graphical sessions with VNC”, Section 4.2 “Remmina: the remote desktop client”).
11.3.2.4.1 VNC over TLS/SSL: VM Host Server configuration #Edit source
To access the graphical console via VNC over TLS/SSL, you need to configure the VM Host Server as follows:
Open ports for the service
VNCin your firewall.Create a directory
/etc/pki/libvirt-vncand link the certificates into this directory as follows:>sudomkdir -p /etc/pki/libvirt-vnc && cd /etc/pki/libvirt-vnc>sudoln -s /etc/pki/CA/cacert.pem ca-cert.pem>sudoln -s /etc/pki/libvirt/servercert.pem server-cert.pem>sudoln -s /etc/pki/libvirt/private/serverkey.pem server-key.pemEdit
/etc/libvirt/qemu.confand set the following parameters:vnc_listen = "0.0.0.0" vnc_tls = 1 vnc_tls_x509_verify = 1Restart the
libvirtd:>sudosystemctl restart libvirtdImportant: VM Guests need to be restarted
The VNC TLS setting is only set when starting a VM Guest. Therefore, you need to restart all machines that have been running before making the configuration change.
11.3.2.4.2 VNC over TLS/SSL: client configuration #Edit source
The only action needed on the client side is to place the x509
client certificates in a location recognized by the client of
choice. However, Virtual Machine Manager and virt-viewer expect
the certificates in a different location. Virtual Machine Manager can either read
from a system-wide location applying to all users, or from a
per-user location. Remmina (refer to Book “Reference”, Chapter 4 “Remote graphical sessions with VNC”, Section 4.2 “Remmina: the remote desktop client”)
asks for the location of certificates when initializing the
connection to the remote VNC session.
- Virtual Machine Manager (
virt-manager) To connect to the remote host, Virtual Machine Manager requires the setup explained in Section 11.3.2.3, “Configuring the client and testing the setup”. To be able to connect via VNC, the client certificates also need to be placed in the following locations:
- System-wide location
/etc/pki/CA/cacert.pem/etc/pki/libvirt-vnc/clientcert.pem/etc/pki/libvirt-vnc/private/clientkey.pem- Per-user location
/etc/pki/CA/cacert.pem~/.pki/libvirt-vnc/clientcert.pem~/.pki/libvirt-vnc/private/clientkey.pem
virt-viewervirt-vieweronly accepts certificates from a system-wide location:/etc/pki/CA/cacert.pem/etc/pki/libvirt-vnc/clientcert.pem/etc/pki/libvirt-vnc/private/clientkey.pem
Important: Restrict access to certificates
Make sure to restrict access to certificates, as explained in Section 11.3.2.5, “Restricting access (security considerations)”.
11.3.2.5 Restricting access (security considerations) #Edit source
Each x509 certificate consists of two pieces: the public certificate and a private key. A client can only authenticate using both pieces. Therefore, any user that has read access to the client certificate and its private key can access your VM Host Server. On the other hand, an arbitrary machine equipped with the full server certificate can pretend to be the VM Host Server. Since this is not desirable, access to at least the private key files needs to be restricted as much as possible. The easiest way to control access to a key file is to use access permissions.
- Server certificates
Server certificates need to be readable for QEMU processes. On openSUSE Leap QEMU, processes started from
libvirttools are owned byroot, so it is sufficient if therootcan read the certificates:>chmod 700 /etc/pki/libvirt/private/>chmod 600 /etc/pki/libvirt/private/serverkey.pemIf you change the ownership for QEMU processes in
/etc/libvirt/qemu.conf, you also need to adjust the ownership of the key file.- System-wide client certificates
To control access to a key file that is available system-wide, restrict read access to a certain group, so that only members of that group can read the key file. In the following example, a group
libvirtis created, and group ownership of theclientkey.pemfile and its parent directory is set tolibvirt. Afterward, the access permissions are restricted to owner and group. Finally, the usertuxis added to the grouplibvirt, and thus can access the key file.CERTPATH="/etc/pki/libvirt/" # create group libvirt groupadd libvirt # change ownership to user root and group libvirt chown root.libvirt $CERTPATH/private $CERTPATH/clientkey.pem # restrict permissions chmod 750 $CERTPATH/private chmod 640 $CERTPATH/private/clientkey.pem # add user tux to group libvirt usermod --append --groups libvirt tux
- Per-user certificates
User-specific client certificates for accessing the graphical console of a VM Guest via VNC need to be placed in the user's home directory in
~/.pki. Contrary to SSH, for example, the VNC viewer using these certificates does not check the access permissions of the private key file. Therefore, it is solely the user's responsibility to make sure the key file is not readable by others.
11.3.2.5.1 Restricting access from the server side #Edit source
By default, every client that is equipped with appropriate client certificates may connect to a VM Host Server accepting TLS connections. Therefore, it is possible to use additional server-side authentication with SASL as described in Section 11.1.1.3, “User name and password authentication with SASL”.
It is also possible to restrict access with a allowlist of DNs (distinguished names), so only clients with a certificate matching a DN from the list can connect.
Add a list of allowed DNs to tls_allowed_dn_list
in /etc/libvirt/libvirtd.conf. This list may
contain wild cards. Do not specify an empty list, since that would
result in refusing all connections.
tls_allowed_dn_list = [
   "C=US,L=Provo,O=SUSE Linux Products GmbH,OU=*,CN=venus.example.com,EMAIL=*",
   "C=DE,L=Nuremberg,O=SUSE Linux Products GmbH,OU=Documentation,CN=*"]
Get the distinguished name of a certificate with the following command:
> certtool -i --infile /etc/pki/libvirt/clientcert.pem | grep "Subject:"
Restart libvirtd after having changed the configuration:
>sudosystemctl restart libvirtd
11.3.2.6 Central user authentication with SASL for TLS sockets #Edit source
A direct user authentication via TLS is not possible—this is
handled indirectly on each client via the read permissions for the
certificates as explained in
Section 11.3.2.5, “Restricting access (security considerations)”. However,
if a central, server-based user authentication is needed, libvirt
also allows to use SASL (Simple Authentication and Security Layer) on
top of TLS for direct user authentication. See
Section 11.1.1.3, “User name and password authentication with SASL” for
configuration details.
11.3.2.7 Troubleshooting #Edit source
11.3.2.7.1 Virtual Machine Manager/virsh cannot connect to server #Edit source
Check the following in the given order:
| Is it a firewall issue (TCP port 16514 needs to be open on the server)? |
Is the client certificate (certificate and key) readable by the
user that has started
Virtual Machine Manager/virsh?
|
| Has the same full qualified host name as in the server certificate been specified with the connection? |
Is TLS enabled on the server (listen_tls =
1)? |
Has libvirtd been
restarted on the server? |
11.3.2.7.2 VNC connection fails #Edit source
Ensure that you can connect to the remote server using Virtual Machine Manager. If
so, check whether the virtual machine on the server has been
started with TLS support. The virtual machine's name in the
following example is sles.
> ps ax | grep qemu | grep "\-name sles" | awk -F" -vnc " '{ print FS $2 }'If the output does not begin with a string similar to the following, the machine has not been started with TLS support and must be restarted.
-vnc 0.0.0.0:0,tls,x509verify=/etc/pki/libvirt
12 Advanced storage topics #Edit source
This chapter introduces advanced topics about manipulating storage from the perspective of the VM Host Server.
12.1 Locking disk files and block devices with virtlockd #Edit source
Locking block devices and disk files prevents concurrent writes to these resources from different VM Guests. It provides protection against starting the same VM Guest twice, or adding the same disk to two different virtual machines. This reduces the risk of a virtual machine's disk image becoming corrupted because of a wrong configuration.
The locking is controlled by a daemon called
virtlockd. Since it operates
independently from the libvirtd daemon, locks endure a crash or a
restart of libvirtd. Locks even persist during an update of the
virtlockd itself, since it can
re-execute itself. This ensures that VM Guests do
not need to be restarted upon a
virtlockd update.
virtlockd is supported for
KVM, QEMU, and Xen.
12.1.1 Enable locking #Edit source
Locking virtual disks is not enabled by default on openSUSE Leap. To enable and automatically start it upon rebooting, perform the following steps:
Edit
/etc/libvirt/qemu.confand setlock_manager = "lockd"
Start the
virtlockddaemon with the following command:>sudosystemctl start virtlockdRestart the
libvirtddaemon with:>sudosystemctl restart libvirtdMake sure
virtlockdis automatically started when booting the system:>sudosystemctl enable virtlockd
12.1.2 Configure locking #Edit source
By default virtlockd is
configured to automatically lock all disks configured for your
VM Guests. The default setting uses a “direct” lockspace,
where the locks are acquired against the actual file paths associated
with the VM Guest <disk> devices. For example,
flock(2) is called directly on
/var/lib/libvirt/images/my-server/disk0.raw when
the VM Guest contains the following <disk> device:
<disk type='file' device='disk'>
 <driver name='qemu' type='raw'/>
 <source file='/var/lib/libvirt/images/my-server/disk0.raw'/>
 <target dev='vda' bus='virtio'/>
</disk>
The virtlockd configuration can
be changed by editing the file
/etc/libvirt/qemu-lockd.conf. It also contains
detailed comments with further information. Make sure to activate
configuration changes by reloading
virtlockd:
>sudosystemctl reload virtlockd
12.1.2.2 Enable locking on LVM or iSCSI volumes #Edit source
When wanting to lock virtual disks placed on LVM or iSCSI volumes shared by several hosts, locking needs to be done by UUID rather than by path (which is used by default). Furthermore, the lockspace directory needs to be placed on a shared file system accessible by all hosts sharing the volume. Set the following options for LVM and/or iSCSI:
lvm_lockspace_dir = "/MY_LOCKSPACE_DIRECTORY"
iscsi_lockspace_dir = "/MY_LOCKSPACE_DIRECTORY"
12.2 Online resizing of guest block devices #Edit source
Sometimes you need to change—extend or shrink—the size of the
block device used by your guest system. For example, when the disk space
originally allocated is no longer enough, it is time to increase its
size. If the guest disk resides on a logical volume,
you can resize it while the guest system is running. This is a big
advantage over an offline disk resizing (see the
virt-resize command from the
Section 18.3, “Guestfs tools” package) as the service provided by
the guest is not interrupted by the resizing process. To resize a
VM Guest disk, follow these steps:
Procedure 12.1: Online resizing of guest disk #
Inside the guest system, check the current size of the disk (for example
/dev/vda).#fdisk -l /dev/vda Disk /dev/sda: 160.0 GB, 160041885696 bytes, 312581808 sectors Units = sectors of 1 * 512 = 512 bytes Sector size (logical/physical): 512 bytes / 512 bytes I/O size (minimum/optimal): 512 bytes / 512 bytesOn the host, resize the logical volume holding the
/dev/vdadisk of the guest to the required size, for example 200 GB.#lvresize -L 200G /dev/mapper/vg00-home Extending logical volume home to 200 GiB Logical volume home successfully resizedOn the host, resize the block device related to the disk
/dev/mapper/vg00-homeof the guest. You can find the DOMAIN_ID withvirsh list.#virsh blockresize --path /dev/vg00/home --size 200G DOMAIN_ID Block device '/dev/vg00/home' is resizedCheck that the new disk size is accepted by the guest.
#fdisk -l /dev/vda Disk /dev/sda: 200.0 GB, 200052357120 bytes, 390727260 sectors Units = sectors of 1 * 512 = 512 bytes Sector size (logical/physical): 512 bytes / 512 bytes I/O size (minimum/optimal): 512 bytes / 512 bytes
12.3 Sharing directories between host and guests (file system pass-through) #Edit source
libvirt allows to share directories between host and guests using QEMU's file system pass-through (also called VirtFS) feature. Such a directory can be also be accessed by several VM Guests at once and therefore be used to exchange files between VM Guests.
Note: Windows guests and file system pass-through
Sharing directories between VM Host Server and Windows guests via File System Pass-Through does not work, because Windows lacks the drivers required to mount the shared directory.
To make a shared directory available on a VM Guest, proceed as follows:
Open the guest's console in Virtual Machine Manager and either choose › from the menu or click in the toolbar. Choose › to open the dialog.
allows you to choose between a or base driver. The default setting is . lets you choose the security model, which influences the way file permissions are set on the host. Three options are available:
- (default)
Files on the file system are directly created with the client-user's credentials. This is similar to what NFSv3 is using.
Same as , but failure of privileged operations like
chownare ignored. This is required when KVM is not run withrootprivileges.Files are created with the file server's credentials (
qemu.qemu). The user credentials and the client-user's credentials are saved in extended attributes. This model is recommended when host and guest domains should be kept isolated.
Specify the path to the directory on the VM Host Server with . Enter a string at to be used as a tag to mount the shared directory. The string of this field is a tag only, not a path on the VM Guest.
the setting. If the VM Guest is currently running, you need to shut it down to apply the new setting (rebooting the guest is not sufficient).
Boot the VM Guest. To mount the shared directory, enter the following command:
>sudomount -t 9p -o trans=virtio,version=9p2000.L,rw TAG /MOUNT_POINTTo make the shared directory permanently available, add the following line to the
/etc/fstabfile:TAG /MOUNT_POINT 9p trans=virtio,version=9p2000.L,rw 0 0
12.4 Using RADOS block devices with libvirt #Edit source
RADOS Block Devices (RBD) store data in a Ceph cluster. They allow
snapshotting, replication and data consistency. You can use an RBD from
your libvirt-managed VM Guests similarly to how you use other block
devices.
13 Configuring virtual machines with Virtual Machine Manager #Edit source
Abstract#
Virtual Machine Manager's view offers in-depth information about the VM Guest's complete configuration and hardware equipment. Using this view, you can also change the guest configuration or add and modify virtual hardware. To access this view, open the guest's console in Virtual Machine Manager and either choose › from the menu, or click in the toolbar.
- 13.1 Machine setup
- 13.2 Storage
- 13.3 Controllers
- 13.4 Networking
- 13.5 Input devices
- 13.6 Video
- 13.7 USB redirectors
- 13.8 Miscellaneous
- 13.9 Adding a CD/DVD-ROM device with Virtual Machine Manager
- 13.10 Adding a floppy device with Virtual Machine Manager
- 13.11 Ejecting and changing floppy or CD/DVD-ROM media with Virtual Machine Manager
- 13.12 Assigning a host PCI device to a VM Guest
- 13.13 Assigning a host USB device to a VM Guest
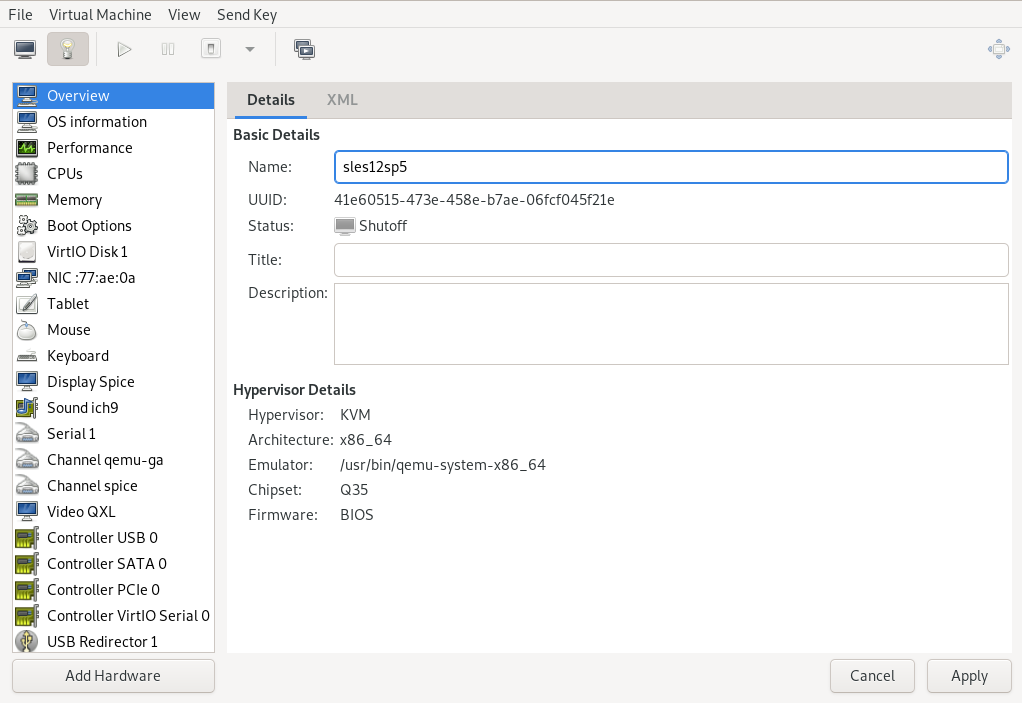
Figure 13.1: view of a VM Guest #
The left panel of the window lists VM Guest overview and already installed
hardware. After clicking an item on the list, you can access its detailed
settings in the details view. You can change the hardware parameters to
match your needs, then click to confirm them. Some
changes take effect immediately, while others need a reboot of the
machine—and virt-manager warns you about
that fact.
To remove installed hardware from a VM Guest, select the appropriate list entry in the left panel and then click in the bottom right of the window.
To add new hardware, click below the left panel, then select the type of the hardware you want to add in the window. Modify its parameters and confirm with .
The following sections describe configuration options for the specific hardware type being added. They do not focus on modifying an existing piece of hardware, as the options are identical.
13.1 Machine setup #Edit source
This section describes the setup of the virtualized processor and memory hardware. These components are vital to a VM Guest, therefore you cannot remove them. It also shows how to view the overview and performance information, and how to change boot parameters.
13.1.1 Overview #Edit source
shows basic details about VM Guest and the hypervisor.

Figure 13.2: Overview details #
, , and are editable and help you identify VM Guest in the list of machines.

Figure 13.3: VM Guest title and description #
shows the universally unique identifier of the virtual machine, while shows its current status—, , or .
The section shows the hypervisor type, CPU architecture, used emulator, and chipset type. None of the hypervisor parameters can be changed.
13.1.2 Performance #Edit source
shows regularly updated charts of CPU and memory usage, and disk and network I/O.
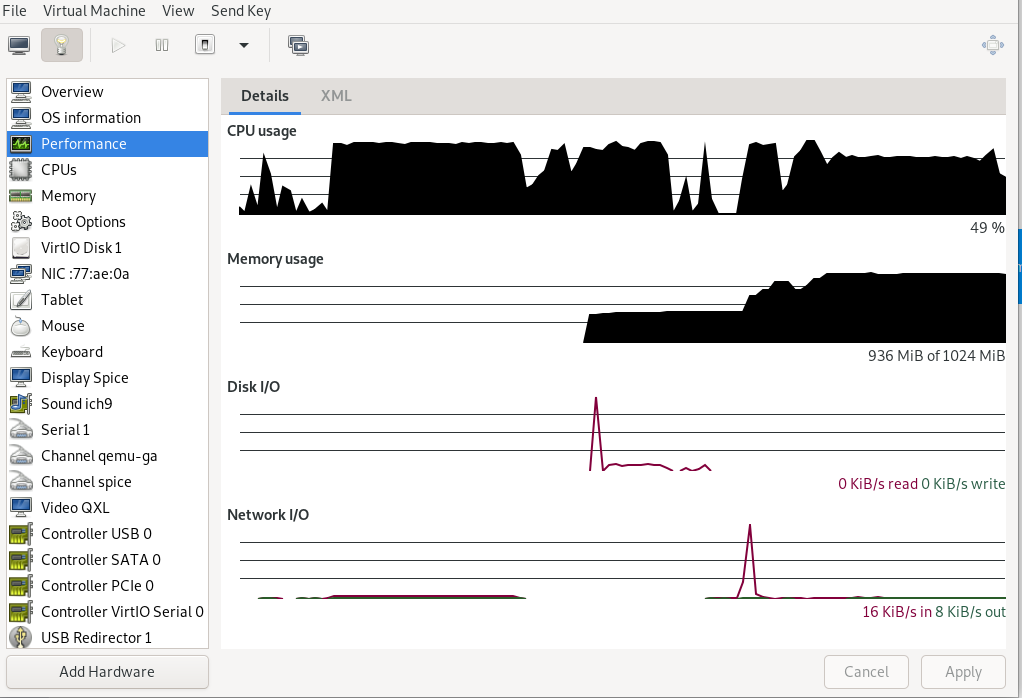
Figure 13.4: Performance #
Tip: Enabling disabled charts
Not all the charts in the view are enabled by default. To enable these charts, go to › , then select › › , and check the charts that you want to see regularly updated.
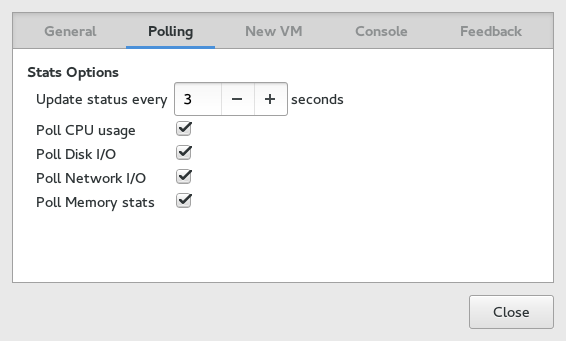
Figure 13.5: Statistics charts #
13.1.3 Processor #Edit source
includes detailed information about VM Guest processor configuration.
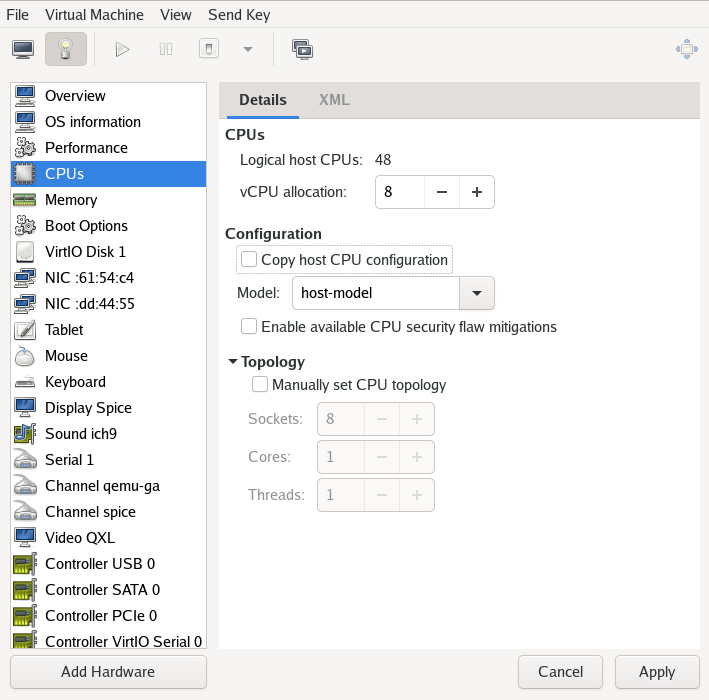
Figure 13.6: Processor view #
In the section, you can configure the number of virtual CPUs allocated to the VM Guest. shows the number of online and usable CPUs on the VM Host Server.
The section lets you configure the CPU model and topology.
When activated, the
option uses the host CPU model for VM Guest. You can see the details
of the host CPU model in the output of the virsh
capabilities command. When deactivated, the CPU model needs
to be specified from the models available in the drop-down box.
The host CPU model provides a good trade-off between CPU
features and the ability to migrate the VM Guest. libvirt does not model
every aspect of each CPU, so the VM Guest CPU does not match the
VM Host Server CPU exactly. But the ABI provided to the VM Guest is
reproducible and during migration the complete CPU model definition is
transferred to the destination VM Host Server, ensuring the migrated
VM Guest can see the exact same CPU model on the destination.
The host-passthrough model provides the VM Guest
with a CPU that is exactly the same as the VM Host Server CPU. This can be
useful when the VM Guest workload requires CPU features not available
in libvirt's simplified host-model CPU. The
host-passthrough model comes with the disadvantage
of reduced migration capability. A VM Guest with
host-passthrough model CPU can only be migrated to a
VM Host Server with identical hardware.
For more information on libvirt's CPU model and topology options, see
the CPU model and topology documentation at
https://libvirt.org/formatdomain.html#cpu-model-and-topology.
After you activate , you can specify a custom number of sockets, cores and threads for the CPU.
13.1.4 Memory #Edit source
contains information about the memory that is available to VM Guest.

Figure 13.7: Memory view #
Total amount of memory installed on VM Host Server.
The amount of memory currently available to VM Guest. You can hotplug more memory by increasing this value up to the value of .
Specify if the virtual machine can use shared memory via the
memfdbacked. It is a requirement for using the virtiofs file system. Find more details in https://libvirt.org/kbase/virtiofs.html.The maximum value to which you can hotplug the currently available memory. Any change to this value takes effect after the next VM Guest reboot.
- Enable launch security
If the VM Host Server supports AMD-SEV technology, activating this option enables a secured guest with encrypted memory. This option requires a virtual machine with chipset type Q35.
Important: Large memory VM Guests
VM Guests with memory requirements of 4 TB or more must either
use the host-passthrough CPU mode, or explicitly
specify the virtual CPU address size when using
host-model or custom CPU modes.
The default virtual CPU address size for these modes may not be
sufficient for memory configurations of 4 TB or more. The address size
can only be specified by editing the VM Guests XML configuration.
See Section 14.6, “Configuring memory allocation” for more
information on specifying virtual CPU address size.
13.1.5 Boot options #Edit source
introduces options affecting the VM Guest boot process.

Figure 13.8: Boot options #
In the section, you can specify whether the virtual machine should automatically start during the VM Host Server boot phase.
In the , activate the devices used for booting VM Guest. You can change their order with the up and down arrow buttons on the right side of the list. To choose from a list of bootable devices on VM Guest start, activate .
To boot a different kernel than the one on the boot device, activate and specify the paths to the alternative kernel and initrd placed on the VM Host Server file system. You can also specify kernel arguments that are passed to the loaded kernel.
13.2 Storage #Edit source
This section gives you a detailed description of configuration options for storage devices. It includes both hard disks and removable media, such as USB or CD-ROM drives.
Procedure 13.1: Adding a new storage device #
Below the left panel, click to open the window. There, select .
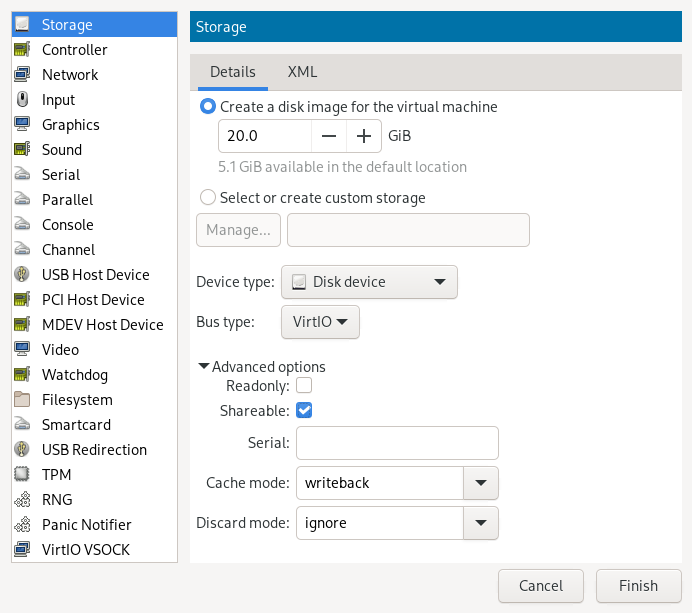
Figure 13.9: Add a new storage #
To create a
qcow2disk image in the default location, activate and specify its size in gigabytes.To gain more control over the disk image creation, activate and click to manage storage pools and images. The window opens, which has almost identical functionality as the tab described in Section 8.2.2, “Managing storage with Virtual Machine Manager”.
Tip: Supported storage formats
SUSE only supports the following storage formats:
rawandqcow2.After you create and specify the disk image file, specify the . It can be one of the following options:
: does not allow using .
: does not allow using .
: required to use an existing SCSI storage directly without adding it into a storage pool.
Select the for your device. The list of available options depends on the device type you selected in the previous step. The types based on use paravirtualized drivers.
In the section, select the preferred . For more information on cache modes, see Chapter 16, Disk cache modes.
Confirm your settings with . A new storage device appears in the left panel.
13.3 Controllers #Edit source
This section focuses on adding and configuring new controllers.
Procedure 13.2: Adding a new controller #
Below the left panel, click to open the window. There, select .
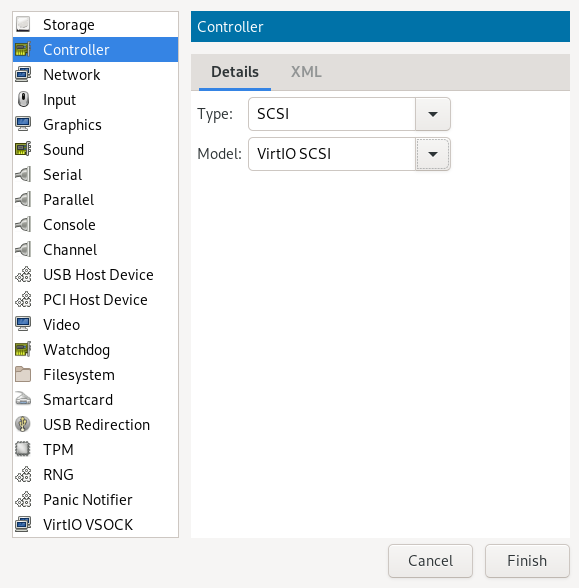
Figure 13.10: Add a new controller #
Select the type of the controller. You can choose from , , , , (paravirtualized), , or (smart card devices).
Optionally, for a USB or SCSI controller, select a controller model.
Confirm your settings with . A new controller appears in the left panel.
13.4 Networking #Edit source
This section describes how to add and configure new network devices.
Procedure 13.3: Adding a new network device #
Below the left panel, click to open the window. There, select .

Figure 13.11: Add a new network interface #
From the list, select the source for the network connection. The list includes VM Host Server's available physical network interfaces, network bridges, or network bonds. You can also assign the VM Guest to an already defined virtual network. See Section 8.1, “Configuring networks” for more information on setting up virtual networks with Virtual Machine Manager.
Specify a for the network device. While Virtual Machine Manager pre-fills a random value for your convenience, it is recommended to supply a MAC address appropriate for your network environment to avoid network conflicts.
Select a device model from the list. You can either leave the , or specify one of , , or models. virtio uses paravirtualized drivers.
Confirm your settings with . A new network device appears in the left panel.
13.5 Input devices #Edit source
This section focuses on adding and configuring new input devices, such as a mouse, a keyboard or a tablet.
Procedure 13.4: Adding a new input device #
Below the left panel, click to open the window. There, select .
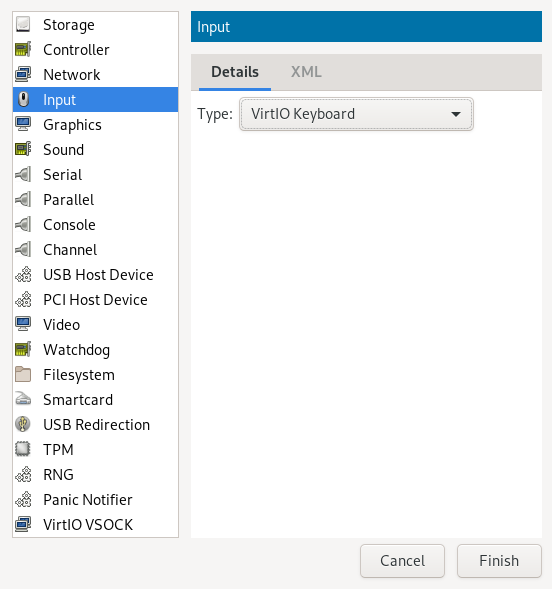
Figure 13.12: Add a new input device #
Select a device type from the list.
Confirm your settings with . A new input device appears in the left panel.
Tip: Enabling seamless and synchronized mouse pointer movement
When you click within a VM Guest's console with the mouse, the pointer is captured by the console window and cannot be used outside the console unless it is explicitly released (by pressing Alt–Ctrl). To prevent the console from grabbing the key and to enable seamless pointer movement between host and guest instead, follow the instructions in Procedure 13.4, “Adding a new input device” to add an to the VM Guest.
Adding a tablet has the additional advantage of synchronizing the mouse pointer movement between VM Host Server and VM Guest when using a graphical environment on the guest. With no tablet configured on the guest, you may often see two pointers with one dragging behind the other.
13.6 Video #Edit source
This section describes how to add and configure new video devices.
Procedure 13.5: Adding a video device #
Below the left panel, click to open the window. There, select .
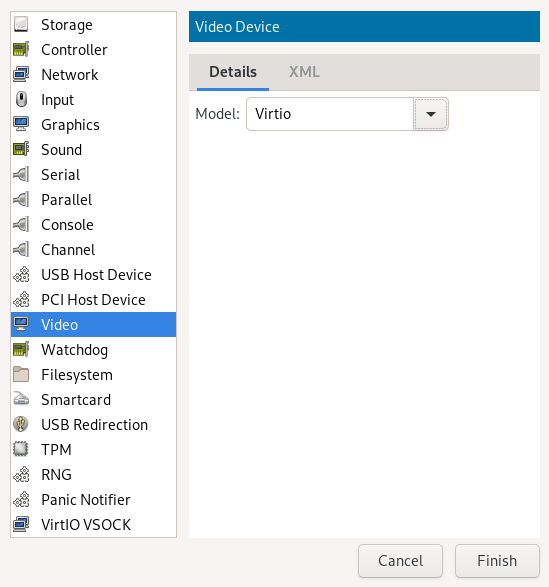
Figure 13.13: Add a new video device #
Select a model from the drop-down box.
Note: Secondary video devices
Only and can be added as secondary video devices.
Confirm your settings with . A new video device appears in the left panel.
13.7 USB redirectors #Edit source
USB devices that are connected to the client machine can be redirected to the VM Guest by using .
Procedure 13.6: Adding a USB redirector #
Below the left panel, click to open the window. There, select .
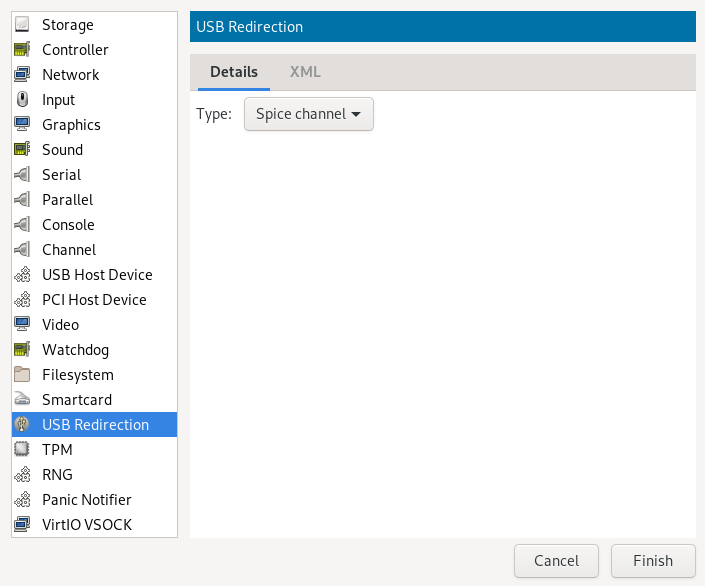
Figure 13.14: Add a new USB redirector #
Select a device type from the list. Depending on your configuration, you can either select a or a redirector.
Confirm your settings with . A new USB redirector appears in the left panel.
13.8 Miscellaneous #Edit source
- Smartcard
Smartcard functionality can be added via the element. A physical USB smartcard reader can then be passed through to the VM Guest.
- Watchdog
Virtual watchdog devices are also supported. They can be created via the element. The model and the action of the device can be specified.
Tip: Requirements for virtual watchdog devices
QA virtual watchdog devices require a specific driver and daemon to be installed in the VM Guest. Otherwise, the virtual watchdog device does not work.
- TPM
You can use the Host TPM device in the VM Guest by adding TPM functionality via the element.
Tip: Virtual TPMs
The Host TPM can only be used in one VM Guest at a time.
13.9 Adding a CD/DVD-ROM device with Virtual Machine Manager #Edit source
KVM supports CD or DVD-ROMs in VM Guest either by directly accessing a
physical drive on the VM Host Server or by accessing ISO images. To create an
ISO image from an existing CD or DVD, use dd:
>sudodd if=/dev/CD_DVD_DEVICE of=my_distro.iso bs=2048
To add a CD/DVD-ROM device to your VM Guest, proceed as follows:
Double-click a VM Guest entry in the Virtual Machine Manager to open its console and switch to the view with › .
Click and choose in the pop-up window.
Change the to .
Select .
To assign the device to a physical medium, enter the path to the VM Host Server's CD/DVD-ROM device (for example,
/dev/cdrom) next to . Alternatively, use to open a file browser and then click to select the device. Assigning the device to a physical medium is only possible when the Virtual Machine Manager was started on the VM Host Server.To assign the device to an existing image, click to choose an image from a storage pool. If the Virtual Machine Manager was started on the VM Host Server, alternatively choose an image from another location on the file system by clicking . Select an image and close the file browser with .
Save the new virtualized device with .
Reboot the VM Guest to make the new device available. For more information, see Section 13.11, “Ejecting and changing floppy or CD/DVD-ROM media with Virtual Machine Manager”.
13.10 Adding a floppy device with Virtual Machine Manager #Edit source
Currently, KVM only supports the use of floppy disk images—using a
physical floppy drive is not supported. Create a floppy disk image from
an existing floppy using dd:
>sudodd if=/dev/fd0 of=/var/lib/libvirt/images/floppy.img
To create an empty floppy disk image, use one of the following commands:
- Raw image
>sudodd if=/dev/zero of=/var/lib/libvirt/images/floppy.img bs=512 count=2880- FAT formatted image
>sudomkfs.msdos -C /var/lib/libvirt/images/floppy.img 1440
To add a floppy device to your VM Guest, proceed as follows:
Double-click a VM Guest entry in the Virtual Machine Manager to open its console and switch to the view with › .
Click and choose in the pop-up window.
Change the to .
Choose and click to choose an existing image from a storage pool. If Virtual Machine Manager was started on the VM Host Server, alternatively choose an image from another location on the file system by clicking . Select an image and close the file browser with .
Save the new virtualized device with .
Reboot the VM Guest to make the new device available. For more information, see Section 13.11, “Ejecting and changing floppy or CD/DVD-ROM media with Virtual Machine Manager”.
13.11 Ejecting and changing floppy or CD/DVD-ROM media with Virtual Machine Manager #Edit source
Whether you are using the VM Host Server's physical CD/DVD-ROM device or an
ISO/floppy image: before you can change the media or image of an existing
device in the VM Guest, you first need to disconnect
the media from the guest.
Double-click a VM Guest entry in the Virtual Machine Manager to open its console and switch to the view with › .
Choose the Floppy or CD/DVD-ROM device and “eject” the medium by clicking .
To “insert” a new medium, click .
If using the VM Host Server's physical CD/DVD-ROM device, first change the media in the device (this may require unmounting it on the VM Host Server before it can be ejected). Then choose and select the device from the drop-down box.
If you are using an ISO image, choose and select an image by clicking . When connecting from a remote host, you may only choose images from existing storage pools.
Click to finish. The new media can now be accessed in the VM Guest.
13.12 Assigning a host PCI device to a VM Guest #Edit source
You can directly assign host-PCI devices to guests (PCI pass-through). When the PCI device is assigned to one VM Guest, it cannot be used on the host or by another VM Guest unless it is reassigned. A prerequisite for this feature is a VM Host Server configuration as described in Important: Requirements for VFIO and SR-IOV.
13.12.1 Adding a PCI device with Virtual Machine Manager #Edit source
The following procedure describes how to assign a PCI device from the host machine to a VM Guest using Virtual Machine Manager:
Double-click a VM Guest entry in the Virtual Machine Manager to open its console and switch to the view with › .
Click and choose the category in the left panel. A list of available PCI devices appears in the right part of the window.
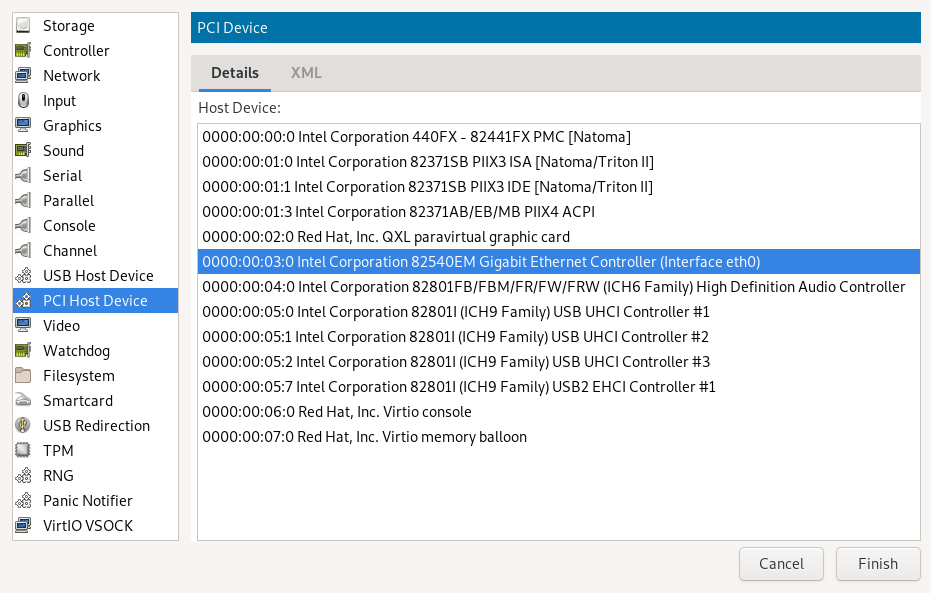
Figure 13.15: Adding a PCI device #
From the list of available PCI devices, choose the one you want to pass to the guest. Confirm with .
Important: SLES 11 SP4 KVM guests
On a newer QEMU machine type (pc-i440fx-2.0 or higher) with
SLES 11 SP4 KVM guests, the
acpiphp module is not
loaded by default in the guest. This module must be loaded to enable
hotplugging of disk and network devices. To load the module manually,
use the command modprobe acpiphp. It is also
possible to autoload the module by adding install acpiphp
/bin/true to the
/etc/modprobe.conf.local file.
Important: KVM guests using QEMU Q35 machine type
KVM guests using the QEMU Q35 machine type have a PCI topology
that includes a pcie-root controller and seven
pcie-root-port controllers. The
pcie-root controller does not support hotplugging.
Each pcie-root-port controller supports
hotplugging a single PCIe device. PCI controllers cannot be
hotplugged, so plan accordingly and add more
pcie-root-ports for more than seven hotplugged
PCIe devices. A pcie-to-pci-bridge controller can
be added to support hotplugging legacy PCI devices. See
https://libvirt.org/pci-hotplug.html for more
information about PCI topology between QEMU machine types.
13.13 Assigning a host USB device to a VM Guest #Edit source
Analogous to assigning host PCI devices (see Section 13.12, “Assigning a host PCI device to a VM Guest”), you can directly assign host USB devices to guests. When the USB device is assigned to one VM Guest, it cannot be used on the host or by another VM Guest unless it is reassigned.
13.13.1 Adding a USB device with Virtual Machine Manager #Edit source
To assign a host USB device to VM Guest using Virtual Machine Manager, follow these steps:
Double-click a VM Guest entry in the Virtual Machine Manager to open its console and switch to the view with › .
Click and choose the category in the left panel. A list of available USB devices appears in the right part of the window.
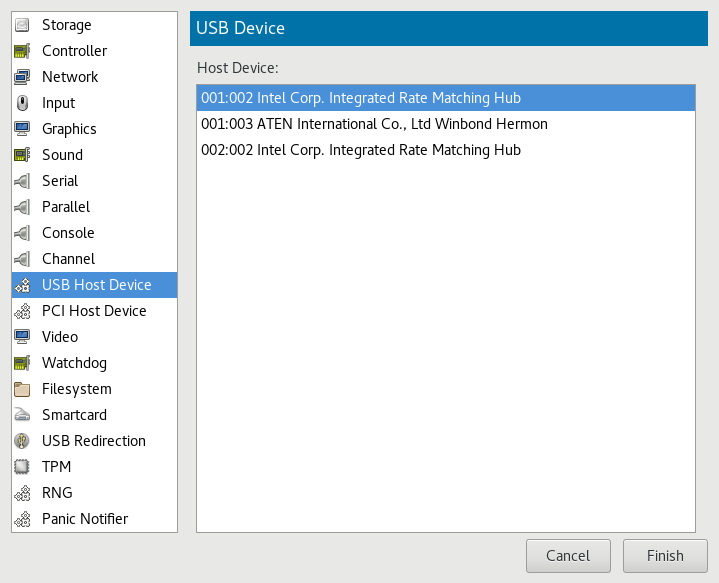
Figure 13.16: Adding a USB device #
From the list of available USB devices, choose the one you want to pass to the guest. Confirm with . The new USB device appears in the left pane of the view.
Tip: USB device removal
To remove the host USB device assignment, click it in the left pane of the view and confirm with .
14 Configuring virtual machines with virsh #Edit source
Abstract#
You can use virsh to configure virtual machines (VM) on the command
line as an alternative to using the Virtual Machine Manager. With virsh, you can
control the state of a VM, edit the configuration of a VM or even
migrate a VM to another host. The following sections describe how to
manage VMs by using virsh.
- 14.1 Editing the VM configuration
- 14.2 Changing the machine type
- 14.3 Configuring hypervisor features
- 14.4 Configuring CPU
- 14.5 Changing boot options
- 14.6 Configuring memory allocation
- 14.7 Adding a PCI device
- 14.8 Adding a USB device
- 14.9 Adding SR-IOV devices
- 14.10 Listing attached devices
- 14.11 Configuring storage devices
- 14.12 Configuring controller devices
- 14.13 Configuring video devices
- 14.14 Configuring network devices
- 14.15 Using macvtap to share VM Host Server network interfaces
- 14.16 Disabling a memory balloon device
- 14.17 Configuring multiple monitors (dual head)
- 14.18 Crypto adapter pass-through to KVM guests on IBM Z
14.1 Editing the VM configuration #Edit source
The configuration of a VM is stored in an XML file in
/etc/libvirt/qemu/ and looks like this:
Example 14.1: Example XML configuration file #
<domain type='kvm'>
  <name>sles15</name>
  <uuid>ab953e2f-9d16-4955-bb43-1178230ee625</uuid>
  <memory unit='KiB'>2097152</memory>
  <currentMemory unit='KiB'>2097152</currentMemory>
  <vcpu placement='static'>2</vcpu>
  <os>
    <type arch='x86_64' machine='pc-q35-2.0'>hvm</type>
  </os>
  <features>...</features>
  <cpu mode='custom' match='exact' check='partial'>
    <model fallback='allow'>Skylake-Client-IBRS</model>
  </cpu>
  <clock>...</clock>
  <on_poweroff>destroy</on_poweroff>
  <on_reboot>restart</on_reboot>
  <on_crash>destroy</on_crash>
  <pm>
    <suspend-to-mem enabled='no'/>
    <suspend-to-disk enabled='no'/>
  </pm>
  <devices>
    <emulator>/usr/bin/qemu-system-x86_64</emulator>
    <disk type='file' device='disk'>...</disk>
  </devices>
  ...
</domain>
To edit the configuration of a VM Guest, check if it is offline:
>sudovirsh list --inactive
If your VM Guest is in this list, you can safely edit its configuration:
>sudovirsh edit NAME_OF_VM_GUEST
Before saving the changes, virsh validates your input against a RelaxNG
schema.
14.2 Changing the machine type #Edit source
When installing with the virt-install tool, the
machine type for a VM Guest is pc-q35 by default.
The machine type is stored in the VM Guest's configuration file in the
type element:
<type arch='x86_64' machine='pc-q35-2.3'>hvm</type>
As an example, the following procedure shows how to change this value to
the machine type q35. The value q35
is an Intel* chipset and includes
PCIe, supports up to 12 USB ports, and
has support for SATA and
IOMMU.
Procedure 14.1: Changing machine type #
Check whether your VM Guest is inactive:
>sudovirsh list --inactiveId Name State ---------------------------------------------------- - sles15 shut offEdit the configuration for this VM Guest:
>sudovirsh edit sles15Replace the value of the
machineattribute withpc-q35-2.0:<type arch='x86_64' machine='pc-q35-2.0'>hvm</type>
Restart the VM Guest:
>sudovirsh start sles15Check if the machine type has changed. Log in to the VM Guest and run the following command:
>sudodmidecode | grep ProductProduct Name: Standard PC (Q35 + ICH9, 2009)
Tip: Machine type update recommendations
Whenever the QEMU version on the host system is upgraded (for example,
when upgrading the VM Host Server to a new service pack), upgrade the machine
type of the VM Guests to the latest available version. To check, use
the command qemu-system-x86_64 -M help on the
VM Host Server.
The default machine type pc-i440fx, for example, is
regularly updated. If your VM Guest still runs with a machine type of
pc-i440fx-1.X, we
strongly recommend an update to
pc-i440fx-2.X. This
allows taking advantage of the most recent updates and corrections in
machine definitions, and ensures better future compatibility.
14.3 Configuring hypervisor features #Edit source
libvirt automatically enables a default set of
hypervisor features that are sufficient in most circumstances, but also
allows enabling and disabling features as needed. As an example, Xen does
not support enabling PCI pass-through by default. It must be enabled with
the passthrough setting. Hypervisor features can be
configured with virsh. Look for the <features> element
in the VM Guest's configuration file and adjust its features as
required. Continuing with the Xen pass-through example:
>sudovirsh edit sle15sp1 <features> <xen> <passthrough/> </xen> </features>
Save your changes and restart the VM Guest.
See the Hypervisor features section of the libvirt Domain XML format manual at https://libvirt.org/formatdomain.html#elementsFeatures for more information.
14.4 Configuring CPU #Edit source
Many aspects of the virtual CPUs presented to VM Guests are configurable
with virsh. The number of current and maximum CPUs allocated to a
VM Guest can be changed, as well as the model of the CPU and its feature
set. The following subsections describe how to change the common CPU
settings of a VM Guest.
14.4.1 Configuring the number of CPUs #Edit source
The number of allocated CPUs is stored in the VM Guest's XML
configuration file in /etc/libvirt/qemu/ in the
vcpu element:
<vcpu placement='static'>1</vcpu>
In this example, the VM Guest has only one allocated CPU. The following procedure shows how to change the number of allocated CPUs for the VM Guest:
Check whether your VM Guest is inactive:
>sudovirsh list --inactiveId Name State ---------------------------------------------------- - sles15 shut offEdit the configuration for an existing VM Guest:
>sudovirsh edit sles15Change the number of allocated CPUs:
<vcpu placement='static'>2</vcpu>
Restart the VM Guest:
>sudovirsh start sles15Check if the number of CPUs in the VM has changed.
>sudovirsh vcpuinfo sled15VCPU: 0 CPU: N/A State: N/A CPU time N/A CPU Affinity: yy VCPU: 1 CPU: N/A State: N/A CPU time N/A CPU Affinity: yy
You can also change the number of CPUs while the VM Guest is running. CPUs can be hotplugged until the maximum number configured at VM Guest start is reached. Likewise, they can be hot-unplugged until the lower limit of 1 is reached. The following example shows changing the active CPU count from 2 to a predefined maximum of 4.
Check the current live vcpu count:
>sudovirsh vcpucount sles15 | grep livemaximum live 4 current live 2Change the current, or active, number of CPUs to 4:
>sudovirsh setvcpus sles15 --count 4 --liveCheck that the current live vcpu count is now 4:
>sudovirsh vcpucount sles15 | grep livemaximum live 4 current live 4
Important: Exceeding 255 CPUs
With KVM, it is possible to define a VM Guest with more than 255
CPUs. However, additional configuration is necessary to start and run
the VM Guest. The ioapic feature needs to be
tuned and an IOMMU device needs to be added to the VM Guest. Below
is an example configuration for 288 CPUs.
<domain>
 <vcpu placement='static'>288</vcpu>
 <features>
  <ioapic driver='qemu'/>
 </features>
 <devices>
  <iommu model='intel'>
   <driver intremap='on' eim='on'/>
  </iommu>
 </devices>
</domain>
14.4.2 Configuring the CPU model #Edit source
The CPU model exposed to a VM Guest can often influence the workload
running within it. The default CPU model is derived from a CPU mode
known as host-model.
<cpu mode='host-model'/>
When starting a VM Guest with the CPU mode host-model,
libvirt copies its model of the host CPU into the VM Guest
definition. The host CPU model and features copied to the VM Guest
definition can be observed in the output of the virsh
capabilities.
Another interesting CPU mode is host-passthrough.
<cpu mode='host-passthrough'/>
When starting a VM Guest with the CPU mode
host-passthrough, it is presented with a CPU that is
exactly the same as the VM Host Server CPU. This can be useful when the
VM Guest workload requires CPU features not available in libvirt's
simplified host-model CPU. The
host-passthrough CPU mode comes with the
disadvantage of reduced migration flexibility. A VM Guest with
host-passthrough CPU mode can only be migrated to a
VM Host Server with identical hardware.
When using the host-passthrough CPU mode, it is
still possible to disable undesirable features. The following
configuration presents the VM Guest with a CPU that is exactly the
same as the host CPU but with the vmx feature
disabled.
<cpu mode='host-passthrough'>
  <feature policy='disable' name='vmx'/>
  </cpu>
The custom CPU mode is another common mode used to
define a normalized CPU that can be migrated throughout dissimilar
hosts in a cluster. For example, in a cluster with hosts containing
Nehalem, IvyBridge and SandyBridge CPUs, the VM Guest can be
configured with a custom CPU mode that contains a
Nehalem CPU model.
<cpu mode='custom' match='exact'>
  <model fallback='allow'>Nehalem</model>
  <feature policy='require' name='vme'/>
  <feature policy='require' name='ds'/>
  <feature policy='require' name='acpi'/>
  <feature policy='require' name='ss'/>
  <feature policy='require' name='ht'/>
  <feature policy='require' name='tm'/>
  <feature policy='require' name='pbe'/>
  <feature policy='require' name='dtes64'/>
  <feature policy='require' name='monitor'/>
  <feature policy='require' name='ds_cpl'/>
  <feature policy='require' name='vmx'/>
  <feature policy='require' name='est'/>
  <feature policy='require' name='tm2'/>
  <feature policy='require' name='xtpr'/>
  <feature policy='require' name='pdcm'/>
  <feature policy='require' name='dca'/>
  <feature policy='require' name='rdtscp'/>
  <feature policy='require' name='invtsc'/>
  </cpu>
For more information on libvirt's CPU model and topology options, see
the CPU model and topology documentation at
https://libvirt.org/formatdomain.html#cpu-model-and-topology.
14.6 Configuring memory allocation #Edit source
The amount of memory allocated for the VM Guest can also be configured
with virsh. It is stored in the memory element and defines
the maximum allocation of memory for the VM Guest at boot time. The
optional currentMemory element defines the actual memory
allocated to the VM Guest. currentMemory can be less than
memory, allowing for increasing (or
ballooning) the memory while the VM Guest is
running. If currentMemory is omitted, it defaults to the same
value as the memory element.
You can adjust memory settings by editing the VM Guest configuration, but be aware that changes do not take place until the next boot. The following steps demonstrate changing a VM Guest to boot with 4G of memory, but allow later expansion to 8G:
Open the VM Guest's XML configuration:
>sudovirsh edit sles15Search for the
memoryelement and set to 8G:... <memory unit='KiB'>8388608</memory> ...
If the
currentMemoryelement does not exist, add it below thememoryelement, or change its value to 4G:[...] <memory unit='KiB'>8388608</memory> <currentMemory unit='KiB'>4194304</currentMemory> [...]
Changing the memory allocation while the VM Guest is running can be done
with the setmem subcommand. The following example
shows increasing the memory allocation to 8G:
Check VM Guest existing memory settings:
>sudovirsh dominfo sles15 | grep memoryMax memory: 8388608 KiB Used memory: 4194608 KiBChange the used memory to 8G:
>sudovirsh setmem sles15 8388608Check the updated memory settings:
>sudovirsh dominfo sles15 | grep memoryMax memory: 8388608 KiB Used memory: 8388608 KiB
Important: Large memory VM Guests
VM Guests with memory requirements of 4 TB or more must either
use the host-passthrough CPU mode, or explicitly
specify the virtual CPU address size when using
host-model or custom CPU modes.
The default virtual CPU address size may not be sufficient for memory
configurations of 4 TB or more. The following example shows how to
use the VM Host Server's physical CPU address size when using the
host-model CPU mode.
[...]
<cpu mode='host-model' check='partial'>
<maxphysaddr mode='passthrough'>
</cpu>
[...]
For more information on specifying virtual CPU address size, see the
maxphysaddr option in the CPU model and
topology documentation at
https://libvirt.org/formatdomain.html#cpu-model-and-topology.
14.7 Adding a PCI device #Edit source
To assign a PCI device to VM Guest with virsh, follow these steps:
Identify the host PCI device to assign to the VM Guest. In the following example, we are assigning a DEC network card to the guest:
>sudolspci -nn[...] 03:07.0 Ethernet controller [0200]: Digital Equipment Corporation DECchip \ 21140 [FasterNet] [1011:0009] (rev 22) [...]Write down the device ID (
03:07.0in this case).Gather detailed information about the device using
virsh
          nodedev-dumpxml ID
. To get the ID, replace the colon and the period in the device ID (03:07.0) with underscores. Prefix the result with “pci_0000_”:pci_0000_03_07_0.>sudovirsh nodedev-dumpxml pci_0000_03_07_0<device> <name>pci_0000_03_07_0</name> <path>/sys/devices/pci0000:00/0000:00:14.4/0000:03:07.0</path> <parent>pci_0000_00_14_4</parent> <driver> <name>tulip</name> </driver> <capability type='pci'> <domain>0</domain> <bus>3</bus> <slot>7</slot> <function>0</function> <product id='0x0009'>DECchip 21140 [FasterNet]</product> <vendor id='0x1011'>Digital Equipment Corporation</vendor> <numa node='0'/> </capability> </device>Write down the values for domain, bus and function (see the previous XML code printed in bold).
Detach the device from the host system before attaching it to the VM Guest:
>sudovirsh nodedev-detach pci_0000_03_07_0Device pci_0000_03_07_0 detachedTip: Multi-function PCI devices
When using a multi-function PCI device that does not support FLR (function level reset) or PM (power management) reset, you need to detach all its functions from the VM Host Server. The whole device must be reset for security reasons.
libvirtrefuses to assign the device if one of its functions is still in use by the VM Host Server or another VM Guest.Convert the domain, bus, slot, and function value from decimal to hexadecimal. In our example, domain = 0, bus = 3, slot = 7, and function = 0. Ensure that the values are inserted in the right order:
>printf "<address domain='0x%x' bus='0x%x' slot='0x%x' function='0x%x'/>\n" 0 3 7 0This results in:
<address domain='0x0' bus='0x3' slot='0x7' function='0x0'/>
Run
virsh editon your domain, and add the following device entry in the<devices>section using the result from the previous step:<hostdev mode='subsystem' type='pci' managed='yes'> <source> <address domain='0x0' bus='0x03' slot='0x07' function='0x0'/> </source> </hostdev>Tip:
managedcompared tounmanagedlibvirtrecognizes two modes for handling PCI devices: they can bemanagedorunmanaged. In the managed case,libvirthandles all details of unbinding the device from the existing driver if needed, resetting the device, binding it tovfio-pcibefore starting the domain, etc. When the domain is terminated or the device is removed from the domain,libvirtunbinds fromvfio-pciand rebinds to the original driver in the case of a managed device. If the device is unmanaged, the user must ensure that all these management aspects of the device are done before assigning it to a domain, and after the device is no longer used by the domain.In the example above, the
managed='yes'option means that the device is managed. To switch the device mode to unmanaged, setmanaged='no'in the listing above. If you do so, you need to take care of the related driver with thevirsh nodedev-detachandvirsh nodedev-reattachcommands. Before starting the VM Guest, you need to detach the device from the host by runningvirsh nodedev-detach pci_0000_03_07_0. In case the VM Guest is not running, you can make the device available for the host by runningvirsh nodedev-reattach pci_0000_03_07_0.Shut down the VM Guest and disable SELinux if it is running on the host.
>sudosetsebool -P virt_use_sysfs 1Start your VM Guest to make the assigned PCI device available:
>sudovirsh start sles15
Important: SLES11 SP4 KVM guests
On a newer QEMU machine type (pc-i440fx-2.0 or higher) with SLES 11
SP4 KVM guests, the acpiphp
module is not loaded by default in the guest. This module must be
loaded to enable hotplugging of disk and network devices. To load the
module manually, use the command modprobe acpiphp.
It is also possible to autoload the module by adding install
acpiphp /bin/true to the
/etc/modprobe.conf.local file.
Important: KVM guests using QEMU Q35 machine type
KVM guests using the QEMU Q35 machine type have a PCI topology that
includes a pcie-root controller and seven
pcie-root-port controllers. The
pcie-root controller does not support hotplugging.
Each pcie-root-port controller supports hotplugging
a single PCIe device. PCI controllers cannot be hotplugged, so plan
accordingly and add more pcie-root-ports to hotplug
more than seven PCIe devices. A pcie-to-pci-bridge
controller can be added to support hotplugging legacy PCI devices. See
https://libvirt.org/pci-hotplug.html for more
information about PCI topology between QEMU machine types.
14.7.1 PCI Pass-Through for IBM Z #Edit source
To support IBM Z, QEMU extended PCI representation by allowing the user to
configure extra attributes. Two more
attributes—uid and
fid—were added to the
<zpci/> libvirt specification.
uid represents user-defined identifier, while
fid represents PCI function identifier. These
attributes are optional and if you do not specify them, they are
automatically generated with non-conflicting values.
To include zPCI attribute in your domain specification, use the following example definition:
<controller type='pci' index='0' model='pci-root'/>
<controller type='pci' index='1' model='pci-bridge'>
  <model name='pci-bridge'/>
  <target chassisNr='1'/>
  <address type='pci' domain='0x0000' bus='0x00' slot='0x01' function='0x0'>
    <zpci uid='0x0001' fid='0x00000000'/>
  </address>
</controller>
<interface type='bridge'>
  <source bridge='virbr0'/>
  <model type='virtio'/>
  <address type='pci' domain='0x0000' bus='0x01' slot='0x01' function='0x0'>
    <zpci uid='0x0007' fid='0x00000003'/>
  </address>
</interface>
14.8 Adding a USB device #Edit source
To assign a USB device to VM Guest using virsh, follow these steps:
Identify the host USB device to assign to the VM Guest:
>sudolsusb[...] Bus 001 Device 003: ID 0557:2221 ATEN International Co., Ltd Winbond Hermon [...]Write down the vendor and product IDs. In our example, the vendor ID is
0557and the product ID is2221.Run
virsh editon your domain, and add the following device entry in the<devices>section using the values from the previous step:<hostdev mode='subsystem' type='usb'> <source startupPolicy='optional'> <vendor id='0557'/> <product id='2221'/> </source> </hostdev>Tip: Vendor/product or device's address
Instead of defining the host device with
<vendor/>and<product/>IDs, you can use the<address/>element as described for host PCI devices in Section 14.7, “Adding a PCI device”.Shut down the VM Guest and disable SELinux if it is running on the host:
>sudosetsebool -P virt_use_sysfs 1Start your VM Guest to make the assigned PCI device available:
>sudovirsh start sles15
14.9 Adding SR-IOV devices #Edit source
Single Root I/O Virtualization (SR-IOV) capable PCIe devices can replicate their resources, so they appear as multiple devices. Each of these “pseudo-devices” can be assigned to a VM Guest.
SR-IOV is an industry specification that was created by the Peripheral Component Interconnect Special Interest Group (PCI-SIG) consortium. It introduces physical functions (PF) and virtual functions (VF). PFs are full PCIe functions used to manage and configure the device. PFs also can move data. VFs lack the configuration and management part—they only can move data and a reduced set of configuration functions. As VFs do not have all PCIe functions, the host operating system or the Hypervisor must support SR-IOV to access and initialize VFs. The theoretical maximum for VFs is 256 per device (consequently the maximum for a dual-port Ethernet card would be 512). In practice, this maximum is much lower, since each VF consumes resources.
14.9.1 Requirements #Edit source
The following requirements must be met to use SR-IOV:
An SR-IOV-capable network card (as of , only network cards support SR-IOV)
An AMD64/Intel 64 host supporting hardware virtualization (AMD-V or Intel VT-x)
A chipset that supports device assignment (AMD-Vi or Intel VT-d)
libvirt0.9.10 or betterSR-IOV drivers must be loaded and configured on the host system
A host configuration that meets the requirements listed at Important: Requirements for VFIO and SR-IOV
A list of the PCI addresses of the VFs assigned to VM Guests
Tip: Checking if a device is SR-IOV-capable
The information whether a device is SR-IOV-capable can be obtained
from its PCI descriptor by running lspci. A device
that supports SR-IOV reports a capability
similar to the following:
Capabilities: [160 v1] Single Root I/O Virtualization (SR-IOV)
Note: Adding an SR-IOV device at VM Guest creation
Before adding an SR-IOV device to a VM Guest when initially setting it up, the VM Host Server already needs to be configured as described in Section 14.9.2, “Loading and configuring the SR-IOV host drivers”.
14.9.2 Loading and configuring the SR-IOV host drivers #Edit source
To access and initialize VFs, an SR-IOV-capable driver needs to be loaded on the host system.
Before loading the driver, make sure the card is properly detected by running
lspci. The following example shows thelspcioutput for the dual-port Intel 82576NS network card:>sudo/sbin/lspci | grep 8257601:00.0 Ethernet controller: Intel Corporation 82576NS Gigabit Network Connection (rev 01) 01:00.1 Ethernet controller: Intel Corporation 82576NS Gigabit Network Connection (rev 01) 04:00.0 Ethernet controller: Intel Corporation 82576NS Gigabit Network Connection (rev 01) 04:00.1 Ethernet controller: Intel Corporation 82576NS Gigabit Network Connection (rev 01)In case the card is not detected, the hardware virtualization support in the BIOS/EFI has probably not been enabled. To check if hardware virtualization support is enabled, look at the settings in the host's BIOS.
Check whether the SR-IOV driver is already loaded by running
lsmod. In the following example, a check for the igb driver (for the Intel 82576NS network card) returns a result. That means the driver is already loaded. If the command returns nothing, the driver is not loaded.>sudo/sbin/lsmod | egrep "^igb "igb 185649 0Skip the following step if the driver is already loaded. If the SR-IOV driver is not yet loaded, the non-SR-IOV driver needs to be removed first, before loading the new driver. Use
rmmodto unload a driver. The following example unloads the non-SR-IOV driver for the Intel 82576NS network card:>sudo/sbin/rmmod igbvfLoad the SR-IOV driver subsequently using the
modprobecommand—the VF parameter (max_vfs) is mandatory:>sudo/sbin/modprobe igb max_vfs=8
As an alternative, you can also load the driver via SYSFS:
Find the PCI ID of the physical NIC by listing Ethernet devices:
>sudolspci | grep Eth06:00.0 Ethernet controller: Emulex Corporation OneConnect NIC (Skyhawk) (rev 10) 06:00.1 Ethernet controller: Emulex Corporation OneConnect NIC (Skyhawk) (rev 10)To enable VFs, echo the number of desired VFs to load to the
sriov_numvfsparameter:>sudoecho 1 > /sys/bus/pci/devices/0000:06:00.1/sriov_numvfsVerify that the VF NIC was loaded:
>sudolspci | grep Eth06:00.0 Ethernet controller: Emulex Corporation OneConnect NIC (Skyhawk) (rev 10) 06:00.1 Ethernet controller: Emulex Corporation OneConnect NIC (Skyhawk) (rev 10) 06:08.0 Ethernet controller: Emulex Corporation OneConnect NIC (Skyhawk) (rev 10)Obtain the maximum number of VFs available:
>sudolspci -vvv -s 06:00.1 | grep 'Initial VFs'Initial VFs: 32, Total VFs: 32, Number of VFs: 0, Function Dependency Link: 01Create a
/etc/systemd/system/before.servicefile which loads VF via SYSFS on boot:[Unit] Before= [Service] Type=oneshot RemainAfterExit=true ExecStart=/bin/bash -c "echo 1 > /sys/bus/pci/devices/0000:06:00.1/sriov_numvfs" # beware, executable is run directly, not through a shell, check the man pages # systemd.service and systemd.unit for full syntax [Install] # target in which to start the service WantedBy=multi-user.target #WantedBy=graphical.target
Before starting the VM, it is required to create another service file (
after-local.service) pointing to the/etc/init.d/after.localscript that detaches the NIC. Otherwise the VM would fail to start:[Unit] Description=/etc/init.d/after.local Compatibility After=libvirtd.service Requires=libvirtd.service [Service] Type=oneshot ExecStart=/etc/init.d/after.local RemainAfterExit=true [Install] WantedBy=multi-user.target
Copy it to
/etc/systemd/system.#! /bin/sh # ... virsh nodedev-detach pci_0000_06_08_0
Save it as
/etc/init.d/after.local.Reboot the machine and check if the SR-IOV driver is loaded by re-running the
lspcicommand from the first step of this procedure. If the SR-IOV driver was loaded successfully you should see additional lines for the VFs:01:00.0 Ethernet controller: Intel Corporation 82576NS Gigabit Network Connection (rev 01) 01:00.1 Ethernet controller: Intel Corporation 82576NS Gigabit Network Connection (rev 01) 01:10.0 Ethernet controller: Intel Corporation 82576 Virtual Function (rev 01) 01:10.1 Ethernet controller: Intel Corporation 82576 Virtual Function (rev 01) 01:10.2 Ethernet controller: Intel Corporation 82576 Virtual Function (rev 01) [...] 04:00.0 Ethernet controller: Intel Corporation 82576NS Gigabit Network Connection (rev 01) 04:00.1 Ethernet controller: Intel Corporation 82576NS Gigabit Network Connection (rev 01) 04:10.0 Ethernet controller: Intel Corporation 82576 Virtual Function (rev 01) 04:10.1 Ethernet controller: Intel Corporation 82576 Virtual Function (rev 01) 04:10.2 Ethernet controller: Intel Corporation 82576 Virtual Function (rev 01) [...]
14.9.3 Adding a VF network device to a VM Guest #Edit source
When the SR-IOV hardware is properly set up on the VM Host Server, you can add VFs to VM Guests. To do so, you need to collect specific data first.
Procedure 14.2: Adding a VF network device to an existing VM Guest #
The following procedure uses example data. Replace it with appropriate data from your setup.
Use the
virsh nodedev-listcommand to get the PCI address of the VF you want to assign and its corresponding PF. Numerical values from thelspcioutput shown in Section 14.9.2, “Loading and configuring the SR-IOV host drivers” (for example01:00.0or04:00.1) are transformed by adding the prefixpci_0000_and by replacing colons and dots with underscores. So a PCI ID listed as04:00.0bylspciis listed aspci_0000_04_00_0by virsh. The following example lists the PCI IDs for the second port of the Intel 82576NS network card:>sudovirsh nodedev-list | grep 0000_04_pci_0000_04_00_0 pci_0000_04_00_1 pci_0000_04_10_0 pci_0000_04_10_1 pci_0000_04_10_2 pci_0000_04_10_3 pci_0000_04_10_4 pci_0000_04_10_5 pci_0000_04_10_6 pci_0000_04_10_7 pci_0000_04_11_0 pci_0000_04_11_1 pci_0000_04_11_2 pci_0000_04_11_3 pci_0000_04_11_4 pci_0000_04_11_5The first two entries represent the PFs, whereas the other entries represent the VFs.
Run the following
virsh nodedev-dumpxmlcommand on the PCI ID of the VF you want to add:>sudovirsh nodedev-dumpxml pci_0000_04_10_0<device> <name>pci_0000_04_10_0</name> <parent>pci_0000_00_02_0</parent> <capability type='pci'> <domain>0</domain> <bus>4</bus> <slot>16</slot> <function>0</function> <product id='0x10ca'>82576 Virtual Function</product> <vendor id='0x8086'>Intel Corporation</vendor> <capability type='phys_function'> <address domain='0x0000' bus='0x04' slot='0x00' function='0x0'/> </capability> </capability> </device>The following data is needed for the next step:
<domain>0</domain><bus>4</bus><slot>16</slot><function>0</function>
Create a temporary XML file (for example
/tmp/vf-interface.xmlcontaining the data necessary to add a VF network device to an existing VM Guest. The minimal content of the file needs to look like the following:<interface type='hostdev'>1 <source> <address type='pci' domain='0' bus='11' slot='16' function='0'2/>2 </source> </interface>
VFs do not get a fixed MAC address; it changes every time the host reboots. When adding network devices the “traditional” way with
hostdev, it would require to reconfigure the VM Guest's network device after each reboot of the host, because of the MAC address change. To avoid this kind of problem,libvirtintroduced thehostdevvalue, which sets up network-specific data before assigning the device.Specify the data you acquired in the previous step here.
In case a device is already attached to the host, it cannot be attached to a VM Guest. To make it available for guests, detach it from the host first:
>sudovirsh nodedev-detach pci_0000_04_10_0Add the VF interface to an existing VM Guest:
>sudovirsh attach-device GUEST /tmp/vf-interface.xml --OPTIONGUEST needs to be replaced by the domain name, ID or UUID of the VM Guest. --OPTION can be one of the following:
--persistentThis option always adds the device to the domain's persistent XML. If the domain is running, the device is hotplugged.
--configThis option affects the persistent XML only, even if the domain is running. The device appears in the VM Guest on next boot.
--liveThis option affects a running domain only. If the domain is inactive, the operation fails. The device is not persisted in the XML and becomes available in the VM Guest on next boot.
--currentThis option affects the current state of the domain. If the domain is inactive, the device is added to the persistent XML and becomes available on next boot. If the domain is active, the device is hotplugged but not added to the persistent XML.
To detach a VF interface, use the
virsh
            detach-device
command, which also takes the options listed above.
14.9.4 Dynamic allocation of VFs from a pool #Edit source
If you define the PCI address of a VF into a VM Guest's configuration statically as described in Section 14.9.3, “Adding a VF network device to a VM Guest”, it is hard to migrate such guest to another host. The host must have identical hardware in the same location on the PCI bus, or the VM Guest configuration must be modified before each start.
Another approach is to create a libvirt network with a device pool
that contains all the VFs of an SR-IOV device.
The VM Guest then references this network, and each time it is
started, a single VF is dynamically allocated to it. When the VM Guest
is stopped, the VF is returned to the pool, available for another
guest.
14.9.4.1 Defining network with pool of VFs on VM Host Server #Edit source
The following example of network definition creates a pool of all VFs
for the SR-IOV device with its physical
function (PF) at the network interface eth0 on the
host:
<network>
  <name>passthrough</name>
    <forward mode='hostdev' managed='yes'>
      <pf dev='eth0'/>
    </forward>
  </network>
To use this network on the host, save the above code to a file, for
example /tmp/passthrough.xml, and execute the
following commands. Remember to replace eth0 with
the real network interface name of your SR-IOV
device's PF:
>sudovirsh net-define /tmp/passthrough.xml>sudovirsh net-autostart passthrough>sudovirsh net-start passthrough
14.9.4.2 Configuring VM Guests to use VF from the pool #Edit source
The following example of VM Guest device interface definition uses a
VF of the SR-IOV device from the pool created
in Section 14.9.4.1, “Defining network with pool of VFs on VM Host Server”. libvirt
automatically derives the list of all VFs associated with that PF the
first time the guest is started.
<interface type='network'>
  <source network='passthrough'>
</interface>
After the first VM Guest starts that uses the network with the pool
of VFs, verify the list of associated VFs. Do so by running
virsh net-dumpxml passthrough on the host.
<network connections='1'>
  <name>passthrough</name>
  <uuid>a6a26429-d483-d4ed-3465-4436ac786437</uuid>
  <forward mode='hostdev' managed='yes'>
    <pf dev='eth0'/>
    <address type='pci' domain='0x0000' bus='0x02' slot='0x10' function='0x1'/>
    <address type='pci' domain='0x0000' bus='0x02' slot='0x10' function='0x3'/>
    <address type='pci' domain='0x0000' bus='0x02' slot='0x10' function='0x5'/>
    <address type='pci' domain='0x0000' bus='0x02' slot='0x10' function='0x7'/>
    <address type='pci' domain='0x0000' bus='0x02' slot='0x11' function='0x1'/>
    <address type='pci' domain='0x0000' bus='0x02' slot='0x11' function='0x3'/>
    <address type='pci' domain='0x0000' bus='0x02' slot='0x11' function='0x5'/>
  </forward>
  </network>
14.10 Listing attached devices #Edit source
Although there is no mechanism in virsh to list all VM Host Server's devices
that have already been attached to its VM Guests, you can list all
devices attached to a specific VM Guest by running the following
command:
virsh dumpxml VMGUEST_NAME | xpath -e /domain/devices/hostdev
For example:
>sudovirsh dumpxml sles12 | -e xpath /domain/devices/hostdev Found 2 nodes: -- NODE -- <hostdev mode="subsystem" type="pci" managed="yes"> <driver name="xen" /> <source> <address domain="0x0000" bus="0x0a" slot="0x10" function="0x1" /> </source> <address type="pci" domain="0x0000" bus="0x00" slot="0x0a" function="0x0" /> </hostdev> -- NODE -- <hostdev mode="subsystem" type="pci" managed="yes"> <driver name="xen" /> <source> <address domain="0x0000" bus="0x0a" slot="0x10" function="0x2" /> </source> <address type="pci" domain="0x0000" bus="0x00" slot="0x0b" function="0x0" /> </hostdev>
Tip: Listing SR-IOV devices attached via <interface type='hostdev'>
For SR-IOV devices that are attached to the VM Host Server via
<interface type='hostdev'>, you need to use a
different XPath query:
virsh dumpxml VMGUEST_NAME | xpath -e /domain/devices/interface/@type
14.11 Configuring storage devices #Edit source
Storage devices are defined within the disk element. The usual
disk element supports several attributes. The following two
attributes are the most important:
The
typeattribute describes the source of the virtual disk device. Valid values arefile,block,dir,network, orvolume.The
deviceattribute shows how the disk is exposed to the VM Guest OS. As an example, possible values can includefloppy,disk,cdrom, and others.
The following child elements are the most important:
drivercontains the driver and the bus. These are used by the VM Guest to work with the new disk device.The
targetelement contains the device name under which the new disk is shown in the VM Guest. It also contains the optional bus attribute, which defines the type of bus on which the new disk should operate.
The following procedure shows how to add storage devices to the VM Guest:
Edit the configuration for an existing VM Guest:
>sudovirsh edit sles15Add a
diskelement inside thediskelement together with the attributestypeanddevice:<disk type='file' device='disk'>
Specify a
driverelement and use the default values:<driver name='qemu' type='qcow2'/>
Create a disk image as a source for the new virtual disk device:
>sudoqemu-img create -f qcow2 /var/lib/libvirt/images/sles15.qcow2 32GAdd the path for the disk source:
<source file='/var/lib/libvirt/images/sles15.qcow2'/>
Define the target device name in the VM Guest and the bus on which the disk should work:
<target dev='vda' bus='virtio'/>
Restart your VM:
>sudovirsh start sles15
Your new storage device should be available in the VM Guest OS.
14.12 Configuring controller devices #Edit source
libvirt manages controllers automatically
based on the type of virtual devices used by the VM Guest. If the
VM Guest contains PCI and SCSI devices, PCI and SCSI controllers are
created and managed automatically. libvirt also models
controllers that are hypervisor-specific, for example, a
virtio-serial controller for KVM VM Guests or a
xenbus controller for Xen VM Guests. Although the
default controllers and their configuration are generally fine, there may
be use cases where controllers or their attributes need to be adjusted
manually. For example, a virtio-serial controller may need more ports, or
a xenbus controller may need more memory or more virtual interrupts.
The xenbus controller is unique in that it serves as the controller for
all Xen paravirtual devices. If a VM Guest has many disk and/or network
devices, the controller may need more memory. Xen's
max_grant_frames attribute sets how many grant frames,
or blocks of shared memory, are allocated to the
xenbus controller for each VM Guest.
The default of 32 is enough in most circumstances, but a VM Guest with
numerous I/O devices and an I/O-intensive workload may experience
performance issues because of grant frame exhaustion. The
xen-diag can check the current and maximum
max_grant_frames values for dom0 and your VM Guests.
The VM Guests must be running:
>sudovirsh list Id Name State -------------------------------- 0 Domain-0 running 3 sle15sp1 running>sudoxen-diag gnttab_query_size 0 domid=0: nr_frames=1, max_nr_frames=256>sudoxen-diag gnttab_query_size 3 domid=3: nr_frames=3, max_nr_frames=32
The sle15sp1 guest is using only three frames out of
32. If you are seeing performance issues, and log entries that point to
insufficient frames, increase the value with virsh. Look for the
<controller type='xenbus'> line in the guest's
configuration file and add the maxGrantFrames control
element:
>sudovirsh edit sle15sp1 <controller type='xenbus' index='0' maxGrantFrames='40'/>
Save your changes and restart the guest. Now it should show your change:
>sudoxen-diag gnttab_query_size 3 domid=3: nr_frames=3, max_nr_frames=40
Similar to maxGrantFrames, the xenbus controller also supports
maxEventChannels. Event channels are like paravirtual
interrupts, and in conjunction with grant frames, form a data transfer
mechanism for paravirtual drivers. They are also used for inter-processor
interrupts. VM Guests with a large number of vCPUs and/or many
paravirtual devices may need to increase the maximum default value of
1023. maxEventChannels can be changed similarly to maxGrantFrames:
>sudovirsh edit sle15sp1 <controller type='xenbus' index='0' maxGrantFrames='128' maxEventChannels='2047'/>
See the Controllers section of the libvirt Domain XML format manual at https://libvirt.org/formatdomain.html#elementsControllers for more information.
14.13 Configuring video devices #Edit source
When using the Virtual Machine Manager, only the Video device model can be defined. The amount of allocated VRAM or 2D/3D acceleration can only be changed in the XML configuration.
14.13.1 Changing the amount of allocated VRAM #Edit source
Edit the configuration for an existing VM Guest:
>sudovirsh edit sles15Change the size of the allocated VRAM:
<video>
<model type='vga' vram='65535' heads='1'>
...
</model>
</video>
Check if the amount of VRAM in the VM has changed by looking at the amount in the Virtual Machine Manager.
14.13.2 Changing the state of 2D/3D acceleration #Edit source
Edit the configuration for an existing VM Guest:
>sudovirsh edit sles15To enable/disable 2D/3D acceleration, change the value of
accel3dandaccel2daccordingly:<video> <model> <acceleration accel3d='yes' accel2d='no'> </model> </video>
Tip: Enabling 2D/3D acceleration
Only virtio and vbox video
devices are capable of 2D/3D acceleration. You cannot enable it on
other video devices.
14.14 Configuring network devices #Edit source
This section describes how to configure specific aspects of virtual
network devices by using virsh.
Find more details about libvirt network interface specification in
https://libvirt.org/formatdomain.html#elementsDriverBackendOptions.
14.14.1 Scaling network performance with multiqueue virtio-net #Edit source
The multiqueue virtio-net feature scales the network performance by allowing the VM Guest's virtual CPUs to transfer packets in parallel. Refer to Section 32.3.3, “Scaling network performance with multiqueue virtio-net” for more general information.
To enable multiqueue virtio-net for a specific VM Guest, edit its XML configuration as described in Section 14.1, “Editing the VM configuration” and modify its network interface as follows:
<interface type='network'>
 [...]
 <model type='virtio'/>
 <driver name='vhost' queues='NUMBER_OF_QUEUES'/>
</interface>
14.15 Using macvtap to share VM Host Server network interfaces #Edit source
Macvtap provides direct attachment of a VM Guest virtual interface to a host network interface. The macvtap-based interface extends the VM Host Server network interface and has its own MAC address on the same Ethernet segment. Typically, this is used to make both the VM Guest and the VM Host Server show up directly on the switch that the VM Host Server is connected to.
Note: Macvtap cannot be used with a Linux bridge
Macvtap cannot be used with network interfaces already connected to a Linux bridge. Before attempting to create the macvtap interface, remove the interface from the bridge.
Note: VM Guest to VM Host Server communication with macvtap
When using macvtap, a VM Guest can communicate with other VM Guests, and with other external hosts on the network. But it cannot communicate with the VM Host Server on which the VM Guest runs. This is the defined behavior of macvtap, because of the way the VM Host Server's physical Ethernet is attached to the macvtap bridge. Traffic from the VM Guest into that bridge that is forwarded to the physical interface cannot be bounced back up to the VM Host Server's IP stack. Similarly, traffic from the VM Host Server's IP stack that is sent to the physical interface cannot be bounced back up to the macvtap bridge for forwarding to the VM Guest.
Virtual network interfaces based on macvtap are supported by libvirt by
specifying an interface type of direct. For example:
<interface type='direct'>
   <mac address='aa:bb:cc:dd:ee:ff'/>
   <source dev='eth0' mode='bridge'/>
   <model type='virtio'/>
   </interface>
The operation mode of the macvtap device can be controlled with the
mode attribute. The following list shows its possible
values and a description for each:
vepa: all VM Guest packets are sent to an external bridge. Packets whose destination is a VM Guest on the same VM Host Server as where the packet originates from are sent back to the VM Host Server by the VEPA capable bridge (today's bridges are typically not VEPA capable).bridge: packets whose destination is on the same VM Host Server as where they originate from are directly delivered to the target macvtap device. Both origin and destination devices need to be inbridgemode for direct delivery. If either of them is invepamode, a VEPA capable bridge is required.private: all packets are sent to the external bridge and delivered to a target VM Guest on the same VM Host Server if they are sent through an external router or gateway and that device sends them back to the VM Host Server. This procedure is followed if either the source or destination device is in private mode.passthrough: a special mode that gives more power to the network interface. All packets are forwarded to the interface, allowing virtio VM Guests to change the MAC address or set promiscuous mode to bridge the interface or create VLAN interfaces on top of it. Note that a network interface is not shareable inpassthroughmode. Assigning an interface to a VM Guest disconnects it from the VM Host Server. For this reason SR-IOV virtual functions are often assigned to the VM Guest inpassthroughmode.
14.16 Disabling a memory balloon device #Edit source
Memory Balloon has become a default option for KVM. The device is added
to the VM Guest explicitly, so you do not need to add this element in
the VM Guest's XML configuration. If you want to disable Memory Balloon
in the VM Guest for any reason, you need to set
model='none' as shown below:
<devices>
   <memballoon model='none'/>
</device>
14.17 Configuring multiple monitors (dual head) #Edit source
libvirt supports a dual head configuration to display the video output
of the VM Guest on multiple monitors.
Important: No support for Xen
The Xen hypervisor does not support dual head configuration.
Procedure 14.3: Configuring dual head #
While the virtual machine is running, verify that the xf86-video-qxl package is installed in the VM Guest:
>rpm -q xf86-video-qxlShut down the VM Guest and start editing its configuration XML as described in Section 14.1, “Editing the VM configuration”.
Verify that the model of the virtual graphics card is “qxl”:
<video>
 <model type='qxl' ... />
Increase the
headsparameter in the graphics card model specification from the default1to2, for example:<video> <model type='qxl' ram='65536' vram='65536' vgamem='16384' heads='2' primary='yes'/> <alias name='video0'/> <address type='pci' domain='0x0000' bus='0x00' slot='0x01' function='0x0'/> </video>
Configure the virtual machine to use the Spice display instead of VNC:
<graphics type='spice' port='5916' autoport='yes' listen='0.0.0.0'>
 <listen type='address' address='0.0.0.0'/>
</graphics>
Start the virtual machine and connect to its display with
virt-viewer, for example:>virt-viewer --connect qemu+ssh://USER@VM_HOST/systemFrom the list of VMs, select the one whose configuration you have modified and confirm with .
After the graphical subsystem (Xorg) loads in the VM Guest, select › › to open a new window with the second monitor's output.
14.18 Crypto adapter pass-through to KVM guests on IBM Z #Edit source
14.18.1 Introduction #Edit source
IBM Z machines include cryptographic hardware with useful functions such as random number generation, digital signature generation, or encryption. KVM allows dedicating these crypto adapters to guests as pass-through devices. The means that the hypervisor cannot observe communications between the guest and the device.
14.18.2 What is covered #Edit source
This section describes how to dedicate a crypto adapter and domains on an IBM Z host to a KVM guest. The procedure includes the following basic steps:
Mask the crypto adapter and domains from the default driver on the host.
Load the
vfio-apdriver.Assign the crypto adapter and domains to the
vfio-apdriver.Configure the guest to use the crypto adapter.
14.18.3 Requirements #Edit source
You need to have the QEMU /
libvirtvirtualization environment correctly installed and functional.The
vfio_apandvfio_mdevmodules for the running kernel need to be available on the host operating system.
14.18.4 Dedicate a crypto adapter to a KVM host #Edit source
Verify that the
vfio_apandvfio_mdevkernel modules are loaded on the host:>lsmod | grep vfio_If any of them is not listed, load it manually, for example:
>sudomodprobe vfio_mdevCreate a new MDEV device on the host and verify that it was added:
uuid=$(uuidgen)
$ echo ${uuid} | sudo tee /sys/devices/vfio_ap/matrix/mdev_supported_types/vfio_ap-passthrough/create
dmesg | tail
[...]
[272197.818811] iommu: Adding device 24f952b3-03d1-4df2-9967-0d5f7d63d5f2 to group 0
[272197.818815] vfio_mdev 24f952b3-03d1-4df2-9967-0d5f7d63d5f2: MDEV: group_id = 0
Identify the device on the host's logical partition that you intend to dedicate to a KVM guest:
>ls -l /sys/bus/ap/devices/ [...] lrwxrwxrwx 1 root root 0 Nov 23 03:29 00.0016 -> ../../../devices/ap/card00/00.0016/ lrwxrwxrwx 1 root root 0 Nov 23 03:29 card00 -> ../../../devices/ap/card00/In this example, it is card
0queue16. To match the Hardware Management Console (HMC) configuration, you need to convert from16hexadecimal to22decimal.Mask the adapter from the
zcryptuse:>lszcrypt CARD.DOMAIN TYPE MODE STATUS REQUEST_CNT ------------------------------------------------- 00 CEX5C CCA-Coproc online 5 00.0016 CEX5C CCA-Coproc online 5Mask the adapter:
>cat /sys/bus/ap/apmask 0xffffffffffffffffffffffffffffffffffffffffffffffffffffffffffffffff echo -0x0 | sudo tee /sys/bus/ap/apmask 0x7fffffffffffffffffffffffffffffffffffffffffffffffffffffffffffffffMask the domain:
>cat /sys/bus/ap/aqmask 0xffffffffffffffffffffffffffffffffffffffffffffffffffffffffffffffff echo -0x0 | sudo tee /sys/bus/ap/aqmask 0xfffffdffffffffffffffffffffffffffffffffffffffffffffffffffffffffffAssign adapter 0 and domain 16 (22 decimal) to
vfio-ap:>sudoecho +0x0 > /sys/devices/vfio_ap/matrix/${uuid}/assign_adapter>echo +0x16 | sudo tee /sys/devices/vfio_ap/matrix/${uuid}/assign_domain>echo +0x16 | sudo tee /sys/devices/vfio_ap/matrix/${uuid}/assign_control_domainVerify the matrix that you have configured:
>cat /sys/devices/vfio_ap/matrix/${uuid}/matrix 00.0016Either create a new VM (refer to Chapter 9, Guest installation) and wait until it is initialized, or use an existing VM. In both cases, make sure the VM is shut down.
Change its configuration to use the MDEV device:
>sudovirsh edit VM_NAME [...] <hostdev mode='subsystem' type='mdev' model='vfio-ap'> <source> <address uuid='24f952b3-03d1-4df2-9967-0d5f7d63d5f2'/> </source> </hostdev> [...]Restart the VM:
>sudovirsh reboot VM_NAMELog in to the guest and verify that the adapter is present:
>lszcrypt CARD.DOMAIN TYPE MODE STATUS REQUEST_CNT ------------------------------------------------- 00 CEX5C CCA-Coproc online 1 00.0016 CEX5C CCA-Coproc online 1
14.18.5 Further reading #Edit source
The installation of virtualization components is detailed in Chapter 6, Installation of virtualization components.
The
vfio_aparchitecture is detailed in https://www.kernel.org/doc/Documentation/s390/vfio-ap.txt.A general outline together with a detailed procedure is described in https://bugs.launchpad.net/ubuntu/+source/linux/+bug/1787405.
The architecture of VFIO Mediated devices (MDEVs) is detailed in https://www.kernel.org/doc/html/latest/driver-api/vfio-mediated-device.html.
15 Xen to KVM migration guide #Edit source
As the KVM virtualization solution is becoming more and more popular among server administrators, many of them need a path to migrate their existing Xen based environments to KVM. As of now, there are no mature tools to automatically convert Xen VMs to KVM. There is, however, a technical solution that helps convert Xen virtual machines to KVM. The following information and procedures help you to perform such a migration.
Important: Migration procedure not supported
The migration procedure described in this document is not fully supported by SUSE. We provide it as a guidance only.
15.1 Migration to KVM using virt-v2v #Edit source
This section contains information to help you import virtual machines
from foreign hypervisors (such as Xen) to KVM managed by libvirt.
Tip: Microsoft Windows guests
This section is focused on converting Linux guests. Converting
Microsoft Windows guests using virt-v2v is the same
as converting Linux guests, except with regard to handling the Virtual
Machine Driver Pack (VMDP). Additional details on converting Windows
guests with the VMDP can be found separately at
Virtual
Machine Driver Pack documentation.
15.1.1 Introduction to virt-v2v #Edit source
virt-v2v is a command line tool to convert
VM Guests from a foreign hypervisor to run on KVM managed by
libvirt. It enables paravirtualized virtio drivers in the converted
virtual machine if possible. A list of supported operating systems and
hypervisors follows:
Supported guest operating systems #
SUSE Linux Enterprise Server
openSUSE
Red Hat Enterprise Linux
Fedora
Microsoft Windows Server 2003 and 2008
Supported source hypervisor #
Xen
Supported target hypervisor #
KVM (managed by
libvirt)
15.1.2 Installing virt-v2v #Edit source
The installation of virt-v2v is simple:
>sudozypper install virt-v2v
Remember that virt-v2v requires root
privileges, so you need to run it either as root, or via
sudo.
15.1.3 Converting virtual machines to run under KVM managed by libvirt #Edit source
virt-v2v converts virtual machines from the Xen
hypervisor to run under KVM managed by libvirt. To learn more about
libvirt and virsh, see
Part II, “Managing virtual machines with libvirt”. Additionally, all
virt-v2v command line options are explained in the
virt-v2v manual page (man 1
virt-v2v).
Before converting a virtual machine, make sure to complete the following steps:
Procedure 15.1: Preparing the environment for the conversion #
Create a new local storage pool.
virt-v2vcopies the storage of the source virtual machine to a local storage pool managed bylibvirt(the original disk image remains unchanged). You can create the pool either with Virtual Machine Manager orvirsh. For more information, see Section 8.2.2, “Managing storage with Virtual Machine Manager” and Section 8.2.1, “Managing storage withvirsh”.Prepare the local network interface.
Check that the converted virtual machine can use a local network interface on the VM Host Server. It is normally a network bridge and if it is not yet defined, create it with › › › › .
Note: Mappings of network devices
Network devices on the source Xen host can be mapped during the conversion process to corresponding network devices on the KVM target host. For example, the Xen bridge
br0can be mapped to the default KVM network device. Sample mappings can be found in/etc/virt-v2v.conf. To enable these mappings, modify the XML rule as necessary and ensure the section is not commented out with<!--and-->markers. For example:<network type='bridge' name='br0'> <network type='network' name='default'/> </network>
Tip: No network bridge
If there is no network bridge available, Virtual Machine Manager can optionally create it.
virt-v2v has the following basic command syntax:
virt-v2v -i INPUT_METHOD -os STORAGE_POOL SOURCE_VM
- input_method
There are two input methods:
libvirtorlibvirtxml. See the SOURCE_VM parameter for more information.- storage_pool
The storage pool you already prepared for the target virtual machine.
- source_vm
The source virtual machine to convert. It depends on the INPUT_METHOD parameter: for
libvirt, specify the name of a libvirt domain. Forlibvirtxml, specify the path to an XML file containing a libvirt domain specification.
Note: Conversion time
Conversion of a virtual machine takes a lot of system resources, mainly for copying the whole disk image for a virtual machine. Converting a single virtual machine typically takes up to 10 minutes.Virtual machines using large disk images can take much longer.
15.1.3.1 Conversion based on the libvirt XML description file #Edit source
This section describes how to convert a local Xen virtual machine
using the libvirt XML configuration file. This method is suitable
if the host is already running the KVM hypervisor. Make sure that
the libvirt XML file of the source virtual machine, and the
libvirt storage pool referenced from it are available on the local
host.
Obtain the
libvirtXML description of the source virtual machine.Tip: Obtaining the XML files
To obtain the
libvirtXML files of the source virtual machine, you must run the host OS under the Xen kernel. If you already rebooted the host to the KVM-enabled environment, reboot back to the Xen kernel, dump thelibvirtXML file, and then reboot back to the KVM environment.First identify the source virtual machine under virsh:
#virsh list Id Name State ---------------------------------------------------- [...] 2 sles12_xen running [...]sles12_xenis the source virtual machine to convert. Now export its XML and save it tosles12_xen.xml:#virsh dumpxml sles12_xen > sles12_xen.xmlVerify that all disk image paths are correct from the KVM host's perspective. This is not a problem when converting on one machine, but may require manual changes when converting using an XML dump from another host.
<source file='/var/lib/libvirt/images/XenPool/SLES.qcow2'/>
Tip: Copying images
To avoid copying an image twice, manually copy the disk image or images directly to the
libvirtstorage pool. Update the source file entries in the XML description file. Thevirt-v2vprocess detects the existing disks and converts them in place.Run
virt-v2vto convert to KVM virtual machine:#virt-v2v sles12_xen.xml1 \ -i LIBVIRTXML2 \ -os remote_host.example.com:/exported_dir3 \ --bridge br04 \ -on sles12_kvm5The XML description of the source Xen-based virtual machine.
virt-v2vreads the information about the source virtual machine from alibvirtXML file.Storage pool where the target virtual machine disk image is placed. In this example, the image is placed on an NFS share
/exported_diron theremote_host.example.comserver.The target KVM-based virtual machine uses the network bridge
br0on the host.The target virtual machine is renamed to
sles12_kvmto prevent name collision with the existing virtual machine of the same name.
15.1.3.2 Conversion based on the libvirt domain name #Edit source
This method is useful if you are still running libvirt under Xen,
and plan to reboot to the KVM hypervisor later.
Find the
libvirtdomain name of the virtual machine you want to convert.#virsh list Id Name State ---------------------------------------------------- [...] 2 sles12_xen running [...]sles12_xenis the source virtual machine to convert.Run
virt-v2vto convert to KVM virtual machine:#virt-v2v sles12_xen1 \ -i libvirt2 \ -os storage_pool3 \ --network eth04 \ -of qcow25 \ -oa sparse6 \ -on sles12_kvmThe domain name of the Xen-based virtual machine.
virt-v2vreads the information about the source virtual machine directly from the activelibvirtconnection.The target disk image is placed in a local
libvirtstorage pool.All guest bridges (or networks) are connected to a locally managed network.
Format for the disk image of the target virtual machine. Supported options are
raworqcow2.Whether the converted guest disk space is
sparseorpreallocated.
15.1.3.3 Converting a remote Xen virtual machine #Edit source
This method is useful if you need to convert a Xen virtual machine
running on a remote host. As virt-v2v connects to
the remote host via ssh, ensure the SSH service is
running on the host.
Note: Passwordless SSH access
virt-v2v requires a
passwordless SSH connection to the remote host. This means a
connection using an SSH key added to the ssh-agent. See
man ssh-keygen and man
ssh-add for more details on this. More information is
also available at Book “Security and Hardening Guide”, Chapter 22 “Securing network operations with OpenSSH”.
To connect to a remote libvirt connection, construct a valid
connection URI relevant for your remote host. In the following
example, the remote host name is
remote_host.example.com, and the user name for the
connection is root. The connection URI then looks as follows:
xen+ssh://root@remote_host.example.com/
For more information on libvirt connection URIs, see
https://libvirt.org/uri.html.
Find the
libvirtdomain name of the remote virtual machine you want to convert.#virsh -c xen+ssh://root@remote_host.example.com/ list Id Name State ---------------------------------------------------- 1 sles12_xen running [...]sles12_xenis the source virtual machine to convert.The
virt-v2vcommand for the remote connection looks like this:#virt-v2v sles12_xen \ -i libvirt \ -ic xen+ssh://root@remote_host.example.com/ \ -os local_storage_pool \ --bridge br0
15.1.4 Running converted virtual machines #Edit source
After virt-v2v completes successfully, a new
libvirt domain is created with the name specified with the
-on option. If you did not specify
-on, the same name as the source virtual machine is
used. The new guest can be managed with standard libvirt tools, such
as virsh or Virtual Machine Manager.
Tip: Rebooting the machine
If you completed the conversion under Xen as described in
Section 15.1.3.2, “Conversion based on the libvirt domain name”, you may need to reboot
the host machine and boot with the non-Xen kernel.
15.2 Xen to KVM manual migration #Edit source
15.2.1 General outline #Edit source
The preferred solution to manage virtual machines is based on
libvirt; for more information, see
https://libvirt.org/. It has several
advantages over the manual way of defining and running virtual
machines—libvirt is cross-platform, supports many hypervisors,
has secure remote management, has virtual networking, and, most of all,
provides a unified abstract layer to manage virtual machines. Therefore
the main focus of this article is on the libvirt solution.
Generally, the Xen to KVM migration consists of the following basic steps:
Make a backup copy of the original Xen VM Guest.
Optionally, apply changes specific to paravirtualized guests.
Obtain information about the original Xen VM Guest and update it to KVM equivalents.
Shut down the guest on the Xen host, and run the new one under the KVM hypervisor.
Warning: No live migration
The Xen to KVM migration cannot be done live while the source VM Guest is running. Before running the new KVM-ready VM Guest, you are advised to shut down the original Xen VM Guest.
15.2.2 Back up the Xen VM Guest #Edit source
To back up your Xen VM Guest, follow these steps:
Identify the relevant Xen guest you want to migrate, and remember its ID/name.
>sudovirsh list --all Id Name State ---------------------------------- 0 Domain-0 running 1 SLES15SP3 running [...]Shut down the guest. You can do this either by shutting down the guest OS, or with
virsh:>sudovirsh shutdown SLES11SP3Back up its configuration to an XML file.
>sudovirsh dumpxml SLES11SP3 > sles11sp3.xmlBack up its disk image file. Use the
cporrsynccommands to create the backup copy. Remember that it is always a good idea to check the copy with themd5sumcommand.After the image file is backed up, you can start the guest again with
>sudovirsh start SLES11SP3
15.2.3 Changes specific to paravirtualized guests #Edit source
Apply the following changes if you are migrating a paravirtualized
Xen guest. You can do it either on the running guest, or on the
stopped guest using guestfs-tools.
Important
After applying the changes described in this section, the image file related to the migrated VM Guest is not usable under Xen anymore.
15.2.3.1 Install the default kernel #Edit source
Warning: No booting
After installing the default kernel, the system fails to boot the Xen guest.
Before cloning the Xen guest disk image for use under the KVM hypervisor, make sure it is bootable without the Xen hypervisor. This is crucial for paravirtualized Xen guests as they normally contain a special Xen kernel, and often do not have a complete GRUB 2 boot loader installed.
For SLES 11, update the
/etc/sysconfig/kernelfile. Change theINITRD_MODULESparameter by removing all Xen drivers and replacing them with virtio drivers. ReplaceINITRD_MODULES="xenblk xennet"
with
INITRD_MODULES="virtio_blk virtio_pci virtio_net virtio_balloon"
For SLES 12, 15, and openSUSE search for
xenblk xennetin/etc/dracut.conf.d/*.confand replace them withvirtio_blk virtio_pci virtio_net virtio_balloonParavirtualized Xen guests run a specific Xen kernel. To run the guest under KVM, you need to install the default kernel.
Note: Default kernel is already installed
You do not need to install the default kernel for a fully virtualized guest, as it is already installed.
Enter
rpm -q kernel-defaulton the Xen guest to find out whether the default kernel is installed. If not, install it withzypper in kernel-default.The kernel we are going to use to boot the guest under KVM must have virtio (paravirtualized) drivers available. Run the following command to find out. Do not forget to replace
5.3.18-8with your kernel version:>sudosudo find /lib/modules/5.3.18-8-default/kernel/drivers/ -name virtio* /lib/modules/5.3.18-8-default/kernel/drivers/block/virtio_blk.ko /lib/modules/5.3.18-8-default/kernel/drivers/char/hw_random/virtio-rng.ko /lib/modules/5.3.18-8-default/kernel/drivers/char/virtio_console.ko /lib/modules/5.3.18-8-default/kernel/drivers/crypto/virtio ...Update
/etc/fstab. Change any storage devices fromxvdatovda.Update the boot loader configuration. Enter
rpm -q
              grub2
on the Xen guest to find out whether GRUB 2 is already installed. If not, install it withzypper in grub2.Now make the newly installed default kernel the default for booting the OS. Also remove/update the kernel command line options that may refer to Xen-specific devices. You can do it either with YaST ( › ), or manually:
Find the preferred Linux boot menu entry by listing them all:
>cat /boot/grub2/grub.cfg | grep 'menuentry 'Remember the order number (counted from zero) of the one you newly installed.
Set it as the default boot menu entry:
>sudogrub2-set-default NReplace N with the number of the boot menu entry you previously discovered.
Open
/etc/default/grubfor editing, and look for theGRUB_CMDLINE_LINUX_DEFAULTandGRUB_CMDLINE_LINUX_RECOVERYoptions. Remove or update any reference to Xen-specific devices. In the following example, you can replaceroot=/dev/xvda1 disk=/dev/xvda console=xvc
with
root=/dev/vda1 disk=/dev/vda
Do not forget to remove all references to
xvc-type consoles (such asxvc0).
Update
device.mapin either the/boot/grub2or/boot/grub2-efidirectory, whichever that VM uses. Change any storage devices fromxvdatovda.To import new default settings, run
grub2-mkconfig -o /boot/grub2/grub.cfg
15.2.3.2 Update the guest for boot under KVM #Edit source
Update the system to use the default serial console. List the configured consoles, and remove symbolic links to
xvc?ones.>sudols -l /etc/systemd/system/getty.target.wants/ getty@tty1.service -> /usr/lib/systemd/system/getty@.service getty@xvc0.service -> /usr/lib/systemd/system/getty@xvc0.service getty@xvc1.service -> /usr/lib/systemd/system/getty@xvc1.service # rm /etc/systemd/system/getty.target.wants/getty@xvc?.serviceUpdate the
/etc/securettyfile. Replacexvc0withttyS0.
15.2.4 Update the Xen VM Guest configuration #Edit source
This section describes how to export the configuration of the original
Xen VM Guest, and what particular changes to apply to it so it can
be imported as a KVM guest into libvirt.
15.2.4.1 Export the Xen VM Guest configuration #Edit source
First export the configuration of the guest and save it to a file. For example:
>sudovirsh dumpxml SLES11SP3 <domain type='xen'> <name>SLES11SP3</name> <uuid>fa9ea4d7-8f95-30c0-bce9-9e58ffcabeb2</uuid> <memory>524288</memory> <currentMemory>524288</currentMemory> <vcpu>1</vcpu> <bootloader>/usr/bin/pygrub</bootloader> <os> <type>linux</type> </os> <clock offset='utc'/> <on_poweroff>destroy</on_poweroff> <on_reboot>restart</on_reboot> <on_crash>restart</on_crash> <devices> <emulator>/usr/lib/xen/bin/qemu-dm</emulator> <disk type='file' device='disk'> <driver name='file'/> <source file='/var/lib/libvirt/images/SLES_11_SP2_JeOS.x86_64-0.0.2_para.raw'/> <target dev='xvda' bus='xen'/> </disk> <interface type='bridge'> <mac address='00:16:3e:2d:91:c3'/> <source bridge='br0'/> <script path='vif-bridge'/> </interface> <console type='pty'> <target type='xen' port='0'/> </console> <input type='mouse' bus='xen'/> <graphics type='vnc' port='-1' autoport='yes' keymap='en-us'/> </devices> </domain>
You can find detailed information on the libvirt XML format for VM Guest description at https://libvirt.org/formatdomain.html.
15.2.4.2 General changes to the guest configuration #Edit source
You need to make a few general changes to the exported Xen guest XML configuration to run it under the KVM hypervisor. The following applies to both fully virtualized and paravirtualized guests. The following XML elements are just an example and do not need to be in your specific configuration.
Tip: Conventions used
To refer to a node in the XML configuration file, an XPath syntax
is used throughout this document. For example, to refer to a
<name> inside the
<domain> tag
<domain>
  <name>sles11sp3</name>
</domain>
an XPath equivalent /domain/name is used.
Change the
typeattribute of the/domainelement fromxentokvm.Remove the
/domain/bootloaderelement section.Remove the
/domain/bootloader_argselement section.Change the
/domain/os/typeelement value fromlinuxtohvm.Add
<boot dev="hd"/>under the/domain/oselement.Add the
archattribute to the/domain/os/typeelement. Acceptable values arearch=”x86_64”orarch=”i686”Change the
/domain/devices/emulatorelement from/usr/lib/xen/bin/qemu-dm'to/usr/bin/qemu-kvm.For each disk associated with the paravirtualized (PV) guest, change the following:
Change the
nameattribute of the/domain/devices/disk/driverelement fromfiletoqemu, and add atypeattribute for the disk type. For example, valid options includerawandqcow2.Change the
devattribute of the/domain/devices/disk/targetelement fromxvdatovda.Change the
busattribute of the/domain/devices/disk/targetelement fromxentovirtio.
For each network interface card, make the following changes:
If there is a
modeldefined in/domain/devices/interface, change itstypeattribute value tovirtio<model type=”virtio”>
Delete all
/domain/devices/interface/scriptsections.Delete all
/domain/devices/interface/targetelements if thedevattribute starts withviforvnetorveth. If using a custom network then change thedevvalue to that target.
Remove the
/domain/devices/consoleelement section if it exists.Remove the
/domain/devices/serialelement section if it exists.Change the
busattribute on the/domain/devices/inputelement fromxentops2.Add the following element for memory ballooning features under the
/domain/deviceselement.<memballoon model="virtio"/>
Tip: Device name
<target dev='hda' bus='ide'/> controls the
device under which the disk is exposed to the guest OS. The
dev attribute indicates the
“logical” device name. The actual device name
specified is not guaranteed to map to the device name in the guest
OS. Therefore you may need to change the disk mapping on the boot
loader command line. For example, if the boot loader expects a root
disk to be hda2 but KVM still sees it as
sda2, change the boot loader command line from
[...] root=/dev/hda2 resume=/dev/hda1 [...]
to
[...] root=/dev/sda2 resume=/dev/sda1 [...]
For paravirtualized xvda devices, change it to:
[...] root=/dev/vda2 resume=/dev/vda1 [...]
Otherwise the VM Guest refuses to boot in the KVM environment.
15.2.4.3 The target KVM guest configuration #Edit source
After having applied all the modifications mentioned above, you end up with the following configuration for your KVM guest:
<domain type='kvm'>
  <name>SLES11SP3</name>
  <uuid>fa9ea4d7-8f95-30c0-bce9-9e58ffcabeb2</uuid>
  <memory>524288</memory>
  <currentMemory>524288</currentMemory>
  <vcpu cpuset='0-3'>1</vcpu>
  <os>
    <type arch=”x86_64”>hvm</type>
    <boot dev="hd"/>
  </os>
  <clock offset='utc'/>
  <on_poweroff>destroy</on_poweroff>
  <on_reboot>restart</on_reboot>
  <on_crash>restart</on_crash>
  <devices>
    <emulator>/usr/bin/qemu-kvm</emulator>
    <disk type='file' device='disk'>
      <driver name='qemu' type="raw"/>
      <source file='/var/lib/libvirt/images/SLES_11_SP2_JeOS.x86_64-0.0.2_para.raw'/>
      <target dev='vda' bus='virtio'/>
    </disk>
    <interface type='bridge'>
      <mac address='00:16:3e:2d:91:c3'/>
      <source bridge='br0'/>
    </interface>
    <input type='mouse' bus='usb'/>
    <graphics type='vnc' port='5900' autoport='yes' keymap='en-us'/>
    <memballoon model="virtio"/>
  </devices>
</domain>
Save the configuration to a file in your home directory, as
SLES11SP3.xml, for example. It gets copied to
the default /etc/libvirt/qemu directory after
the import.
15.2.5 Migrate the VM Guest #Edit source
After you updated the VM Guest configuration, and applied necessary changes to the guest OS, shut down the original Xen guest, and run its clone under the KVM hypervisor.
Shut down the guest on the Xen host by running
shutdown -h nowasrootfrom the console.Copy the disk images associated with the VM Guest if needed. A default configuration requires the Xen disk files to be copied from
/var/lib/xen/imagesto/var/lib/kvm/images. The/var/lib/kvm/imagesdirectory may need to be created (asroot) if you have not previously created a VM Guest.Create the new domain, and register it with
libvirt:>sudovirsh define SLES11SP3.xml Domain SLES11SP3 defined from SLES11SP3.xmlVerify that the new guest is seen in the KVM configuration:
>virsh list –allAfter the domain is created, you can start it:
>sudovirsh start SLES11SP3 Domain SLES11SP3 started
15.3 More information #Edit source
For more information on libvirt, see https://libvirt.org.
You can find more details on the libvirt XML format at
https://libvirt.org/formatdomain.html.
Part III Hypervisor-independent features #Edit source
- 16 Disk cache modes
- 17 VM Guest clock settings
Keeping the correct time in a VM Guest is one of the more difficult aspects of virtualization. Keeping the correct time is especially important for network applications and is also a prerequisite to do a live migration of a VM Guest.
- 18 libguestfs
Virtual Machines consist of disk images and definition files. Manually accessing and manipulating these guest components (outside of normal hypervisor processes) is possible, but inherently dangerous and risks compromising data integrity. libguestfs is a C library and a corresponding set of tools designed for safely accessing and modifying Virtual Machine disk images—outside of normal hypervisor processes, but without the risk normally associated with manual editing.
- 19 QEMU guest agent
The QEMU guest agent (GA) runs inside the VM Guest and allows the VM Host Server to run commands in the guest operating system via
libvirt. It supports many functions—for example, getting details about guest file systems, freezing and thawing file systems, or suspending or rebooting a guest.- 20 Software TPM emulator
The Trusted Platform Module (TPM) is a cryptoprocessor that secures hardware using cryptographic keys. For developers who use the TPM to develop security features, a software TPM emulator is a convenient solution. Compared to a hardware TPM device, the emulator has no limit on the number of guests t…
- 21 Creating crash dumps of a VM Guest
Whenever a VM crashes, it is useful to collect a core dump of the VM memory for debugging and analysis. For physical machines, Kexec and Kdump takes care of collecting crash dumps. For virtual machines, it depends whether the guest is fully virtualized (FV) or paravirtualized (PV).
16 Disk cache modes #Edit source
16.1 What is a disk cache? #Edit source
A disk cache is a memory used to speed up the process of storing and accessing data from the hard disk. Physical hard disks have their cache integrated as a standard feature. For virtual disks, the cache uses VM Host Server's memory and you can fine-tune its behavior, for example, by setting its type.
16.2 How does a disk cache work? #Edit source
Normally, a disk cache stores the most recent and frequently used programs and data. When a user or program requests data, the operating system first checks the disk cache. If the data is there, the operating system quickly delivers the data to the program instead of re-reading the data from the disk.
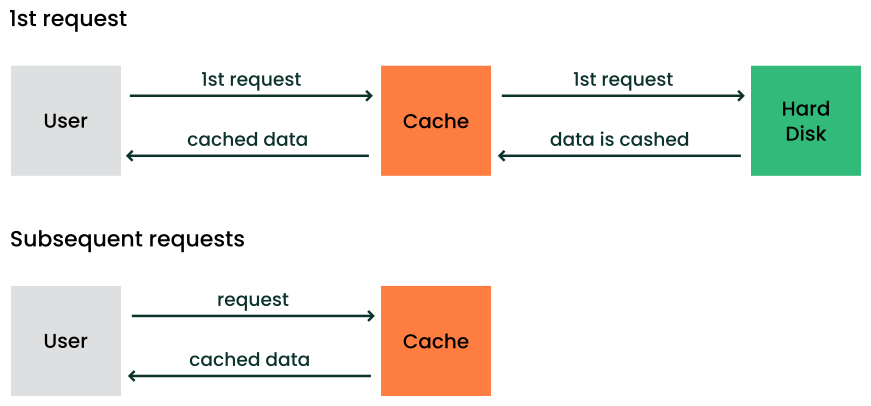
Figure 16.1: Caching mechanism #
16.3 Benefits of disk caching #Edit source
Caching of virtual disk devices affects the overall performance of guest machines. You can improve the performance by optimizing the combination of cache mode, disk image format, and storage subsystem.
16.4 Virtual disk cache modes #Edit source
If you do not specify a cache mode, writeback is used
by default. Each guest disk can use one of the following cache modes:
- writeback
writebackuses the host page cache. Writes are reported to the guest as completed when they are placed in the host cache. Cache management handles commitment to the storage device. The guest's virtual storage adapter is informed of the writeback cache and therefore expected to send flush commands as needed to manage data integrity.- writethrough
Writes are reported as completed only when the data has been committed to the storage device. The guest's virtual storage adapter is informed that there is no writeback cache, so the guest does not need to send flush commands to manage data integrity.
- none
The host cache is bypassed, and reads and writes happen directly between the hypervisor and the storage device. Because the actual storage device may report a write as completed when the data is still placed in its write queue only, the guest's virtual storage adapter is informed that there is a writeback cache. This mode is equivalent to direct access to the host's disk.
- unsafe
Similar to the writeback mode, except all flush commands from the guests are ignored. Using this mode implies that the user prioritizes performance gain over the risk of data loss in case of a host failure. This mode can be useful during guest installation, but not for production workloads.
- directsync
Writes are reported as completed only when the data has been committed to the storage device and the host cache is bypassed. Similar to writethrough, this mode can be useful for guests that do not send flushes when needed.
16.5 Cache modes and data integrity #Edit source
- writethrough, none, directsync
These modes are considered to be safest when the guest operating system uses flushes as needed. For unsafe or unstable guests, use writethough or directsync.
- writeback
This mode informs the guest of the presence of a write cache, and it relies on the guest to send flush commands as needed to maintain data integrity within its disk image. This mode exposes the guest to data loss if the host fails. The reason is the gap between the moment a write is reported as completed and the time the write being committed to the storage device.
- unsafe
This mode is similar to writeback caching, except the guest flush commands are ignored. This means a higher risk of data loss caused by host failure.
16.6 Cache modes and live migration #Edit source
The caching of storage data restricts the configurations that support
live migration. Currently, only raw and
qcow2 image formats can be used for live migration. If
a clustered file system is used, all cache modes support live migration.
Otherwise the only cache mode that supports live migration on read/write
shared storage is none.
The libvirt management layer includes checks for migration
compatibility based on several factors. If the guest storage is hosted on
a clustered file system, is read-only, or is marked shareable, then the
cache mode is ignored when determining if migration can be allowed.
Otherwise libvirt does not allow migration unless the cache mode is set
to none. However, this restriction can be overridden
with the “--unsafe” option to the migration APIs, which is
also supported by virsh. For example
> virsh migrate --live --unsafeTip
The cache mode none is required for the AIO mode
setting native. If another cache mode is used, the
AIO mode is silently switched back to the default
threads.
17 VM Guest clock settings #Edit source
Abstract#
Keeping the correct time in a VM Guest is one of the more difficult aspects of virtualization. Keeping the correct time is especially important for network applications and is also a prerequisite to do a live migration of a VM Guest.
Tip: Timekeeping on the VM Host Server
It is strongly recommended to ensure the VM Host Server keeps the correct time as well, for example, by using NTP (see Book “Reference”, Chapter 18 “Time synchronization with NTP” for more information).
17.1 KVM: using kvm_clock #Edit source
KVM provides a paravirtualized clock which is supported via the
kvm_clock driver. It is strongly recommended to
use kvm_clock.
Use the following command inside a VM Guest running Linux to check
whether the driver kvm_clock has been loaded:
>sudodmesg | grep kvm-clock [ 0.000000] kvm-clock: cpu 0, msr 0:7d3a81, boot clock [ 0.000000] kvm-clock: cpu 0, msr 0:1206a81, primary cpu clock [ 0.012000] kvm-clock: cpu 1, msr 0:1306a81, secondary cpu clock [ 0.160082] Switching to clocksource kvm-clock
To check which clock source is currently used, run the following command
in the VM Guest. It should output kvm-clock:
> cat /sys/devices/system/clocksource/clocksource0/current_clocksourceImportant: kvm-clock and NTP
When using kvm-clock, it is recommended to use NTP
in the VM Guest, as well. Using NTP on the VM Host Server is also
recommended.
17.1.1 Other timekeeping methods #Edit source
The paravirtualized kvm-clock is currently not for
Windows* operating systems. For Windows*, use the Windows Time
Service Tools for time synchronization.
17.2 Xen virtual machine clock settings #Edit source
With Xen 4, the independent wallclock setting
/proc/sys/xen/independent_wallclock used for time
synchronization between Xen host and guest was removed. A new
configuration option tsc_mode was introduced. It
specifies a method of using the time stamp counter
to synchronize the guest time with the Xen server. Its default value 0
handles the most hardware and software environments.
For more details on tsc_mode, see the
xen-tscmode manual page (man 7
xen-tscmode).
18 libguestfs #Edit source
Abstract#
Virtual Machines consist of disk images and definition files. Manually accessing and manipulating these guest components (outside of normal hypervisor processes) is possible, but inherently dangerous and risks compromising data integrity. libguestfs is a C library and a corresponding set of tools designed for safely accessing and modifying Virtual Machine disk images—outside of normal hypervisor processes, but without the risk normally associated with manual editing.
Important
Using libguestfs tools is fully supported on the AMD64/Intel 64 architecture only.
18.1 VM Guest manipulation overview #Edit source
18.1.1 VM Guest manipulation risk #Edit source
As disk images and definition files are simply another type of file in a Linux environment, it is possible to use many tools to access, edit and write to these files. When used correctly, such tools can be an important part of guest administration. However, even correct usage of these tools is not without risk. Risks that should be considered when manually manipulating guest disk images include:
Data Corruption: concurrently accessing images, by the host machine or another node in a cluster, can cause changes to be lost or data corruption to occur if virtualization protection layers are bypassed.
Security: mounting disk images as loop devices requires root access. While an image is loop mounted, other users and processes can potentially access the disk contents.
Administrator Error: bypassing virtualization layers correctly requires advanced understanding of virtual components and tools. Failing to isolate the images or failing to clean up properly after changes have been made can lead to further problems once back in virtualization control.
18.1.2 libguestfs design #Edit source
libguestfs C library has been designed to safely and securely create, access and modify virtual machine (VM Guest) disk images. It also provides additional language bindings: for Perl, Python, PHP (only for 64-bit machines), and Ruby. libguestfs can access VM Guest disk images without needing root and with multiple layers of defense against rogue disk images.
libguestfs provides many tools designed for accessing and modifying VM Guest disk images and contents. These tools provide such capabilities as: viewing and editing files inside guests, scripting changes to VM Guests, monitoring disk used/free statistics, creating guests, doing V2V or P2V migrations, performing backups, cloning VM Guests, formatting disks, and resizing disks.
Warning: Best practices
You must not use libguestfs tools on live virtual machines. Doing so may result in disk corruption in the VM Guest. libguestfs tools try to stop you from doing this, but cannot catch all cases.
However, most commands have the --ro (read-only)
option. With this option, you can run a command on a live virtual
machine. The results may be strange or inconsistent but you do not
risk disk corruption.
18.2 Package installation #Edit source
libguestfs is shipped through 4 packages:
libguestfs0: which provides the main C libraryguestfs-data: which contains the appliance files used when launching images (stored in/usr/lib64/guestfs)guestfs-tools: the core guestfs tools, man pages, and the/etc/libguestfs-tools.confconfiguration file.guestfs-winsupport: provides support for Windows file guests in the guestfs tools. This package only needs to be installed to handle Windows guests, for example when converting a Windows guest to KVM.
To install guestfs tools on your system run:
>sudozypper in guestfs-tools
18.3 Guestfs tools #Edit source
18.3.1 Modifying virtual machines #Edit source
The set of tools found within the guestfs-tools package is used for
accessing and modifying virtual machine disk images. This functionality
is provided through a familiar shell interface with built-in safeguards
which ensure image integrity. Guestfs tools shells expose all
capabilities of the guestfs API, and create an appliance on the fly
using the packages installed on the machine and the files found in
/usr/lib64/guestfs.
18.3.2 Supported file systems and disk images #Edit source
Guestfs tools support multiple file systems including:
Ext2, Ext3, Ext4
Xfs
Btrfs
Multiple disk image formats are also supported:
raw
qcow2
Warning: Unsupported file systems
Guestfs may also support Windows* file systems (VFAT, NTFS), BSD* and Apple* file systems, and other disk image formats (VMDK, VHDX...). However, these file systems and disk image formats are unsupported on openSUSE Leap.
18.3.3 virt-rescue #Edit source
virt-rescue is similar to a rescue CD, but for
virtual machines, and without the need for a CD. virt-rescue presents
users with a rescue shell and several simple recovery tools which can
be used to examine and correct problems within a virtual machine or
disk image.
> virt-rescue -a sles.qcow2
Welcome to virt-rescue, the libguestfs rescue shell.
Note: The contents of / are the rescue appliance.
You need to mount the guest's partitions under /sysroot
before you can examine them. A helper script for that exists:
mount-rootfs-and-do-chroot.sh /dev/sda2
><rescue>
[ 67.194384] EXT4-fs (sda1): mounting ext3 file system
using the ext4 subsystem
[ 67.199292] EXT4-fs (sda1): mounted filesystem with ordered data
mode. Opts: (null)
mount: /dev/sda1 mounted on /sysroot.
mount: /dev bound on /sysroot/dev.
mount: /dev/pts bound on /sysroot/dev/pts.
mount: /proc bound on /sysroot/proc.
mount: /sys bound on /sysroot/sys.
Directory: /root
Thu Jun 5 13:20:51 UTC 2014
(none):~ #You are now running the VM Guest in rescue mode:
(none):~ # cat /etc/fstab devpts /dev/pts devpts mode=0620,gid=5 0 0 proc /proc proc defaults 0 0 sysfs /sys sysfs noauto 0 0 debugfs /sys/kernel/debug debugfs noauto 0 0 usbfs /proc/bus/usb usbfs noauto 0 0 tmpfs /run tmpfs noauto 0 0 /dev/disk/by-id/ata-QEMU_HARDDISK_QM00001-part1 / ext3 defaults 1 1
18.3.4 virt-resize #Edit source
virt-resize is used to resize a virtual machine
disk, making it larger or smaller overall, and resizing or deleting any
partitions contained within.
Procedure 18.1: Expanding a disk #
Full step-by-step example: how to expand a virtual machine disk
First, with virtual machine powered off, determine the size of the partitions available on this virtual machine:
>virt-filesystems --long --parts --blkdevs -h -a sles.qcow2 Name Type MBR Size Parent /dev/sda1 partition 83 16G /dev/sda /dev/sda device - 16G -virt-resizecannot do in-place disk modifications—there must be sufficient space to store the resized output disk. Use thetruncatecommand to create a file of suitable size:>truncate -s 32G outdisk.imgUse
virt-resizeto resize the disk image.virt-resizerequires two mandatory parameters for the input and output images:>virt-resize --expand /dev/sda1 sles.qcow2 outdisk.img Examining sles.qcow2 ... ********** Summary of changes: /dev/sda1: This partition will be resized from 16,0G to 32,0G. The filesystem ext3 on /dev/sda1 will be expanded using the 'resize2fs' method. ********** Setting up initial partition table on outdisk.img ... Copying /dev/sda1 ... ◐ 84% ⟦▒▒▒▒▒▒▒▒▒▒▒▒▒▒▒▒▒▒▒▒▒▒▒▒▒▒▒▒▒▒▒▒▒▒▒▒▒▒▒▒▒▒▒▒▒▒▒▒▒▒▒▒▒▒▒▒▒▒▒▒▒▒▒▒════════⟧ 00:03 Expanding /dev/sda1 using the 'resize2fs' method ... Resize operation completed with no errors. Before deleting the old disk, carefully check that the resized disk boots and works correctly.Confirm the image was resized properly:
>virt-filesystems --long --parts --blkdevs -h -a outdisk.img Name Type MBR Size Parent /dev/sda1 partition 83 32G /dev/sda /dev/sda device - 32G -Bring up the VM Guest using the new disk image and confirm correct operation before deleting the old image.
18.3.5 Other virt-* tools #Edit source
There are guestfs tools to simplify administrative tasks—such as viewing and editing files, or obtaining information on the virtual machine.
18.3.5.1 virt-filesystems #Edit source
This tool is used to report information regarding file systems, partitions and logical volumes in a disk image or virtual machine.
> virt-filesystems -l -a sles.qcow2
Name Type VFS Label Size Parent
/dev/sda1 filesystem ext3 - 17178820608 -18.3.5.2 virt-ls #Edit source
virt-ls lists file names, file sizes, checksums,
extended attributes and more from a virtual machine or disk image.
Multiple directory names can be given, in which case the output from
each is concatenated. To list directories from a libvirt guest, use
the -d option to specify the name of the guest. For
a disk image, use the -a option.
> virt-ls -h -lR -a sles.qcow2 /var/log/
d 0755 776 /var/log
- 0640 0 /var/log/NetworkManager
- 0644 23K /var/log/Xorg.0.log
- 0644 23K /var/log/Xorg.0.log.old
d 0700 482 /var/log/YaST2
- 0644 512 /var/log/YaST2/_dev_vda
- 0644 59 /var/log/YaST2/arch.info
- 0644 473 /var/log/YaST2/config_diff_2017_05_03.log
- 0644 5.1K /var/log/YaST2/curl_log
- 0644 1.5K /var/log/YaST2/disk_vda.info
- 0644 1.4K /var/log/YaST2/disk_vda.info-1
[...]18.3.5.3 virt-cat #Edit source
virt-cat is a command line tool to display the
contents of a file that exists in the named virtual machine (or disk
image). Multiple file names can be given, in which case they are
concatenated together. Each file name must be specified by its
absolute path, starting at the root directory with
/.
> virt-cat -a sles.qcow2 /etc/fstab
devpts /dev/pts devpts mode=0620,gid=5 0 0
proc /proc proc defaults 0 018.3.5.4 virt-df #Edit source
virt-df is a command line tool to display free
space on virtual machine file systems. Unlike other tools, it not
only displays the size of disk allocated to a virtual machine, but
can look inside disk images to show how much space is being used.
> virt-df -a sles.qcow2
Filesystem 1K-blocks Used Available Use%
sles.qcow2:/dev/sda1 16381864 520564 15022492 4%18.3.5.5 virt-edit #Edit source
virt-edit is a command line tool capable of
editing files that reside in the named virtual machine (or disk
image).
18.3.5.6 virt-tar-in/out #Edit source
virt-tar-in unpacks an uncompressed TAR archive
into a virtual machine disk image or named libvirt domain.
virt-tar-out packs a virtual machine disk image
directory into a TAR archive.
> virt-tar-out -a sles.qcow2 /home homes.tar18.3.5.7 virt-copy-in/out #Edit source
virt-copy-in copies files and directories from the
local disk into a virtual machine disk image or named libvirt domain.
virt-copy-out copies files and directories out of
a virtual machine disk image or named libvirt domain.
>virt-copy-in -a sles.qcow2 data.tar /tmp/>virt-ls -a sles.qcow2 /tmp/ .ICE-unix .X11-unix data.tar
18.3.5.8 virt-log #Edit source
virt-log shows the log files of the named libvirt
domain, virtual machine or disk image. If the package
guestfs-winsupport is installed it can also show
the event log of a Windows virtual machine disk image.
> virt-log -a windows8.qcow2
<?xml version="1.0" encoding="utf-8" standalone="yes" ?>
<Events>
<Event xmlns="http://schemas.microsoft.com/win/2004/08/events/event"><System><Provider Name="EventLog"></Provider>
<EventID Qualifiers="32768">6011</EventID>
<Level>4</Level>
<Task>0</Task>
<Keywords>0x0080000000000000</Keywords>
<TimeCreated SystemTime="2014-09-12 05:47:21"></TimeCreated>
<EventRecordID>1</EventRecordID>
<Channel>System</Channel>
<Computer>windows-uj49s6b</Computer>
<Security UserID=""></Security>
</System>
<EventData><Data><string>WINDOWS-UJ49S6B</string>
<string>WIN-KG190623QG4</string>
</Data>
<Binary></Binary>
</EventData>
</Event>
...18.3.6 guestfish #Edit source
guestfish is a shell and command line tool for
examining and modifying virtual machine file systems. It uses
libguestfs and exposes all the functionality of the guestfs API.
Examples of usage:
> guestfish -a disk.img <<EOF
run
list-filesystems
EOFguestfish
Welcome to guestfish, the guest filesystem shell for
editing virtual machine filesystems and disk images.
Type: 'help' for help on commands
'man' to read the manual
'quit' to quit the shell
><fs> add sles.qcow2
><fs> run
><fs> list-filesystems
/dev/sda1: ext3
><fs> mount /dev/sda1 /
cat /etc/fstab
devpts /dev/pts devpts mode=0620,gid=5 0 0
proc /proc proc defaults 0 0
sysfs /sys sysfs noauto 0 0
debugfs /sys/kernel/debug debugfs noauto 0 0
usbfs /proc/bus/usb usbfs noauto 0 0
tmpfs /run tmpfs noauto 0 0
/dev/disk/by-id/ata-QEMU_HARDDISK_QM00001-part1 / ext3 defaults 1 118.3.7 Converting a physical machine into a KVM guest #Edit source
Libguestfs provides tools to help converting Xen virtual machines or physical machines into KVM guests. The following section covers a special use case: converting a bare metal machine into a KVM one.
Converting a physical machine into a KVM one is not yet supported in openSUSE Leap. This feature is released as a technology preview only.
Converting a physical machine requires collecting information about it
and transmitting this to a conversion server. This is achieved by
running a live system prepared with virt-p2v and
KIWI tools on the machine.
Procedure 18.2: Using virt-p2v #
Install the needed packages with the command:
>sudozypper in virt-p2v kiwi-desc-isobootNote
These steps document how to create an ISO image to create a bootable DVD. Alternatively, you can create a PXE boot image instead; for more information about building PXE images with KIWI, see
man virt-p2v-make-kiwi.Create a KIWI configuration:
>virt-p2v-make-kiwi -o /tmp/p2v.kiwiThe
-odefines where to create the KIWI configuration.Edit the
config.xmlfile in the generated configuration if needed. For example, inconfig.xmladjust the keyboard layout of the live system.Build the ISO image with
kiwi:>kiwi --build /tmp/p2v.kiwi1 \ -d /tmp/build2 \ --ignore-repos \ --add-repo http://URL_TO_REPOSITORIES3 \ --type isoBurn the ISO on a DVD or a USB stick. With such a medium, boot the machine to be converted.
After the system is started, enter the connection details of the conversion server. This server is a machine with the
virt-v2vpackage installed.If the network setup is more complex than a DHCP client, click the button to open the YaST network configuration dialog.
Click the button to allow moving to the next page of the wizard.
Select the disks and network interfaces to be converted and define the VM data like the amount of allocated CPUs, memory and the Virtual Machine name.
Note
If not defined, the created disk image format is raw by default. This can be changed by entering the desired format in the field.
There are two possibilities to generate the virtual machine: either using the local or the libvirt output. The first one places the Virtual Machine disk image and configuration in the path defined in the field. These can then be used to define a new libvirt-handled guest using
virsh. The second method creates a new libvirt-handled guest with the disk image placed in the pool defined in the field.Click to start it.
18.4 Troubleshooting #Edit source
18.4.1 Btrfs-related problems #Edit source
When using the guestfs tools on an image with Btrfs root partition (the default with openSUSE Leap) the following error message may be displayed:
> virt-ls -a /path/to/sles12sp2.qcow2 /
virt-ls: multi-boot operating systems are not supported
If using guestfish '-i' option, remove this option and instead
use the commands 'run' followed by 'list-filesystems'.
You can then mount file systems you want by hand using the
'mount' or 'mount-ro' command.
If using guestmount '-i', remove this option and choose the
filesystem(s) you want to see by manually adding '-m' option(s).
Use 'virt-filesystems' to see what file systems are available.
If using other virt tools, multi-boot operating systems won't work
with these tools. Use the guestfish equivalent commands
(see the virt tool manual page).
This is often caused by the presence of snapshots in the guests. In
this case guestfs does not know which snapshot to bootstrap. To force
the use of a snapshot, use the -m parameter as
follows:
> virt-ls -m /dev/sda2:/:subvol=@/.snapshots/2/snapshot -a /path/to/sles12sp2.qcow2 /18.4.2 Environment #Edit source
When troubleshooting problems within a libguestfs appliance, the environment variable LIBGUESTFS_DEBUG=1 can be used to enable debug messages. To output each command/API call in a format that is similar to guestfish commands, use the environment variable LIBGUESTFS_TRACE=1.
18.4.3 libguestfs-test-tool #Edit source
libguestfs-test-tool is a test program that checks
if basic libguestfs functionality is working. It prints a large amount
of diagnostic messages and details of the guestfs environment, then
create a test image and try to start it. If it runs to completion
successfully, the following message should be seen near the end:
===== TEST FINISHED OK =====
18.5 More information #Edit source
19 QEMU guest agent #Edit source
The QEMU guest agent (GA) runs inside the VM Guest and allows the
VM Host Server to run commands in the guest operating system via libvirt. It
supports many functions—for example, getting details about guest file
systems, freezing and thawing file systems, or suspending or rebooting a
guest.
QEMU GA is included in the qemu-guest-agent package and is installed, configured and activated by default on KVM virtual machines.
QEMU GA is installed in Xen virtual machines, but it is not activated by default. Although it is possible to use QEMU GA with Xen virtual machines, there is no integration with libvirt as described below for KVM virtual machines. To use QEMU GA with Xen, a channel device must be added to the VM Guest configuration. The channel device includes a Unix domain socket path on the VM Host Server for communicating with QEMU GA.
<channel type='unix'> <source mode='bind' path='/example/path'/> <target type='xen' name='org.qemu.guest_agent.0'/> </channel>
19.1 Running QEMU GA commands #Edit source
QEMU GA includes many native commands that do not have direct libvirt
counterparts. Refer to Section 19.4, “More information” to find the
complete list. You can run all the QEMU GA commands by using
libvirt's general purpose command
qemu-agent-command:
virsh qemu-agent-command DOMAIN_NAME '{"execute":"QEMU_GA_COMMAND"}'For example:
>sudovirsh qemu-agent-command sle15sp2 '{"execute":"guest-info"}' --pretty { "return": { "version": "4.2.0", "supported_commands": [ { "enabled": true, "name": "guest-get-osinfo", "success-response": true }, [...]
19.2 virsh commands that require QEMU GA #Edit source
Several virsh commands require QEMU GA for their functionality. For
example, the following ones:
virsh guestinfoPrints information about the guest from the guest's point of view.
virsh guestvcpusQueries or changes the state of virtual CPUs from the guest's point of view.
virsh set-user-passwordSets the password for a user account in the guest.
virsh domfsinfoShows a list of mounted file systems within the running domain.
virsh dompmsuspendSuspends a running guest.
19.3 Enhancing libvirt commands #Edit source
If QEMU GA is enabled inside the guest, several virsh subcommands
have enhanced functionality when run in the agent
mode. The following list includes only certain examples of them. For a
complete list, see the virsh manual page and search for the
agent string.
virsh shutdown --mode agentandvirsh reboot --mode agentThis method of shutting down or rebooting leaves the guest clean for its next run, similar to the ACPI method.
virsh domfsfreezeandvirsh domfsthawInstructs the guest to make its file system quiescent—to flush all I/O operations in the cache and leave volumes in a consistent state, so that no checks are needed when they are remounted.
virsh setvcpus --guestChanges the number of CPUs assigned to a guest.
virsh domifaddr --source agentQueries the QEMU GA for the guest's IP address.
virsh vcpucount --guestPrints information about the virtual CPU counts from the perspective of the guest.
19.4 More information #Edit source
A complete list of commands supported by the QEMU GA is at https://www.qemu.org/docs/master/interop/qemu-ga-ref.html.
The
virshmanual page (man 1 virsh) includes descriptions of the commands that support the QEMU GA interface.
20 Software TPM emulator #Edit source
20.1 Introduction #Edit source
The Trusted Platform Module (TPM) is a cryptoprocessor that secures hardware using cryptographic keys. For developers who use the TPM to develop security features, a software TPM emulator is a convenient solution. Compared to a hardware TPM device, the emulator has no limit on the number of guests that can access it. Also, it is simple to switch between TPM versions 1.2 and 2.0. QEMU supports the software TPM emulator that is included in the swtpm package.
20.2 Prerequisites #Edit source
Before you can install and use the software TPM emulator, you need to
install the libvirt virtualization environment. Refer to
Section 6.2, “Installing virtualization components” and install one
of the provided virtualization solutions.
20.3 Installation #Edit source
To use the software TPM emulator, install the swtpm package:
>sudozypper install swtpm
20.4 Using swtpm with QEMU #Edit source
swtpm provides three types of interface:
socket, chardev, and
cuse. This procedure focuses on the
socket interface.
Create a directory
mytpm0inside the VM directory to store the TPM states—for example,/var/lib/libvirt/qemu/sle15sp3:>sudomkdir /var/lib/libvirt/qemu/sle15sp3/mytpm0Start
swtmp. It creates a socket file that QEMU can use—for example,/var/lib/libvirt/qemu/sle15sp3:>sudoswtpm socket --tpmstate dir=/var/lib/libvirt/qemu/sle15sp3/mytpm0 \ --ctrl type=unixio,path=/var/lib/libvirt/qemu/sle15sp3/mytpm0/swtpm-sock \ --log level=20Tip: TPM version 2.0
By default,
swtpmstarts a TPM version 1.2 emulator and stores its states in thetpm-00.permalldirectory. To create a TPM 2.0 instance, run:>sudoswtpm socket --tpm2 --tpmstate dir=/var/lib/libvirt/qemu/sle15sp3/mytpm0 \ --ctrl type=unixio,path=/var/lib/libvirt/qemu/sle15sp3/mytpm0/swtpm-sock \ --log level=20TPM 2.0 states are stored in the
tpm2-00.permalldirectory.Add the following command line parameters to the
qemu-system-ARCHcommand:>qemu-system-x86_64 \ [...] -chardev socket,id=chrtpm,path=/var/lib/libvirt/qemu/sle15sp3/mytpm0/swtpm-sock \ -tpmdev emulator,id=tpm0,chardev=chrtpm \ -device tpm-tis,tpmdev=tpm0Verify that the TPM device is available in the guest by running the following command:
>tpm_version TPM 1.2 Version Info: Chip Version: 1.2.18.158 Spec Level: 2 Errata Revision: 3 TPM Vendor ID: IBM TPM Version: 01010000 Manufacturer Info: 49424d00
20.5 Using swtpm with libvirt #Edit source
To use swtpm with libvirt, add the following TPM device to the guest
XML specification:
<devices> <tpm model='tpm-tis'> <backend type='emulator' version='2.0'/> </tpm> </devices>
libvirt starts swtpm for the guest automatically. You do not need to
start it manually in advance. The corresponding
permall file is created in
/var/lib/libvirt/swtpm/VM_UUID.
20.6 TPM measurement with OVMF firmware #Edit source
If the guest uses the Open Virtual Machine Firmware (OVMF), it measures
components with TPM. You can find the event log in
/sys/kernel/security/tpm0/binary_bios_measurements.
20.7 Resources #Edit source
Wikipedia offers a thorough description of the TPM at the page https://en.wikipedia.org/wiki/Trusted_Platform_Module.
Configuring a specific virtualization environment on openSUSE Leap is described in Chapter 6, Installation of virtualization components.
Details on the use of swtpm are on its manual page (
man 8 swtpm).A detailed
libvirtspecification of TPM is at https://libvirt.org/formatdomain.html#elementsTpmA description of enabling UEFI firmware by using OVMF is at Section 6.3, “Installing UEFI support”.
21 Creating crash dumps of a VM Guest #Edit source
21.1 Introduction #Edit source
Whenever a VM crashes, it is useful to collect a core dump of the VM memory for debugging and analysis. For physical machines, Kexec and Kdump takes care of collecting crash dumps. For virtual machines, it depends whether the guest is fully virtualized (FV) or paravirtualized (PV).
21.2 Creating crash dumps for fully virtualized machines #Edit source
To view crash dumps for FV machines, use the same procedures as for physical machines—Kexec and Kdump.
21.3 Creating crash dumps for paravirtualized machines #Edit source
Unlike with FVs, Kexec/Kdump does not work in paravirtualized
machines. Crash dumps of PV guests must be performed by the host tool
stack. If using the xl tool stack for Xen domUs, the
xl dump-core command produces the dump. For
libvirt-based VM Guests, the virsh dump command
provides the same functionality.
You can configure automatic collection of a core dump with the
on_crash setting in the configuration of the VM Guest.
This setting tells the host tool stack what to do if the VM Guest
encounters a crash. The default in both xl and
libvirt is destroy. Useful options for automatically
collecting a core dump are coredump-destroy and
coredump-restart.
21.4 Additional information #Edit source
The difference between fully virtualized and paravirtualized virtual machines is described in Section 1.3, “Virtualization modes”.
Detailed information about Kexec/Kdump mechanism is included in Book “System Analysis and Tuning Guide”, Chapter 17 “Kexec and Kdump”.
Refer to the xl.cfg manual page (
man 5 xl.cfg) for more information on thexlconfiguration syntax.Refer to https://libvirt.org/formatdomain.html#events-configuration for details about the
libvirtXML settings.
Part IV Managing virtual machines with Xen #Edit source
- 22 Setting up a virtual machine host
This section documents how to set up and use openSUSE Leap 15.5 as a virtual machine host.
- 23 Virtual networking
A VM Guest system needs specific means to communicate either with other VM Guest systems or with a local network. The network interface to the VM Guest system is made of a split device driver, which means that any virtual Ethernet device has a corresponding network interface in Dom0. This interface …
- 24 Managing a virtualization environment
Apart from using the recommended
libvirtlibrary (Part II, “Managing virtual machines withlibvirt”), you can manage Xen guest domains with thexltool from the command line.- 25 Block devices in Xen
- 26 Virtualization: configuration options and settings
The documentation in this section, describes advanced management tasks and configuration options that may help technology innovators implement leading-edge virtualization solutions. It is provided as a courtesy and does not imply that all documented options and tasks are supported by Novell, Inc.
- 27 Administrative tasks
- 28 XenStore: configuration database shared between domains
This section introduces basic information about XenStore, its role in the Xen environment, the directory structure of files used by XenStore, and the description of XenStore's commands.
- 29 Xen as a high-availability virtualization host
Setting up two Xen hosts as a failover system has several advantages compared to a setup where every server runs on dedicated hardware.
- 30 Xen: converting a paravirtual (PV) guest into a fully virtual (FV/HVM) guest
This chapter explains how to convert a Xen paravirtual machine into a Xen fully virtualized machine.
22 Setting up a virtual machine host #Edit source
This section documents how to set up and use openSUSE Leap 15.5 as a virtual machine host.
The hardware requirements for the Dom0 are often the same as those for the openSUSE Leap operating system. Additional CPU, disk, memory and network resources should be added to accommodate the resource demands of all planned VM Guest systems.
Tip: Resources
Remember that VM Guest systems, like physical machines, perform better when they run on faster processors and have access to more system memory.
The virtual machine host requires several software packages and their dependencies to be installed. To install all necessary packages, run YaST , select › and choose for installation. The installation can also be performed with YaST using the module › .
After the Xen software is installed, restart the computer and, on the boot screen, choose the newly added option with the Xen kernel.
Updates are available through your update channel. To be sure to have the latest updates installed, run YaST after the installation has finished.
22.1 Best practices and suggestions #Edit source
When installing and configuring the openSUSE Leap operating system on the host, be aware of the following best practices and suggestions:
If the host should always run as Xen host, run YaST › and activate the Xen boot entry as default boot section.
In YaST, click .
Change the default boot to the label, then click .
Click .
For best performance, only the applications and processes required for virtualization should be installed on the virtual machine host.
If you intend to use a watchdog device attached to the Xen host, use only one at a time. It is recommended to use a driver with actual hardware integration over a generic software one.
Note: Hardware monitoring
The Dom0 kernel is running virtualized, so tools like
irqbalance or lscpu do not
reflect the real hardware characteristics.
Important: Trusted boot not supported by Xen
Trusted boot (Tboot) is not supported by Xen. To ensure that the Xen host boots correctly, verify that the option is deactivated in the GRUB 2 configuration dialog.
22.2 Managing Dom0 memory #Edit source
In previous versions of openSUSE Leap, the default memory allocation scheme of a Xen host was to allocate all host physical memory to Dom0 and enable auto-ballooning. Memory was automatically ballooned from Dom0 when additional domains were started. This behavior has always been error prone and disabling it was strongly encouraged. Starting with openSUSE Leap 15.1, auto-ballooning has been disabled by default and Dom0 is given 10% of host physical memory + 1 GB. For example, on a host with 32 GB of physical memory, 4.2 GB of memory is allocated for Dom0.
The use of the dom0_mem Xen command line option in
/etc/default/grub is still supported and encouraged.
You can restore the old behavior by setting dom0_mem to
the host physical memory size and enabling the
autoballoon setting in
/etc/xen/xl.conf.
Warning: Insufficient memory for Dom0
The amount of memory reserved for Dom0 is a function of the number of VM Guests running on the host since Dom0 provides back-end network and disk I/O services for each VM Guest. Other workloads running in Dom0 should also be considered when calculating Dom0 memory allocation. In general, memory sizing of Dom0 should be determined like any other virtual machine.
22.2.1 Setting Dom0 memory allocation #Edit source
Determine memory allocation required for Dom0.
At Dom0, type
xl infoto view the amount of memory that is available on the machine. Dom0's current memory allocation can be determined with thexl listcommand.Edit
/etc/default/gruband adjust theGRUB_CMDLINE_XENoption so that it includesdom0_mem=MEM_AMOUNT. Replace MEM_AMOUNT with the maximum amount of memory to allocate to Dom0. AddK,M, orG, to specify the size unit. For example:GRUB_CMDLINE_XEN="dom0_mem=2G"
Restart the computer to apply the changes.
Tip
Refer to Book “Reference”, Chapter 12 “The boot loader GRUB 2”, Section 12.2.2 “The file /etc/default/grub” for more
details about Xen-related boot configuration options.
Warning: Xen Dom0 memory
When using the XL tool stack and the dom0_mem=
option for the Xen hypervisor in GRUB 2 you need to disable xl
autoballoon in
etc/xen/xl.conf. Otherwise launching VMs fails
with errors about not being able to balloon down Dom0. So add
autoballoon=0 to xl.conf if
you have the dom0_mem= option specified for Xen.
Also see
Xen
dom0 memory
22.3 Network card in fully virtualized guests #Edit source
In a fully virtualized guest, the default network card is an emulated Realtek network card. However, it also possible to use the split network driver to run the communication between Dom0 and a VM Guest. By default, both interfaces are presented to the VM Guest, because the drivers of certain operating systems require both to be present.
When using openSUSE Leap, only the paravirtualized network cards are available for the VM Guest by default. The following network options are available:
- emulated
To use an emulated network interface like an emulated Realtek card, specify
type=ioemuin thevifdevice section of the domain xl configuration. An example configuration would look like:vif = [ 'type=ioemu,mac=00:16:3e:5f:48:e4,bridge=br0' ]
Find more details about the xl configuration in the
xl.confmanual pageman 5 xl.conf.- paravirtualized
When you specify
type=vifand do not specify a model or type, the paravirtualized network interface is used:vif = [ 'type=vif,mac=00:16:3e:5f:48:e4,bridge=br0,backen=0' ]
- emulated and paravirtualized
If the administrator should be offered both options, simply specify both type and model. The xl configuration would look like:
vif = [ 'type=ioemu,mac=00:16:3e:5f:48:e4,model=rtl8139,bridge=br0' ]
In this case, one of the network interfaces should be disabled on the VM Guest.
22.4 Starting the virtual machine host #Edit source
If virtualization software is correctly installed, the computer boots to display the GRUB 2 boot loader with a option on the menu. Select this option to start the virtual machine host.
Warning
When booting a Xen system, you may observe error messages in the
/var/log/messages log file or systemd journal of dom0 similar to
following:
isst_if_mbox_pci: probe of 0000:ff:1e.1 failed with error -5 isst_if_pci: probe of 0000:fe:00.1 failed with error -5
Ignore them as they are harmless and are caused by the fact that the ISST driver does not provide any power or frequency scaling feature for virtual machines.
Note: Xen and Kdump
In Xen, the hypervisor manages the memory resource. If you need to
reserve system memory for a recovery kernel in Dom0, this memory need
to be reserved by the hypervisor. Thus, it is necessary to add the
parameter crashkernel=size to the
kernel line instead of using the line with the other
boot parameters.
For more information on the crashkernel parameter, see
Book “System Analysis and Tuning Guide”, Chapter 17 “Kexec and Kdump”, Section 17.4 “Calculating crashkernel allocation size”.
If the option is not on the GRUB 2 menu, review the steps for installation and verify that the GRUB 2 boot loader has been updated. If the installation has been done without selecting the Xen pattern, run the YaST , select the filter and choose for installation.
After booting the hypervisor, the Dom0 virtual machine starts and displays its graphical desktop environment. If you did not install a graphical desktop, the command line environment appears.
Tip: Graphics problems
Sometimes it may happen that the graphics system does not work
properly. In this case, add vga=ask to the boot
parameters. To activate permanent settings, use
vga=mode-0x??? where ??? is
calculated as 0x100 + VESA mode from
http://en.wikipedia.org/wiki/VESA_BIOS_Extensions,
for example vga=mode-0x361.
Before starting to install virtual guests, make sure that the system time is correct. To do this, configure NTP (Network Time Protocol) on the controlling domain:
In YaST select › .
Select the option to automatically start the NTP daemon during boot. Provide the IP address of an existing NTP time server, then click .
Note: Time services on virtual guests
Hardware clocks are not precise. All modern operating systems try to
correct the system time compared to the hardware time bvia an
additional time source. To get the correct time on all VM Guest
systems, also activate the network time services on each respective
guest or make sure that the guest uses the system time of the host. For
more about Independent Wallclocks in openSUSE Leap
see Section 17.2, “Xen virtual machine clock settings”.
For more information about managing virtual machines, see Chapter 24, Managing a virtualization environment.
22.5 PCI Pass-Through #Edit source
To take full advantage of VM Guest systems, it is sometimes necessary to assign specific PCI devices to a dedicated domain. When using fully virtualized guests, this functionality is only available if the chipset of the system supports this feature, and if it is activated from the BIOS.
This feature is available from both AMD* and Intel*. For AMD machines, the feature is called IOMMU. In Intel speak, this is VT-d. Be aware that Intel-VT technology is not sufficient to use this feature for fully virtualized guests. To make sure that your computer supports this feature, ask your supplier specifically to deliver a system that supports PCI Pass-Through.
Limitations #
Some graphics drivers use highly optimized ways to access DMA. This is not supported, and thus using graphics cards may be difficult.
When accessing PCI devices behind a PCIe bridge, all the PCI devices must be assigned to a single guest. This limitation does not apply to PCIe devices.
Guests with dedicated PCI devices cannot be migrated live to a different host.
The configuration of PCI Pass-Through is twofold. First, the hypervisor must be informed at boot time that a PCI device should be available for reassigning. Second, the PCI device must be assigned to the VM Guest.
22.5.1 Configuring the hypervisor for PCI Pass-Through #Edit source
Select a device to reassign to a VM Guest. To do this, run
lspci -k, and read the device number and the name of the original module that is assigned to the device:06:01.0 Ethernet controller: Intel Corporation Ethernet Connection I217-LM (rev 05) Subsystem: Dell Device 0617 Kernel driver in use: e1000e Kernel modules: e1000eIn this case, the PCI number is
(06:01.0)and the dependent kernel module ise1000e.Specify a module dependency to ensure that
xen_pcibackis the first module to control the device. Add the file named/etc/modprobe.d/50-e1000e.confwith the following content:install e1000e /sbin/modprobe xen_pciback ; /sbin/modprobe \ --first-time --ignore-install e1000e
Instruct the
xen_pcibackmodule to control the device using thehideoption. Edit or create/etc/modprobe.d/50-xen-pciback.confwith the following content:options xen_pciback hide=(06:01.0)
Reboot the system.
Check if the device is in the list of assignable devices with the command
xl pci-assignable-list
22.5.1.1 Dynamic assignment with xl #Edit source
To avoid restarting the host system, you can use dynamic assignment with xl to use PCI Pass-Through.
Begin by making sure that dom0 has the pciback module loaded:
>sudomodprobe pciback
Then make a device assignable by using xl
pci-assignable-add. For example, to make the device
06:01.0 available for guests, run the command:
>sudoxl pci-assignable-add 06:01.0
22.5.2 Assigning PCI devices to VM Guest systems #Edit source
There are several possibilities to dedicate a PCI device to a VM Guest:
- Adding the device while installing:
During installation, add the
pciline to the configuration file:pci=['06:01.0']
- Hotplugging PCI devices to VM Guest systems
The command
xlcan be used to add or remove PCI devices on the fly. To add the device with number06:01.0to a guest with namesles12use:xl pci-attach sles12 06:01.0
- Adding the PCI device to Xend
To add the device to the guest permanently, add the following snippet to the guest configuration file:
pci = [ '06:01.0,power_mgmt=1,permissive=1' ]
After assigning the PCI device to the VM Guest, the guest system must care for the configuration and device drivers for this device.
22.5.3 VGA Pass-Through #Edit source
Xen 4.0 and newer supports VGA graphics adapter pass-through on fully virtualized VM Guests. The guest can take full control of the graphics adapter with high-performance full 3D and video acceleration.
Limitations #
VGA Pass-Through functionality is similar to PCI Pass-Through and as such also requires IOMMU (or Intel VT-d) support from the mainboard chipset and BIOS.
Only the primary graphics adapter (the one that is used when you power on the computer) can be used with VGA Pass-Through.
VGA Pass-Through is supported only for fully virtualized guests. Paravirtual guests (PV) are not supported.
The graphics card cannot be shared between multiple VM Guests using VGA Pass-Through — you can dedicate it to one guest only.
To enable VGA Pass-Through, add the following settings to your fully virtualized guest configuration file:
gfx_passthru=1 pci=['yy:zz.n']
where yy:zz.n is the PCI controller ID of the VGA
graphics adapter as found with lspci -v on Dom0.
22.5.4 Troubleshooting #Edit source
In certain circumstances, problems may occur during the installation of the VM Guest. This section describes several known problems and their solutions.
- During boot, the system hangs
The software I/O translation buffer allocates a large chunk of low memory early in the bootstrap process. If the requests for memory exceed the size of the buffer, it may result in a hung boot process. To check if this is the case, switch to console 10 and check the output there for a message similar to
kernel: PCI-DMA: Out of SW-IOMMU space for 32768 bytes at device 000:01:02.0
In this case you need to increase the size of the
swiotlb. Addswiotlb=VALUE(where VALUE is specified as the number of slab entries) on the command line of Dom0. The number can be adjusted up or down to find the optimal size for the machine.
Note: swiotlb a PV guest
The swiotlb=force kernel parameter is required for
DMA access to work for PCI devices on a PV guest. For more
information about IOMMU and the swiotlb option see
the file boot-options.txt from the package
kernel-source.
22.5.5 More information #Edit source
There are several resources on the Internet that provide interesting information about PCI Pass-Through:
22.6 USB pass-through #Edit source
There are two methods for passing through individual host USB devices to a guest. The first is via an emulated USB device controller, the second is using PVUSB.
22.6.1 Identify the USB device #Edit source
Before you can pass through a USB device to the VM Guest, you need to
identify it on the VM Host Server. Use the lsusb command
to list the USB devices on the host system:
# lsusb
Bus 001 Device 001: ID 1d6b:0002 Linux Foundation 2.0 root hub
Bus 002 Device 003: ID 0461:4d15 Primax Electronics, Ltd Dell Optical Mouse
Bus 002 Device 001: ID 1d6b:0001 Linux Foundation 1.1 root hub
To pass through the Dell mouse, for example, specify either the device
tag in the form vendor_id:device_id (0461:4d15) or
the bus address in the form bus.device (2.3).
Remember to remove leading zeros, otherwise xl would
interpret the numbers as octal values.
22.6.2 Emulated USB device #Edit source
In emulated USB, the device model (QEMU) presents an emulated USB controller to the guest. The USB device is then controlled from Dom0 while USB commands are translated between the VM Guest and the host USB device. This method is only available to fully virtualized domains (HVM).
Enable the emulated USB hub with the usb=1 option.
Then specify devices among the list of devices in the configuration
file along with other emulated devices by using
host:USBID. For example:
usb=1 usbdevice=['tablet','host:2.3','host:0424:460']
22.6.3 Paravirtualized PVUSB #Edit source
PVUSB is a new high performance method for USB Pass-Through from dom0 to the virtualized guests. With PVUSB, there are two ways to add USB devices to a guest:
via the configuration file at domain creation time
via hotplug while the VM is running
PVUSB uses paravirtualized front- and back-end interfaces. PVUSB supports USB 1.1 and USB 2.0, and it works for both PV and HVM guests. To use PVUSB, you need usbfront in your guest OS, and usbback in dom0 or usb back-end in qemu. On openSUSE Leap, the USB back-end comes with qemu.
As of Xen 4.7, xl PVUSB support and hotplug support
is introduced.
In the configuration file, specify USB controllers and USB host devices
with usbctrl and usbdev. For
example, in case of HVM guests:
usbctrl=['type=qusb,version=2,ports=4', 'type=qusb,version=1,ports=4', ] usbdev=['hostbus=2, hostaddr=1, controller=0,port=1', ]
Note
It is important to specify type=qusb for the
controller of HVM guests.
To manage hotpluggin PVUSB devices, use the
usbctrl-attach, usbctrl-detach,
usb-list, usbdev-attach and
usb-detach subcommands. For example:
Create a USB controller which is version USB 1.1 and has 8 ports:
# xl usbctrl-attach test_vm version=1 ports=8 type=qusb
Find the first available controller:port in the domain, and attach USB
device whose busnum:devnum is 2:3 to it; you can also specify
controller and port:
# xl usbdev-attach test_vm hostbus=2 hostaddr=3Show all USB controllers and USB devices in the domain:
# xl usb-list test_vm
Devid Type BE state usb-ver ports
0 qusb 0 1 1 8
Port 1: Bus 002 Device 003
Port 2:
Port 3:
Port 4:
Port 5:
Port 6:
Port 7:
Port 8:Detach the USB device under controller 0 port 1:
# xl usbdev-detach test_vm 0 1
Remove the USB controller with the indicated dev_id,
and all USB devices under it:
# xl usbctrl-detach test_vm dev_idFor more information, see https://wiki.xenproject.org/wiki/Xen_USB_Passthrough.
23 Virtual networking #Edit source
A VM Guest system needs specific means to communicate either with other VM Guest systems or with a local network. The network interface to the VM Guest system is made of a split device driver, which means that any virtual Ethernet device has a corresponding network interface in Dom0. This interface is set up to access a virtual network that is run in Dom0. The bridged virtual network is fully integrated into the system configuration of openSUSE Leap and can be configured with YaST.
When installing a Xen VM Host Server, a bridged network configuration is proposed during normal network configuration. The user can choose to change the configuration during the installation and customize it to the local needs.
If desired, Xen VM Host Server can be installed after performing a default
Physical Server installation using the Install Hypervisor and
Tools module in YaST. This module prepares the system for
hosting virtual machines, including invocation of the default bridge
networking proposal.
In case the necessary packages for a Xen VM Host Server are installed manually
with rpm or zypper, the
remaining system configuration needs to be done by the administrator
manually or with YaST.
The network scripts that are provided by Xen are not used by default in openSUSE Leap. They are only delivered for reference but disabled. The network configuration that is used in openSUSE Leap is done by means of the YaST system configuration similar to the configuration of network interfaces in openSUSE Leap.
For more general information about managing network bridges, see Section 8.1.1, “Network bridge”.
23.1 Network devices for guest systems #Edit source
The Xen hypervisor can provide different types of network interfaces to the VM Guest systems. The preferred network device should be a paravirtualized network interface. This yields the highest transfer rates with the lowest system requirements. Up to eight network interfaces may be provided for each VM Guest.
Systems that are not aware of paravirtualized hardware may not have this option. To connect systems to a network that can only run fully virtualized, several emulated network interfaces are available. The following emulations are at your disposal:
Realtek 8139 (PCI). This is the default emulated network card.
AMD PCnet32 (PCI)
NE2000 (PCI)
NE2000 (ISA)
Intel e100 (PCI)
Intel e1000 and its variants e1000-82540em, e1000-82544gc, e1000-82545em (PCI)
All these network interfaces are software interfaces. Because every network interface must have a unique MAC address, an address range has been assigned to Xensource that can be used by these interfaces.
Tip: Virtual network interfaces and MAC addresses
The default configuration of MAC addresses in virtualized environments creates a random MAC address that looks like 00:16:3E:xx:xx:xx. Normally, the amount of available MAC addresses should be big enough to get only unique addresses. However, if you have a large installation, or to make sure that no problems arise from random MAC address assignment, you can also manually assign these addresses.
For debugging or system management purposes, it may be useful to know
which virtual interface in Dom0 is connected to which Ethernet device
in a running guest. This information may be read from the device naming
in Dom0. All virtual devices follow the rule vif<domain
number>.<interface_number>.
For example, to know the device name for the third interface (eth2) of
the VM Guest with id 5, the device in Dom0 would be
vif5.2. To obtain a list of all available interfaces,
run the command ip a.
The device naming does not contain any information about which bridge
this interface is connected to. However, this information is available in
Dom0. To get an overview about which interface is connected to which
bridge, run the command bridge link. The output may
look as follows:
>sudobridge link 2: eth0 state DOWN : <NO-CARRIER,BROADCAST,MULTICAST,SLAVE,UP> mtu 1500 master br0 3: eth1 state UP : <BROADCAST,MULTICAST,SLAVE,UP,LOWER_UP> mtu 1500 master br1
In this example, there are three configured bridges:
br0, br1 and
br2. Currently, br0 and
br1 each have a real Ethernet device added:
eth0 and eth1, respectively.
23.2 Host-based routing in Xen #Edit source
Xen can be set up to use host-based routing in the controlling Dom0, although this is not yet well supported from YaST and requires certain amount of manual editing of configuration files. Thus, this is a task that requires an advanced administrator.
The following configuration only works when using fixed IP addresses. Using DHCP is not practicable with this procedure, because the IP address must be known to both the VM Guest and the VM Host Server system.
The easiest way to create a routed guest is to change the networking from a bridged to a routed network. As a requirement to the following procedures, a VM Guest with a bridged network setup must be installed. For example, the VM Host Server is named earth with the IP 192.168.1.20, and the VM Guest has the name alice with the IP 192.168.1.21.
Procedure 23.1: Configuring a routed IPv4 VM Guest #
Make sure that alice is shut down. Use
xlcommands to shut down and check.Prepare the network configuration on the VM Host Server earth:
Create a hotplug interface to route the traffic. To accomplish this, create a file named
/etc/sysconfig/network/ifcfg-alice.0with the following content:NAME="Xen guest alice" BOOTPROTO="static" STARTMODE="hotplug"
Ensure that IP forwarding is enabled:
In YaST, go to › .
Enter the tab and activate and options.
Confirm the setting and quit YaST.
Apply the following configuration to
firewalld:Add alice.0 to the devices in the public zone:
>sudofirewall-cmd --zone=public --add-interface=alice.0Tell the firewall which address should be forwarded:
>sudofirewall-cmd --zone=public \ --add-forward-port=port=80:proto=tcp:toport=80:toaddr="192.168.1.21/32,0/0"Make the runtime configuration changes permanent:
>sudofirewall-cmd --runtime-to-permanent
Add a static route to the interface of alice. To accomplish this, add the following line to the end of
/etc/sysconfig/network/routes:192.168.1.21 - - alice.0
To make sure that the switches and routers that the VM Host Server is connected to know about the routed interface, activate
proxy_arpon earth. Add the following lines to/etc/sysctl.conf:net.ipv4.conf.default.proxy_arp = 1 net.ipv4.conf.all.proxy_arp = 1
Activate all changes with the commands:
>sudosystemctl restart systemd-sysctl wicked
Proceed with configuring the Xen configuration of the VM Guest by changing the vif interface configuration for alice as described in Section 24.1, “XL—Xen management tool”. Make the following changes to the text file you generate during the process:
Remove the snippet
bridge=br0
And add the following one:
vifname=vifalice.0
or
vifname=vifalice.0=emu
for a fully virtualized domain.
Change the script that is used to set up the interface to the following:
script=/etc/xen/scripts/vif-route-ifup
Activate the new configuration and start the VM Guest.
The remaining configuration tasks must be accomplished from inside the VM Guest.
Open a console to the VM Guest with
xl consoleDOMAIN and log in.Check that the guest IP is set to 192.168.1.21.
Provide VM Guest with a host route and a default gateway to the VM Host Server. Do this by adding the following lines to
/etc/sysconfig/network/routes:192.168.1.20 - - eth0 default 192.168.1.20 - -
Finally, test the network connection from the VM Guest to the world outside and from the network to your VM Guest.
23.3 Creating a masqueraded network setup #Edit source
Creating a masqueraded network setup is similar to the routed setup.
However, there is no proxy_arp needed, and certain firewall rules are
different. To create a masqueraded network to a guest dolly with
the IP address 192.168.100.1 where the host has its external interface on
br0, proceed as follows. For easier configuration,
only the already installed guest is modified to use a masqueraded
network:
Procedure 23.2: Configuring a masqueraded IPv4 VM guest #
Shut down the VM Guest system with
xl shutdownDOMAIN.Prepare the network configuration on the VM Host Server:
Create a hotplug interface to route the traffic. To accomplish this, create a file named
/etc/sysconfig/network/ifcfg-dolly.0with the following content:NAME="Xen guest dolly" BOOTPROTO="static" STARTMODE="hotplug"
Edit the file
/etc/sysconfig/SuSEfirewall2and add the following configurations:Add dolly.0 to the devices in FW_DEV_DMZ:
FW_DEV_DMZ="dolly.0"
Switch on the routing in the firewall:
FW_ROUTE="yes"
Switch on masquerading in the firewall:
FW_MASQUERADE="yes"
Tell the firewall which network should be masqueraded:
FW_MASQ_NETS="192.168.100.1/32"
Remove the networks from the masquerading exceptions:
FW_NOMASQ_NETS=""
Finally, restart the firewall with the command:
>sudosystemctl restart SuSEfirewall2
Add a static route to the interface of dolly. To accomplish this, add the following line to the end of
/etc/sysconfig/network/routes:192.168.100.1 - - dolly.0
Activate all changes with the command:
>sudosystemctl restart wicked
Proceed with configuring the Xen configuration of the VM Guest.
Change the vif interface configuration for dolly as described in Section 24.1, “XL—Xen management tool”.
Remove the entry:
bridge=br0
And add the following one:
vifname=vifdolly.0
Change the script that is used to set up the interface to the following:
script=/etc/xen/scripts/vif-route-ifup
Activate the new configuration and start the VM Guest.
The remaining configuration tasks need to be accomplished from inside the VM Guest.
Open a console to the VM Guest with
xl consoleDOMAIN and log in.Check whether the guest IP is set to 192.168.100.1.
Provide VM Guest with a host route and a default gateway to the VM Host Server. Do this by adding the following lines to
/etc/sysconfig/network/routes:192.168.1.20 - - eth0 default 192.168.1.20 - -
Finally, test the network connection from the VM Guest to the outside world.
23.4 Special configurations #Edit source
There are many network configuration possibilities available to Xen. The following configurations are not activated by default:
23.4.1 Bandwidth throttling in virtual networks #Edit source
With Xen, you may limit the network transfer rate a virtual guest may use to access a bridge. To configure this, you need to modify the VM Guest configuration as described in Section 24.1, “XL—Xen management tool”.
In the configuration file, first search for the device that is connected to the virtual bridge. The configuration looks like the following:
vif = [ 'mac=00:16:3e:4f:94:a9,bridge=br0' ]
To add a maximum transfer rate, add a parameter
rate to this configuration as in:
vif = [ 'mac=00:16:3e:4f:94:a9,bridge=br0,rate=100Mb/s' ]
The rate is either Mb/s (megabits per second) or
MB/s (megabytes per second). In the above example,
the maximum transfer rate of the virtual interface is 100 megabits. By
default, there is no limitation to the bandwidth of a guest to the
virtual bridge.
It is even possible to fine-tune the behavior by specifying the time window that is used to define the granularity of the credit replenishment:
vif = [ 'mac=00:16:3e:4f:94:a9,bridge=br0,rate=100Mb/s@20ms' ]
23.4.2 Monitoring the network traffic #Edit source
To monitor the traffic on a specific interface, the little application
iftop is a nice program that displays the
current network traffic in a terminal.
When running a Xen VM Host Server, you need to define the interface that is
monitored. The interface that Dom0 uses to get access to the physical
network is the bridge device, for example br0.
This, however, may vary on your system. To monitor all traffic to the
physical interface, run a terminal as root and use the command:
iftop -i br0
To monitor the network traffic of a special network interface of a specific VM Guest, supply the correct virtual interface. For example, to monitor the first Ethernet device of the domain with id 5, use the command:
ftop -i vif5.0
To quit iftop, press the key Q.
More options and possibilities are available in the manual page
man 8 iftop.
24 Managing a virtualization environment #Edit source
Apart from using the recommended libvirt library
(Part II, “Managing virtual machines with libvirt”), you can manage Xen guest domains
with the xl tool from the command line.
24.1 XL—Xen management tool #Edit source
The xl program is a tool for managing Xen guest
domains. It is part of the xen-tools package.
xl is based on the LibXenlight library, and can be
used for general domain management, such as domain creation, listing,
pausing or shutting down. You need to be root to execute
xl commands.
Note
xl can only manage running guest domains specified
by their configuration file. If a guest domain is not running, you
cannot manage it with xl.
Tip
To allow users to continue to have managed guest domains in the way the
obsolete xm command allowed, we now recommend using
libvirt's virsh and
virt-manager tools. For more information, see
Part II, “Managing virtual machines with libvirt”.
xl operations rely upon
xenstored and
xenconsoled services. Make sure you start
> systemctl start xencommons
at boot time to initialize all the daemons required by
xl.
Tip: Set up a xenbr0 network bridge in the host domain
In the most common network configuration, you need to set up a bridge
in the host domain named xenbr0 to have a working
network for the guest domains.
The basic structure of every xl command is:
xl <subcommand> [options] domain_id
where <subcommand> is the xl command to run, domain_id is the ID
number assigned to a domain or the name of the virtual machine, and
OPTIONS indicates subcommand-specific options.
For a complete list of the available xl subcommands,
run xl help. For each command, there is a more
detailed help available that is obtained with the extra parameter
--help. More information about the respective
subcommands is available in the manual page of xl.
For example, the xl list --help displays all options
that are available to the list command. As an example, the xl
list command displays the status of all virtual machines.
>sudoxl list Name ID Mem VCPUs State Time(s) Domain-0 0 457 2 r----- 2712.9 sles12 7 512 1 -b---- 16.3 opensuse 512 1 12.9
The information indicates if a machine is
running, and in which state it is. The most common flags are
r (running) and b (blocked) where
blocked means it is either waiting for IO, or sleeping because there is
nothing to do. For more details about the state flags, see man 1
xl.
Other useful xl commands include:
xl createcreates a virtual machine from a given configuration file.xl rebootreboots a virtual machine.xl destroyimmediately terminates a virtual machine.xl block-listdisplays all virtual block devices attached to a virtual machine.
24.1.1 Guest domain configuration file #Edit source
When operating domains, xl requires a domain
configuration file for each domain. The default directory to store such
configuration files is /etc/xen/.
A domain configuration file is a plain text file. It consists of
several KEY=VALUE
pairs. Certain keys are mandatory. General keys apply to any guest, and
specific ones apply only to a specific guest type (para or fully
virtualized). A value can either be a "string"
surrounded by single or double quotes, a number, a boolean value, or a
list of several values enclosed in brackets [ value1, value2,
... ].
Example 24.1: Guest domain configuration file for SLED 12: /etc/xen/sled12.cfg #
name= "sled12" builder = "hvm" vncviewer = 1 memory = 512 disk = [ '/var/lib/xen/images/sled12.raw,,hda', '/dev/cdrom,,hdc,cdrom' ] vif = [ 'mac=00:16:3e:5f:48:e4,model=rtl8139,bridge=br0' ] boot = "n"
To start such domain, run xl create
/etc/xen/sled12.cfg.
24.2 Automatic start of guest domains #Edit source
To make a guest domain start automatically after the host system boots, follow these steps:
Create the domain configuration file if it does not exist, and save it in the
/etc/xen/directory, for example/etc/xen/domain_name.cfg.Make a symbolic link of the guest domain configuration file in the
auto/subdirectory.>sudoln -s /etc/xen/domain_name.cfg /etc/xen/auto/domain_name.cfgOn the next system boot, the guest domain defined in
domain_name.cfgis started.
24.3 Event actions #Edit source
In the guest domain configuration file, you can define actions to be performed on a predefined set of events. For example, to tell the domain to restart itself after it is powered off, include the following line in its configuration file:
on_poweroff="restart"
A list of predefined events for a guest domain follows:
List of events #
- on_poweroff
Specifies what should be done with the domain if it shuts itself down.
- on_reboot
Action to take if the domain shuts down with a reason code requesting a reboot.
- on_watchdog
Action to take if the domain shuts down because of a Xen watchdog timeout.
- on_crash
Action to take if the domain crashes.
For these events, you can define one of the following actions:
List of related actions #
- destroy
Destroy the domain.
- restart
Destroy the domain and immediately create a new domain with the same configuration.
- rename-restart
Rename the domain that terminated, and then immediately create a new domain with the same configuration as the original.
- preserve
Keep the domain. It can be examined, and later destroyed with
xl destroy.- coredump-destroy
Write a core dump of the domain to
/var/xen/dump/NAMEand then destroy the domain.- coredump-restart
Write a core dump of the domain to
/var/xen/dump/NAMEand then restart the domain.
24.4 Time Stamp Counter #Edit source
The Time Stamp Counter (TSC) may be specified for each domain in the guest domain configuration file (for more information, see Section 24.1.1, “Guest domain configuration file”).
With the tsc_mode setting, you specify whether rdtsc
instructions are executed “natively” (fast, but
TSC-sensitive applications may sometimes run incorrectly) or emulated
(always run correctly, but performance may suffer).
tsc_mode=0(default)Use this to ensure correctness while providing the best performance possible—for more information, see https://xenbits.xen.org/docs/4.3-testing/misc/tscmode.txt.
tsc_mode=1(always emulate)Use this when TSC-sensitive apps are running and worst-case performance degradation is known and acceptable.
tsc_mode=2(never emulate)Use this when all applications running in this VM are TSC-resilient and highest performance is required.
tsc_mode=3(PVRDTSCP)High-TSC-frequency applications may be paravirtualized (modified) to obtain both correctness and highest performance—any unmodified applications must be TSC-resilient.
For background information, see https://xenbits.xen.org/docs/4.3-testing/misc/tscmode.txt.
24.5 Saving virtual machines #Edit source
Procedure 24.1: Save a virtual machine’s current state #
Make sure the virtual machine to be saved is running.
In the host environment, enter
>sudoxl save ID STATE-FILEwhere ID is the virtual machine ID you want to save, and STATE-FILE is the name you specify for the memory state file. By default, the domain is no longer running after you create its snapshot. Use
-cto keep it running even after you create the snapshot.
24.6 Restoring virtual machines #Edit source
Procedure 24.2: Restore a virtual machine’s current state #
Make sure the virtual machine to be restored has not been started since you ran the save operation.
In the host environment, enter
>sudoxl restore STATE-FILEwhere STATE-FILE is the previously saved memory state file. By default, the domain is running after it is restored. To pause it after the restore, use
-p.
24.7 Virtual machine states #Edit source
A virtual machine’s state can be displayed by viewing the results of the
xl list command, which abbreviates the state using a
single character.
r- running - The virtual machine is currently running and consuming allocated resources.b- blocked - The virtual machine’s processor is not running and not able to run. It is either waiting for I/O or has stopped working.p- paused - The virtual machine is paused. It does not interact with the hypervisor but still maintains its allocated resources, such as memory.s- shutdown - The guest operating system is in the process of being shut down, rebooted, or suspended, and the virtual machine is being stopped.c- crashed - The virtual machine has crashed and is not running.d- dying - The virtual machine is shutting down or crashing.
25 Block devices in Xen #Edit source
25.1 Mapping physical storage to virtual disks #Edit source
The disk specification for a Xen domain in the domain configuration file is as straightforward as the following example:
disk = [ 'format=raw,vdev=hdc,access=ro,devtype=cdrom,target=/root/image.iso' ]
It defines a disk block device based on the
/root/image.iso disk image file. The is seen as
hdc by the guest, with read-only
(ro) access. The type of the device is
cdrom with raw format.
The following example defines an identical device, but using simplified positional syntax:
disk = [ '/root/image.iso,raw,hdc,ro,cdrom' ]
You can include more disk definitions in the same line, each one separated by a comma. If a parameter is not specified, then its default value is taken:
disk = [ '/root/image.iso,raw,hdc,ro,cdrom','/dev/vg/guest-volume,,hda','...' ]
List of parameters #
- target
Source block device or disk image path.
- format
The format of the image file. Default is
raw.- vdev
Virtual device as seen by the guest. Supported values are hd[x], xvd[x], sd[x] etc. See
/usr/share/doc/packages/xen/misc/vbd-interface.txtfor more details. This parameter is mandatory.- access
Whether the block device is provided to the guest in read-only or read-write mode. Supported values are
roorrfor read-only, andrworwfor read/write access. Default isrofordevtype=cdrom, andrwfor other device types.- devtype
Qualifies virtual device type. Supported value is
cdrom.- backendtype
The back-end implementation to use. Supported values are
phy,tap, andqdisk. Normally this option should not be specified as the back-end type is automatically determined.- script
Specifies that
targetis not a normal host path, but rather information to be interpreted by the executable program. The specified script file is looked for in/etc/xen/scriptsif it does not point to an absolute path. These scripts are normally calledblock-<script_name>.
For more information about specifying virtual disks, see
/usr/share/doc/packages/xen/misc/xl-disk-configuration.txt.
25.2 Mapping network storage to virtual disk #Edit source
Similar to mapping a local disk image (see Section 25.1, “Mapping physical storage to virtual disks”), you can map a network disk as a virtual disk as well.
The following example shows mapping of an RBD (RADOS Block Device) disk with multiple Ceph monitors and cephx authentication enabled:
disk = [ 'vdev=hdc, backendtype=qdisk, \ target=rbd:libvirt-pool/new-libvirt-image:\ id=libvirt:key=AQDsPWtW8JoXJBAAyLPQe7MhCC+JPkI3QuhaAw==:auth_supported=cephx;none:\ mon_host=137.65.135.205\\:6789;137.65.135.206\\:6789;137.65.135.207\\:6789' ]
Following is an example of an NBD (Network Block Device) disk mapping:
disk = [ 'vdev=hdc, backendtype=qdisk, target=nbd:151.155.144.82:5555' ]
25.3 File-backed virtual disks and loopback devices #Edit source
When a virtual machine is running, each of its file-backed virtual disks consumes a loopback device on the host. By default, the host allows up to 64 loopback devices to be consumed.
To simultaneously run more file-backed virtual disks on a host, you can
increase the number of available loopback devices by adding the following
option to the host’s /etc/modprobe.conf.local file.
options loop max_loop=x
where x is the maximum number of loopback devices to
create.
Changes take effect after the module is reloaded.
Tip
Enter rmmod loop and modprobe
loop to unload and reload the module. In case
rmmod does not work, unmount all existing loop
devices or reboot the computer.
25.4 Resizing block devices #Edit source
While it is always possible to add new block devices to a VM Guest system, it is sometimes more desirable to increase the size of an existing block device. In case such a system modification is already planned during deployment of the VM Guest, several basic considerations should be done:
Use a block device that may be increased in size. LVM devices and file system images are commonly used.
Do not partition the device inside the VM Guest, but use the main device directly to apply the file system. For example, use
/dev/xvdbdirectly instead of adding partitions to/dev/xvdb.Make sure that the file system to be used can be resized. Sometimes, for example with Ext3, certain features must be switched off to be able to resize the file system. A file system that can be resized online and mounted is
XFS. Use the commandxfs_growfsto resize that file system after the underlying block device has been increased in size. For more information aboutXFS, seeman 8 xfs_growfs.
When resizing an LVM device that is assigned to a VM Guest, the new size is automatically known to the VM Guest. No further action is needed to inform the VM Guest about the new size of the block device.
When using file system images, a loop device is used to attach the image file to the guest. For more information about resizing that image and refreshing the size information for the VM Guest, see Section 27.2, “Sparse image files and disk space”.
25.5 Scripts for managing advanced storage scenarios #Edit source
There are scripts that can help with managing advanced storage scenarios
such as disk environments provided by dmmd
(“device mapper—multi disk”) including LVM
environments built upon a software RAID set, or a software RAID set built
upon an LVM environment. These scripts are part of the
xen-tools package. After installation, they can be
found in /etc/xen/scripts:
block-dmmdblock-drbd-probeblock-npiv
The scripts allow for external commands to perform specific action, or series of actions of the block devices before serving them up to a guest.
These scripts could formerly only be used with xl or
libxl using the disk configuration syntax
script=. They can now be used with libvirt by
specifying the base name of the block script in the
<source> element of the disk. For example:
<source dev='dmmd:md;/dev/md0;lvm;/dev/vgxen/lv-vm01'/>
26 Virtualization: configuration options and settings #Edit source
The documentation in this section, describes advanced management tasks and configuration options that may help technology innovators implement leading-edge virtualization solutions. It is provided as a courtesy and does not imply that all documented options and tasks are supported by Novell, Inc.
26.1 Virtual CD readers #Edit source
Virtual CD readers can be set up when a virtual machine is created or added to an existing virtual machine. A virtual CD reader can be based on a physical CD/DVD, or based on an ISO image. Virtual CD readers work differently depending on whether they are paravirtual or fully virtual.
26.1.1 Virtual CD readers on paravirtual machines #Edit source
A paravirtual machine can have up to 100 block devices composed of virtual CD readers and virtual disks. On paravirtual machines, virtual CD readers present the CD as a virtual disk with read-only access. Virtual CD readers cannot be used to write data to a CD.
After you have finished accessing a CD on a paravirtual machine, it is recommended that you remove the virtual CD reader from the virtual machine.
Paravirtualized guests can use the device type
devtype=cdrom. This partly emulates the behavior of
a real CD reader, and allows CDs to be changed. It is even possible to
use the eject command to open the tray of the CD reader.
26.1.2 Virtual CD readers on fully virtual machines #Edit source
A fully virtual machine can have up to four block devices composed of virtual CD readers and virtual disks. A virtual CD reader on a fully virtual machine interacts with an inserted CD in the way you would expect a physical CD reader to interact.
When a CD is inserted in the physical CD reader on the host computer,
all virtual machines with virtual CD readers based on the physical CD
reader, such as /dev/cdrom/, can read the inserted
CD. Assuming the operating system has automount functionality, the CD
should automatically appear in the file system. Virtual CD readers
cannot be used to write data to a CD. They are configured as read-only
devices.
26.1.3 Adding virtual CD readers #Edit source
Virtual CD readers can be based on a CD inserted into the CD reader or on an ISO image file.
Make sure that the virtual machine is running and the operating system has finished booting.
Insert the desired CD into the physical CD reader or copy the desired ISO image to a location available to Dom0.
Select a new, unused block device in your VM Guest, such as
/dev/xvdb.Choose the CD reader or ISO image that you want to assign to the guest.
When using a real CD reader, use the following command to assign the CD reader to your VM Guest. In this example, the name of the guest is alice:
>sudoxl block-attach alice target=/dev/sr0,vdev=xvdb,access=roWhen assigning an image file, use the following command:
>sudoxl block-attach alice target=/path/to/file.iso,vdev=xvdb,access=roA new block device, such as
/dev/xvdb, is added to the virtual machine.If the virtual machine is running Linux, complete the following:
Open a terminal in the virtual machine and enter
fdisk -lto verify that the device was properly added. You can also enterls /sys/blockto see all disks available to the virtual machine.The CD is recognized by the virtual machine as a virtual disk with a drive designation, for example:
/dev/xvdb
Enter the command to mount the CD or ISO image using its drive designation. For example,
>sudomount -o ro /dev/xvdb /mntmounts the CD to a mount point named
/mnt.The CD or ISO image file should be available to the virtual machine at the specified mount point.
If the virtual machine is running Windows, reboot the virtual machine.
Verify that the virtual CD reader appears in its
My Computersection.
26.1.4 Removing virtual CD readers #Edit source
Make sure that the virtual machine is running and the operating system has finished booting.
If the virtual CD reader is mounted, unmount it from within the virtual machine.
Enter
xl block-list aliceon the host view of the guest block devices.Enter
xl block-detach aliceBLOCK_DEV_ID to remove the virtual device from the guest. If that fails, try to add-fto force the removal.Press the hardware eject button to eject the CD.
26.2 Remote access methods #Edit source
Some configurations, such as those that include rack-mounted servers,
require a computer to run without a video monitor, keyboard or mouse.
This type of configuration is often called headless
and requires the use of remote administration technologies.
Typical configuration scenarios and technologies include:
- Graphical desktop with X Window System server
If a graphical desktop, such as GNOME, is installed on the virtual machine host, you can use a remote viewer, such as a VNC viewer. On a remote computer, log in and manage the remote guest environment by using graphical tools, such as
tigervncorvirt-viewer.- Text only
You can use the
sshcommand from a remote computer to log in to a virtual machine host and access its text-based console. You can then use thexlcommand to manage virtual machines, and thevirt-installcommand to create new virtual machines.
26.3 VNC viewer #Edit source
VNC viewer is used to view the environment of the running guest system in a graphical way. You can use it from Dom0 (known as local access or on-box access), or from a remote computer.
You can use the IP address of a VM Host Server and a VNC viewer to view the display of this VM Guest. When a virtual machine is running, the VNC server on the host assigns the virtual machine a port number to be used for VNC viewer connections. The assigned port number is the lowest port number available when the virtual machine starts. The number is only available for the virtual machine while it is running. After shutting down, the port number may be assigned to other virtual machines.
For example, if ports 1 and 2 and 4 and 5 are assigned to the running virtual machines, the VNC viewer assigns the lowest available port number, 3. If port number 3 is still in use the next time the virtual machine starts, the VNC server assigns a different port number to the virtual machine.
To use the VNC viewer from a remote computer, the firewall must permit access to as many ports as VM Guest systems run from. This means from port 5900 and up. For example, to run 10 VM Guest systems, you need to open the TCP ports 5900:5910.
To access the virtual machine from the local console running a VNC viewer client, enter one of the following commands:
vncviewer ::590#vncviewer :#
# is the VNC viewer port number assigned to the virtual machine.
When accessing the VM Guest from a machine other than Dom0, use the following syntax:
> vncviewer 192.168.1.20::590#In this case, the IP address of Dom0 is 192.168.1.20.
26.3.1 Assigning VNC viewer port numbers to virtual machines #Edit source
Although the default behavior of VNC viewer is to assign the first available port number, you should assign a specific VNC viewer port number to a specific virtual machine.
To assign a specific port number on a VM Guest, edit the xl setting of
the virtual machine and change the vnclisten to the
desired value. For example, for port number 5902, specify 2 only, as
5900 is added automatically:
vfb = [ 'vnc=1,vnclisten="localhost:2"' ]
For more information regarding editing the xl settings of a guest domain, see Section 24.1, “XL—Xen management tool”.
Tip
Assign higher port numbers to avoid conflict with port numbers assigned by the VNC viewer, which uses the lowest available port number.
26.3.2 Using SDL instead of a VNC viewer #Edit source
If you access a virtual machine's display from the virtual machine host console (known as local or on-box access), you should use SDL instead of VNC viewer. VNC viewer is faster for viewing desktops over a network, but SDL is faster for viewing desktops from the same computer.
To set the default to use SDL instead of VNC, change the virtual machine's configuration information to the following. For instructions, see Section 24.1, “XL—Xen management tool”.
vfb = [ 'sdl=1' ]
Remember that, unlike a VNC viewer window, closing an SDL window terminates the virtual machine.
26.4 Virtual keyboards #Edit source
When a virtual machine is started, the host creates a virtual keyboard
that matches the keymap entry according to the virtual
machine's settings. If there is no keymap entry
specified, the virtual machine's keyboard defaults to English (US).
To view a virtual machine's current keymap entry,
enter the following command on the Dom0:
> xl list -l VM_NAME | grep keymapTo configure a virtual keyboard for a guest, use the following snippet:
vfb = [ 'keymap="de"' ]
For a complete list of supported keyboard layouts, see the
Keymaps section of the xl.cfg
manual page man 5 xl.cfg.
26.5 Dedicating CPU resources #Edit source
In Xen it is possible to specify how many and which CPU cores the Dom0 or VM Guest should use to retain its performance. The performance of Dom0 is important for the overall system, as the disk and network drivers are running on it. Also I/O intensive guests' workloads may consume lots of Dom0s' CPU cycles. However, the performance of VM Guests is also important, to be able to accomplish the task they were set up for.
26.5.1 Dom0 #Edit source
Dedicating CPU resources to Dom0 results in a better overall performance of the virtualized environment because Dom0 has free CPU time to process I/O requests from VM Guests. Failing to dedicate exclusive CPU resources to Dom0 may results in a poor performance and can cause the VM Guests to function incorrectly.
Dedicating CPU resources involves three basic steps: modifying Xen boot line, binding Dom0's VCPUs to a physical processor, and configuring CPU-related options on VM Guests:
First you need to append the
dom0_max_vcpus=Xto the Xen boot line. Do so by adding the following line to/etc/default/grub:GRUB_CMDLINE_XEN="dom0_max_vcpus=X"
If
/etc/default/grubalready contains a line settingGRUB_CMDLINE_XEN, rather appenddom0_max_vcpus=Xto this line.Xneeds to be replaced by the number of VCPUs dedicated to Dom0.Update the GRUB 2 configuration file by running the following command:
>sudogrub2-mkconfig -o /boot/grub2/grub.cfgReboot for the change to take effect.
The next step is to bind (or “pin”) each Dom0's VCPU to a physical processor.
>sudoxl vcpu-pin Domain-0 0 0 xl vcpu-pin Domain-0 1 1The first line binds Dom0's VCPU number 0 to the physical processor number 0, while the second line binds Dom0's VCPU number 1 to the physical processor number 1.
Lastly, you need to make sure no VM Guest uses the physical processors dedicated to VCPUs of Dom0. Assuming you are running an 8-CPU system, you need to add
cpus="2-8"
to the configuration file of the relevant VM Guest.
26.5.2 VM Guests #Edit source
It is often necessary to dedicate specific CPU resources to a virtual machine. By default, a virtual machine uses any available CPU core. Its performance can be improved by assigning a reasonable number of physical processors to it as other VM Guests are not allowed to use them after that. Assuming a machine with 8 CPU cores while a virtual machine needs to use 2 of them, change its configuration file as follows:
vcpus=2 cpus="2,3"
The above example dedicates 2 processors to the
VM Guest, and these being the third and fourth one,
(2 and 3 counted from zero). If
you need to assign more physical processors, use the
cpus="2-8" syntax.
If you need to change the CPU assignment for a guest named “alice” in a hotplug manner, do the following on the related Dom0:
>sudoxl vcpu-set alice 2>sudoxl vcpu-pin alice 0 2>sudoxl vcpu-pin alice 1 3
The example dedicates 2 physical processors to the guest, and bind its VCPU 0 to physical processor 2 and VCPU 1 to physical processor 3. Now check the assignment:
>sudoxl vcpu-list alice Name ID VCPUs CPU State Time(s) CPU Affinity alice 4 0 2 -b- 1.9 2-3 alice 4 1 3 -b- 2.8 2-3
26.6 HVM features #Edit source
In Xen, certain features are only available for fully virtualized domains. They are rarely used, but still may be interesting in specific environments.
26.6.1 Specify boot device on boot #Edit source
Just as with physical hardware, it is sometimes desirable to boot a
VM Guest from a different device than its own boot device. For fully
virtual machines, it is possible to select a boot device with the
boot parameter in a domain xl configuration file:
boot = BOOT_DEVICE
BOOT_DEVICE can be one of
c for hard disk, d for CD-ROM, or
n for Network/PXE. You can specify multiple options,
and they will be attempted in the given order. For example,
boot = dc
boots from CD-ROM, and falls back to the hard disk if CD-ROM is not bootable.
26.6.2 Changing CPUIDs for guests #Edit source
To be able to migrate a VM Guest from one VM Host Server to a different
VM Host Server, the VM Guest system may only use CPU features that are
available on both VM Host Server systems. If the actual CPUs are different on
both hosts, it may be necessary to hide certain features before the
VM Guest is started. This maintains the possibility to migrate the
VM Guest between both hosts. For fully virtualized guests, this can be
achieved by configuring the cpuid that is available
to the guest.
To gain an overview of the current CPU, have a look at
/proc/cpuinfo. This contains all the important
information that defines the current CPU.
To redefine a CPU, first have a look at the respective cpuid definitions of the CPU vendor. These are available from:
cpuid = "host,tm=0,sse3=0"
The syntax is a comma-separated list of key=value
pairs, preceded by the word host. A few keys take a
numerical value, while all others take a single character which
describes what to do with the feature bit. See man 5
xl.cfg for a complete list of cpuid keys. The respective bits
may be changed by using the following values:
- 1
Force the corresponding bit to
1- 0
Force the corresponding bit to
0- x
Use the values of the default policy
- k
Use the values defined by the host
- s
Like
k, but preserve the value over migrations
Tip
Remember that counting bits is done from right to left, starting with
bit 0.
26.6.3 Increasing the number of PCI-IRQs #Edit source
In case you need to increase the default number of PCI-IRQs available
to Dom0 and/or VM Guest, you can do so by modifying the Xen kernel
command line. Use the command extra_guest_irqs=
DOMU_IRGS,DOM0_IRGS. The optional first
number DOMU_IRGS is common for all
VM Guests, while the optional second number
DOM0_IRGS (preceded by a comma) is for
Dom0. Changing the setting for VM Guest has no impact on Dom0 and
vice versa. For example to change Dom0 without changing VM Guest,
use
extra_guest_irqs=,512
26.7 Virtual CPU scheduling #Edit source
The Xen hypervisor schedules virtual CPUs individually across physical CPUs. With modern CPUs supporting multiple threads on each core, virtual CPUs can run on the same core in different threads and thus influence each other. The performance of a virtual CPU running in one thread can be noticeably affected by what other virtual CPUs in other threads are doing. When these virtual CPUs belong to different guest systems, these guests can influence each other. The effect can vary, from variations in the guest CPU time accounting to worse scenarios such as side channel attack.
Scheduling granularity addresses this problem. You can specify it at boot time by using a Xen boot parameter:
sched-gran=GRANULARITY
Replace GRANULARITY with one of:
- cpu
The regular scheduling of the Xen hypervisor. Virtual CPUs of different guests can share one physical CPU core. This is the default.
- core
Virtual CPUs of a virtual core are always scheduled together on one physical core. Two or more virtual CPUs from different virtual cores will never be scheduled on the same physical core. Therefore, certain physical cores may have several of their CPUs left idle, even if there are virtual CPUs wanting to run. The impact on performance will depend on the actual workload being run inside of the guest systems. In most of the analyzed cases, the observed performance degradation, especially if under considerable load, was smaller than disabling HyperThreading, which leaves all the cores with just one thread (see the
smtboot option at https://xenbits.xen.org/docs/unstable/misc/xen-command-line.html#smt-x86).- socket
The granularity goes even higher to a CPU socket level.
27 Administrative tasks #Edit source
27.1 The boot loader program #Edit source
The boot loader controls how the virtualization software boots and runs. You can modify the boot loader properties by using YaST, or by directly editing the boot loader configuration file.
The YaST boot loader program is located at › › . Click the tab and select the line containing the Xen kernel as the .

Figure 27.1: Boot loader settings #
Confirm with . Next time you boot the host, it can provide the Xen virtualization environment.
You can use the Boot Loader program to specify functionality, such as:
Pass kernel command-line parameters.
Specify the kernel image and initial RAM disk.
Select a specific hypervisor.
Pass additional parameters to the hypervisor. See http://xenbits.xen.org/docs/unstable/misc/xen-command-line.html for their complete list.
You can customize your virtualization environment by editing the
/etc/default/grub file. Add the following line to
this file: GRUB_CMDLINE_XEN="<boot_parameters>".
Do not forget to run grub2-mkconfig -o
/boot/grub2/grub.cfg after editing the file.
27.2 Sparse image files and disk space #Edit source
If the host’s physical disk reaches a state where it has no available space, a virtual machine using a virtual disk based on a sparse image file cannot write to its disk. Consequently, it reports I/O errors.
If this situation occurs, you should free up available space on the physical disk, remount the virtual machine’s file system, and set the file system back to read-write.
To check the actual disk requirements of a sparse image file, use the
command du -h <image file>.
To increase the available space of a sparse image file, first increase the file size and then the file system.
Warning: Back up before resizing
Touching the sizes of partitions or sparse files always bears the risk of data failure. Do not work without a backup.
The resizing of the image file can be done online, while the VM Guest is running. Increase the size of a sparse image file with:
>sudodd if=/dev/zero of=<image file> count=0 bs=1M seek=<new size in MB>
For example, to increase the file
/var/lib/xen/images/sles/disk0 to a size of 16GB,
use the command:
>sudodd if=/dev/zero of=/var/lib/xen/images/sles/disk0 count=0 bs=1M seek=16000
Note: Increasing non-sparse images
It is also possible to increase the image files of devices that are not sparse files. However, you must know exactly where the previous image ends. Use the seek parameter to point to the end of the image file and use a command similar to the following:
>sudodd if=/dev/zero of=/var/lib/xen/images/sles/disk0 seek=8000 bs=1M count=2000
Be sure to use the right seek, else data loss may happen.
If the VM Guest is running during the resize operation, also resize the loop device that provides the image file to the VM Guest. First detect the correct loop device with the command:
>sudolosetup -j /var/lib/xen/images/sles/disk0
Then resize the loop device, for example /dev/loop0,
with the following command:
>sudolosetup -c /dev/loop0
Finally check the size of the block device inside the guest system with
the command fdisk -l /dev/xvdb. Replace the device
name with your increased disk.
The resizing of the file system inside the sparse file involves tools that are depending on the actual file system.
27.3 Migrating Xen VM Guest systems #Edit source
With Xen it is possible to migrate a VM Guest system from one VM Host Server to another with almost no service interruption. This could be used, for example, to move a busy VM Guest to a VM Host Server that has stronger hardware or is not yet loaded. Or, if a service of a VM Host Server is required, all VM Guest systems running on this machine can be migrated to other machines to avoid interruption of service. These are only two examples—many more reasons may apply to your personal situation.
Before starting, certain preliminary considerations regarding the VM Host Server should be taken into account:
All VM Host Server systems should use a similar CPU. The frequency is not so important, but they should be using the same CPU family. To get more information about the used CPU, use
cat /proc/cpuinfo. Find more details about comparing host CPU features in Section 27.3.1, “Detecting CPU features”.All resources that are used by a specific guest system must be available on all involved VM Host Server systems—for example all used block devices must exist on both VM Host Server systems.
If the hosts included in the migration process run in different subnets, make sure that either DHCP relay is available to the guests, or for guests with static network configuration, set up the network manually.
Using special features like
PCI Pass-Throughmay be problematic. Do not implement these when deploying for an environment that should migrate VM Guest systems between different VM Host Server systems.For fast migrations, a fast network is mandatory. If possible, use GB Ethernet and fast switches. Deploying VLAN may also help avoid collisions.
27.3.1 Detecting CPU features #Edit source
By using the cpuid and
xen_maskcalc.py tools, you can compare
features of a CPU on the host from where you are migrating the source
VM Guest with the features of CPUs on the target hosts. This way you
can better predict if the guest migrations will be successful.
Run the
cpuid -1rcommand on each Dom0 that is supposed to run or receive the migrated VM Guest and capture the output in text files, for example:tux@vm_host1 >sudo cpuid -1r > vm_host1.txttux@vm_host2 >sudo cpuid -1r > vm_host2.txttux@vm_host3 >sudo cpuid -1r > vm_host3.txtCopy all the output text files on a host with the
xen_maskcalc.pyscript installed.Run the
xen_maskcalc.pyscript on all output text files:>sudoxen_maskcalc.py vm_host1.txt vm_host2.txt vm_host3.txt cpuid = [ "0x00000001:ecx=x00xxxxxx0xxxxxxxxx00xxxxxxxxxxx", "0x00000007,0x00:ebx=xxxxxxxxxxxxxxxxxx00x0000x0x0x00" ]Copy the output
cpuid=[...]configuration snipped into thexlconfiguration of the migrated guestdomU.cfgor alternatively to itslibvirt's XML configuration.Start the source guest with the trimmed CPU configuration. The guest can now only use CPU features which are present on each of the hosts.
27.3.1.1 More information #Edit source
You can find more details about cpuid at
http://etallen.com/cpuid.html.
You can download the latest version of the CPU mask calculator from https://github.com/twizted/xen_maskcalc.
27.3.2 Preparing block devices for migrations #Edit source
The block devices needed by the VM Guest system must be available on all involved VM Host Server systems. This is done by implementing a specific kind of shared storage that serves as a container for the root file system of the migrated VM Guest system. Common possibilities include:
iSCSIcan be set up to give access to the same block devices from different systems at the same time.NFSis a widely used root file system that can easily be accessed from different locations. For more information, see Book “Reference”, Chapter 22 “Sharing file systems with NFS”.DRBDcan be used if only two VM Host Server systems are involved. This adds certain extra data security, because the used data is mirrored over the network. .SCSIcan also be used if the available hardware permits shared access to the same disks.NPIVis a special mode to use Fibre channel disks. However, in this case, all migration hosts must be attached to the same Fibre channel switch. For more information about NPIV, see Section 25.1, “Mapping physical storage to virtual disks”. Commonly, this works if the Fibre channel environment supports 4 Gbps or faster connections.
27.3.3 Migrating VM Guest systems #Edit source
The actual migration of the VM Guest system is done with the command:
>sudoxl migrate <domain_name> <host>
The speed of the migration depends on how fast the memory print can be saved to disk, sent to the new VM Host Server and loaded there. This means that small VM Guest systems can be migrated faster than big systems with a lot of memory.
27.4 Monitoring Xen #Edit source
For a regular operation of many virtual guests, having a possibility to check the sanity of all the different VM Guest systems is indispensable. Xen offers several tools besides the system tools to gather information about the system.
Tip: Monitoring the VM Host Server
Basic monitoring of the VM Host Server (I/O and CPU) is available via the Virtual Machine Manager. Refer to Section 10.8.1, “Monitoring with Virtual Machine Manager” for details.
27.4.1 Monitor Xen with xentop #Edit source
The preferred terminal application to gather information about Xen
virtual environment is xentop. Be aware that this
tool needs a rather broad terminal, else it inserts line breaks into
the display.
xentop has several command keys that can give you
more information about the system that is monitored. For example:
- D
Change the delay between the refreshes of the screen.
- N
Also display network statistics. Note, that only standard configurations are displayed. If you use a special configuration like a routed network, no network is displayed.
- B
Display the respective block devices and their cumulated usage count.
For more information about xentop, see the manual
page man 1 xentop.
Tip: virt-top
libvirt offers the hypervisor-agnostic tool
virt-top, which is recommended for monitoring
VM Guests. See
Section 10.8.2, “Monitoring with virt-top” for
details.
27.4.2 Additional tools #Edit source
There are many system tools that also help monitoring or debugging a running openSUSE system. Many of these are covered in Book “System Analysis and Tuning Guide”, Chapter 2 “System monitoring utilities”. Especially useful for monitoring a virtualization environment are the following tools:
- ip
The command-line utility
ipmay be used to monitor arbitrary network interfaces. This is especially useful if you have set up a network that is routed or applied a masqueraded network. To monitor a network interface with the namealice.0, run the following command:>watch ip -s link show alice.0- bridge
In a standard setup, all the Xen VM Guest systems are attached to a virtual network bridge.
bridgeallows you to determine the connection between the bridge and the virtual network adapter in the VM Guest system. For example, the output ofbridge linkmay look like the following:2: eth0 state DOWN : <NO-CARRIER, ...,UP> mtu 1500 master br0 8: vnet0 state UNKNOWN : <BROADCAST, ...,LOWER_UP> mtu 1500 master virbr0 \ state forwarding priority 32 cost 100
This shows that there are two virtual bridges defined on the system. One is connected to the physical Ethernet device
eth0, the other one is connected to a VLAN interfacevnet0.- iptables-save
Especially when using masquerade networks, or if several Ethernet interfaces are set up together with a firewall setup, it may be helpful to check the current firewall rules.
The command
iptablesmay be used to check all the different firewall settings. To list all the rules of a chain, or even of the complete setup, you may use the commandsiptables-saveoriptables -S.
27.5 Providing host information for VM Guest systems #Edit source
In a standard Xen environment, the VM Guest systems have only limited
information about the VM Host Server system they are running on. If a guest
should know more about the VM Host Server it runs on,
vhostmd can provide more information to selected
guests. To set up your system to run vhostmd,
proceed as follows:
Install the package vhostmd on the VM Host Server.
To add or remove
metricsections from the configuration, edit the file/etc/vhostmd/vhostmd.conf. However, the default works well.Check the validity of the
vhostmd.confconfiguration file with the command:>cd /etc/vhostmd>xmllint --postvalid --noout vhostmd.confStart the vhostmd daemon with the command
sudo systemctl start vhostmd.If vhostmd should be started automatically during start-up of the system, run the command:
>sudosystemctl enable vhostmdAttach the image file
/dev/shm/vhostmd0to the VM Guest system named alice with the command:>xl block-attach opensuse /dev/shm/vhostmd0,,xvdb,roLog on the VM Guest system.
Install the client package
vm-dump-metrics.Run the command
vm-dump-metrics. To save the result to a file, use the option-d <filename>.
The result of the vm-dump-metrics is an XML
output. The respective metric entries follow the DTD
/etc/vhostmd/metric.dtd.
For more information, see the manual pages man 8
vhostmd and /usr/share/doc/vhostmd/README
on the VM Host Server system. On the guest, see the manual page man 1
vm-dump-metrics.
28 XenStore: configuration database shared between domains #Edit source
This section introduces basic information about XenStore, its role in the Xen environment, the directory structure of files used by XenStore, and the description of XenStore's commands.
28.1 Introduction #Edit source
XenStore is a database of configuration and status information shared
between VM Guests and the management tools running in Dom0. VM Guests
and the management tools read and write to XenStore to convey
configuration information, status updates, and state changes. The
XenStore database is managed by Dom0 and supports simple operations,
such as reading and writing a key. VM Guests and management tools can be
notified of any changes in XenStore by watching entries of interest.
The xenstored daemon is managed by the
xencommons service.
XenStore is located on Dom0 in a single database file
/var/lib/xenstored/tdb (tdb
represents tree database).
28.2 File system interface #Edit source
XenStore database content is represented by a virtual file system
similar to /proc (for more information on
/proc, see Book “System Analysis and Tuning Guide”, Chapter 2 “System monitoring utilities”, Section 2.6 “The /proc file system”). The
tree has three main paths: /vm,
/local/domain, and /tool.
/vm- stores information about the VM Guest configuration./local/domain- stores information about VM Guest on the local node./tool- stores general information about multiple tools.
Tip
Each VM Guest has two different ID numbers. The universal unique identifier (UUID) remains the same even if the VM Guest is migrated to another machine. The domain identifier (DOMID) is an identification number that represents a particular running instance. It typically changes when the VM Guest is migrated to another machine.
28.2.1 XenStore commands #Edit source
The file system structure of the XenStore database can be operated with the following commands:
xenstore-lsDisplays the full dump of the XenStore database.
xenstore-readpath_to_xenstore_entryDisplays the value of the specified XenStore entry.
xenstore-existsxenstore_pathReports whether the specified XenStore path exists.
xenstore-listxenstore_pathDisplays all the children entries of the specified XenStore path.
xenstore-writepath_to_xenstore_entryUpdates the value of the specified XenStore entry.
xenstore-rmxenstore_pathRemoves the specified XenStore entry or directory.
xenstore-chmodxenstore_pathmodeUpdates the read/write permission on the specified XenStore path.
xenstore-controlSends a command to the
xenstoredback-end, such as triggering an integrity check.
28.2.2 /vm #Edit source
The /vm path is indexed by the UUID of each
VM Guest, and stores configuration information such as the number of
virtual CPUs and the amount of allocated memory. There is a
/vm/<uuid> directory for each VM Guest. To
list the directory content, use xenstore-list.
>sudoxenstore-list /vm 00000000-0000-0000-0000-000000000000 9b30841b-43bc-2af9-2ed3-5a649f466d79-1
The first line of the output belongs to Dom0, and the second one to a running VM Guest. The following command lists all the entries related to the VM Guest:
>sudoxenstore-list /vm/9b30841b-43bc-2af9-2ed3-5a649f466d79-1 image rtc device pool_name shadow_memory uuid on_reboot start_time on_poweroff bootloader_args on_crash vcpus vcpu_avail bootloader name
To read a value of an entry, for example, the number of virtual CPUs
dedicated to the VM Guest, use xenstore-read:
>sudoxenstore-read /vm/9b30841b-43bc-2af9-2ed3-5a649f466d79-1/vcpus 1
A list of selected /vm/<uuid> entries
follows:
uuidUUID of the VM Guest. It does not change during the migration process.
on_rebootSpecifies whether to destroy or restart the VM Guest in response to a reboot request.
on_poweroffSpecifies whether to destroy or restart the VM Guest in response to a halt request.
on_crashSpecifies whether to destroy or restart the VM Guest in response to a crash.
vcpusNumber of virtual CPUs allocated to the VM Guest.
vcpu_availBitmask of active virtual CPUs for the VM Guest. The bitmask has several bits equal to the value of
vcpus, with a bit set for each online virtual CPU.nameThe name of the VM Guest.
Regular VM Guests (not Dom0) use the
/vm/<uuid>/image path:
>sudoxenstore-list /vm/9b30841b-43bc-2af9-2ed3-5a649f466d79-1/image ostype kernel cmdline ramdisk dmargs device-model display
An explanation of the used entries follows:
ostypeThe OS type of the VM Guest.
kernelThe path on Dom0 to the kernel for the VM Guest.
cmdlineThe kernel command line for the VM Guest used when booting.
ramdiskThe path on Dom0 to the RAM disk for the VM Guest.
dmargsShows arguments passed to the QEMU process. If you look at the QEMU process with
ps, you should see the same arguments as in/vm/<uuid>/image/dmargs.
28.2.3 /local/domain/<domid> #Edit source
This path is indexed by the running domain (VM Guest) ID, and contains information about the running VM Guest. Remember that the domain ID changes during VM Guest migration. The following entries are available:
vmThe path of the
/vmdirectory for this VM Guest.on_reboot, on_poweroff, on_crash, nameSee identical options in Section 28.2.2, “
/vm”domidDomain identifier for the VM Guest.
cpuThe current CPU to which the VM Guest is pinned.
cpu_weightThe weight assigned to the VM Guest for scheduling purposes. Higher weights use the physical CPUs more often.
Apart from the individual entries described above, there are also
several subdirectories under
/local/domain/<domid>, containing specific
entries. To see all entries available, refer to
XenStore
Reference.
/local/domain/<domid>/memoryContains memory information.
/local/domain/<domid>/memory/targetcontains target memory size for the VM Guest (in kilobytes)./local/domain/<domid>/consoleContains information about a console used by the VM Guest.
/local/domain/<domid>/backendContains information about all back-end devices used by the VM Guest. The path has subdirectories of its own.
/local/domain/<domid>/deviceContains information about the front-end devices for the VM Guest.
/local/domain/<domid>/device-miscContains miscellaneous information about devices.
/local/domain/<domid>/storeContains information about the VM Guest's store.
29 Xen as a high-availability virtualization host #Edit source
Setting up two Xen hosts as a failover system has several advantages compared to a setup where every server runs on dedicated hardware.
Failure of a single server does not cause major interruption of the service.
A single big machine is normally way cheaper than multiple smaller machines.
Adding new servers as needed is a trivial task.
The usage of the server is improved, which has positive effects on the power consumption of the system.
The setup of migration for Xen hosts is described in Section 27.3, “Migrating Xen VM Guest systems”. In the following, several typical scenarios are described.
29.1 Xen HA with remote storage #Edit source
Xen can directly provide several remote block devices to the respective Xen guest systems. These include iSCSI, NPIV and NBD. They may be used to do live migrations. When a storage system is already in place, first try to use the same device type you already used in the network.
If the storage system cannot be used directly but provides a possibility to offer the needed space over NFS, it is also possible to create image files on NFS. If NFS is available on all Xen host systems, this method also allows live migrations of Xen guests.
When setting up a new system, one of the main considerations is whether a dedicated storage area network should be implemented. The following possibilities are available:
Table 29.1: Xen remote storage #
|
Method |
Complexity |
Comments |
|---|---|---|
|
Ethernet |
low |
All block device traffic goes over the same Ethernet interface as the network traffic. This may be limiting the performance of the guest. |
|
Ethernet dedicated to storage. |
medium |
Running the storage traffic over a dedicated Ethernet interface may eliminate a bottleneck on the server side. However, planning your own network with your own IP address range and a VLAN dedicated to storage requires certain considerations. |
|
NPIV |
high |
NPIV is a method to virtualize Fibre channel connections. This is available with adapters that support a data rate of at least 4 Gbit/s and allows the setup of complex storage systems. |
Typically, a 1 Gbit/s Ethernet device can fully use a typical hard disk or storage system. When using fast storage systems, such an Ethernet device may limit the speed of the system.
29.2 Xen HA with local storage #Edit source
For space or budget reasons, it may be necessary to rely on storage that is local to the Xen host systems. To still maintain the possibility of live migrations, it is necessary to build block devices that are mirrored to both Xen hosts. The software that allows this is called Distributed Replicated Block Device (DRBD).
If a system that uses DRBD to mirror the block devices or files between two Xen hosts should be set up, both hosts should use the identical hardware. If one of the hosts has slower hard disks, both hosts suffer from this limitation.
During the setup, each of the required block devices should use its own DRBD device. The setup of such a system is a complex task.
29.3 Xen HA and private bridges #Edit source
When using several guest systems that need to communicate between each other, it is possible to do this over the regular interface. However, for security reasons it may be advisable to create a bridge that is only connected to guest systems.
In an HA environment that also should support live migrations, such a private bridge must be connected to the other Xen hosts. This is possible by using dedicated physical Ethernet devices and a dedicated network.
A different implementation method is using VLAN interfaces. In that case, all the traffic goes over the regular Ethernet interface. However, the VLAN interface does not get the regular traffic, because only the VLAN packets that are tagged for the correct VLAN are forwarded.
For more information about the setup of a VLAN interface see Section 8.1.1.4, “Using VLAN interfaces”.
30 Xen: converting a paravirtual (PV) guest into a fully virtual (FV/HVM) guest #Edit source
This chapter explains how to convert a Xen paravirtual machine into a Xen fully virtualized machine.
Procedure 30.1: Guest side #
To start the guest in FV mode, you need to run the following steps inside the guest.
Before converting the guest, apply all pending patches and reboot the guest.
FV machines use the
-defaultkernel. If this kernel is not already installed, install thekernel-defaultpackage (while running in PV mode).PV machines typically use disk names such as
vda*. These names must be changed to the FVhd*syntax. This change must be done in the following files:/etc/fstab/boot/grub/menu.lst(SLES 11 only)/boot/grub*/device.map/etc/sysconfig/bootloader/etc/default/grub(SLES 12, 15, openSUSE)
Note: Prefer UUIDs
You should use UUIDs or logical volumes within your
/etc/fstab. Using UUIDs simplifies the use of attached network storage, multipathing and virtualization. To find the UUID of your disk, use the commandblkid.To avoid any error regenerating the
initrdwith the required modules, you can create a symbolic link from/dev/hda2to/dev/xvda2etc. by using theln:ln -sf /dev/xvda2 /dev/hda2 ln -sf /dev/xvda1 /dev/hda1 .....
PV and FV machines use different disk and network driver modules. These FV modules must be added to the initrd manually. The expected modules are
xen-vbd(for disk) andxen-vnif(for network). These are the only PV drivers for a fully virtualized VM Guest. All other modules, such asata_piix,ata_genericandlibata, should be added automatically.Tip: Adding modules to the initrd
On SLES 11, you can add modules to the
INITRD_MODULESline in the/etc/sysconfig/kernelfile. For example:INITRD_MODULES="xen-vbd xen-vnif"
Run
dracutto build a new initrd containing the modules.On SLES 12, 15, and openSUSE open or create
/etc/dracut.conf.d/10-virt.confand add the modules withforce_driversby adding a line as in the example below (mind the leading whitespace):force_drivers+=" xen-vbd xen-vnif"
Run
dracut -f --kver KERNEL_VERSION-defaultto build a new initrd (for the default version of the kernel) that contains the required modules.Find your kernel version. Use the
uname -rcommand to get the current version used on your system.
Before shutting down the guest, set the default boot parameter to the
-defaultkernel usingyast bootloader.Under openSUSE Leap 11, if you have an X server running on your guest, you need to adjust the
/etc/X11/xorg.conffile to adjust the X driver. Search forfbdevand change tocirrus.Section "Device" Driver "cirrus" ...... EndSectionNote: openSUSE Leap 12/15 and Xorg
Under openSUSE Leap 12/15, Xorg automatically adjusts the driver needed to be able to get a working X server.
Shut down the guest.
Procedure 30.2: Host side #
The following steps explain the action that you need to perform on the host.
To start the guest in FV mode, the configuration of the VM must be modified to match an FV configuration. Editing the configuration of the VM can easily be done using
virsh edit [DOMAIN]. The following changes are recommended:Make sure the machine, the type, and the
loaderentries in the OS section are changed fromxenpvtoxenfv. The updated OS section should look similar to:<os> <type arch='x86_64' machine='xenfv'>hvm</type> <loader>/usr/lib/xen/boot/hvmloader</loader> <boot dev='hd'/> </os>In the OS section, remove anything that is specific to PV guests:
<bootloader>pygrub</bootloader>
<kernel>/usr/lib/grub2/x86_64-xen/grub.xen</kernel>
<cmdline>xen-fbfront.video=4,1024,768</cmdline>
In the devices section, add the qemu emulator as:
<emulator>/usr/lib/xen/bin/qemu-system-i386</emulator>
Update the disk configuration so the target device and bus use the FV syntax. This requires replacing the
xendisk bus withide, and thevdatarget device withhda. The changes should look similar to:<target dev='hda' bus='ide'/>
Change the bus for the mouse and keyboard from
xentops2. Also add a new USB tablet device:<input type='mouse' bus='ps2'/> <input type='keyboard' bus='ps2'/> <input type='tablet' bus='usb'/>Change the console target type from
xentoserial:<console type='pty'> <target type='serial' port='0'/> </console>Change the video configuration from
xentocirrus, with 8 MB of VRAM:<video> <model type='cirrus' vram='8192' heads='1' primary='yes'/> </video>If desired, add
acpiandapicto the features of the VM:<features> <acpi/> <apic/> </features>
Start the guest (using
virshorvirt-manager). If the guest is running kernel-default (as verified throughuname -a), the machine is running in Fully Virtual mode.
Note: guestfs-tools
To script this process, or work on disk images directly, you can use the guestfs-tools suite (see Section 18.3, “Guestfs tools” for more information). Several tools exist to help modify disk images.
Part V Managing virtual machines with QEMU #Edit source
- 31 QEMU overview
QEMU is a fast, cross-platform open source machine emulator which can emulate many hardware architectures. QEMU lets you run a complete unmodified operating system (VM Guest) on top of your existing system (VM Host Server). You can also use QEMU for debugging purposes—you can easily stop your runnin…
- 32 Setting up a KVM VM Host Server
This section documents how to set up and use openSUSE Leap 15.5 as a QEMU-KVM based virtual machine host.
- 33 Guest installation
The
libvirt-based tools such asvirt-managerandvirt-installoffer convenient interfaces to set up and manage virtual machines. They act as a kind of wrapper for theqemu-system-ARCHcommand. However, it is also possible to useqemu-system-ARCHdirectly without usinglibvirt-based tools.- 34 Running virtual machines with qemu-system-ARCH
Once you have a virtual disk image ready (for more information on disk images, see Section 33.2, “Managing disk images with qemu-img”), it is time to start the related virtual machine. Section 33.1, “Basic installation with qemu-system-ARCH” introduced simple commands to install and run a VM Guest. …
- 35 Virtual machine administration using QEMU monitor
When a virtual machine is invoked by the qemu-system-ARCH command, for example qemu-system-x86_64, a monitor console is provided for performing interaction with the user. Using the commands available in the monitor console, it is possible to inspect the running operating system, change removable med…
31 QEMU overview #Edit source
QEMU is a fast, cross-platform open source machine emulator which can emulate many hardware architectures. QEMU lets you run a complete unmodified operating system (VM Guest) on top of your existing system (VM Host Server). You can also use QEMU for debugging purposes—you can easily stop your running virtual machine, inspect its state, and save and restore it later.
QEMU mainly consists of the following parts:
Processor emulator.
Emulated devices, such as graphic card, network card, hard disks, or mouse.
Generic devices used to connect the emulated devices to the related host devices.
Debugger.
User interface used to interact with the emulator.
QEMU is central to KVM and Xen Virtualization, where it provides the general machine emulation. Xen's usage of QEMU is partially hidden from the user, while KVM's usage exposes most QEMU features transparently. If the VM Guest hardware architecture is the same as the VM Host Server's architecture, QEMU can use the KVM acceleration (SUSE only supports QEMU with the KVM acceleration loaded).
Apart from providing a core virtualization infrastructure and processor-specific drivers, QEMU also provides an architecture-specific user space program for managing VM Guests. Depending on the architecture this program is one of:
qemu-system-i386qemu-system-s390xqemu-system-x86_64qemu-system-aarch64
In the following this command is called qemu-system-ARCH; in examples the
qemu-system-x86_64 command is used.
32 Setting up a KVM VM Host Server #Edit source
This section documents how to set up and use openSUSE Leap 15.5 as a QEMU-KVM based virtual machine host.
Tip: Resources
The virtual guest system needs the same hardware resources as if it were installed on a physical machine. The more guests you plan to run on the host system, the more hardware resources—CPU, disk, memory and network—you need to add to the VM Host Server.
32.1 CPU support for virtualization #Edit source
To run KVM, your CPU must support virtualization, and virtualization
needs to be enabled in BIOS. The file /proc/cpuinfo
includes information about your CPU features.
32.2 Required software #Edit source
The KVM host requires several packages to be installed. To install all necessary packages, do the following:
Verify that the yast2-vm package is installed. This package is YaST's configuration tool that simplifies the installation of virtualization hypervisors.
Run › › .
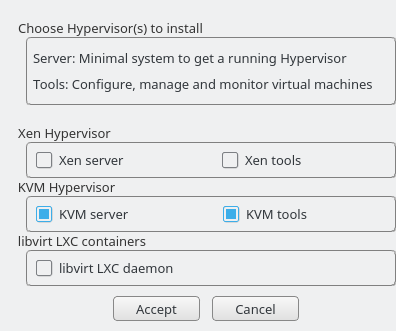
Figure 32.1: Installing the KVM hypervisor and tools #
Select and preferably also , and confirm with .
During the installation process, you can optionally let YaST create a for you automatically. If you do not plan to dedicate an additional physical network card to your virtual guests, network bridge is a standard way to connect the guest machines to the network.
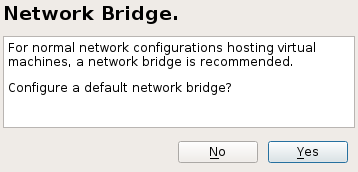
Figure 32.2: Network bridge #
After all the required packages are installed (and new network setup activated), try to load the KVM kernel module relevant for your CPU type—
kvm_intelorkvm_amd:#modprobe kvm_intelCheck if the module is loaded into memory:
>lsmod | grep kvm kvm_intel 64835 6 kvm 411041 1 kvm_intelNow the KVM host is ready to serve KVM VM Guests. For more information, see Chapter 34, Running virtual machines with qemu-system-ARCH.
32.3 KVM host-specific features #Edit source
You can improve the performance of KVM-based VM Guests by letting them fully use specific features of the VM Host Server's hardware (paravirtualization). This section introduces techniques to make the guests access the physical host's hardware directly—without the emulation layer—to make the most use of it.
Tip
Examples included in this section assume basic knowledge of the
qemu-system-ARCH command
line options. For more information, see
Chapter 34, Running virtual machines with qemu-system-ARCH.
32.3.1 Using the host storage with virtio-scsi #Edit source
virtio-scsi is an advanced storage stack for
KVM. It replaces the former virtio-blk stack
for SCSI devices pass-through. It has several advantages over
virtio-blk:
- Improved scalability
KVM guests have a limited number of PCI controllers, which results in a limited number of attached devices.
virtio-scsisolves this limitation by grouping multiple storage devices on a single controller. Each device on avirtio-scsicontroller is represented as a logical unit, or LUN.- Standard command set
virtio-blkuses a small set of commands that need to be known to both thevirtio-blkdriver and the virtual machine monitor, and so introducing a new command requires updating both the driver and the monitor.By comparison,
virtio-scsidoes not define commands, but rather a transport protocol for these commands following the industry-standard SCSI specification. This approach is shared with other technologies, such as Fibre Channel, ATAPI and USB devices.- Device naming
virtio-blkdevices are presented inside the guest as/dev/vdX, which is different from device names in physical systems and may cause migration problems.virtio-scsikeeps the device names identical to those on physical systems, making the virtual machines easily relocatable.- SCSI device pass-through
For virtual disks backed by a whole LUN on the host, it is preferable for the guest to send SCSI commands directly to the LUN (pass-through). This is limited in
virtio-blk, as guests need to use the virtio-blk protocol instead of SCSI command pass-through, and, moreover, it is not available for Windows guests.virtio-scsinatively removes these limitations.
32.3.1.1 virtio-scsi usage #Edit source
KVM supports the SCSI pass-through feature with the
virtio-scsi-pci device:
# qemu-system-x86_64 [...] \
-device virtio-scsi-pci,id=scsi32.3.2 Accelerated networking with vhost-net #Edit source
The vhost-net module is used to accelerate
KVM's paravirtualized network drivers. It provides better latency and
greater network throughput. Use the vhost-net driver
by starting the guest with the following example command line:
# qemu-system-x86_64 [...] \
-netdev tap,id=guest0,vhost=on,script=no \
-net nic,model=virtio,netdev=guest0,macaddr=00:16:35:AF:94:4B
guest0 is an identification string of the
vhost-driven device.
32.3.3 Scaling network performance with multiqueue virtio-net #Edit source
As the number of virtual CPUs increases in VM Guests, QEMU offers a way of improving the network performance using multiqueue. Multiqueue virtio-net scales the network performance by allowing VM Guest virtual CPUs to transfer packets in parallel. Multiqueue support is required on both the VM Host Server and VM Guest sides.
Tip: Performance benefit
The multiqueue virtio-net solution is most beneficial in the following cases:
Network traffic packets are large.
VM Guest has many connections active at the same time, mainly between the guest systems, or between the guest and the host, or between the guest and an external system.
The number of active queues is equal to the number of virtual CPUs in the VM Guest.
Note
While multiqueue virtio-net increases the total network throughput, it increases CPU consumption as it uses of the virtual CPU's power.
Procedure 32.1: How to enable multiqueue virtio-net #
The following procedure lists important steps to enable the
multiqueue feature with qemu-system-ARCH. It
assumes that a tap network device with multiqueue capability
(supported since kernel version 3.8) is set up on the VM Host Server.
In
qemu-system-ARCH, enable multiqueue for the tap device:-netdev tap,vhost=on,queues=2*N
where
Nstands for the number of queue pairs.In
qemu-system-ARCH, enable multiqueue and specify MSI-X (Message Signaled Interrupt) vectors for the virtio-net-pci device:-device virtio-net-pci,mq=on,vectors=2*N+2
where the formula for the number of MSI-X vectors results from: N vectors for TX (transmit) queues, N for RX (receive) queues, one for configuration purposes, and one for possible VQ (vector quantization) control.
In VM Guest, enable multiqueue on the relevant network interface (
eth0in this example):>sudoethtool -L eth0 combined 2*N
The resulting qemu-system-ARCH command line looks
similar to the following example:
qemu-system-x86_64 [...] -netdev tap,id=guest0,queues=8,vhost=on \ -device virtio-net-pci,netdev=guest0,mq=on,vectors=10
Note that the id of the network device
(guest0 ) needs to be identical for both options.
Inside the running VM Guest, specify the following command with
root privileges:
>sudoethtool -L eth0 combined 8
Now the guest system networking uses the multiqueue support from the
qemu-system-ARCH hypervisor.
32.3.4 VFIO: secure direct access to devices #Edit source
Directly assigning a PCI device to a VM Guest (PCI pass-through) avoids performance issues caused by avoiding any emulation in performance-critical paths. VFIO replaces the traditional KVM PCI Pass-Through device assignment. A prerequisite for this feature is a VM Host Server configuration as described in Important: Requirements for VFIO and SR-IOV.
To be able to assign a PCI device via VFIO to a VM Guest, you need to find out which IOMMU Group it belongs to. The IOMMU (input/output memory management unit that connects a direct memory access-capable I/O bus to the main memory) API supports the notion of groups. A group is a set of devices that can be isolated from all other devices in the system. Groups are therefore the unit of ownership used by VFIO.
Procedure 32.2: Assigning a PCI device to a VM Guest via VFIO #
Identify the host PCI device to assign to the guest.
>sudolspci -nn [...] 00:10.0 Ethernet controller [0200]: Intel Corporation 82576 \ Virtual Function [8086:10ca] (rev 01) [...]Note down the device ID (
00:10.0in this case) and the vendor ID (8086:10ca).Find the IOMMU group of this device:
>sudoreadlink /sys/bus/pci/devices/0000\:00\:10.0/iommu_group ../../../kernel/iommu_groups/20The IOMMU group for this device is
20. Now you can check the devices belonging to the same IOMMU group:>sudols -l /sys/bus/pci/devices/0000\:01\:10.0/iommu_group/devices/ [...] 0000:00:1e.0 -> ../../../../devices/pci0000:00/0000:00:1e.0 [...] 0000:01:10.0 -> ../../../../devices/pci0000:00/0000:00:1e.0/0000:01:10.0 [...] 0000:01:10.1 -> ../../../../devices/pci0000:00/0000:00:1e.0/0000:01:10.1Unbind the device from the device driver:
>sudoecho "0000:01:10.0" > /sys/bus/pci/devices/0000\:01\:10.0/driver/unbindBind the device to the vfio-pci driver using the vendor ID from step 1:
>sudoecho "8086 153a" > /sys/bus/pci/drivers/vfio-pci/new_idA new device
/dev/vfio/IOMMU_GROUPis created as a result,/dev/vfio/20in this case.Change the ownership of the newly created device:
>sudochown qemu.qemu /dev/vfio/DEVICENow run the VM Guest with the PCI device assigned.
>sudoqemu-system-ARCH [...] -device vfio-pci,host=00:10.0,id=ID
Important: No hotplugging
As of openSUSE Leap 15.5, hotplugging of PCI devices passed to a VM Guest via VFIO is not supported.
You can find more detailed information on the
VFIO driver in the
/usr/src/linux/Documentation/vfio.txt file
(package kernel-source needs to be installed).
32.3.5 VirtFS: sharing directories between host and guests #Edit source
VM Guests normally run in a separate computing space—they are provided their own memory range, dedicated CPUs, and file system space. The ability to share parts of the VM Host Server's file system makes the virtualization environment more flexible by simplifying mutual data exchange. Network file systems, such as CIFS and NFS, have been the traditional way of sharing directories. But as they are not specifically designed for virtualization purposes, they suffer from major performance and feature issues.
KVM introduces a new optimized method called VirtFS (sometimes called “file system pass-through”). VirtFS uses a paravirtual file system driver, which avoids converting the guest application file system operations into block device operations, and then again into host file system operations.
You typically use VirtFS for the following situations:
To access a shared directory from several guests, or to provide guest-to-guest file system access.
To replace the virtual disk as the root file system to which the guest's RAM disk connects during the guest boot process.
To provide storage services to different customers from a single host file system in a cloud environment.
32.3.5.1 Implementation #Edit source
In QEMU, the implementation of VirtFS is simplified by defining two types of devices:
virtio-9p-pcidevice which transports protocol messages and data between the host and the guest.fsdevdevice which defines the export file system properties, such as file system type and security model.
Example 32.1: Exporting host's file system with VirtFS #
>sudoqemu-system-x86_64 [...] \ -fsdev local,id=exp11,path=/tmp/2,security_model=mapped3 \ -device virtio-9p-pci,fsdev=exp14,mount_tag=v_tmp5
Identification of the file system to be exported. | |
File system path on the host to be exported. | |
Security model to be used— | |
The exported file system ID defined before with | |
Mount tag used later on the guest to mount the exported file system. |
Such an exported file system can be mounted on the guest as follows:
>sudomount -t 9p -o trans=virtio v_tmp /mnt
where v_tmp is the mount tag defined earlier
with -device mount_tag= and
/mnt is the mount point where you want to mount
the exported file system.
32.3.6 KSM: sharing memory pages between guests #Edit source
Kernel Same Page Merging (KSM) is a Linux kernel feature that merges identical memory pages from multiple running processes into one memory region. Because KVM guests run as processes under Linux, KSM provides the memory overcommit feature to hypervisors for more efficient use of memory. Therefore, if you need to run multiple virtual machines on a host with limited memory, KSM may be helpful to you.
KSM stores its status information in
the files under the /sys/kernel/mm/ksm directory:
> ls -1 /sys/kernel/mm/ksm
full_scans
merge_across_nodes
pages_shared
pages_sharing
pages_to_scan
pages_unshared
pages_volatile
run
sleep_millisecs
For more information on the meaning of the
/sys/kernel/mm/ksm/* files, see
/usr/src/linux/Documentation/vm/ksm.txt (package
kernel-source).
To use KSM, do the following.
Although openSUSE Leap includes KSM support in the kernel, it is disabled by default. To enable it, run the following command:
#echo 1 > /sys/kernel/mm/ksm/runNow run several VM Guests under KVM and inspect the content of files
pages_sharingandpages_shared, for example:>while [ 1 ]; do cat /sys/kernel/mm/ksm/pages_shared; sleep 1; done 13522 13523 13519 13518 13520 13520 13528
33 Guest installation #Edit source
The libvirt-based tools such as
virt-manager and virt-install offer
convenient interfaces to set up and manage virtual machines. They act as a
kind of wrapper for the qemu-system-ARCHcommand.
However, it is also possible to use qemu-system-ARCH
directly without using
libvirt-based tools.
Warning: qemu-system-ARCH and libvirt
Virtual Machines created with
qemu-system-ARCH are not visible for the
libvirt-based tools.
33.1 Basic installation with qemu-system-ARCH #Edit source
In the following example, a virtual machine for a SUSE Linux Enterprise Server 11 installation is created. For detailed information on the commands, refer to the respective man pages.
If you do not already have an image of a system that you want to run in a virtualized environment, you need to create one from the installation media. In such case, you need to prepare a hard disk image, and obtain an image of the installation media or the media itself.
Create a hard disk with qemu-img.
> qemu-img create1 -f raw2 /images/sles/hda3 8G4
The subcommand | |
Specify the disk's format with the | |
The full path to the image file. | |
The size of the image—8 GB in this case. The image is created as a Sparse image file file that grows when the disk is filled with data. The specified size defines the maximum size to which the image file can grow. |
After at least one hard disk image is created, you can set up a virtual
machine with qemu-system-ARCH that boots into the
installation system:
# qemu-system-x86_64 -name "sles"1-machine accel=kvm -M pc2 -m 7683 \
-smp 24 -boot d5 \
-drive file=/images/sles/hda,if=virtio,index=0,media=disk,format=raw6 \
-drive file=/isos/SLE-15-SP5-Online-ARCH-GM-media1.iso,index=1,media=cdrom7 \
-net nic,model=virtio,macaddr=52:54:00:05:11:118 -net user \
-vga cirrus9 -balloon virtio10Name of the virtual machine that is displayed in the window caption and be used for the VNC server. This name must be unique. | |
Specifies the machine type. Use | |
Maximum amount of memory for the virtual machine. | |
Defines an SMP system with two processors. | |
Specifies the boot order. Valid values are | |
Defines the first ( | |
The second ( | |
Defines a paravirtualized ( | |
Specifies the graphic card. If you specify | |
Defines the paravirtualized balloon device that allows to dynamically
change the amount of memory (up to the maximum value specified with
the parameter |
After the installation of the guest operating system finishes, you can start the related virtual machine without the need to specify the CD-ROM device:
# qemu-system-x86_64 -name "sles" -machine type=pc,accel=kvm -m 768 \
-smp 2 -boot c \
-drive file=/images/sles/hda,if=virtio,index=0,media=disk,format=raw \
-net nic,model=virtio,macaddr=52:54:00:05:11:11 \
-vga cirrus -balloon virtio33.2 Managing disk images with qemu-img #Edit source
In the previous section (see
Section 33.1, “Basic installation with qemu-system-ARCH”), we used the
qemu-img command to create an image of a hard disk.
You can, however, use qemu-img for general disk image
manipulation. This section introduces qemu-img
subcommands to help manage the disk images flexibly.
33.2.1 General information on qemu-img invocation #Edit source
qemu-img uses subcommands (like
zypper does) to do specific tasks. Each subcommand
understands a different set of options. Certain options are general and
used by more of these subcommands, while others are unique to the
related subcommand. See the qemu-img manual page (man 1
qemu-img) for a list of all supported options.
qemu-img uses the following general syntax:
> qemu-img subcommand [options]and supports the following subcommands:
createCreates a new disk image on the file system.
checkChecks an existing disk image for errors.
compareCheck if two images have the same content.
mapDumps the metadata of the image file name and its backing file chain.
amendAmends the image format specific options for the image file name.
convertConverts an existing disk image to a new one in a different format.
infoDisplays information about the relevant disk image.
snapshotManages snapshots of existing disk images.
commitApplies changes made to an existing disk image.
rebaseCreates a new base image based on an existing image.
resizeIncreases or decreases the size of an existing image.
33.2.2 Creating, converting, and checking disk images #Edit source
This section describes how to create disk images, check their condition, convert a disk image from one format to another, and get detailed information about a particular disk image.
33.2.2.1 qemu-img create #Edit source
Use qemu-img create to create a new disk image for
your VM Guest operating system. The command uses the following
syntax:
> qemu-img create -f fmt1 -o options2 fname3 size4
The format of the target image. Supported formats are
| |
Some image formats support additional options to be passed on the
command line. You can specify them here with the
| |
Path to the target disk image to be created. | |
Size of the target disk image (if not already specified with the
|
To create a new disk image sles.raw in the
directory /images growing up to a maximum size
of 4 GB, run the following command:
>qemu-img create -f raw -o size=4G /images/sles.raw Formatting '/images/sles.raw', fmt=raw size=4294967296>ls -l /images/sles.raw -rw-r--r-- 1 tux users 4294967296 Nov 15 15:56 /images/sles.raw>qemu-img info /images/sles.raw image: /images/sles11.raw file format: raw virtual size: 4.0G (4294967296 bytes) disk size: 0
As you can see, the virtual size of the newly created image is 4 GB, but the actual reported disk size is 0 as no data has been written to the image yet.
Tip: VM Guest images on the Btrfs file system
If you need to create a disk image on the Btrfs file system, you
can use nocow=on to reduce the performance
overhead created by the copy-on-write feature of Btrfs:
> qemu-img create -o nocow=on test.img 8G
If you, however, want to use copy-on-write (for example for
creating snapshots or sharing them across virtual machines), then
leave the command line without the nocow option.
33.2.2.2 qemu-img convert #Edit source
Use qemu-img convert to convert disk images to
another format. To get a complete list of image formats supported by
QEMU, run qemu-img -h and look
at the last line of the output. The command uses the following
syntax:
> qemu-img convert -c1 -f fmt2 -O out_fmt3 -o options4 fname5 out_fname6
Applies compression on the target disk image. Only
| |
The format of the source disk image. It is normally autodetected and can therefore be omitted. | |
The format of the target disk image. | |
Specify additional options relevant for the target image format.
Use | |
Path to the source disk image to be converted. | |
Path to the converted target disk image. |
>qemu-img convert -O vmdk /images/sles.raw \ /images/sles.vmdk>ls -l /images/ -rw-r--r-- 1 tux users 4294967296 16. lis 10.50 sles.raw -rw-r--r-- 1 tux users 2574450688 16. lis 14.18 sles.vmdk
To see a list of options relevant for the selected target image
format, run the following command (replace vmdk
with your image format):
> qemu-img convert -O vmdk /images/sles.raw \
/images/sles.vmdk -o ?
Supported options:
size Virtual disk size
backing_file File name of a base image
compat6 VMDK version 6 image
subformat VMDK flat extent format, can be one of {monolithicSparse \
(default) | monolithicFlat | twoGbMaxExtentSparse | twoGbMaxExtentFlat}
scsi SCSI image33.2.2.3 qemu-img check #Edit source
Use qemu-img check to check the existing disk
image for errors. Not all disk image formats support this feature.
The command uses the following syntax:
> qemu-img check -f fmt1 fname2The format of the source disk image. It is normally autodetected and can therefore be omitted. | |
Path to the source disk image to be checked. |
If no error is found, the command returns no output. Otherwise, the type and number of errors found is shown.
> qemu-img check -f qcow2 /images/sles.qcow2
ERROR: invalid cluster offset=0x2af0000
[...]
ERROR: invalid cluster offset=0x34ab0000
378 errors were found on the image.33.2.2.4 Increasing the size of an existing disk image #Edit source
When creating a new image, you must specify its maximum size before the image is created (see Section 33.2.2.1, “qemu-img create”). After you have installed the VM Guest and have been using it for certain time, the initial size of the image may no longer be sufficient. In that case, add more space to it.
To increase the size of an existing disk image by 2 gigabytes, use:
> qemu-img resize /images/sles.raw +2GBNote
You can resize the disk image using the formats
raw and qcow2. To resize an
image in another format, convert it to a supported format with
qemu-img convert first.
The image now contains an empty space of 2 GB after the final partition. You can resize the existing partitions or add new ones.
33.2.2.5 Advanced options for the qcow2 file format #Edit source
qcow2 is the main disk image format used by QEMU. Its size grows on demand, and the disk space is only allocated when it is needed by the virtual machine.
A qcow2 formatted file is organized in units of constant size. These units are called clusters. Viewed from the guest side, the virtual disk is also divided into clusters of the same size. QEMU defaults to 64 kB clusters, but you can specify a different value when creating a new image:
> qemu-img create -f qcow2 -o cluster_size=128K virt_disk.qcow2 4GA qcow2 image contains a set of tables organized in two levels that are called the L1 and L2 tables. There is just one L1 table per disk image, while there can be many L2 tables depending on how big the image is.
To read or write data to the virtual disk, QEMU needs to read its corresponding L2 table to find out the relevant data location. Because reading the table for each I/O operation consumes system resources, QEMU keeps a cache of L2 tables in memory to speed up disk access.
33.2.2.5.1 Choosing the right cache size #Edit source
The cache size relates to the amount of allocated space. L2 cache can map the following amount of virtual disk:
disk_size = l2_cache_size * cluster_size / 8
With the default 64 kB of cluster size, that is
disk_size = l2_cache_size * 8192
Therefore, to have a cache that maps n gigabytes
of disk space with the default cluster size, you need
l2_cache_size = disk_size_GB * 131072
QEMU uses 1 MB (1048576 bytes) of L2 cache by default. Following the above formulas, 1 MB of L2 cache covers 8 GB (1048576 / 131072) of virtual disk. This means that the performance is fine with the default L2 cache size if your virtual disk size is up to 8 GB. For larger disks, you can speed up the disk access by increasing the L2 cache size.
33.2.2.5.2 Configuring the cache size #Edit source
You can use the -drive option on the QEMU
command line to specify the cache sizes. Alternatively when
communicating via QMP, use the blockdev-add
command. For more information on QMP, see
Section 35.11, “QMP - QEMU machine protocol”.
The following options configure the cache size for the virtual guest:
- l2-cache-size
The maximum size of the L2 table cache.
- refcount-cache-size
The maximum size of the refcount block cache. For more information on refcount, see https://raw.githubusercontent.com/qemu/qemu/master/docs/qcow2-cache.txt.
- cache-size
The maximum size of both caches combined.
When specifying values for the options above, be aware of the following:
The size of both the L2 and refcount block caches needs to be a multiple of the cluster size.
If you only set one of the options, QEMU automatically adjusts the other options so that the L2 cache is 4 times bigger than the refcount cache.
The refcount cache is used much less often than the L2 cache, therefore you can keep it small:
# qemu-system-ARCH [...] \
-drive file=disk_image.qcow2,l2-cache-size=4194304,refcount-cache-size=26214433.2.2.5.3 Reducing the memory usage #Edit source
The larger the cache, the more memory it consumes. There is a separate L2 cache for each qcow2 file. When using a lot of big disk images, you may need a considerably large amount of memory. Memory consumption is even worse if you add backing files (Section 33.2.4, “Manipulate disk images effectively”) and snapshots (see Section 33.2.3, “Managing snapshots of virtual machines with qemu-img”) to the guest's setup chain.
That is why QEMU introduced the
cache-clean-interval setting. It defines an
interval in seconds after which all cache entries that have not
been accessed are removed from memory.
The following example removes all unused cache entries every 10 minutes:
# qemu-system-ARCH [...] -drive file=hd.qcow2,cache-clean-interval=600If this option is not set, the default value is 0 and it disables this feature.
33.2.3 Managing snapshots of virtual machines with qemu-img #Edit source
Virtual Machine snapshots are snapshots of the complete environment in which a VM Guest is running. The snapshot includes the state of the processor (CPU), memory (RAM), devices, and all writable disks.
Snapshots are helpful when you need to save your virtual machine in a particular state. For example, after you configured network services on a virtualized server and want to quickly start the virtual machine in the same state you last saved it. Or you can create a snapshot after the virtual machine has been powered off to create a backup state before you try something experimental and make VM Guest unstable. This section introduces the latter case, while the former is described in Chapter 35, Virtual machine administration using QEMU monitor.
To use snapshots, your VM Guest must contain at least one writable
hard disk image in qcow2 format. This device is
normally the first virtual hard disk.
Virtual Machine snapshots are created with the
savevm command in the interactive QEMU monitor. To
make identifying a particular snapshot easier, you can assign it a
tag. For more information on QEMU monitor, see
Chapter 35, Virtual machine administration using QEMU monitor.
Once your qcow2 disk image contains saved snapshots,
you can inspect them with the qemu-img snapshot
command.
Warning: Shut down the VM Guest
Do not create or delete virtual machine snapshots with the
qemu-img snapshot command while the virtual
machine is running. Otherwise, you may damage the disk image with the
state of the virtual machine saved.
33.2.3.1 Listing existing snapshots #Edit source
Use qemu-img snapshot -l
DISK_IMAGE to view a list of all existing
snapshots saved in the disk_image image. You can
get the list even while the VM Guest is running.
> qemu-img snapshot -l /images/sles.qcow2
Snapshot list:
ID1 TAG2 VM SIZE3 DATE4 VM CLOCK5
1 booting 4.4M 2013-11-22 10:51:10 00:00:20.476
2 booted 184M 2013-11-22 10:53:03 00:02:05.394
3 logged_in 273M 2013-11-22 11:00:25 00:04:34.843
4 ff_and_term_running 372M 2013-11-22 11:12:27 00:08:44.965Unique auto-incremented identification number of the snapshot. | |
Unique description string of the snapshot. It is meant as a human-readable version of the ID. | |
The disk space occupied by the snapshot. Note that the more memory is consumed by running applications, the bigger the snapshot is. | |
Time and date the snapshot was created. | |
The current state of the virtual machine's clock. |
33.2.3.2 Creating snapshots of a powered-off virtual machine #Edit source
Use qemu-img snapshot -c
SNAPSHOT_TITLE
DISK_IMAGE to create a snapshot of the
current state of a virtual machine that was previously powered off.
> qemu-img snapshot -c backup_snapshot /images/sles.qcow2> qemu-img snapshot -l /images/sles.qcow2
Snapshot list:
ID TAG VM SIZE DATE VM CLOCK
1 booting 4.4M 2013-11-22 10:51:10 00:00:20.476
2 booted 184M 2013-11-22 10:53:03 00:02:05.394
3 logged_in 273M 2013-11-22 11:00:25 00:04:34.843
4 ff_and_term_running 372M 2013-11-22 11:12:27 00:08:44.965
5 backup_snapshot 0 2013-11-22 14:14:00 00:00:00.000If something breaks in your VM Guest and you need to restore the state of the saved snapshot (ID 5 in our example), power off your VM Guest and execute the following command:
> qemu-img snapshot -a 5 /images/sles.qcow2
The next time you run the virtual machine with
qemu-system-ARCH, it will be in the state of
snapshot number 5.
Note
The qemu-img snapshot -c command is not related
to the savevm command of QEMU monitor (see
Chapter 35, Virtual machine administration using QEMU monitor). For example, you cannot apply
a snapshot with qemu-img snapshot -a on a
snapshot created with savevm in QEMU's
monitor.
33.2.3.3 Deleting snapshots #Edit source
Use qemu-img snapshot -d
SNAPSHOT_ID
DISK_IMAGE to delete old or unneeded
snapshots of a virtual machine. This saves disk space inside the
qcow2 disk image as the space occupied by the
snapshot data is restored:
> qemu-img snapshot -d 2 /images/sles.qcow233.2.4 Manipulate disk images effectively #Edit source
Imagine the following real-life situation: you are a server administrator who runs and manages several virtualized operating systems. One group of these systems is based on one specific distribution, while another group (or groups) is based on different versions of the distribution or even on a different (and maybe non-Unix) platform. To make the case even more complex, individual virtual guest systems based on the same distribution differ according to the department and deployment. A file server typically uses a different setup and services than a Web server does, while both may still be based on openSUSE.
With QEMU it is possible to create “base” disk images. You can use them as template virtual machines. These base images save you plenty of time because you do not need to install the same operating system more than once.
33.2.4.1 Base and derived images #Edit source
First, build a disk image as usual and install the target system on
it. For more information, see
Section 33.1, “Basic installation with qemu-system-ARCH” and
Section 33.2.2, “Creating, converting, and checking disk images”. Then build a
new image while using the first one as a base image. The base image
is also called a backing file. After your new
derived image is built, never boot the base
image again, but boot the derived image instead. Several derived
images may depend on one base image at the same time. Therefore,
changing the base image can damage the dependencies. While using your
derived image, QEMU writes changes to it and uses the base image
only for reading.
It is a good practice to create a base image from a freshly installed (and, if needed, registered) operating system with no patches applied and no additional applications installed or removed. Later on, you can create another base image with the latest patches applied and based on the original base image.
33.2.4.2 Creating derived images #Edit source
Note
While you can use the raw format for base
images, you cannot use it for derived images because the
raw format does not support the
backing_file option. Use for example the
qcow2 format for the derived images.
For example, /images/sles_base.raw is the base
image holding a freshly installed system.
> qemu-img info /images/sles_base.raw
image: /images/sles_base.raw
file format: raw
virtual size: 4.0G (4294967296 bytes)
disk size: 2.4G
The image's reserved size is 4 GB, the actual size is 2.4 GB, and its
format is raw. Create an image derived from the
/images/sles_base.raw base image with:
> qemu-img create -f qcow2 /images/sles_derived.qcow2 \
-o backing_file=/images/sles_base.raw
Formatting '/images/sles_derived.qcow2', fmt=qcow2 size=4294967296 \
backing_file='/images/sles_base.raw' encryption=off cluster_size=0Look at the derived image details:
> qemu-img info /images/sles_derived.qcow2
image: /images/sles_derived.qcow2
file format: qcow2
virtual size: 4.0G (4294967296 bytes)
disk size: 140K
cluster_size: 65536
backing file: /images/sles_base.raw \
(actual path: /images/sles_base.raw)Although the reserved size of the derived image is the same as the size of the base image (4 GB), the actual size is 140 KB only. The reason is that only changes made to the system inside the derived image are saved. Run the derived virtual machine, register it, if needed, and apply the latest patches. Do any other changes in the system such as removing unneeded or installing new software packages. Then shut the VM Guest down and examine its details once more:
> qemu-img info /images/sles_derived.qcow2
image: /images/sles_derived.qcow2
file format: qcow2
virtual size: 4.0G (4294967296 bytes)
disk size: 1.1G
cluster_size: 65536
backing file: /images/sles_base.raw \
(actual path: /images/sles_base.raw)
The disk size value has grown to 1.1 GB, which is
the disk space occupied by the changes on the file system compared to
the base image.
33.2.4.3 Rebasing derived images #Edit source
After you have modified the derived image (applied patches, installed specific applications, changed environment settings, etc.), it reaches the desired state. At that point, you can merge the original base image and the derived image to create a new base image.
Your original base image (/images/sles_base.raw)
holds a freshly installed system. It can be a template for new
modified base images, while the new one can contain the same system
as the first one plus all security and update patches applied, for
example. After you have created this new base image, you can use it
as a template for more specialized derived images as well. The new
base image becomes independent of the original one. The process of
creating base images from derived ones is called
rebasing:
> qemu-img convert /images/sles_derived.qcow2 \
-O raw /images/sles_base2.raw
This command created the new base image
/images/sles_base2.raw using the
raw format.
> qemu-img info /images/sles_base2.raw
image: /images/sles11_base2.raw
file format: raw
virtual size: 4.0G (4294967296 bytes)
disk size: 2.8GThe new image is 0.4 gigabytes bigger than the original base image. It uses no backing file, and you can easily create new derived images based upon it. This lets you create a sophisticated hierarchy of virtual disk images for your organization, saving a lot of time and work.
33.2.4.4 Mounting an image on a VM Host Server #Edit source
It can be useful to mount a virtual disk image under the host system. It is strongly recommended to read Chapter 18, libguestfs and use dedicated tools to access a virtual machine image. However, if you need to do this manually, follow this guide.
Linux systems can mount an internal partition of a
raw disk image using a loopback device. The first
example procedure is more complex but more illustrative, while the
second one is straightforward:
Procedure 33.1: Mounting disk image by calculating partition offset #
Set a loop device on the disk image whose partition you want to mount.
>losetup /dev/loop0 /images/sles_base.rawFind the sector size and the starting sector number of the partition you want to mount.
>fdisk -lu /dev/loop0 Disk /dev/loop0: 4294 MB, 4294967296 bytes 255 heads, 63 sectors/track, 522 cylinders, total 8388608 sectors Units = sectors of 1 * 512 = 5121 bytes Disk identifier: 0x000ceca8 Device Boot Start End Blocks Id System /dev/loop0p1 63 1542239 771088+ 82 Linux swap /dev/loop0p2 * 15422402 8385929 3421845 83 LinuxCalculate the partition start offset:
sector_size * sector_start = 512 * 1542240 = 789626880Delete the loop and mount the partition inside the disk image with the calculated offset on a prepared directory.
>losetup -d /dev/loop0>mount -o loop,offset=789626880 \ /images/sles_base.raw /mnt/sles/>ls -l /mnt/sles/ total 112 drwxr-xr-x 2 root root 4096 Nov 16 10:02 bin drwxr-xr-x 3 root root 4096 Nov 16 10:27 boot drwxr-xr-x 5 root root 4096 Nov 16 09:11 dev [...] drwxrwxrwt 14 root root 4096 Nov 24 09:50 tmp drwxr-xr-x 12 root root 4096 Nov 16 09:16 usr drwxr-xr-x 15 root root 4096 Nov 16 09:22 varCopy one or more files onto the mounted partition and unmount it when finished.
>cp /etc/X11/xorg.conf /mnt/sles/root/tmp>ls -l /mnt/sles/root/tmp>umount /mnt/sles/
Warning: Do not write to images currently in use
Never mount a partition of an image of a running virtual machine in
a read-write mode. This could corrupt the
partition and break the whole VM Guest.
34 Running virtual machines with qemu-system-ARCH #Edit source
Once you have a virtual disk image ready (for more information on disk
images, see Section 33.2, “Managing disk images with qemu-img”), it is time to
start the related virtual machine.
Section 33.1, “Basic installation with qemu-system-ARCH” introduced simple commands
to install and run a VM Guest. This chapter focuses on a more detailed
explanation of qemu-system-ARCH usage, and shows
solutions for more specific tasks. For a complete list of
qemu-system-ARCH's options, see its manual page
(man 1 qemu).
34.1 Basic qemu-system-ARCH invocation #Edit source
The qemu-system-ARCH command uses the following
syntax:
qemu-system-ARCH OPTIONS1 -drive file=DISK_IMAGE2
| |
Path to the disk image holding the guest system you want to
virtualize. |
Important: AArch64 architecture
KVM support is available only for 64-bit ARM architecture (AArch64). Running QEMU on the AArch64 architecture requires you to specify:
A machine type designed for QEMU ARM virtual machines using the
-machine virt-VERSION_NUMBERoption.A firmware image file using the
-biosoption.You can specify the firmware image files alternatively using the
-driveoptions, for example:-drive file=/usr/share/edk2/aarch64/QEMU_EFI-pflash.raw,if=pflash,format=raw -drive file=/var/lib/libvirt/qemu/nvram/opensuse_VARS.fd,if=pflash,format=raw
A CPU of the VM Host Server using the
-cpu hostoption (default iscortex-15).The same Generic Interrupt Controller (GIC) version as the host using the
-machine gic-version=hostoption (default is2).If a graphic mode is needed, a graphic device of type
virtio-gpu-pci.
For example:
>sudoqemu-system-aarch64 [...] \ -bios /usr/share/qemu/qemu-uefi-aarch64.bin \ -cpu host \ -device virtio-gpu-pci \ -machine virt,accel=kvm,gic-version=host
34.2 General qemu-system-ARCH options #Edit source
This section introduces general qemu-system-ARCH
options and options related to the basic emulated hardware, such as the
virtual machine's processor, memory, model type, or time processing
methods.
-name NAME_OF_GUESTSpecifies the name of the running guest system. The name is displayed in the window caption and used for the VNC server.
-boot OPTIONSSpecifies the order in which the defined drives are booted. Drives are represented by letters, where
aandbstand for the floppy drives 1 and 2,cstands for the first hard disk,dstands for the first CD-ROM drive, andntopstand for Ether-boot network adapters.For example,
qemu-system-ARCH [...] -boot order=ndcfirst tries to boot from the network, then from the first CD-ROM drive, and finally from the first hard disk.-pidfile FILENAMEStores the QEMU's process identification number (PID) in a file. This is useful if you run QEMU from a script.
-nodefaultsBy default QEMU creates basic virtual devices even if you do not specify them on the command line. This option turns this feature off, and you must specify every single device manually, including graphical and network cards, parallel or serial ports, or virtual consoles. Even QEMU monitor is not attached by default.
-daemonize“Daemonizes” the QEMU process after it is started. QEMU detaches from the standard input and standard output after it is ready to receive connections on any of its devices.
Note: SeaBIOS BIOS implementation
SeaBIOS is the default BIOS used. You can boot USB devices, any drive (CD-ROM, Floppy or a hard disk). It has USB mouse and keyboard support and supports multiple VGA cards. For more information about SeaBIOS, refer to the SeaBIOS Website.
34.2.1 Basic virtual hardware #Edit source
34.2.1.1 Machine type #Edit source
You can specify the type of the emulated machine. Run
qemu-system-ARCH -M help to view a list of
supported machine types.
Note: ISA-PC
The machine type isapc: ISA-only-PC is unsupported.
34.2.1.2 CPU model #Edit source
To specify the type of the processor (CPU) model, run
qemu-system-ARCH -cpu
MODEL. Use qemu-system-ARCH -cpu
help to view a list of supported CPU models.
34.2.1.3 Other basic options #Edit source
The following is a list of most commonly used options while launching qemu from command line. To see all options available refer to qemu-doc man page.
-m MEGABYTESSpecifies how many megabytes are used for the virtual RAM size.
-balloon virtioSpecifies a paravirtualized device to dynamically change the amount of virtual RAM assigned to VM Guest. The top limit is the amount of memory specified with
-m.-smp NUMBER_OF_CPUSSpecifies how many CPUs to emulate. QEMU supports up to 255 CPUs on the PC platform (up to 64 with KVM acceleration used). This option also takes other CPU-related parameters, such as number of sockets, number of cores per socket, or number of threads per core.
The following is an example of a working
qemu-system-ARCH command line:
>sudoqemu-system-x86_64 \ -name "SLES 15.5" \ -M pc-i440fx-2.7 -m 512 \ -machine accel=kvm -cpu kvm64 -smp 2 \ -drive format=raw,file=/images/sles.raw
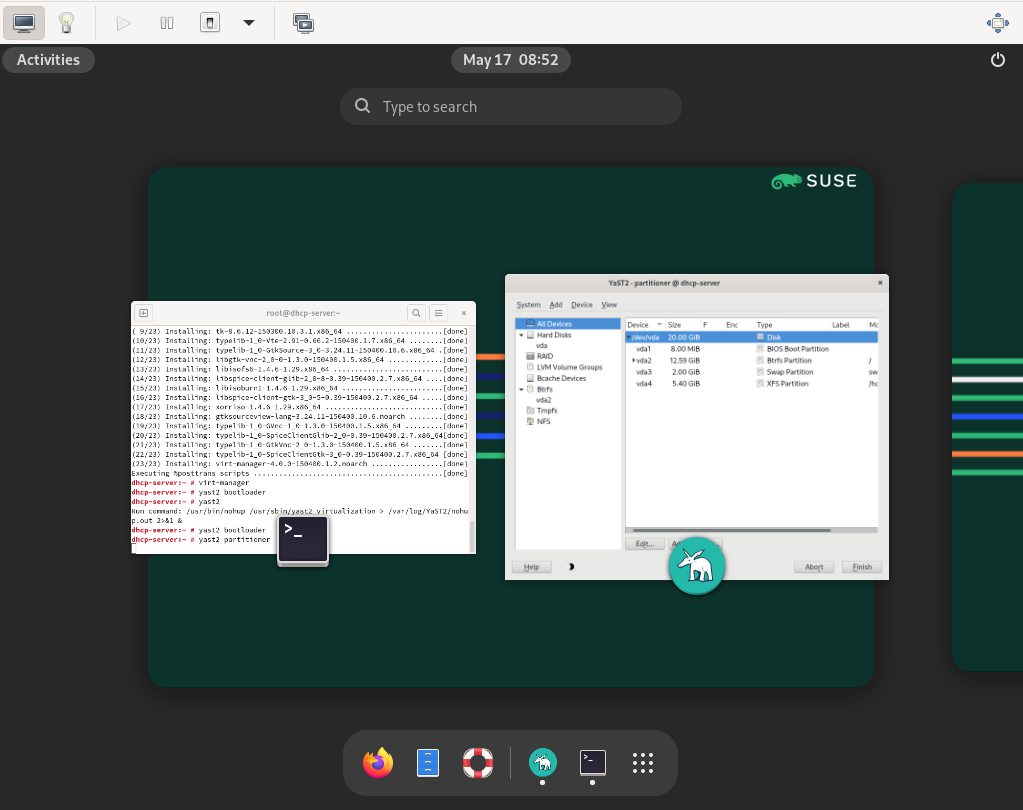
Figure 34.1: QEMU window with SLES as VM Guest #
-no-acpiDisables ACPI support.
-SQEMU starts with CPU stopped. To start CPU, enter
cin QEMU monitor. For more information, see Chapter 35, Virtual machine administration using QEMU monitor.
34.2.2 Storing and reading configuration of virtual devices #Edit source
-readconfig CFG_FILEInstead of entering the devices configuration options on the command line each time you want to run VM Guest,
qemu-system-ARCHcan read it from a file that was either previously saved with-writeconfigor edited manually.-writeconfig CFG_FILEDumps the current virtual machine's devices configuration to a text file. It can be consequently re-used with the
-readconfigoption.>sudoqemu-system-x86_64 -name "SLES 15.5" \ -machine accel=kvm -M pc-i440fx-2.7 -m 512 -cpu kvm64 \ -smp 2 /images/sles.raw -writeconfig /images/sles.cfg (exited)>cat /images/sles.cfg # qemu config file [drive] index = "0" media = "disk" file = "/images/sles_base.raw"This way you can effectively manage the configuration of your virtual machines' devices in a well-arranged way.
34.2.3 Guest real-time clock #Edit source
-rtc OPTIONSSpecifies the way the RTC is handled inside a VM Guest. By default, the clock of the guest is derived from that of the host system. Therefore, it is recommended that the host system clock is synchronized with an accurate external clock (for example, via NTP service).
If you need to isolate the VM Guest clock from the host one, specify
clock=vminstead of the defaultclock=host.You can also specify the initial time of the VM Guest's clock with the
baseoption:>sudoqemu-system-x86_64 [...] -rtc clock=vm,base=2010-12-03T01:02:00Instead of a time stamp, you can specify
utcorlocaltime. The former instructs VM Guest to start at the current UTC value (Coordinated Universal Time, see http://en.wikipedia.org/wiki/UTC), while the latter applies the local time setting.
34.3 Using devices in QEMU #Edit source
QEMU virtual machines emulate all devices needed to run a VM Guest. QEMU supports, for example, several types of network cards, block devices (hard and removable drives), USB devices, character devices (serial and parallel ports), or multimedia devices (graphic and sound cards). This section introduces options to configure multiple types of supported devices.
Tip
If your device, such as -drive, needs a special
driver and driver properties to be set, specify them with the
-device option, and identify with
drive= suboption. For example:
>sudoqemu-system-x86_64 [...] -drive if=none,id=drive0,format=raw \ -device virtio-blk-pci,drive=drive0,scsi=off ...
To get help on available drivers and their properties, use
-device ? and -device
DRIVER,?.
34.3.1 Block devices #Edit source
Block devices are vital for virtual machines. These are fixed or removable storage media called drives. One of the connected hard disks typically holds the guest operating system to be virtualized.
Virtual Machine drives are defined with
-drive. This option has many sub-options, so me of
which are described in this section. For the complete list, see the
manual page (man 1 qemu).
Sub-options for the -drive option #
file=image_fnameSpecifies the path to the disk image that to be used with this drive. If not specified, an empty (removable) drive is assumed.
if=drive_interfaceSpecifies the type of interface to which the drive is connected. Currently only
floppy,scsi,ide, orvirtioare supported by SUSE.virtiodefines a paravirtualized disk driver. Default iside.index=index_of_connectorSpecifies the index number of a connector on the disk interface (see the
ifoption) where the drive is connected. If not specified, the index is automatically incremented.media=typeSpecifies the type of media. Can be
diskfor hard disks, orcdromfor removable CD-ROM drives.format=img_fmtSpecifies the format of the connected disk image. If not specified, the format is autodetected. Currently, SUSE supports
rawandqcow2formats.cache=methodSpecifies the caching method for the drive. Possible values are
unsafe,writethrough,writeback,directsync, ornone. To improve performance when using theqcow2image format, selectwriteback.nonedisables the host page cache and, therefore, is the safest option. Default for image files iswriteback. For more information, see Chapter 16, Disk cache modes.
Tip
To simplify defining block devices, QEMU understands several
shortcuts which you may find handy when entering the
qemu-system-ARCH command line.
You can use
>sudoqemu-system-x86_64 -cdrom /images/cdrom.iso
instead of
>sudoqemu-system-x86_64 -drive format=raw,file=/images/cdrom.iso,index=2,media=cdrom
and
>sudoqemu-system-x86_64 -hda /images/imagei1.raw -hdb /images/image2.raw -hdc \ /images/image3.raw -hdd /images/image4.raw
instead of
>sudoqemu-system-x86_64 -drive format=raw,file=/images/image1.raw,index=0,media=disk \ -drive format=raw,file=/images/image2.raw,index=1,media=disk \ -drive format=raw,file=/images/image3.raw,index=2,media=disk \ -drive format=raw,file=/images/image4.raw,index=3,media=disk
Tip: Using host drives instead of images
As an alternative to using disk images (see
Section 33.2, “Managing disk images with qemu-img”) you can also use
existing VM Host Server disks, connect them as drives, and access them from
VM Guest. Use the host disk device directly instead of disk image
file names.
To access the host CD-ROM drive, use
>sudoqemu-system-x86_64 [...] -drive file=/dev/cdrom,media=cdrom
To access the host hard disk, use
>sudoqemu-system-x86_64 [...] -drive file=/dev/hdb,media=disk
A host drive used by a VM Guest must not be accessed concurrently by the VM Host Server or another VM Guest.
34.3.1.1 Freeing unused guest disk space #Edit source
A Sparse image file is a type of disk image file that grows in size as the user adds data to it, taking up only as much disk space as is stored in it. For example, if you copy 1 GB of data inside the sparse disk image, its size grows by 1 GB. If you then delete for example 500 MB of the data, the image size does not by default decrease as expected.
That is why the discard=on option is introduced on
the KVM command line. It tells the hypervisor to automatically free
the “holes” after deleting data from the sparse guest
image. Note that this option is valid only for the
if=scsi drive interface:
>sudoqemu-system-x86_64 [...] -drive format=img_format,file=/path/to/file.img,if=scsi,discard=on
Important: Support status
if=scsi is not supported. This interface does not
map to virtio-scsi, but rather to the
lsi SCSI adapter.
34.3.1.2 IOThreads #Edit source
IOThreads are dedicated event loop threads for virtio devices to perform I/O requests to improve scalability, especially on an SMP VM Host Server with SMP VM Guests using many disk devices. Instead of using QEMU's main event loop for I/O processing, IOThreads allow spreading I/O work across multiple CPUs and can improve latency when properly configured.
IOThreads are enabled by defining IOThread objects. virtio devices
can then use the objects for their I/O event loops. Many virtio
devices can use a single IOThread object, or virtio devices and
IOThread objects can be configured in a 1:1 mapping. The following
example creates a single IOThread with ID
iothread0 which is then used as the event loop for
two virtio-blk devices.
>sudoqemu-system-x86_64 [...] -object iothread,id=iothread0\ -drive if=none,id=drive0,cache=none,aio=native,\ format=raw,file=filename -device virtio-blk-pci,drive=drive0,scsi=off,\ iothread=iothread0 -drive if=none,id=drive1,cache=none,aio=native,\ format=raw,file=filename -device virtio-blk-pci,drive=drive1,scsi=off,\ iothread=iothread0 [...]
The following qemu command line example illustrates a 1:1 virtio device to IOThread mapping:
>sudoqemu-system-x86_64 [...] -object iothread,id=iothread0\ -object iothread,id=iothread1 -drive if=none,id=drive0,cache=none,aio=native,\ format=raw,file=filename -device virtio-blk-pci,drive=drive0,scsi=off,\ iothread=iothread0 -drive if=none,id=drive1,cache=none,aio=native,\ format=raw,file=filename -device virtio-blk-pci,drive=drive1,scsi=off,\ iothread=iothread1 [...]
34.3.1.3 Bio-based I/O path for virtio-blk #Edit source
For better performance of I/O-intensive applications, a new I/O path was introduced for the virtio-blk interface in kernel version 3.7. This bio-based block device driver skips the I/O scheduler, and thus shortens the I/O path in guest and has lower latency. It is especially useful for high-speed storage devices, such as SSD disks.
The driver is disabled by default. To use it, do the following:
Append
virtio_blk.use_bio=1to the kernel command line on the guest. You can do so via › › .You can do it also by editing
/etc/default/grub, searching for the line that containsGRUB_CMDLINE_LINUX_DEFAULT=, and adding the kernel parameter at the end. Then rungrub2-mkconfig >/boot/grub2/grub.cfgto update the grub2 boot menu.Reboot the guest with the new kernel command line active.
Tip: Bio-based driver on slow devices
The bio-based virtio-blk driver does not help on slow devices such as spin hard disks. The reason is that the benefit of scheduling is larger than what the shortened bio path offers. Do not use the bio-based driver on slow devices.
34.3.1.4 Accessing iSCSI resources directly #Edit source
QEMU now integrates with libiscsi. This allows
QEMU to access iSCSI resources directly and use them as virtual
machine block devices. This feature does not require any host iSCSI
initiator configuration, as is needed for a libvirt iSCSI target
based storage pool setup. Instead it directly connects guest storage
interfaces to an iSCSI target LUN via the user space library
libiscsi. iSCSI-based disk devices can also be specified in the
libvirt XML configuration.
Note: RAW image format
This feature is only available using the RAW image format, as the iSCSI protocol has certain technical limitations.
The following is the QEMU command line interface for iSCSI connectivity.
Note: virt-manager limitation
The use of libiscsi based storage provisioning is not yet exposed by the virt-manager interface, but instead it would be configured by directly editing the guest xml. This new way of accessing iSCSI based storage is to be done at the command line.
>sudoqemu-system-x86_64 -machine accel=kvm \ -drive file=iscsi://192.168.100.1:3260/iqn.2016-08.com.example:314605ab-a88e-49af-b4eb-664808a3443b/0,\ format=raw,if=none,id=mydrive,cache=none \ -device ide-hd,bus=ide.0,unit=0,drive=mydrive ...
Here is an example snippet of guest domain xml which uses the protocol based iSCSI:
<devices>
...
<disk type='network' device='disk'>
<driver name='qemu' type='raw'/>
<source protocol='iscsi' name='iqn.2013-07.com.example:iscsi-nopool/2'>
<host name='example.com' port='3260'/>
</source>
<auth username='myuser'>
<secret type='iscsi' usage='libvirtiscsi'/>
</auth>
<target dev='vda' bus='virtio'/>
</disk>
</devices>Contrast that with an example which uses the host based iSCSI initiator which virt-manager sets up:
<devices>
...
<disk type='block' device='disk'>
<driver name='qemu' type='raw' cache='none' io='native'/>
<source dev='/dev/disk/by-path/scsi-0:0:0:0'/>
<target dev='hda' bus='ide'/>
<address type='drive' controller='0' bus='0' target='0' unit='0'/>
</disk>
<controller type='ide' index='0'>
<address type='pci' domain='0x0000' bus='0x00' slot='0x01'
function='0x1'/>
</controller>
</devices>34.3.1.5 Using RADOS block devices with QEMU #Edit source
RADOS Block Devices (RBD) store data in a Ceph cluster. They allow snapshotting, replication and data consistency. You can use an RBD from your KVM-managed VM Guests similarly to how you use other block devices.
34.3.2 Graphic devices and display options #Edit source
This section describes QEMU options affecting the type of the emulated video card and the way VM Guest graphical output is displayed.
34.3.2.1 Defining video cards #Edit source
QEMU uses -vga to define a video card used to
display VM Guest graphical output. The -vga
option understands the following values:
noneDisables video cards on VM Guest (no video card is emulated). You can still access the running VM Guest via the serial console.
stdEmulates a standard VESA 2.0 VBE video card. Use it if you intend to use high display resolution on VM Guest.
- qxl
QXL is a paravirtual graphic card. It is VGA compatible (including VESA 2.0 VBE support).
qxlis recommended when using thespicevideo protocol.- virtio
Paravirtual VGA graphic card.
34.3.2.2 Display options #Edit source
The following options affect the way VM Guest graphical output is displayed.
-display gtkDisplay video output in a GTK window. This interface provides UI elements to configure and control the VM during runtime.
-display sdlDisplay video output via SDL in a separate graphics window. For more information, see the SDL documentation.
-spice option[,option[,...]]Enables the spice remote desktop protocol.
-display vncRefer to Section 34.5, “Viewing a VM Guest with VNC” for more information.
-nographicDisables QEMU's graphical output. The emulated serial port is redirected to the console.
After starting the virtual machine with
-nographic, press Ctrl–A H in the virtual console to view the list of other useful shortcuts, for example, to toggle between the console and the QEMU monitor.>sudoqemu-system-x86_64 -hda /images/sles_base.raw -nographic C-a h print this help C-a x exit emulator C-a s save disk data back to file (if -snapshot) C-a t toggle console timestamps C-a b send break (magic sysrq) C-a c switch between console and monitor C-a C-a sends C-a (pressed C-a c) QEMU 2.3.1 monitor - type 'help' for more information (qemu)-no-frameDisables decorations for the QEMU window. Convenient for dedicated desktop work space.
-full-screenStarts QEMU graphical output in full screen mode.
-no-quitDisables the close button of the QEMU window and prevents it from being closed by force.
-alt-grab,-ctrl-grabBy default, the QEMU window releases the “captured” mouse after pressing Ctrl–Alt. You can change the key combination to either Ctrl–Alt–Shift (
-alt-grab), or the right Ctrl key (-ctrl-grab).
34.3.3 USB devices #Edit source
There are two ways to create USB devices usable by the VM Guest in
KVM: you can either emulate new USB devices inside a VM Guest, or
assign an existing host USB device to a VM Guest. To use USB devices
in QEMU you first need to enable the generic USB driver with the
-usb option. Then you can specify individual devices
with the -usbdevice option.
34.3.3.1 Emulating USB devices in VM Guest #Edit source
SUSE currently supports the following types of USB devices:
disk, host,
serial, braille,
net, mouse, and
tablet.
Types of USB devices for the -usbdevice option #
diskEmulates a mass storage device based on file. The optional
formatoption is used rather than detecting the format.>sudoqemu-system-x86_64 [...] -usbdevice disk:format=raw:/virt/usb_disk.rawhostPass through the host device (identified by bus.addr).
serialSerial converter to a host character device.
brailleEmulates a braille device using BrlAPI to display the braille output.
netEmulates a network adapter that supports CDC Ethernet and RNDIS protocols.
mouseEmulates a virtual USB mouse. This option overrides the default PS/2 mouse emulation. The following example shows the hardware status of a mouse on VM Guest started with
qemu-system-ARCH [...] -usbdevice mouse:>sudohwinfo --mouse 20: USB 00.0: 10503 USB Mouse [Created at usb.122] UDI: /org/freedesktop/Hal/devices/usb_device_627_1_1_if0 [...] Hardware Class: mouse Model: "Adomax QEMU USB Mouse" Hotplug: USB Vendor: usb 0x0627 "Adomax Technology Co., Ltd" Device: usb 0x0001 "QEMU USB Mouse" [...]tabletEmulates a pointer device that uses absolute coordinates (such as touchscreen). This option overrides the default PS/2 mouse emulation. The tablet device is useful if you are viewing VM Guest via the VNC protocol. See Section 34.5, “Viewing a VM Guest with VNC” for more information.
34.3.4 Character devices #Edit source
Use -chardev to create a new character device. The
option uses the following general syntax:
qemu-system-x86_64 [...] -chardev BACKEND_TYPE,id=ID_STRING
where BACKEND_TYPE can be one of
null, socket,
udp, msmouse,
vc, file,
pipe, console,
serial, pty,
stdio, braille,
tty, or parport. All character
devices must have a unique identification string up to 127 characters
long. It is used to identify the device in other related directives.
For the complete description of all back-end's sub-options, see the
manual page (man 1 qemu). A brief description of the
available back-ends follows:
nullCreates an empty device that outputs no data and drops any data it receives.
stdioConnects to QEMU's process standard input and standard output.
socketCreates a two-way stream socket. If PATH is specified, a Unix socket is created:
>sudoqemu-system-x86_64 [...] -chardev \ socket,id=unix_socket1,path=/tmp/unix_socket1,serverThe SERVER suboption specifies that the socket is a listening socket.
If PORT is specified, a TCP socket is created:
>sudoqemu-system-x86_64 [...] -chardev \ socket,id=tcp_socket1,host=localhost,port=7777,server,nowaitThe command creates a local listening (
server) TCP socket on port 7777. QEMU does not block waiting for a client to connect to the listening port (nowait).udpSends all network traffic from VM Guest to a remote host over the UDP protocol.
>sudoqemu-system-x86_64 [...] \ -chardev udp,id=udp_fwd,host=mercury.example.com,port=7777The command binds port 7777 on the remote host mercury.example.com and sends VM Guest network traffic there.
vcCreates a new QEMU text console. You can optionally specify the dimensions of the virtual console:
>sudoqemu-system-x86_64 [...] -chardev vc,id=vc1,width=640,height=480 \ -mon chardev=vc1The command creates a new virtual console called
vc1of the specified size, and connects the QEMU monitor to it.fileLogs all traffic from VM Guest to a file on VM Host Server. The
pathis required and is automatically created if it does not exist.>sudoqemu-system-x86_64 [...] \ -chardev file,id=qemu_log1,path=/var/log/qemu/guest1.log
By default QEMU creates a set of character devices for serial and parallel ports, and a special console for QEMU monitor. However, you can create your own character devices and use them for the mentioned purposes. The following options may help you:
-serial CHAR_DEVRedirects the VM Guest's virtual serial port to a character device CHAR_DEV on VM Host Server. By default, it is a virtual console (
vc) in graphical mode, andstdioin non-graphical mode. The-serialunderstands many sub-options. See the manual pageman 1 qemufor a complete list of them.You can emulate up to four serial ports. Use
-serial noneto disable all serial ports.-parallel DEVICERedirects the VM Guest's parallel port to a DEVICE. This option supports the same devices as
-serial.Tip
With openSUSE Leap as a VM Host Server, you can directly use the hardware parallel port devices
/dev/parportNwhereNis the number of the port.You can emulate up to three parallel ports. Use
-parallel noneto disable all parallel ports.-monitor CHAR_DEVRedirects the QEMU monitor to a character device CHAR_DEV on VM Host Server. This option supports the same devices as
-serial. By default, it is a virtual console (vc) in a graphical mode, andstdioin non-graphical mode.
For a complete list of available character devices back-ends, see the
man page (man 1 qemu).
34.4 Networking in QEMU #Edit source
Use the -netdev option in combination with
-device to define a specific type of networking and a
network interface card for your VM Guest. The syntax for the
-netdev option is
-netdev type[,prop[=value][,...]]
Currently, SUSE supports the following network types:
user, bridge, and
tap. For a complete list of -netdev
sub-options, see the manual page (man 1 qemu).
Supported -netdev sub-options #
bridgeUses a specified network helper to configure the TAP interface and attach it to a specified bridge. For more information, see Section 34.4.3, “Bridged networking”.
userSpecifies user-mode networking. For more information, see Section 34.4.2, “User-mode networking”.
tapSpecifies bridged or routed networking. For more information, see Section 34.4.3, “Bridged networking”.
34.4.1 Defining a network interface card #Edit source
Use -netdev together with the related
-device option to add a new emulated network card:
>sudoqemu-system-x86_64 [...] \ -netdev tap1,id=hostnet0 \ -device virtio-net-pci2,netdev=hostnet0,vlan=13,\ macaddr=00:16:35:AF:94:4B4,name=ncard1
Specifies the network device type. | |
Specifies the model of the network card. Use
Currently, SUSE supports the models
| |
Connects the network interface to VLAN number 1. You can specify your own number—it is mainly useful for identification purpose. If you omit this suboption, QEMU uses the default 0. | |
Specifies the Media Access Control (MAC) address for the network card. It is a unique identifier and you are advised to always specify it. If not, QEMU supplies its own default MAC address and creates a possible MAC address conflict within the related VLAN. |
34.4.2 User-mode networking #Edit source
The -netdev user option instructs QEMU to use
user-mode networking. This is the default if no networking mode is
selected. Therefore, these command lines are equivalent:
>sudoqemu-system-x86_64 -hda /images/sles_base.raw
>sudoqemu-system-x86_64 -hda /images/sles_base.raw -netdev user,id=hostnet0
This mode is useful to allow the VM Guest to access the external network resources, such as the Internet. By default, no incoming traffic is permitted and therefore, the VM Guest is not visible to other machines on the network. No administrator privileges are required in this networking mode. The user-mode is also useful for doing a network boot on your VM Guest from a local directory on VM Host Server.
The VM Guest allocates an IP address from a virtual DHCP server.
VM Host Server (the DHCP server) is reachable at 10.0.2.2, while the IP
address range for allocation starts from 10.0.2.15. You can use
ssh to connect to VM Host Server at 10.0.2.2, and
scp to copy files back and forth.
34.4.2.1 Command line examples #Edit source
This section shows several examples on how to set up user-mode networking with QEMU.
Example 34.1: Restricted user-mode networking #
>sudoqemu-system-x86_64 [...] \ -netdev user1,id=hostnet0 \ -device virtio-net-pci,netdev=hostnet0,vlan=12,name=user_net13,restrict=yes4
Specifies user-mode networking. | |
Connects to VLAN number 1. If omitted, defaults to 0. | |
Specifies a human-readable name of the network stack. Useful when identifying it in the QEMU monitor. | |
Isolates VM Guest. It then cannot communicate with VM Host Server and no network packets are routed to the external network. |
Example 34.2: User-mode networking with custom IP range #
>sudoqemu-system-x86_64 [...] \ -netdev user,id=hostnet0 \ -device virtio-net-pci,netdev=hostnet0,net=10.2.0.0/81,host=10.2.0.62,\ dhcpstart=10.2.0.203,hostname=tux_kvm_guest4
Specifies the IP address of the network that VM Guest sees and optionally the netmask. Default is 10.0.2.0/8. | |
Specifies the VM Host Server IP address that VM Guest sees. Default is 10.0.2.2. | |
Specifies the first of the 16 IP addresses that the built-in DHCP server can assign to VM Guest. Default is 10.0.2.15. | |
Specifies the host name that the built-in DHCP server assigns to VM Guest. |
Example 34.3: User-mode networking with network-boot and TFTP #
>sudoqemu-system-x86_64 [...] \ -netdev user,id=hostnet0 \ -device virtio-net-pci,netdev=hostnet0,tftp=/images/tftp_dir1,\ bootfile=/images/boot/pxelinux.02
Activates a built-in TFTP (a file transfer protocol with the functionality of a basic FTP) server. The files in the specified directory are visible to a VM Guest as the root of a TFTP server. | |
Broadcasts the specified file as a BOOTP (a network protocol
that offers an IP address and a network location of a boot
image, often used in diskless workstations) file. When used
together with |
Example 34.4: User-mode networking with host port forwarding #
>sudoqemu-system-x86_64 [...] \ -netdev user,id=hostnet0 \ -device virtio-net-pci,netdev=hostnet0,hostfwd=tcp::2222-:22
Forwards incoming TCP connections to the port 2222 on the host to
the port 22 (SSH) on
VM Guest. If sshd is
running on VM Guest, enter
> ssh qemu_host -p 2222
where qemu_host is the host name or IP address
of the host system, to get a
SSH prompt from VM Guest.
34.4.3 Bridged networking #Edit source
With the -netdev tap option, QEMU creates a
network bridge by connecting the host TAP network device to a specified
VLAN of VM Guest. Its network interface is then visible to the rest of
the network. This method does not work by default and needs to be
explicitly specified.
First, create a network bridge and add a VM Host Server physical network
interface to it, such as eth0:
Start and select › .
Click and select from the drop-down box in the window. Click .
Choose whether you need a dynamically or statically assigned IP address, and fill the related network settings if applicable.
In the pane, select the Ethernet device to add to the bridge.
Click . When asked about adapting an already configured device, click .
Click to apply the changes. Check if the bridge is created:
>bridge link 2: eth0 state UP : <BROADCAST,MULTICAST,UP,LOWER_UP> mtu 1500 master br0 \ state forwarding priority 32 cost 100
34.4.3.1 Connecting to a bridge manually #Edit source
Use the following example script to connect VM Guest to the newly
created bridge interface br0. Several commands in
the script are run via the sudo mechanism because
they require root privileges.
Tip: Required software
To manage a network bridge, you need to have the tunctl package installed.
#!/bin/bash bridge=br01 tap=$(sudo tunctl -u $(whoami) -b)2 sudo ip link set $tap up3 sleep 1s4 sudo ip link add name $bridge type bridge sudo ip link set $bridge up sudo ip link set $tap master $bridge5 qemu-system-x86_64 -machine accel=kvm -m 512 -hda /images/sles_base.raw \ -netdev tap,id=hostnet0 \ -device virtio-net-pci,netdev=hostnet0,vlan=0,macaddr=00:16:35:AF:94:4B,\ ifname=$tap6,script=no7,downscript=no sudo ip link set $tap nomaster8 sudo ip link set $tap down9 sudo tunctl -d $tap10
Name of the bridge device. | |
Prepare a new TAP device and assign it to the user who runs the script. TAP devices are virtual network devices often used for virtualization and emulation setups. | |
Bring up the newly created TAP network interface. | |
Make a 1-second pause to make sure the new TAP network interface is really up. | |
Add the new | |
The | |
Before | |
Deletes the TAP interface from a network bridge
| |
Sets the state of the TAP device to | |
Tear down the TAP device. |
34.4.3.2 Connecting to a bridge with qemu-bridge-helper #Edit source
Another way to connect VM Guest to a network through a network
bridge is via the qemu-bridge-helper helper
program. It configures the TAP interface for you, and attaches it to
the specified bridge. The default helper executable is
/usr/lib/qemu-bridge-helper. The helper
executable is setuid root, which is only executable by the members of
the virtualization group (kvm). Therefore the
qemu-system-ARCH command itself does not need to
be run under root privileges.
The helper is automatically called when you specify a network bridge:
qemu-system-x86_64 [...] \ -netdev bridge,id=hostnet0,vlan=0,br=br0 \ -device virtio-net-pci,netdev=hostnet0
You can specify your own custom helper script that takes care of the
TAP device (de)configuration, with the
helper=/path/to/your/helper option:
qemu-system-x86_64 [...] \ -netdev bridge,id=hostnet0,vlan=0,br=br0,helper=/path/to/bridge-helper \ -device virtio-net-pci,netdev=hostnet0
Tip
To define access privileges to
qemu-bridge-helper, inspect the
/etc/qemu/bridge.conf file. For example the
following directive
allow br0
allows the qemu-system-ARCH command to connect
its VM Guest to the network bridge br0.
34.5 Viewing a VM Guest with VNC #Edit source
By default QEMU uses a GTK (a cross-platform toolkit library) window to
display the graphical output of a VM Guest.
With the -vnc option specified, you can make QEMU
listen on a specified VNC display and redirect its graphical output to
the VNC session.
Tip
When working with QEMU's virtual machine via VNC session, it is
useful to work with the -usbdevice tablet option.
Moreover, if you need to use another keyboard layout than the default
en-us, specify it with the -k
option.
The first suboption of -vnc must be a
display value. The -vnc option
understands the following display specifications:
host:displayOnly connections from
hoston the display numberdisplayare accepted. The TCP port on which the VNC session is then running is normally a 5900 +displaynumber. If you do not specifyhost, connections are accepted from any host.unix:pathThe VNC server listens for connections on Unix domain sockets. The
pathoption specifies the location of the related Unix socket.noneThe VNC server functionality is initialized, but the server itself is not started. You can start the VNC server later with the QEMU monitor. For more information, see Chapter 35, Virtual machine administration using QEMU monitor.
Following the display value there may be one or more option flags separated by commas. Valid options are:
reverseConnect to a listening VNC client via a reverse connection.
websocketOpens an additional TCP listening port dedicated to VNC Websocket connections. By definition the Websocket port is 5700+display.
passwordRequire that password-based authentication is used for client connections.
tlsRequire that clients use TLS when communicating with the VNC server.
x509=/path/to/certificate/dirValid if TLS is specified. Require that x509 credentials are used for negotiating the TLS session.
x509verify=/path/to/certificate/dirValid if TLS is specified. Require that x509 credentials are used for negotiating the TLS session.
saslRequire that the client uses SASL to authenticate with the VNC server.
aclTurn on access control lists for checking of the x509 client certificate and SASL party.
lossyEnable lossy compression methods (gradient, JPEG, ...).
non-adaptiveDisable adaptive encodings. Adaptive encodings are enabled by default.
share=[allow-exclusive|force-shared|ignore]Set display sharing policy.
Note
For more details about the display options, see the qemu-doc man page.
An example VNC usage:
tux >sudoqemu-system-x86_64 [...] -vnc :5 # (on the client:)wilber >vncviewer venus:5 &
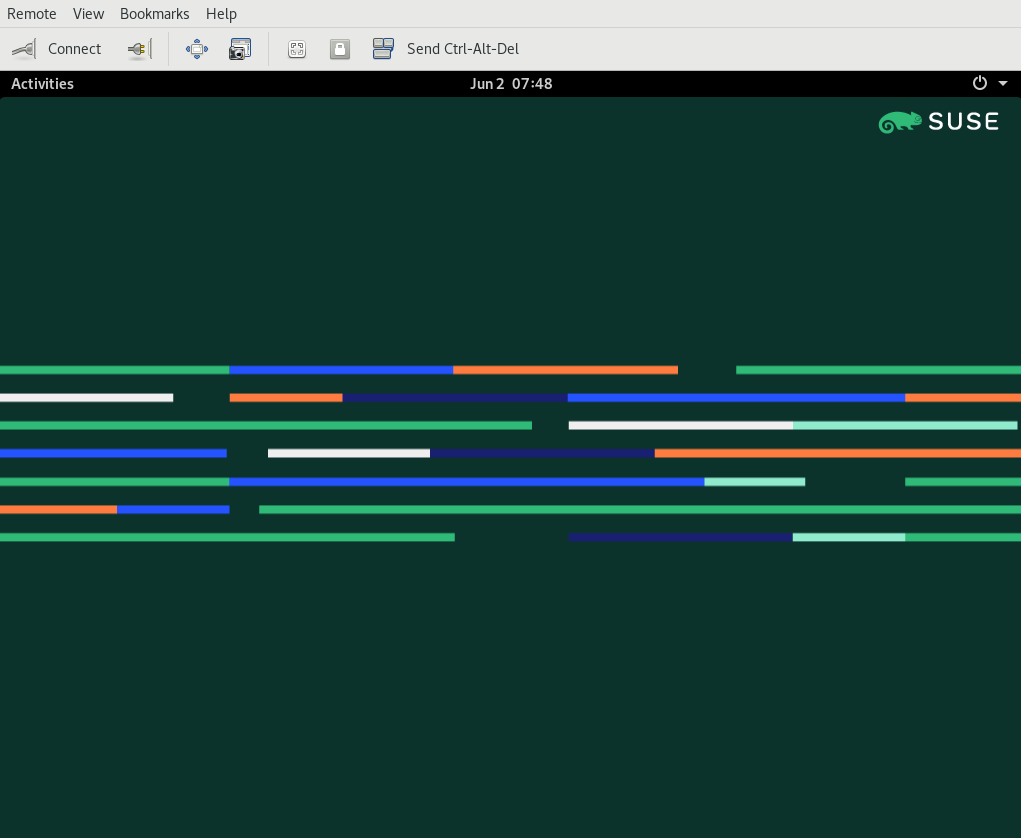
Figure 34.2: QEMU VNC session #
34.5.1 Secure VNC connections #Edit source
The default VNC server setup does not use any form of authentication. In the previous example, any user can connect and view the QEMU VNC session from any host on the network.
There are several levels of security that you can apply to your VNC client/server connection. You can either protect your connection with a password, use x509 certificates, use SASL authentication, or even combine several authentication methods in one QEMU command.
For more information about configuring x509 certificates on a VM Host Server
and the client, see Section 11.3.2, “Remote TLS/SSL connection with x509 certificate (qemu+tls or xen+tls)”
and Section 11.3.2.3, “Configuring the client and testing the setup”.
The Remmina VNC viewer supports advanced authentication mechanisms. For
this example, let us assume that the server x509 certificates
ca-cert.pem, server-cert.pem,
and server-key.pem are located in the
/etc/pki/qemu directory on the host. The client
certificates can be placed in any custom directory, as Remmina asks for
their path on the connection start-up.
Example 34.5: Password authentication #
qemu-system-x86_64 [...] -vnc :5,password -monitor stdio
Starts the VM Guest graphical output on VNC display number 5 which
corresponds to port 5905. The password suboption
initializes a simple password-based authentication method. There is
no password set by default and you need to set one with the
change vnc password command in QEMU monitor:
QEMU 2.3.1 monitor - type 'help' for more information (qemu) change vnc password Password: ****
You need the -monitor stdio option here, because
you would not be able to manage the QEMU monitor without
redirecting its input/output.
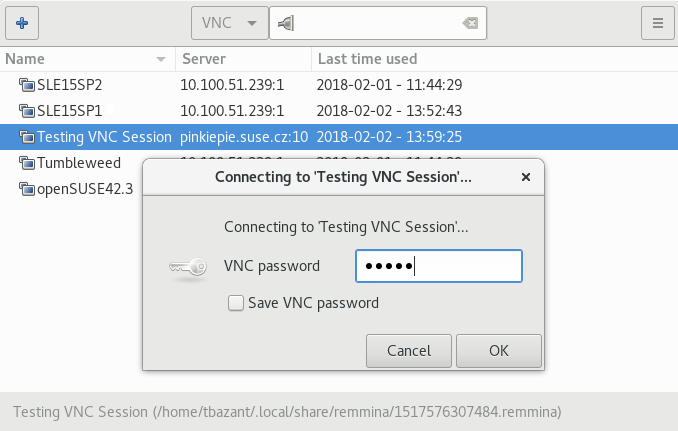
Figure 34.3: Authentication dialog in Remmina #
Example 34.6: x509 certificate authentication #
The QEMU VNC server can use TLS encryption for the session and x509 certificates for authentication. The server asks the client for a certificate and validates it against the CA certificate. Use this authentication type if your company provides an internal certificate authority.
qemu-system-x86_64 [...] -vnc :5,tls,x509verify=/etc/pki/qemu
Example 34.7: x509 certificate and password authentication #
You can combine the password authentication with TLS encryption and x509 certificate authentication to create a two-layer authentication model for clients. Remember to set the password in the QEMU monitor after you run the following command:
qemu-system-x86_64 [...] -vnc :5,password,tls,x509verify=/etc/pki/qemu \ -monitor stdio
Example 34.8: SASL authentication #
Simple Authentication and Security Layer (SASL) is a framework for authentication and data security in Internet protocols. It integrates several authentication mechanisms, like PAM, Kerberos, LDAP and more. SASL keeps its own user database, so the connecting user accounts do not need to exist on VM Host Server.
For security reasons, you are advised to combine SASL authentication with TLS encryption and x509 certificates:
qemu-system-x86_64 [...] -vnc :5,tls,x509,sasl -monitor stdio
35 Virtual machine administration using QEMU monitor #Edit source
- 35.1 Accessing monitor console
- 35.2 Getting information about the guest system
- 35.3 Changing VNC password
- 35.4 Managing devices
- 35.5 Controlling keyboard and mouse
- 35.6 Changing available memory
- 35.7 Dumping virtual machine memory
- 35.8 Managing virtual machine snapshots
- 35.9 Suspending and resuming virtual machine execution
- 35.10 Live migration
- 35.11 QMP - QEMU machine protocol
When a virtual machine is invoked by the qemu-system-ARCH command, for
example qemu-system-x86_64, a monitor console is
provided for performing interaction with the user. Using the commands
available in the monitor console, it is possible to inspect the running
operating system, change removable media, take screenshots or audio grabs
and control other aspects of the virtual machine.
Note
The following sections list selected useful QEMU monitor commands and
their purpose. To get the full list, enter help in the
QEMU monitor command line.
35.1 Accessing monitor console #Edit source
Tip: No monitor console for libvirt
You can access the monitor console only if you started the virtual
machine directly with the qemu-system-ARCH command and are viewing its
graphical output in a native QEMU window.
If you started the virtual machine with libvirt (for example, using
virt-manager) and are viewing its output via VNC or
Spice sessions, you cannot access the monitor console directly. You
can, however, send the monitor command to the virtual machine via
virsh:
# virsh qemu-monitor-command COMMAND
The way you access the monitor console depends on which display device
you use to view the output of a virtual machine. Find more details about
displays in Section 34.3.2.2, “Display options”.
For example, to view the monitor while the -display gtk
option is in use, press Ctrl–Alt–2. Similarly, when
the -nographic option is in use, you can switch to the
monitor console by pressing the following key combination:
Ctrl–AC.
To get help while using the console, use help or
?. To get help for a specific command, use
help COMMAND.
35.2 Getting information about the guest system #Edit source
To get information about the guest system, use info.
If used without any option, the list of possible options is printed.
Options determine which part of the system is analyzed:
info versionShows the version of QEMU.
info commandsLists available QMP commands.
info networkShows the network state.
info chardevShows the character devices.
info blockInformation about block devices, such as hard disks, floppy drives, or CD-ROMs.
info blockstatsRead and write statistics on block devices.
info registersShows the CPU registers.
info cpusShows information about available CPUs.
info historyShows the command line history.
info irqShows the interrupt statistics.
info picShows the i8259 (PIC) state.
info pciShows the PCI information.
info tlbShows virtual to physical memory mappings.
info memShows the active virtual memory mappings.
info jitShows dynamic compiler information.
info kvmShows the KVM information.
info numaShows the NUMA information.
info usbShows the guest USB devices.
info usbhostShows the host USB devices.
info profileShows the profiling information.
info captureShows the capture (audio grab) information.
info snapshotsShows the currently saved virtual machine snapshots.
info statusShows the current virtual machine status.
info miceShows which guest mice are receiving events.
info vncShows the VNC server status.
info nameShows the current virtual machine name.
info uuidShows the current virtual machine UUID.
info usernetShows the user network stack connection states.
info migrateShows the migration status.
info balloonShows the balloon device information.
info qtreeShows the device tree.
info qdmShows the qdev device model list.
info romsShows the ROMs.
info migrate_cache_sizeShows the current migration xbzrle (“Xor Based Zero Run Length Encoding”) cache size.
info migrate_capabilitiesShows the status of the multiple migration capabilities, such as xbzrle compression.
info mtreeShows the VM Guest memory hierarchy.
info trace-eventsShows available trace-events and their status.
35.3 Changing VNC password #Edit source
To change the VNC password, use the change vnc
password command and enter the new password:
(qemu) change vnc password Password: ******** (qemu)
35.4 Managing devices #Edit source
To add a new disk while the guest is running (hotplug), use the
drive_add and device_add commands.
First define a new drive to be added as a device to bus 0:
(qemu) drive_add 0 if=none,file=/tmp/test.img,format=raw,id=disk1 OK
You can confirm your new device by querying the block subsystem:
(qemu) info block [...] disk1: removable=1 locked=0 tray-open=0 file=/tmp/test.img ro=0 drv=raw \ encrypted=0 bps=0 bps_rd=0 bps_wr=0 iops=0 iops_rd=0 iops_wr=0
After the new drive is defined, it needs to be connected to a device so
that the guest can see it. The typical device would be a
virtio-blk-pci or scsi-disk. To get
the full list of available values, run:
(qemu) device_add ? name "VGA", bus PCI name "usb-storage", bus usb-bus [...] name "virtio-blk-pci", bus virtio-bus
Now add the device
(qemu) device_add virtio-blk-pci,drive=disk1,id=myvirtio1
and confirm with
(qemu) info pci
[...]
Bus 0, device 4, function 0:
SCSI controller: PCI device 1af4:1001
IRQ 0.
BAR0: I/O at 0xffffffffffffffff [0x003e].
BAR1: 32 bit memory at 0xffffffffffffffff [0x00000ffe].
id "myvirtio1"Tip
Devices added with the device_add command can be
removed from the guest with device_del. Enter
help device_del on the QEMU monitor command line
for more information.
To release the device or file connected to the removable media device,
use the eject DEVICE
command. Use the optional -f to force ejection.
To change removable media (like CD-ROMs), use the
change DEVICE command. The
name of the removable media can be determined using the info
block command:
(qemu)info blockide1-cd0: type=cdrom removable=1 locked=0 file=/dev/sr0 ro=1 drv=host_device(qemu)change ide1-cd0 /path/to/image
35.5 Controlling keyboard and mouse #Edit source
It is possible to use the monitor console to emulate keyboard and mouse
input if necessary. For example, if your graphical user interface
intercepts certain key combinations at low level (such as
Ctrl–Alt–F1
in X Window Syustem), you can still enter them using the
sendkey KEYS:
sendkey ctrl-alt-f1
To list the key names used in the KEYS option,
enter sendkey and press →|.
To control the mouse, the following commands can be used:
mouse_moveDX dy [DZ]Move the active mouse pointer to the specified coordinates dx, dy with the optional scroll axis dz.
mouse_buttonVALChange the state of the mouse buttons (1=left, 2=middle, 4=right).
mouse_setINDEXSet which mouse device receives events. Device index numbers can be obtained with the
info micecommand.
35.6 Changing available memory #Edit source
If the virtual machine was started with the -balloon
virtio option (the paravirtualized balloon device is therefore
enabled), you can change the available memory dynamically. For more
information about enabling the balloon device, see
Section 33.1, “Basic installation with qemu-system-ARCH”.
To get information about the balloon device in the monitor console and to
determine whether the device is enabled, use the info
balloon command:
(qemu) info balloon
If the balloon device is enabled, use the balloon
MEMORY_IN_MB command to set the requested
amount of memory:
(qemu) balloon 400
35.7 Dumping virtual machine memory #Edit source
To save the content of the virtual machine memory to a disk or console output, use the following commands:
memsaveADDRSIZEFILENAMESaves virtual memory dump starting at ADDR of size SIZE to file FILENAME
pmemsaveADDRSIZEFILENAMESaves physical memory dump starting at ADDR of size SIZE to file FILENAME-
- x /FMTADDR
Makes a virtual memory dump starting at address ADDR and formatted according to the FMT string. The FMT string consists of three parameters
COUNTFORMATSIZE:The COUNT parameter is the number of items to be dumped.
The FORMAT can be
x(hex),d(signed decimal),u(unsigned decimal),o(octal),c(char) ori(assembly instruction).The SIZE parameter can be
b(8 bits),h(16 bits),w(32 bits) org(64 bits). On x86,horwcan be specified with theiformat to respectively select 16 or 32-bit code instruction size.- xp /FMTADDR
Makes a physical memory dump starting at address ADDR and formatted according to the FMT string. The FMT string consists of three parameters
COUNTFORMATSIZE:The COUNT parameter is the number of the items to be dumped.
The FORMAT can be
x(hex),d(signed decimal),u(unsigned decimal),o(octal),c(char) ori(asm instruction).The SIZE parameter can be
b(8 bits),h(16 bits),w(32 bits) org(64 bits). On x86,horwcan be specified with theiformat to respectively select 16 or 32-bit code instruction size.
35.8 Managing virtual machine snapshots #Edit source
Managing snapshots in QEMU monitor is not officially supported by SUSE yet. The information found in this section may be helpful in specific cases.
Virtual Machine snapshots are snapshots of the complete
virtual machine including the state of CPU, RAM and the content of all
writable disks. To use virtual machine snapshots, you must have at least
one non-removable and writable block device using the
qcow2 disk image format.
Snapshots are helpful when you need to save your virtual machine in a particular state. For example, after you have configured network services on a virtualized server and want to quickly start the virtual machine in the same state that was saved last. You can also create a snapshot after the virtual machine has been powered off to create a backup state before you try something experimental and make VM Guest unstable. This section introduces the former case, while the latter is described in Section 33.2.3, “Managing snapshots of virtual machines with qemu-img”.
The following commands are available for managing snapshots in QEMU monitor:
savevmNAMECreates a new virtual machine snapshot under the tag NAME or replaces an existing snapshot.
loadvmNAMELoads a virtual machine snapshot tagged NAME.
delvmDeletes a virtual machine snapshot.
info snapshotsPrints information about available snapshots.
(qemu) info snapshots Snapshot list: ID1 TAG2 VM SIZE3 DATE4 VM CLOCK5 1 booting 4.4M 2013-11-22 10:51:10 00:00:20.476 2 booted 184M 2013-11-22 10:53:03 00:02:05.394 3 logged_in 273M 2013-11-22 11:00:25 00:04:34.843 4 ff_and_term_running 372M 2013-11-22 11:12:27 00:08:44.965
Unique auto-incremented identification number of the snapshot.
Unique description string of the snapshot. It is meant as a human readable version of the ID.
The disk space occupied by the snapshot. Note that the more memory is consumed by running applications, the bigger the snapshot is.
Time and date the snapshot was created.
The current state of the virtual machine's clock.
35.9 Suspending and resuming virtual machine execution #Edit source
The following commands are available for suspending and resuming virtual machines:
stopSuspends the execution of the virtual machine.
contResumes the execution of the virtual machine.
system_resetResets the virtual machine. The effect is similar to the reset button on a physical machine. This may leave the file system in an unclean state.
system_powerdownSends an ACPI shutdown request to the machine. The effect is similar to the power button on a physical machine.
qorquitTerminates QEMU immediately.
35.10 Live migration #Edit source
The live migration process allows to transmit any virtual machine from one host system to another host system without any interruption in availability. It is possible to change hosts permanently or only during maintenance.
The requirements for live migration:
All requirements from Section 10.7.1, “Migration requirements” are applicable.
Live migration is only possible between VM Host Servers with the same CPU features.
AHCI interface, VirtFS feature, and the
-mem-pathcommand line option are not compatible with migration.The guest on the source and destination hosts must be started in the same way.
-snapshotqemu command line option should not be used for migration (and thisqemucommand line option is not supported).
Important: Support status
The postcopy mode is not yet supported in
openSUSE Leap. It is released as a technology preview only. For more
information about postcopy, see
http://wiki.qemu.org/Features/PostCopyLiveMigration.
More recommendations can be found at the following Web site: http://www.linux-kvm.org/page/Migration
The live migration process has the following steps:
The virtual machine instance is running on the source host.
The virtual machine is started on the destination host in the frozen listening mode. The parameters used are the same as on the source host plus the
-incoming tcp:IP:PORTparameter, where IP specifies the IP address and PORT specifies the port for listening to the incoming migration. If 0 is set as IP address, the virtual machine listens on all interfaces.On the source host, switch to the monitor console and use the
migrate -d tcp:DESTINATION_IP:PORT command to initiate the migration.To determine the state of the migration, use the
info migratecommand in the monitor console on the source host.To cancel the migration, use the
migrate_cancelcommand in the monitor console on the source host.To set the maximum tolerable downtime for migration in seconds, use the
migrate_set_downtimeNUMBER_OF_SECONDS command.To set the maximum speed for migration in bytes per second, use the
migrate_set_speedBYTES_PER_SECOND command.
35.11 QMP - QEMU machine protocol #Edit source
QMP is a JSON-based protocol that allows applications—such as
libvirt—to communicate with a running QEMU instance. There are
several ways you can access the QEMU monitor using QMP commands.
35.11.1 Access QMP via standard input/output #Edit source
The most flexible way to use QMP is by specifying the
-mon option. The following example creates a QMP
instance using standard input/output. In the following examples,
-> marks lines with commands sent from client to
the running QEMU instance, while <- marks lines
with the output returned from QEMU.
>sudoqemu-system-x86_64 [...] \ -chardev stdio,id=mon0 \ -mon chardev=mon0,mode=control,pretty=on <- { "QMP": { "version": { "qemu": { "micro": 0, "minor": 0, "major": 2 }, "package": "" }, "capabilities": [ ] } }
When a new QMP connection is established, QMP sends its greeting
message and enters capabilities negotiation mode. In this mode, only
the qmp_capabilities command works. To exit
capabilities negotiation mode and enter command mode, the
qmp_capabilities command must be issued first:
-> { "execute": "qmp_capabilities" }
<- {
"return": {
}
}
Note that "return": {} is a QMP's success response.
QMP's commands can have arguments. For example to eject a CD-ROM drive, enter the following:
->{ "execute": "eject", "arguments": { "device": "ide1-cd0" } }
<- {
"timestamp": {
"seconds": 1410353381,
"microseconds": 763480
},
"event": "DEVICE_TRAY_MOVED",
"data": {
"device": "ide1-cd0",
"tray-open": true
}
}
{
"return": {
}
}35.11.2 Access QMP via telnet #Edit source
Instead of the standard input/output, you can connect the QMP interface to a network socket and communicate with it via a specified port:
>sudoqemu-system-x86_64 [...] \ -chardev socket,id=mon0,host=localhost,port=4444,server,nowait \ -mon chardev=mon0,mode=control,pretty=on
And then run telnet to connect to port 4444:
> telnet localhost 4444
Trying ::1...
Connected to localhost.
Escape character is '^]'.
<- {
"QMP": {
"version": {
"qemu": {
"micro": 0,
"minor": 0,
"major": 2
},
"package": ""
},
"capabilities": [
]
}
}You can create several monitor interfaces at the same time. The following example creates one HMP instance—human monitor which understands 'normal' QEMU monitor's commands—on the standard input/output, and one QMP instance on localhost port 4444:
>sudoqemu-system-x86_64 [...] \ -chardev stdio,id=mon0 -mon chardev=mon0,mode=readline \ -chardev socket,id=mon1,host=localhost,port=4444,server,nowait \ -mon chardev=mon1,mode=control,pretty=on
35.11.3 Access QMP via Unix socket #Edit source
Invoke QEMU using the -qmp option, and create a Unix
socket:
>sudoqemu-system-x86_64 [...] \ -qmp unix:/tmp/qmp-sock,server --monitor stdio QEMU waiting for connection on: unix:./qmp-sock,server
To communicate with the QEMU instance via the
/tmp/qmp-sock socket, use nc (see
man 1 nc for more information) from another terminal
on the same host:
>sudonc -U /tmp/qmp-sock <- {"QMP": {"version": {"qemu": {"micro": 0, "minor": 0, "major": 2} [...]
35.11.4 Access QMP via libvirt's virsh command #Edit source
If you run your virtual machines under libvirt (see
Part II, “Managing virtual machines with libvirt”), you can communicate with its
running guests by running the virsh
qemu-monitor-command:
>sudovirsh qemu-monitor-command vm_guest1 \ --pretty '{"execute":"query-kvm"}' <- { "return": { "enabled": true, "present": true }, "id": "libvirt-8" }
In the above example, we ran the simple command
query-kvm which checks if the host is capable of
running KVM and if KVM is enabled.
Tip: Generating human-readable output
To use the standard human-readable output format of QEMU instead of
the JSON format, use the --hmp option:
>sudovirsh qemu-monitor-command vm_guest1 --hmp "query-kvm"
Part VI Troubleshooting #Edit source
- 36 Integrated help and package documentation
Virtualization packages provide commands for managing many aspects of a virtualization host. It is not possible or expected to remember all options supported by these commands. A basic installation of a Xen or KVM host includes manual pages and integrated help for shell commands. The documentation s…
- 37 Gathering system information and logs
In certain cases logs generated from a custom logging or debugging configuration may be required to determine the cause of a problem.
36 Integrated help and package documentation #Edit source
Virtualization packages provide commands for managing many aspects of a virtualization host. It is not possible or expected to remember all options supported by these commands. A basic installation of a Xen or KVM host includes manual pages and integrated help for shell commands. The documentation sub-packages provide additional content beyond what is provided by the basic installation.
- Manual pages for shell commands
Most commands include a manual page that provides detailed information about the command, describes any options, and in certain cases gives example command usage. For example, to see the manual for the
virt-installcommand type:>man virt-install- Integrated help for shell commands
Commands also include integrated help, providing more compact and topic-driven documentation. For example, to see a brief description of the
virt-installcommand type:>virt-install --helpIntegrated help can also be used to see the details of a specific option. For example, to see the sub-options supported by the disk option type:
>virt-install --disk help- Documentation sub-packages
Many of the virtualization packages provide additional content in their documentation sub-package. As an example, the libvirt-doc package contains all the documentation available at http://libvirt.org, plus sample code demonstrating the use of the libvirt C API. Use the
rpmcommand to view the contents of a documentation sub-package. For example, to see the contents of libvirt-doc:rpm -ql libvirt-doc
37 Gathering system information and logs #Edit source
In certain cases logs generated from a custom logging or debugging configuration may be required to determine the cause of a problem.
37.1 libvirt log controls #Edit source
libvirt provides logging facilities for both the library and the
daemon. The behavior of the logging facility is controlled by adjusting
the log level, filter and output settings.
- Log level
libvirtlog messages are classified into four priority levels: DEBUG, INFO, WARNING and ERROR. The DEBUG level is verbose and capable of generating gigabytes of information in a short time. The volume of log messages progressively decreases with the INFO, WARNING and ERROR log levels. ERROR is the default log level.- Log filters
Log filters provide a way to log only messages matching a specific component and log level. Log filters allow collecting the verbose DEBUG log messages of specific components, but only ERROR level log messages from the rest of the system. By default, no log filters are defined.
- Log outputs
Log outputs allow specifying where the filtered log messages are sent. Messages can be sent to a file, the standard error stream of the process, or journald. By default, filtered log messages are sent to journald.
See https://libvirt.org/logging.html for more
details on libvirt's log controls.
A default libvirt installation has the log level set to ERROR, no log
filters defined, and log outputs set to journald. Log messages from the
libvirt daemon can be viewed with the journalctl
command:
# journalctl --unit libvirtd
The default log facility settings are fine for normal operations and
provide useful messages for applications and users of libvirt, but
internal issues often require DEBUG level messages. As an example,
consider a potential bug in the interaction between libvirt and the
QEMU monitor. In this case, we only need to see the debug messages of
the communication between libvirt and QEMU. The following example
creates a log filter to select debug messages from the QEMU driver and
send them to a file named /tmp/libvirtd.log
log_filters="1:qemu.qemu_monitor_json" log_outputs="1:file:/tmp/libvirtd.log"
Log controls for the libvirt daemon can be found in
/etc/libvirt/libvirtd.conf. The daemon must be
restarted after making any changes to the configuration file.
# systemctl restart libvirtd.serviceGlossary #Edit source
General
- Create Virtual Machine Wizard #
A software program available in YaST and Virtual Machine Manager that provides a graphical interface to guide you through the steps to create virtual machines. It can also be run in text mode by entering
virt-installat a command prompt in the host environment.- Dom0 #
The term is used in Xen environments, and refers to a virtual machine. The host operating system is a virtual machine running in a privileged domain and can be called Dom0. All other virtual machines on the host run in unprivileged domains and can be called domain U's.
- hardware-assisted #
Intel* and AMD* provide virtualization hardware-assisted technology. This reduces the frequency of VM IN/OUT (fewer VM traps), because software is a major source of overhead, and increases the efficiency (the execution is done by the hardware). Moreover, this reduces the memory footprint, provides better resource control, and allows secure assignment of specific I/O devices.
- Host Environment #
The desktop or command line environment that allows interaction with the host computer's environment. It provides a command line environment and can also include a graphical desktop, such as GNOME or IceWM. The host environment runs as a special type of virtual machine that has privileges to control and manage other virtual machines. Other commonly used terms include Dom0, privileged domain, and host operating system.
- Hypervisor #
The software that coordinates the low-level interaction between virtual machines and the underlying physical computer hardware.
- KVM #
- Paravirtualized Frame Buffer #
The video output device that drives a video display from a memory buffer containing a complete frame of data for virtual machine displays running in paravirtual mode.
- VHS #
Virtualization Host Server
The physical computer running a SUSE virtualization platform software. The virtualization environment consists of the hypervisor, the host environment, virtual machines and associated tools, commands and configuration files. Other commonly used terms include host, Host Computer, Host Machine (HM), Virtual Server (VS), Virtual Machine Host (VMH), and VM Host Server (VHS).
- VirtFS #
VirtFS is a new paravirtualized file system interface designed for improving pass-through technologies in the KVM environment. It is based on the VirtIO framework.
- Virtualized #
A guest operating system or application running on a virtual machine.
- Virtual Machine #
A virtualized PC environment (VM) capable of hosting a guest operating system and associated applications. Could be also called a VM Guest.
- Virtual Machine Manager #
A software program that provides a graphical user interface for creating and managing virtual machines.
- Xen #
- xl #
A set of commands for Xen that lets administrators manage virtual machines from a command prompt on the host computer. It replaced the deprecated
xmtool stack.
CPU
- CPU capping #
Virtual CPU capping allows you to set vCPU capacity to 1–100 percent of the physical CPU capacity.
- CPU hotplugging #
CPU hotplugging is used to describe the functions of replacing/adding/removing a CPU without shutting down the system.
- CPU over-commitment #
Virtual CPU over-commitment is the ability to assign more virtual CPUs to VMs than the actual number of physical CPUs present in the physical system. This procedure does not increase the overall performance of the system, but may be useful for testing purposes.
- CPU pinning #
Processor affinity, or CPU pinning enables the binding and unbinding of a process or a thread to a central processing unit (CPU) or a range of CPUs.
Network
- Bridged Networking #
A type of network connection that lets a virtual machine be identified on an external network as a unique identity that is separate from and unrelated to its host computer.
- Empty Bridge #
A type of network bridge that has no physical network device or virtual network device provided by the host. This lets virtual machines communicate with other virtual machines on the same host but not with the host or on an external network.
- External Network #
The network outside a host's internal network environment.
- Internal Network #
A type of network configuration that restricts virtual machines to their host environment.
- Local Bridge #
A type of network bridge that has a virtual network device but no physical network device provided by the host. This lets virtual machines communicate with the host and other virtual machines on the host. Virtual machines can communicate on an external network through the host.
- Network Address Translation (NAT) #
A type of network connection that lets a virtual machine use the IP address and MAC address of the host.
- No Host Bridge #
A type of network bridge that has a physical network device but no virtual network device provided by the host. This lets virtual machines communicate on an external network but not with the host. This lets you separate virtual machine network communications from the host environment.
- Traditional Bridge #
A type of network bridge that has both a physical network device and a virtual network device provided by the host.
Storage
- AHCI #
The Advanced Host Controller Interface (AHCI) is a technical standard defined by Intel* that specifies the operation of Serial ATA (SATA) host bus adapters in a non-implementation-specific manner.
- Block Device #
Data storage devices, such as CD-ROM drives or disk drives, that move data in the form of blocks. Partitions and volumes are also considered block devices.
- File-Backed Virtual Disk #
A virtual disk based on a file, also called a disk image file.
- Raw Disk #
A method of accessing data on a disk at the individual byte level instead of through its file system.
- Sparse image file #
A disk image file that does not reserve its entire amount of disk space but expands as data is written to it.
- xvda #
The drive designation given to the first virtual disk on a paravirtual machine.
Acronyms
- ACPI #
Advanced Configuration and Power Interface (ACPI) specification provides an open standard for device configuration and power management by the operating system.
- AER #
Advanced Error Reporting
AER is a capability provided by the PCI Express specification which allows for reporting of PCI errors and recovery from some of them.
- APIC #
Advanced Programmable Interrupt Controller (APIC) is a family of interrupt controllers.
- BDF #
Bus:Device:Function
Notation used to succinctly describe PCI and PCIe devices.
- CG #
Control Groups
Feature to limit, account and isolate resource usage (CPU, memory, disk I/O, etc.).
- EDF #
Earliest Deadline First
This scheduler provides weighted CPU sharing in an intuitive way and uses real-time algorithms to ensure time guarantees.
- EPT #
Extended Page Tables
Performance in a virtualized environment is close to that in a native environment. Virtualization does create some overheads, however. These come from the virtualization of the CPU, the MMU, and the I/O devices. In some recent x86 processors AMD and Intel have begun to provide hardware extensions to help bridge this performance gap. In 2006, both vendors introduced their first generation hardware support for x86 virtualization with AMD-Virtualization (AMD-V) and Intel® VT-x technologies. Recently Intel introduced its second generation of hardware support that incorporates MMU-virtualization, called Extended Page Tables (EPT). EPT-enabled systems can improve performance compared to using shadow paging for MMU virtualization. EPT increases memory access latencies for a few workloads. This cost can be reduced by effectively using large pages in the guest and the hypervisor.
- FLASK #
Flux Advanced Security Kernel
Xen implements a type of mandatory access control via a security architecture called FLASK using a module of the same name.
- HAP #
High Assurance Platform
HAP combines hardware and software technologies to improve workstation and network security.
- HVM #
Hardware Virtual Machine (commonly called like this by Xen).
- IOMMU #
Input/Output Memory Management Unit
IOMMU (AMD* technology) is a memory management unit (MMU) that connects a direct memory access-capable (DMA-capable) I/O bus to the main memory.
- KSM #
Kernel Same Page Merging
KSM allows for automatic sharing of identical memory pages between guests to save host memory. KVM is optimized to use KSM if enabled on the VM Host Server.
- MMU #
Memory Management Unit
is a computer hardware component responsible for handling accesses to memory requested by the CPU. Its functions include translation of virtual addresses to physical addresses (that is, virtual memory management), memory protection, cache control, bus arbitration and in simpler computer architectures (especially 8-bit systems) bank switching.
- PAE #
Physical Address Extension
32-bit x86 operating systems use Physical Address Extension (PAE) mode to enable addressing of more than 4 GB of physical memory. In PAE mode, page table entries (PTEs) are 64 bits in size.
- PCID #
Process-context identifiers
These are a facility by which a logical processor may cache information for multiple linear-address spaces so that the processor may retain cached information when software switches to a different linear address space. INVPCID instruction is used for fine-grained TLB flush, which is benefit for kernel.
- PCIe #
Peripheral Component Interconnect Express
PCIe was designed to replace older PCI, PCI-X and AGP bus standards. PCIe has numerous improvements including a higher maximum system bus throughput, a lower I/O pin count and smaller physical footprint. Moreover it also has a more detailed error detection and reporting mechanism (AER), and a native hotplug functionality. It is also backward compatible with PCI.
- PSE and PSE36 #
Page Size Extended
PSE refers to a feature of x86 processors that allows for pages larger than the traditional 4 KiB size. PSE-36 capability offers 4 more bits, in addition to the normal 10 bits, which are used inside a page directory entry pointing to a large page. This allows a large page to be located in 36-bit address space.
- PT #
Page Table
A page table is the data structure used by a virtual memory system in a computer operating system to store the mapping between virtual addresses and physical addresses. Virtual addresses are those unique to the accessing process. Physical addresses are those unique to the hardware (RAM).
- QXL #
QXL is a cirrus VGA framebuffer (8M) driver for virtualized environment.
- RVI or NPT #
Rapid Virtualization Indexing, Nested Page Tables
An AMD second generation hardware-assisted virtualization technology for the processor memory management unit (MMU).
- SATA #
Serial ATA
SATA is a computer bus interface that connects host bus adapters to mass storage devices such as hard disks and optical drives.
- Seccomp2-based sandboxing #
Sandboxed environment where only predetermined system calls are permitted for added protection against malicious behavior.
- SMEP #
Supervisor Mode Execution Protection
This prevents the execution of user-mode pages by the Xen hypervisor, making many application-to-hypervisor exploits much harder.
- SPICE #
Simple Protocol for Independent Computing Environments
- SXP #
An SXP file is a Xen Configuration File.
- TCG #
Tiny Code Generator
Instructions are emulated rather than executed by the CPU.
- THP #
Transparent Huge Pages
This allows CPUs to address memory using pages larger than the default 4 KB. This helps reduce memory consumption and CPU cache usage. KVM is optimized to use THP (via madvise and opportunistic methods) if enabled on the VM Host Server.
- TLB #
Translation Lookaside Buffer
TLB is a cache that memory management hardware uses to improve virtual address translation speed. All current desktop, notebook, and server processors use a TLB to map virtual and physical address spaces, and it is nearly always present in any hardware that uses virtual memory.
- VCPU #
A scheduling entity, containing each state for virtualized CPU.
- VDI #
Virtual Desktop Infrastructure
- VFIO #
Since kernel v3.6; a new method of accessing PCI devices from user space called VFIO.
- VHS #
Virtualization Host Server
- VMCS #
Virtual Machine Control Structure
VMX non-root operation and VMX transitions are controlled by a data structure called a virtual-machine control structure (VMCS). Access to the VMCS is managed through a component of processor state called the VMCS pointer (one per logical processor). The value of the VMCS pointer is the 64-bit address of the VMCS. The VMCS pointer is read and written using the instructions VMPTRST and VMPTRLD. The VMM configures a VMCS using the VMREAD, VMWRITE, and VMCLEAR instructions. A VMM could use a different VMCS for each virtual machine that it supports. For a virtual machine with multiple logical processors (virtual processors), the VMM could use a different VMCS for each virtual processor.
- VMDq #
Virtual Machine Device Queue
Multi-queue network adapters exist which support multiple VMs at the hardware level, having separate packet queues associated to the different hosted VMs (by means of the IP addresses of the VMs).
- VMM #
Virtual Machine Monitor (Hypervisor)
When the processor encounters an instruction or event of interest to the Hypervisor (VMM), it exits from guest mode back to the VMM. The VMM emulates the instruction or other event, at a fraction of native speed, and then returns to guest mode. The transitions from guest mode to the VMM and back again are high-latency operations, during which guest execution is completely stalled.
- VM root #
VMM will run in VMX root operation and guest software will run in VMX non-root operation. Transitions between VMX root operation and VMX non-root operation are called VMX transitions.
- VMX #
Virtual Machine eXtensions
- VPID #
New support for software control of TLB (VPID improves TLB performance with small VMM development effort).
- VT-d #
Virtualization Technology for Directed I/O
- vTPM #
Component to establish end-to-end integrity for guests via Trusted Computing.
Configuring GPU Pass-Through for NVIDIA cards
A.1 Introduction #Edit source
This article describes how to assign an NVIDIA GPU graphics card on the host machine to a virtualized guest.
A.2 Prerequisites #Edit source
GPU pass-through is supported on the AMD64/Intel 64 architecture only.
This article deals with a set of instructions based on V100/T1000 NVIDIA cards, and is meant for GPU computation purposes only.
Verify that you are using an NVIDIA Tesla product—Maxwell, Pascal, or Volta.
To manage the host system, you need an additional display card on the host that you can use when configuring the GPU pass-through, or a functional SSH environment.
A.3 Configuring the host #Edit source
A.3.1 Verify the host environment #Edit source
Verify that the host supports VT-d technology and that it is already enabled in the firmware settings:
>dmesg | grep -e "Directed I/O" [ 12.819760] DMAR: Intel(R) Virtualization Technology for Directed I/OIf VT-d is not enabled in the firmware, enable it and reboot the host.
Verify that the host has an extra GPU or VGA card:
>lspci | grep -i "vga" 07:00.0 VGA compatible controller: Matrox Electronics Systems Ltd. \ MGA G200e [Pilot] ServerEngines (SEP1) (rev 05)With a Tesla V100 card:
>lspci | grep -i nvidia 03:00.0 3D controller: NVIDIA Corporation GV100 [Tesla V100 PCIe] (rev a1)With a T1000 Mobile (available on Dell 5540):
>lspci | grep -i nvidia 01:00.0 3D controller: NVIDIA Corporation TU117GLM [Quadro T1000 Mobile] (rev a1)
A.3.2 Enable IOMMU #Edit source
IOMMU is disabled by default. You
need to enable it at boot time in the
/etc/default/grub configuration file.
For Intel-based hosts:
GRUB_CMDLINE_LINUX="intel_iommu=on iommu=pt rd.driver.pre=vfio-pci"
For AMD-based hosts:
GRUB_CMDLINE_LINUX="iommu=pt amd_iommu=on rd.driver.pre=vfio-pci"
When you save the modified
/etc/default/grubfile, re-generate the main GRUB 2 configuration file/boot/grub2/grub.cfg:>sudogrub2-mkconfig -o /boot/grub2/grub.cfgReboot the host and verify that IOMMU is enabled:
>dmesg | grep -e DMAR -e IOMMU
A.3.3 Blacklist the Nouveau driver #Edit source
To assign the NVIDIA card to a VM guest, we need to prevent the host
OS from loading the built-in nouveau driver for
NVIDIA GPUs. Create the file
/etc/modprobe.d/60-blacklist-nouveau.conf with the
following content:
blacklist nouveau
A.3.4 Configure VFIO and isolate the GPU used for pass-through #Edit source
Find the card vendor and model IDs. Use the bus number identified in Section A.3.1, “Verify the host environment”, for example,
03:00.0:>lspci -nn | grep 03:00.0 03:00.0 3D controller [0302]: NVIDIA Corporation GV100 [Tesla V100 PCIe] [10de:1db4] (rev a1)Create the file
/etc/modprobe.d/vfio.confwith the following content:options vfio-pci ids=10de:1db4
Note
Verify that your card does not need an extra
ids=parameter. For certain cards, you must specify the audio device too, therefore device's ID must also be added to the list, otherwise you cannot use the card.
A.3.5 Load the VFIO driver #Edit source
There are three ways you can load the VFIO driver.
A.3.5.1 Including the driver in the initrd file #Edit source
Create the file
/etc/dracut.conf.d/gpu-passthrough.confand add the following content (mind the leading whitespace):add_drivers+=" vfio vfio_iommu_type1 vfio_pci vfio_virqfd"
Re-generate the initrd file:
>sudodracut --force /boot/initrd $(uname -r)
A.3.5.2 Adding the driver to the list of auto-loaded modules #Edit source
Create the file
/etc/modules-load.d/vfio-pci.conf and add the
following content:
vfio vfio_iommu_type1 vfio_pci kvm kvm_intel
A.3.5.3 Loading the driver manually #Edit source
To load the driver manually at runtime, execute the following command:
>sudomodprobe vfio-pci
A.3.6 Disable MSR for Microsoft Windows guests #Edit source
For Microsoft Windows guests, we recommend disabling MSR (model-specific
register) to avoid the guest crashing. Create the file
/etc/modprobe.d/kvm.conf and add the following
content:
options kvm ignore_msrs=1
A.3.7 Install UEFI firmware #Edit source
For proper GPU pass-through functionality, the host needs to boot using UEFI firmware (that is, not using a legacy-style BIOS boot sequence). Install the qemu-ovmf package if not already installed:
>sudozypper install qemu-ovmf
A.3.8 Reboot the host machine #Edit source
For most of the changes in the above steps to take effect, you need to reboot the host machine:
>sudoshutdown -r now
A.4 Configuring the guest #Edit source
This section describes how to configure the guest virtual machine so that
it can use the host's NVIDIA GPU. Use Virtual Machine Manager or
virt-install to install the guest VM. Find more
details in Chapter 9, Guest installation.
A.4.1 Requirements for the guest configuration #Edit source
During the guest VM installation, select and configure the following devices:
Use Q35 chipset if possible.
Install the guest VM using UEFI firmware.
Add the following emulated devices:
Graphic: Spice or VNC
Device: qxl, VGA or Virtio
Find more information in Section 13.6, “Video”.
Add the host PCI device (
03:00.0in our example) to the guest. Find more information in Section 13.12, “Assigning a host PCI device to a VM Guest”.For the best performance, we recommend using virtio drivers for the network card and storage.
A.4.2 Install the graphic card driver #Edit source
A.4.2.1 Linux guest #Edit source
Procedure A.1: RPM-based distributions #
Download the driver RPM package from http://www.nvidia.com/download/driverResults.aspx/131159/en-us.
Install the downloaded RPM package:
>sudorpm -i nvidia-diag-driver-local-repo-sles123-390.30-1.0-1.x86_64.rpmRefresh repositories and install cuda-drivers. This step is different for non-SUSE distributions:
>sudozypper refresh && zypper install cuda-driversReboot the guest VM:
>sudoshutdown -r now
Procedure A.2: Generic installer #
Because the installer needs to compile the NVIDIA driver modules, install the gcc-c++ and kernel-devel packages.
Disable Secure Boot on the guest, because NVIDIA's driver modules are unsigned. On SUSE distributions, you can use the YaST GRUB 2 module to disable Secure Boot. Find more information in Book “Reference”, Chapter 14 “UEFI (Unified Extensible Firmware Interface)”, Section 14.1.1 “Implementation on openSUSE Leap”.
Download the driver installation script from https://www.nvidia.com/Download/index.aspx?lang=en-us, make it executable and run it to complete the driver installation:
>chmod +x NVIDIA-Linux-x86_64-460.73.01.run>sudo./NVIDIA-Linux-x86_64-460.73.01.runDownload CUDA drivers from https://developer.nvidia.com/cuda-downloads?target_os=Linux&target_arch=x86_64&target_distro=SLES&target_version=15&target_type=rpmlocal and install following the on-screen instructions.
Note: Display issues
After you have installed the NVIDIA drivers, the Virtual Machine Manager display
loses its connection to the guest OS. To access the guest VM, you
must either login via ssh, change to the console
interface, or install a dedicated VNC server in the guest. To avoid
a flickering screen, stop and disable the display manager:
>sudosystemctl stop display-manager && systemctl disable display-manager
Procedure A.3: Testing the Linux driver installation #
Change the directory to the CUDA sample templates:
>cd /usr/local/cuda-9.1/samples/0_Simple/simpleTemplatesCompile and run the
simpleTemplatesfile:>make && ./simpleTemplates runTest<float,32> GPU Device 0: "Tesla V100-PCIE-16GB" with compute capability 7.0 CUDA device [Tesla V100-PCIE-16GB] has 80 Multi-Processors Processing time: 495.006000 (ms) Compare OK runTest<int,64> GPU Device 0: "Tesla V100-PCIE-16GB" with compute capability 7.0 CUDA device [Tesla V100-PCIE-16GB] has 80 Multi-Processors Processing time: 0.203000 (ms) Compare OK [simpleTemplates] -> Test Results: 0 Failures
A.4.2.2 Microsoft Windows guest #Edit source
Important
Before you install the NVIDIA drivers, you need to hide the
hypervisor from the drivers by using the <hidden
state='on'/> directive in the guest's libvirt
definition, for example:
<features> <acpi/> <apic/> <kvm> <hidden state='on'/> </kvm> </features>
Download and install the NVIDIA driver from https://www.nvidia.com/Download/index.aspx.
Download and install the CUDA toolkit from https://developer.nvidia.com/cuda-downloads?target_os=Windows&target_arch=x86_64.
Find several NVIDIA demo samples in the directory
Program Files\Nvidia GPU Computing Toolkit\CUDA\v10.2\extras\demo_suiteon the guest.
B GNU licenses #Edit source
This appendix contains the GNU Free Documentation License version 1.2.
GNU Free Documentation License #Edit source
Copyright (C) 2000, 2001, 2002 Free Software Foundation, Inc. 51 Franklin St, Fifth Floor, Boston, MA 02110-1301 USA. Everyone is permitted to copy and distribute verbatim copies of this license document, but changing it is not allowed.
0. PREAMBLE #Edit source
The purpose of this License is to make a manual, textbook, or other functional and useful document "free" in the sense of freedom: to assure everyone the effective freedom to copy and redistribute it, with or without modifying it, either commercially or non-commercially. Secondarily, this License preserves for the author and publisher a way to get credit for their work, while not being considered responsible for modifications made by others.
This License is a kind of "copyleft", which means that derivative works of the document must themselves be free in the same sense. It complements the GNU General Public License, which is a copyleft license designed for free software.
We have designed this License to use it for manuals for free software, because free software needs free documentation: a free program should come with manuals providing the same freedoms that the software does. But this License is not limited to software manuals; it can be used for any textual work, regardless of subject matter or whether it is published as a printed book. We recommend this License principally for works whose purpose is instruction or reference.
1. APPLICABILITY AND DEFINITIONS #Edit source
This License applies to any manual or other work, in any medium, that contains a notice placed by the copyright holder saying it can be distributed under the terms of this License. Such a notice grants a world-wide, royalty-free license, unlimited in duration, to use that work under the conditions stated herein. The "Document", below, refers to any such manual or work. Any member of the public is a licensee, and is addressed as "you". You accept the license if you copy, modify or distribute the work in a way requiring permission under copyright law.
A "Modified Version" of the Document means any work containing the Document or a portion of it, either copied verbatim, or with modifications and/or translated into another language.
A "Secondary Section" is a named appendix or a front-matter section of the Document that deals exclusively with the relationship of the publishers or authors of the Document to the Document's overall subject (or to related matters) and contains nothing that could fall directly within that overall subject. (Thus, if the Document is in part a textbook of mathematics, a Secondary Section may not explain any mathematics.) The relationship could be a matter of historical connection with the subject or with related matters, or of legal, commercial, philosophical, ethical or political position regarding them.
The "Invariant Sections" are certain Secondary Sections whose titles are designated, as being those of Invariant Sections, in the notice that says that the Document is released under this License. If a section does not fit the above definition of Secondary then it is not allowed to be designated as Invariant. The Document may contain zero Invariant Sections. If the Document does not identify any Invariant Sections then there are none.
The "Cover Texts" are certain short passages of text that are listed, as Front-Cover Texts or Back-Cover Texts, in the notice that says that the Document is released under this License. A Front-Cover Text may be at most 5 words, and a Back-Cover Text may be at most 25 words.
A "Transparent" copy of the Document means a machine-readable copy, represented in a format whose specification is available to the general public, that is suitable for revising the document straightforwardly with generic text editors or (for images composed of pixels) generic paint programs or (for drawings) some widely available drawing editor, and that is suitable for input to text formatters or for automatic translation to a variety of formats suitable for input to text formatters. A copy made in an otherwise Transparent file format whose markup, or absence of markup, has been arranged to thwart or discourage subsequent modification by readers is not Transparent. An image format is not Transparent if used for any substantial amount of text. A copy that is not "Transparent" is called "Opaque".
Examples of suitable formats for Transparent copies include plain ASCII without markup, Texinfo input format, LaTeX input format, SGML or XML using a publicly available DTD, and standard-conforming simple HTML, PostScript or PDF designed for human modification. Examples of transparent image formats include PNG, XCF and JPG. Opaque formats include proprietary formats that can be read and edited only by proprietary word processors, SGML or XML for which the DTD and/or processing tools are not generally available, and the machine-generated HTML, PostScript or PDF produced by some word processors for output purposes only.
The "Title Page" means, for a printed book, the title page itself, plus such following pages as are needed to hold, legibly, the material this License requires to appear in the title page. For works in formats which do not have any title page as such, "Title Page" means the text near the most prominent appearance of the work's title, preceding the beginning of the body of the text.
A section "Entitled XYZ" means a named subunit of the Document whose title either is precisely XYZ or contains XYZ in parentheses following text that translates XYZ in another language. (Here XYZ stands for a specific section name mentioned below, such as "Acknowledgements", "Dedications", "Endorsements", or "History".) To "Preserve the Title" of such a section when you modify the Document means that it remains a section "Entitled XYZ" according to this definition.
The Document may include Warranty Disclaimers next to the notice which states that this License applies to the Document. These Warranty Disclaimers are considered to be included by reference in this License, but only as regards disclaiming warranties: any other implication that these Warranty Disclaimers may have is void and has no effect on the meaning of this License.
2. VERBATIM COPYING #Edit source
You may copy and distribute the Document in any medium, either commercially or non-commercially, provided that this License, the copyright notices, and the license notice saying this License applies to the Document are reproduced in all copies, and that you add no other conditions whatsoever to those of this License. You may not use technical measures to obstruct or control the reading or further copying of the copies you make or distribute. However, you may accept compensation in exchange for copies. If you distribute a large enough number of copies you must also follow the conditions in section 3.
You may also lend copies, under the same conditions stated above, and you may publicly display copies.
3. COPYING IN QUANTITY #Edit source
If you publish printed copies (or copies in media that commonly have printed covers) of the Document, numbering more than 100, and the Document's license notice requires Cover Texts, you must enclose the copies in covers that carry, clearly and legibly, all these Cover Texts: Front-Cover Texts on the front cover, and Back-Cover Texts on the back cover. Both covers must also clearly and legibly identify you as the publisher of these copies. The front cover must present the full title with all words of the title equally prominent and visible. You may add other material on the covers in addition. Copying with changes limited to the covers, as long as they preserve the title of the Document and satisfy these conditions, can be treated as verbatim copying in other respects.
If the required texts for either cover are too voluminous to fit legibly, you should put the first ones listed (as many as fit reasonably) on the actual cover, and continue the rest onto adjacent pages.
If you publish or distribute Opaque copies of the Document numbering more than 100, you must either include a machine-readable Transparent copy along with each Opaque copy, or state in or with each Opaque copy a computer-network location from which the general network-using public has access to download using public-standard network protocols a complete Transparent copy of the Document, free of added material. If you use the latter option, you must take reasonably prudent steps, when you begin distribution of Opaque copies in quantity, to ensure that this Transparent copy will remain thus accessible at the stated location until at least one year after the last time you distribute an Opaque copy (directly or through your agents or retailers) of that edition to the public.
It is requested, but not required, that you contact the authors of the Document well before redistributing any large number of copies, to give them a chance to provide you with an updated version of the Document.
4. MODIFICATIONS #Edit source
You may copy and distribute a Modified Version of the Document under the conditions of sections 2 and 3 above, provided that you release the Modified Version under precisely this License, with the Modified Version filling the role of the Document, thus licensing distribution and modification of the Modified Version to whoever possesses a copy of it. In addition, you must do these things in the Modified Version:
Use in the Title Page (and on the covers, if any) a title distinct from that of the Document, and from those of previous versions (which should, if there were any, be listed in the History section of the Document). You may use the same title as a previous version if the original publisher of that version gives permission.
List on the Title Page, as authors, one or more persons or entities responsible for authorship of the modifications in the Modified Version, together with at least five of the principal authors of the Document (all of its principal authors, if it has fewer than five), unless they release you from this requirement.
State on the Title page the name of the publisher of the Modified Version, as the publisher.
Preserve all the copyright notices of the Document.
Add an appropriate copyright notice for your modifications adjacent to the other copyright notices.
Include, immediately after the copyright notices, a license notice giving the public permission to use the Modified Version under the terms of this License, in the form shown in the Addendum below.
Preserve in that license notice the full lists of Invariant Sections and required Cover Texts given in the Document's license notice.
Include an unaltered copy of this License.
Preserve the section Entitled "History", Preserve its Title, and add to it an item stating at least the title, year, new authors, and publisher of the Modified Version as given on the Title Page. If there is no section Entitled "History" in the Document, create one stating the title, year, authors, and publisher of the Document as given on its Title Page, then add an item describing the Modified Version as stated in the previous sentence.
Preserve the network location, if any, given in the Document for public access to a Transparent copy of the Document, and likewise the network locations given in the Document for previous versions it was based on. These may be placed in the "History" section. You may omit a network location for a work that was published at least four years before the Document itself, or if the original publisher of the version it refers to gives permission.
For any section Entitled "Acknowledgements" or "Dedications", Preserve the Title of the section, and preserve in the section all the substance and tone of each of the contributor acknowledgements and/or dedications given therein.
Preserve all the Invariant Sections of the Document, unaltered in their text and in their titles. Section numbers or the equivalent are not considered part of the section titles.
Delete any section Entitled "Endorsements". Such a section may not be included in the Modified Version.
Do not retitle any existing section to be Entitled "Endorsements" or to conflict in title with any Invariant Section.
Preserve any Warranty Disclaimers.
If the Modified Version includes new front-matter sections or appendices that qualify as Secondary Sections and contain no material copied from the Document, you may at your option designate some or all of these sections as invariant. To do this, add their titles to the list of Invariant Sections in the Modified Version's license notice. These titles must be distinct from any other section titles.
You may add a section Entitled "Endorsements", provided it contains nothing but endorsements of your Modified Version by various parties--for example, statements of peer review or that the text has been approved by an organization as the authoritative definition of a standard.
You may add a passage of up to five words as a Front-Cover Text, and a passage of up to 25 words as a Back-Cover Text, to the end of the list of Cover Texts in the Modified Version. Only one passage of Front-Cover Text and one of Back-Cover Text may be added by (or through arrangements made by) any one entity. If the Document already includes a cover text for the same cover, previously added by you or by arrangement made by the same entity you are acting on behalf of, you may not add another; but you may replace the old one, on explicit permission from the previous publisher that added the old one.
The author(s) and publisher(s) of the Document do not by this License give permission to use their names for publicity for or to assert or imply endorsement of any Modified Version.
5. COMBINING DOCUMENTS #Edit source
You may combine the Document with other documents released under this License, under the terms defined in section 4 above for modified versions, provided that you include in the combination all of the Invariant Sections of all of the original documents, unmodified, and list them all as Invariant Sections of your combined work in its license notice, and that you preserve all their Warranty Disclaimers.
The combined work need only contain one copy of this License, and multiple identical Invariant Sections may be replaced with a single copy. If there are multiple Invariant Sections with the same name but different contents, make the title of each such section unique by adding at the end of it, in parentheses, the name of the original author or publisher of that section if known, or else a unique number. Make the same adjustment to the section titles in the list of Invariant Sections in the license notice of the combined work.
In the combination, you must combine any sections Entitled "History" in the various original documents, forming one section Entitled "History"; likewise combine any sections Entitled "Acknowledgements", and any sections Entitled "Dedications". You must delete all sections Entitled "Endorsements".
6. COLLECTIONS OF DOCUMENTS #Edit source
You may make a collection consisting of the Document and other documents released under this License, and replace the individual copies of this License in the various documents with a single copy that is included in the collection, provided that you follow the rules of this License for verbatim copying of each of the documents in all other respects.
You may extract a single document from such a collection, and distribute it individually under this License, provided you insert a copy of this License into the extracted document, and follow this License in all other respects regarding verbatim copying of that document.
7. AGGREGATION WITH INDEPENDENT WORKS #Edit source
A compilation of the Document or its derivatives with other separate and independent documents or works, in or on a volume of a storage or distribution medium, is called an "aggregate" if the copyright resulting from the compilation is not used to limit the legal rights of the compilation's users beyond what the individual works permit. When the Document is included in an aggregate, this License does not apply to the other works in the aggregate which are not themselves derivative works of the Document.
If the Cover Text requirement of section 3 is applicable to these copies of the Document, then if the Document is less than one half of the entire aggregate, the Document's Cover Texts may be placed on covers that bracket the Document within the aggregate, or the electronic equivalent of covers if the Document is in electronic form. Otherwise they must appear on printed covers that bracket the whole aggregate.
8. TRANSLATION #Edit source
Translation is considered a kind of modification, so you may distribute translations of the Document under the terms of section 4. Replacing Invariant Sections with translations requires special permission from their copyright holders, but you may include translations of some or all Invariant Sections in addition to the original versions of these Invariant Sections. You may include a translation of this License, and all the license notices in the Document, and any Warranty Disclaimers, provided that you also include the original English version of this License and the original versions of those notices and disclaimers. In case of a disagreement between the translation and the original version of this License or a notice or disclaimer, the original version will prevail.
If a section in the Document is Entitled "Acknowledgements", "Dedications", or "History", the requirement (section 4) to Preserve its Title (section 1) will typically require changing the actual title.
9. TERMINATION #Edit source
You may not copy, modify, sublicense, or distribute the Document except as expressly provided for under this License. Any other attempt to copy, modify, sublicense or distribute the Document is void, and will automatically terminate your rights under this License. However, parties who have received copies, or rights, from you under this License will not have their licenses terminated so long as such parties remain in full compliance.
10. FUTURE REVISIONS OF THIS LICENSE #Edit source
The Free Software Foundation may publish new, revised versions of the GNU Free Documentation License from time to time. Such new versions will be similar in spirit to the present version, but may differ in detail to address new problems or concerns. See http://www.gnu.org/copyleft/.
Each version of the License is given a distinguishing version number. If the Document specifies that a particular numbered version of this License "or any later version" applies to it, you have the option of following the terms and conditions either of that specified version or of any later version that has been published (not as a draft) by the Free Software Foundation. If the Document does not specify a version number of this License, you may choose any version ever published (not as a draft) by the Free Software Foundation.
ADDENDUM: How to use this License for your documents #Edit source
Copyright (c) YEAR YOUR NAME. Permission is granted to copy, distribute and/or modify this document under the terms of the GNU Free Documentation License, Version 1.2 or any later version published by the Free Software Foundation; with no Invariant Sections, no Front-Cover Texts, and no Back-Cover Texts. A copy of the license is included in the section entitled “GNU Free Documentation License”.
If you have Invariant Sections, Front-Cover Texts and Back-Cover Texts, replace the “with...Texts.” line with this:
with the Invariant Sections being LIST THEIR TITLES, with the Front-Cover Texts being LIST, and with the Back-Cover Texts being LIST.
If you have Invariant Sections without Cover Texts, or some other combination of the three, merge those two alternatives to suit the situation.
If your document contains nontrivial examples of program code, we recommend releasing these examples in parallel under your choice of free software license, such as the GNU General Public License, to permit their use in free software.