2 Installation with YaST
Abstract#
Install your openSUSE® Leap system with YaST, the central tool for installation and configuration of your system. YaST guides you through the installation process of your system. If you are a first-time user of openSUSE Leap, you might want to follow the default YaST proposals in most parts, but you can also adjust the settings as described here to fine-tune your system according to your preferences. Help for each installation step is provided by clicking .
During the installation process, YaST analyzes both your current system settings and your hardware components. Based on this analysis your system will be set up with a basic configuration including networking (provided the system could be configured using DHCP). To fine-tune the system after the installation has finished, start YaST from the installed system.
- 2.1 Choosing the Installation Method
- 2.2 System Start-up for Installation
- 2.3 Steps of the Installation
- 2.4 Installer Self-Update
- 2.5 Language, Keyboard and License Agreement
- 2.6 Network Settings
- 2.7 Suggested Partitioning
- 2.8 Clock and Time Zone
- 2.9 User Interface
- 2.10 Create New User
- 2.11 Password for the System Administrator
root - 2.12 Installation Settings
- 2.13 Performing the Installation
2.1 Choosing the Installation Method #
After having selected the installation medium, determine the suitable installation method and boot option that best matches your needs:
- Installing from the openSUSE Leap Media (DVD, USB)
Choose this option if you want to perform a stand-alone installation and do not want to rely on a network to provide the installation data or the boot infrastructure. The installation proceeds exactly as outlined in Section 2.3, “Steps of the Installation”.
- Installing from a Network Server
Choose this option if you have an installation server available in your network or want to use an external server as the source of your installation data. This setup can be configured to boot from physical media (flash disk, CD/DVD, or hard disk) or configured to boot via network using PXE/BOOTP. Refer to Section 2.2, “System Start-up for Installation” for details.
The installation program configures the network connection with DHCP and retrieves the location of the network installation source from the OpenSLP server. If no DHCP is available, choose › › and enter the network data. On EFI systems modify the network boot parameters as described in Section 2.2.1.2, “The Boot Screen on Machines Equipped with UEFI”.
Installing from an SLP Server. If your network setup supports OpenSLP and your network installation source has been configured to announce itself via SLP, boot the system, press F4 in the boot screen and select from the menu. On EFI systems set the
installparameter toinstall=slp:/as described in Section 2.2.1.2, “The Boot Screen on Machines Equipped with UEFI”.Installing from a Network Source without SLP. If your network setup does not support OpenSLP for the retrieval of network installation sources, boot the system and press F4 in the boot screen to select the desired network protocol (NFS, HTTP, FTP, or SMB/CIFS) and provide the server's address and the path to the installation media. On EFI systems modify the boot parameter
install=as described in Section 2.2.1.2, “The Boot Screen on Machines Equipped with UEFI”.
2.2 System Start-up for Installation #
The way the system is started for the installation depends on the architecture—system start-up is different for PC (AMD64/Intel 64) or mainframe, for example. If you install openSUSE Leap as a VM Guest on a KVM or Xen hypervisor, follow the instructions for the AMD64/Intel 64 architecture.
2.2.1 PC (AMD64/Intel 64/ARM AArch64): System Start-up #
openSUSE Leap supports several boot options from which you can choose, depending on the hardware available and on the installation scenario you prefer. Booting from the openSUSE Leap media is the most straightforward option, but special requirements might call for special setups:
Table 2.1: Boot Options #
|
Boot Option |
Description |
|---|---|
|
DVD |
This is the easiest boot option. This option can be used if the system has a local DVD-ROM drive that is supported by Linux. |
|
Flash Disks (USB Mass Storage Device) |
In case your machine is not equipped with an optical drive, you can
boot the installation image from a flash disk. To create a bootable
flash disk, you need to copy either the DVD or the Mini CD ISO image
to the device using the dd if=PATH_TO_ISO_IMAGE of=USB_STORAGE_DEVICE bs=4M Important: CompatibilityNote that booting from a USB Mass Storage Device is not supported on UEFI machines and on the POWER architecture. |
|
PXE or BOOTP |
Booting over the network must be supported by the system's BIOS or firmware, and a boot server must be available in the network. This task can also be handled by another openSUSE Leap system. |
|
Hard Disk |
openSUSE Leap installation can also be booted from the hard disk. To
do this, copy the kernel ( |
Tip: Booting from DVD on UEFI Machines
DVD1 can be used as a boot medium for machines equipped with UEFI (Unified Extensible Firmware Interface). Refer to your vendor's documentation for specific information. If booting fails, try to enable CSM (Compatibility Support Module) in your firmware.
2.2.1.1 The Boot Screen on Machines Equipped with Traditional BIOS #
The boot screen displays several options for the installation procedure. boots the installed system and is selected by default, because the CD is often left in the drive. Select one of the other options with the arrow keys and press Enter to boot it. The relevant options are:
The normal installation mode. All modern hardware functions are enabled. In case the installation fails, see F5 for boot options that disable potentially problematic functions.
Perform a system upgrade. For more information refer to Chapter 12, Upgrading the System and System Changes.
Starts a minimal Linux system without a graphical user interface. For more information, see Section 16.6.2, “Using the Rescue System”.
This option is only available when you install from media created from downloaded ISOs. In this case it is recommended to check the integrity of the installation medium. This option starts the installation system before automatically checking the media. In case the check was successful, the normal installation routine starts. If a corrupt media is detected, the installation routine aborts.

Warning: Failure of Media Check
If the media check fails, your medium is damaged. Do not continue the installation because installation may fail or you may lose your data. Replace the broken medium and restart the installation process.
Tests your system RAM using repeated read and write cycles. Terminate the test by rebooting. For more information, see Section 16.2.4, “Fails to Boot”.
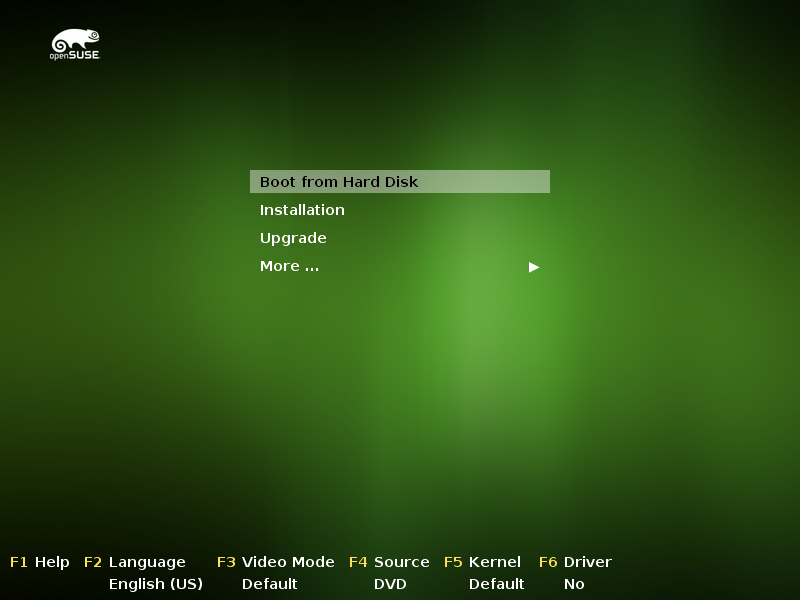
Figure 2.1: The Boot Screen on Machines with a Traditional BIOS #
Use the function keys indicated in the bar at the bottom of the screen to change the language, screen resolution, installation source or to add an additional driver from your hardware vendor:
- F1
Get context-sensitive help for the active element of the boot screen. Use the arrow keys to navigate, Enter to follow a link, and Esc to leave the help screen.
- F2
Select the display language and a corresponding keyboard layout for the installation. The default language is English (US).
- F3
Select various graphical display modes for the installation. By the video resolution is automatically determined using KMS (“Kernel Mode Setting”). If this setting does not work on your system, choose and, optionally, specify
vga=askon the boot command line to get prompted for the video resolution. Choose if the graphical installation causes problems.- F4
Normally, the installation is performed from the inserted installation medium. Here, select other sources, like FTP or NFS servers. If the installation is deployed on a network with an SLP server, select an installation source available on the server with this option.
- F5
If you encounter problems with the regular installation, this menu offers to disable a few potentially problematic functions. If your hardware does not support ACPI (advanced configuration and power interface) select to install without ACPI support. disables support for APIC (Advanced Programmable Interrupt Controllers) which may cause problems with some hardware. boots the system with the DMA mode (for CD/DVD-ROM drives) and power management functions disabled.
If you are not sure, try the following options first: or . Experts can also use the command line () to enter or change kernel parameters.
- F6
Press this key to notify the system that you have an optional driver update for openSUSE Leap. With or , load drivers directly before the installation starts. If you select , you are prompted to insert the update disk at the appropriate point in the installation process.
2.2.1.2 The Boot Screen on Machines Equipped with UEFI #
UEFI (Unified Extensible Firmware Interface) is a new industry standard which replaces and extends the traditional BIOS. The latest UEFI implementations contain the “Secure Boot” extension, which prevents booting malicious code by only allowing signed boot loaders to be executed. See Book “Reference”, Chapter 14 “UEFI (Unified Extensible Firmware Interface)” for more information.
The boot manager GRUB 2, used to boot machines with a traditional BIOS,
does not support UEFI, therefore GRUB 2 is replaced with GRUB 2 for EFI. If
Secure Boot is enabled, YaST will automatically select GRUB 2 for EFI for
installation. From an administrative and user perspective, both
boot manager implementations behave the same and are called
GRUB 2 in the following.
Tip: UEFI and Secure Boot are Supported by Default
The installation routine of openSUSE Leap automatically detects if the machine is equipped with UEFI. All installation sources also support Secure Boot. If an EFI system partition already exists on dual boot machines (from a Microsoft Windows 8 installation, for example), it will automatically be detected and used. Partition tables will be written as GPT on UEFI systems.
Warning: Using Non-Inbox Drivers with Secure Boot
There is no support for adding non-inbox drivers (that is, drivers that do not come with SLE) during installation with Secure Boot enabled. The signing key used for SolidDriver/PLDP is not trusted by default.
To solve this problem, it is necessary to either add the needed keys to the firmware database via firmware/system management tools before the installation or to use a bootable ISO that will enroll the needed keys in the MOK list at first boot. For more information, see Book “Reference”, Chapter 14 “UEFI (Unified Extensible Firmware Interface)”, Section 14.1 “Secure Boot”.
The boot screen displays several options for the installation procedure. Change the selected option with the arrow keys and press Enter to boot it. The relevant options are:
The normal installation mode.
Perform a system upgrade.
Starts a minimal Linux system without a graphical user interface. For more information, see Section 16.6.2, “Using the Rescue System”.
This option is only available when you install from media created from downloaded ISOs. In this case it is recommended to check the integrity of the installation medium. This option starts the installation system before automatically checking the media. In case the check was successful, the normal installation routine starts. If a corrupt media is detected, the installation routine aborts.
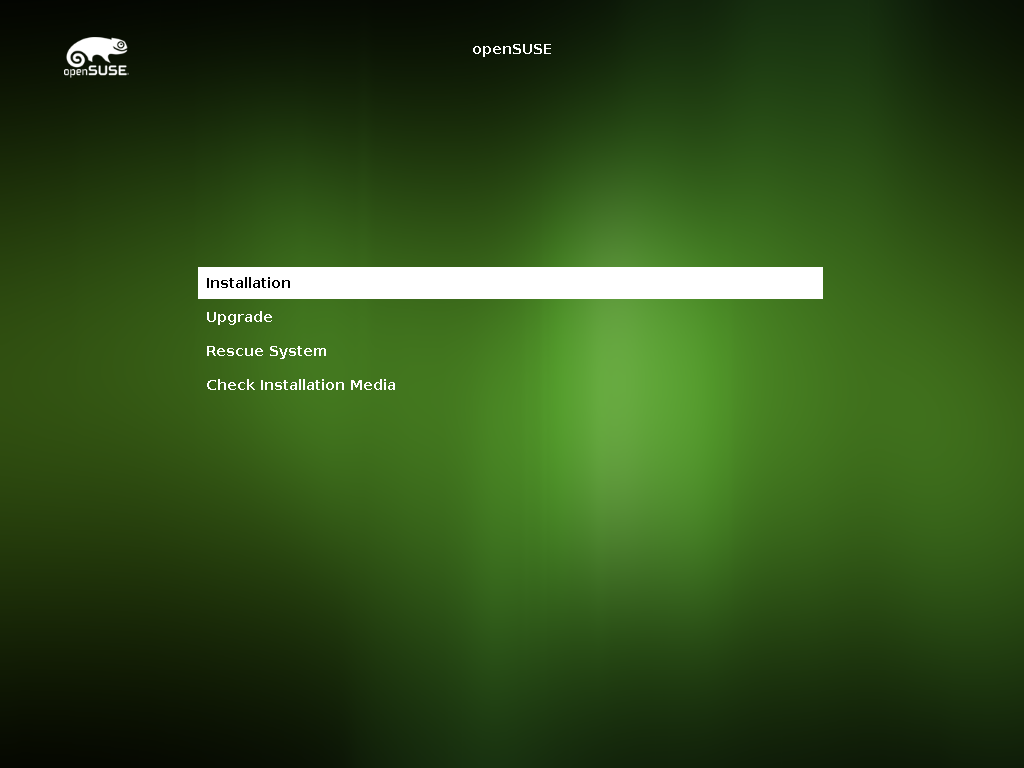
Figure 2.2: The Boot Screen on Machines with UEFI #
GRUB 2 for EFI on openSUSE Leap does not support a boot prompt or function keys for adding boot parameters. By default, the installation will be started with American English and the boot media as the installation source. A DHCP lookup will be performed to configure the network. To change these defaults or to add additional boot parameters you need to edit the respective boot entry. Highlight it using the arrow keys and press E. See the on-screen help for editing hints (note that only an English keyboard is available now). The entry will look similar to the following:
setparams 'Installation'

    set gfxpayload=keep
    echo 'Loading kernel ...'
    linuxefi /boot/x86_64/loader/linux splash=silent
    echo 'Loading initial ramdisk ...'
    initrdefi /boot/x86_64/loader/initrd
Add space-separated parameters to the end of the line starting with
linuxefi. To boot the edited entry, press
F10. If you access the machine via serial console, press
Esc–0. A
complete list of parameters is available at
http://en.opensuse.org/Linuxrc. The most important
ones are:
Table 2.2: Installation Sources #
|
CD/DVD (default) |
|
|
Hard disk |
|
|
SLP |
|
|
FTP |
|
|
HTTP |
|
|
NFS |
|
|
SMB / CIFS |
|
Table 2.3: Network Configuration #
|
DHCP (default) |
netsetup=dhcp |
|
Prompt for Parameters |
|
|
Host IP address |
|
|
Netmask |
|
|
Gateway |
|
|
Name Server |
|
|
Domain Search Path |
|
Table 2.4: Miscellaneous #
|
Driver Updates: Prompt |
|
|
Driver Updates: URL |
|
|
Installation Language |
Supported values for LANGUAGE are, among
others, |
|
Kernel: No ACPI |
|
|
Kernel: No Local APIC |
|
|
Video: Disable KMS |
|
|
Video: Start Installer in Text Mode |
|
2.2.2 Boot Parameters for Advanced Setups #
In case you want to configure access to a local SMT or
supportconfig server for the installation, you can
specify boot parameters that will be parsed by the installation routine to
set up these services. The same is also true if you need IPv6 support
during the installation.
2.2.2.1 Using IPv6 During the Installation #
By default you can only assign IPv4 network addresses to your machine. To enable IPv6 during installation, enter one of the following parameters at the boot prompt:
- Accept IPv4 and IPv6
ipv6=1
- Accept IPv6 only
ipv6only=1
2.2.2.2 Using a Proxy During the Installation #
In networks enforcing the usage of a proxy server for accessing remote Web sites, registration during installation is only possible when configuring a proxy server.
To use a proxy during the installation, press F4 on the
boot screen and set the required parameters in the dialog. Alternatively provide the kernel parameter
proxy at the boot prompt:
l>proxy=http://USER:PASSWORD@proxy.example.com:PORT
Specifying USER and
PASSWORD is optional—if the server allows
anonymous access, the following data is sufficient:
http://proxy.example.com:PORT.
2.2.2.3 Enabling SELinux Support #
Enabling SELinux upon installation start-up enables you to configure it after the installation has been finished without having to reboot. Use the following parameters:
security=selinux selinux=1
2.2.2.4 Enabling the Installer Self-Update #
During installation and upgrade, YaST can update itself as described
in Section 2.4, “Installer Self-Update” to solve potential bugs
discovered after release. The self_update parameter can
be used to modify the behavior of this feature.
To enable the installer self-update, set the parameter to
1:
self_update=1
To use a user-defined repository, specify a URL:
self_update=https://updates.example.com/
2.3 Steps of the Installation #
The interactive installation of openSUSE Leap split into several steps is listed below. For more information about performing non-interactive automated installations, see Book “AutoYaST”.
After starting the installation, openSUSE Leap loads and configures a minimal Linux system to run the installation procedure. To view the boot messages and copyright notices during this process, press Esc. On completion of this process, the YaST installation program starts and displays the graphical installer.
Tip: Installation Without a Mouse
If the installer does not detect your mouse correctly, use →| for navigation, arrow keys to scroll, and Enter to confirm a selection. Various buttons or selection fields contain a letter with an underscore. Use Alt–Letter to select a button or a selection directly instead of navigating there with →|.
2.4 Installer Self-Update #
During the installation and upgrade process, YaST is able to update itself
to solve bugs in the installer that were discovered after the release.
This functionality is disabled by default; to enable it, set the
boot parameter self_update to 1.
For more information, see
Section 2.2.2.4, “Enabling the Installer Self-Update”.
Although this feature was designed to run without user intervention, it is worth knowing how it works. If you are not interested, you can jump directly to Section 2.5, “Language, Keyboard and License Agreement” and skip the rest of this section.
Tip: Language Selection
The installer self-update is executed before the language selection step. This means that progress and errors which happen during this process are displayed in English by default.
To use another language for this part of the installer, press
F2 in the DVD boot menu and select the language from the
list. Alternatively, use the language boot parameter
(for example, language=de_DE).
2.4.1 Self-Update Process #
The process can be broken down into two different parts:
Determine the update repository location.
Download and apply the updates to the installation system.
2.4.1.1 Determining the Update Repository Location #
Installer Self-Updates are distributed as regular RPM packages via a dedicated repository, so the first step is to find out the repository URL.
Important: Installer Self-Update Repository Only
No matter which of the following options you use, only the installer self-update repository URL is expected, for example:
self_update=https://updates.suse.com/SUSE/Updates/SLE-SERVER-INSTALLER/12-SP2/x86_64/update/
Do not supply any other repository URL—for example the URL of the software update repository.
YaST will try the following sources of information:
The
self_updateboot parameter. (For more details, see Section 2.2.2.4, “Enabling the Installer Self-Update”.) If you specify a URL, it will take precedence over any other method.The
/general/self_update_urlprofile element in case you are using AutoYaST.If none of the previous attempts worked, the fallback URL (defined in the installation media) will be used.
2.4.1.2 Downloading and Applying the Updates #
When the updates repository is determined, YaST will check whether an update is available. If so, all the updates will be downloaded and applied to the installation system.
Finally, YaST will be restarted to load the new version and the welcome screen will be shown. If no updates were available, the installation will continue without restarting YaST.
Note: Update Integrity
Update signatures will be checked to ensure integrity and authorship. If a signature is missing or invalid, you will be asked whether you want to apply the update.
2.4.2 Networking during Self-Update #
To download installer updates, YaST needs network access. By default, it tries to use DHCP on all network interfaces. If there is a DHCP server in the network, it will work automatically.
If you need a static IP setup, you can use the ifcfg
boot argument. For more details, see the linuxrc documentation at
https://en.opensuse.org/Linuxrc.
2.4.3 Custom Self-Update Repositories #
YaST can use a user-defined repository instead of the official one by
specifying a URL through the self_update boot option.
However, the following points should be considered:
Only HTTP/HTTPS and FTP repositories are supported.
Only RPM-MD repositories are supported (required by SMT).
Packages are not installed in the usual way: They are uncompressed only and no scripts are executed.
No dependency checks are performed. Packages are installed in alphabetical order.
Files from the packages override the files from the original installation media. This means that the update packages might not need to contain all files, only files that have changed. Unchanged files are omitted to save memory and download bandwidth.
Note: Only One Repository
Currently, it is not possible to use more than one repository as source for installer self-updates.
2.5 Language, Keyboard and License Agreement #
Start the installation of openSUSE Leap by choosing your language. Changing the language will automatically preselect a corresponding keyboard layout. Override this proposal by selecting a different keyboard layout from the drop-down box. The language selected here is also used to assume a time zone for the system clock. This setting can be modified later in the installed system as described in Chapter 4, Changing Language and Country Settings with YaST.
Read the license agreement that is displayed beneath the language and keyboard selection thoroughly. Use to access translations. By proceeding with , you agree to the license agreement. Choose to cancel the installation if you do not agree to the license terms.
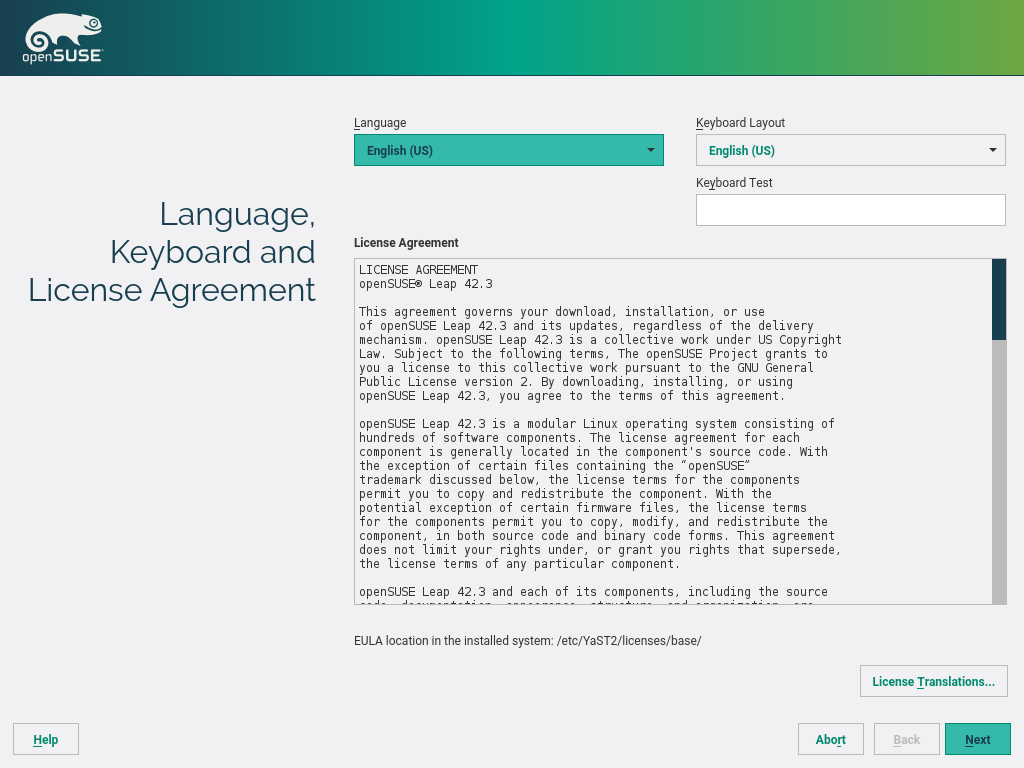
Figure 2.3: Language, Keyboard and License Agreement #
2.6 Network Settings #
After booting into the installation, the installation routine is set up. During this setup, an attempt to configure at least one network interface with DHCP is made. In case this attempt fails, the dialog launches. Choose a network interface from the list and click to change its settings. Use the tabs to configure DNS and routing. See Book “Reference”, Chapter 13 “Basic Networking”, Section 13.4 “Configuring a Network Connection with YaST” for more details.
Note: Network Interface Configured via linuxrc
If at least one network interface is configured via linuxrc, automatic DHCP configuration is disabled and configuration from linuxrc is imported and used.
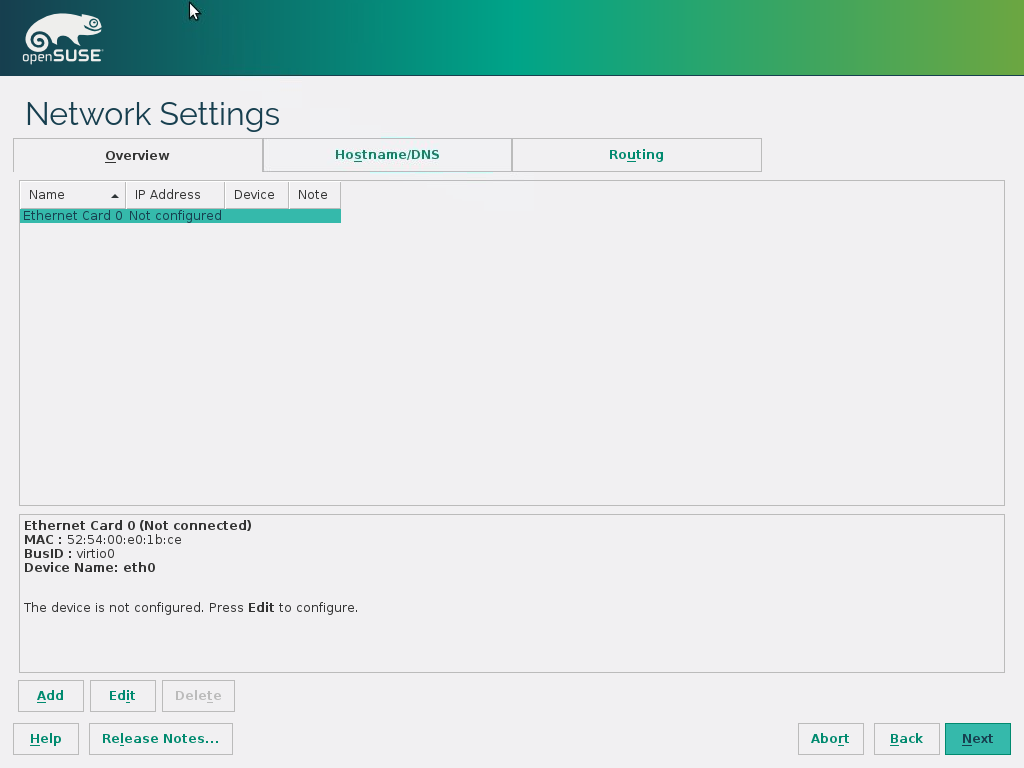
Figure 2.4: Network Settings #
Tip: Accessing Network Storage or Local RAID
In case you need to access a SAN or a local RAID during the installation, you can use the libstorage command line client for this purpose:
Switch to a console with Ctrl–Alt–F2.
Install the libstoragemgmt extension by running
extend libstoragemgmt.Now you have access to the
lsmclicommand. For more information, runlsmcli --help.To return to the installer, press Alt–F7
Supported are Netapp Ontap, all SMI-S compatible SAN providers, and LSI MegaRAID.
2.7 Suggested Partitioning #
Define a partition setup for openSUSE Leap in this step. The installer creates a proposal for one of the available disks containing a root partition formatted with Btrfs, a swap partition, and a home partition formatted with XFS. On hard disks smaller than 20 GB the proposal does not include a separate home partition. If one or more swap partitions have been detected on the available hard disks, these existing ones will be used (rather than proposing a new swap partition). You have several options to proceed:
To accept the proposal without any changes, click to proceed with the installation workflow.
To adjust the proposal choose . The pop-up dialog lets you switch to an or an . You may also adjust file systems for the proposed partitions, create a separate home partition, and enlarge the swap partition (to enable suspend to disk, for example).
If the root file system format is Btrfs, you can also enable Btrfs snapshots here.
Use this option to move the proposal described above to a different disk. Select a specific disk from the list. If the chosen hard disk does not contain any partitions yet, the whole hard disk will be used for the proposal. Otherwise, you can choose which existing partition(s) to use. lets you fine-tune the proposal.
To create a custom partition setup choose . The Expert Partitioner opens, displaying the current partition setup for all hard disks, including the proposal suggested by the installer. You can , , , or partitions.
You can also set up Logical Volumes (LVM), configure software RAID and device mapping (DM), encrypt Partitions, mount NFS shares and manage tmpfs volumes with the Expert Partitioner. To fine-tune settings such as the subvolume and snapshot handling for each Btrfs partition, choose . For more information about custom partitioning and configuring advanced features, refer to Book “Reference”, Chapter 5 “Advanced Disk Setup”, Section 5.1 “Using the YaST Partitioner”.
Warning: Custom Partitioning on UEFI Machines
A UEFI machine requires an EFI system partition that must be mounted to
/boot/efi. This partition must be formatted with theFATfile system.If an EFI system partition is already present on your system (for example from a previous Windows installation) use it by mounting it to
/boot/efiwithout formatting it.Warning: Custom Partitioning and Snapper
openSUSE Leap can be configured to support snapshots which provide the ability to do rollbacks of system changes. openSUSE Leap uses Snapper in conjunction with Btrfs for this feature. Btrfs needs to be set up with snapshots enabled for the root partition. Refer to Book “Reference”, Chapter 3 “System Recovery and Snapshot Management with Snapper” for details on Snapper.
Being able to create system snapshots that enable rollbacks requires most of the system directories to be mounted on a single partition. Refer to Book “Reference”, Chapter 3 “System Recovery and Snapshot Management with Snapper”, Section 3.1 “Default Setup” for more information. This also includes
/usrand/var. Only directories that are excluded from snapshots (see Book “Reference”, Chapter 3 “System Recovery and Snapshot Management with Snapper”, Section 3.1.2 “Directories That Are Excluded from Snapshots” for a list) may reside on separate partitions. Among others, this list includes/usr/local,/var/log, and/tmp.If you do not plan to use Snapper for system rollbacks, the partitioning restrictions mentioned above do not apply.

Important: Btrfs on an Encrypted Root Partition
The default partitioning setup suggests the root partition as Btrfs with
/bootbeing a directory. If you need to have the root partition encrypted in this setup, make sure to use the GPT partition table type instead of the default MSDOS type. Otherwise the GRUB2 boot loader may not have enough space for the second stage loader.
Note: Supported Software RAID Volumes
Installing to and booting from existing software RAID volumes is supported for Disk Data Format (DDF) volumes and Intel Matrix Storage Manager (IMSM) volumes. IMSM is also known by the following names:
Intel Rapid Storage Technology
Intel Matrix Storage Technology
Intel Application Accelerator / Intel Application Accelerator RAID Edition
Note: Mount Points for FCoE and iSCSI Devices
FCoE and iSCSI devices will appear asynchronously during the
boot process. While the initrd guarantees that those devices are
set up correctly for the root file system, there are no such
guarantees for any other file systems or mount points like
/usr. Hence any system mount points like
/usr or /var are not
supported. If you want to use those devices, ensure correct
synchronization of the respective services and devices.
Important: Handling of Windows Partitions in Proposals
In case the disk selected for the suggested partitioning proposal contains a large Windows FAT or NTFS partition, it will automatically be resized to make room for the openSUSE Leap installation. To avoid data loss it is strongly recommended to
make sure the partition is not fragmented (run a defragmentation program from Windows prior to the openSUSE Leap installation)
double-check the suggested size for the Windows partition is big enough
back up your data prior to the openSUSE Leap installation
To adjust the proposed size of the Windows partition, use the .
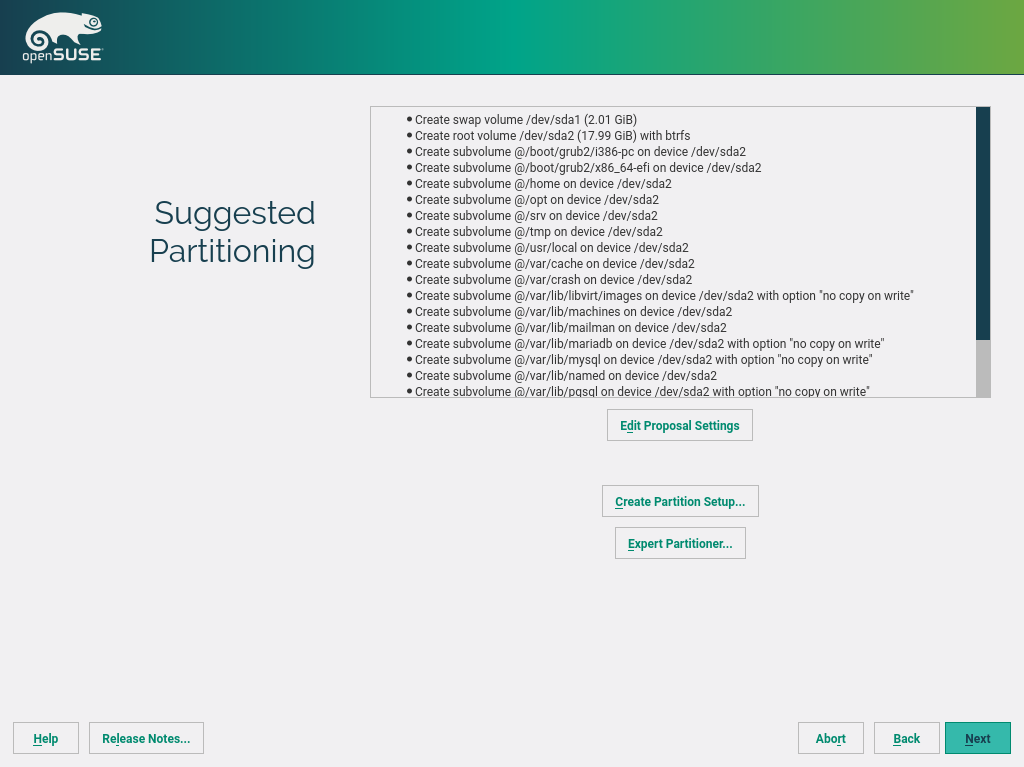
Figure 2.5: Partitioning #
2.8 Clock and Time Zone #
In this dialog, select your region and time zone. Both are preselected according to the installation language. To change the preselected values, either use the map or the drop-down boxes for and . When using the map, point the cursor at the rough direction of your region and left-click to zoom. Now choose your country or region by left-clicking. Right-click to return to the world map.
To set up the clock, choose whether the . If you run another operating system on your machine, such as Microsoft Windows, it is likely your system uses local time instead. If you only run Linux on your machine, set the hardware clock to UTC and have the switch from standard time to daylight saving time performed automatically.
Important: Set the Hardware Clock to UTC
The switch from standard time to daylight saving time (and vice versa) can only be performed automatically when the hardware clock (CMOS clock) is set to UTC. This also applies if you use automatic time synchronization with NTP, because automatic synchronization will only be performed if the time difference between the hardware and system clock is less than 15 minutes.
Since a wrong system time can cause severe problems (missed backups, dropped mail messages, mount failures on remote file systems, etc.) it is strongly recommended to always set the hardware clock to UTC.
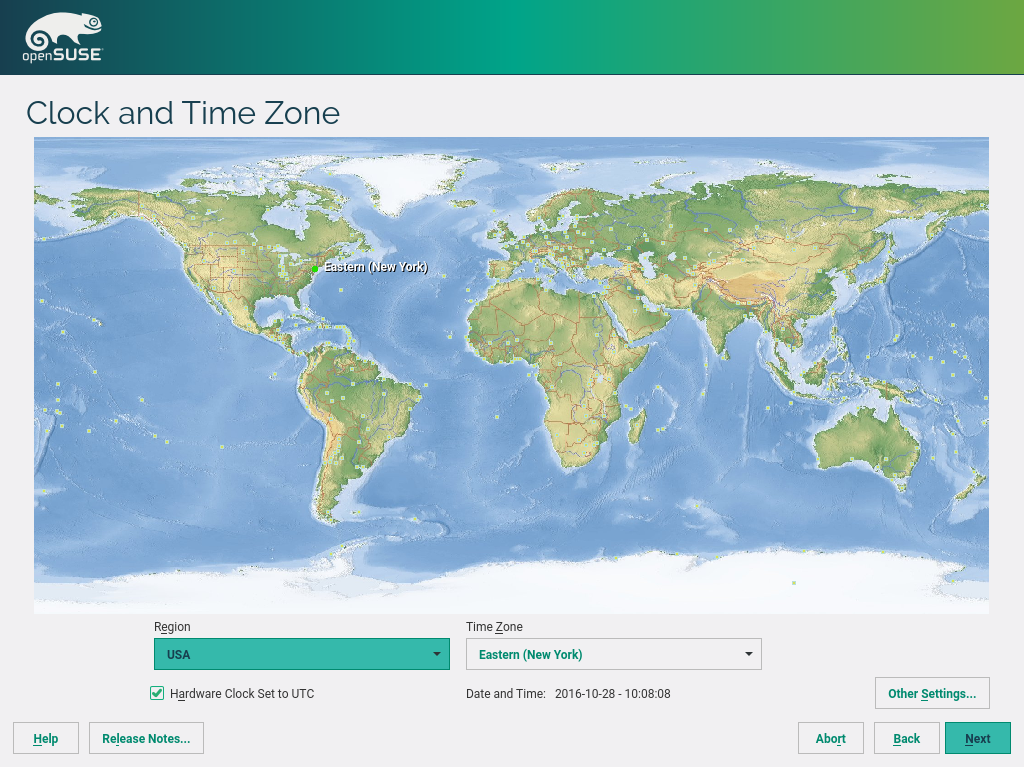
Figure 2.6: Clock and Time Zone #
If a network is already configured, you can configure time synchronization with an NTP server. Click to either alter the NTP settings or to set the time. See Book “Reference”, Chapter 18 “Time Synchronization with NTP” for more information on configuring the NTP service. When finished, click to continue the installation.
If running without NTP configured, consider setting
SYSTOHC=no (sysconfig variable) to
avoid saving unsynchronized time into the hardware clock.
2.9 User Interface #
Select the desktop system you would like to use in the dialog. and are among the most widely used desktops on Linux.
If setting up a server, you probably do not need a graphical user interface. Choose in this case.
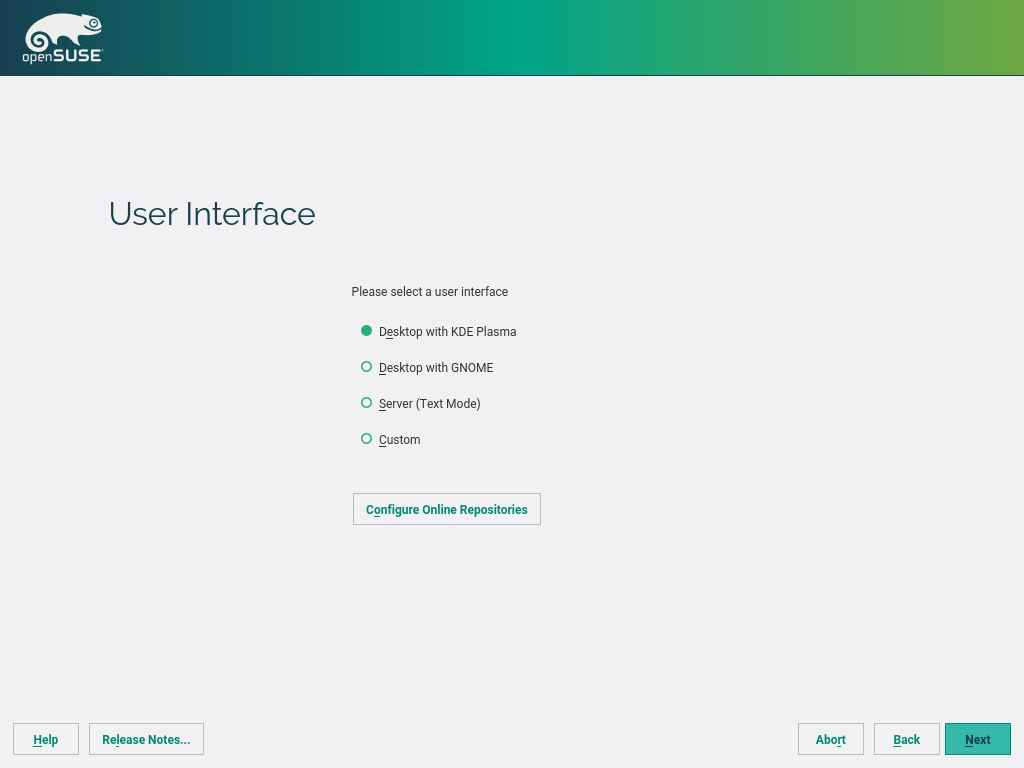
More desktop systems, such as XFCE, LXDE, MATE, and Enlightenment are available after having enabled the online repositories. Doing so is also recommended if you want to get the latest security updates and fixes during the installation. A working Internet connection is required. To install a user interface, choose . You have the following choices:
The contains open source software (OSS). Compared to the DVD installation media, it contains many additional software packages, among them the above mentioned desktop systems. Choose this repository to install them.
The contains security updates and fixes for packages from the and the DVD installation media. Choosing this repository is recommended for all installation scenarios.
The contains packages with a proprietary software license. Choosing it is not required for installing a custom desktop system.
Choosing is recommended when also having chosen the . It contains the respective updates and security fixes.
All other repositories are intended for experienced users and developers. Click on a repository name to get more information.
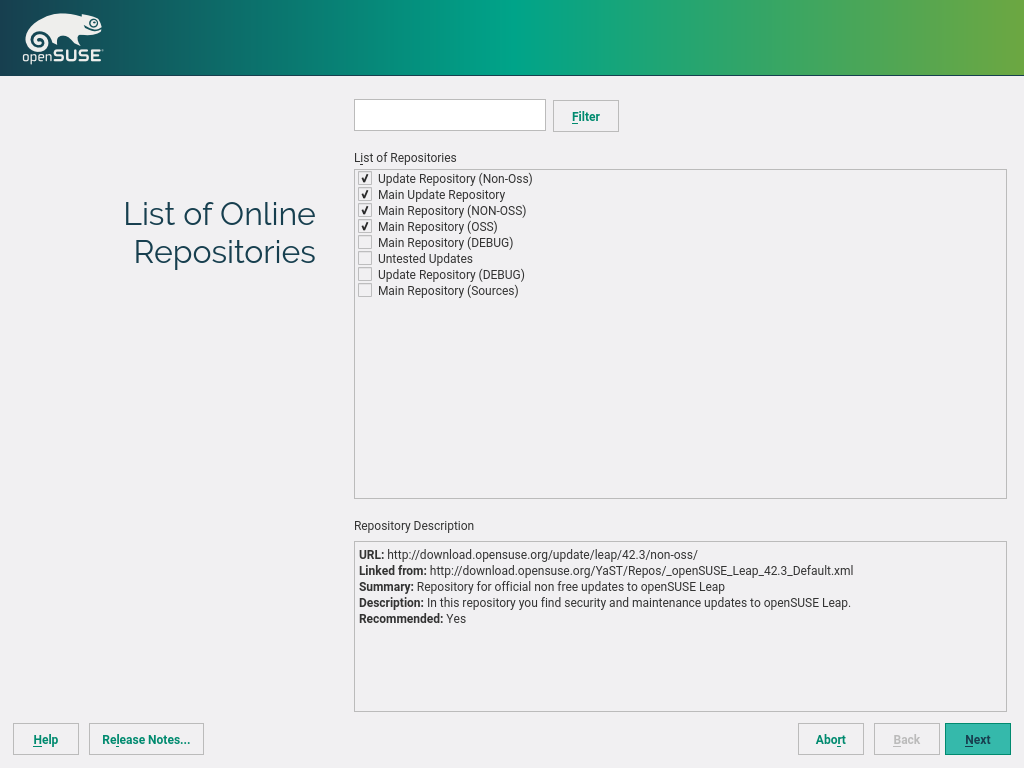
Confirm your selection with . Depending on your choice, you need to confirm one or more license agreements. Do so by choosing until you return to the screen. Now choose and , to proceed to the , where you can choose a custom desktop system from the left-hand pane.
2.10 Create New User #
Create a local user in this step. After entering the first name and last
name, either accept the proposal or specify a new
that will be used to log in. Only
use lowercase letters (a-z), digits (0-9) and the characters
. (dot), - (hyphen) and
_ (underscore). Special characters, umlauts and accented
characters are not allowed.
Finally, enter a password for the user. Re-enter it for confirmation (to ensure that you did not type something else by mistake). To provide effective security, a password should be at least six characters long and consist of uppercase and lowercase letters, digits and special characters (7-bit ASCII). Umlauts or accented characters are not allowed. Passwords you enter are checked for weakness. When entering a password that is easy to guess (such as a dictionary word or a name) you will see a warning. It is a good security practice to use strong passwords.
Important: User Name and Password
Remember both your user name and the password because they are needed each time you log in to the system.
If you install openSUSE Leap on a machine with one or more existing Linux installations, YaST allows you to import user data such as user names and passwords. Select and then for import.
In case you do not want to configure any local users, for example when setting up a client on a network with centralized user authentication, skip this step by choosing and confirming the warning. Network user authentication can be configured at any time later in the installed system; refer to Chapter 3, Managing Users with YaST for instructions.
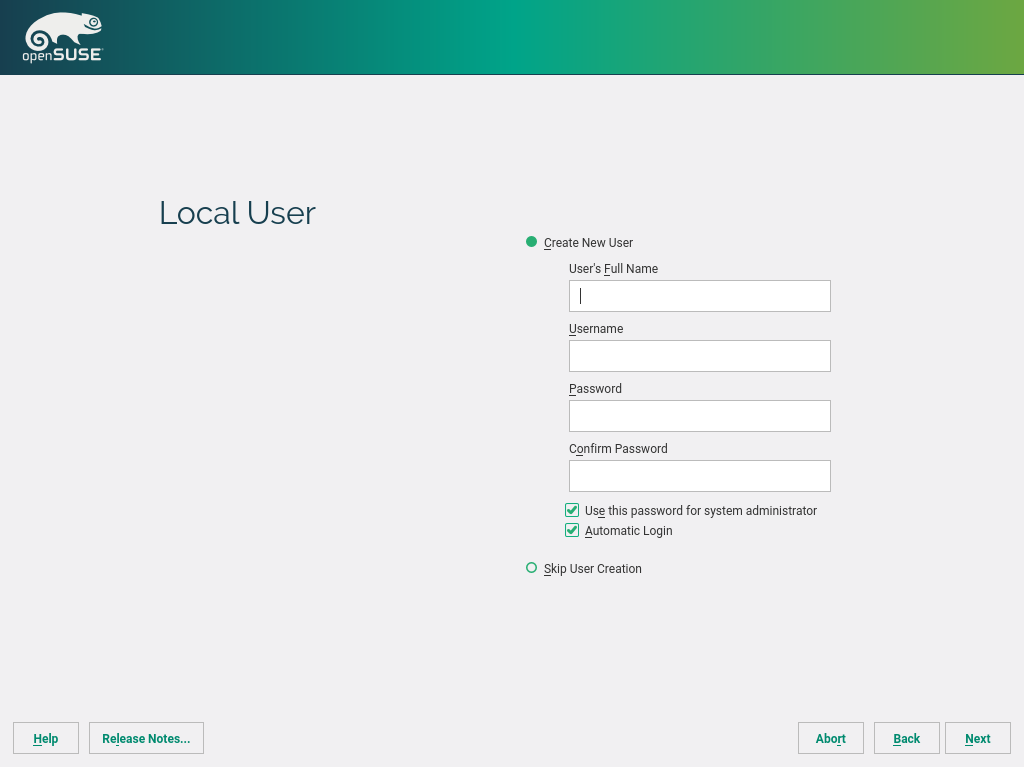
Figure 2.7: Create New User #
Two additional options are available:
If checked, the same password you have entered for the user will be used for the system administrator
root. This option is suitable for stand-alone workstations or machines in a home network that are administrated by a single user. When not checked, you are prompted for a system administrator password in the next step of the installation workflow (see Section 2.11, “Password for the System Administratorroot”).This option automatically logs the current user in to the system when it starts. This is mainly useful if the computer is operated by only one user.
Warning: Automatic Login
With the automatic login enabled, the system boots straight into your desktop with no authentication. If you store sensitive data on your system, you should not enable this option if the computer can also be accessed by others.
If you install on a system where a previous Linux installation was found, you may . Click for a list of available user accounts. Select one or more user.
In an environment where users are centrally managed (for example by NIS or LDAP) you may want to skip the creation of local users. Select in this case.
2.11 Password for the System Administrator root #
If you have not chosen in the previous step, you will be prompted to enter
a password for the System Administrator root. Otherwise this
configuration step is skipped.
root is the name of the superuser, or the administrator of the system.
Unlike regular users (who may or may not have permission to access certain
areas or execute certain commands on the system), root has unlimited
access to change the system configuration, install programs, and set up new
hardware. If users forget their passwords or have other problems with the
system, root can help. The root account should only be used for
system administration, maintenance, and repair. Logging in as root for
daily work is rather risky: a single mistake could lead to irretrievable
loss of system files.
For verification purposes, the password for root must be entered
twice. Do not forget the root password. After having been entered,
this password cannot be retrieved.
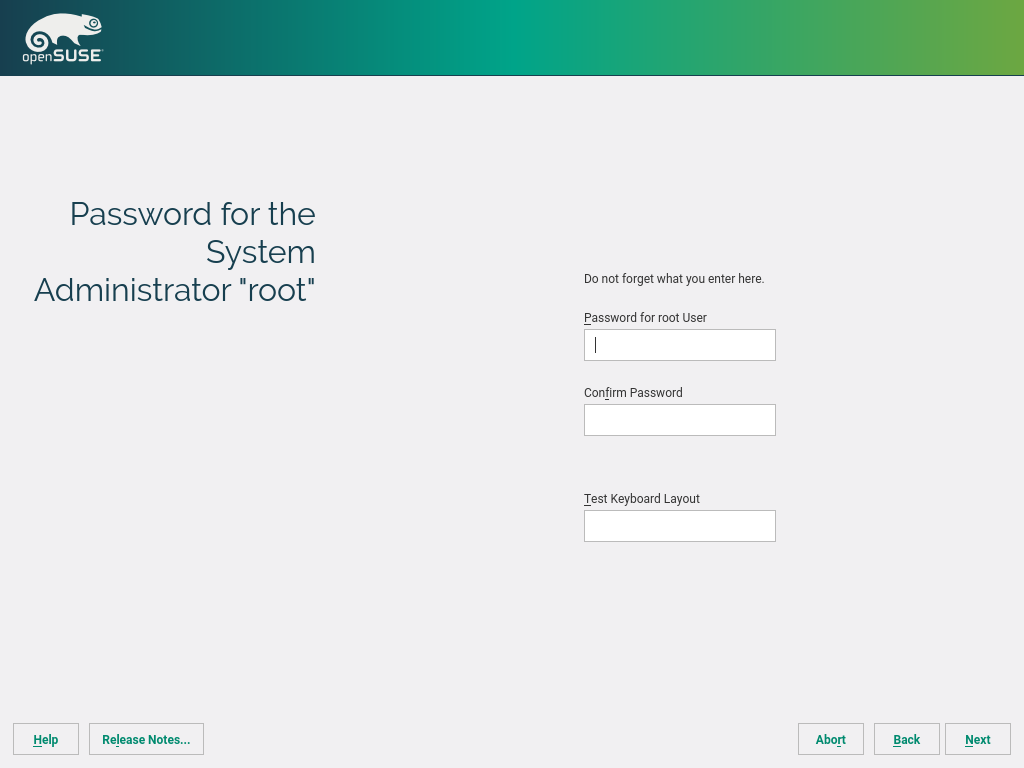
Figure 2.8: Password for the System Administrator root #
Tip: Passwords and Keyboard Layout
It is recommended to only use characters that are available on an English keyboard. In case of a system error or when you need to start your system in rescue mode a localized keyboard might not be available.
The root password can be changed any time later in the installed
system. To do so run YaST and start › .
Important: The root User
The user root has all the permissions needed to make changes to the
system. To carry out such tasks, the root password is required. You
cannot carry out any administrative tasks without this password.
2.12 Installation Settings #
On the last step before the real installation takes place, you can alter installation settings suggested by the installer. To modify the suggestions, click the respective headline. After having made changes to a particular setting, you are always returned to the Installation Settings window, which is updated accordingly.
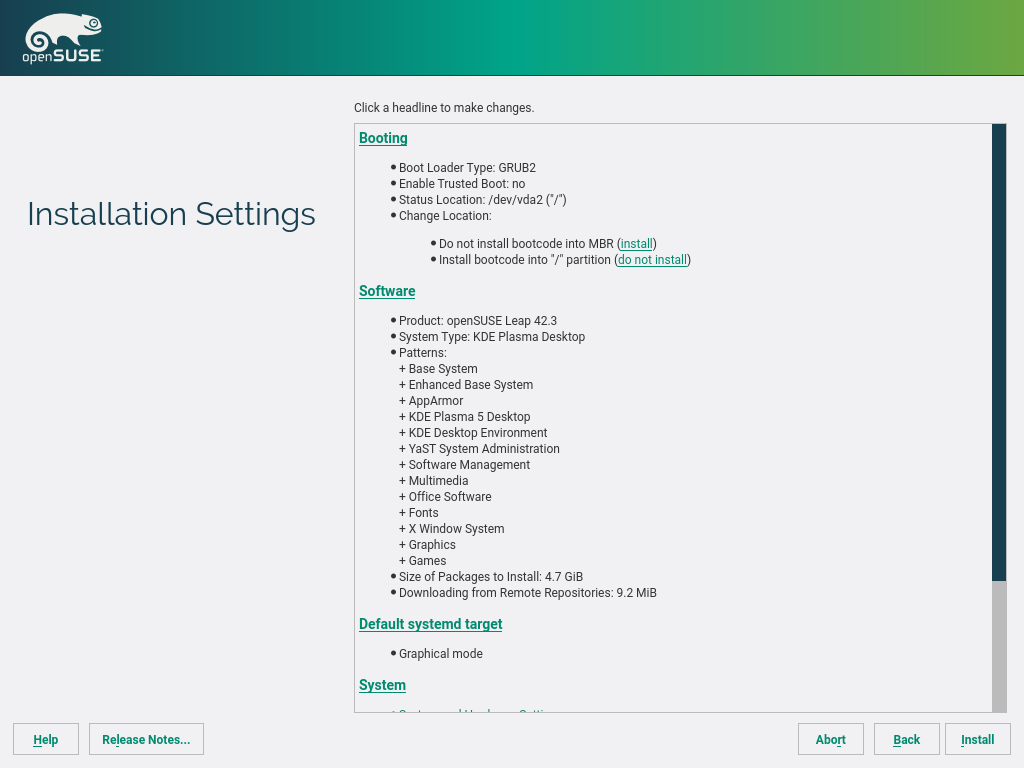
Figure 2.9: Installation Settings #
2.12.1 #
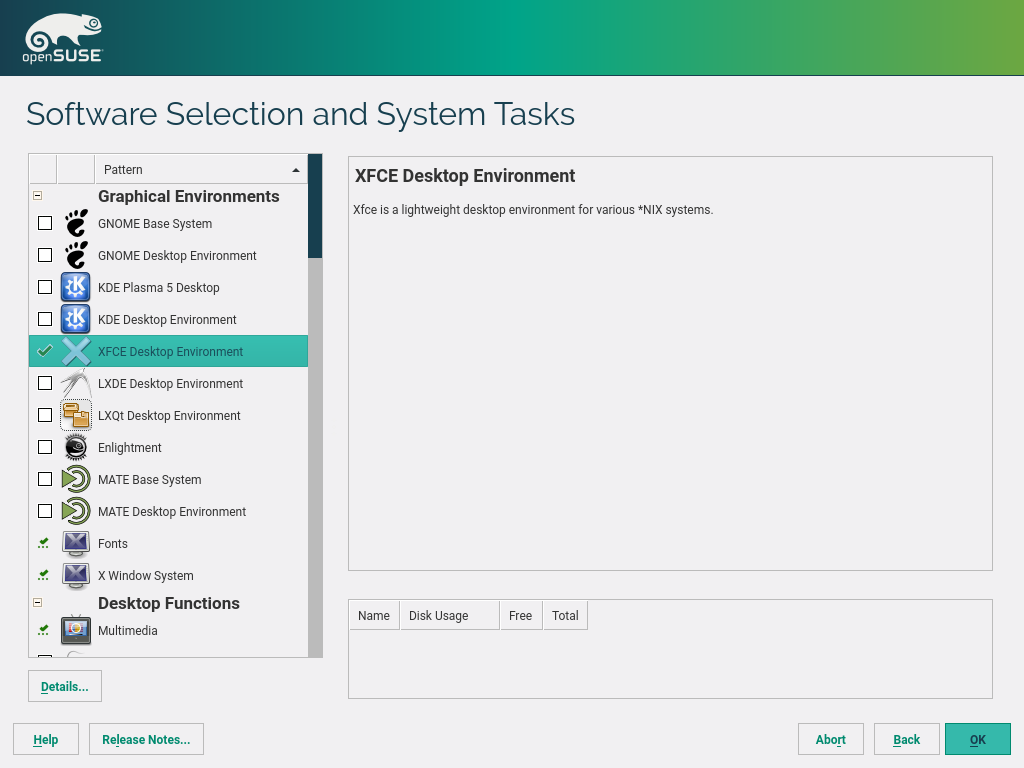
openSUSE Leap contains several software patterns for various application purposes. Click to open the screen where you can modify the pattern selection according to your needs. Select a pattern from the list and see a description in the right-hand part of the window. Each pattern contains several software packages needed for specific functions (for example Multimedia or Office software). For a more detailed selection based on software packages to install, select to switch to the YaST Software Manager.
You can also install additional software packages or remove software packages from your system at any later time with the YaST Software Manager. For more information, refer to Chapter 9, Installing or Removing Software.
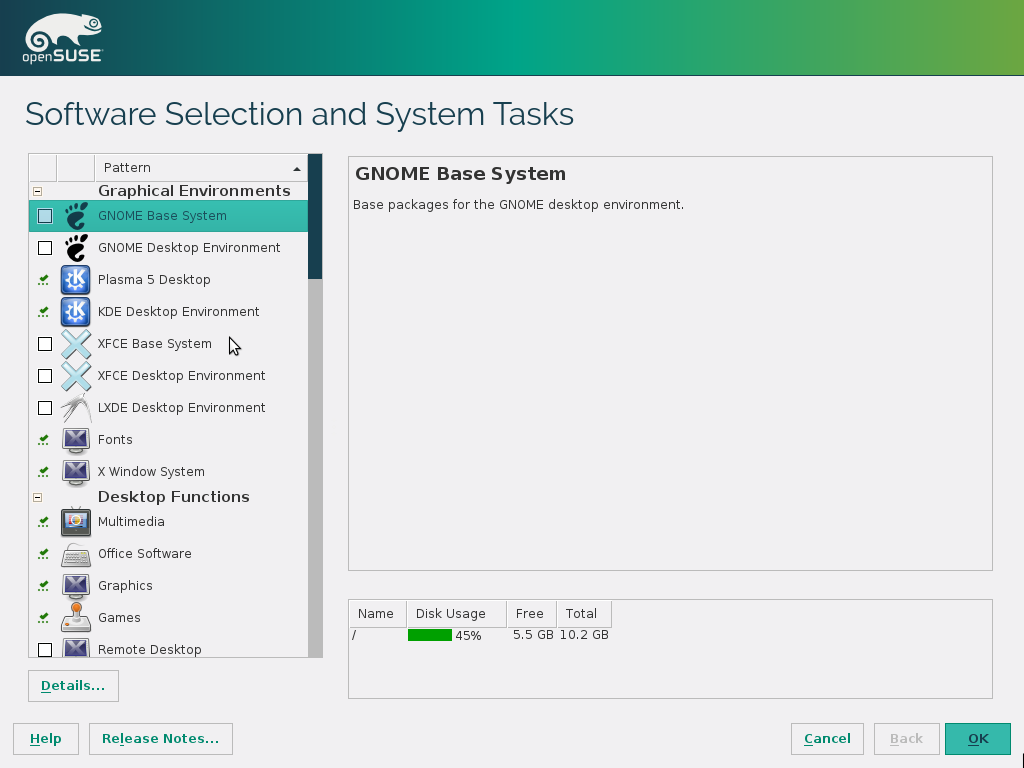
Figure 2.10: Software Selection and System Tasks #
Tip: Adding Secondary Languages
The language you selected with the first step of the installation will be used as the primary (default) language for the system. You can add secondary languages from within the dialog by choosing › › .
2.12.2 #
The installer proposes a boot configuration for your system. Other operating systems found on your computer, such as Microsoft Windows or other Linux installations, will automatically be detected and added to the boot loader. However, openSUSE Leap will be booted by default. Normally, you can leave these settings unchanged. If you need a custom setup, modify the proposal according to your needs. For information, see Book “Reference”, Chapter 12 “The Boot Loader GRUB 2”, Section 12.3 “Configuring the Boot Loader with YaST”.
Important: Software RAID 1
Booting a configuration where /boot resides on a
software RAID 1 device is supported, but it requires to install the boot
loader into the MBR ( › ). Having
/boot on software RAID devices with a level other
than RAID 1 is not supported.
2.12.3 #
By default SuSEFirewall2 is enabled on all configured network interfaces. To globally disable the firewall for this computer, click (not recommended).
Note: Firewall Settings
If the firewall is activated, all interfaces are configured to be in the “External Zone”, where all ports are closed by default, ensuring maximum security. The only port you can open during the installation is port 22 (SSH), to allow remote access. All other services requiring network access (such as FTP, Samba, Web server, etc.) will only work after having adjusted the firewall settings. Refer to Book “Security Guide”, Chapter 15 “Masquerading and Firewalls” for more information.
To enable remote access via the secure shell (SSH), make sure the
SSH service is enabled and the SSH
port is open.
Tip: Existing SSH Host Keys
If you install openSUSE Leap on a machine with one or more existing Linux installations, the installation routine imports the SSH host key with the most recent access time from an existing installation by default.
In case you are performing a remote administration over VNC, you can also configure whether the machine should be accessible via VNC even after the installation. Note that enabling VNC also requires you to set the to .
2.12.4 #
openSUSE Leap can boot into two different targets (formerly known as “runlevels”). The target starts a display manager, whereas the target starts the command line interface.
The default target is . In case you have not installed the patterns, you need to change it to . If the system should be accessible via VNC, you need to choose .
2.12.5 #
This screen lists all the hardware information the installer could obtain about your computer. When opened for the first time, the hardware detection is started. Depending on your system, this may take some time. Select any item in the list and click to see detailed information about the selected item. Use to save a detailed list to either the local file system or a removable device.
Advanced users can also change the and kernel settings by choosing . A screen with two tabs opens:
Each kernel driver contains a list of device IDs of all devices it supports. If a new device is not in any driver's database, the device is treated as unsupported, even if it can be used with an existing driver. You can add PCI IDs to a device driver here. Only advanced users should attempt to do so.
To add an ID, click and select whether to enter the data, or whether to choose from a list. Enter the required data. The is the directory name from
/sys/bus/pci/drivers—if empty, the name is used as the directory name. Existing entries can be managed with and .Change the here. If is chosen, the default setting for the respective architecture will be used. This setting can also be changed at any time later from the installed system. Refer to Book “System Analysis and Tuning Guide”, Chapter 12 “Tuning I/O Performance” for details on I/O tuning.
Also activate the here. These keys will let you issue basic commands (such as rebooting the system or writing kernel dumps) in case the system crashes. Enabling these keys is recommended when doing kernel development. Refer to https://www.kernel.org/doc/html/latest/admin-guide/sysrq.html for details.
2.13 Performing the Installation #
After configuring all installation settings, click in the Installation Settings window to start the installation. Some software may require a license confirmation. If your software selection includes such software, license confirmation dialogs are displayed. Click to install the software package. When not agreeing to the license, click and the software package will not be installed. In the dialog that follows, confirm with again.
The installation usually takes between 15 and 30 minutes, depending on the system performance and the selected software scope. After having prepared the hard disk and having saved and restored the user settings, the software installation starts. During this procedure a slide show introduces the features of openSUSE Leap. Choose to switch to the installation log or to read important up-to-date information that was not available when the manuals were printed.
After the software installation has completed, the system reboots into the new installation where you can log in. To customize the system configuration or to install additional software packages, start YaST.