| 4.4. Partitioning | ||
|---|---|---|
 | Chapter 4. Configuration and Installation Options |  |
| 4.4. Partitioning | ||
|---|---|---|
| | Chapter 4. Configuration and Installation Options | |
![[Warning]](../images/warning.png) | EVMS support dropped in openSUSE 11.1 and SLES11 |
|---|---|
since openSUSE 11.1 and SLES11 there is no longer support for EVMS in the installation system. That means all support for EVMS in AutoYaST was dropped too. Alll EVMS documentation on this page is on valid for SLES10 (all service packs) and openSUSE versions prior openSUSE 11.1 |
The following elements must be between the <partitioning config:type="list"><drive> ... </drive></partitioning> tags in the <profile> section.
Table 4.1.
| Attribute | Values | Description |
|---|---|---|
| device | the device you want to configure in this section. Since SUSE Linux 10.1 and SLES10, you can use persistent device names via id, like /dev/disk/by-id/edd-int13_dev80. With SLES10 SP1 and SUSE Linux 10.2, by-path is possible too like /dev/disk/by-path/pci-0001:00:03.0-scsi-0:0:0:0.
<device>/dev/hda</device> | optional. If left out, autoyast tries to guess the device. A RAID must always have "/dev/md" as device |
| initialize | if set to true, the partition table gets wiped out before autoyast starts the partition calculation
<initialize config:type="boolean">true</initialize> | optional. The default is false. |
| is_lvm_vg | This tells autoyast that this device is not a physical device but a LVM volume group (see LVM configuration below)
<is_lvm_vg config:type="boolean">true</is_lvm_vg> | DEPRECATED since SLES10SP1 and SL10.2 - use type instead. Must be true if this device is a LVM volume group. The default is false. |
| is_evms_vg | this tells autoyast that this device is not a physical device but an EVMS volume group (see EVMS configuration below)
<is_evms_vg config:type="boolean">true</is_evms_vg> | DEPRECATED since SLES10SP1 and SL10.2 - use type instead. Must be true if this device is an EVMS volume group. The default is false. |
| partitions | this is a list of <partition> entries (see table below)
<partitions config:type="list"><partition>...</partition>...</partitions> | optional. If no partition is specified, autoyast will create it's own idea of a nice partitioning (see Automated Partitioning below). |
| pesize | this value makes only sense with LVM/EVMS.
<pesize>8M</pesize> | optional. Default is 4M for EVMS/LVM volume groups. |
| use | this parameter tells autoyast which strategy it shall use to partition the harddisc.
You can choose between:
| this parameter should be provided |
| type | this value describes the type of the drive and is a replacement for
is_lvm_vg and is_evms_vg used in SLES10 and SL10.1
You can choose between:
<type config:type="symbol">CT_LVM</type> | optional. Default is CT_DISK for a normal physical harddisk. |
The following elements must be between the <partitions config:type="list"><partition> ... </partition></partitions> tags in the <drive> section.
Table 4.2.
| Attribute | Values | Description |
|---|---|---|
| create |
the "create" tells autoyast if this partition must be created or if it's already existing <create config:type="boolean">false</create> | if set to false, there must be some information for autoyast which partition this is (like with partition_nr) |
| mount |
the mountpoint of this partition. <mount>/</mount> <mount>swap</mount> | you should have at least a root partition (/) and a swap partition |
| fstopt |
mount options for this partition <fstopt>ro,noatime,user,data=ordered,acl,user_xattr</fstopt> | see "man mount" for the mountoptions you can use |
| label |
the label the partition has (useful for the "mountby" parameter - see below). <label>mydata</label> | see "man e2label" for example. |
| uuid |
the uuid the partition has (only useful for the "mountby" parameter - see below). <uuid>1b4e28ba-2fa1-11d2-883f-b9a761bde3fb</uuid> | see "man uuidgen" |
| size |
the size for the partition like 4G, 4500M, ... The /boot partition and the swap partition can have "auto" as size too, to let autoyast calculate a reasonable size for them. On partition can have the value "max" to fillup all available space. with SUSE Linux 10.2 and SLES10 SP1, you can specify the the size in percentage. So 10% will use 10% of the size of the harddisk/VG. You can mix auto,max,sizes and percentage like you want. <size>10G</size> | |
| format |
shall autoyast format the partition? <format config:type="boolean">false</format> | if "create" is true, then it's very likely that this is true too |
| filesystem |
what filesystem is used on this partition?
<filesystem config:type="symbol">reiser</filesystem> | optional. The default is reiser |
| partition_nr |
the partition_nr this partition has/will have. If you have set create=false, then you can tell autoyast which partition you mean by the partition_nr. You can force autoyast to create only primary partitions by configuring only partition numbers below 5. <partition_nr config:type="integer">2</partition_nr> | in most cases nr. 1-4 are primary partitions and 5-... are logical partitions |
| partition_id |
the partition_id configures the id of the partition. If you want something else than 131 for linux partition or 130 for swap, you must configure that with partition_id. <partition_id config:type="integer">131</partition_id> | the default is 131 for linux partition. 130 for swap is set by autoyast itself too. |
| filesystem_id |
look at partition_id above. For historical reasons they represent the same. <filesystem_id config:type="integer">131</filesystem_id> | since 10.1 and SLES10 it's recommended to use partition_id instead. |
| mountby |
instead of a partition number, you can tell autoyast to mount a partition by label, uuid, path or id which are the udev path and udev id (see /dev/disk/...) <mountby config:type="symbol">label</mountby> | see "label" and "uuid" documentation above |
| lv_name |
if this partition is in a logical volume in a volume group (LVM or EVMS) (see is_lvm_vg/is_evms_vg parameter in drive configuration) you must specifiy the logical volume name here. <lv_name>opt_lv</lv_name> | |
| lvm_group |
if this is a physical partition that is used by (part of) a volume group (LVM), you have to specify the name of the volume group here. <lvm_group>system</lvm_group> | |
| evms_group |
if this physical partition is used by a volume group (EVMS), you have to specify the name of the volume group here. <evms_group>system</evms_group> | |
| raid_name |
this physical volume is part of a RAID and the name of the raid is specified here. <raid_name>/dev/md0</raid_name> | |
| raid_type |
this physical volume is part of a RAID and the type of the raid is specified here.. <raid_type>raid1</raid_type> | |
| raid_options |
special options for the raid are specified here. See below. <raid_options>...</raid_options> | |
| resize |
This parameter is available since SLES10 SP1 and OpenSUSE 10.2. This boolean must be true if an existing partition should be resized. In this case, you want to set create to false too and in most cases you don't want to format the partition. You need to tell autoyast the partition_nr and the size. The size can be in percentage of the original size or as a number of the new size, like 800M. max and auto don't work as size here. <resize config:type="boolean">false</resize> | The resize only works with physical disks. Not with LVM/EVMS volumes. |
The following elements must be between the <partition><raid_options> ... </raid_options></partition> tags.
Table 4.3.
| Attribute | Values | Description |
|---|---|---|
| chunk_size |
<chunk_size>4</chunk_size> | |
| parity_algorithm |
possible values are: left_asymmetric, left_symmetric, right_asymmetric, right_symmetric <parity_algorithm>left_asymmetric</parity_algorithm> | |
| raid_type |
possible values are raid0,raid1 and raid5 <raid_type>raid1</raid_type> | the default is raid1 |
For the automated partitioning to be completed, only the sizes and mount points of partitions can be provided. All other data needed for successful partitioning can be calculated during installation if they were not provided in the control file.
If no partitions are defined and the specified drive is also the drive where the root partition should be created, the following partitions are created automatically:
/boot
Size of the /boot is determined by the architecture of the target system.
swap
Size of the swap partitions is determined by the amount of memory available in the system.
/ (root partition)
Size of the / (root partition) is the space left after creating swap and /boot.
Depending on the initial status of the drive and how it was previously partitioned, it is possible to create the default partitioning in the following ways:
Use free space
If the drive is already partitioned, it is possible to create the new partitions using the available space on the hard drive. This requires the availability of enough space for all selected packages in addition to swap.
Reuse all available space
This option will lead to the deletion of all existing partitions (Linux and non-Linux partitions).
Reuse all available Linux partitions
This option will lead to the deletion of existing Linux partitions. All other partitions (i.e. Windows) will be kept. Note that this works only if the Linux partitions are at the end of the device.
Reuse only specified partitions
This option will lead to the deletion of the specified partitions. The selection of the partitions scheduled for deletion should be started from the last available partition.
Repartitioning using only some of the existing partitions can be accomplished only if the region selected to be partitioned exists at the end of the device and only with neighboring partitions. This means that you cannot repartition a region which contains a partition that should not be touched in the middle.
![[Caution]](../images/caution.png) | Important Notice |
|---|---|
The value provided in the use property determines how existing data and partitions are treated. The value all means that ALL data on the disk will be erased. Make backups and use the confirm property if you are going to keep some partitions with important data. This is automated installation and no pop-ups will notify you about partitions being deleted. |
In case of the presence of multiple drives in the target system, all drives must be identified with their device names and how the partitioning should be performed.
Partition sizes can be given in Gigabytes, Megabytes or can be set to a flexible value using the keywords auto and max. max is used to fill a partition to the maximal available space on a drive (Which mean that the partition should be the last one on the drive). auto can be used to determine the size of a swap or boot partitions depending on the memory available and the type of the system.
A fixed size can be given as shown below:
1GB will create a partition with 1 GB size. 1500MB will create a partition which is 1.5 GB big.
Example 4.6. Automated partitioning
The following is an example of a single drive system, which is not pre-partitioned and should be automatically partitioned according to the described pre-defined partition plan. If you leave the device out, an autodetection of the device will happen. So you don't have to do different profiles for /dev/sda or /dev/hda systems.
  <partitioning  config:type="list">
    <drive>
      <device>/dev/hda</device>
      <use>all</use>
    </drive>
  </partitioning>
A more detailed example shows how existing partitions and multiple drives are handled.
Example 4.7. Detailed automated partitioning
  <partitioning  config:type="list">
  <drive>
    <device>/dev/hda</device>
    <partitions config:type="list">
      <partition>
	<mount>/</mount>
	<size>5gb</size>
      </partition>
      <partition>
	<mount>swap</mount>
	<size>1gb</size>
      </partition>
    </partitions>
  </drive>
  <drive>
    <device>/dev/hdb</device>
    <use>all</use>
    <partitions config:type="list">
      <partition>
	<filesystem  config:type="symbol">reiser</filesystem>
	<mount>/data1</mount>
	<size>15gb</size>
      </partition>
      <partition>
	<filesystem  config:type="symbol">jfs</filesystem>
	<mount>/data2</mount>
	<size>auto</size>
      </partition>
    </partitions>
    <use>free</use>
  </drive>
</partitioning>
In the most cases this is not needed because autoyast can delete partitions one by one automatically but you have the option to let autoyast clear the partition table instead of deleting the partitions individually.
if you go into the "drive" section, you can add
<initialize config:type="boolean">true</initialize>
which tells Autoyast to delete the partition table before it starts to analyse the actual partitioning and calculates it's partition plan. Of course this means, that you can't keep any of your existing partitions.
By default a file system which is to be mounted is
identified in /etc/fstab by the device name. This identification
can be changed so the file system is found by searching
for a UUID or a volume label. Note that not all file systems can be mounted
by UUID or a volume label. To specify how a
partition is to be mounted, use the mountby
property which has the symbol type. Possible
options are:
device (default)
label
UUID
If you choose to mount the partition using a label, the name entered in the label property is used as the volume label.
Add any legal mount option allowed in the fourth field of
/etc/fstab. Multiple options are separated by commas. Possible fstab options:
Mount Read-Only (ro): No writable access to the file system is possible. Default is false.
No access time (noatime): Access times are not updated when a file is read. Default is false.
Mountable by User (user): The file system may be mounted by an ordinary user. Default is false.
Data Journaling Mode (ordered | journal | writeback) : Specifies the journaling mode for file data. journal -- All data is committed into the journal prior to being written into the main file system. ordered -- All data is forced directly out to the main file system prior to its meta data being committed to the journal. writeback -- Data ordering is not preserved.
Access Control List (acl): Enable access control lists on the file system.
Extended User Attributes (user_xattr): Allow extended user attributes on the file system.
Example 4.8. Mount Options
  <partitions config:type="list">
    <partition>
      <filesystem config:type="symbol">reiser</filesystem>
      <format config:type="boolean">true</format>
      <fstopt>ro,noatime,user,data=ordered,acl,user_xattr</fstopt>
      <mount>/local</mount>
      <mountby config:type="symbol">uuid</mountby>
      <partition_id config:type="integer">131</partition_id>
      <size>10gb</size>
    </partition>
  </partitions>
In some cases you might choose to keep some partitions untouched and only format specific target partitions, rather than creating them from scratch. This might be the case of Linux installations have to co-exist with another operating system or if certain partitions contain data that you wish to keep untouched.
Such scenarios require certain knowledge about the target systems and hard drives. Depending on the scenario, you might need to know the exact partition table of the target hard drive with partition id's, sizes and numbers. With such data you can tell AutoYaST to keep certain partitions, format others and create new partitions if needed.
The following example will keep partitions 1, 2 and 5 and delete partition 6 to create two new partitions. All kept partitions will be only formatted.
Example 4.9. Keeping partitions
    <partitioning config:type="list">
      <drive>
        <device>/dev/hdc</device>
        <partitions config:type="list">
          <partition>
            <create config:type="boolean">false</create>
            <format config:type="boolean">true</format>
            <mount>/</mount>
            <partition_nr config:type="integer">1</partition_nr>
          </partition>
          <partition>
            <create config:type="boolean">false</create>
            <format config:type="boolean">false</format>
            <partition_nr config:type="integer">2</partition_nr>
            <mount>/space</mount>
          </partition>
          <partition>
            <create config:type="boolean">false</create>
            <format config:type="boolean">true</format>
            <filesystem config:type="symbol">swap</filesystem>
            <partition_nr config:type="integer">5</partition_nr>
            <mount>swap</mount>
          </partition>
          <partition>
            <format config:type="boolean">true</format>
            <mount>/space2</mount>
            <size>50mb</size>
          </partition>
          <partition>
            <format config:type="boolean">true</format>
            <mount>/space3</mount>
            <size>max</size>
          </partition>
        </partitions>
        <use>6</use>
      </drive>
    </partitioning>
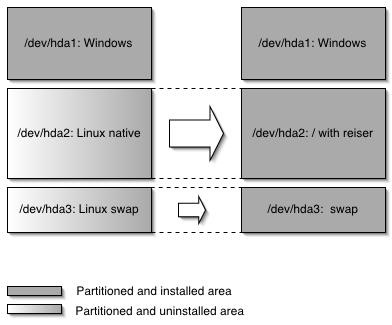
The last example requires exact knowledge about the existing partition table and about the partition numbers of those partitions that should be kept. In some cases however, such data might be not available, especially in a mixed hardware environment with different hard drive types and configurations. The following scenario is for a system with a non-Linux OS with a designated area for a Linux installation.
In this scenario and as shown in figure “Keeping partitions” , AutoYaST should not in any case create any new partitions, instead it should search for certain partition types on the system and use them according to the partitioning plan in the control file. No partition numbers are given in this case, only the mount points and the partition types (Additional configuration data can be provided, for example file system options, encryption and filesystem type)
Example 4.10. Auto-detection of partitions to be kept.
    <partitioning config:type="list">
      <drive>
        <partitions config:type="list">
          <partition>
            <create config:type="boolean">false</create>
            <format config:type="boolean">true</format>
            <mount>/</mount>
            <partition_id config:type="integer">131</partition_id>
          </partition>
          <partition>
            <create config:type="boolean">false</create>
            <format config:type="boolean">true</format>
            <filesystem config:type="symbol">swap</filesystem>
            <partition_id config:type="integer">130</partition_id>
            <mount>swap</mount>
          </partition>
        </partitions>
      </drive>
    </partitioning>
![[Note]](../images/note.png) | New Feature |
|---|---|
This option will allow the AutoYaST to use an existing
/etc/fstab and use the partition data from
from a previous installation. All partitions are kept and no new
partitions are created. The found partitions will be formatted and
mounted as specified in /etc/fstab found on a
Linux root partition.
Although the default behaviour is to format all partitions, it is also possible to leave some partitions untouched and only mount them, for example data partitions. If multiple installations are found on the system (multiple root partitions with different fstab files, the installation will abort, unless the desired root partition is configured in the control file. The following example illustrates how this option can be used:
Example 4.11.
Reading existing /etc/fstab
    <partitioning_advanced>
      <fstab>
	<!-- Read data from existing fstab. If multiple root partitions are
	found, use the one specified below. Otherwise the first root
	partition is taken -->
	<!-- <root_partition>/dev/hda5</root_partition> -->
	<use_existing_fstab config:type="boolean">true</use_existing_fstab>
	<!-- all partitions found in fstab will be formatted and mounted
	by default unless a partition is listed below with different
	settings -->
	<partitions config:type="list">
	  <partition>
	    <format config:type="boolean">false</format>
	    <mount>/bootmirror</mount>
	  </partition>
	</partitions>
      </fstab>
    </partitioning_advanced>
To configure LVM, first you need to create a physical volume using the normal partitioning method described above.
Example 4.12. Create LVM Physical Volume
The following example shows how to prepare for LVM in the partitioning resource:
  <partitioning config:type="list">
    <drive>
      <device>/dev/sda</device>

      <partitions config:type="list">
	<partition>
	  <lvm_group>system</lvm_group>
	  <partition_type>primary</partition_type>
	  <size>max</size>
	</partition>
      </partitions>
      <use>all</use>
    </drive>
  </partitioning>
The last example will create a non-formatted partition on device
/dev/sda1 of the type LVM and
with the volume group system. The partition
created will use all available space on this drive.
Example 4.13. LVM Logical Volumes (New syntax)
  <partitioning config:type="list">
    <drive>
      <device>/dev/sda</device>
      <partitions config:type="list">
	<partition>
	  <lvm_group>system</lvm_group>
	  <partition_type>primary</partition_type>
	  <size>max</size>
	</partition>
      </partitions>
      <use>all</use>
    </drive>
    <drive>
      <device>/dev/system</device>
      <is_lvm_vg config:type="boolean">true</is_lvm_vg>
      <partitions config:type="list">
	<partition>
	  <filesystem config:type="symbol">reiser</filesystem>
	  <lv_name>user_lv</lv_name>
	  <mount>/usr</mount>
	  <size>500mb</size>
	</partition>
	<partition>
	  <filesystem config:type="symbol">reiser</filesystem>
	  <lv_name>opt_lv</lv_name>
	  <mount>/opt</mount>
	  <size>1500mb</size>
	</partition>
	<partition>
	  <filesystem config:type="symbol">reiser</filesystem>
	  <lv_name>var_lv</lv_name>
	  <mount>/var</mount>
	  <size>200mb</size>
	</partition>
      </partitions>
      <pesize>4M</pesize>
      <use>all</use>
    </drive>
  </partitioning>
With SUSE Linux 10.1 and all following versions, it's possible to set the size to max for the logical volumes. Of course, you can only use max only for one(!) logical volumes. You can't have two logical volumes in one volume group with the size set to max
SLES10 autoyast has EVMS support. SLES11 has not!
Using EVMS is quite similar to using LVM (see above). So switching from LVM to EVMS is just a small change in the autoyast profile. All you have to do is to change the "is_lvm_vg" element into "is_evms_vg" and the "lvm_group" element into "evms_group".
With autoyast it's not possible to mix LVM and EVMS.
Using the LVM example from above for EVMS now looks like this:
Example 4.14. EVMS Logical Volumes
  <partitioning config:type="list">
    <drive>
      <device>/dev/sda</device>
      <partitions config:type="list">
	<partition>
	  <evms_group>system</evms_group>
	  <partition_type>primary</partition_type>
	  <size>max</size>
	</partition>
      </partitions>
      <use>all</use>
    </drive>
    <drive>
      <device>/dev/system</device>
      <is_evms_vg config:type="boolean">true</is_evms_vg>
      <partitions config:type="list">
	<partition>
	  <filesystem config:type="symbol">reiser</filesystem>
	  <lv_name>user_lv</lv_name>
	  <mount>/usr</mount>
	  <size>500mb</size>
	</partition>
	<partition>
	  <filesystem config:type="symbol">reiser</filesystem>
	  <lv_name>opt_lv</lv_name>
	  <mount>/opt</mount>
	  <size>1500mb</size>
	</partition>
	<partition>
	  <filesystem config:type="symbol">reiser</filesystem>
	  <lv_name>var_lv</lv_name>
	  <mount>/var</mount>
	  <size>200mb</size>
	</partition>
      </partitions>
      <pesize>4M</pesize>
      <use>all</use>
    </drive>
  </partitioning>
Using AutoYaST, you can create and assemble software RAID devices. The supported RAID levels are the following:
RAID 0: This level increases your disk performance. There is NO redundancy in this mode. If one of the drives crashes, data recovery will not be possible.
RAID 1:This mode has the best redundancy. It can be used with two or more disks. This mode maintains an exact copy of all data on all disks. As long as at least one disk is still working, no data is lost. The partitions used for this type of RAID should have approximately the same size.
RAID 5: This mode combines management of a larger number of disks and still maintains some redundancy. This mode can be used on three disks or more. If one disk fails, all data is still intact. If two disks fail simultaneously, all data is lost.
Multipath:This mode allow access to the same physical device over multiple controller for redundancy against a fault in a controller card. This mode can be used with at least two devices.
As with LVM, you need to create all RAID partitions first and assign the partitions to the RAID device you want to create and additionally you need to specify whether a partition or a device should be configured in the RAID or if it should configured as a Spare device.
The following example shows a simple RAID1 configuration:
Example 4.15. RAID1 configuration
  <partitioning config:type="list">
    <drive>
      <device>/dev/sda</device>
      <partitions config:type="list">
	<partition>
	  <partition_id config:type="integer">253</partition_id>
	  <format config:type="boolean">false</format>
	  <raid_name>/dev/md0</raid_name>
	  <raid_type>raid</raid_type>
	  <size>4gb</size>
	</partition>

	<!-- Here come the regular partitions, i.e. / and swap -->
      </partitions>
      <use>all</use>
    </drive>
    <drive>
      <device>/dev/sdb</device>

      <partitions config:type="list">
	<partition>
	  <format config:type="boolean">false</format>
	  <partition_id config:type="integer">253</partition_id>
	  <raid_name>/dev/md0</raid_name>
	  <raid_type>raid</raid_type>
	  <size>4gb</size>
	</partition>
      </partitions>
      <use>all</use>
    </drive>
    <drive>
      <device>/dev/md</device>
      <partitions config:type="list">
	<partition>
	  <filesystem config:type="symbol">reiser</filesystem>
	  <format config:type="boolean">true</format>
	  <mount>/space</mount>
	  <partition_id config:type="integer">131</partition_id>
	  <partition_nr config:type="integer">0</partition_nr>
	  <raid_options>
	    <chunk_size>4</chunk_size>
	    <parity_algorithm>left-asymmetric</parity_algorithm>
	    <raid_type>raid1</raid_type>
	  </raid_options>

	</partition>
      </partitions>
      <use>all</use>
    </drive>

  </partitioning>
The following has to be taken into consideration when configuring raid:
The device for raid is always /dev/md
The property partition_nr is used to determine the MD device number. if partition_nr is equal to 0, then /dev/md0 is configured.
All RAID specific options are contained in the raid_options resource.
| |  | |
| 4.3. The Boot loader |  | 4.5. Software |