11 LibreOffice Impress, Base, Draw, and Math
Besides LibreOffice Writer and LibreOffice Calc, LibreOffice also includes the modules Impress, Base, Draw, and Math. With these you can create presentations, design databases, draw up graphics and diagrams, and create mathematical formulas.
11.1 Using Presentations with Impress #
Use LibreOffice Impress to create presentations for screen display or printing. If you have used other presentation software, Impress makes it easy to switch. It works very similarly to other presentation software.
Impress can open and save Microsoft* PowerPoint* presentations. This means you can exchange presentations with PowerPoint* users, as long as you save your presentations in PowerPoint* format.
11.1.1 Creating a Presentation #
There are multiple ways to create a new Impress document:
From Scratch. To create a document from scratch, click › › and a new empty Impress document is created.
Wizard. To use a standard format and predefined elements for your documents use a wizard. Click › › and follow the steps.
Templates. To use a template, click › › and choose a template from . A new document based on the style of your selected template is created.
The following procedure describes how to create a presentation by using the wizard. Proceed as follows:
Start LibreOffice.
Select › ›
Choose and select from the pop-up menu to set your preferred background and click .

Select an output medium. The output medium is the form the final presentation will take, such as: , , a slideshow on a 4:3 or a 16:9 , among other choices.
Select for a thumbnail showing your choices. If all options are set according to your wishes, click .
If you want to use effects for slide transitions, select the you want to use and specify the . The effect will be previewed immediately.
Either use the default presentation type or choose to specify the amount of time each page displays and the length of the pause between presentations.
If all options are set according to your wishes, click .
The presentation opens, ready for editing.
11.1.2 Using Master Pages #
Master pages give your presentation a consistent look by defining what fonts and other design elements are used. Impress uses two types of master pages:
- Slide Master
Contains elements that appear on all slides. For example, you might want your company logo to appear in the same place on every slide. The slide master also determines the text formatting style for the heading and outline of every slide that uses that master page, as well as any information you want to appear in a header or footer.
- Notes Master
Determines the formatting and appearance of the notes in your presentation.
11.1.2.1 Creating a Slide Master #
Impress comes with a collection of preformatted master pages. Eventually, many users will want to customize their presentations by creating their own slide masters.
Start Impress.
To create a new empty presentation, select › › .
Click › › .
This opens the current slide master in . The toolbar appears.
Right-click the left-hand panel, then click .
Edit the slide master until it has the desired look.
A special feature of Master View is that you can edit outline styles by directly formatting the sample text on the slide.
To finish editing slide masters, in the toolbar, click . Alternatively, choose › .
Tip: Collect Slide Masters in a Template
When you have created all of the slide masters you want to use in your presentations, you can save them in an Impress template. Then, any time you want to create presentations that use those slide masters, open a new presentation with your template.
11.1.2.2 Applying a Slide Master #
Slide masters can be applied to selected slides or to all slides in the presentation.
Open your presentation.
(Optional) If you want to apply the slide master to multiple slides, but not to all slides. Select the slides that you want to use that slide master applied to.
To select multiple slides, pressCtrl in the while clicking the slides you want to use.
In the Tasks Pane, open the and click the master page you want to apply. The slide master is applied to the corresponding page(s).
If you do not see the , click › .
11.2 Using Databases with Base #
LibreOffice includes the database module Base. Use Base to design a database to store many different kinds of information. From a simple address book or recipe file to a sophisticated document management system.
Tables, forms, queries, and reports can be created manually or by using convenient wizards. For example, the Table Wizard contains several common fields for business and personal use. Databases created in Base can be used as data sources, such as when creating form letters.
It is beyond the scope of this document to detail database design with Base. More information can be found at the sources listed in Section 8.10, “For More Information”.
11.2.1 Creating a Database Using Predefined Options #
Base comes with several predefined database fields to help you create a database. A wizard guides you through the steps to create a new database. The steps in this section are specific to creating an address book using predefined fields, but it should be easy to follow them to use the predefined fields for any of the built-in database options.
The process for creating a database can be broken into several subprocesses:
11.2.1.1 Creating the Database #
Start LibreOffice Base.
Select .
You can choose between creating an HSQLDB or Firebird database.
- HSQLDB Embedded (default)
This database format is also available in older versions of OpenOffice.org and LibreOffice. It depends on Java being installed on the computer.
- Firebird Embedded
This database format can only be used in newer versions of LibreOffice. It does not depend on Java. When you do large database operations, Firebird can perform better.
Proceed with .
Click to make your database information available to other LibreOffice modules and select the check boxes to and . Then click .
Browse to the directory where you want to save the database, specify a name for the database, then click .
11.2.1.2 Setting Up the Database Table #
After you have created the database, if you have selected the check box, the table wizard opens. If you have not, click the link in the area. Next, define the fields you want to use in your database table.
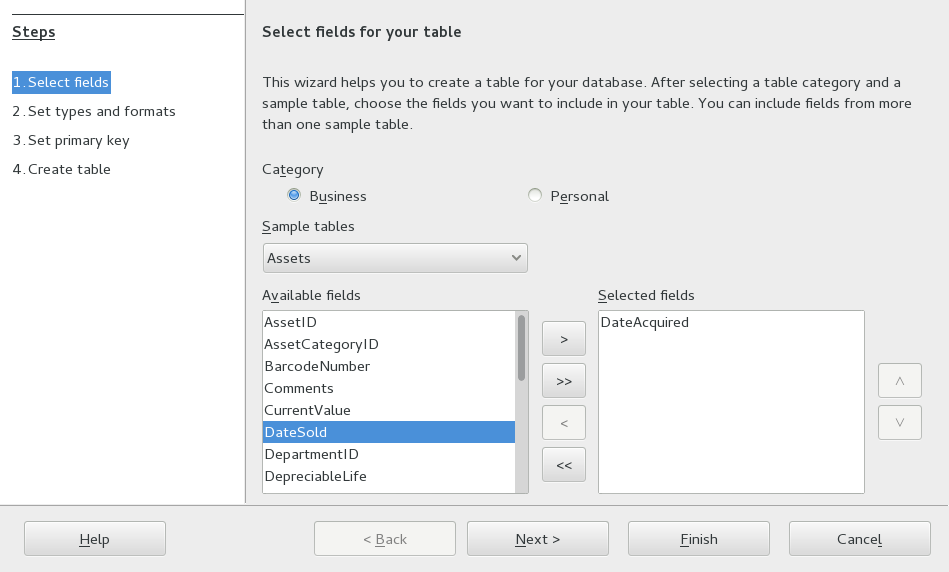
In the , click .
The list changes to show the predefined tables for personal use. If you had clicked , the list would contain predefined business tables.
In the list, click .
The available fields for the predefined address book appear in the menu.
In the menu, click the fields you want to use in your address book.
You can select one item at a time, or you can shift-click multiple items to select them.
Click the single arrow icon to move the selected items to the menu.
To move all available fields to the menu, click the double right-arrow.
Use the ↑ and ↓ keys to adjust the order of the selected fields, then click .
The fields appear in the table and forms in the order in which they are listed.
Make sure each of the fields is defined correctly.
You can change the field name, type, maximum characters and whether it is a required field. For this example, leave the settings as they are, then click .
Click , click , click , then click .
11.2.1.3 Creating a Form #
Next, create the form to use when entering data into your address book.
In the , click the double right-arrow icon to move all available fields to the list, then click .
Select if you want to add a subform, then click .
For this example, accept the default selections.
Select how you want to arrange your form, then click .
Select and leave all of the check boxes empty, then click .
Apply a style and field border, then click .
For this example, accept the default selections.
Name the form, select the option, then click .
11.2.1.4 Modifying the Form #
After the form has been defined, you can modify the appearance of the form to suit your preferences.
Close the form that opened when you finished the previous step.
In the main window for your database, right-click the form you want to modify (there should be only one option), then click .
Arrange the fields on the form by dragging them to their new locations.
For example, move the First Name field so it appears to the right of the Last Name field, and then adjust the locations of the other fields to suit your preference.
When you have finished modifying the form, save it and close it.
11.2.1.5 Further Steps #
After you have created your database tables and forms, you are ready to enter your data. You can also design queries and reports to help sort and display the data.
Refer to LibreOffice online help and other sources listed in Section 8.10, “For More Information” for additional information about Base.
11.3 Creating Graphics with Draw #
Use LibreOffice Draw to create graphics and diagrams. You can export your drawings to the most common vector graphics formats and import them into any application that lets you import graphics, including other LibreOffice modules. You can also create Adobe* Flash* (SWF) versions of your drawings.
Procedure 11.1: Creating a Graphic #
Start LibreOffice Draw.
Use the toolbar at the bottom of the window to create a graphic.
Save the graphic.
To embed an existing Draw graphic into a LibreOffice document, select › › . Select and click to navigate to the Draw file to insert. If you insert a file as OLE object, you can easily edit the object later by double-clicking it.
Procedure 11.2: Opening Draw From Other LibreOffice Modules #
One particularly useful feature of Draw is the ability to open it from other LibreOffice modules, so you can create a drawing that is automatically imported into your document.
From a LibreOffice module (for example, from Writer), click › › › › .
The user interface of Writer will now be replaced by that of Draw.
Create your drawing.
Click in your document, outside the Draw frame.
The drawing is automatically inserted into your document.
11.4 Creating Mathematical Formulas with Math #
It is usually difficult to include complex mathematical formulas in your documents. To make this task easier, the LibreOffice Math equation editor lets you create formulas using operators, functions, and formatting assistants. You can then save those formulas as an object that can be imported into other documents. Math functions can be inserted into other LibreOffice documents like any other graphic object.
Note: Math is For Creating Mathematical Formulas
Math is not a calculator. The functions it creates are graphical objects. Even if they are imported into Calc, these functions cannot be evaluated.
To create a formula proceed as follows:
Start LibreOffice Math.
Click › › . The formula window opens.
Enter your formula in the lower part of the window. For example, the binomial theorem in LibreOffice Math syntax is:
(a + b)^2 = a^2 + 2 a b + b^2
The result is displayed in the upper part of the window.
Use the window or right-click the lower part of the window to insert other terms. If you need symbols, use › to, for example, insert Greek or other special characters.
Save your document.
The result is shown in Figure 11.1, “Mathematical Formula in LibreOffice Math”:
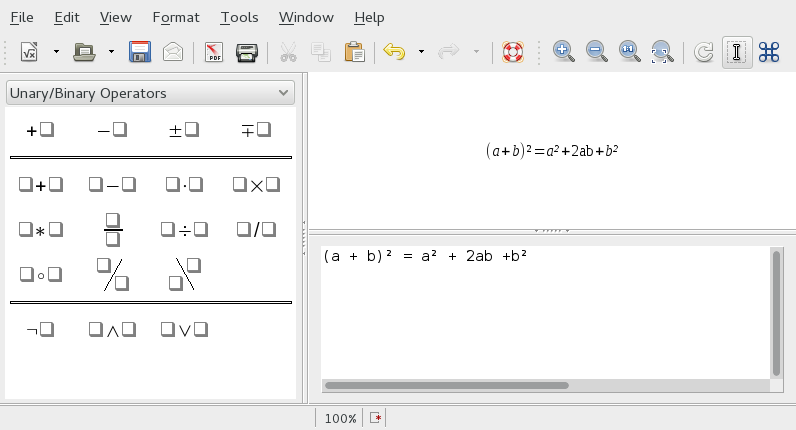
Figure 11.1: Mathematical Formula in LibreOffice Math #
It is possible to include your formula in Writer, for example. To do so, proceed as follows:
Create a new Writer document or open an already existing one.
Select › › in the main menu. The window appears.
Select .
Click to locate your formula. If needed, you can activate .
Confirm with and your formula is inserted at the current cursor position.