3 Customizing Your Settings Edit source
- 3.1 Changing the Desktop Background
- 3.2 Configuring Language Settings
- 3.3 Configuring the Keyboard
- 3.4 Using XCompose to Type Special Characters
- 3.5 Configuring Bluetooth Settings
- 3.6 Configuring Power Settings
- 3.7 Configuring the Mouse and Touchpad
- 3.8 Installing and Configuring Printers
- 3.9 Configuring Screens
- 3.10 Configuring Sound Settings
- 3.11 Setting Default Applications
- 3.12 Setting Session Sharing Preferences
You can change the way the GNOME desktop looks and behaves to suit your own personal tastes and needs. Some possible changes of settings are:
Keyboard and mouse configuration, as described in Section 3.3, “Configuring the Keyboard” and Section 3.7, “Configuring the Mouse and Touchpad”
Desktop background, as described in Section 3.1, “Changing the Desktop Background”
Sounds, as described in Section 3.10, “Configuring Sound Settings”
These settings and others can be changed in the GNOME dialog. It focuses on look and feel, personal settings and preferences of your GNOME desktop.
To change some system-wide settings, you need to use YaST instead. This is the case for administrator settings (including most of the hardware, the graphical user interface, Internet access, security settings, user administration, software installation and system updates and information). For information about using YaST, refer to the integrated YaST help texts or to the Book “Start-Up”.
To access the GNOME settings dialog, right-click the desktop and choose .
3.1 Changing the Desktop Background #Edit source
The desktop background is the image or color that is applied to your desktop. You can also customize the image shown when the screen is locked.
To change the desktop background or the lock screen:
Right-click the desktop and choose .
Choose or .
Click , , or .
Wallpapers are preconfigured images distributed with your system. Pictures are your own images from your
Picturesdirectory (~/Pictures). Colors are predefined colors chosen by GNOME developers.Choose an option from the list.
When you are satisfied with your choice, click .
3.2 Configuring Language Settings #Edit source
openSUSE Leap can be configured to use any of several languages. The language setting determines the language of dialogs and menus and can also determine the keyboard and clock layout.
To configure your language settings right-click the desktop and choose . Now choose .
Here you can choose:
. Choose a language from the list and confirm with . To make the change take effect, you need to restart the desktop afterwards.
: To change the formats for date, number, currency and related options, choose a country from the list and confirm with . To make the change take effect, you need to restart the desktop afterwards.
(keyboard layout). Change your keyboard layout here or add another one. If you use more than one keyboard layout, you can switch keyboards by clicking the language code in the Activities Bar.
Note:
Settings Made Using ibus-setup Do Not Take Effect
On GNOME, settings made using ibus-setup do not take
effect. ibus-setup can only be
used to configure IceWM. Instead, always use the
application:
To change input methods, use .
To change the key combination that switches between input methods, use › . In there, choose the category and the entry .
3.3 Configuring the Keyboard #Edit source
Refer to Section 4.4, “Keyboard and Mouse” for additional settings, such as key autorepetition and cursor blink rate, and accessibility features. To configure your keyboard layout, refer to Section 3.2, “Configuring Language Settings”.
To modify keyboard shortcuts right-click the desktop and choose . Now choose › .

Figure 3.1: Keyboard Dialog #
The dialog shows the keyboard shortcuts that are configured for your system. To edit a key combination, click the entry you like to change. To set a new key combination, press the respective keys. To disable a shortcut, press <— instead.
3.4 Using XCompose to Type Special Characters #Edit source
GNOME supports fast input source (keyboard layout) switching
(Section 3.2, “Configuring Language Settings”). However, if you are using
xmodmap to create custom keymaps, it may not
work correctly when you switch between multiple input sources. For
example, you have two input sources, English and German. Your
xmodmap commands work fine in the first input
source you select, but when you switch to the second input source
the same xmodmap commands produce incorrect output.
xmodmap is an older protocol and does not have
full view of the keyboard layout, so in more complex situations it
causes errors.
An alternative method is to use xcompose to assign
special symbols to sequences of key presses. This should work
with any input source. Install xcompose
by installing the libX11-devel package.
Next, assign a compose key with the Tweaks tool in Activities. You will press this key in sequence with one or two additional keys to print a special character. The keys must be pressed in the correct sequence, starting with the compose key.
Navigate to › and select your command key (Figure 3.2, “Enabling the Compose Key in Tweaks”).
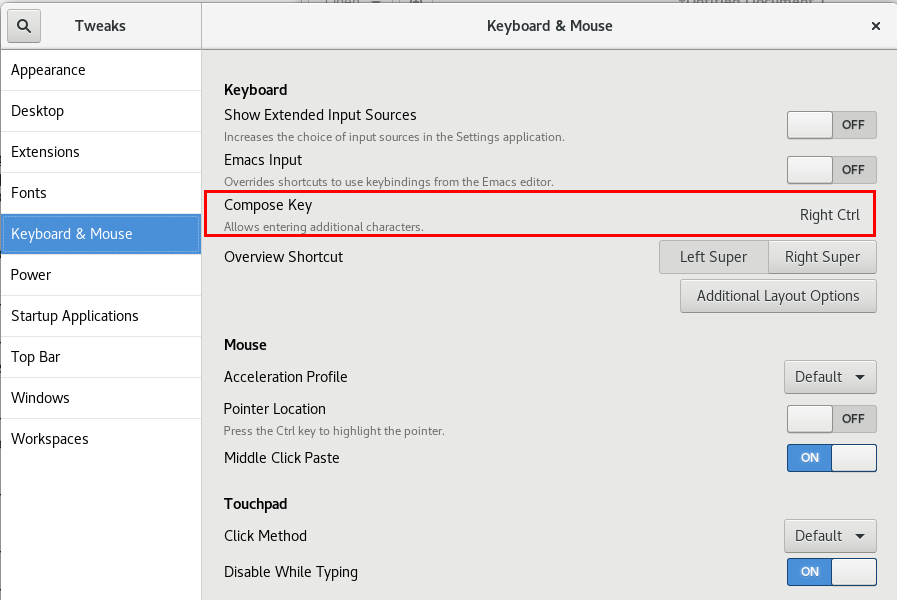
Figure 3.2: Enabling the Compose Key in Tweaks #
Next, create a ~/.XCompose file. This is the default
per-user configuration file. Enter your
keymappings in this file, like this example:
include "%L"

<Multi_key> <a> : "α"
<Multi_key> <b> : "β"
<Multi_key> <exclam>  : "¡"
include "%L" includes the default compose file
for your locale, for example
/usr/share/X11/locale/en_US.UTF-8.
The remaining lines specify the compose key, the other keypresses, and the symbols they are intended to print. After you make changes to your compose file, you must log out of your session and log back in to activate the changes.
Your key assignments are case-sensitive.
~/.XCompose overrides the system files. Use the
compose file for your locale to see what is already configured, and to
copy symbols from it into your personal compose file. (These files
may have a lot of whitespace at the beginning; they're not empty so keep
scrolling.) As always, watch out for conflicts with the other keymaps
on your system.
For additional information see man xcompose.
3.5 Configuring Bluetooth Settings #Edit source
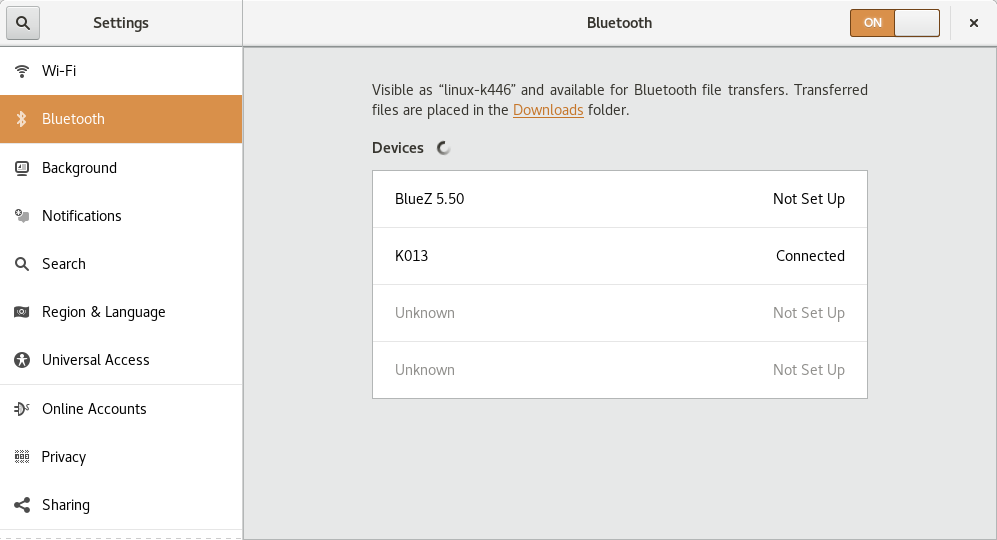
The Bluetooth module lets you set the visibility of your machine over Bluetooth and connect to available Bluetooth devices. To configure Bluetooth connectivity, follow these steps:
Right-click the desktop and choose . Now choose .
To use Bluetooth, turn the switch on.
To make your computer visible over Bluetooth, turn the switch on. The computer will start searching for other visible Bluetooth devices in the vicinity and display any found devices in the list. At first, the list may be empty.

Note: Temporary Visibility
The switch is meant to be used only temporarily. You only need to turn it on for the initial setup of a connection to a Bluetooth device. After the connection has been established, turn off the switch.
On the device you want to connect, turn on Bluetooth connectivity and visibility, too.
If the desired device has been found and is shown in the list, click it to establish a connection to it.
You will be asked whether the PINs of the two devices match.
If the PINs match, confirm this on both your computer and the device.
The pairing is now established. On your computer, the device in the list is shown as .
Depending on the device type, it will now be available in other applications, for example as a storage device in GNOME Files, or a sound device in playback applications.
To connect to a paired Bluetooth device, select the device in the list. In the dialog that appears, turn the switch on. You can send files to the connected device by using the button. If you are connected to a device such as a mobile phone, you can use it as a network device by activating the appropriate option.
To remove a connected device from the list on your computer, click and confirm your choice. To completely remove the pairing, you also need to do so on your device.
3.6 Configuring Power Settings #Edit source
Settings available in this dialog depend on your hardware. In the following we describe options that are typically available when using a laptop. On a workstation, many of the described options are not available.
Right-click the desktop and choose . Now choose .
In the upper part of the dialog the current state of the battery is displayed.
In the section of the dialog, set the . You can also set whether to dim or blank the screen after or turn off wireless networking a period of inactivity.
In the section of the dialog, configure a time after which the computer is set to do an . You may set diff
You can also set the action performed when the power button is pressed. Choose to use a mode where the computer turns off completely but saves your running session to the hard disk. Alternatively, choose or .
3.7 Configuring the Mouse and Touchpad #Edit source
To modify mouse and touchpad options, right-click the desktop and choose . Now choose › .
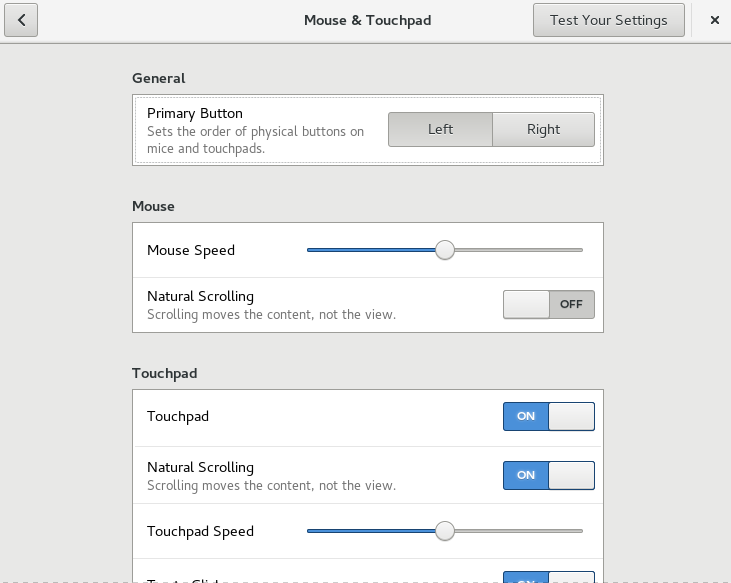
Figure 3.3: Mouse and Touchpad Settings Dialog #
In the section of the dialog, you can set the orientation (left or right).
In the section of the dialog, use to adjust the sensitivity of the mouse pointer. With you can set the direction in which the content moves, when scrolling with the mouse. When natural scrolling is turned off, the content moves up when pushing the scroll wheel down. When natural scrolling is turned on, the content moves in the same direction as the mouse wheel.
In the section of the dialog, you can turn the touchpad on and off. Use to adjust the sensitivity of the touchpad pointer. You can also disable the touchpad while typing and enable clicks by tapping the touchpad.
With you can set the direction in which the content moves, when scrolling with two fingers. When natural scrolling is turned on, the content moves in the same directions as your fingers. When natural scrolling is turned off, the content moves in the opposite direction.
To test your settings, click and try the pointing device.
For configuration of mouse accessibility options, refer to the Section 4.4, “Keyboard and Mouse”.
3.8 Installing and Configuring Printers #Edit source
The dialog lets you connect to any available local or remote CUPS server and configure printers.
To start the Printers module, right-click the desktop and choose . Now choose › . For detailed information, refer to Chapter 6, Managing Printers.
3.9 Configuring Screens #Edit source
To specify resolution and orientation for your screen or to configure multiple screens, right-click the desktop and choose . The configuration options available in this dialog depend on whether you have a single or a multiple monitor setup.
3.9.1 Changing Settings: Single Monitor Setup #Edit source
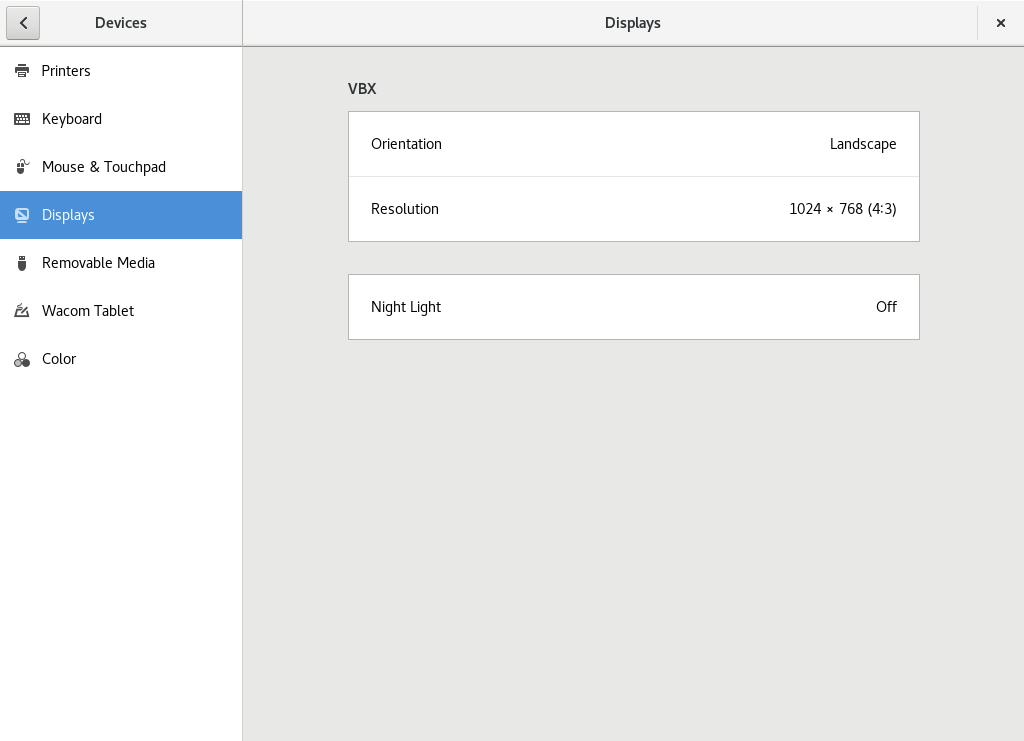
Figure 3.4: Single Monitor Settings Dialog #
If you use a monitor which can change its orientation, you need to adjust the display before turning the monitor. Use to do this. Choose the orientation your monitor supports, close the selection box and click . You have 20 seconds to , otherwise they will automatically be applied.
To change the screen resolution, click . Choose a new value, close the selection box and click . You have 20 seconds to , otherwise they will automatically be applied.
If you are working in a dark environment, your eyes can easily be strained by the monitor. To prevent this, change the screen's color palette to a warmer tone by turning on . Under you can automate this setting by specifying at which time should be turned on and off.
3.9.2 Changing Settings: Multiple Monitor Setup #Edit source
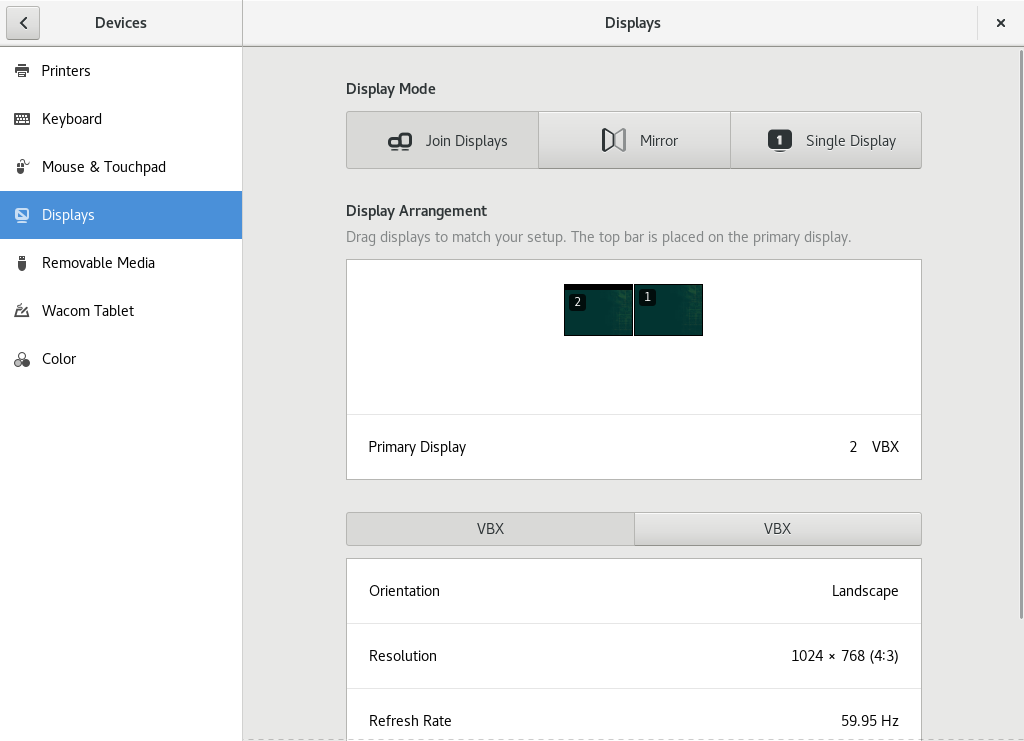
Figure 3.5: Single Monitor Settings Dialog #
In case you have a multiple monitor setup, identify each monitor by the number displayed in its upper left corner.
Choose how to use the monitors. With you get a single desktop that stretches across all monitors. displays the same content on each monitor. deactivates all monitors but the one chosen.
- Display Arrangement
Drag and Drop the monitor pictograms to order them so they match your physical setup. This is especially important when using joint displays, to ensure you can move from monitor to monitor in the correct order. You can also set the primary display here. This is the display that shows GNOME's activity bar.
- Monitor Configuration
To configure orientation and resolution for each monitor, select a monitor by clicking its pictogram or its tab. For further instructions refer to Section 3.9.1, “Changing Settings: Single Monitor Setup”.
3.10 Configuring Sound Settings #Edit source
The tool lets you manage sound devices and set the sound effects. In the top part of the dialog, you can select the general output volume or turn the sound off completely.
To open the sound settings, right-click the desktop and choose . Now choose .
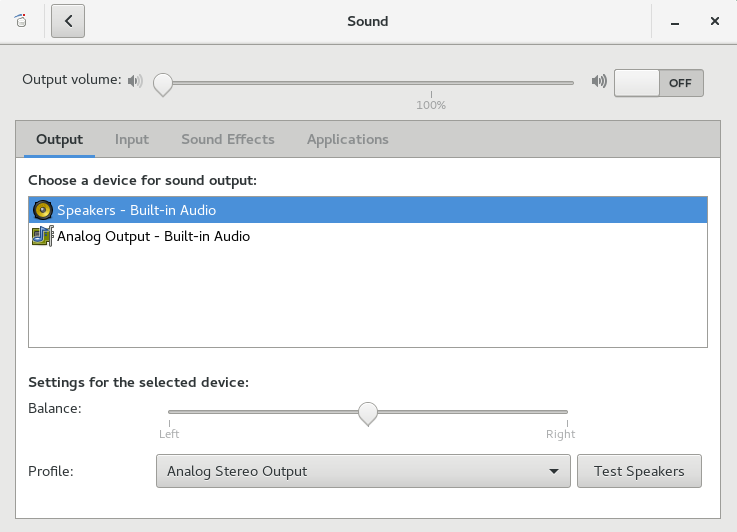
Figure 3.6: Configuring Sound Settings #
3.10.1 Configuring Sound Devices #Edit source
Use the tab to select the device for sound output. Below the list, choose the sound device setting you prefer, for example balance.
Use the tab to set the input device volume or to mute the input temporarily. If you have more than one sound device, you can also select a default device for audio input in the list.
3.10.2 Configuring Sound Effects #Edit source
Use the tab to configure whether and how you want sound to be played when message boxes appear.
Specify the volume at which the sound effects will be played under . You can also turn the effects on and off.
Choose a sound of your choice under .
3.11 Setting Default Applications #Edit source
To change the default application for various common tasks such as browsing the Internet, sending mails or playing multimedia files, right-click the desktop and choose . Now choose › .
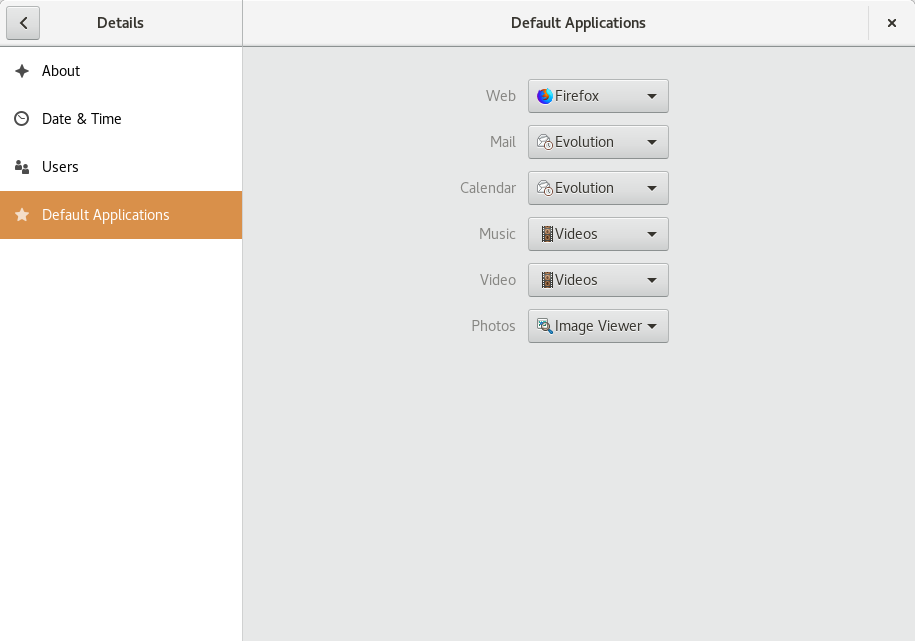
Figure 3.7: Default Applications #
You can choose an application to handle Web, mail, calendar, music, videos or photographs. Select one of the available applications from the drop-down boxes for the task of your choice.