Reference
- About This Guide
- I Advanced Administration
- II System
- 8 32-Bit and 64-Bit Applications in a 64-Bit System Environment
- 9 Introduction to the Boot Process
- 10 The
systemdDaemon - 11
journalctl: Query thesystemdJournal - 12 The Boot Loader GRUB 2
- 13 Basic Networking
- 14 UEFI (Unified Extensible Firmware Interface)
- 15 Special System Features
- 16 Dynamic Kernel Device Management with
udev
- III Services
- IV Mobile Computers
- A An Example Network
- B GNU Licenses
1 YaST in Text Mode Edit source
This section is intended for system administrators and experts who do not run an X server on their systems and depend on the text-based installation tool. It provides basic information about starting and operating YaST in text mode.
YaST in text mode uses the ncurses library to provide an easy pseudo-graphical user interface. The ncurses library is installed by default. The minimum supported size of the terminal emulator in which to run YaST is 80x25 characters.
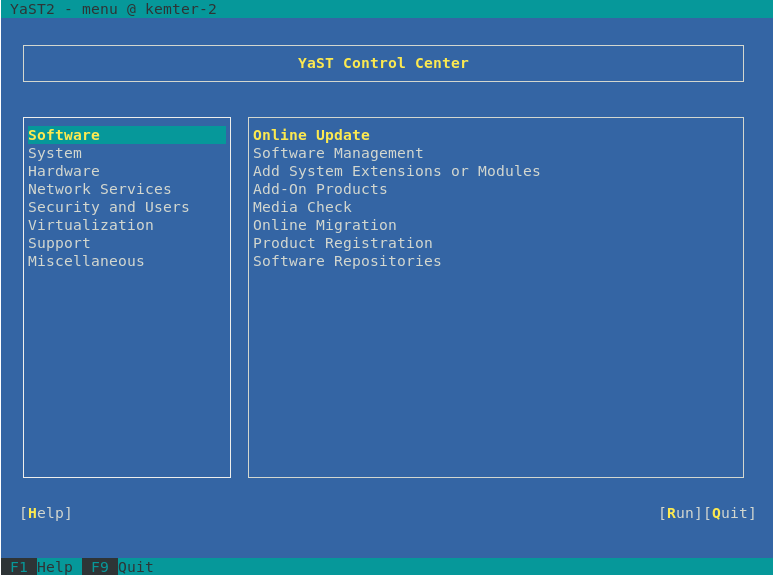
Figure 1.1: Main Window of YaST in Text Mode #
When you start YaST in text mode, the YaST control center appears (see Figure 1.1). The main window consists of three areas. The left frame features the categories to which the various modules belong. This frame is active when YaST is started and therefore it is marked by a bold white border. The active category is selected. The right frame provides an overview of the modules available in the active category. The bottom frame contains the buttons for and .
When you start the YaST control center, the category is selected automatically. Use ↓ and ↑ to change the category. To select a module from the category, activate the right frame with → and then use ↓ and ↑ to select the module. Keep the arrow keys pressed to scroll through the list of available modules. After selecting a module, press Enter to start it.
Various buttons or selection fields in the module contain a highlighted letter (yellow by default). Use Alt–highlighted_letter to select a button directly instead of navigating there with →|. Exit the YaST control center by pressing Alt–Q or by selecting and pressing Enter.
Tip: Refreshing YaST Dialogs
If a YaST dialog gets corrupted or distorted (for example, while resizing the window), press Ctrl–L to refresh and restore its contents.
1.1 Navigation in Modules #Edit source
The following description of the control elements in the YaST modules assumes that all function keys and Alt key combinations work and are not assigned to different global functions. Read Section 1.3, “Restriction of Key Combinations” for information about possible exceptions.
- Navigation among Buttons and Selection Lists
Use →| to navigate among the buttons and frames containing selection lists. To navigate in reverse order, use Alt–→| or Shift–→| combinations.
- Navigation in Selection Lists
Use the arrow keys (↑ and ↓) to navigate among the individual elements in an active frame containing a selection list. If individual entries within a frame exceed its width, use Shift–→ or Shift–← to scroll horizontally to the right and left. Alternatively, use Ctrl–E or Ctrl–A. This combination can also be used if using → or ← results in changing the active frame or the current selection list, as in the control center.
- Buttons, Radio Buttons, and Check Boxes
To select buttons with empty square brackets (check boxes) or empty parentheses (radio buttons), press Space or Enter. Alternatively, radio buttons and check boxes can be selected directly with Alt–highlighted_letter. In this case, you do not need to confirm with Enter. If you navigate to an item with →|, press Enter to execute the selected action or activate the respective menu item.
- Function Keys
The function keys (F1 ... F12) enable quick access to the various buttons. Available function key combinations (
FX) are shown in the bottom line of the YaST screen. Which function keys are actually mapped to which buttons depend on the active YaST module, because the different modules offer different buttons (, , , , etc.). Use F10 for , , , and . Press F1 to access the YaST help.- Using Navigation Tree in ncurses Mode
Some YaST modules use a navigation tree in the left part of the window to select configuration dialogs. Use the arrow keys (↑ and ↓) to navigate in the tree. Use Space to open or close tree items. In ncurses mode, Enter must be pressed after a selection in the navigation tree to show the selected dialog. This is an intentional behavior to save time consuming redraws when browsing through the navigation tree.
- Selecting Software in the Software Installation Module
Use the filters on the left side to limit the amount of displayed packages. Installed packages are marked with the letter
i. To change the status of a package, press Space or Enter. Alternatively, use the menu to select the needed status change (install, delete, update, taboo or lock).

Figure 1.2: The Software Installation Module #
1.2 Advanced Key Combinations #Edit source
YaST in text mode has a set of advanced key combinations.
- Shift–F1
List advanced hotkeys.
- Shift–F4
Change color schema.
- Ctrl–\
Quit the application.
- Ctrl–L
Refresh screen.
- Ctrl–DF1
List advanced hotkeys.
- Ctrl–DShift–D
Dump dialog to the log file as a screenshot.
- Ctrl–DShift–Y
Open YDialogSpy to see the widget hierarchy.
1.3 Restriction of Key Combinations #Edit source
If your window manager uses global Alt combinations, the Alt combinations in YaST might not work. Keys like Alt or Shift can also be occupied by the settings of the terminal.
- Replacing Alt with Esc
Alt shortcuts can be executed with Esc instead of Alt. For example, Esc–H replaces Alt–H. (First press Esc, then press H.)
- Backward and Forward Navigation with Ctrl–F and Ctrl–B
If the Alt and Shift combinations are occupied by the window manager or the terminal, use the combinations Ctrl–F (forward) and Ctrl–B (backward) instead.
- Restriction of Function Keys
The function keys (F1 ... F12) are also used for functions. Certain function keys might be occupied by the terminal and may not be available for YaST. However, the Alt key combinations and function keys should always be fully available on a pure text console.
1.4 YaST Command Line Options #Edit source
Besides the text mode interface, YaST provides a pure command line interface. To get a list of YaST command line options, enter:
tux >sudoyast -h
1.4.1 Installing Packages from the Command Line #Edit source
If you know the package name and the package is provided by any of your
active installation repositories, you can use the command line option
-i to install the package:
tux >sudoyast -i package_name
or
tux >sudoyast --install -i package_name
package_name can be a single short package name (for example gvim) installed with dependency checking, or the full path to an RPM package which is installed without dependency checking.
If you need a command line based software management utility with functionality beyond what YaST provides, consider using Zypper. This utility uses the same software management library that is also the foundation for the YaST package manager. The basic usage of Zypper is covered in Section 2.1, “Using Zypper”.
1.4.2 Starting Individual Modules #Edit source
To save time, you can start individual YaST modules directly. To start a module, enter:
tux >sudoyast module_name
View a list of all module names available on your system with yast
-l or yast --list. Start the network module,
for example, with yast lan.
1.4.3 Command Line Parameters of YaST Modules #Edit source
To use YaST functionality in scripts, YaST provides command line support for individual modules. Not all modules have command line support. To display the available options of a module, enter:
tux >sudoyast module_name help
If a module does not provide command line support, it is started in a text mode and the following message appears:
This YaST module does not support the command line interface.
The following sections describe all YaST modules with command line support, together with a brief explanation of all their commands and available options.
1.4.3.1 Common YaST Module Commands #Edit source
All YaST modules support the following commands:
- help
Lists all the module's supported commands together with their description:
tux >sudoyast lan help- longhelp
Same as
help, but adds a detailed list of each command's options together with their description:tux >sudoyast lan longhelp- xmlhelp
Same as
longhelp, but the output is structured as an XML document and redirected to a file:tux >sudoyast lan xmlhelp xmlfile=/tmp/yast_lan.xml- interactive
If you need to spend more time querying a module's settings, run the interactive mode. The YaST shell opens, where you can enter all the module's commands without the
sudo yast
        ...
prefix. To leave the interactive mode, enterexit.
1.4.3.2 yast add-on #Edit source
Adds a new add-on product from the specified path:
tux >sudoyast add-on http://server.name/directory/Lang-AddOn-CD1/
You can use the following protocols to specify the source path: http:// ftp:// nfs:// disk:// cd:// or dvd://.
1.4.3.3 yast audit-laf #Edit source
Displays and configures the Linux Audit Framework. Refer to the
Book “Security Guide” for more details. yast
audit-laf accepts the following commands:
- set
Sets an option:
tux >sudoyast audit-laf set log_file=/tmp/audit.logFor a complete list of options, run
yast audit-laf set help.- show
Displays settings of an option:
tux >sudoyast audit-laf show diskspace space_left: 75 space_left_action: SYSLOG admin_space_left: 50 admin_space_left_action: SUSPEND action_mail_acct: root disk_full_action: SUSPEND disk_error_action: SUSPENDFor a complete list of options, run
yast audit-laf show
        help
.
1.4.3.4 yast dhcp-server #Edit source
Manages the DHCP server and configures its settings. yast
dhcp-server accepts the following commands:
- disable
Disables the DHCP server service.
- enable
Enables the DHCP server service.
- host
Configures settings for individual hosts.
- interface
Specifies to which network interface to listen to:
tux >sudoyast dhcp-server interface current Selected Interfaces: eth0 Other Interfaces: bond0, pbu, eth1For a complete list of options, run
yast dhcp-server interface help.- options
Manages global DHCP options. For a complete list of options, run
yast dhcp-server options help.- status
Prints the status of the DHCP service.
- subnet
Manages the DHCP subnet options. For a complete list of options, run
yast dhcp-server subnet help.
1.4.3.5 yast dns-server #Edit source
Manages the DNS server configuration. yast dns-server
accepts the following commands:
- acls
Displays access control list settings:
tux >sudoyast dns-server acls show ACLs: ----- Name Type Value ---------------------------- any Predefined localips Predefined localnets Predefined none Predefined- dnsrecord
Configures zone resource records:
tux >sudoyast dnsrecord add zone=example.org query=office.example.org type=NS value=ns3For a complete list of options, run
yast dns-server dnsrecord help.- forwarders
Configures DNS forwarders:
tux >sudoyast dns-server forwarders add ip=10.0.0.100tux >sudoyast dns-server forwarders show [...] Forwarder IP ------------ 10.0.0.100For a complete list of options, run
yast dns-server forwarders help.- host
Handles 'A' and its related 'PTR' record at once:
tux >sudoyast dns-server host show zone=example.orgFor a complete list of options, run
yast dns-server host help.- logging
Configures logging settings:
tux >sudoyast dns-server logging set updates=no transfers=yesFor a complete list of options, run
yast dns-server logging help.- mailserver
Configures zone mail servers:
tux >sudoyast dns-server mailserver add zone=example.org mx=mx1 priority=100For a complete list of options, run
yast dns-server mailserver help.- nameserver
Configures zone name servers:
tux >sudoyast dns-server nameserver add zone=example.com ns=ns1For a complete list of options, run
yast dns-server nameserver help.- soa
Configures the start of authority (SOA) record:
tux >sudoyast dns-server soa set zone=example.org serial=2006081623 ttl=2D3H20SFor a complete list of options, run
yast dns-server soa help.- startup
Manages the DNS server service:
tux >sudoyast dns-server startup atbootFor a complete list of options, run
yast dns-server startup help.- transport
Configures zone transport rules. For a complete list of options, run
yast dns-server transport help.- zones
Manages DNS zones:
tux >sudoyast dns-server zones add name=example.org zonetype=masterFor a complete list of options, run
yast dns-server zones
        help
.
1.4.3.6 yast disk #Edit source
Prints information about all disks or partitions. The only supported
command is list followed by either of the following
options:
- disks
Lists all configured disks in the system:
tux >sudoyast disk list disks Device | Size | FS Type | Mount Point | Label | Model ---------+------------+---------+-------------+-------+------------- /dev/sda | 119.24 GiB | | | | SSD 840 /dev/sdb | 60.84 GiB | | | | WD1003FBYX-0- partitions
Lists all partitions in the system:
tux >sudoyast disk list partitions Device | Size | FS Type | Mount Point | Label | Model ---------------+------------+---------+-------------+-------+------ /dev/sda1 | 1.00 GiB | Ext2 | /boot | | /dev/sdb1 | 1.00 GiB | Swap | swap | | /dev/sdc1 | 698.64 GiB | XFS | /mnt/extra | | /dev/vg00/home | 580.50 GiB | Ext3 | /home | | /dev/vg00/root | 100.00 GiB | Ext3 | / | | [...]
1.4.3.7 yast ftp-server #Edit source
Configures FTP server settings. yast ftp-server accepts
the following options:
- SSL, TLS
Controls secure connections via SSL and TLS. SSL options are valid for the
vsftpdonly.tux >sudoyast ftp-server SSL enabletux >sudoyast ftp-server TLS disable- access
Configures access permissions:
tux >sudoyast ftp-server access authen_onlyFor a complete list of options, run
yast ftp-server access help.- anon_access
Configures access permissions for anonymous users:
tux >sudoyast ftp-server anon_access can_uploadFor a complete list of options, run
yast ftp-server anon_access help.- anon_dir
Specifies the directory for anonymous users. The directory must already exist on the server:
tux >sudoyast ftp-server anon_dir set_anon_dir=/srv/ftpFor a complete list of options, run
yast ftp-server anon_dir help.- chroot
Controls change root environment (chroot):
tux >sudoyast ftp-server chroot enabletux >sudoyast ftp-server chroot disable- idle-time
Sets the maximum idle time in minutes before FTP server terminates the current connection:
tux >sudoyast ftp-server idle-time set_idle_time=15- logging
Controls whether to save the log messages into a log file:
tux >sudoyast ftp-server logging enabletux >sudoyast ftp-server logging disable- max_clients
Specifies the maximum number of concurrently connected clients:
tux >sudoyast ftp-server max_clients set_max_clients=1500- max_clients_ip
Specifies the maximum number of concurrently connected clients via IP:
tux >sudoyast ftp-server max_clients_ip set_max_clients=20- max_rate_anon
Specifies the maximum data transfer rate permitted for anonymous clients (KB/s):
tux >sudoyast ftp-server max_rate_anon set_max_rate=10000- max_rate_authen
Specifies the maximum data transfer rate permitted for locally authenticated users (KB/s):
tux >sudoyast ftp-server max_rate_authen set_max_rate=10000- port_range
Specifies the port range for passive connection replies:
tux >sudoyast ftp-server port_range set_min_port=20000 set_max_port=30000For a complete list of options, run
yast ftp-server port_range help.- show
Displays FTP server settings.
- startup
Controls the FTP start-up method:
tux >sudoyast ftp-server startup atbootFor a complete list of options, run
yast ftp-server startup help.- umask
Specifies the file umask for
authenticated:anonymoususers:tux >sudoyast ftp-server umask set_umask=177:077- welcome_message
Specifies the text to display when someone connects to the FTP server:
tux >sudoyast ftp-server welcome_message set_message="hello everybody"
1.4.3.8 yast http-server #Edit source
Configures the HTTP server (Apache2). yast http-server
accepts the following commands:
- configure
Configures the HTTP server host settings:
tux >sudoyast http-server configure host=main servername=www.example.com \ serveradmin=admin@example.comFor a complete list of options, run
yast http-server configure
        help
.
- hosts
Configures virtual hosts:
tux >sudoyast http-server hosts create servername=www.example.com \ serveradmin=admin@example.com documentroot=/var/wwwFor a complete list of options, run
yast http-server hosts
        help
.
- listen
Specifies the ports and network addresses where the HTTP server should listen:
tux >sudoyast http-server listen add=81tux >sudoyast http-server listen list Listen Statements: ================== :80 :81tux >sudoyast http-server delete=80For a complete list of options, run
yast http-server listen
        help
.
- mode
Enables or disables the wizard mode:
tux >sudoyast http-server mode wizard=on
- modules
Controls the Apache2 server modules:
tux >sudoyast http-server modules enable=php5,rewritetux >sudoyast http-server modules disable=ssltux >sudohttp-server modules list [...] Enabled rewrite Disabled ssl Enabled php5 [...]
1.4.3.9 yast kdump #Edit source
Configures kdump settings. For more information
on kdump, refer to the
Book “System Analysis and Tuning Guide”, Chapter 17 “Kexec and Kdump”, Section 17.7 “Basic Kdump Configuration”. yast kdump
accepts the following commands:
- copykernel
Copies the kernel into the dump directory.
- customkernel
Specifies the kernel_string part of the name of the custom kernel. The naming scheme is
/boot/vmlinu[zx]-kernel_string[.gz].tux >sudoyast kdump customkernel kernel=kdumpFor a complete list of options, run
yast kdump customkernel help.- dumpformat
Specifies the (compression) format of the dump kernel image. Available formats are 'none', 'ELF', 'compressed', or 'lzo':
tux >sudoyast kdump dumpformat dump_format=ELF- dumplevel
Specifies the dump level number in the range from 0 to 31:
tux >sudoyast kdump dumplevel dump_level=24- dumptarget
Specifies the destination for saving dump images:
tux >sudokdump dumptarget taget=ssh server=name_server port=22 \ dir=/var/log/dump user=user_nameFor a complete list of options, run
yast kdump dumptarget help.- immediatereboot
Controls whether the system should reboot immediately after saving the core in the kdump kernel:
tux >sudoyast kdump immediatereboot enabletux >sudoyast kdump immediatereboot disable- keepolddumps
Specifies how many old dump images are kept. Specify zero to keep them all:
tux >sudoyast kdump keepolddumps no=5- kernelcommandline
Specifies the command line that needs to be passed off to the kdump kernel:
tux >sudoyast kdump kernelcommandline command="ro root=LABEL=/"- kernelcommandlineappend
Specifies the command line that you need to append to the default command line string:
tux >sudoyast kdump kernelcommandlineappend command="ro root=LABEL=/"- notificationcc
Specifies an e-mail address for sending copies of notification messages:
tux >sudoyast kdump notificationcc email="user1@example.com user2@example.com"- notificationto
Specifies an e-mail address for sending notification messages:
tux >sudoyast kdump notificationto email="user1@example.com user2@example.com"- show
Displays
kdumpsettings:tux >sudoyast kdump show Kdump is disabled Dump Level: 31 Dump Format: compressed Dump Target Settings target: file file directory: /var/crash Kdump immediate reboots: Enabled Numbers of old dumps: 5- smtppass
Specifies the file with the plain text SMTP password used for sending notification messages:
tux >sudoyast kdump smtppass pass=/path/to/file- smtpserver
Specifies the SMTP server host name used for sending notification messages:
tux >sudoyast kdump smtpserver server=smtp.server.com- smtpuser
Specifies the SMTP user name used for sending notification messages:
tux >sudoyast kdump smtpuser user=smtp_user- startup
Enables or disables start-up options:
tux >sudoyast kdump startup enable alloc_mem=128,256tux >sudoyast kdump startup disable
1.4.3.10 yast keyboard #Edit source
Configures the system keyboard for virtual consoles. It does not affect
the keyboard settings in graphical desktop environments, such as GNOME
or KDE. yast keyboard accepts the following commands:
- list
Lists all available keyboard layouts.
- set
Activates new keyboard layout setting:
tux >sudoyast keyboard set layout=czech- summary
Displays the current keyboard configuration.
1.4.3.11 yast lan #Edit source
Configures network cards. yast lan accepts the
following commands:
- add
Configures a new network card:
tux >sudoyast lan add name=vlan50 ethdevice=eth0 bootproto=dhcpFor a complete list of options, run
yast lan add help.- delete
Deletes an existing network card:
tux >sudoyast lan delete id=0- edit
Changes the configuration of an existing network card:
tux >sudoyast lan edit id=0 bootproto=dhcp- list
Displays a summary of network card configuration:
tux >sudoyast lan list id name, bootproto 0 Ethernet Card 0, NONE 1 Network Bridge, DHCP
1.4.3.12 yast language #Edit source
Configures system languages. yast language accepts the
following commands:
- list
Lists all available languages.
- set
Specifies the main system languages and secondary languages as well:
tux >sudoyast language set lang=cs_CZ languages=en_US,es_ES no_packages
1.4.3.13 yast mail #Edit source
Displays the configuration of the mail system:
tux >sudoyast mail summary
1.4.3.14 yast nfs #Edit source
Controls the NFS client. yast nfs accepts the following
commands:
- add
Adds a new NFS mount:
tux >sudoyast nfs add spec=remote_host:/path/to/nfs/share file=/local/mount/pointFor a complete list of options, run
yast nfs add help.- delete
Deletes an existing NFS mount:
tux >sudoyast nfs delete spec=remote_host:/path/to/nfs/share file=/local/mount/pointFor a complete list of options, run
yast nfs delete help.- edit
Changes an existing NFS mount:
tux >sudoyast nfs edit spec=remote_host:/path/to/nfs/share \ file=/local/mount/point type=nfs4For a complete list of options, run
yast nfs edit help.- list
Lists existing NFS mounts:
tux >sudoyast nfs list Server Remote File System Mount Point Options ---------------------------------------------------------------- nfs.example.com /mnt /nfs/mnt nfs nfs.example.com /home/tux/nfs_share /nfs/tux nfs
1.4.3.15 yast nfs-server #Edit source
Configures the NFS server. yast nfs-server accepts the
following commands:
- add
Adds a directory to export:
tux >sudoyast nfs-server add mountpoint=/nfs/export hosts=*.allowed_hosts.comFor a complete list of options, run
yast nfs-server add help.- delete
Deletes a directory from the NFS export:
tux >sudoyast nfs-server delete mountpoint=/nfs/export- set
Specifies additional parameters for the NFS server:
tux >sudoyast nfs-server set enablev4=yes security=yesFor a complete list of options, run
yast nfs-server set help.- start
Starts the NFS server service:
tux >sudoyast nfs-server start- stop
Stops the NFS server service:
tux >sudoyast nfs-server stop- summary
Displays a summary of the NFS server configuration:
tux >sudoyast nfs-server summary NFS server is enabled NFS Exports * /mnt * /home NFSv4 support is enabled. The NFSv4 domain for idmapping is localdomain. NFS Security using GSS is enabled.
1.4.3.16 yast nis #Edit source
Configures the NIS client. yast nis accepts the
following commands:
- configure
Changes global settings of a NIS client:
tux >sudoyast nis configure server=nis.example.com broadcast=yesFor a complete list of options, run
yast nis configure help.- disable
Disables the NIS client:
tux >sudoyast nis disable- enable
Enables your machine as NIS client:
tux >sudoyast nis enable server=nis.example.com broadcast=yes automounter=yesFor a complete list of options, run
yast nis enable help.- find
Shows available NIS servers for a given domain:
tux >sudoyast nis find domain=nisdomain.com- summary
Displays a configuration summary of a NIS client.
1.4.3.17 yast nis-server #Edit source
Configures a NIS server. yast nis-server accepts the
following commands:
- master
Configures a NIS master server:
tux >sudoyast nis-server master domain=nisdomain.com yppasswd=yesFor a complete list of options, run
yast nis-server master help.- slave
Configures a NIS slave server:
tux >sudoyast nis-server slave domain=nisdomain.com master_ip=10.100.51.65For a complete list of options, run
yast nis-server slave help.- stop
Stops a NIS server:
tux >sudoyast nis-server stop- summary
Displays a configuration summary of a NIS server:
tux >sudoyast nis-server summary
1.4.3.18 yast proxy #Edit source
Configures proxy settings. yast proxy accepts the
following commands:
- authentication
Specifies the authentication options for proxy:
tux >sudoyast proxy authentication username=tux password=secretFor a complete list of options, run
yast proxy authentication help.- enable, disable
Enables or disables proxy settings.
- set
Changes the current proxy settings:
tux >sudoyast proxy set https=proxy.example.comFor a complete list of options, run
yast proxy set help.- summary
Displays proxy settings.
1.4.3.19 yast rdp #Edit source
Controls remote desktop settings. yast rdp accepts the
following commands:
- allow
Allows remote access to the server's desktop:
tux >sudoyast rdp allow set=yes- list
Displays the remote desktop configuration summary.
1.4.3.20 yast samba-client #Edit source
Configures the Samba client settings. yast samba-client
accepts the following commands:
- configure
Changes global settings of Samba:
tux >sudoyast samba-client configure workgroup=FAMILY- isdomainmember
Verifies if the machine is a member of a domain:
tux >sudoyast samba-client isdomainmember domain=SMB_DOMAIN- joindomain
Makes the machine a member of a domain:
tux >sudoyast samba-client joindomain domain=SMB_DOMAIN user=username password=pwd- winbind
Enables or disables Winbind services (the
winbindddaemon):tux >sudoyast samba-client winbind enabletux >sudoyast samba-client winbind disable
1.4.3.21 yast samba-server #Edit source
Configures Samba server settings. yast samba-server
accepts the following commands:
- backend
Specifies the back-end for storing user information:
tux >sudoyast samba-server backend smbpasswdFor a complete list of options, run
yast samba-server backend help.- configure
Configures global settings of the Samba server:
tux >sudoyast samba-server configure workgroup=FAMILY description='Home server'For a complete list of options, run
yast samba-server configure help.- list
Displays a list of available shares:
tux >sudoyast samba-server list Status Type Name ============================== Disabled Disk profiles Enabled Disk print$ Enabled Disk homes Disabled Disk groups Enabled Disk movies Enabled Printer printers- role
Specifies the role of the Samba server:
tux >sudoyast samba-server role standaloneFor a complete list of options, run
yast samba-server role help.- service
Enables or disables the Samba services (
smbandnmb):tux >sudoyast samba-server service enabletux >sudoyast samba-server service disable- share
Manipulates a single Samba share:
tux >sudoyast samba-server share name=movies browseable=yes guest_ok=yesFor a complete list of options, run
yast samba-server share
        help
.
1.4.3.22 yast security #Edit source
Controls the security level of the host. yast security
accepts the following commands:
- level
Specifies the security level of the host:
tux >sudoyast security level serverFor a complete list of options, run
yast security level help.- set
Sets the value of specific options:
tux >sudoyast security set passwd=sha512 crack=yesFor a complete list of options, run
yast security set help.- summary
Displays a summary of the current security configuration:
sudoyast security summary
1.4.3.23 yast sound #Edit source
Configures sound card settings. yast sound accepts the
following commands:
- add
Configures a new sound card. Without any parameters, the command adds the first one detected.
tux >sudoyast sound add card=0 volume=75For a complete list of options, run
yast sound add help.- channels
Lists available volume channels of a sound card:
tux >sudoyast sound channels card=0 Master 75 PCM 100- modules
Lists all available sound kernel modules:
tux >sudoyast sound modules snd-atiixp ATI IXP AC97 controller (snd-atiixp) snd-atiixp-modem ATI IXP MC97 controller (snd-atiixp-modem) snd-virtuoso Asus Virtuoso driver (snd-virtuoso) [...]- playtest
Plays a test sound on a sound card:
tux >sudoyast sound playtest card=0- remove
Removes a configured sound card:
tux >sudoyast sound remove card=0tux >sudoyast sound remove all- set
Specifies new values for a sound card:
tux >sudoyast sound set card=0 volume=80- show
Displays detailed information about a sound card:
tux >sudoyast sound show card=0 Parameters of card 'ThinkPad X240' (using module snd-hda-intel): align_buffer_size Force buffer and period sizes to be multiple of 128 bytes. bdl_pos_adj BDL position adjustment offset. beep_mode Select HDA Beep registration mode (0=off, 1=on) (default=1). Default Value: 0 enable_msi Enable Message Signaled Interrupt (MSI) [...]- summary
Prints a configuration summary for all sound cards on the system:
tux >sudoyast sound summary- volume
Specifies the volume level of a sound card:
sudoyast sound volume card=0 play
1.4.3.24 yast sysconfig #Edit source
Controls the variables in files under /etc/sysconfig.
yast sysconfig accepts the following commands:
- clear
Sets empty value to a variable:
tux >sudoyast sysconfig clear=POSTFIX_LISTEN
Tip: Variable in Multiple Files
If the variable is available in several files, use the VARIABLE_NAME$FILE_NAME syntax:
tux >sudoyast sysconfig clear=CONFIG_TYPE$/etc/sysconfig/mail- details
Displays detailed information about a variable:
tux >sudoyast sysconfig details variable=POSTFIX_LISTEN Description: Value: File: /etc/sysconfig/postfix Possible Values: Any value Default Value: Configuration Script: postfix Description: Comma separated list of IP's NOTE: If not set, LISTEN on all interfaces- list
Displays summary of modified variables. Use
allto list all variables and their values:tux >sudoyast sysconfig list all AOU_AUTO_AGREE_WITH_LICENSES="false" AOU_ENABLE_CRONJOB="true" AOU_INCLUDE_RECOMMENDS="false" [...]- set
Sets a value to a variable:
tux >sudoyast sysconfig set DISPLAYMANAGER=gdmTip: Variable in Multiple Files
If the variable is available in several files, use the VARIABLE_NAME$FILE_NAME syntax:
tux >sudoyast sysconfig set CONFIG_TYPE$/etc/sysconfig/mail=advanced
1.4.3.25 yast tftp-server #Edit source
Configures a TFTP server. yast tftp-server accepts the
following commands:
- directory
Specifies the directory of the TFTP server:
tux >sudoyast tftp-server directory path=/srv/tftptux >sudoyast tftp-server directory list Directory Path: /srv/tftp- status
Controls the status of the TFTP server service:
tux >sudoyast tftp-server status disabletux >sudoyast tftp-server status show Service Status: falsetux >sudoyast tftp-server status enable
1.4.3.26 yast timezone #Edit source
Configures the time zone. yast timezone accepts the
following commands:
- list
Lists all available time zones grouped by region:
tux >sudoyast timezone list Region: Africa Africa/Abidjan (Abidjan) Africa/Accra (Accra) Africa/Addis_Ababa (Addis Ababa) [...]- set
Specifies new values for the time zone configuration:
tux >sudoyast timezone set timezone=Europe/Prague hwclock=local- summary
Displays the time zone configuration summary:
tux >sudoyast timezone summary Current Time Zone: Europe/Prague Hardware Clock Set To: Local time Current Time and Date: Mon 12. March 2018, 11:36:21 CET
1.4.3.27 yast users #Edit source
Manages user accounts. yast users accepts the following
commands:
- add
Adds a new user:
tux >sudoyast users add username=user1 password=secret home=/home/user1For a complete list of options, run
yast users add help.- delete
Deletes an existing user account:
tux >sudoyast users delete username=user1 delete_homeFor a complete list of options, run
yast users delete help.- edit
Changes an existing user account:
tux >sudoyast users edit username=user1 password=new_secretFor a complete list of options, run
yast users edit help.- list
Lists existing users filtered by user type:
tux >sudoyast users list systemFor a complete list of options, run
yast users list help.- show
Displays details about a user:
tux >sudoyast users show username=wwwrun Full Name: WWW daemon apache List of Groups: www Default Group: wwwrun Home Directory: /var/lib/wwwrun Login Shell: /sbin/nologin Login Name: wwwrun UID: 456For a complete list of options, run
yast users show
        help
.