Security Guide
- About This Guide
- 1 Security and Confidentiality
- I Authentication
- II Local Security
- III Network Security
- IV Confining Privileges with AppArmor
- 19 Introducing AppArmor
- 20 Getting Started
- 21 Immunizing Programs
- 22 Profile Components and Syntax
- 23 AppArmor Profile Repositories
- 24 Building and Managing Profiles with YaST
- 25 Building Profiles from the Command Line
- 26 Profiling Your Web Applications Using ChangeHat
- 27 Confining Users with
pam_apparmor - 28 Managing Profiled Applications
- 29 Support
- 30 AppArmor Glossary
- V SELinux
- VI The Linux Audit Framework
- A GNU Licenses
5 LDAP—A Directory Service Edit source
Abstract#
The Lightweight Directory Access Protocol (LDAP) is a protocol designed to access and maintain information directories. LDAP can be used for user and group management, system configuration management, address management, and more. This chapter provides a basic understanding of how LDAP works.
Ideally, a central server stores the data in a directory and distributes it to all clients using a well-defined protocol. The structured data allow a wide range of applications to access them. A central repository reduces the necessary administrative effort. The use of an open and standardized protocol like LDAP ensures that as many client applications as possible can access such information.
A directory in this context is a type of database optimized for quick and effective reading and searching. The type of data stored in a directory tends to be long lived and changes infrequently. This allows the LDAP service to be optimized for high performance concurrent reads, whereas conventional databases are optimized for accepting a large number of writes to data in a short time.
5.1 Structure of an LDAP Directory Tree #Edit source
This section introduces the layout of an LDAP directory tree and provides the basic terminology used with regard to LDAP. If you are familiar with LDAP, read on at Section 5.3, “Manually Configuring a 389 Directory Server”.
An LDAP directory has a tree structure. All entries (called objects) of the directory have a defined position within this hierarchy. This hierarchy is called the directory information tree (DIT). The complete path to the desired entry, which unambiguously identifies it, is called the distinguished name or DN. An object in the tree is identified by its relative distinguished name (RDN). The distinguished name is built from the RDN’s of all entries on the path to the entry.
The relations within an LDAP directory tree become more evident in the following example, shown in Figure 5.1, “Structure of an LDAP Directory”.

Figure 5.1: Structure of an LDAP Directory #
The complete diagram is a fictional directory information tree. The
entries on three levels are depicted. Each entry corresponds to one box
in the image. The complete, valid distinguished name
for the fictional employee Geeko
Linux, in this case, is cn=Geeko
Linux,ou=doc,dc=example,dc=com. It is composed by adding the
RDN cn=Geeko Linux to the DN of the preceding entry
ou=doc,dc=example,dc=com.
The types of objects that can be stored in the DIT are globally determined following a Schema. The type of an object is determined by the object class. The object class determines what attributes the relevant object must or may be assigned. The Schema contains all object classes and attributes which can be used by the LDAP server. Attributes are a structured data type. Their syntax, ordering and other behavior is defined by the Schema. LDAP servers supply a core set of Schemas which can work in a broad variety of environments. If a custom Schema is required, you can load it to an LDAP server.
Table 5.1, “Commonly Used Object Classes and Attributes” offers a small overview of the object
classes from 00core.ldif and
06inetorgperson.ldif used in the example, including
required attributes (Req. Attr.) and valid attribute values. After installing
389-ds, these can be found in
usr/share/dirsrv/schema.
Table 5.1: Commonly Used Object Classes and Attributes #
|
Object Class |
Meaning |
Example Entry |
Req. Attr. |
|---|---|---|---|
|
|
name components of the domain |
example |
displayName |
|
|
organizational unit |
doc |
ou |
|
|
person-related data for the intranet or Internet |
Geeko Linux |
cn |
Example 5.1, “Excerpt from CN=schema” shows an excerpt from a Schema directive with explanations.
Example 5.1: Excerpt from CN=schema #
attributetype (1.2.840.113556.1.2.102 NAME 'memberOf' 1
       DESC 'Group that the entry belongs to' 2
       SYNTAX 1.3.6.1.4.1.1466.115.121.1.12 3
       X-ORIGIN 'Netscape Delegated Administrator') 4

objectclass (2.16.840.1.113730.3.2.333 NAME 'nsPerson' 5
       DESC 'A representation of a person in a directory server' 6
       SUP top STRUCTURAL 7
       MUST ( displayName $ cn ) 8
       MAY ( userPassword $ seeAlso $ description $ legalName $ mail \
             $ preferredLanguage ) 9
       X-ORIGIN '389 Directory Server Project’
  ...
The name of the attribute, its unique object identifier (OID, numerical), and the abbreviation of the attribute. | |
A brief description of the attribute with | |
The type of data that can be held in the attribute. In this case, it is a case-insensitive directory string. | |
The source of the schema element (for example, the name of the project). | |
The definition of the object class | |
A brief description of the object class. | |
The | |
With | |
With |
5.2 Installing the Software for 389 Directory Server #Edit source
The 389-ds package contains the 389 Directory Server and the
administration tools. If the package is not installed yet, install it with
the following command:
tux >sudozypper install 389-ds
After installation, you can set up the server either manually (as described in Section 5.3) or create a very basic setup with YaST (as described in Section 5.4).
5.3 Manually Configuring a 389 Directory Server #Edit source
Setting up the 389 Directory Server takes the following basic steps:
The 389 Directory Server is controlled by 3 primary commands:
dsctlManages a local instance and requires
rootpermissions. Requires you to be connected to a terminal which is running the directory server instance. Used for starting, stopping, backing up the database and more.dsconfThe primary tool used for administration and configuration of the server. Manages an instance's configuration via its external interfaces. This allows you to make configuration changes remotely on the instance.
dsidmUsed for identity management (manage users, groups, passwords etc.). The permissions are granted by access controls, so users can reset their own password or change details of their own account, for example.
5.3.1 Creating the 389 Directory Server Instance #Edit source
You create the instance with the dscreate command.
It can take a configuration file (*.inf) which
defines the instance configuration settings. Alternatively, the command can
be run in an interactive mode.
Note: Instance Name
If not specified otherwise, the default instance name is
localhost. The instance name cannot
be changed after the instance has been created.
Example 5.2 shows an
example configuration file that you can use as a starting point. Alternatively,
use dscreate create-template to create a template
*.inf file. The template is commented and pre-filled,
so you can adjust its variables to your needs. For more details, see the
man page of dscreate.
If you want to set up a trial instance, start an editor and save the following as
/tmp/instance.inf:Example 5.2: Basic Instance Configuration File #
# /tmp/instance.inf [general] config_version = 2 [slapd] root_password = YOUR_PASSWORD_FOR_CN=DIRECTORY_MANAGER1 [backend-userroot] sample_entries = yes suffix = dc=example,dc=comSet the
root_passwordto the password for the directory serverrootuser. The password is used for LDAP server administration only.To create the 389 Directory Server instance from Example 5.2, run:
tux >sudodscreate from-file /tmp/instance.infThis creates a working LDAP server.
If
dscreateshould fail, the messages will tell you why. For more details, repeat the command with the-voption:tux >sudodscreate -v from-file /tmp/instance.infCheck the status of the server with:
tux >sudodsctl localhost status instance 'Localhost' is runningIn case you want to delete the instance later on:
tux >sudodsctl localhost remove --do-itWith this command, you can also remove partially installed or corrupted instances.
5.3.2 Using CA Certificates for TSL #Edit source
You can manage the CA certificates for 389 Directory Server with the following command
line tools: certutil, openssl, and
pk12util.
For testing purposes, you can create a self-signed certificate with
dscreate. Find the certificate at
/etc/dirsrv/slapd-localhost/ca.crt. For remote administration,
copy the certificate to a readable location. For production environments,
contact a CA authority of your organization's choice and request a server
certificate, a client certificate, and a root certificate.
Make sure to meet the following requirements before executing the procedure below:
You have a server certificate and a private key to use for the TSL connection.
You have set up an NSS (Network Security Services) database (for example, with the
certutilcommand).
Before you can import an existing private key and certificate into the NSS
(Network Security Services) database, you need to create a bundle of the
private key and the server certificate. This results in a *.p12
file.
Important: *.p12 File and Friendly Name
When creating the PKCS12 bundle, you must encode a “friendly name”
in the *.p12 file.
Make sure to use Server-Cert as friendly name. Otherwise
the TLS connection will fail, because the 389 Directory Server searches for this exact string.
As soon as you have imported the *.p12 file in the NSS
database, the friendly name cannot be changed any more.
To create the PKCS12 bundle with the required friendly name:
root #openssl pkcs12 -export -in SERVER.crt \ -inkey SERVER.key -out SERVER.p12 \ -name Server-CertReplace SERVER.crt with the server certificate and SERVER.key with the private key to be bundled. With
-out, specify the name of the*.p12file. Use-nameto set the friendly name to use,Server-Cert.After you have created the required SERVER.p12 file, import the file into your NSS database:
pk12util -i SERVER.p12 -d PATH_TO_NSS_DB
5.3.3 Configuring Admin Credentials for Remote/Local Access #Edit source
For remote or local administration of the 389 Directory Server, you can create a
.dsrc configuration file in your home directory. This
saves you to type your user name and connection details with every command.
Example 5.3 shows an example configuration file for remote
administration, whereas Example 5.4 shows one for local administration.
Example 5.3: A .dsrc File for Remote Administration #
# cat ~/.dsrc
[localhost]
uri = ldaps://localhost 1
basedn = dc=example,dc=com
binddn = cn=Directory Manager
tls_cacertdir = PATH_TO_CERTDIR 2
If you want to administer the instance on the same host where the 389 Directory Server runs, use the configuration file in Example 5.4.
Example 5.4: A .dsrc File for Local Administration #
# cat ~/.dsrc
[localhost]
# Note that '/' is replaced with '%%2f'.
uri = ldapi://%%2fvar%%2frun%%2fslapd-localhost.socket 1
basedn = dc=example,dc=com
binddn = cn=Directory Manager
When using |
5.3.4 Configuring LDAP Users and Groups #Edit source
Users and groups can be created and managed with the dsidm
command. It either runs interactively or you can use it with arguments from
the command line.
In the following example, we add two users, wilber and geeko,
by specifying their data via command line arguments.
Procedure 5.1: Creating LDAP Users #
Create the user
wilber:tux >sudodsidmlocalhost user create --uid \ --cnwilber--displayName 'Wilber Fox' --uidNumber 1000 --gidNumber 1000 \ --homeDirectory /home/wilberTo look up a user's
distinguished name(fully qualified name to the directory object, which is guaranteed unique):tux >sudodsidm localhost user getwilberdn: uid=wilber,ou=people,dc=example,dc=com [...]The system prompts you for the directory server
rootuser password (unless you configured remote or local access as described in Section 5.3.3, “Configuring Admin Credentials for Remote/Local Access”).You need the distinguished name for actions such as changing the password for a user.
To set or change the password for
wilber:tux >sudodsidm localhost account reset_password \ uid=wilber,ou=people,dc=example,dc=comThe system prompts you for the directory server
rootuser password (unless you configured remote or local access as described in Section 5.3.3, “Configuring Admin Credentials for Remote/Local Access”).Enter the new password for
wilbertwice.If the action was successful, you get the following message:
reset password for uid=
wilber,ou=people,dc=example,dc=com
Create the user
geeko:tux >sudodsidmlocalhost user create --uid \ --cngeeko--displayName 'Suzanne Geeko' \ --uidNumber 1001 --gidNumber 1001 --homeDirectory /home/geeko
Procedure 5.2: Creating LDAP Groups and Assigning Users to Them #
In the following, we create a group, server_admins, and assign the user
wilber to this group.
Create the group:
tux >sudodsidm localhost group createYou will be prompted for a group name:
Enter value for cn :
Enter the name for the group, for example:
server_admins.Add the user
wilberto the group:tux >sudodsidm localhost group add_member server_admins uid=wilber,ou=people,dc=example,dc=com added member: uid=wilber,ou=people,dc=example,dc=comVerify if authentication works:
tux >sudoldapwhoami -H ldaps://localhost -D \ uid=wilber,ou=people,dc=example,dc=com -W -xIf you are prompted for the LDAP password of
wilber, authentication works.If the command fails with the following error, you are probably using a self-signed certificate:
ldap_sasl_bind(SIMPLE): Can't contact LDAP server (-1)
In that case, edit
/etc/openldap/ldap.confand add the path to the certificate. For example:TLS_CACERT=/etc/dirsrv/slapd-localhost/ca.crt
Alternatively, include the path to the certificate in the
whoamicommand:tux >sudoLDAPTLS_CACERT=/etc/dirsrv/slapd-localhost/ca.crt \ ldapwhoami -H ldaps://localhost -D \ uid=wilber,ou=people,dc=example,dc=com -W -x
5.3.5 Setting Up SSSD #Edit source
SSSD (System Security Services Daemon) is a daemon that communicates with
remote identity providers and allows pam and
nsswitch to consume that data. SSSD can have multiple
back-ends, cache users and groups and provides features like SSH key
distributions.
On a separate server, install the
sssdpackage:tux >sudozypper in sssdDisable and stop the
nscddaemon because it conflicts withsssd:tux >sudosystemctl disable nscd && systemctl stop nscdCreate the SSSD configuration and restrict the login to the members of the group
server_adminsthat we created in Procedure 5.2:tux >sudodsidm localhost client_config sssd.conf server_adminsReview the output and paste (or redirect) it to
/etc/sssd/sssd.conf. If required, edit the configuration file according to your needs.To configure the certificates on your client, copy
ca.crtfrom the LDAP server to your client:tux >sudomkdir -p /etc/openldap/certs cp [...]>/ca.crt /etc/openldap/certs/ /usr/bin/c_rehash /etc/openldap/certsEnable and start SSSD:
tux >sudosystemctl enable sssd systemctl start sssdTo make sure SSSD is part of PAM and NSS, follow the instructions in sections Configure PAM (SUSE) and Configure NSS (SUSE) at http://www.port389.org/docs/389ds/howto/howto-sssd.html.
Verify if the client can provide the details for user
wilber:tux >sudoidwilberuid=1000(wilber) gid=100(users) groups=100(users)If everything is set up correctly,
wilbercan access the 389 Directory Server instance via SSH to the machine where you have installed and configured SSSD. However,geekowill fail to do so, becausegeekodoes not belong to the groupserver_adminsthat we have configured in Procedure 5.2.
5.4 Setting Up a 389 Directory Server with YaST #Edit source
You can use YaST to quickly create a very basic setup of the 389 Directory Server.
5.4.1 Creating an 389 Directory Server Instance with YaST #Edit source
In YaST, click › . Alternatively, start the module from command line with
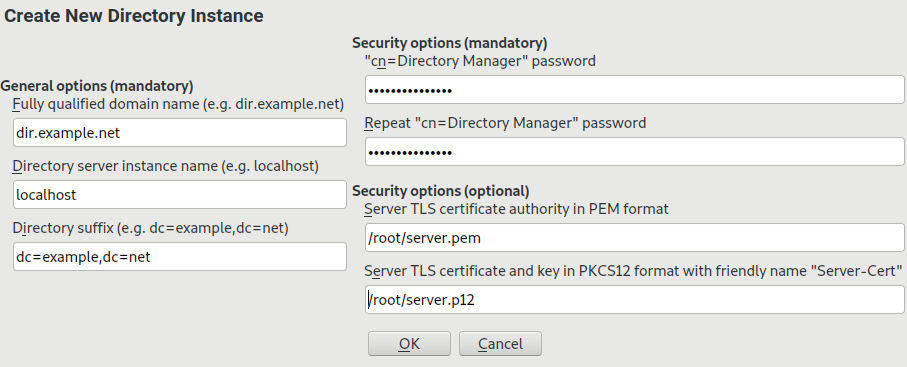
yast2 ldap-server.In the window that opens, you need to fill in all mandatory text fields.
Enter the of the 389 Directory Server. It must be resolvable from the host.
In , enter a local name for the LDAP server instance.

Note: Instance Name
The instance name cannot be changed after the instance has been created. If you plan for only one LDAP server, use the default instance name
localhost. However, if you plan to host multiple LDAP servers, use meaningful names for the individual instances.In , enter the base domain name of the LDAP tree. It is your domain name split by component. For example,
example.combecomesdc=example,dc=com.In the mandatory security options, enter the password for the directory manager (LDAP's root/admin account) and repeat the password in the next step. The password must be at least 8 characters long.
To run 389 Directory Server with a CA certificate, specify both of the following options:
Enter the path to the , with which the server certificates have been signed.
Enter the path to the . The
*.p12file contains the server's private key and certificate. These must have been signed by the CA in PEM format that you have specified above. The must beServer-Cert, see Section 5.3.2, “Using CA Certificates for TSL” for details.If you do not specify a CA certificate here, a self-signed certificate will be created automatically. After the instance has been created, find the related files in
/etc/dirsrv/slapd-INSTANCENAME.
If you are ready to create the instance, click .
YaST displays a message whether the creation was successful and where to find the log files.
The setup with YaST provides only a very basic configuration of the 389 Directory Server. To fine-tune more settings, see Section 5.3, “Manually Configuring a 389 Directory Server” or the documentation mentioned in Section 5.6, “For More Information”.
5.4.2 Configuring an LDAP Client with YaST #Edit source
YaST includes the module that helps define authentication scenarios involving either LDAP or Kerberos.
It can also be used to join Kerberos and LDAP separately. However, in many such cases, using this module may not be the first choice, such as for joining Active Directory (which uses a combination of LDAP and Kerberos). For more information, see Section 4.1, “Configuring an Authentication Client with YaST”.
Start the module by selecting › .
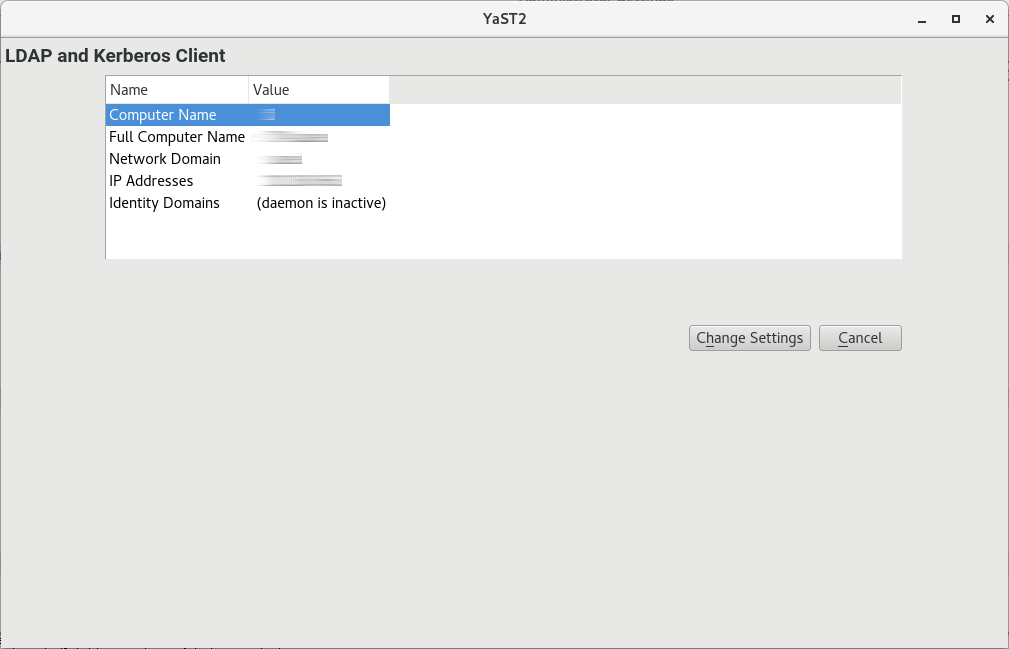
Figure 5.2: Window #
To configure an LDAP client, follow the procedure below:
In the window , click .
Make sure that the tab is chosen.
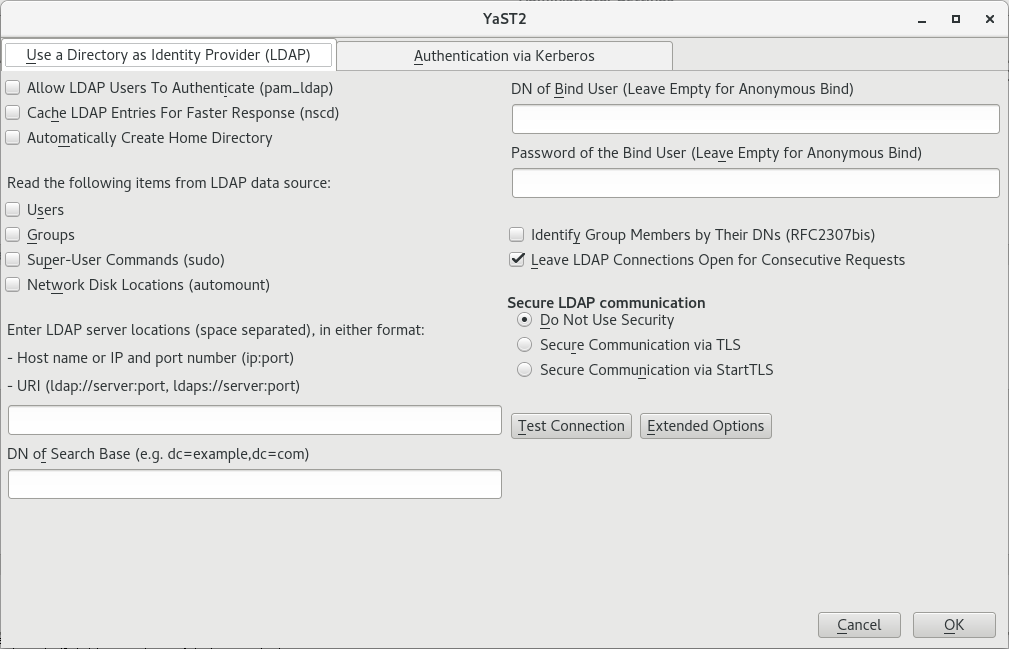
Specify one or more LDAP server URLs or host names under . For security reasons, we recommend to use
LDAPS://URLs only. When specifying multiple addresses, separate them with spaces.Specify the appropriate LDAP distinguished name (DN) under . For example, a valid entry could be
dc=example,dc=com.If your LDAP server supports TLS encryption, choose the appropriate security option under .
To first ask the server whether it supports TLS encryption and be able to downgrade to an unencrypted connection if it does not, use .
Activate other options as necessary:
You can and on the local computer for them.
If you want to cache LDAP entries locally, use .

Warning: Potential Security Risk with Caching
Using the cache bears security risks, depending on the used mechanism.
- nscd
If you define an authorization rule (for example, members of group
admincan log in), and you remove a user from that group, the client cache will not see that change until the cache expires or refreshes. So a user whose account has been revoked can still log in for a period of time later.- sssd
This caching mechanism constantly checks if group memberships are still valid. Thus the cache risk only exists if the
sssddaemon is disconnected from the LDAP server for any reason.
Specify the types of data that should be used from the LDAP source, such as and , , and (network-shared drives that can be automatically mounted on request).
Specify the distinguished name (DN) and password of the user under whose name you want to bind to the LDAP directory in and .
Otherwise, if the server supports it, you can also leave both text boxes empty to bind anonymously to the server.
Warning: Authentication Without Encryption
When using authentication without enabling transport encryption using TLS or StartTLS, the password will be transmitted in the clear.
Under , you can additionally configure timeouts for BIND operations.
To check whether the LDAP connection works, click .
To leave the dialog, click . Then wait for the setup to complete.
Finally, click .
5.5 Manually Administering LDAP Data #Edit source
The command line tools provided by the openldap2-client
package (like ldapsearch or ldapmodify)
can be used for administration of data in the LDAP directory. However, they
are low-level tools and hard to use. For details about their use, refer to
the respective man pages and documentation.
5.6 For More Information #Edit source
For more information about 389 Directory Server, see the upstream documentation, available at http://www.port389.org/docs/389ds/documentation.html.