Reference
- About This Guide
- I Advanced Administration
- II System
- 8 32-Bit and 64-Bit Applications in a 64-Bit System Environment
- 9 Introduction to the Boot Process
- 10 The
systemdDaemon - 11
journalctl: Query thesystemdJournal - 12 The Boot Loader GRUB 2
- 13 Basic Networking
- 14 UEFI (Unified Extensible Firmware Interface)
- 15 Special System Features
- 16 Dynamic Kernel Device Management with
udev
- III Services
- IV Mobile Computers
- A An Example Network
- B GNU Licenses
20 DHCP
Abstract#
The purpose of the Dynamic Host Configuration Protocol (DHCP) is to assign network settings centrally (from a server) rather than configuring them locally on every workstation. A host configured to use DHCP does not have control over its own static address. It is enabled to configure itself completely and automatically according to directions from the server. If you use the NetworkManager on the client side, you do not need to configure the client. This is useful if you have changing environments and only one interface active at a time. Never use NetworkManager on a machine that runs a DHCP server.
One way to configure a DHCP server is to identify each client using the hardware address of its network card (which should usually be fixed), then supply that client with identical settings each time it connects to the server. DHCP can also be configured to assign addresses to each relevant client dynamically from an address pool set up for this purpose. In the latter case, the DHCP server tries to assign the same address to the client each time it receives a request, even over extended periods. This works only if the network does not have more clients than addresses.
DHCP makes life easier for system administrators. Any changes, even bigger ones, related to addresses and the network configuration in general can be implemented centrally by editing the server's configuration file. This is much more convenient than reconfiguring numerous workstations. It is also much easier to integrate machines, particularly new machines, into the network, because they can be given an IP address from the pool. Retrieving the appropriate network settings from a DHCP server is especially useful in case of laptops regularly used in different networks.
In this chapter, the DHCP server will run in the same subnet as the
workstations, 192.168.2.0/24 with
192.168.2.1 as gateway. It has
the fixed IP address 192.168.2.254 and
serves two address ranges,
192.168.2.10 to
192.168.2.20 and
192.168.2.100 to
192.168.2.200.
A DHCP server supplies not only the IP address and the netmask, but also the host name, domain name, gateway, and name server addresses for the client to use. In addition to that, DHCP allows several parameters to be configured in a centralized way, for example, a time server from which clients may poll the current time or even a print server.
20.1 Configuring a DHCP Server with YaST #
To install a DHCP server, start YaST and select › . Choose › and select . Confirm the installation of the dependent packages to finish the installation process.
Important: LDAP Support
The YaST DHCP module can be set up to store the server configuration locally (on the host that runs the DHCP server) or to have its configuration data managed by an LDAP server. To use LDAP, set up your LDAP environment before configuring the DHCP server.
For more information about LDAP, see Book “Security Guide”, Chapter 5 “LDAP—A Directory Service”.
The YaST DHCP module (yast2-dhcp-server) allows
you to set up your own DHCP server for the local network. The module can run
in wizard mode or expert configuration mode.
20.1.1 Initial Configuration (Wizard) #
When the module is started for the first time, a wizard starts, prompting you to make a few basic decisions concerning server administration. Completing this initial setup produces a very basic server configuration that should function in its essential aspects. The expert mode can be used to deal with more advanced configuration tasks. Proceed as follows:
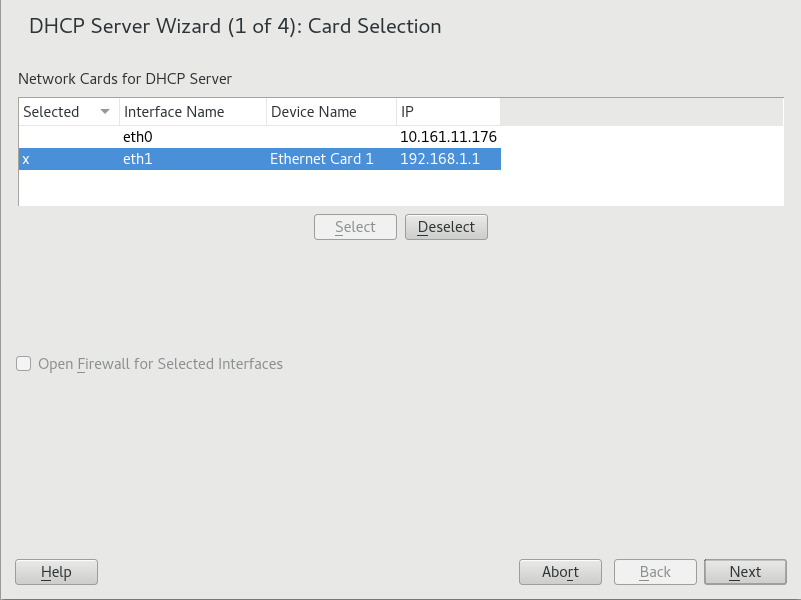
Select the interface from the list to which the DHCP server should listen and click and then . See Figure 20.1, “DHCP Server: Card Selection”.

Note: DHCP and
firewalldPlease note that the option does not (yet) support
firewalldin openSUSE Leap 15.0. To manually open the DHCP port, runtux >sudofirewall-cmd --zone=public --permanent --add-service=dhcptux >sudofirewall-cmd --reloadFigure 20.1: DHCP Server: Card Selection #
Use the check box to determine whether your DHCP settings should be automatically stored by an LDAP server. In the text boxes, provide the network specifics for all clients the DHCP server should manage. These specifics are the domain name, address of a time server, addresses of the primary and secondary name server, addresses of a print and a WINS server (for a mixed network with both Windows and Linux clients), gateway address, and lease time. See Figure 20.2, “DHCP Server: Global Settings”.
Figure 20.2: DHCP Server: Global Settings #
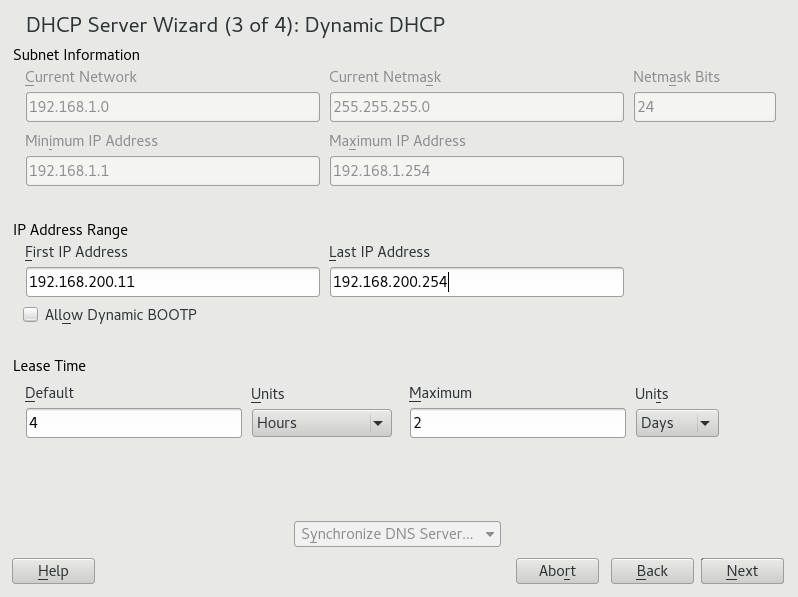
Configure how dynamic IP addresses should be assigned to clients. To do so, specify an IP range from which the server can assign addresses to DHCP clients. All these addresses must be covered by the same netmask. Also specify the lease time during which a client may keep its IP address without needing to request an extension of the lease. Optionally, specify the maximum lease time—the period during which the server reserves an IP address for a particular client. See Figure 20.3, “DHCP Server: Dynamic DHCP”.
Figure 20.3: DHCP Server: Dynamic DHCP #
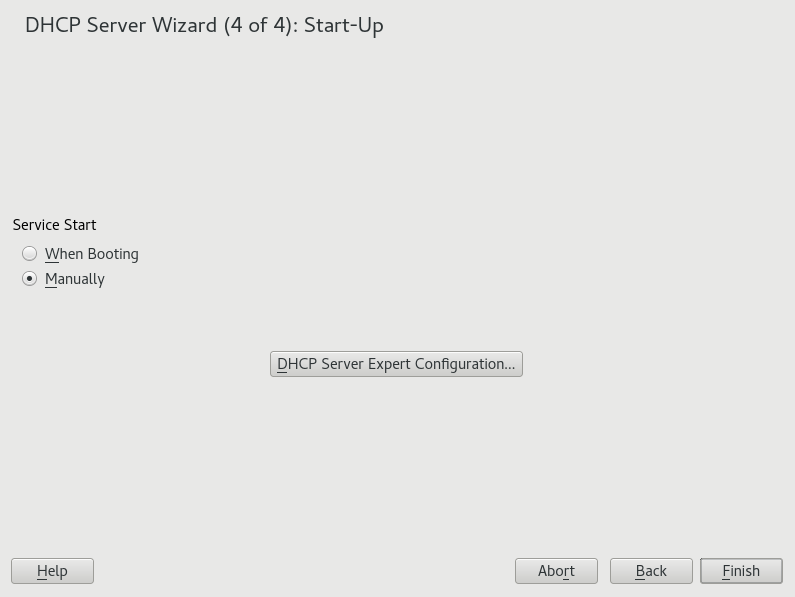
Define how the DHCP server should be started. Specify whether to start the DHCP server automatically when the system is booted or manually when needed (for example, for testing purposes). Click to complete the configuration of the server. See Figure 20.4, “DHCP Server: Start-Up”.
Figure 20.4: DHCP Server: Start-Up #
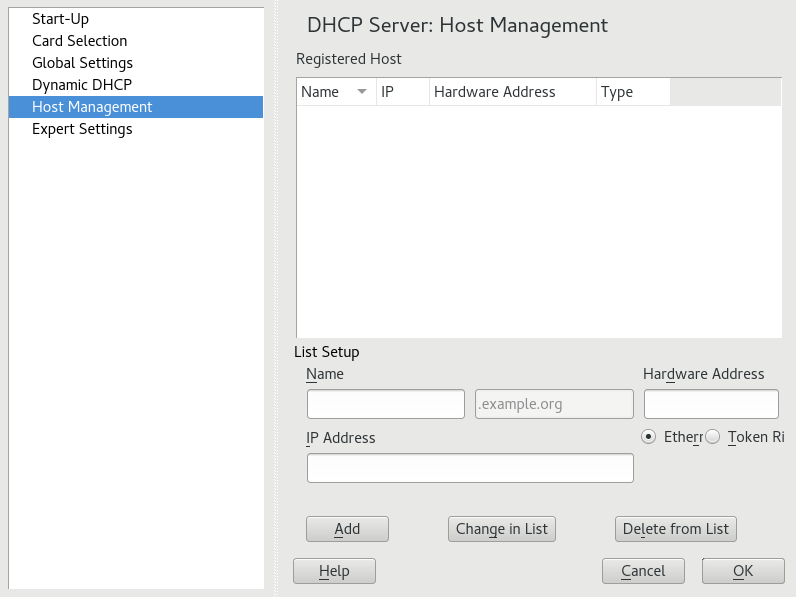
Instead of using dynamic DHCP in the way described in the preceding steps, you can also configure the server to assign addresses in quasi-static fashion. Use the text boxes provided in the lower part to specify a list of the clients to manage in this way. Specifically, provide the and the to give to such a client, the , and the (token ring or Ethernet). Modify the list of clients, which is shown in the upper part with , , and . See Figure 20.5, “DHCP Server: Host Management”.
Figure 20.5: DHCP Server: Host Management #
20.1.2 DHCP Server Configuration (Expert) #
In addition to the configuration method discussed earlier, there is also an expert configuration mode that allows you to change the DHCP server setup in every detail. Start the expert configuration by clicking in the dialog (see Figure 20.4, “DHCP Server: Start-Up”).
- Chroot Environment and Declarations
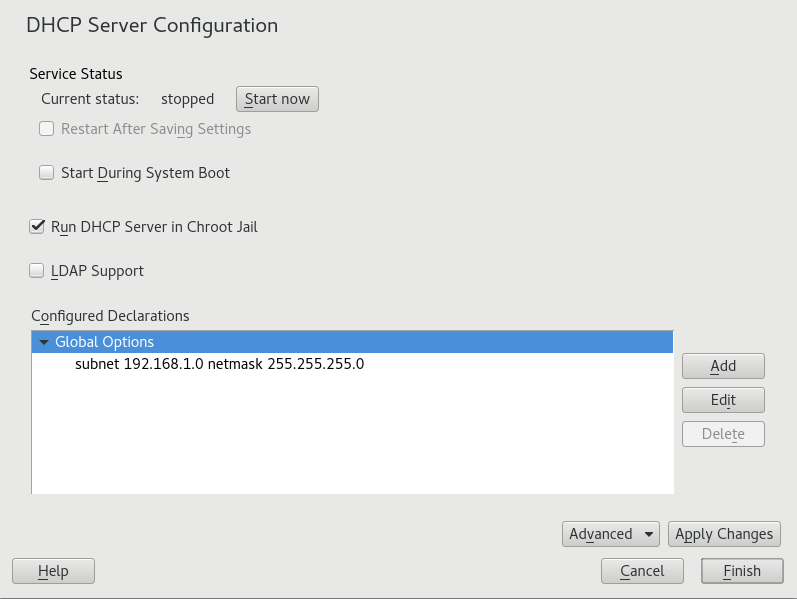
In this first dialog, make the existing configuration editable by selecting . An important feature of the behavior of the DHCP server is its ability to run in a chroot environment, or chroot jail, to secure the server host. If the DHCP server should ever be compromised by an outside attack, the attacker will still be in the chroot jail, which prevents them from accessing the rest of the system. The lower part of the dialog displays a tree view with the declarations that have already been defined. Modify these with , , and . Selecting takes you to additional expert dialogues. See Figure 20.6, “DHCP Server: Chroot Jail and Declarations”. After selecting , define the type of declaration to add. With , view the log file of the server, configure TSIG key management, and adjust the configuration of the firewall according to the setup of the DHCP server.
Figure 20.6: DHCP Server: Chroot Jail and Declarations #
- Selecting the Declaration Type
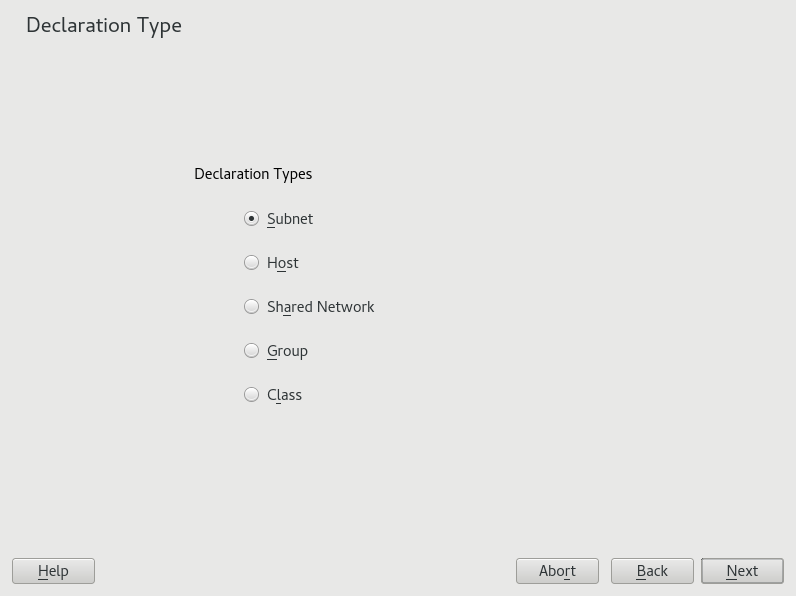
The of the DHCP server are made up of several declarations. This dialog lets you set the declaration types , , , , , and . This example shows the selection of a new subnet (see Figure 20.7, “DHCP Server: Selecting a Declaration Type”).
Figure 20.7: DHCP Server: Selecting a Declaration Type #
- Subnet Configuration
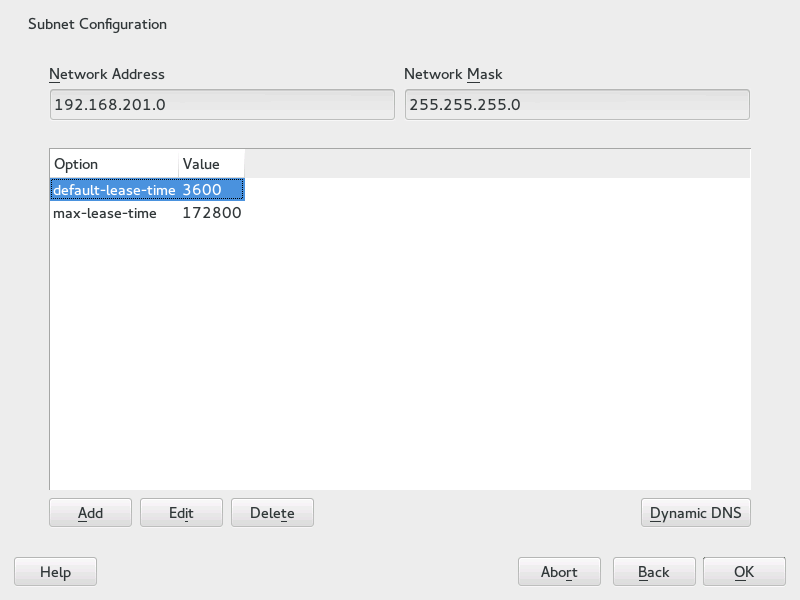
This dialog allows you specify a new subnet with its IP address and netmask. In the middle part of the dialog, modify the DHCP server start options for the selected subnet using , , and . To set up dynamic DNS for the subnet, select .
Figure 20.8: DHCP Server: Configuring Subnets #
- TSIG Key Management
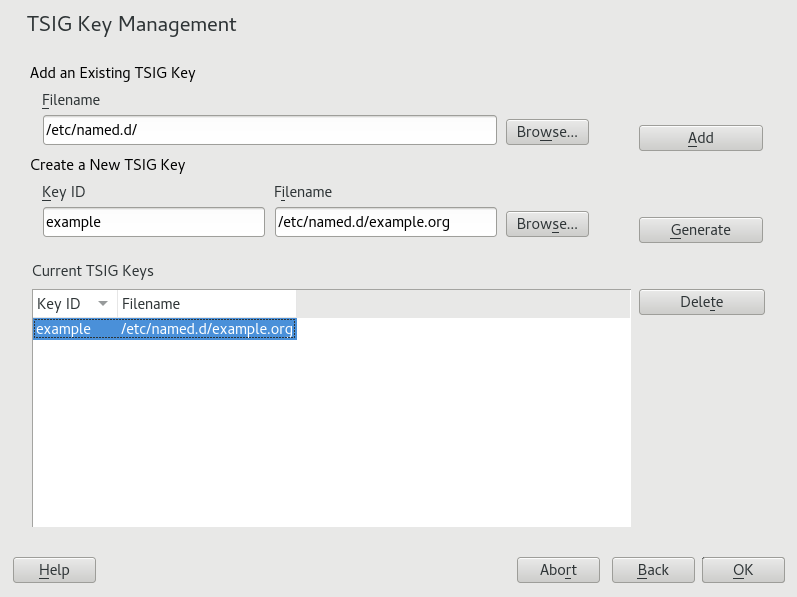
If you chose to configure dynamic DNS in the previous dialog, you can now configure the key management for a secure zone transfer. Selecting takes you to another dialog in which to configure the interface for dynamic DNS (see Figure 20.10, “DHCP Server: Interface Configuration for Dynamic DNS”).
Figure 20.9: DHCP Server: TSIG Configuration #
- Dynamic DNS: Interface Configuration
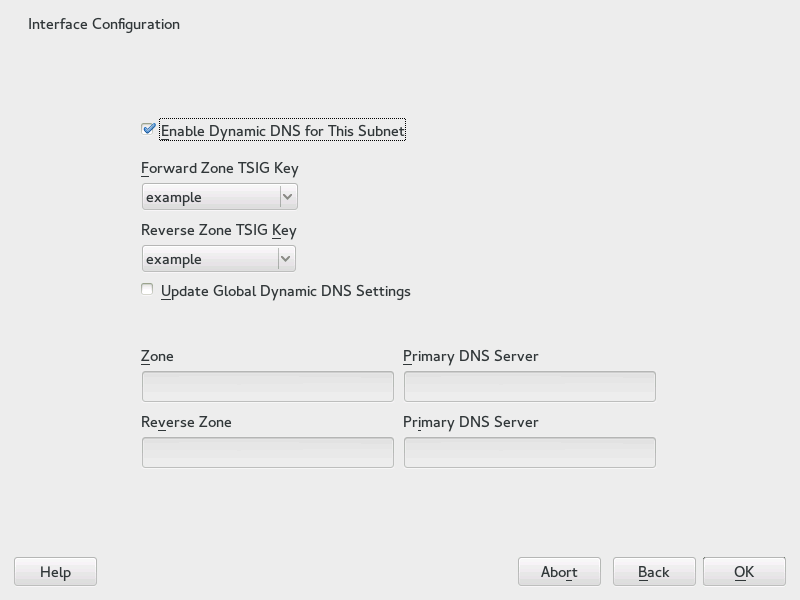
You can now activate dynamic DNS for the subnet by selecting . After doing so, use the drop-down box to activate the TSIG keys for forward and reverse zones, making sure that the keys are the same for the DNS and the DHCP server. With , enable the automatic update and adjustment of the global DHCP server settings according to the dynamic DNS environment. Finally, define which forward and reverse zones should be updated per dynamic DNS, specifying the name of the primary name server for each of the two zones. Selecting returns to the subnet configuration dialog (see Figure 20.8, “DHCP Server: Configuring Subnets”). Selecting again returns to the original expert configuration dialog.
Figure 20.10: DHCP Server: Interface Configuration for Dynamic DNS #
- Network Interface Configuration
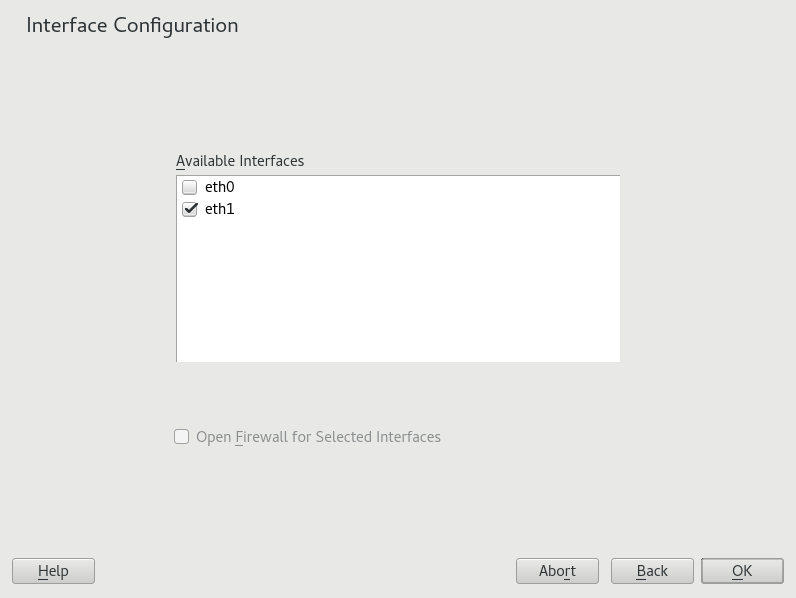
To define the interfaces the DHCP server should listen to and to adjust the firewall configuration, select › from the expert configuration dialog. From the list of interfaces displayed, select one or more that should be attended by the DHCP server. If clients in all subnets need to be able to communicate with the server and the server host also runs a firewall, adjust the firewall accordingly.

Note: DHCP and
firewalldPlease note that the option does not (yet) support
firewalldin openSUSE Leap 15.0. To manually open the DHCP port, runtux >sudofirewall-cmd --zone=public --permanent --add-service=dhcptux >sudofirewall-cmd --reloadFigure 20.11: DHCP Server: Network Interface and Firewall #
After completing all configuration steps, close the dialog with . The server is now started with its new configuration.
20.2 DHCP Software Packages #
Both the DHCP server and the DHCP clients are available for
openSUSE Leap. The DHCP server available is dhcpd (published by the Internet Systems
Consortium).
On the client side, there is dhcp-client (also from
ISC) and tools coming with the wicked package.
By default, the wicked tools are installed with the
services wickedd-dhcp4 and
wickedd-dhcp6. Both are launched automatically on
each system boot to watch for a DHCP server. They do not need a
configuration file to do their job and work out of the box in most standard
setups. For more complex situations, use the ISC
dhcp-client, which is controlled by means of the
configuration files /etc/dhclient.conf and
/etc/dhclient6.conf.
20.3 The DHCP Server dhcpd #
The core of any DHCP system is the dynamic host configuration protocol
daemon. This server leases addresses and watches how
they are used, according to the settings defined in the configuration file
/etc/dhcpd.conf. By changing the parameters and values
in this file, a system administrator can influence the program's behavior in
numerous ways. Look at the basic sample /etc/dhcpd.conf
file in Example 20.1, “The Configuration File /etc/dhcpd.conf”.
Example 20.1: The Configuration File /etc/dhcpd.conf #
default-lease-time 600;         # 10 minutes
max-lease-time 7200;            # 2  hours

option domain-name "example.com";
option domain-name-servers 192.168.1.116;
option broadcast-address 192.168.2.255;
option routers 192.168.2.1;
option subnet-mask 255.255.255.0;

subnet 192.168.2.0 netmask 255.255.255.0
 {
  range 192.168.2.10 192.168.2.20;
  range 192.168.2.100 192.168.2.200;
 }
This simple configuration file should be sufficient to get the DHCP server to assign IP addresses in the network. Make sure that a semicolon is inserted at the end of each line, because otherwise dhcpd is not started.
The sample file can be divided into three sections. The first one defines
how many seconds an IP address is leased to a requesting client by default
(default-lease-time) before it should apply for renewal.
This section also includes a statement of the maximum period for which a
machine may keep an IP address assigned by the DHCP server without applying
for renewal (max-lease-time).
In the second part, some basic network parameters are defined on a global level:
The line
option domain-namedefines the default domain of your network.With the entry
option domain-name-servers, specify up to three values for the DNS servers used to resolve IP addresses into host names and vice versa. Ideally, configure a name server on your machine or somewhere else in your network before setting up DHCP. That name server should also define a host name for each dynamic address and vice versa. To learn how to configure your own name server, read Chapter 19, The Domain Name System.The line
option broadcast-addressdefines the broadcast address the requesting client should use.With
option routers, set where the server should send data packets that cannot be delivered to a host on the local network (according to the source and target host address and the subnet mask provided). Usually, especially in smaller networks, this router is identical to the Internet gateway.With
option subnet-mask, specify the netmask assigned to clients.
The last section of the file defines a network, including a subnet mask. To
finish, specify the address range that the DHCP daemon should use to assign
IP addresses to interested clients. In Example 20.1, “The Configuration File /etc/dhcpd.conf”,
clients may be given any address between 192.168.2.10
and 192.168.2.20 or 192.168.2.100
and 192.168.2.200.
After editing these few lines, you should be able to activate the DHCP
daemon with the command systemctl start dhcpd. It will be
ready for use immediately. Use the command
rcdhcpd check-syntax
to perform a brief syntax check. If you encounter any unexpected problems
with your configuration (the server aborts with an error or does not return
done on start), you should be able to find out what has
gone wrong by looking for information either in the main system log that can
be queried with the command journalctl (see
Chapter 11, journalctl: Query the systemd Journal for more information).
On a default openSUSE Leap system, the DHCP daemon is started in a chroot
environment for security reasons. The configuration files must be copied to
the chroot environment so the daemon can find them. Normally, there is no
need to worry about this because the command systemctl start dhcpd
automatically copies the files.
20.3.1 Clients with Fixed IP Addresses #
DHCP can also be used to assign a predefined, static address to a specific client. Addresses assigned explicitly always take priority over dynamic addresses from the pool. A static address never expires in the way a dynamic address would, for example, if there were not enough addresses available and the server needed to redistribute them among clients.
To identify a client configured with a static address, dhcpd uses the
hardware address (which is a globally unique, fixed numerical code
consisting of six octet pairs) for the identification of all network
devices (for example, 00:30:6E:08:EC:80). If the respective
lines, like the ones in Example 20.2, “Additions to the Configuration File”, are added to
the configuration file of Example 20.1, “The Configuration File /etc/dhcpd.conf”, the DHCP daemon
always assigns the same set of data to the corresponding client.
Example 20.2: Additions to the Configuration File #
host jupiter {
hardware ethernet 00:30:6E:08:EC:80;
fixed-address 192.168.2.100;
}
The name of the respective client (host
HOSTNAME, here jupiter)
is entered in the first line and the MAC address in the second line. On
Linux hosts, find the MAC address with the command ip
link show followed by the network device (for example,
eth0). The output should contain something like
link/ether 00:30:6E:08:EC:80
In the preceding example, a client with a network card having the MAC
address 00:30:6E:08:EC:80 is assigned the IP address
192.168.2.100 and the host name
jupiter automatically. The type of hardware to enter is
ethernet in nearly all cases, although
token-ring, which is often found on IBM systems, is also
supported.
20.3.2 The openSUSE Leap Version #
To improve security, the openSUSE Leap version of the ISC's DHCP server
comes with the non-root/chroot patch by Ari Edelkind applied. This enables
dhcpd to run with the user ID
nobody and run in a chroot
environment (/var/lib/dhcp). To make this possible,
the configuration file dhcpd.conf must be located in
/var/lib/dhcp/etc. The init script automatically
copies the file to this directory when starting.
Control the server's behavior regarding this feature by means of entries in
the file /etc/sysconfig/dhcpd. To run dhcpd without
the chroot environment, set the variable
DHCPD_RUN_CHROOTED in
/etc/sysconfig/dhcpd to “no”.
To enable dhcpd to resolve host names even from within the chroot environment, some other configuration files must be copied as well:
/etc/localtime/etc/host.conf/etc/hosts/etc/resolv.conf
These files are copied to /var/lib/dhcp/etc/ when
starting the init script. Take these copies into account for any changes
that they require if they are dynamically modified by scripts like
/etc/ppp/ip-up. However, there should be no need to
worry about this if the configuration file only specifies IP addresses
(instead of host names).
If your configuration includes additional files that should be copied into
the chroot environment, set these under the variable
DHCPD_CONF_INCLUDE_FILES in the file
/etc/sysconfig/dhcpd. To ensure that the DHCP logging
facility keeps working even after a restart of the syslog daemon, there is
an additional entry SYSLOGD_ADDITIONAL_SOCKET_DHCP
in the file /etc/sysconfig/syslog.
20.4 For More Information #
More information about DHCP is available at the Web site of the
Internet Systems Consortium
(http://www.isc.org/products/DHCP/). Information is
also available in the dhcpd, dhcpd.conf,
dhcpd.leases, and dhcp-options man pages.

