Security and Hardening Guide
- Preface
- 1 Security and confidentiality
- I Authentication
- II Local security
- 9 Physical security
- 10 Software management
- 11 File management
- 12 Encrypting partitions and files
- 13 Storage encryption for hosted applications with cryptctl
- 14 User management
- 15 Restricting
cronandat - 16 Spectre/Meltdown checker
- 17 Configuring security settings with YaST
- 18 The Polkit authentication framework
- 19 Access control lists in Linux
- 20 Intrusion detection with AIDE
- III Network security
- IV Confining privileges with AppArmor
- 27 Introducing AppArmor
- 28 Getting started
- 29 Immunizing programs
- 30 Profile components and syntax
- 31 AppArmor profile repositories
- 32 Building and managing profiles with YaST
- 33 Building profiles from the command line
- 34 Profiling your Web applications using ChangeHat
- 35 Confining users with
pam_apparmor - 36 Managing profiled applications
- 37 Support
- 38 AppArmor glossary
- V SELinux
- VI The Linux Audit Framework
- A GNU licenses
34 Profiling your Web applications using ChangeHat #Edit source
An AppArmor® profile represents the security policy for an individual program instance or process. It applies to an executable program, but if a portion of the program needs different access permissions than other portions, the program can “change hats” to use a different security context, distinctive from the access of the main program. This is known as a hat or subprofile.
ChangeHat enables programs to change to or from a hat within an AppArmor profile. It enables you to define security at a finer level than the process. This feature requires that each application be made “ChangeHat-aware”, meaning that it is modified to make a request to the AppArmor module to switch security domains at specific times during the application execution. One example of a ChangeHat-aware application is the Apache Web server.
A profile can have an arbitrary number of subprofiles, but there are only
two levels: a subprofile cannot have further child profiles. A subprofile
is written as a separate profile. Its name consists of the name of the
containing profile followed by the subprofile name, separated by a
^.
Subprofiles are either stored in the same file as the parent profile, or in a separate file. The latter case is recommended on sites with many hats—it allows the policy caching to handle changes at the per hat level. If all the hats are in the same file as the parent profile, then the parent profile and all hats must be recompiled.
An external subprofile that is going to be used as a hat, must begin with
the word hat or the ^ character.
The following two subprofiles cannot be used as a hat:
/foo//bar { }or
profile /foo//bar { }While the following two are treated as hats:
^/foo//bar { }or
hat /foo//bar { } # this syntax is not highlighted in vimThe security of hats is considerably weaker than that of full profiles. Using certain types of bugs in a program, an attacker may be able to escape from a hat into the containing profile. This is because the security of hats is determined by a secret key handled by the containing process, and the code running in the hat must not have access to the key. Thus, change_hat is most useful with application servers, where a language interpreter (such as PERL, PHP or Java) is isolating pieces of code such that they do not have direct access to the memory of the containing process.
The rest of this chapter describes using change_hat with
Apache, to contain Web server components run using mod_perl and mod_php.
Similar approaches can be used with any application server by providing an
application module similar to the mod_apparmor described next in
Section 34.1.2, “Location and directory directives”.
Tip: More information
For more information, see the change_hat man page.
34.1 Configuring Apache for mod_apparmor #Edit source
AppArmor provides a mod_apparmor module (package apache2-mod-apparmor) for the Apache
program. This module
makes the Apache Web server ChangeHat aware. Install it along with Apache.
When Apache is ChangeHat-aware, it checks for the following customized AppArmor security profiles in the order given for every URI request that it receives.
URI-specific hat. For example,
^www_app_name/templates/classic/images/bar_left.gifDEFAULT_URIHANDLING_UNTRUSTED_INPUT
Note: Apache configuration
If you install
apache2-mod-apparmor, make
sure the module is enabled, and then restart Apache by executing the
following command:
> a2enmod apparmor && sudo systemctl reload apache2
Apache is configured by placing directives in plain text configuration
files. The main configuration file is
/etc/apache2/httpd.conf. When you compile Apache,
you can indicate the location of this file. Directives can be placed in
any of these configuration files to alter the way Apache behaves. When
you make changes to the main configuration files, you need to reload
Apache with sudo systemctl reload apache2, so
the changes are recognized.
34.1.1 Virtual host directives #Edit source
<VirtualHost> and </VirtualHost> directives are used to enclose a group of directives that applies only to a particular virtual host. For more information on Apache virtual host directives, refer to https://httpd.apache.org/docs/2.4/en/mod/core.html#virtualhost.
The ChangeHat-specific configuration keyword is
AADefaultHatName. It is used similarly to
AAHatName, for example, AADefaultHatName
My_Funky_Default_Hat.
It allows you to specify a default hat to be used for virtual hosts and
other Apache server directives, so that you can have different defaults
for different virtual hosts. This can be overridden by the
AAHatName directive and is checked for only if there
is not a matching AAHatName or hat named by the URI.
If the AADefaultHatName hat does not exist, it falls
back to the DEFAULT_URI hat if it exists/
If none of those are matched, it goes back to the “parent” Apache hat.
34.1.2 Location and directory directives #Edit source
Location and directory directives specify hat names in the program configuration file so the Apache calls the hat regarding its security. For Apache, you can find documentation about the location and directory directives at https://httpd.apache.org/docs/2.4/en/sections.html.
The location directive example below specifies that, for a given
location, mod_apparmor should use a specific hat:
<Location /foo/>
  AAHatName MY_HAT_NAME
</Location>
This tries to use MY_HAT_NAME for any URI beginning
with /foo/ (/foo/,
/foo/bar,
/foo/cgi/path/blah_blah/blah, etc.).
The directory directive works similarly to the location directive, except it refers to a path in the file system as in the following example:
<Directory "/srv/www/www.example.org/docs">
  # Note lack of trailing slash
  AAHatName example.org
</Directory>
34.2 Managing ChangeHat-aware applications #Edit source
In the previous section you learned about mod_apparmor
and the way it helps you to secure a specific Web application. This
section walks you through a real-life example of creating a hat for a Web
application, and using AppArmor's change_hat feature to secure it.
This chapter focuses on AppArmor's command-line tools, as
YaST's AppArmor module has limited functionality.
34.2.1 With AppArmor's command line tools #Edit source
For illustration purposes, let us choose the Web application called Adminer (https://www.adminer.org/en/). It is a full-featured SQL database management tool written in PHP, yet consisting of a single PHP file. For Adminer to work, you need to set up an Apache Web server, PHP and its Apache module, and one of the database drivers available for PHP—MariaDB in this example. You can install the required packages with
zypper in apache2 apache2-mod_apparmor apache2-mod_php5 php5 php5-mysql
To set up the Web environment for running Adminer, follow these steps:
Procedure 34.1: Setting up a web server environment #
Make sure
apparmorandphp5modules are enabled for Apache. To enable the modules in any case, use:>a2enmod apparmor php5and then restart Apache with
>sudosystemctl restart apache2Make sure MariaDB is running. If unsure, restart it with
>sudosystemctl restart mariadbDownload Adminer from https://www.adminer.org, copy it to
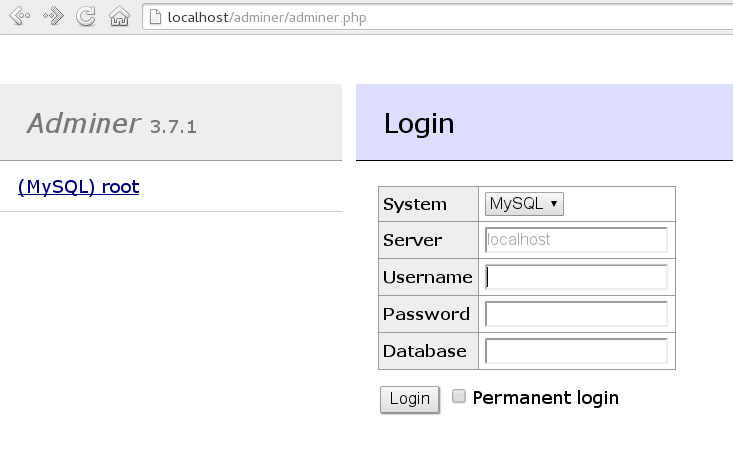
/srv/www/htdocs/adminer/, and rename it toadminer.php, so that its full path is/srv/www/htdocs/adminer/adminer.php.Test Adminer in your Web browser by entering
http://localhost/adminer/adminer.phpin its URI address field. If you installed Adminer to a remote server, replacelocalhostwith the real host name of the server.Figure 34.1: Adminer login page #
Tip
If you encounter problems viewing the Adminer login page, try to look for help in the Apache error log
/var/log/apache2/error.log. Another reason you cannot access the Web page may be that your Apache is already under AppArmor control and its AppArmor profile is too tight to permit viewing Adminer. Check it withaa-status, and if needed, set Apache temporarily in complain mode with#sudo aa-complain usr.sbin.httpd2-prefork
After the Web environment for Adminer is ready, you need to configure
Apache's mod_apparmor, so that AppArmor can detect accesses to Adminer and
change to the specific “hat”.
Procedure 34.2: Configuring mod_apparmor #
Apache has several configuration files under
/etc/apache2/and/etc/apache2/conf.d/. Choose your preferred one and open it in a text editor. In this example, thevimeditor is used to create a new configuration file/etc/apache2/conf.d/apparmor.conf.>sudovim /etc/apache2/conf.d/apparmor.confCopy the following snippet into the edited file.
<Directory /srv/www/htdocs/adminer>
  AAHatName adminer
</Directory>
It tells Apache to let AppArmor know about a change_hat event when the Web user accesses the directory
/adminer(and any file/directory inside) in Apache's document root. Remember, we placed theadminer.phpapplication there.Save the file, close the editor, and restart Apache with
>sudosystemctl restart apache2
Apache now knows about our Adminer and changing a “hat” for
it. It is time to create the related hat for Adminer in the AppArmor
configuration. If you do not have an AppArmor profile yet, create one
before proceeding. Remember that if your Apache's main binary is
/usr/sbin/httpd2-prefork, then the related profile
is named /etc/apparmor.d/usr.sbin.httpd2-prefork.
Procedure 34.3: Creating a hat for Adminer #
Open (or create one if it does not exist) the file
/etc/apparmor.d/usr.sbin.httpd2-preforkin a text editor. Its contents should be similar to the following:#include <tunables/global> /usr/sbin/httpd2-prefork { #include <abstractions/apache2-common> #include <abstractions/base> #include <abstractions/php5> capability kill, capability setgid, capability setuid, /etc/apache2/** r, /run/httpd.pid rw, /usr/lib{,32,64}/apache2*/** mr, /var/log/apache2/** rw, ^DEFAULT_URI { #include <abstractions/apache2-common> /var/log/apache2/** rw, } ^HANDLING_UNTRUSTED_INPUT { #include <abstractions/apache2-common> /var/log/apache2/** w, } }Before the last closing curly bracket (
}), insert the following section:^adminer flags=(complain) { }Note the
(complain)addition after the hat name—it tells AppArmor to leave theadminerhat in complain mode. That is because we need to learn the hat profile by accessing Adminer later on.Save the file, and then restart AppArmor, then Apache.
>sudosystemctl reload apparmor apache2Check if the
adminerhat really is in complain mode.>sudoaa-status apparmor module is loaded. 39 profiles are loaded. 37 profiles are in enforce mode. [...] /usr/sbin/httpd2-prefork /usr/sbin/httpd2-prefork//DEFAULT_URI /usr/sbin/httpd2-prefork//HANDLING_UNTRUSTED_INPUT [...] 2 profiles are in complain mode. /usr/bin/getopt /usr/sbin/httpd2-prefork//adminer [...]As we can see, the
httpd2-prefork//admineris loaded in complain mode.
Our last task is to find out the right set of rules for the
adminer hat. That is why we set the
adminer hat into complain mode—the
logging facility collects useful information about the access
requirements of adminer.php as we use it via the Web
browser. aa-logprof then helps us with creating the
hat's profile.
Procedure 34.4: Generating rules for the adminer hat #
Open Adminer in the Web browser. If you installed it locally, then the URI is
http://localhost/adminer/adminer.php.Choose the database engine you want to use (MariaDB in our case), and log in to Adminer using the existing database user name and password. You do not need to specify the database name as you can do so after logging in. Perform any operations with Adminer you like—create a new database, create a new table for it, set user privileges, and so on.
After the short testing of Adminer's user interface, switch back to console and examine the log for collected data.
>sudoaa-logprof Reading log entries from /var/log/audit/audit.log. Updating AppArmor profiles in /etc/apparmor.d. Complain-mode changes: Profile: /usr/sbin/httpd2-prefork^adminer Path: /dev/urandom Mode: r Severity: 3 1 - #include <abstractions/apache2-common> [...] [8 - /dev/urandom] [(A)llow] / (D)eny / (G)lob / Glob w/(E)xt / (N)ew / Abo(r)t / (F)inish / (O)ptsFrom the
aa-logprofmessage, it is clear that our newadminerhat was correctly detected:Profile: /usr/sbin/httpd2-prefork^adminer
The
aa-logprofcommand asks you to pick the right rule for each discovered AppArmor event. Specify the one you want to use, and confirm with . For more information on working with theaa-genprofandaa-logprofinterface, see Section 33.7.3.8, “aa-genprof—generating profiles”.Tip
aa-logprofoffers several valid rules for the examined event. Some are abstractions—predefined sets of rules affecting a specific common group of targets. Sometimes it is useful to include such an abstraction instead of a direct URI rule:1 - #include <abstractions/php5> [2 - /var/lib/php5/sess_3jdmii9cacj1e3jnahbtopajl7p064ai242]
In the example above, it is recommended hitting and confirming with to allow the abstraction.
After the last change, you are asked to save the changed profile.
The following local profiles were changed. Would you like to save them?
 [1 - /usr/sbin/httpd2-prefork]

 (S)ave Changes / [(V)iew Changes] / Abo(r)t
Hit to save the changes.
Set the profile to enforce mode with
aa-enforce>sudoaa-enforce usr.sbin.httpd2-preforkand check its status with
aa-status>sudoaa-status apparmor module is loaded. 39 profiles are loaded. 38 profiles are in enforce mode. [...] /usr/sbin/httpd2-prefork /usr/sbin/httpd2-prefork//DEFAULT_URI /usr/sbin/httpd2-prefork//HANDLING_UNTRUSTED_INPUT /usr/sbin/httpd2-prefork//adminer [...]As you can see, the
//adminerhat jumped from complain to enforce mode.Try to run Adminer in the Web browser, and if you encounter problems running it, switch it to the complain mode, repeat the steps that previously did not work well, and update the profile with
aa-logprofuntil you are satisfied with the application's functionality.
Note: Hat and parent profile relationship
The profile ^adminer is only available in the
context of a process running under the parent profile
usr.sbin.httpd2-prefork.
34.2.2 Adding hats and entries to hats in YaST #Edit source
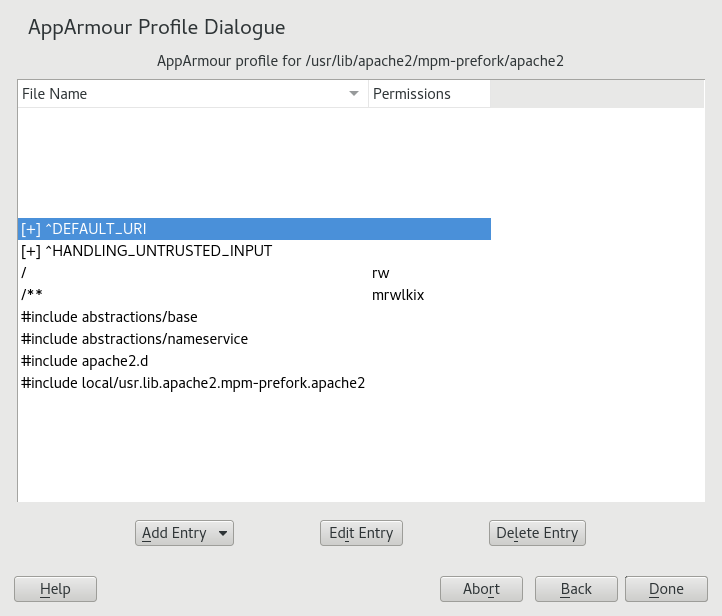
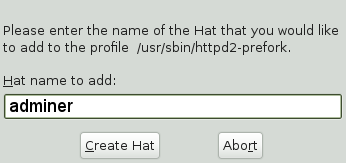
When you use the dialog (for instructions, refer to Section 32.2, “Editing profiles”) or when you add a new profile using (for instructions, refer to Section 32.1, “Manually adding a profile”), you are given the option of adding hats (subprofiles) to your AppArmor profiles. Add a ChangeHat subprofile from the window as in the following.


