Virtualization Guide
- About This Manual
- I Introduction
- II Managing Virtual Machines with
libvirt - III Hypervisor-Independent Features
- IV Managing Virtual Machines with Xen
- 18 Setting Up a Virtual Machine Host
- 19 Virtual Networking
- 20 Managing a Virtualization Environment
- 21 Block Devices in Xen
- 22 Virtualization: Configuration Options and Settings
- 23 Administrative Tasks
- 24 XenStore: Configuration Database Shared between Domains
- 25 Xen as a High-Availability Virtualization Host
- V Managing Virtual Machines with QEMU
- VI Managing Virtual Machines with LXC
- Glossary
- A Virtual Machine Drivers
- B Appendix
- C XM, XL Toolstacks and Libvirt framework
- D GNU Licenses
14 Configuring Virtual Machines
Abstract#
Virtual Machine Manager's view offers in-depth information about the VM Guest's complete configuration and hardware equipment. Using this view, you can also change the guest configuration or add and modify virtual hardware. To access this view, open the guest's console in Virtual Machine Manager and either choose › from the menu, or click the bulb icon in the toolbar.
- 14.1 Machine Setup
- 14.2 Storage
- 14.3 Controllers
- 14.4 Networking
- 14.5 Enabling Seamless and Synchronized Cursor Movement
- 14.6 Adding a CD/DVD-ROM Device with Virtual Machine Manager
- 14.7 Adding a Floppy Device with Virtual Machine Manager
- 14.8 Ejecting and Changing Floppy or CD/DVD-ROM Media with Virtual Machine Manager
- 14.9 Change the Machine Type with
virsh - 14.10 Adding a PCI Device to a VM Guest
- 14.11 Adding SR-IOV Devices
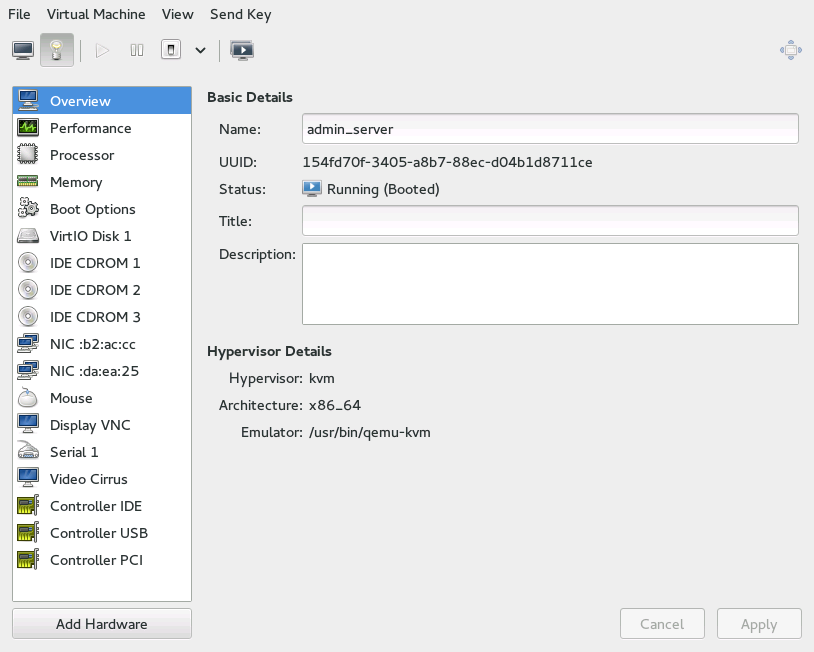
Figure 14.1: View of a VM Guest #
The left panel of the window lists VM Guest overview and already
installed hardware. After clicking an item in the list, you can access its
detailed settings in the details view. You can change the hardware
parameters to match your needs, then click to
confirm them. Some changes take effect immediately, while other need
reboot of the machine—and virt-manager
warns you about that fact.
To remove installed hardware form VM Guest, click it in the left panel and then click in the bottom right of the window.
To add new hardware, click below the left panel, then select the type of the hardware you want to add in the window. Modify its parameters and confirm with .
The following sections describe configuration options for the specific hardware type being added. They do not focus on modifying an existing piece of hardware as the options are identical.
14.1 Machine Setup #
This section describes hardware components and options that are vital to a VM Guest and you cannot remove them: the processor and memory. It also shows how to view the overview and performance information, and boot options as well.
14.1.1 Overview #
shows basic details about VM Guest and the hypervisor.
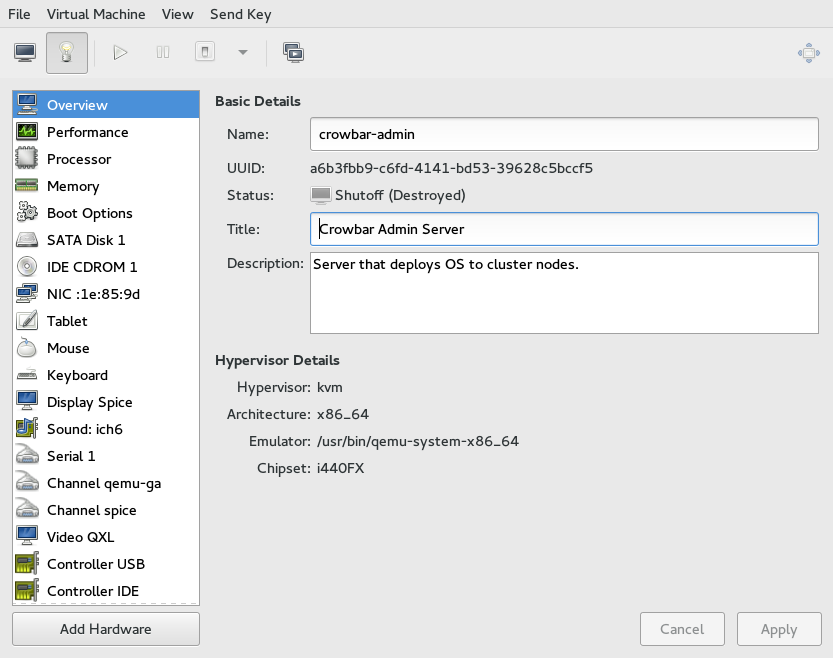
Figure 14.2: Overview details #
, , and are editable and help you identify VM Guest in the list of machines.

Figure 14.3: VM Guest Title and Description #
shows the universally unique identifier of the virtual machine, while shows its current status—, , or .
The section shows the hypervisor type, CPU architecture, used emulator, and chipset type. None of the hypervisor parameters can be changed.
14.1.2 Performance #
shows regularly updated charts of CPU and memory usage, and disk and network I/O.

Figure 14.4: Performance #
Tip: Enabling Disabled Charts
Not all the charts in the view are enabled by default. To enable disable selected charts, go to › › , and check the charts that you want to see regularly updated. You can also specify the time interval (in seconds) of the update.
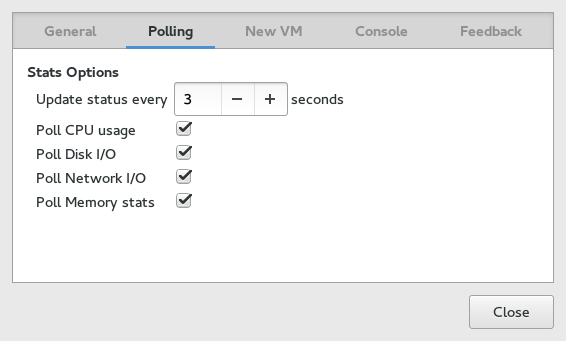
Figure 14.5: Statistics Charts #
14.1.3 Processor #
includes detailed information about VM Guest processor configuration.
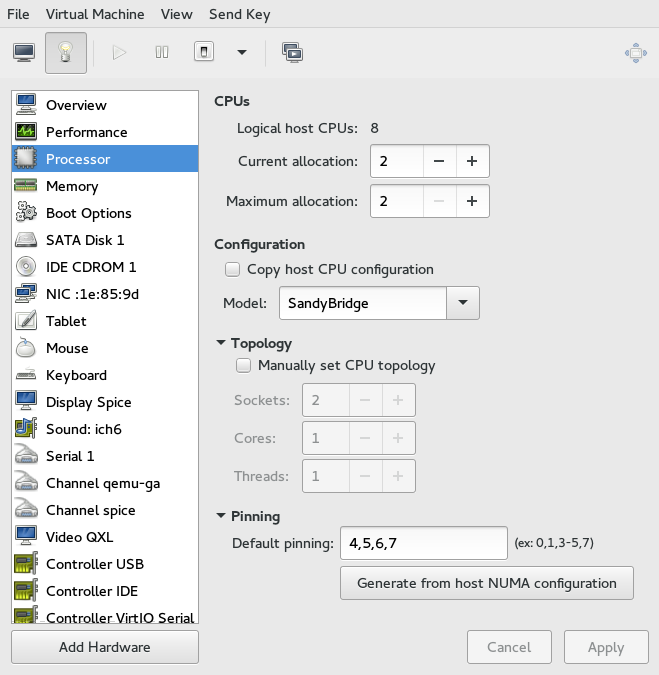
Figure 14.6: Processor View #
In the section, you can configure several parameters related to the number of allocated CPUs.
The real number of CPUs installed on VM Host Server.
The number of currently allocated CPUs. You can hotplug more CPUs by increasing this value up to the value.
Maximum number of allocable CPUs for the current session. Any change to this value will take effect after next VM Guest reboot.
The section lets you configure the CPU model, topology, and pinning.
When activated, the option uses the host CPU model for VM Guest. Otherwise you need to specify the CPU model from the drop-down list.
After you activate , you can specify a custom number of sockets, cores and threads for the CPU.
You can also specify (see CPU pinning) for the CPU, or get the relevant pinning information from the host by clicking .
14.1.4 Memory #
contains information about the memory that is available to VM Guest.

Figure 14.7: Memory View #
Total amount of memory installed on VM Host Server.
The amount of memory currently available to VM Guest. You can hotplug more memory by increasing this value up to the value of .
The maximum value to which you can hotplug the currently available memory. Any change to this value will take effect after next VM Guest reboot.
14.1.5 Boot Options #
introduces options affecting the VM Guest boot process.

Figure 14.8: Boot Options #
In the section, you can specify whether the virtual machine should automatically start during VM Host Server boot phase.
In the , activate the devices that will be used for booting VM Guest. You can change their order with the up an down arrows on the right side of the list. If you want to choose from a list of bootable devices on VM Guest startup, activate .
To boot a different kernel than the one on the boot device, activate and specify paths to alternative kernel and initrd placed on the VM Host Server file system. You can also specify kernel arguments that will be passed to the loaded kernel.
14.2 Storage #
This section gives you detailed description of configuration options for storage devices. It includes both hard disks and removable media, such as USB or CDROM drives.
Procedure 14.1: Adding a New Storage Device #
Click below the left panel, then select from the window.

Figure 14.9: Add a New Storage #
If you prefer that Virtual Machine Manager creates a disk image for you, activate and specify its size in Gigabytes. If you want Virtual Machine Manager to allocate the entire disk space no, activate the relevant option. Note that
qcow2andqedformats do not support full allocation.If you want to have more control over the disk image creation, activate and click to manage storage pools and images. window opens, which has almost identical functionality as the card described in Section 12.1, “Managing Storage with Virtual Machine Manager”.
After you manage to create and specify the disk image file, specify the . It can be either , , , or . The latter is required if you want to use an existing SCSI storage directly without adding it into a storage pool.
Select the for your device. The list of available options depends on the device type you selected in the previous step. Note that the based types use paravirtualized drivers.
In the section, select the preferred and . For more information on cache modes, see Chapter 15, Disk Cache Modes.

Tip: Supported Storage Formats
Only the
raw,qcow2, andqedstorage formats are supported by SUSE.Confirm your settings with . A new storage device appears in the left panel.
14.3 Controllers #
This section focuses on adding and configuring new controllers.
Procedure 14.2: Adding a New Controller #
Click below the left panel, then select from the window.

Figure 14.10: Add a New Controller #
Select the type of the controller. You can choose from , , , , (paravirtualized), , or (smart card devices).
Optionally, select the model for the controller. It is available for and types.
Confirm your settings with . A new controller appears in the left panel.
14.4 Networking #
This section describes how to add and configure new network devices.
Procedure 14.3: Adding a New Network Device #
Click below the left panel, then select from the window.
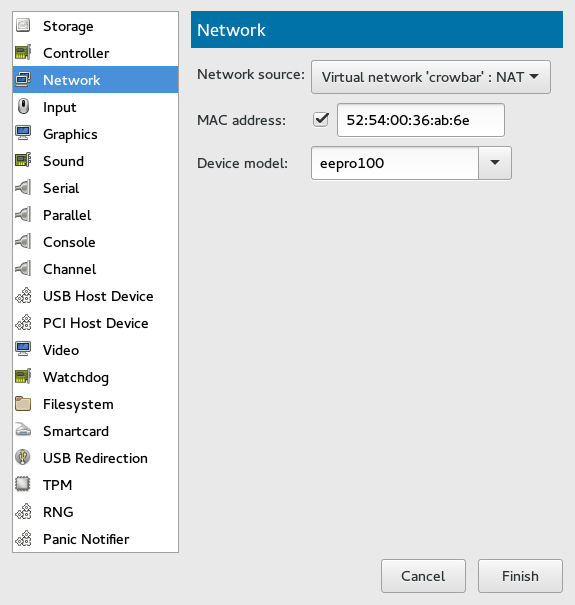
Figure 14.11: Add a New Controller #
From the list, select the source for the network connection. The list includes VM Host Server's available physical network interfaces, network bridges, or network bonds. You can also assign the VM Guest to an already defined virtual network. See Chapter 13, Managing Networks for more information on setting up virtual networks with Virtual Machine Manager.
Specify a for the network device. While Virtual Machine Manager pre-fills a random value for your convenience, it is recommended to supply a MAC address appropriate for your network environment to avoid network conflicts.
Select a device model from the list. You can either leave the , or specify one of , , , or models. Note that virtio uses paravirtualized drivers.
Confirm your settings with . A new network device appears in the left panel.
14.5 Enabling Seamless and Synchronized Cursor Movement #
When you click within a VM Guest's console with the mouse, the cursor is captured by the console window and cannot be used outside the console unless it is explicitly released (by pressing Alt–Ctrl ). To prevent the console from grabbing the key and to enable seamless cursor movement between host and guest instead, add a tablet to the VM Guest.
Adding a tablet has the additional advantage of synchronizing the cursor movement between VM Host Server and VM Guest when using a graphical environment on the guest. With no tablet configured on the guest, you will often see two cursor symbols with one dragging behind the other.
Double-click a VM Guest entry in the Virtual Machine Manager to open its console and switch to the view with › .
Click and choose and then in the pop-up window. Proceed with .
If you try to add the tablet while the guest is still running, you will be asked whether to enable the tablet after the next reboot. Confirm with .
When you (re)start the VM Guest, the tablet is available in the VM Guest.
14.6 Adding a CD/DVD-ROM Device with Virtual Machine Manager #
KVM supports CD or DVD-ROMs in VM Guest either by directly accessing a
physical drive on the VM Host Server or by accessing ISO images. To create an
ISO image from an existing CD or DVD, use dd:
dd if=/dev/cd_dvd_device of=my_distro.iso bs=2048
To add a CD/DVD-ROM device to your VM Guest, proceed as follows:
Double-click a VM Guest entry in the Virtual Machine Manager to open its console and switch to the view with › .
Click and choose in the pop-up window. Proceed with .
Change the to .
Select .
To assign the device to a physical medium, enter the path to the VM Host Server's CD/DVD-ROM device (for example,
/dev/cdrom) next to the button. Alternatively you may use the button to open a file browser and then click to select the device. Assigning the device to a physical medium is only possible when the Virtual Machine Manager was started on the VM Host Server.To assign the device to an existing image, click to choose an image from a storage pool. If the Virtual Machine Manager was started on the VM Host Server, you may alternatively choose an image from another location on the file system by clicking . Select an image and close the file browser with .
Proceed with to review the settings. Apply them with , , and .
Reboot the VM Guest to make the new device available. For further information also see Section 14.8, “Ejecting and Changing Floppy or CD/DVD-ROM Media with Virtual Machine Manager”.
14.7 Adding a Floppy Device with Virtual Machine Manager #
Currently KVM only supports the use of floppy disk images—using a
physical floppy drive is not supported. Create a floppy disk image from
an existing floppy using dd:
dd if=/dev/fd0 of=/var/lib/libvirt/images/floppy.img
To create an empty floppy disk image use one of the following commands:
- Raw Image
dd if=/dev/zero of=/var/lib/libvirt/images/floppy.img bs=512 count=2880
- FAT Formatted Image
mkfs.msdos -C /var/lib/libvirt/images/floppy.img 1440
To add a floppy device to your VM Guest, proceed as follows:
Double-click a VM Guest entry in the Virtual Machine Manager to open its console and switch to the view with › .
Click and choose in the pop-up window. Proceed with .
Change the to .
Choose and click to choose an existing image from a storage pool. If Virtual Machine Manager was started on the VM Host Server, you may alternatively choose an image from another location on the file system by clicking . Select an image and close the file browser with .
Proceed with to review the settings. Apply them with , , and .
Reboot the VM Guest to make the new device available. For further information also see Section 14.8, “Ejecting and Changing Floppy or CD/DVD-ROM Media with Virtual Machine Manager”.
14.8 Ejecting and Changing Floppy or CD/DVD-ROM Media with Virtual Machine Manager #
Regardless of whether you are using the VM Host Server's physical CD/DVD-ROM
device or an ISO/floppy image, before you can change the media or image
of an existing device in the VM Guest, you first need to
disconnect the media from the guest.
Double-click a VM Guest entry in the Virtual Machine Manager to open its console and switch to the view with › .
Choose the Floppy or CD/DVD-ROM device and “eject” the media by clicking .
To “insert” a new media, click .
If using the VM Host Server's physical CD/DVD-ROM device, first change the media in the device (this may require unmounting it on the VM Host Server before it can be ejected). Then choose and select the device from the drop-down box.
If using an ISO image, choose and select an image by clicking . When connecting from a remote host, you may only choose images from existing storage pools.
Click to finish. The new media can now be accessed in the VM Guest.
14.9 Change the Machine Type with virsh #
By default, when installing with virt-install or
vm-install tools, the machine type for VM Guest is
pc-i440fx. The machine type is stored in the
VM Guest's xml configuration file in
/etc/libvirt/qemu/ in the tag
type
:
<type arch='x86_64' machine='pc-i440fx-2.3'>hvm</type>
Let's change this value to the new supported q35 machine type. q35 is an Intel* chipset. It includes PCIe. q35 supports up to 12 USB ports, and has SATA and IOMMU support. IRQ routing has also been improved.
Check that your VM Guest is inactive:
virsh list --inactive
 Id    Name                           State
 ----------------------------------------------------
 -     sles11                         shut off
Edit the configuration for this VM Guest:
virsh edit sles11
Change the value of the
machineattribute:<type arch='x86_64' machine='pc-q35-2.0'>hvm</type>
Now you can restart the VM Guest.
virsh start sles11
Now check that the machine type has changed. Log in to the VM Guest as root and run the following command:
root #dmidecode | grep Product Product Name: Standard PC (Q35 + ICH9, 2009)
Tip: Machine Type Update Recommendations
Whenever the QEMU version on the host system is upgraded (for example
when upgrading the VM Host Server to a new service pack), it is also
recommended to upgrade the machine type of the VM Guests to the latest
available version (check with the command qemu-system-x86_64 -M
help on the VM Host Server).
The default machine type pc-i440fx, for example, is
regularly updated. If your VM Guest still runs with a machine type of
pc-i440fx-1.x, an update
to pc-i440fx-2.x is
strongly recommended. This allows to take advantage of the most recent
updates and corrections in the machine definitions, with an eye towards
better future-looking compatibility.
14.10 Adding a PCI Device to a VM Guest #
You can directly assign host-PCI devices to guests (PCI pass-through). When the PCI device is assigned to one VM Guest, it cannot be used on the host or by another VM Guest unless re-assigned. A prerequisite for this feature is a VM Host Server configuration as described in Important: Requirements for VFIO and SR-IOV.
Note: VFIO vs. KVM PCI Pass-Through
openSUSE Leap currently supports two ways of assigning PCI devices to VM Guests: either via VFIO or via the legacy KVM PCI Pass-Through. Using VFIO is strongly recommended, since it is more stable and secure. Support for the legacy KVM PCI Pass-Through will be removed from future openSUSE Leap releases. See Section 1.5, “I/O Virtualization” for more details.
VFIO support is built into libvirt and will automatically be used if the
vfio_pci driver is loaded (see
Important: Requirements for VFIO and SR-IOV for setup instructions). In case
vfio_pci is not loaded, libvirt will automatically
fall back to KVM PCI Pass-Through.
14.10.1 Adding a PCI Device with Virtual Machine Manager #
The following procedure describes how to add a PCI device to a VM Guest using Virtual Machine Manager:
Double-click a VM Guest entry in the Virtual Machine Manager to open its console and switch to the view with › .
Click and choose the category in the left pane. A list of available PCI devices appears in the right part of the window.
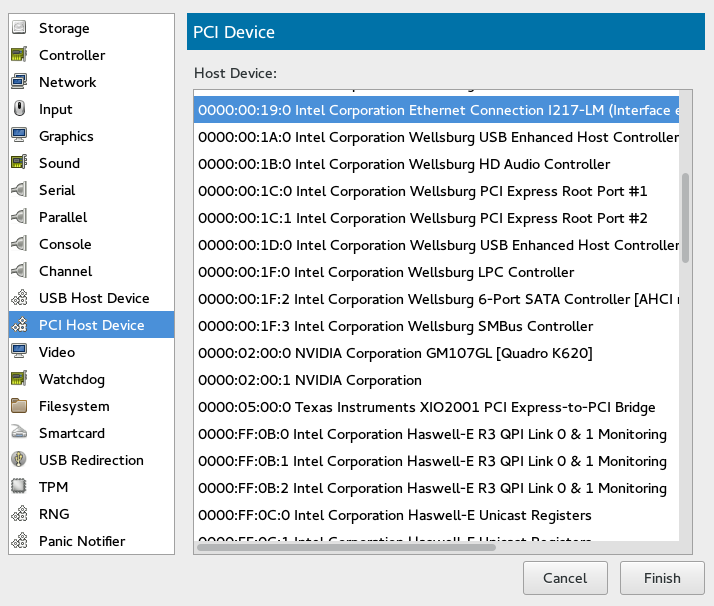
Figure 14.12: Adding a PCI Device #
From the list of available PCI devices, choose the one you want to pass to the guest. Confirm with .
Tip: Assigning a PCI Device Requires a VM Guest Shutdown
Although it is possible to assign a PCI device to a running VM Guest as described above, the device will not become available until you shut down the VM Guest and reboot it afterwards.
14.10.2 Adding a PCI Device with virsh #
To assign a PCI device to VM Guest with virsh,
follow these steps:
Identify the host PCI device to assign to the guest. In the following example we are assigning a DEC network card to the guest:
tux >sudo lspci -nn [...] 03:07.0 Ethernet controller [0200]: Digital Equipment Corporation DECchip \ 21140 [FasterNet] [1011:0009] (rev 22) [...]Note down the device ID (
03:07.0in this case).Gather detailed information about the device using
virsh
      nodedev-dumpxml ID
. To get the ID, you need to replace colon and period in the device ID (03:07.0) with underscore and prefix the result with “pci_0000_” (pci_0000_03_07_0).tux >virsh nodedev-dumpxml pci_0000_03_07_0 <device> <name>pci_0000_03_07_0</name> <path>/sys/devices/pci0000:00/0000:00:14.4/0000:03:07.0</path> <parent>pci_0000_00_14_4</parent> <driver> <name>tulip</name> </driver> <capability type='pci'> <domain>0</domain> <bus>3</bus> <slot>7</slot> <function>0</function> <product id='0x0009'>DECchip 21140 [FasterNet]</product> <vendor id='0x1011'>Digital Equipment Corporation</vendor> <numa node='0'/> </capability> </device>Note down the values for domain, bus, and function.
Detach the device from the host system prior to attaching it to VM Guest.
tux >virsh nodedev-detach pci_0000_03_07_0 Device pci_0000_03_07_0 detachedTip: Multi-Function PCI Devices
When using a multi-function PCI device that does not support FLR (function level reset) or PM (power management) reset, you need to detach all its functions from the VM Host Server. The whole device must be reset for security reasons.
libvirtwill refuse to assign the device if one of its functions is still in use by the VM Host Server or another VM Guest.Convert the domain, bus, slot, and function value from decimal to hexadecimal, and prepend
0xto tell the system that the value is hexadecimal. In our example, domain = 0, bus = 3, slot = 7, and function = 0. Their hexadecimal values are:tux >printf %x 0 0tux >printf %x 3 3tux >printf %x 7 7This results in domain = 0x0000, bus = 0x03, slot = 0x07 and function = 0x00.
Run
virsh editon your domain, and add the following device entry in the<devices>section using the values from the previous step:<hostdev mode='subsystem' type='pci' managed='yes'> <source> <address domain='0x0000' bus='0x03' slot='0x07' function='0x00'/> </source> </hostdev>Tip:
managedvs.unmanagedlibvirtrecognizes two modes for handling PCI devices: they can be eithermanagedorunmanaged. In the managed case,libvirtwill handle all the details of unbinding the device from the existing driver if needed, resetting the device, binding it tovfio-pcibefore starting the domain, etc. When the domain is terminated or the device is removed from the domain,libvirtwill unbind fromvfio-pciand rebind to the original driver in the case of a managed device. If the device is unmanaged, the user must take care to ensure all of these management aspects of the device are done before assigning it to a domain, and after the device is no longer used by the domain.In the example above, the
managed='yes'option means that the device is managed. To switch the device mode to unmanaged, setmanaged='no'in the listing above. If you do so, you need to take care of the related driver with thevirsh nodedev-detachandvirsh nodedev-reattachcommands. That means you need to runvirsh nodedev-detach pci_0000_03_07_0prior to starting the VM Guest to detach the device from the host. In case the VM Guest is not running, you can make the device available for the host by runningvirsh nodedev-reattach pci_0000_03_07_0.Shut down the VM Guest and restart it to make the assigned PCI device available.
Tip: SELinux
If you are running SELinux on your VM Host Server, you need to disable it prior to starting the VM Guest with
setsebool -P virt_use_sysfs 1
14.11 Adding SR-IOV Devices #
Single Root I/O Virtualization (SR-IOV) capable PCIe devices can replicate their resources, so they appear to be multiple devices. Each of these "pseudo-devices" can be assigned to a VM Guest.
SR-IOV is an industry specification that was created by the Peripheral Component Interconnect Special Interest Group (PCI-SIG) consortium. It introduces physical functions (PF) and virtual functions (VF). PFs are full PCIe functions used to manage and configure the device. PFs also can move data. VFs lack the configuration and management part—they only can move data and a reduced set of configuration functions. Since VFs do not have all PCIe functions, the host operating system or the Hypervisor must support SR-IOV to be able to access and initialize VFs. The theoretical maximum for VFs is 256 per device (consequently the maximum for a dual-port Ethernet card would be 512). In practice this maximum is much lower, since each VF consumes resources.
14.11.1 Requirements #
The following requirements must be met to be able to use SR-IOV:
An SR-IOV-capable network card (as of openSUSE Leap 42.1, only network cards support SR-IOV)
An AMD64/Intel 64 host supporting hardware virtualization (AMD-V or Intel VT-x), see Section 7.3, “KVM Hardware Requirements” for more information
A chipset that supports device assignment (AMD-Vi or Intel VT-d)
libvirt-0.9.10 or better
SR-IOV drivers must be loaded and configured on the host system
A host configuration that meets the requirements listed at Important: Requirements for VFIO and SR-IOV
A list of the PCI addresses of the VF(s) that will be assigned to VM Guests
Tip: Checking if a Device is SR-IOV-Capable
The information whether a device is SR-IOV-capable can be obtained from
its PCI descriptor by running lspci. A device that
supports SR-IOV reports a capability similar to
the following:
Capabilities: [160 v1] Single Root I/O Virtualization (SR-IOV)
Note: Adding an SR-IOV Device at VM Guest Creation
In case you want to add an SR-IOV device to a VM Guest when initially setting it up, the VM Host Server already needs to be configured as described in Section 14.11.2, “Loading and Configuring the SR-IOV Host Drivers”.
14.11.2 Loading and Configuring the SR-IOV Host Drivers #
To be able to access and initialize VFs, an SR-IOV-capable driver needs to be loaded on the host system.
Before loading the driver, make sure the card is properly detected by running
lspci. The following example shows thelspcioutput for the dual-port Intel 82576NS network card:tux >sudo /sbin/lspci | grep 82576 01:00.0 Ethernet controller: Intel Corporation 82576NS Gigabit Network Connection (rev 01) 01:00.1 Ethernet controller: Intel Corporation 82576NS Gigabit Network Connection (rev 01) 04:00.0 Ethernet controller: Intel Corporation 82576NS Gigabit Network Connection (rev 01) 04:00.1 Ethernet controller: Intel Corporation 82576NS Gigabit Network Connection (rev 01)In case the card is not detected, it is likely that the hardware virtualization support in the BIOS/EFI has not been enabled.
Check whether the SR-IOV driver is already loaded by running
lsmod. In the following example a check for the igb driver (for the Intel 82576NS network card) returns a result. That means the driver is already loaded. If the command returns nothing, the driver is not loaded.tux >sudo /sbin/lsmod | egrep "^igb " igb 185649 0Skip this step if the driver is already loaded.
If the SR-IOV driver is not yet loaded, the non-SR-IOV driver needs to be removed first, before loading the new driver. Use
rmmodto unload a driver. The following example unloads the non-SR-IOV driver for the Intel 82576NS network card:sudo /sbin/rmmod igbvf
Load the SR-IOV driver subsequently using the
modprobecommand:sudo /sbin/modprobe igb
Configure the driver by adding the number of VFs you want to make available and, if necessary, by blacklisting the non-SR-IOV driver:
sudo echo -e "options igb max_vfs=8\nblacklist igbvf" >> /etc/modprobe.d/50-igb/
Make sure to replace the example values
igb,igbvfand50-igbby values appropriate for your driver.Now make sure the driver is loaded on boot by creating the file
/etc/modules-load.d/igb.confwith the following content:# Load the igb driver at boot igb
Make sure to replace the example value
igbby a string appropriate for your driver.Reboot the machine and check if the SR-IOV driver is loaded by re-running the
lspcicommand from the first step of this procedure. If the SR-IOV driver was loaded successfully you should see additional lines for the VFs:01:00.0 Ethernet controller: Intel Corporation 82576NS Gigabit Network Connection (rev 01) 01:00.1 Ethernet controller: Intel Corporation 82576NS Gigabit Network Connection (rev 01) 01:10.0 Ethernet controller: Intel Corporation 82576 Virtual Function (rev 01) 01:10.1 Ethernet controller: Intel Corporation 82576 Virtual Function (rev 01) 01:10.2 Ethernet controller: Intel Corporation 82576 Virtual Function (rev 01) [...] 04:00.0 Ethernet controller: Intel Corporation 82576NS Gigabit Network Connection (rev 01) 04:00.1 Ethernet controller: Intel Corporation 82576NS Gigabit Network Connection (rev 01) 04:10.0 Ethernet controller: Intel Corporation 82576 Virtual Function (rev 01) 04:10.1 Ethernet controller: Intel Corporation 82576 Virtual Function (rev 01) 04:10.2 Ethernet controller: Intel Corporation 82576 Virtual Function (rev 01) [...]
14.11.3 Adding a VF Network Device to an Existing VM Guest #
When the SR-IOV hardware is properly set up on the VM Host Server, you can add VFs to VM Guests. To do so, you need to collect some data first.
Note: The following procedure is using example data. Make sure to replace it by appropriate data from your setup.
Use the
virsh nodedev-listcommand to get the PCI address of the VF you want to assign and its corresponding PF. Numerical values from thelspcioutput shown in Section 14.11.2, “Loading and Configuring the SR-IOV Host Drivers” (for example01:00.0or04:00.1) are transformed by adding the prefix "pci_0000_" and by replacing colons and dots with underscores. So a PCI ID listed as "04:00.0" bylspciis listed as "pci_0000_04_00_0" by virsh. The following example lists the PCI IDs for the second port of the Intel 82576NS network card:tux >sudo virsh nodedev-list | grep 0000_04_ pci_0000_04_00_0 pci_0000_04_00_1 pci_0000_04_10_0 pci_0000_04_10_1 pci_0000_04_10_2 pci_0000_04_10_3 pci_0000_04_10_4 pci_0000_04_10_5 pci_0000_04_10_6 pci_0000_04_10_7 pci_0000_04_11_0 pci_0000_04_11_1 pci_0000_04_11_2 pci_0000_04_11_3 pci_0000_04_11_4 pci_0000_04_11_5The first two entries represent the PFs, whereas the other entries represent the VFs.
Get more data that will be needed by running the command
virsh nodedev-dumpxmlon the PCI ID of the VF you want to add:tux >sudo virsh nodedev-dumpxml pci_0000_04_10_0 <device> <name>pci_0000_04_10_0</name> <parent>pci_0000_00_02_0</parent> <capability type='pci'> <domain>0</domain> <bus>4</bus> <slot>16</slot> <function>0</function> <product id='0x10ca'>82576 Virtual Function</product> <vendor id='0x8086'>Intel Corporation</vendor> <capability type='phys_function'> <address domain='0x0000' bus='0x04' slot='0x00' function='0x0'/> </capability> </capability> </device>The following data is needed for the next step:
<domain>0</domain>
<bus>4</bus>
<slot>16</slot>
<function>0</function>
Create a temporary XML file (for example
/tmp/vf-interface.xmlcontaining the data necessary to add a VF network device to an existing VM Guest. The minimal content of the file needs to look like the following:<interface type='hostdev'>1 <source> <address type='pci' domain='0' bus='11' slot='16' function='0'2/>2 </source> </interface>
VFs do not get a fixed MAC address; it changes every time the host reboots. When adding network devices the “traditional” way with <hostdev>, it would require to reconfigure the VM Guest's network device after each reboot of the host, because of the MAC address change. To avoid this kind of problem, libvirt introduced the “interface type='hostdev'” directive, which sets up network-specific data before assigning the device.
Specify the data you acquired in the previous step here.
In case a device is already attached to the host, it cannot be attached to a guest. To make it available for guests, detach it from the host first:
virsh nodedev-detach pci_0000_04_10_0
Last, add the VF interface to an existing VM Guest:
virsh attach-device GUEST /tmp/vf-interface.xml --OPTION
GUEST needs to be replaced by the domain name, id or uuid of the VM Guest and --OPTION can be one of the following:
--persistentThis option will always add the device to the domain's persistent XML. In addition, if the domain is running, it will be hotplugged.
--configThis option will only affect the persistent XML, even if the domain is running. The device will only show up in the guest on next boot.
--liveThis option will only affect a running domain. If the domain is inactive, the operation will fail. The device is not persisted in the XML and will not be available in the guest on next boot.
- --current
This option affects the current state of the domain. If the domain is inactive, the device is added to the persistent XML and will be available on next boot. If the domain is active, the device is hotplugged but not added to the persistent XML.
To detach a VF interface, use the
virsh
      detach-device
command, which also takes the options listed above.
14.11.4 Dynamic Allocation of VFs from a Pool #
If you define the PCI address of a VF into a guest's configuration statically as described in Section 14.11.3, “Adding a VF Network Device to an Existing VM Guest”, it is hard to migrate such guest to another host. The host must have identical hardware in the same location on the PCI bus, or the guest configuration must be modified prior to each start.
Another approach is to create a libvirt network with a device pool
that contains all the VFs of an SR-IOV device.
The guest then references this network, and each time it is started, a
single VF is dynamically allocated to it. When the guest is stopped, the
VF is returned to the pool, available for another guest.
14.11.4.1 Defining Network with Pool of VFs on VM Host Server #
The following example of network definition creates a pool of all VFs for the SR-IOV device with its physical function (PF) at the network interface eth0 on the host:
<network>
  <name>passthrough</name>
    <forward mode='hostdev' managed='yes'>
      <pf dev='eth0'/>
    </forward>
  </network>
To use this network on the host, save the above code to a file, for
example /tmp/passthrough.xml, and execute the
following commands. Remember to replace eth0 with the real network
interface name of your SR-IOV device's PF:
virsh net-define /tmp/passthrough.xml
virsh net-autostart passthrough
virsh net-start passthrough
14.11.4.2 Configuring VM Guest to Use VF from the Pool #
The following example of guest device interface definition uses a VF of
the SR-IOV device from the pool created in
Section 14.11.4.1, “Defining Network with Pool of VFs on VM Host Server”. libvirt automatically
derives the list of all VFs associated with that PF the first time the
guest is started.
<interface type='network'>
  <source network='passthrough'>
</interface>
To verify the list of associated VFs, run virsh net-dumpxml
passthrough on the host after the first guest that uses the
network with the pool of VFs starts.
<network connections='1'>
  <name>passthrough</name>
  <uuid>a6a26429-d483-d4ed-3465-4436ac786437</uuid>
  <forward mode='hostdev' managed='yes'>
    <pf dev='eth0'/>
    <address type='pci' domain='0x0000' bus='0x02' slot='0x10' function='0x1'/>
    <address type='pci' domain='0x0000' bus='0x02' slot='0x10' function='0x3'/>
    <address type='pci' domain='0x0000' bus='0x02' slot='0x10' function='0x5'/>
    <address type='pci' domain='0x0000' bus='0x02' slot='0x10' function='0x7'/>
    <address type='pci' domain='0x0000' bus='0x02' slot='0x11' function='0x1'/>
    <address type='pci' domain='0x0000' bus='0x02' slot='0x11' function='0x3'/>
    <address type='pci' domain='0x0000' bus='0x02' slot='0x11' function='0x5'/>
  </forward>
  </network>