Virtualization Guide
- About This Manual
- I Introduction
- II Managing Virtual Machines with
libvirt - III Hypervisor-Independent Features
- IV Managing Virtual Machines with Xen
- 18 Setting Up a Virtual Machine Host
- 19 Virtual Networking
- 20 Managing a Virtualization Environment
- 21 Block Devices in Xen
- 22 Virtualization: Configuration Options and Settings
- 23 Administrative Tasks
- 24 XenStore: Configuration Database Shared between Domains
- 25 Xen as a High-Availability Virtualization Host
- V Managing Virtual Machines with QEMU
- VI Managing Virtual Machines with LXC
- Glossary
- A Virtual Machine Drivers
- B Appendix
- C XM, XL Toolstacks and Libvirt framework
- D GNU Licenses
13 Managing Networks
Abstract#
This chapter introduces common networking configurations supported by
libvirt. It does not depend on the hypervisor used, which means that
it is valid for all hypervisors supported by libvirt, such as KVM or
Xen. These setups can be achieved using both the graphical interface
of Virtual Machine Manager and the command line tool virsh.
There are two common network setups to provide a VM Guest with a network connection—either create a virtual network for the guest, or create a network bridge over a host's physical network interface and have the guest use it.
13.1 Virtual Networks #
A virtual network is a computer network which does not consist of a physical network link, but rather uses a virtual network link. Each host can have a number of virtual networks defined. Virtual networks are based on virtual devices that connects virtual machines inside a hypervisor. They allow outgoing traffic translated to the LAN and are provided with DHCP and DNS services. Virtual networks can be either isolated, or forwarded to a physical network.
Guests inside an isolated virtual network can communicate with each other, but cannot communicate with guests outside the virtual network. Also, guests not belonging to the isolated virtual network cannot communicated with guests inside.
On the other hand, guests inside a forwarded (NAT,
network address translation) virtual network can make any outgoing
network connection they request. Incoming connections are allowed from
VM Host Server, and from other guests connected to the same virtual network.
All other incoming connections are blocked by
iptables rules.
A standard libvirt installation on openSUSE Leap already comes with a predefined virtual network providing DHCP server and network address translation (NAT) named "default".
13.1.1 Managing Virtual Networks with Virtual Machine Manager #
You can define, configure, and operate both isolated and forwarded virtual networks with Virtual Machine Manager.
13.1.1.1 Defining Virtual Networks #
Start Virtual Machine Manager. In the list of available connections, left-click the name of the connection for which you need to configure the virtual network, and then select .
In the window, click the tab. You can see the list of all virtual networks available for the current connection. On the right, there are details of the highlighted virtual network.
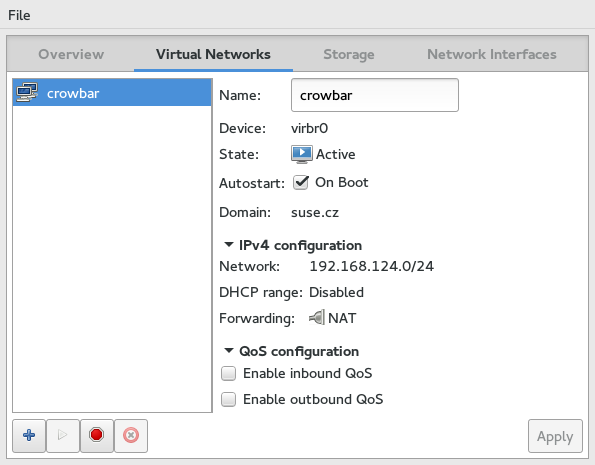
Figure 13.1: Connection Details #
Click
 to add a new virtual network.
Type a name for the new virtual network and click .
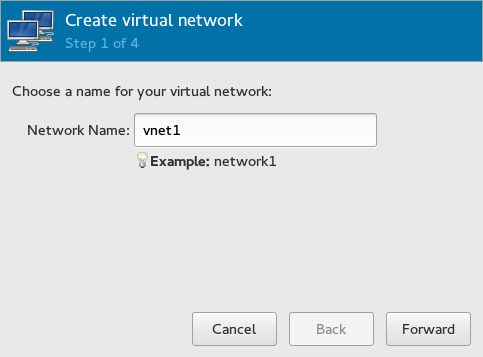
Figure 13.2: Create virtual network #
If you want to specify an IPv4 network address space definition, activate the relevant option and type it into the text entry.
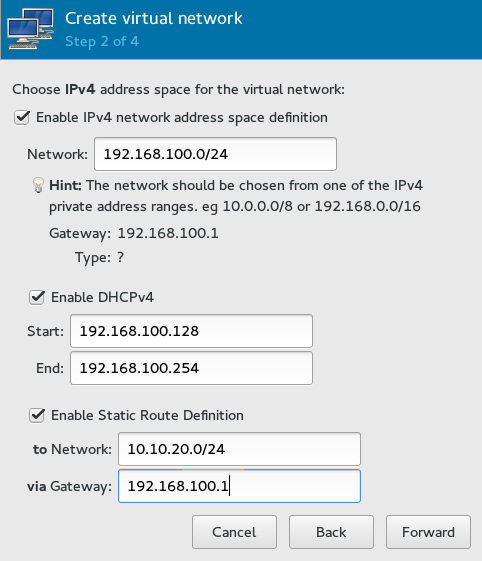
Figure 13.3: Create virtual network #
libvirtcan provide your virtual network with a DHCP server. If you need it, activate , then type the start and end IP address range of assignable addresses.To enable static routing for the new virtual network, activate the relevant option and type the network and gateway addresses.
Click to proceed.
To specify IPv6-related options—network address space, DHCPv6 server, or static route—activatei and activate/fill the relevant options.
Click to proceed.
Select whether you want isolated or forwarded virtual network.
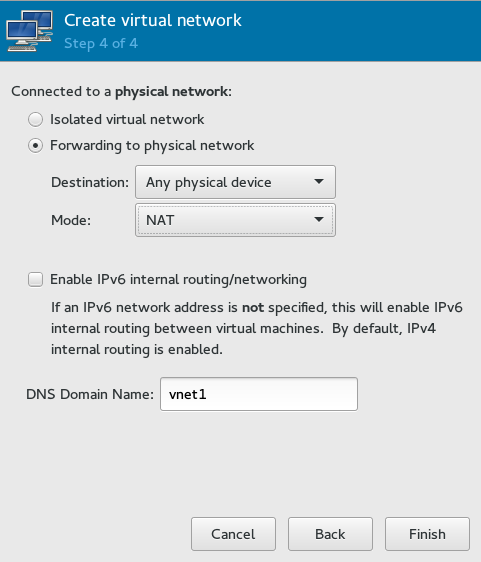
Figure 13.4: Create virtual network #
For forwarded networks, specify the network interface to which the requests will be forwarded, and one of the forwarding modes: while (network address translation) remaps the virtual network address space and allows sharing a single IP address, connects the virtual switch to the physical host LAN with no network translation.
If you did not specify IPv6 network address space definition earlier, you can enable IPv6 internal routing between virtual machines.
Optionally, change the DNS domain name.
Click to create the new virtual network. On VM Host Server, a new virtual network bridge
virbrXis available, which corresponds to the newly create virtual network. You can check withbrctl show.libvirtautomatically adds iptables rules to allow traffic to/from guests attached to the new virbrX device.
13.1.1.2 Starting Virtual Networks #
To start a virtual network that is temporarily stopped, follow these steps:
Start Virtual Machine Manager. In the list of available connections, left-click the name of the connection for which you need to configure the virtual network, and then select .
In the window, click the tab. You can see the list of all virtual networks available for the current connection.
Click
 to start the virtual network.
13.1.1.3 Stopping Virtual Networks #
To stop an active virtual network, follow these steps:
Start Virtual Machine Manager. In the list of available connections, left-click the name of the connection for which you need to configure the virtual network, and then select .
In the window, click the tab. You can see the list of all virtual networks available for the current connection.
Click
 to stop the virtual network.
13.1.1.4 Deleting Virtual Networks #
To delete a virtual network from VM Host Server, follow these steps:
Start Virtual Machine Manager. In the list of available connections, left-click the name of the connection for which you need to configure the virtual network, and then select .
In the window, click the tab. You can see the list of all virtual networks available for the current connection.
Click
 to delete the virtual network.
13.1.2 Managing Virtual Networks with virsh #
You can manage libvirt-provided virtual networks with the
virsh command line tool. To view all network related
virsh commands, run
# virsh help network
Networking (help keyword 'network'):
 net-autostart                  autostart a network
        net-create                     create a network from an XML file
        net-define                     define (but don't start) a network from an XML file
        net-destroy                    destroy (stop) a network
        net-dumpxml                    network information in XML
        net-edit                       edit XML configuration for a network
        net-event                      Network Events
        net-info                       network information
        net-list                       list networks
        net-name                       convert a network UUID to network name
        net-start                      start a (previously defined) inactive network
        net-undefine                   undefine an inactive network
        net-update                     update parts of an existing network's configuration
 net-uuid                       convert a network name to network UUID
To view a brief help information for a specific virsh
command, run virsh help
virsh_command:
# virsh help net-create
  NAME
    net-create - create a network from an XML file

  SYNOPSIS
    net-create <file>

  DESCRIPTION
    Create a network.

  OPTIONS
    [--file] <string>  file containing an XML network description
13.1.2.1 Creating a Network #
To create a new running virtual network, run
root # virsh net-create vnet_definition.xml
The vnet_definition.xml XML file includes
the definition of the virtual network that libvirt accepts.
To define a new virtual network without activating it, run
root # virsh net-define vnet_definition.xmlThe following examples illustrate definitions of different types of virtual networks.
Example 13.1: NAT Based Network #
The following configuration allows VM Guests outgoing connectivity if it is available on VM Host Server. In the absence of VM Host Server networking, it allows guests to talk directly to each other.
<network>
<name>vnet_nated</name>1
<bridge name="virbr1" />2
 <forward mode="nat"/>3
 <ip address="192.168.122.1" netmask="255.255.255.0">4
  <dhcp>
   <range start="192.168.122.2" end="192.168.122.254" />5
  </dhcp>
 </ip>
</network>
The name of the new virtual network. | |
The name of the bridge device used to construct the virtual network.
When defining a new network with a <forward> mode of "nat" or
"route" (or an isolated network with no <forward> element),
| |
Inclusion of the <forward> element indicates that the virtual
network will be connected to the physical LAN. The
| |
The IP address and netmask for the network bridge. | |
Enable DHCP server for the virtual network, offering IP addresses
ranging from the specified |
Example 13.2: Routed Network #
The following configuration routes traffic from the virtual network to the LAN without applying any NAT. The IP address range must be pre-configured in the routing tables of the router on VM Host Server network.
<network>
 <name>vnet_routed</name>
 <bridge name="virbr1" />
 <forward mode="route" dev="eth1"/>1
 <ip address="192.168.122.1" netmask="255.255.255.0">
  <dhcp>
   <range start="192.168.122.2" end="192.168.122.254" />
  </dhcp>
 </ip>
</network>
The guest traffic may only go out via the
|
Example 13.3: Isolated Network #
This configuration provides a completely isolated private network. The guests can talk to each other, and to VM Host Server, but cannot reach any other machines on the LAN, as the <forward> element is missing in the XML description.
<network>
        <name>vnet_isolated</name>
        <bridge name="virbr3" />
        <ip address="192.168.152.1" netmask="255.255.255.0">
                <dhcp>
                        <range start="192.168.152.2" end="192.168.152.254" />
                </dhcp>
        </ip>
</network>
Example 13.4: Using an Existing Bridge on VM Host Server #
This configuration shows how to use an existing VM Host Server's network
bridge br0. VM Guests are directly connected to
the physical network. Their IP addresses will all be on the subnet of
the physical network, and there will be no restrictions on incoming or
outgoing connections.
<network>
        <name>host-bridge</name>
        <forward mode="bridge"/>
        <bridge name="br0"/>
</network>
13.1.2.2 Listing Networks #
To list all virtual networks available to libvirt, run
root # virsh net-list --all

 Name                 State      Autostart     Persistent
----------------------------------------------------------
 crowbar              active     yes           yes
 vnet_nated           active     yes           yes
 vnet_routed          active     yes           yes
 vnet_isolated        inactive   yes           yes
13.1.2.3 Getting Details about a Network #
To get detailed informaiton about a network, run
root # virsh net-info vnet_routed
Name:           vnet_routed
UUID:           756b48ff-d0c6-4c0a-804c-86c4c832a498
Active:         yes
Persistent:     yes
Autostart:      yes
Bridge:         virbr5
13.1.2.4 Starting a Network #
To start an inactive network that was already defined, find its name (or unique identifier, UUID) with
root # virsh net-list --inactive
 Name                 State      Autostart     Persistent
----------------------------------------------------------
 vnet_isolated        inactive   yes           yes
and then run
root # virsh net-start vnet_isolated
Network vnet_isolated started
13.1.2.5 Stopping a Network #
To stop an active network, find its name (or unique identifier, UUID) with
root # virsh net-list --inactive
 Name                 State      Autostart     Persistent
----------------------------------------------------------
 vnet_isolated        active     yes           yes
and then run
root # virsh net-destroy vnet_isolated
Network vnet_isolated destroyed
13.1.2.6 Removing a Network #
To remove the definition of an inactive network from VM Host Server permanently, run
root # virsh net-undefine vnet_isolated
Network vnet_isolated has been undefined
13.2 Bridged Networking #
A network bridge is used to connect two or more network segments. It behaves like a virtual network switch, and guest machines treat it transparently as a physical network interface. Any physical or virtual device can be connected to the bridge.
If there is a network bridge present on VM Host Server, you can connect VM Guest directly to it. This provides the VM Guest with full incoming and outgoing network access.
13.2.1 Managing Network Bridges with YaST #
This section includes procedures to add or remove network bridges with YaST.
13.2.1.1 Adding a Network Bridge #
To add a network bridge on VM Host Server, follow these steps:
Start › › .
Activate the tab and click .
Select from the list and enter the bridge device interface name in the entry. Proceed with .
In the tab, specify networking details such as DHCP/static IP address, subnet mask or host name.
Activate the tab and activate the network devices you want to include in the network bridge.
Click to return to the tab and confirm with . The new network bridge should be active on VM Host Server now.
13.2.1.2 Deleting a Network Bridge #
To delete an existing network bridge, follow these steps:
Start › › .
Select the bridge device you want to delete from the list in the tab.
Delete the bridge with and confirm with .
13.2.2 Managing Network Bridges with brctl #
This section includes procedures to add or remove network bridges with
the brctl command line tool.
13.2.2.1 Adding a Network Bridge #
To add a new network bridge device on VM Host Server with
brctl, follow these steps:
Login as
rooton the VM Host Server where you want to create a new network bridge.Choose a name for the new bridge—virbr_test in our example— and run
root #brctl addbr virbr_testCheck if the bridge was create on VM Host Server:
root #brctl show bridge name bridge id STP enabled interfaces br0 8000.e06995ec09e8 no eth0 virbr0 8000.525400b37ec9 yes virbr0-nic virbr_test 8000.000000000000 novirbr_testis present, but is not associated with any physical network interface.Add a network interface to the bridge:
root #brctl addif eth1
Important
You can only enslave a network interface that is not yet used by other network bridge.
Optionally, enable STP (see Spanning Tree Protocol:
root #brctl stp virbr_test on
13.2.2.2 Deleting a Network Bridge #
To delete an existing network bridge device on VM Host Server with
brctl, follow these steps:
Login as
rooton the VM Host Server where you want to delete an existing network bridge.List existing network bridges to identify the name of the bridge to remove:
root #brctl show bridge name bridge id STP enabled interfaces br0 8000.e06995ec09e8 no eth0 virbr0 8000.525400b37ec9 yes virbr0-nic virbr_test 8000.000000000000 yes eth1Delete the bridge:
root #brctl delbr virbr_test