Virtualization Guide
- About This Manual
- I Introduction
- II Managing Virtual Machines with
libvirt - III Hypervisor-Independent Features
- IV Managing Virtual Machines with Xen
- 18 Setting Up a Virtual Machine Host
- 19 Virtual Networking
- 20 Managing a Virtualization Environment
- 21 Block Devices in Xen
- 22 Virtualization: Configuration Options and Settings
- 23 Administrative Tasks
- 24 XenStore: Configuration Database Shared between Domains
- 25 Xen as a High-Availability Virtualization Host
- V Managing Virtual Machines with QEMU
- VI Managing Virtual Machines with LXC
- Glossary
- A Virtual Machine Drivers
- B Appendix
- C XM, XL Toolstacks and Libvirt framework
- D GNU Licenses
23 Administrative Tasks
23.1 The Boot Loader Program #
The boot loader controls how the virtualization software boots and runs. You can modify the boot loader properties by using YaST, or by directly editing the boot loader configuration file.
The YaST boot loader program is located at › › . Click the tab and select the line containing the Xen kernel as the .
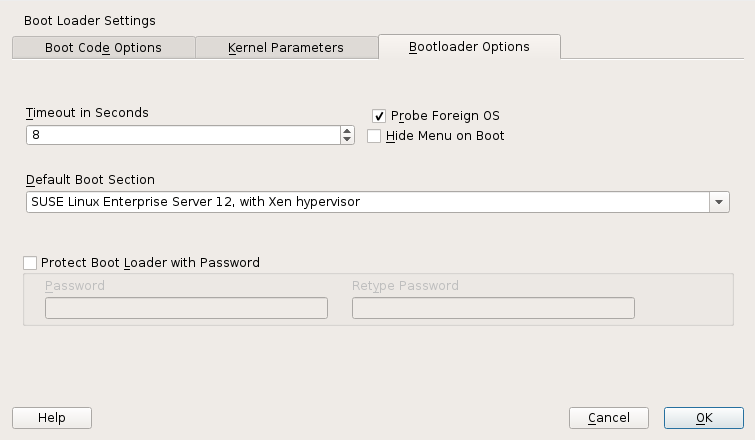
Figure 23.1: Boot Loader Settings #
Confirm with . Next time you boot the host, it will be ready to provide the Xen virtualization environment.
You can use the Boot Loader program to specify functionality, such as:
Pass kernel command line parameters.
Specify the kernel image and initial RAM disk.
Select a specific hypervisor.
Pass additional parameters to the hypervisor. See http://xenbits.xen.org/docs/unstable/misc/xen-command-line.html for their complete list.
You can customize your virtualization environment by editing the
/etc/default/grub file. Add the following line to
this file:
GRUB_CMDLINE_XEN="<boot_parameters>". Do not
forget to run grub2-mkconfig -o /boot/grub2/grub.cfg
after editing the file.
23.2 Sparse Image Files and Disk Space #
If the host’s physical disk reaches a state where it has no available space, a virtual machine using a virtual disk based on a sparse image file cannot write to its disk. Consequently, it reports I/O errors.
If this situation occurs, you should free up available space on the physical disk, remount the virtual machine’s file system, and set the file system back to read-write.
To check the actual disk requirements of a sparse image file, use the
command du -h <image file>.
To increase the available space of a sparse image file, first increase the file size and then the file system.
Warning: Back Up Before Resizing
Touching the sizes of partitions or sparse files always bears the risk of data failure. Do not work without a backup.
The resizing of the image file can be done online, while the VM Guest is running. Increase the size of a sparse image file with:
dd if=/dev/zero of=<image file> count=0 bs=1M seek=<new size in MB>
For example, to increase the file
/var/lib/xen/images/sles/disk0 to a size of 16GB,
use the command:
dd if=/dev/zero of=/var/lib/xen/images/sles/disk0 count=0 bs=1M seek=16000
Note: Increasing Non-Sparse Images
It is also possible to increase the image files of devices that are not sparse files. However, you must know exactly where the previous image ends. Use the seek parameter to point to the end of the image file and use a command similar to the following:
dd if=/dev/zero of=/var/lib/xen/images/sles/disk0 seek=8000 bs=1M count=2000
Be sure to use the right seek, else data loss may happen.
If the VM Guest is running during the resize operation, also resize the loop device that provides the image file to the VM Guest. First detect the correct loop device with the command:
losetup -j /var/lib/xen/images/sles/disk0
Then resize the loop device, for example /dev/loop0,
with the following command:
losetup -c /dev/loop0
Finally check the size of the block device inside the guest system with
the command fdisk -l /dev/xvdb. The device name
depends on the actually increased device.
The resizing of the file system inside the sparse file involves tools that are depending on the actual file system.
23.3 Migrating Xen VM Guest Systems #
With Xen it is possible to migrate a VM Guest system from one VM Host Server to another with almost no service interruption. This could be used for example to move a busy VM Guest to a VM Host Server that has stronger hardware or is not yet loaded. Or, if a service of a VM Host Server is required, all VM Guest systems running on this machine can be migrated to other machines to avoid interruption of service. These are only two examples—many more reasons may apply to your personal situation.
Before starting, some preliminary considerations regarding the VM Host Server should be taken into account:
All VM Host Server systems should use a similar CPU. The frequency is not so important, but they should be using the same CPU family. To get more information about the used CPU, see
cat /proc/cpuinfo.All resources that are used by a specific guest system must be available on all involved VM Host Server systems—for example all used block devices must exist on both VM Host Server systems.
If the hosts included in the migration process run in different subnets, make sure that either DHCP relay is available to the guests, or for guests with static network configuration, set up the network manually.
Using special features like
PCI Pass-Throughmay be problematic. Do not implement these when deploying for an environment that should migrate VM Guest systems between different VM Host Server systems.For fast migrations, a fast network is mandatory. If possible, use GB Ethernet and fast switches. Deploying VLAN might also help avoid collisions.
23.3.1 Preparing Block Devices for Migrations #
The block devices needed by the VM Guest system must be available on all involved VM Host Server systems. This is done by implementing some kind of shared storage that serves as container for the root file system of the migrated VM Guest system. Common possibilities include:
iSCSIcan be set up to give access to the same block devices from different systems at the same time.NFSis a widely used root file system that can easily be accessed from different locations. For more information, see Book “Reference”, Chapter 22 “Sharing File Systems with NFS”.DRBDcan be used if only two VM Host Server systems are involved. This gives some extra data security, because the used data is mirrored over the network. For more information, see the SUSE Linux Enterprise High Availability Extension 42.1 documentation at http://www.suse.com/doc/.SCSIcan also be used if the available hardware permits shared access to the same disks.NPIVis a special mode to use Fibre channel disks. However, in this case all migration hosts must be attached to the same Fibre channel switch. For more information about NPIV, see Section 21.1, “Mapping Physical Storage to Virtual Disks”. Commonly, this works if the Fibre channel environment supports 4 Gbit or faster connections.
23.3.2 Migrating VM Guest Systems #
The actual migration of the VM Guest system is done with the command:
xl migrate <domain_name> <host>
The speed of the migration depends on how fast the memory print can be saved to disk, sent to the new VM Host Server and loaded there. This means that small VM Guest systems can be migrated faster than big systems with a lot of memory.
23.4 Monitoring Xen #
For a regular operation of many virtual guests, having a possibility to check the sanity of all the different VM Guest systems is indispensable. Xen offers several tools besides the system tools to gather information about the system.
Tip: Monitoring the VM Host Server
Basic monitoring of the VM Host Server (I/O and CPU) is available via the Virtual Machine Manager. Refer to Section 10.8.1, “Monitoring with Virtual Machine Manager” for details.
23.4.1 Monitor Xen with xentop #
The preferred terminal application to gather information about Xen
virtual environment is xentop. Unfortunately, this
tool needs a rather broad terminal, else it inserts line breaks into the
display.
xentop has several command keys that can give you
more information about the system that is monitored. Some of the more
important are:
- D
Change the delay between the refreshes of the screen.
- N
Also display network statistics. Note, that only standard configurations will be displayed. If you use a special configuration like a routed network, no network will be displayed.
- B
Display the respective block devices and their cumulated usage count.
For more information about xentop see the manual page
man 1 xentop.
Tip: virt-top
libvirt offers the hypervisor-agnostic tool virt-top,
which is recommended for monitoring VM Guests. See Section 10.8.2, “Monitoring with virt-top” for details.
23.4.2 More Helpful Tools #
There are many different system tools that also help monitoring or debugging a running SUSE Linux Enterprise system. Many of these are covered in the official SUSE Linux Enterprise documentation. Especially useful for monitoring a virtualization environment are the following tools:
- ip
The command line utility
ipmay be used to monitor arbitrary network interfaces. This is especially useful if you have set up a network that is routed or applied a masqueraded network. To monitor a network interface with the namealice.0, run the following command:watch ip -s link show alice.0
- brctl
In a standard setup, all the Xen VM Guest systems are attached to a virtual network bridge.
brctlallows you to determine the connection between the bridge and the virtual network adapter in the VM Guest system. For example, the output ofbrctl showmay look like the following:bridge name bridge id STP enabled interfaces br0 8000.000476f060cc no eth0 vif1.0 br1 8000.00001cb5a9e7 no vlan22This shows that there are two virtual bridges defined on the system. One is connected to the physical Ethernet device
eth0, the other one is connected to a VLAN interfacevlan22.There is only one guest interface active in this setup,
vif1.0. This means that the guest with ID 1 has an Ethernet interfaceeth0assigned, that is connected tobr0in the VM Host Server.- iptables-save
Especially when using masquerade networks, or if several Ethernet interfaces are set up together with a firewall setup, it may be helpful to check the current firewall rules.
The command
iptablesmay be used to check all the different firewall settings. To list all the rules of a chain, or even of the complete setup, you may use the commandsiptables-saveoriptables -S.
23.5 Providing Host Information for VM Guest Systems #
In a standard Xen environment, the VM Guest systems have only
very limited information about the VM Host Server system they are running
on. If a guest should know more about the VM Host Server it runs on,
vhostmd can provide more information to selected
guests. To set up your system to run vhostmd,
proceed as follows:
Install the package vhostmd on the VM Host Server.
Edit the file
/etc/vhostmd/vhostmd.confif you want to add or removemetricsections from the configuration. However, the default works well.Check the validity of the
vhostmd.confconfiguration file with the command:cd /etc/vhostmd xmllint --postvalid --noout vhostmd.conf
Start the vhostmd daemon with the command
sudo systemctl start vhostmd.If vhostmd should be started automatically during start-up of the system, run the command:
sudo systemctl enable vhostmd
Attach the image file
/dev/shm/vhostmd0to the VM Guest system named alice with the command:xl block-attach opensuse /dev/shm/vhostmd0,,xvdb,ro
Log on the VM Guest system.
Install the client package
vm-dump-metrics.Run the command
vm-dump-metrics. If you want to have the result in a file, use the option-d <filename>.
The result of the vm-dump-metrics is an XML
output. The respective metric entries follow the DTD
/etc/vhostmd/metric.dtd.
For more information, see the manual pages man 8
vhostmd and /usr/share/doc/vhostmd/README
on the VM Host Server system. On the guest, see the manual page man
1 vm-dump-metrics.