5 Accessing Network Resources
From your desktop, you can access files and directories or certain services on remote hosts or make your own files and directories available to other users in your network. openSUSE® Leap offers the following ways of accessing and creating network shared resources.
- Network Browsing
Your file manager, GNOME Files, lets you browse your network for shared resources and services. Learn more about this in Section 5.3, “Accessing Network Shares”.
- Sharing Directories in Mixed Environments
Using GNOME Files, configure your files and directories to share with other members of your network. Make your data readable or writable for users from any Windows or Linux workstation. Learn more about this in Section 5.4, “Sharing Directories”.
- Managing Windows Files
openSUSE Leap can be configured to integrate into an existing Windows network. Your Linux machine then behaves like a Windows client. It takes all account information from the Active Directory domain controller, just as the Windows clients do. Learn more about this in Section 5.5, “Managing Windows Files”.
- Configuring and Accessing a Windows Network Printer
You can configure a Windows network printer through the GNOME control center. Learn how to do this in Section 5.6, “Configuring and Accessing a Windows Network Printer”.
5.1 Connecting to a Network #
You can connect to a network with wired and wireless connections. To view your network connection, check the icon in the right part of the main panel. If you click the icon, you can see more details in the menu. Click the connection name to see more details and access the settings.
To learn more about connecting to a network, see Book “Reference”, Chapter 28 “Using NetworkManager”.
5.2 General Notes on File Sharing and Network Browsing #
Network browsing, be it SMB browsing for Windows shares or SLP browsing for remote services, relies heavily on the machine's ability to send broadcast messages to all clients in the network. These messages and the clients' replies to them enable your machine to detect any available shares or services.
For broadcasts to work effectively, your machine must be part of the same subnet as all other machines it is querying. If network browsing does not work on your machine or the detected shares and services do not meet your expectations, ensure that you are connected to the appropriate subnet.
To allow network browsing, your machine needs to keep several network ports open to send and receive network messages that provide details on the network and the availability of shares and services.
If you try to browse a network with a restrictive firewall running on your machine, GNOME Files warns you that your security restrictions are not allowing it to query the network.
5.3 Accessing Network Shares #
Networking workstations can be set up to share directories. Typically, files and directories are marked to allow users remote access. These are called network shares. If your system is configured to access network shares, you can use your file manager to access these shares and browse them just as easily as if they were located on your local machine. Your level of access to the shared directories (whether read-only or write access, as well) is dependent on the permissions granted to you by the owner of the shares.
To access network shares, open GNOME Files and click from the pane. GNOME Files displays the servers and networks that you can access. Double-click a server or network to access its shares. You might be required to authenticate to the server by providing a user name and password. Common network shares are SFTP-accessible resources (SSH File Transfer Protocol) or Windows shares.
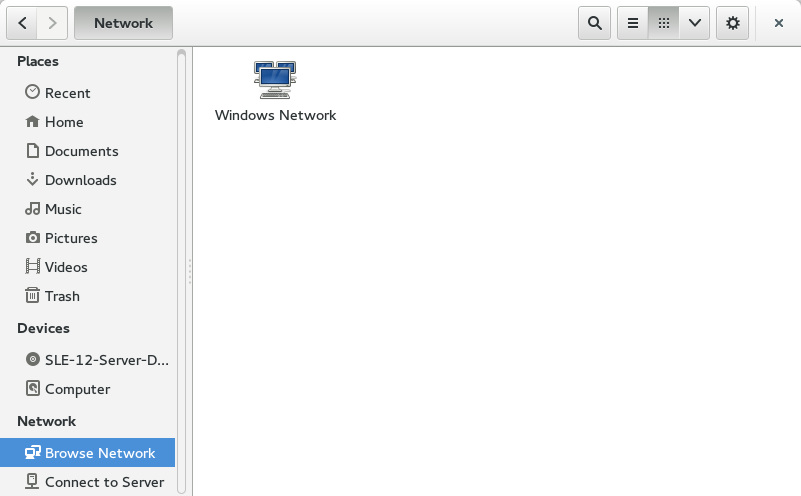
Figure 5.1: Network File Browser #
5.4 Sharing Directories #
Sharing and exchanging documents is a must-have in corporate environments. GNOME Files offers you file sharing, which makes your files and directories available to both Linux and Windows users.
5.4.1 Enabling Sharing on the Computer #
Before you can share a directory, you must enable sharing on your computer. To enable sharing:
Start YaST from the main menu.
Enter the
rootpassword.In the category , click .
Click , then click .
5.4.2 Enabling Sharing for a Directory #
To configure file sharing for a directory:
Open GNOME Files.
Right-click a directory, then select from the context menu.
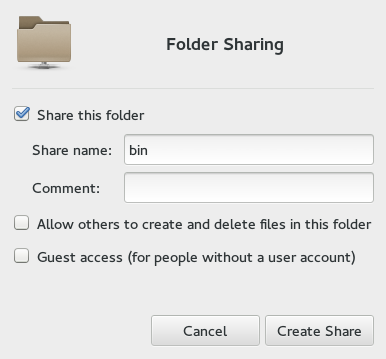
Select .
If you want other people to be able to write to the directory, select . To allow access for people without a user account check .
Click .
If the directory does not already have the permissions that are required for sharing, a dialog appears. Click .
The directory icon changes to indicate that the directory is now shared.
Important: Samba Domain Browsing and Firewalls
Samba domain browsing only works if your system's firewall is configured accordingly. Either disable the firewall entirely or assign the browsing interface to the internal firewall zone.
5.5 Managing Windows Files #
With your openSUSE Leap machine being an Active Directory client, you can browse, view and manipulate data located on Windows servers. The following examples are the most prominent ones:
- Browsing Windows Files with GNOME Files
Use GNOME Files's network browsing features to browse your Windows data.
- Viewing Windows Data with GNOME Files
Use GNOME Files to display the contents of your Windows user directory as you would for displaying a Linux directory. Create new files and directories on the Windows server.
- Manipulating Windows Data with GNOME Applications
Many GNOME applications allow you to open files on the Windows server, manipulate them and save them back to the Windows server.
- Single Sign-On
GNOME applications, including GNOME Files, support Single Sign-On. This means that you do not need to re-authenticate when you access other Windows resources. These can be Web servers, proxy servers or groupware servers like Microsoft Exchange*. Authentication against all these is handled silently in the background using the user name and password you provided when you logged in.
To access your Windows data using GNOME Files, proceed as follows:
Open GNOME Files and click in the Places pane.
Double-click .
Double-click the icon of the workgroup containing the computer you want to access.
Click the computer’s icon (and authenticate if prompted to do so) and navigate to the shared directory on that computer.
To create directories in your Windows user directory using GNOME Files, proceed as you would when creating a Linux directory.
5.6 Configuring and Accessing a Windows Network Printer #
Being part of a corporate network and authenticating against a Windows Active Directory server, you can access corporate resources such as printers. GNOME allows you to configure printing from your Linux client to a Windows network printer.
To configure a Windows network printer for use through your Linux workstation, proceed as follows:
Start the GNOME control center from the main menu by clicking › › › .
Click and enter the
rootpassword.Click the plus icon.
Select a Windows printer connected via Samba.
To print to the Windows network printer configured above, select it from the list of available printers.