14 Pidgin: Instant Messaging
Pidgin is an instant messaging (IM) client that allows you to connect to multiple accounts simultaneously. Chat live with your contacts in one tabbed interface, regardless of which IM system they use.
Pidgin supports the following instant messaging protocols: AOL* Instant Messenger (AIM), Bonjour, Gadu-Gadu, Google* Talk, GroupWise® Messenger, ICQ*, IRC, Jabber/XMPP, Microsoft Lync*/Office Communicator*, MSN* Messenger, MXit, MySpace* IM, QQ, SIMPLE, Yahoo!*, and Zephyr*. Pidgin supports many features of the various networks, such as file transfers, away messages, and typing notifications.
In the following, learn how to set up Pidgin and how to communicate with your contacts.
Note: Pidgin May Not Be Installed
Before proceeding, make sure that the package pidgin is installed.
To chat with users of Microsoft Lync and Microsoft Office Communicator, make sure that the package pidgin-sipe is installed.
14.1 Starting Pidgin #
To start Pidgin, select › › .
14.2 Configuring Accounts #
To use Pidgin, you must already have accounts on the systems you want to use. For example, to use Pidgin for your AIM account, you must first have an AIM account. Once you have those accounts, set them up in the Pidgin dialog.
Procedure 14.1: Adding and Editing Accounts #
To start Pidgin, select › › .
If you start Pidgin for the first time, a message appears, prompting you to configure an account. Otherwise, Pidgin opens the Buddy List window, showing your contacts.
(Optional) To add or edit an account from the Buddy List, select › .
In the dialog, click to add a new account or select an existing account and click .
On the tab, select the protocol. The dialog to add or modify accounts differs for each protocol, depending on what setup options are available for that protocol.
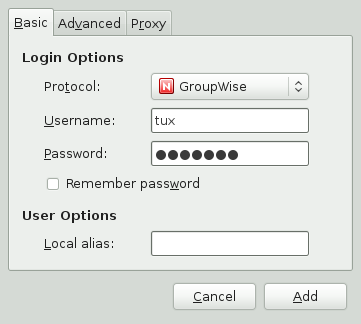
Enter the data you received when you registered with the messaging service. This usually consists of the user name or e-mail address and a password.
Your protocol might also support additional options, such as a buddy icon, alias, login options, or others.
(Optional) Often the correct server data is now already set up. However, if you are configuring a Bonjour, Jabber, Groupwise, IRC, Microsoft Lync/Office Communicator, SIMPLE, or ZEPHYR account, you will need to add server or personal data.
On the tab, enter the data you got from your messaging service.
Click (new account) or (modified account).
Repeat this procedure to add accounts for each additional protocol you want to use.
After an account is added, you can log in to that account by entering your password in the Pidgin login dialog.
Use the menu to view and enable or disable accounts that you have configured.
14.3 Managing Contacts #
Use the Buddy List to manage your contacts, also known as buddies. You can add and remove buddies from your Buddy List. You can also organize your buddies in groups, so they are easy to find.
After your accounts are set up, all buddies who are online appear in your Buddy List. If you want buddies who are not online to appear in the Buddy List, click › › .

Figure 14.1: Pidgin Buddy List #
To add a buddy to your Buddy List, click › , then enter the information about that buddy.
Note: Adding Contacts for Certain Protocols
For some protocols, you cannot add a buddy in the Pidgin interface. You must use the official client for those protocols if you want to add to your buddy list. After you have added a buddy in the protocol’s client, that buddy appears in your Buddy List.
To remove a buddy from the list of contacts, right-click the name of that buddy in the Buddy List and click .
14.4 Chatting with Friends #
It is necessary to be connected to the Internet to be able to chat with other participants. After a successful login, you are usually marked as in the Buddy List, and thus visible to others. To change your status, click the drop-down box at the bottom of the Buddy List and select another option.
To open a chat session, double-click a buddy name in the Buddy List. The Chat screen opens. Type your message, then press Enter to send.
If you open more than one chat session, the new session appears as a tab in the existing Chat window. To see all messages of a session and to be able to write a reply, click the tab of that session. To see multiple session side by side, use the mouse to drag a tab out of the window. A second window will open.
To close a chat session, close the tab or window for it.
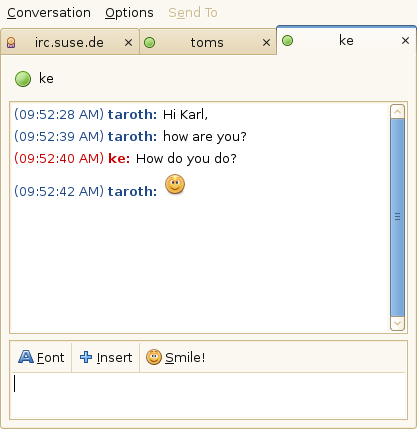
Figure 14.2: Pidgin Chat Session #
14.5 For More Information #
This chapter explained the Pidgin options you need to know about to set up Pidgin and communicate with your contacts. It does not explain all of features and options of Pidgin. For more information, open Pidgin, then click › or press F1.
For updates about new features and for the latest information, refer to the home page of the project at http://www.pidgin.im.