Reference
- About This Guide
- I Advanced Administration
- II System
- 8 32-Bit and 64-Bit Applications in a 64-Bit System Environment
- 9 Booting a Linux System
- 10 The
systemdDaemon - 11
journalctl: Query thesystemdJournal - 12 The Boot Loader GRUB 2
- 13 Basic Networking
- 14 UEFI (Unified Extensible Firmware Interface)
- 15 Special System Features
- 16 Dynamic Kernel Device Management with
udev
- III Services
- IV Mobile Computers
- A An Example Network
- B GNU Licenses
21 Samba
Abstract#
Using Samba, a Unix machine can be configured as a file and print server for macOS, Windows, and OS/2 machines. Samba has developed into a fully-fledged and rather complex product. Configure Samba with YaST, or by editing the configuration file manually.
21.1 Terminology #
The following are some terms used in Samba documentation and in the YaST module.
- SMB protocol
Samba uses the SMB (server message block) protocol that is based on the NetBIOS services. Microsoft released the protocol so other software manufacturers could establish connections to a Microsoft domain network. With Samba, the SMB protocol works on top of the TCP/IP protocol, so the TCP/IP protocol must be installed on all clients.
- CIFS protocol
CIFS (common Internet file system) protocol is another protocol supported by Samba. CIFS defines a standard remote file system access protocol for use over the network, enabling groups of users to work together and share documents across the network.
- NetBIOS
NetBIOS is a software interface (API) designed for communication between machines providing a name service. It enables machines connected to the network to reserve names for themselves. After reservation, these machines can be addressed by name. There is no central process that checks names. Any machine on the network can reserve as many names as it wants as long as the names are not already in use. The NetBIOS interface can be implemented for different network architectures. An implementation that works relatively closely with network hardware is called NetBEUI, but this is often called NetBIOS. Network protocols implemented with NetBIOS are IPX from Novell (NetBIOS via TCP/IP) and TCP/IP.
The NetBIOS names sent via TCP/IP have nothing in common with the names used in
/etc/hostsor those defined by DNS. NetBIOS uses its own, completely independent naming convention. However, it is recommended to use names that correspond to DNS host names to make administration easier or use DNS natively. This is the default used by Samba.- Samba server
Samba server provides SMB/CIFS services and NetBIOS over IP naming services to clients. For Linux, there are three daemons for Samba server: smbd for SMB/CIFS services, nmbd for naming services, and winbind for authentication.
- Samba client
The Samba client is a system that uses Samba services from a Samba server over the SMB protocol. All common operating systems, such as macOS, Windows, and OS/2, support the SMB protocol. The TCP/IP protocol must be installed on all computers. Samba provides a client for the different Unix flavors. For Linux, there is a kernel module for SMB that allows the integration of SMB resources on the Linux system level. You do not need to run any daemon for the Samba client.
- Shares
SMB servers provide resources to the clients by means of shares. Shares are printers and directories with their subdirectories on the server. It is exported by means of a name and can be accessed by its name. The share name can be set to any name—it does not need to be the name of the export directory. A printer is also assigned a name. Clients can access the printer by its name.
- DC
A domain controller (DC) is a server that handles accounts in a domain. For data replication, additional domain controllers are available in one domain.
21.2 Installing a Samba Server #
To install a Samba server, start YaST and select › . Choose › and select . Confirm the installation of the required packages to finish the installation process.
21.3 Starting and Stopping Samba #
You can start or stop the Samba server automatically (during boot) or manually. Starting and stopping policy is a part of the YaST Samba server configuration described in Section 21.4.1, “Configuring a Samba Server with YaST”.
From a command line, stop services required for Samba with
systemctl stop smb nmb and start them with
systemctl start nmb smb. The smb
service cares about winbind if needed.
Tip: winbind
winbind is an independent service, and as such is
also offered as an individual samba-winbind
package.
21.4 Configuring a Samba Server #
A Samba server in openSUSE® Leap can be configured in two different ways: with YaST or manually. Manual configuration offers a higher level of detail, but lacks the convenience of the YaST GUI.
21.4.1 Configuring a Samba Server with YaST #
To configure a Samba server, start YaST and select › .
21.4.1.1 Initial Samba Configuration #
When starting the module for the first time, the dialog starts, prompting you to make a few basic decisions concerning administration of the server. At the end of the configuration it prompts for the Samba administrator password (). For later starts, the dialog appears.
The dialog consists of two steps and optional detailed settings:
- Workgroup or Domain Name
Select an existing name from or enter a new one and click .
- Samba Server Type
In the next step, specify whether your server should act as a primary domain controller (PDC), backup domain controller (BDC), or not act as a domain controller. Continue with .
If you do not want to proceed with a detailed server configuration, confirm with . Then in the final pop-up box, set the .
You can change all settings later in the dialog with the , , , , and tabs.
21.4.1.2 Advanced Samba Configuration #
During the first start of the Samba server module the dialog appears directly after the two initial steps described in Section 21.4.1.1, “Initial Samba Configuration”. Use it to adjust your Samba server configuration.
After editing your configuration, click to save your settings.
21.4.1.2.1 Starting the Server #
In the tab, configure the start of the Samba server. To start the service every time your system boots, select . To activate manual start, choose . More information about starting a Samba server is provided in Section 21.3, “Starting and Stopping Samba”.
In this tab, you can also open ports in your firewall. To do so, select . If you have multiple network interfaces, select the network interface for Samba services by clicking , selecting the interfaces, and clicking .
21.4.1.2.3 Identity #
In the tab, you can determine the domain with which the host is associated () and whether to use an alternative host name in the network (). It is also possible to use Microsoft Windows Internet Name Service (WINS) for name resolution. In this case, activate and decide whether to . To set expert global settings or set a user authentication source, for example LDAP instead of TDB database, click .
21.4.1.2.4 Trusted Domains #
To enable users from other domains to access your domain, make the appropriate settings in the tab. To add a new domain, click . To remove the selected domain, click .
21.4.1.2.5 LDAP Settings #
In the tab , you can determine the LDAP server to use for authentication. To test the connection to your LDAP server, click . To set expert LDAP settings or use default values, click .
For more information about LDAP configuration, see Book “Security Guide”, Chapter 5 “LDAP—A Directory Service”.
21.4.2 Configuring the Server Manually #
If you intend to use Samba as a server, install
samba. The main configuration
file for Samba is /etc/samba/smb.conf. This file can
be divided into two logical parts. The [global] section
contains the central and global settings. The following default sections
contain the individual file and printer shares:
[homes]
[profiles]
[users]
[groups]
[printers]
[print$]
By means of this approach, details regarding the shares can be set
differently or globally in the [global] section, which
enhances the structural transparency of the configuration file.
21.4.2.1 The global Section #
The following parameters of the [global] section need
some adjustment to match the requirements of your network setup so other
machines can access your Samba server via SMB in a Windows environment.
workgroup = WORKGROUPThis line assigns the Samba server to a workgroup. Replace
WORKGROUPwith an appropriate workgroup of your networking environment. Your Samba server appears under its DNS name unless this name has been assigned to some other machine in the network. If the DNS name is not available, set the server name usingnetbiosname=MYNAME. For more details about this parameter, see thesmb.confman page.os level = 20This parameter triggers whether your Samba server tries to become LMB (local master browser) for its workgroup. Choose a very low value such as
2to spare the existing Windows network from any disturbances caused by a misconfigured Samba server. More information about this important topic can be found in the Network Browsing chapter of the Samba 3 Howto; for more information on the Samba 3 Howto, see Section 21.9, “For More Information”.If no other SMB server is in your network (such as a Windows 2000 server) and you want the Samba server to keep a list of all systems present in the local environment, set the
os levelto a higher value (for example,65). Your Samba server is then chosen as LMB for your local network.When changing this setting, consider carefully how this could affect an existing Windows network environment. First test the changes in an isolated network or at a noncritical time of day.
wins supportandwins serverTo integrate your Samba server into an existing Windows network with an active WINS server, enable the
wins serveroption and set its value to the IP address of that WINS server.If your Windows machines are connected to separate subnets and need to still be aware of each other, you need to set up a WINS server. To turn a Samba server into such a WINS server, set the option
wins
        support = Yes
. Make sure that only one Samba server of the network has this setting enabled. The optionswins serverandwins supportmust never be enabled at the same time in yoursmb.conffile.
21.4.2.3 Security Levels #
To improve security, each share access can be protected with a password. SMB offers the following ways of checking permissions:
- User Level Security (
security = user) This variant introduces the concept of the user to SMB. Each user must register with the server with his or her own password. After registration, the server can grant access to individual exported shares dependent on user names.
- ADS Level Security (
security = ADS) In this mode, Samba will act as a domain member in an Active Directory environment. To operate in this mode, the machine running Samba needs Kerberos installed and configured. You must join the machine using Samba to the ADS realm. This can be done using the YaST module.
- Domain Level Security (
security = domain) This mode will only work correctly if the machine has been joined into a Windows NT Domain. Samba will try to validate user name and password by passing it to a Windows NT Primary or Backup Domain Controller. The same way as a Windows NT Server would do. It expects the encrypted passwords parameter to be set to
yes.
The selection of share, user, server, or domain level security applies to the entire server. It is not possible to offer individual shares of a server configuration with share level security and others with user level security. However, you can run a separate Samba server for each configured IP address on a system.
More information about this subject can be found in the Samba 3 HOWTO.
For multiple servers on one system, pay attention to the options
interfaces and bind interfaces only.
21.5 Configuring Clients #
Clients can only access the Samba server via TCP/IP. NetBEUI and NetBIOS via IPX cannot be used with Samba.
21.5.1 Configuring a Samba Client with YaST #
Configure a Samba client to access resources (files or printers) on the Samba or Windows server. Enter the NT or Active Directory domain or workgroup in the dialog › . If you activate , the user authentication runs over the Samba, NT or Kerberos server.
Click for advanced configuration
options. For example, use the
table to enable mounting server home directory automatically with
authentication. This way users can access their home directories when
hosted on CIFS. For details, see the pam_mount man
page.
After completing all settings, confirm the dialog to finish the configuration.
21.6 Samba as Login Server #
In networks where predominantly Windows clients are found, it is often
preferable that users may only register with a valid account and password.
In a Windows-based network, this task is handled by a primary domain
controller (PDC). You can use a Windows NT server configured as PDC, but
this task can also be done with a Samba server. The entries that must be
made in the [global] section of
smb.conf are shown in
Example 21.3, “Global Section in smb.conf”.
Example 21.3: Global Section in smb.conf #
[global]
    workgroup = WORKGROUP
    domain logons = Yes
    domain master = Yes
It is necessary to prepare user accounts and passwords in an encryption
format that conforms with Windows. Do this with the command
smbpasswd -a name. Create the domain
account for the computers, required by the Windows domain concept, with the
following commands:
useradd hostname\$
smbpasswd -a -m hostname
With the useradd command, a dollar sign is added. The
command smbpasswd inserts this automatically when the
parameter -m is used. The commented configuration example
(/usr/share/doc/packages/samba/examples/smb.conf.SUSE)
contains settings that automate this task.
add machine script = /usr/sbin/useradd -g nogroup -c "NT Machine Account" \
-s /bin/false %m\$
To make sure that Samba can execute this script correctly, choose a Samba
user with the required administrator permissions and add it to the
ntadmin group. Then all users
belonging to this Linux group can be assigned Domain
Admin status with the command:
net groupmap add ntgroup="Domain Admins" unixgroup=ntadmin
21.7 Samba Server in the Network with Active Directory #
If you run Linux servers and Windows servers together, you can build two independent authentication systems and networks or connect servers to one network with one central authentication system. Because Samba can cooperate with an active directory domain, you can join your SUSE Linux Enterprise Server to Active Directory (AD).
To join an AD domain proceed as follows:
Log in as
rootand start YaST.Start › .
Enter the domain to join at in the screen.
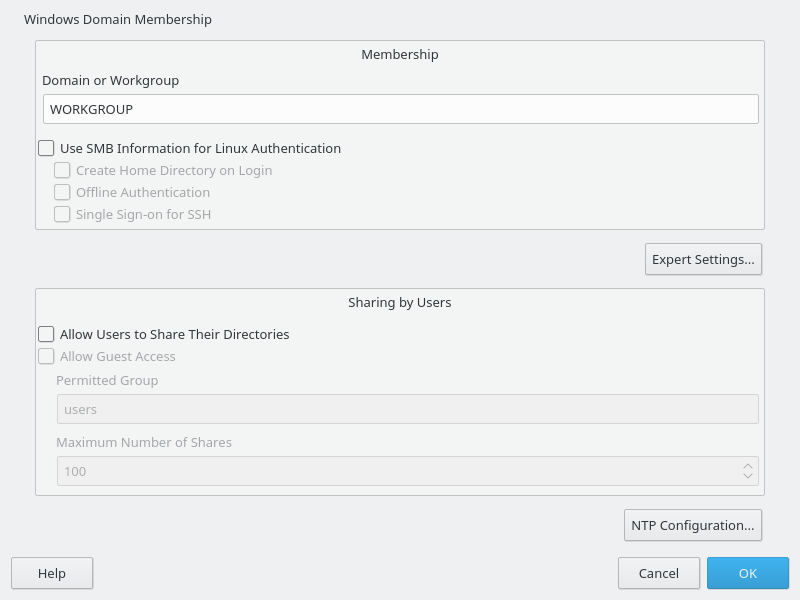
Figure 21.1: Determining Windows Domain Membership #
Check to use the SMB source for Linux authentication on your SUSE Linux Enterprise Server.
Click and confirm the domain join when prompted for it.
Provide the password for the Windows Administrator on the AD server and click .
Your server is now set up to pull in all authentication data from the Active Directory domain controller.
Tip: Identity Mapping
In an environment with more than one Samba server, UIDs and GIDs will not be created consistently. The UIDs that get assigned to users will be dependent on the order in which they first log in, which results in UID conflicts across servers. To fix this, you need to use identity mapping. See https://www.samba.org/samba/docs/man/Samba-HOWTO-Collection/idmapper.html for more details.
21.8 Advanced Topics #
This section introduces more advanced techniques to manage both the client and server part of the Samba suite.
21.8.1 Transparent File Compression on Btrfs #
Samba allows clients to remotely manipulate file and directory compression flags for shares placed on the Btrfs file system. Windows Explorer provides the ability to flag files/directories for transparent compression via the › › dialog:

Figure 21.2: Windows Explorer Dialog #
Files flagged for compression are transparently compressed and decompressed by the underlying file system when accessed or modified. This normally results in storage capacity savings at the expense of extra CPU overhead when accessing the file. New files and directories inherit the compression flag from the parent directory, unless created with the FILE_NO_COMPRESSION option.
Windows Explorer presents compressed files and directories visually differently to those that are not compressed:
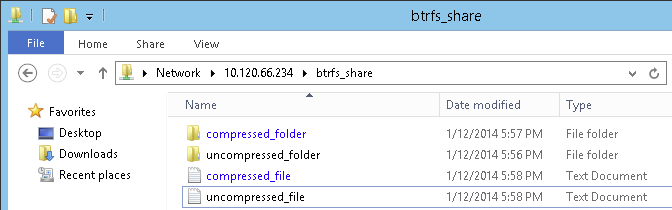
Figure 21.3: Windows Explorer Directory Listing with Compressed Files #
You can enable Samba share compression either manually by adding
vfs objects = btrfs
to the share configuration in /etc/samba/smb.conf, or
using YaST: › › , and checking
.
21.8.2 Snapshots #
Snapshots, also called Shadow Copies, are copies of the state of a file system subvolume at a certain point of time. Snapper is the tool to manage these snapshots in Linux. Snapshots are supported on the Btrfs file system or thin-provisioned LVM volumes. The Samba suite supports managing of remote snapshots through the FSRVP protocol on both the server and client side.
21.8.2.1 Previous Versions #
Snapshots on a Samba server can be exposed to remote Windows clients as file or directory previous versions.
To enable snapshots on a Samba server, the following conditions must be fulfilled:
The SMB network share resides on a Btrfs subvolume.
The SMB network share path has a related snapper configuration file. You can create the snapper file with
snapper -c <cfg_name> create-config
/path/to/shareFor more information on snapper, see Chapter 3, System Recovery and Snapshot Management with Snapper.
The snapshot directory tree must allow access for relevant users. For more information, see the PERMISSIONS section of the vfs_snapper manual page (
man 8 vfs_snapper).
To support remote snapshots, you need to modify the
/etc/samba/smb.conf file. You can do it either with
› › , or
manually by enhancing the relevant share section with
vfs objects = snapper
Note that you need to restart the Samba service for manual
smb.conf changes to take effect:
systemctl restart nmb smb
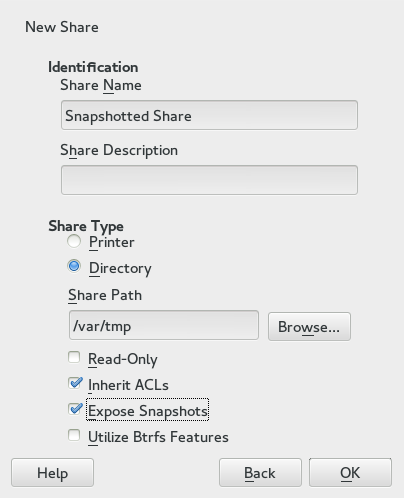
Figure 21.4: Adding a New Samba Share with Snapshotting Enabled #
After being configured, snapshots created by snapper for the Samba share path can be accessed from Windows Explorer from a file or directory's tab.
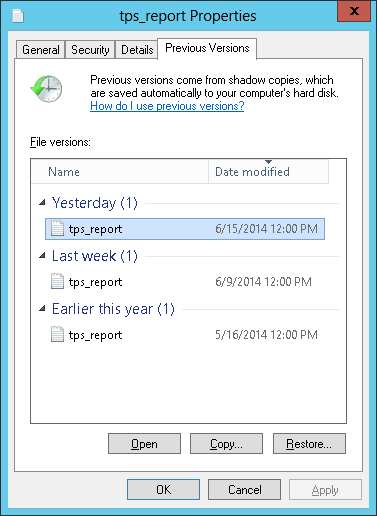
Figure 21.5: The tab in Windows Explorer #
21.8.2.2 Remote Share Snapshots #
By default, snapshots can only be created and deleted on the Samba server locally, via the snapper command line utility, or using snapper's time line feature.
Samba can be configured to process share snapshot creation and deletion requests from remote hosts using the File Server Remote VSS Protocol (FSRVP).
In addition to the configuration and prerequisites documented in
Section 21.8.2.1, “Previous Versions”, the following global
configuration is required in /etc/samba/smb.conf:
[global]
rpc_daemon:fssd = fork
registry shares = yes
include = registry
FSRVP clients, including Samba's rpcclient and Windows
Server 2012 DiskShadow.exe, can then instruct Samba to
create or delete a snapshot for a given share, and expose the snapshot as
a new share.
21.8.2.3 Managing Snapshots Remotely from Linux with rpcclient #
The samba-client package contains an FSRVP client
that can remotely request a Windows/Samba server to create and expose a
snapshot of a given share. You can then use existing tools in SUSE Linux Enterprise Server to
mount the exposed share and back up its files. Requests to the server are
sent using the rpcclient binary.
Example 21.4: Using rpcclient to Request a Windows Server 2012 Share Snapshot #
Connect to win-server.example.com server as an
administrator in an EXAMPLE domain:
# rpcclient -U 'EXAMPLE\Administrator' ncacn_np:win-server.example.com[ndr64,sign]
Enter EXAMPLE/Administrator's password:
Check that the SMB share is visible for rpcclient:
rpcclient $> netshareenum
netname: windows_server_2012_share
remark:
path:   C:\Shares\windows_server_2012_share
password:       (null)
Check that the SMB share supports snapshot creation:
rpcclient $> fss_is_path_sup windows_server_2012_share \
UNC \\WIN-SERVER\windows_server_2012_share\ supports shadow copy requests
Request the creation of a share snapshot:
rpcclient $> fss_create_expose backup ro windows_server_2012_share
13fe880e-e232-493d-87e9-402f21019fb6: shadow-copy set created
13fe880e-e232-493d-87e9-402f21019fb6(1c26544e-8251-445f-be89-d1e0a3938777): \
\\WIN-SERVER\windows_server_2012_share\ shadow-copy added to set
13fe880e-e232-493d-87e9-402f21019fb6: prepare completed in 0 secs
13fe880e-e232-493d-87e9-402f21019fb6: commit completed in 1 secs
13fe880e-e232-493d-87e9-402f21019fb6(1c26544e-8251-445f-be89-d1e0a3938777): \
share windows_server_2012_share@{1C26544E-8251-445F-BE89-D1E0A3938777} \
exposed as a snapshot of \\WIN-SERVER\windows_server_2012_share\
Confirm that the snapshot share is exposed by the server:
rpcclient $> netshareenum
netname: windows_server_2012_share
remark:
path:   C:\Shares\windows_server_2012_share
password:       (null)

netname: windows_server_2012_share@{1C26544E-8251-445F-BE89-D1E0A3938777}
remark: (null)
path:   \\?\GLOBALROOT\Device\HarddiskVolumeShadowCopy{F6E6507E-F537-11E3-9404-B8AC6F927453}\Shares\windows_server_2012_share\
password:       (null)
Attempt to delete the snapshot share:
rpcclient $> fss_delete windows_server_2012_share \
13fe880e-e232-493d-87e9-402f21019fb6 1c26544e-8251-445f-be89-d1e0a3938777
13fe880e-e232-493d-87e9-402f21019fb6(1c26544e-8251-445f-be89-d1e0a3938777): \
\\WIN-SERVER\windows_server_2012_share\ shadow-copy deleted
Confirm that the snapshot share has been removed by the server:
rpcclient $> netshareenum
netname: windows_server_2012_share
remark:
path:   C:\Shares\windows_server_2012_share
password:       (null)
21.8.2.4 Managing Snapshots Remotely from Windows with DiskShadow.exe #
You can manage snapshots of SMB shares on the Linux Samba server from the
Windows environment acting as a client as well. Windows Server 2012
includes the DiskShadow.exe utility that can manage
remote shares similar to the rpcclient described in
Section 21.8.2.3, “Managing Snapshots Remotely from Linux with rpcclient”. Note that you
need to carefully set up the Samba server first.
Following is an example procedure to set up the Samba server so that the
Windows Server client can manage its share's snapshots. Note that EXAMPLE
is the Active Directory domain used in the testing environment,
fsrvp-server.example.com is the host name of the Samba server, and
/srv/smb is the path to the SMB share.
Procedure 21.1: Detailed Samba Server Configuration #
Join Active Directory domain via YaST. For more information, Section 21.7, “Samba Server in the Network with Active Directory”.
Ensure that the Active Domain DNS entry was correct:
fsrvp-server:~ # net -U 'Administrator' ads dns register \
fsrvp-server.example.com <IP address>
Successfully registered hostname with DNS
Create Btrfs subvolume at
/srv/smbfsrvp-server:~ # btrfs subvolume create /srv/smb
Create snapper configuration file for path
/srv/smbfsrvp-server:~ # snapper -c <snapper_config> create-config /srv/smb
Create new share with path
/srv/smb, and YaST check box enabled. Make sure to add the following snippets to the global section of/etc/samba/smb.confas mentioned in Section 21.8.2.2, “Remote Share Snapshots”:[global] rpc_daemon:fssd = fork registry shares = yes include = registry
Restart Samba with
systemctl restart nmb smbConfigure snapper permissions:
fsrvp-server:~ # snapper -c <snapper_config> set-config \
ALLOW_USERS="EXAMPLE\\\\Administrator EXAMPLE\\\\win-client$"
Ensure that any ALLOW_USERS are also permitted traversal of the
.snapshotssubdirectory.fsrvp-server:~ # snapper -c <snapper_config> set-config SYNC_ACL=yes

Important: Path Escaping
Be careful about the '\' escapes! Escape twice to ensure that the value stored in
/etc/snapper/configs/<snapper_config>is escaped once."EXAMPLE\win-client$" corresponds to the Windows client computer account. Windows issues initial FSRVP requests while authenticated with this account.
Grant Windows client account necessary privileges:
fsrvp-server:~ # net -U 'Administrator' rpc rights grant \
"EXAMPLE\\win-client$" SeBackupPrivilege
Successfully granted rights.
The previous command is not needed for the "EXAMPLE\Administrator" user, which has privileges already granted.
Procedure 21.2: Windows Client Setup and DiskShadow.exe in Action #
Boot Windows Server 2012 (example host name WIN-CLIENT).
Join the same Active Directory domain EXAMPLE as with the SUSE Linux Enterprise Server.
Reboot.
Open Powershell.
Start
DiskShadow.exeand begin the backup procedure:PS C:\Users\Administrator.EXAMPLE> diskshadow.exe Microsoft DiskShadow version 1.0 Copyright (C) 2012 Microsoft Corporation On computer: WIN-CLIENT, 6/17/2014 3:53:54 PM DISKSHADOW> begin backup
Specify that shadow copy persists across program exit, reset or reboot:
DISKSHADOW> set context PERSISTENT
Check whether the specified share supports snapshots, and create one:
DISKSHADOW> add volume \\fsrvp-server\sles_snapper

DISKSHADOW> create
Alias VSS_SHADOW_1 for shadow ID {de4ddca4-4978-4805-8776-cdf82d190a4a} set as \
 environment variable.
Alias VSS_SHADOW_SET for shadow set ID {c58e1452-c554-400e-a266-d11d5c837cb1} \
 set as environment variable.

Querying all shadow copies with the shadow copy set ID \
 {c58e1452-c554-400e-a266-d11d5c837cb1}

 * Shadow copy ID = {de4ddca4-4978-4805-8776-cdf82d190a4a}     %VSS_SHADOW_1%
    - Shadow copy set: {c58e1452-c554-400e-a266-d11d5c837cb1}  %VSS_SHADOW_SET%
    - Original count of shadow copies = 1
    - Original volume name: \\FSRVP-SERVER\SLES_SNAPPER\ \
      [volume not on this machine]
    - Creation time: 6/17/2014 3:54:43 PM
    - Shadow copy device name:
      \\FSRVP-SERVER\SLES_SNAPPER@{31afd84a-44a7-41be-b9b0-751898756faa}
    - Originating machine: FSRVP-SERVER
    - Service machine: win-client.example.com
    - Not exposed
    - Provider ID: {89300202-3cec-4981-9171-19f59559e0f2}
    - Attributes:  No_Auto_Release Persistent FileShare

Number of shadow copies listed: 1
Finish the backup procedure:
DISKSHADOW> end backup
After the snapshot was created, try to delete it and verify the deletion:
DISKSHADOW> delete shadows volume \\FSRVP-SERVER\SLES_SNAPPER\
Deleting shadow copy {de4ddca4-4978-4805-8776-cdf82d190a4a} on volume \
 \\FSRVP-SERVER\SLES_SNAPPER\ from provider \
{89300202-3cec-4981-9171-19f59559e0f2} [Attributes: 0x04000009]...

Number of shadow copies deleted: 1

DISKSHADOW> list shadows all

Querying all shadow copies on the computer ...
No shadow copies found in system.
21.9 For More Information #
Documentation for Samba ships with the samba-doc
package which is not installed by default. Install it with zypper
install samba-doc. Enter apropos
samba at the command line to display some manual pages or
browse the /usr/share/doc/packages/samba directory for
more online documentation and examples. Find a commented example
configuration (smb.conf.SUSE) in the
examples subdirectory. Another file to look for Samba
related information is
/usr/share/doc/packages/samba/README.SUSE.
The Samba HOWTO (see https://wiki.samba.org) provided by the Samba team includes a section about troubleshooting. In addition to that, Part V of the document provides a step-by-step guide to checking your configuration.