Reference
- About This Guide
- I Advanced Administration
- II System
- 8 32-Bit and 64-Bit Applications in a 64-Bit System Environment
- 9 Booting a Linux System
- 10 The
systemdDaemon - 11
journalctl: Query thesystemdJournal - 12 The Boot Loader GRUB 2
- 13 Basic Networking
- 14 UEFI (Unified Extensible Firmware Interface)
- 15 Special System Features
- 16 Dynamic Kernel Device Management with
udev
- III Services
- IV Mobile Computers
- A An Example Network
- B GNU Licenses
14 UEFI (Unified Extensible Firmware Interface)
UEFI (Unified Extensible Firmware Interface) is the interface between the firmware that comes with the system hardware, all the hardware components of the system, and the operating system.
UEFI is becoming more and more available on PC systems and thus is replacing the traditional PC-BIOS. UEFI, for example, properly supports 64-bit systems and offers secure booting (“Secure Boot”, firmware version 2.3.1c or better required), which is one of its most important features. Lastly, with UEFI a standard firmware will become available on all x86 platforms.
UEFI additionally offers the following advantages:
Booting from large disks (over 2 TiB) with a GUID Partition Table (GPT).
CPU-independent architecture and drivers.
Flexible pre-OS environment with network capabilities.
CSM (Compatibility Support Module) to support booting legacy operating systems via a PC-BIOS-like emulation.
For more information, see http://en.wikipedia.org/wiki/Unified_Extensible_Firmware_Interface. The following sections are not meant as a general UEFI overview; these are only hints about how some features are implemented in SUSE Linux Enterprise.
14.1 Secure Boot #
In the world of UEFI, securing the bootstrapping process means establishing a chain of trust. The “platform” is the root of this chain of trust; in the context of SUSE Linux Enterprise, the mainboard and the on-board firmware could be considered the “platform”. Or, put slightly differently, it is the hardware vendor, and the chain of trust flows from that hardware vendor to the component manufacturers, the OS vendors, etc.
The trust is expressed via public key cryptography. The hardware vendor puts a so-called Platform Key (PK) into the firmware, representing the root of trust. The trust relationship with operating system vendors and others is documented by signing their keys with the Platform Key.
Finally, security is established by requiring that no code will be executed by the firmware unless it has been signed by one of these “trusted” keys—be it an OS boot loader, some driver located in the flash memory of some PCI Express card or on disk, or be it an update of the firmware itself.
Essentially, to use Secure Boot, you need to have your OS loader signed with a key trusted by the firmware, and you need the OS loader to verify that the kernel it loads can be trusted.
Key Exchange Keys (KEK) can be added to the UEFI key database. This way, you can use other certificates, as long as they are signed with the private part of the PK.
14.1.1 Implementation on openSUSE Leap #
Microsoft’s Key Exchange Key (KEK) is installed by default.
Note: GUID Partitioning Table (GPT) Required
The Secure Boot feature is enabled by default on UEFI/x86_64 installations. You can find the option in the tab of the dialog. It supports booting when the secure boot is activated in the firmware, while making it possible to boot when it is deactivated.

Figure 14.1: Secure Boot Support #
The Secure Boot feature requires that a GUID Partitioning Table (GPT) replaces the old partitioning with a Master Boot Record (MBR). If YaST detects EFI mode during the installation, it will try to create a GPT partition. UEFI expects to find the EFI programs on a FAT-formatted EFI System Partition (ESP).
Supporting UEFI Secure Boot essentially requires having a boot loader with a digital signature that the firmware recognizes as a trusted key. To be useful for SUSE Linux Enterprise customers, that key is trusted by the firmware a priori, without requiring any manual intervention.
There are two ways of getting there. One is to work with hardware vendors to have them endorse a SUSE key, which SUSE then signs the boot loader with. The other way is to go through Microsoft’s Windows Logo Certification program to have the boot loader certified and have Microsoft recognize the SUSE signing key (that is, have it signed with their KEK). By now, SUSE got the loader signed by UEFI Signing Service (that is Microsoft in this case).
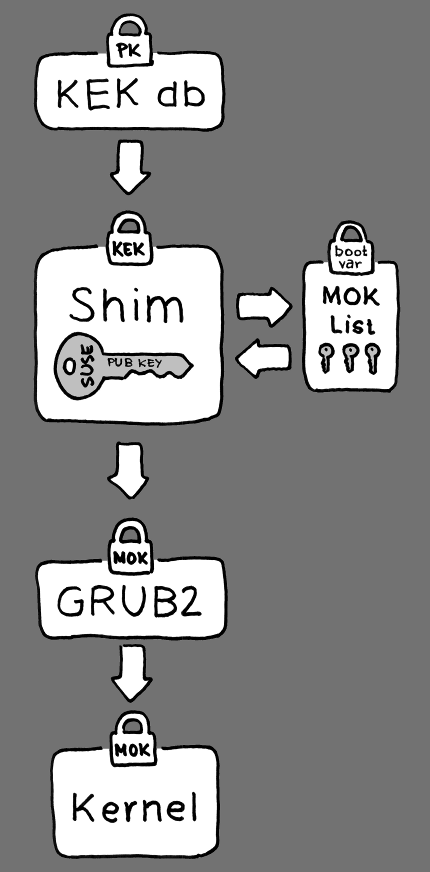
Figure 14.2: UEFI: Secure Boot Process #
At the implementation layer, SUSE uses the shim
loader which is installed by default. It is a smart solution that avoids
legal issues, and simplifies the certification and signing step
considerably. The shim loader’s job is to load a
boot loader such as GRUB 2 and verify it; this boot loader in
turn will load kernels signed by a SUSE key only.
There are two types of trusted users:
First, those who hold the keys. The Platform Key (PK) allows almost everything. The Key Exchange Key (KEK) allows all a PK can except changing the PK.
Second, anyone with physical access to the machine. A user with physical access can reboot the machine, and configure UEFI.
UEFI offers two types of variables to fulfill the needs of those users:
The first is the so-called “Authenticated Variables”, which can be updated from both within the boot process (the so-called Boot Services Environment) and the running OS, but only when the new value of the variable is signed with the same key that the old value of the variable was signed with. And they can only be appended to or changed to a value with a higher serial number.
The second is the so-called “Boot Services Only Variables”. These variables are accessible to any code that runs during the boot process. After the boot process ends and before the OS starts, the boot loader must call the
ExitBootServicescall. After that, these variables are no longer accessible, and the OS cannot touch them.
The various UEFI key lists are of the first type, as this allows online updating, adding, and blacklisting of keys, drivers, and firmware fingerprints. It is the second type of variable, the “Boot Services Only Variable”, that helps to implement Secure Boot, in a matter that is both secure and open source friendly, and thus compatible with GPLv3.
SUSE starts with shim—a small and simple EFI
boot loader—which was originally developed by Fedora. It is signed by
a certificate signed by the SUSE KEK and a Microsoft-issued certificate,
based on which KEKs are available in the UEFI key database on the system.
This allows shim to load and execute.
shim then goes on to verify that the boot loader
it wants to load is trusted.
In a default situation shim will use an
independent SUSE certificate embedded in its body. In addition,
shim will allow to “enroll”
additional keys, overriding the default SUSE key. In the following, we call
them “Machine Owner Keys” or MOKs for short.
Next the boot loader will verify and then boot the kernel, and the kernel will do the same on the modules.
14.1.2 MOK (Machine Owner Key) #
If the user (“machine owner”) wants to replace any components
of the boot process, Machine Owner Keys (MOKs) are to be used. The
mokutils tool will help with signing components
and managing MOKs.
The enrollment process begins with rebooting the machine and interrupting
the boot process (for example, pressing a key) when
shim loads. shim will
then go into enrollment mode, allowing the user to replace the default SUSE
key with keys from a file on the boot partition. If the user chooses to do
so, shim will then calculate a hash of that file
and put the result in a “Boot Services Only” variable. This
allows shim to detect any change of the file made
outside of Boot Services and thus avoid tampering with the list of
user-approved MOKs.
All of this happens during boot time—only verified code is executing now. Therefore, only a user present at the console can use the machine owner's set of keys. It cannot be malware or a hacker with remote access to the OS because hackers or malware can only change the file, but not the hash stored in the “Boot Services Only” variable.
The boot loader, after having been loaded and verified by
shim, will call back to
shim when it wants to verify the kernel—to
avoid duplication of the verification code. Shim
will use the same list of MOKs for this and tell the boot loader whether it
can load the kernel.
This way, you can install your own kernel or boot loader. It is only
necessary to install a new set of keys and authorize them by being
physically present during the first reboot. Because MOKs are a list and not
just a single MOK, you can make shim trust keys
from several vendors, allowing dual- and multi-boot from the boot loader.
14.1.3 Booting a Custom Kernel #
The following is based on http://en.opensuse.org/openSUSE:UEFI#Booting_a_custom_kernel.
Secure Boot does not prevent you from using a self-compiled kernel. You must sign it with your own certificate and make that certificate known to the firmware or MOK.
Create a custom X.509 key and certificate used for signing:
openssl req -new -x509 -newkey rsa:2048 -keyout key.asc \
  -out cert.pem -nodes -days 666 -subj "/CN=$USER/"
For more information about creating certificates, see http://en.opensuse.org/openSUSE:UEFI_Image_File_Sign_Tools#Create_Your_Own_Certificate.
Package the key and the certificate as a PKCS#12 structure:
openssl pkcs12 -export -inkey key.asc -in cert.pem \
  -name kernel_cert -out cert.p12
Generate an NSS database for use with
pesign:certutil -d . -N
Import the key and the certificate contained in PKCS#12 into the NSS database:
pk12util -d . -i cert.p12
“Bless” the kernel with the new signature using
pesign:pesign -n . -c kernel_cert -i arch/x86/boot/bzImage \ -o vmlinuz.signed -s
List the signatures on the kernel image:
pesign -n . -S -i vmlinuz.signed
At that point, you can install the kernel in
/bootas usual. Because the kernel now has a custom signature the certificate used for signing needs to be imported into the UEFI firmware or MOK.Convert the certificate to the DER format for import into the firmware or MOK:
openssl x509 -in cert.pem -outform der -out cert.der
Copy the certificate to the ESP for easier access:
sudo cp cert.der /boot/efi/
Use
mokutilto launch the MOK list automatically.Import the certificate to MOK:
mokutil --root-pw --import cert.der
The
--root-pwoption enables usage of therootuser directly.Check the list of certificates that are prepared to be enrolled:
mokutil --list-new
Reboot the system;
shimshould launch MokManager. You need to enter therootpassword to confirm the import of the certificate to the MOK list.Check if the newly imported key was enrolled:
mokutil --list-enrolled
Alternatively, this is the procedure if you want to launch MOK manually:
Reboot
In the GRUB 2 menu press the '
c' key.Type:
chainloader $efibootdir/MokManager.efi
boot
Select .
Navigate to the
cert.derfile and press Enter.Follow the instructions to enroll the key. Normally this should be pressing '
0' and then 'y' to confirm.Alternatively, the firmware menu may provide ways to add a new key to the Signature Database.
14.1.4 Using Non-Inbox Drivers #
There is no support for adding non-inbox drivers (that is, drivers that do not come with openSUSE Leap) during installation with Secure Boot enabled. The signing key used for SolidDriver/PLDP is not trusted by default.
It is possible to install third party drivers during installation with Secure Boot enabled in two different ways. In both cases:
Add the needed keys to the firmware database via firmware/system management tools before the installation. This option depends on the specific hardware you are using. Consult your hardware vendor for more information.
Use a bootable driver ISO from https://drivers.suse.com/ or your hardware vendor to enroll the needed keys in the MOK list at first boot.
To use the bootable driver ISO to enroll the driver keys to the MOK list, follow these steps:
Burn the ISO image above to an empty CD/DVD medium.
Start the installation using the new CD/DVD medium, having the standard SUSE Linux Enterprise media at hand or a URL to a network installation server.
If doing a network installation, enter the URL of the network installation source on the boot command line using the
install=option.If doing installation from optical media, the installer will first boot from the driver kit and then ask to insert the first disk of the SUSE Linux Enterprise product.
An initrd containing updated drivers will be used for installation.
For more information, see https://drivers.suse.com/doc/Usage/Secure_Boot_Certificate.html.
14.1.5 Features and Limitations #
When booting in Secure Boot mode, the following features apply:
Installation to UEFI default boot loader location, a mechanism to keep or restore the EFI boot entry.
Reboot via UEFI.
Xen hypervisor will boot with UEFI when there is no legacy BIOS to fall back to.
UEFI IPv6 PXE boot support.
UEFI videomode support, the kernel can retrieve video mode from UEFI to configure KMS mode with the same parameters.
UEFI booting from USB devices is supported.
When booting in Secure Boot mode, the following limitations apply:
To ensure that Secure Boot cannot be easily circumvented, some kernel features are disabled when running under Secure Boot.
Boot loader, kernel, and kernel modules must be signed.
Kexec and Kdump are disabled.
Hibernation (suspend on disk) is disabled.
Access to
/dev/kmemand/dev/memis not possible, not even as root user.Access to the I/O port is not possible, not even as root user. All X11 graphical drivers must use a kernel driver.
PCI BAR access through sysfs is not possible.
custom_methodin ACPI is not available.debugfs for asus-wmi module is not available.
the
acpi_rsdpparameter does not have any effect on the kernel.
14.2 For More Information #
http://www.uefi.org —UEFI home page where you can find the current UEFI specifications.
Blog posts by Olaf Kirch and Vojtěch Pavlík (the chapter above is heavily based on these posts):
http://en.opensuse.org/openSUSE:UEFI —UEFI with openSUSE.