Security and Hardening Guide
- Preface
- 1 Security and confidentiality
- 2 Common Criteria
- I Authentication
- II Local security
- 10 Physical security
- 11 Software management
- 12 File management
- 13 Encrypting partitions and files
- 14 Storage encryption for hosted applications with cryptctl
- 15 User management
- 16 Restricting
cronandat - 17 Spectre/Meltdown checker
- 18 Configuring security settings with YaST
- 19 Authorization with PolKit
- 20 Access control lists in Linux
- 21 Intrusion detection with AIDE
- III Network security
- IV Confining privileges with AppArmor
- 29 Introducing AppArmor
- 30 Getting started
- 31 Immunizing programs
- 32 Profile components and syntax
- 33 AppArmor profile repositories
- 34 Building and managing profiles with YaST
- 35 Building profiles from the command line
- 36 Profiling your Web applications using ChangeHat
- 37 Confining users with
pam_apparmor - 38 Managing profiled applications
- 39 Support
- 40 AppArmor glossary
- V SELinux
- VI The Linux Audit Framework
- A GNU licenses
18 Configuring security settings with YaST #Edit source
Abstract#
The YaST module provides a central control panel for configuring security-related settings for openSUSE Leap. Use it to configure security aspects such as settings for the login procedure and for password creation, for boot permissions, user creation, or for default file permissions. Launch it from the YaST control center with › . The dialog opens to the , with additional configuration dialogs in the left and right panes.
18.1 #Edit source
The displays a comprehensive list of the most important security settings for your system. The security status of each entry in the list is clearly visible. A green check mark indicates a secure setting while a red cross indicates an entry as being insecure. Click to open an overview of the setting and information on how to make it secure. To change a setting, click the corresponding link in the Status column. Depending on the setting, the following entries are available:
- /
Click this entry to toggle the status of the setting to either enabled or disabled.
Click this entry to launch another YaST module for configuration. You will return to the Security Overview when leaving the module.
A setting's status is set to unknown when the associated service is not installed. Such a setting does not represent a potential security risk.
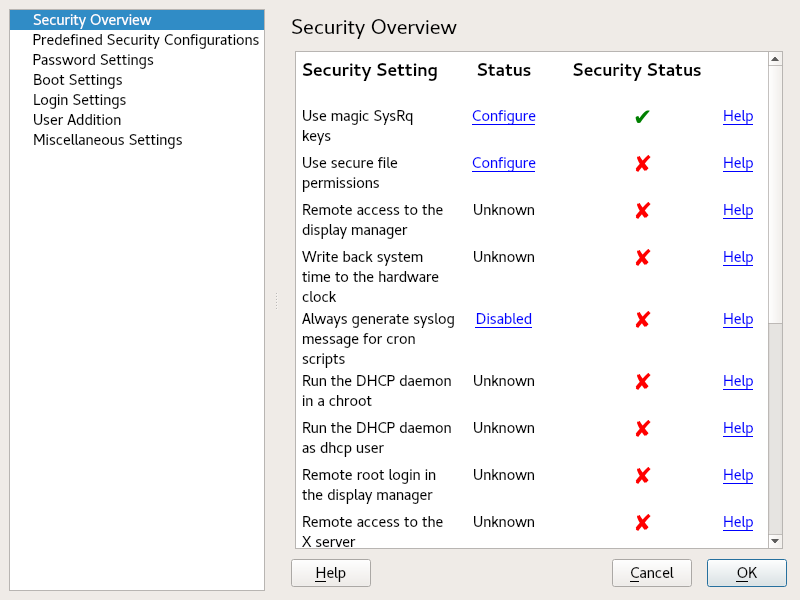
Figure 18.1: YaST security center and hardening: security overview #
18.2 #Edit source
openSUSE Leap includes three . These configurations affect all the settings available in the module. Click in the left pane to see the predefined configurations. Click the one you want to apply, then the module closes. If you wish to modify the predefined settings, re-open the module, click , then click in the right pane. Any changes you make are applied to your selected predefined configuration.
A configuration for a workstation with any kind of network connection (including a connection to the Internet).
This setting is designed for a laptop or tablet that connects to different networks.
Security settings designed for a machine providing network services such as a Web server, file server, name server, etc. This set provides the most secure configuration of the predefined settings.
Select to modify any of the three predefined configurations after they have been applied.
18.3 #Edit source
Passwords that are easy to guess are a major security issue. The dialog provides the means to ensure that only secure passwords can be used.
By activating this option, a warning will be issued if new passwords appear in a dictionary, or if they are proper names (proper nouns).
If the user chooses a password with a length shorter than specified here, a warning will be issued.
When password expiration is activated (via ), this setting stores the given number of a user's previous passwords, preventing their reuse.
Choose a password encryption algorithm. Normally there is no need to change the default (Blowfish).
Activate password expiration by specifying a minimum and a maximum time limit (in days). By setting the minimum age to a value greater than
0days, you can prevent users from immediately changing their passwords again (and in doing so circumventing the password expiration). Use the values0and99999to deactivate password expiration.When a password expires, the user receives a warning in advance. Specify the number of days prior to the expiration date that the warning should be issued.
18.4 #Edit source
Configure which users can shut down the machine via the graphical login manager in this dialog. You can also specify how Ctrl–Alt–Del will be interpreted and who can hibernate the system.
18.5 #Edit source
This dialog lets you configure security-related login settings:
To make it difficult to guess a user's password by repeatedly logging in, it is recommended to delay the display of the login prompt that follows an incorrect login. Specify the value in seconds. Make sure that users who have mistyped their passwords do not need to wait too long.
When checked, the graphical login manager (GDM) can be accessed from the network. This is a potential security risk.
18.6 #Edit source
Set minimum and maximum values for user and group IDs. These default settings would rarely need to be changed.
18.7 #Edit source
Other security settings that do not fit the above-mentioned categories are listed here:
openSUSE Leap comes with three predefined sets of file permissions for system files. These permission sets define whether a regular user can read log files or start certain programs. file permissions are suitable for stand-alone machines. These settings allow regular users to, for example, read most system files. See the file
/etc/permissions.easyfor the complete configuration. The file permissions are designed for multiuser machines with network access. A thorough explanation of these settings can be found in/etc/permissions.secure. The settings are the most restrictive ones and should be used with care. See/etc/permissions.paranoidfor more information.The program
updatedbscans the system and creates a database of all files, which can be queried with the commandlocate. Whenupdatedbis run as user nobody, only world-readable files will be added to the database. When run as userroot, almost all files (except the ones root is not allowed to read) will be added.The magic SysRq key is a key combination that enables you to have some control over the system even when it has crashed. The complete documentation can be found at https://www.kernel.org/doc/html/latest/admin-guide/sysrq.html.