2 Boot parameters #Edit source
Abstract#
openSUSE Leap allows setting several parameters during boot, for example choosing the source of the installation data or setting the network configuration.
Using the appropriate set of boot parameters helps simplify your installation
procedure. Many parameters can also be configured later using the linuxrc
routines, but using the boot parameters is easier. In some automated setups,
the boot parameters can be provided with initrd or an
info file.
The way the system is started for the installation depends on the architecture—system start-up is different for PC (AMD64/Intel 64) or mainframe, for example. If you install openSUSE Leap as a VM Guest on a KVM or Xen hypervisor, follow the instructions for the AMD64/Intel 64 architecture.
Note: Boot options and boot parameters
The terms Boot Parameters and Boot Options are often used interchangeably. In this documentation, we mostly use the term Boot Parameters.
2.1 Using the default boot parameters #Edit source
The boot parameters are described in detail in Chapter 3, Installation steps. Generally, selecting starts the installation boot process.
If problems occur, use or . For more information about troubleshooting the installation process, refer to Chapter 4, Troubleshooting.
The menu bar at the bottom of the screen offers some advanced functionality needed in some setups. Using the function keys (F1 ... F12), you can specify additional options to pass to the installation routines without having to know the detailed syntax of these parameters (see Chapter 2, Boot parameters). A detailed description of the available function keys is available in Section 2.2.1, “The boot screen on machines with traditional BIOS”.
2.2 PC (AMD64/Intel 64/AArch64) #Edit source
This section describes changing the boot parameters for AMD64, Intel 64 and AArch64.
2.2.1 The boot screen on machines with traditional BIOS #Edit source
The boot screen displays several options for the installation procedure. boots the installed system and is selected by default. Select one of the other options with the arrow keys and press Enter to boot it. The relevant options are:
The normal installation mode. All modern hardware functions are enabled. In case the installation fails, see F5 for boot parameters that disable potentially problematic functions.
Perform a system upgrade. For more information refer to Chapter 12, Upgrading the system and system changes.
- ›
Starts a minimal Linux system without a graphical user interface. For more information, see Section 21.5.2, “Using the rescue system”. This option is not available on Live CDs.
- ›
Boot a Linux system that is already installed. You will be asked from which partition to boot the system.
- ›
This option is only available when you install from media created from downloaded ISOs. In this case it is recommended to check the integrity of the installation medium. This option starts the installation system before automatically checking the media. In case the check was successful, the normal installation routine starts. If a corrupt media is detected, the installation routine aborts. Replace the broken medium and restart the installation process.
- ›
Tests your system RAM using repeated read and write cycles. Terminate the test by rebooting. For more information, see Section 4.4, “Boot failure”.
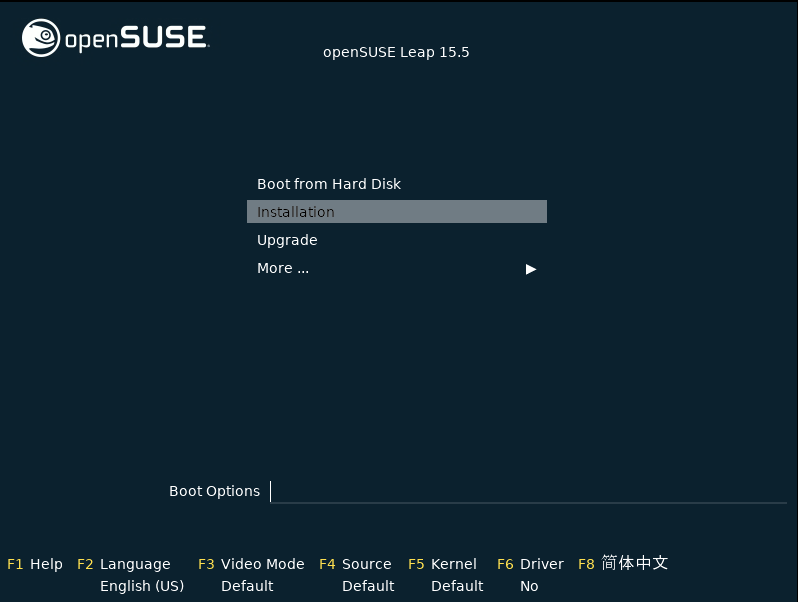
Figure 2.1: The boot screen on machines with a traditional BIOS #
Use the function keys shown at the bottom of the screen to change the language, screen resolution, installation source or to add an additional driver from your hardware vendor:
- F1
Get context-sensitive help for the active element of the boot screen. Use the arrow keys to navigate, Enter to follow a link, and Esc to leave the help screen.
- F2
Select the display language and a corresponding keyboard layout for the installation. The default language is English (US).
- F3
Select various graphical display modes for the installation. By the video resolution is automatically determined using KMS (“Kernel Mode Setting”). If this setting does not work on your system, choose and, optionally, specify
vga=askon the boot command line to get prompted for the video resolution. Choose if the graphical installation causes problems.- F4
Normally, the installation is performed from the inserted installation medium. Here, select other sources, like FTP or NFS servers, or configure a proxy server.
- F5
If you encounter problems with the regular installation, this menu offers to disable a few potentially problematic functions. If your hardware does not support ACPI (advanced configuration and power interface) select to install without ACPI support. disables support for APIC (Advanced Programmable Interrupt Controllers) which may cause problems with some hardware. boots the system with the DMA mode (for CD/DVD-ROM drives) and power management functions disabled.
If you are not sure, try the following options first: or . Experts can also use the command line () to enter or change kernel parameters.
- F6
Press this key to notify the system that you have an optional driver update for openSUSE Leap. With or , load drivers directly before the installation starts. If you select , you are prompted to insert the update disk at the appropriate point in the installation process.
2.2.2 The boot screen on machines equipped with UEFI #Edit source
UEFI (Unified Extensible Firmware Interface) is a new industry standard which replaces and extends the traditional BIOS. The latest UEFI implementations contain the “Secure Boot” extension, which prevents booting malicious code by only allowing signed boot loaders to be executed. See Book “Reference”, Chapter 14 “UEFI (Unified Extensible Firmware Interface)” for more information.
The boot manager GRUB 2, used to boot machines with a traditional BIOS,
does not support UEFI, therefore GRUB 2 is replaced with GRUB 2 for EFI. If
Secure Boot is enabled, YaST will automatically select GRUB 2 for EFI for
installation. From an administrative and user perspective, both boot
manager implementations behave the same and are called
GRUB 2 in the following.
Tip: Using additional drivers with Secure Boot
When installing with Secure Boot enabled, you cannot load drivers that are not shipped with openSUSE Leap. This is also true of drivers shipped via SolidDriver, because their signing key is not trusted by default.
To load drivers not shipped with openSUSE Leap, do either of the following:
Before the installation, add the needed keys to the firmware database via firmware/system management tools.
Use a bootable ISO that will enroll the needed keys in the MOK list on the first boot.
For more information, see Book “Reference”, Chapter 14 “UEFI (Unified Extensible Firmware Interface)”, Section 14.1 “Secure boot”.
The boot screen displays several options for the installation procedure. Change the selected option with the arrow keys and press Enter to boot it. The relevant options are:
The normal installation mode. All modern hardware functions are enabled. In case the installation fails, see F5 for boot parameters that disable potentially problematic functions.
Perform a system upgrade. For more information refer to Chapter 12, Upgrading the system and system changes.
- ›
Starts a minimal Linux system without a graphical user interface. For more information, see Section 21.5.2, “Using the rescue system”. This option is not available on Live CDs.
- ›
Boot a Linux system that is already installed. You will be asked from which partition to boot the system.
- ›
This option is only available when you install from media created from downloaded ISOs. In this case it is recommended to check the integrity of the installation medium. This option starts the installation system before automatically checking the media. In case the check was successful, the normal installation routine starts. If a corrupt media is detected, the installation routine aborts.
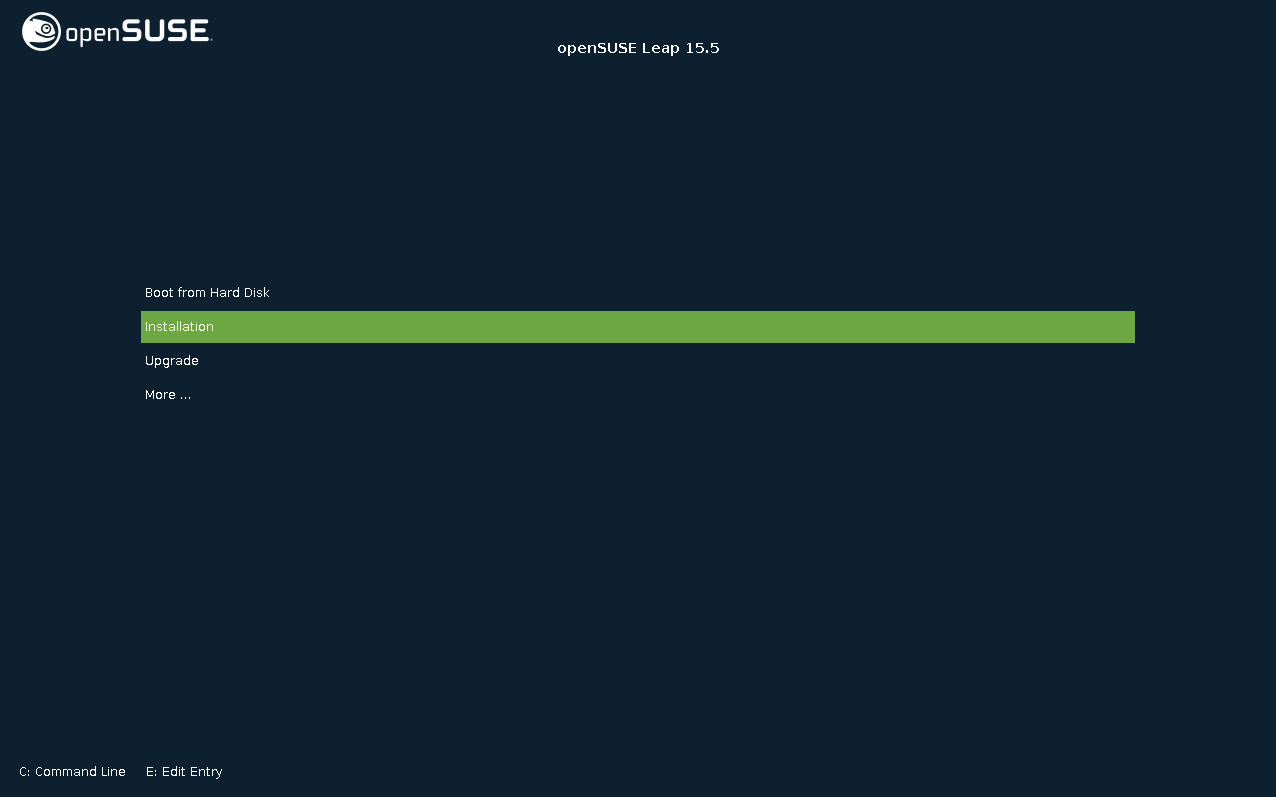
Figure 2.2: The boot screen on machines with UEFI #
GRUB 2 for EFI on openSUSE Leap does not support a boot prompt or function keys for adding boot parameters. By default, the installation will be started with American English and the boot media as the installation source. A DHCP lookup will be performed to configure the network. To change these defaults or to add boot parameters you need to edit the respective boot entry. Highlight it using the arrow keys and press E. See the on-screen help for editing hints (note that only an English keyboard is available now). The entry will look similar to the following:
setparams 'Installation'

   set gfxpayload=keep
   echo 'Loading kernel ...'
   linuxefi /boot/x86_64/loader/linux splash=silent
   echo 'Loading initial ramdisk ...'
   initrdefi /boot/x86_64/loader/initrd
Add space-separated parameters to the end of the line starting with
linuxefi. To boot the edited entry, press
F10. If you access the machine via serial console, press
Esc–0. A
complete list of parameters is available at
https://en.opensuse.org/Linuxrc.
2.3 List of important boot parameters #Edit source
This section contains a selection of important boot parameters.
2.3.1 General boot parameters #Edit source
autoyast=URLThe
autoyastparameter specifies the location of theautoinst.xmlcontrol file for automatic installation.manual=<0|1>The
manualparameter controls whether the other parameters are only default values that still must be acknowledged by the user. Set this parameter to0if all values should be accepted and no questions asked. Settingautoyastimplies settingmanualto0.Info=URLSpecifies a location for a file from which to read additional options.
upgrade=<0|1>To upgrade openSUSE Leap, specify
Upgrade=1.dud=URLLoad driver updates from URL.
Set
dud=ftp://ftp.example.com/PATH_TO_DRIVERordud=http://www.example.com/PATH_TO_DRIVERto load drivers from a URL. Whendud=1you will be asked for the URL during boot.language=LANGUAGESet the installation language. Some supported values are
cs_CZ,de_DE,es_ES,fr_FR,ja_JP,pt_BR,pt_PT,ru_RU,zh_CN, andzh_TW.acpi=offDisable ACPI support.
noapicNo logical APIC.
nomodesetDisable KMS.
textmode=1Start installer in text mode.
console=SERIAL_DEVICE[,MODE]SERIAL_DEVICE can be an actual serial or parallel device (for example
ttyS0) or a virtual terminal (for exampletty1). MODE is the baud rate, parity and stop bit (for example9600n8). The default for this setting is set by the mainboard firmware. If you do not see output on your monitor, try settingconsole=tty1. It is possible to define multiple devices.
2.3.2 Configuring the network interface #Edit source
Important: Configuring the network interface
The settings discussed in this section apply only to the network interface used during installation. Configure additional network interfaces in the installed system by following the instructions in Book “Reference”, Chapter 13 “Basic networking”, Section 13.6 “Configuring a network connection manually”.
The network will only be configured if it is required during the
installation. To force the network to be configured, use the
netsetup or ifcfg parameters.
netsetup=VALUEnetsetup=dhcpforces a configuration via DHCP. Setnetsetup=-dhcpwhen configuring the network with the boot parametershostip,gatewayandnameserver. With the optionnetsetup=hostip,netmask,gateway,nameserverthe installer asks for the network settings during boot.ifcfg=INTERFACE[.VLAN]=[.try,]SETTINGSINTERFACE can be
*to match all interfaces or, for example,eth*to match all interfaces that start witheth. It is also possible to use MAC addresses as values.Optionally, a VLAN can be set behind the interface name, separated by a period.
If SETTINGS is
dhcp, all matching interfaces will be configured with DHCP. If you add thetryoption, configuration will stop when the installation repository can be reached via one of the configured interfaces.Alternatively, you can use static configuration. With static parameters, only the first matching interface will be configured, unless you add the
tryoption. This will configure all interfaces until the repository can be reached.The syntax for the static configuration is:
ifcfg=*="IPS_NETMASK,GATEWAYS,NAMESERVERS,DOMAINS"
Each comma separated value can in turn contain a list of space character separated values. IPS_NETMASK is in the CIDR notation, for example
10.0.0.1/24. The quotes are only needed when using space character separated lists. Example with two name servers:ifcfg=*="10.0.0.10/24,10.0.0.1,10.0.0.1 10.0.0.2,example.com"

Tip: Other networking parameters
The
ifcfgboot parameter is very powerful and allows you to set almost all networking parameters. In addition to the parameters mentioned above, you can set values for all configuration options (comma separated) from/etc/sysconfig/network/ifcfg.templateand/etc/sysconfig/network/config. The following example sets a custom MTU size on an interface otherwise configured via DHCP:ifcfg=eth0=dhcp,MTU=1500
hostname=host.example.comEnter the fully qualified host name.
domain=example.comDomain search path for DNS. Allows you to use short host names instead of fully qualified ones.
hostip=192.168.1.2[/24]Enter the IP address of the interface to configure. The IP can contain the subnet mask, for example
hostip=192.168.1.2/24. This setting is only evaluated if the network is required during the installation.gateway=192.168.1.3Specify the gateway to use. This setting is only evaluated if the network is required during the installation.
nameserver=192.168.1.4Specify the DNS server in charge. This setting is only evaluated if the network is required during the installation.
domain=example.comDomain search path. This setting is only evaluated if the network is required during the installation.
2.3.3 Specifying the installation source #Edit source
If you are not using DVD or USB flash drive for installation, specify an alternative installation source.
install=SOURCESpecify the location of the installation source to use. Possible protocols are
cd,hd,slp,nfs,smb(Samba/CIFS),ftp,tftp,http, andhttps. The default option iscd.To install over an encrypted connection, use an
httpsURL. If the certificate cannot be verified, disable certificate checking with thesslcerts=0boot parameter.If an
http,https,ftp,tftp, orsmbURL is given, you can authenticate by specifying the user name and password with the URL. Example:install=https://USER:PASSWORD@SERVER/DIRECTORY/DVD1/
In case of a Samba or CIFS installation, you can also specify the domain that should be used:
install=smb://WORKDOMAIN;USER:PASSWORD@SERVER/DIRECTORY/DVD1/
To use
cd,hdorslp, set them as the following example:install=cd:/ install=hd:/?device=sda/PATH_TO_ISO install=slp:/
2.3.4 Specifying remote access #Edit source
Only one of the different remote control methods should be specified at a time. The different methods are: SSH, VNC, remote X server.
display_ip=IP_ADDRESSDisplay_IPcauses the installing system to try to connect to an X server at the given address.
Important: X authentication mechanism
The direct installation with the X Window System relies on a primitive authentication mechanism based on host names. This mechanism is disabled on current openSUSE Leap versions. Installation with SSH or VNC is preferred.
vnc=1Enables a VNC server during the installation.
vncpassword=PASSWORDSets the password for the VNC server.
ssh=1sshenables SSH installation.ssh.password=PASSWORDSpecifies an SSH password for the root user during installation.
2.4 Advanced setups #Edit source
To configure access to a local RMT or supportconfig
server for the installation, you can specify boot parameters to set up these
services during installation. The same applies if you need IPv6 support
during the installation.
2.4.1 Using IPv6 for the installation #Edit source
By default you can only assign IPv4 network addresses to your machine. To enable IPv6 during installation, enter one of the following parameters at the boot prompt:
- Accept IPv4 and IPv6
ipv6=1
- Accept IPv6 only
ipv6only=1
2.4.2 Using a proxy for the installation #Edit source
In networks enforcing the usage of a proxy server for accessing remote web sites, registration during installation is only possible when configuring a proxy server.
On systems with traditional BIOS, press F4 on the boot screen and set the required parameters in the dialog.
On Systems with UEFI BIOS, provide the boot parameter
proxy at the boot prompt:
On the boot screen, press E to edit the boot menu.
Append the
proxyparameter to thelinuxline in the following format:proxy=https://proxy.example.com:PORT
If the proxy server requires authentication, add the credentials as follows:
proxy=https://USER:PASSWORD@proxy.example.com:PORT
If the proxy server's SSL certificate cannot be verified, disable certificate checking with the
sslcerts=0boot parameter.The outcome will be similar to the following:

Figure 2.3: GRUB options editor #
Press F10 to boot with the new proxy setting.
2.4.3 Enabling SELinux support #Edit source
Enabling SELinux upon installation start-up enables you to configure it after the installation has been finished without having to reboot. Use the following parameters:
security=selinux selinux=1
2.4.4 Enabling the installer self-update #Edit source
During installation and upgrade, YaST can update itself as described in
Section 3.2, “Installer self-update” to solve potential bugs
discovered after release. The self_update parameter can
be used to modify the behavior of this feature.
To enable the installer self-update, set the parameter to
1:
self_update=1
To use a user-defined repository, specify a URL:
self_update=https://updates.example.com/
2.4.5 Reusing LVM #Edit source
As of SUSE Linux Enterprise 15 SP6, the installer no longer reuses pre-existing Logical Volume Manager (LVM)
configurations in its for this can be confusing and lead to
suboptimal setups. To reuse an existing LVM regardless, use the
YAST_REUSE_LVM parameter or configure it manually in the (Book “Reference”, Chapter 5 “”).
2.4.6 Scale user interface for high DPI #Edit source
If your screen uses a very high DPI, use the boot parameter
QT_AUTO_SCREEN_SCALE_FACTOR. This scales font and user
interface elements to the screen DPI.
QT_AUTO_SCREEN_SCALE_FACTOR=1
2.4.7 Using CPU mitigations #Edit source
The boot parameter mitigations lets you control
mitigation options for side-channel attacks on affected CPUs. Its possible
values are:
auto.
Enables all mitigations required for your CPU model, but does
not protect against cross-CPU thread attacks. This setting may impact
performance to some degree, depending on the workload.
nosmt.
Provides the full set of available security mitigations. Enables all
mitigations required for your CPU model. In addition, it disables
Simultaneous Multithreading (SMT) to avoid side-channel attacks across
multiple CPU threads. This setting may further impact performance,
depending on the workload.
off.
Disables all mitigations. Side-channel attacks against your CPU
are possible, depending on the CPU model. This setting has no impact
on performance.
Each value comes with a set of specific parameters, depending on the CPU architecture, the kernel version, and on the vulnerabilities that need to be mitigated. Refer to the kernel documentation for details.
2.4.8 LUKS 2 Support #Edit source
LUKS2 encryption is supported by the YaST installer as of SUSE Linux Enterprise 15 SP4, but needs to be enabled explicitly.
YAST_LUKS2_AVAILABLE
Alternatively, you can also enable LUKS2 in the YaST expert console. For more information, refer to Book “Reference”, Chapter 5 “”, Section 5.2 “Device encryption”.
2.5 More information #Edit source
You can find more information about boot parameters in the openSUSE wiki at https://en.opensuse.org/SDB:Linuxrc#Parameter_Reference.