5 Managing users with YaST #Edit source
During installation, you may have created a local user for your system. With the YaST module you can add users or edit existing ones. It also lets you configure your system to authenticate users with a network server.
5.1 User and group administration dialog #Edit source
To administer users or groups, start YaST and click › . Alternatively, start the dialog directly by running sudo
yast2 users & from a command line.
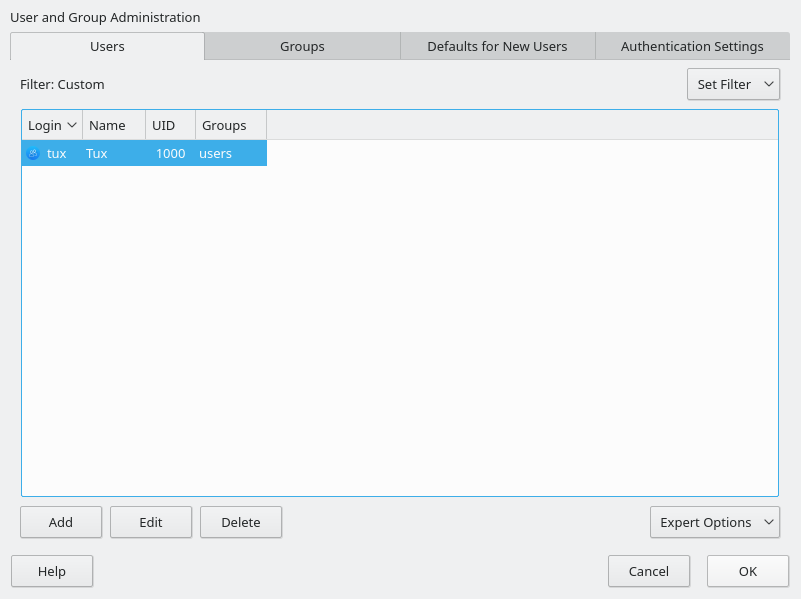
Figure 5.1: YaST user and group administration #
Every user is assigned a system-wide user ID (UID). Apart from the users that can log in to your machine, there are also several system users for internal use only. Each user is assigned to one or more groups. Similar to system users, there are also system groups for internal use.
The main window shows several tabs, depending on the set of users (local users, network users, system users) you choose to view and modify. The tabs allow you to perform the following tasks:
- Managing user accounts
From the tab create, modify, delete or temporarily disable user accounts as described in Section 5.2, “Managing user accounts”. Learn about advanced options like enforcing password policies, using encrypted home directories, or managing disk quotas in Section 5.3, “Additional options for user accounts”.
- Changing default settings
Local user accounts are created according to the settings defined on the tab. Learn how to change the default group assignment, or the default path and access permissions for home directories in Section 5.4, “Changing default settings for local users”.
- Assigning users to groups
Learn how to change the group assignment for individual users in Section 5.5, “Assigning users to groups”.
- Managing groups
From the tab, you can add, modify or delete existing groups. Refer to Section 5.6, “Managing groups” for information on how to do this.
- Changing user authentication method
When your machine is connected to a network that provides user authentication methods like NIS or LDAP, you can choose between several authentication methods on the tab. For more information, refer to Section 5.7, “Changing the user authentication method”.
For user and group management, the dialog provides similar functionality. You can easily switch between the user and group administration view by choosing the appropriate tab at the top of the dialog.
Filter options allow you to define the set of users or groups you want to modify: on the or tab, click to view and edit users or groups. They are listed according to certain categories, such as or , if applicable. With › you can also set up and use a custom filter.
Depending on the filter you choose, not all the following options and functions may be available from the dialog.
5.2 Managing user accounts #Edit source
YaST allows you to create, modify, delete or temporarily disable user accounts. Do not modify user accounts unless you are an experienced user or administrator.
Note: Changing user IDs of existing users
File ownership is bound to the user ID, not to the user name. After a user ID change, the files in the user's home directory are automatically adjusted to reflect this change. However, after an ID change, the user no longer owns the files they created elsewhere in the file system unless the file ownership for those files are manually modified.
The following instructions demonstrate how to set up default user accounts. For further options, refer to Section 5.3, “Additional options for user accounts”.
Procedure 5.1: Adding or modifying user accounts #
Open the YaST dialog and click the tab.
With define the set of users you want to manage. The dialog lists users in the system and the groups the users belong to.
To modify options for an existing user, select an entry and click .
To create a new user account, click .
Enter the appropriate user data on the first tab, such as (which is used for login) and . This data is sufficient to create a new user. If you click now, the system automatically assigns a user ID and sets all other values as default.
Activate if you want system notifications to be delivered to this user's mailbox. This creates a mail alias for
rootand the user can read the system mail without having to first log in asroot.The mails sent by system services are stored in the local mailbox
/var/spool/mail/USERNAME, where USERNAME is the login name of the selected user. To read e-mails, you can use themailcommand.To adjust further details such as the user ID or the path to the user's home directory, do so on the tab.
If you need to relocate the home directory of an existing user, enter the path to the new home directory there and move the contents of the current home directory with . Otherwise, a new home directory is created without any of the existing data.
To force users to regularly change their password or set other password options, switch to and adjust the options. For more details, refer to Section 5.3.2, “Enforcing password policies”.
If all options are set according to your wishes, click .
Click to close the administration dialog and to save the changes. A newly added user can now log in to the system using the login name and password you created.
Alternatively, to save all changes without exiting the dialog, click › .
Warning: Do not rename the root account
While it is technically possible to rename the root account, certain
applications, scripts or third-party products may rely on the existence of
a user called root. While such a configuration always targets
individual environments, necessary adjustments could be overwritten by
vendor updates, so this becomes an ongoing task rather than a one-time
setting. This is especially true in complex setups involving third-party
applications, where it needs to be verified with every vendor involved
whether a rename of the root account is supported.
As the implications for renaming the root account cannot be foreseen, SUSE does not
support renaming the root account.
Usually, the idea behind renaming the root account is to hide it or make it unpredictable.
However, /etc/passwd requires 644 permissions for
regular users, so any user of the system can retrieve the login name for the
user ID 0.
For better ways to secure the root account, refer to
Book “Security and Hardening Guide”, Chapter 14 “User management”, Section 14.5 “Restricting root logins” and
Book “Security and Hardening Guide”, Chapter 14 “User management”, Section 14.5.3 “Restricting SSH logins”.
Tip: Matching user IDs
It is useful to match the (local) user ID to the ID in the network. For example, a new (local) user on a laptop should be integrated into a network environment with the same user ID. This ensures that the file ownership of the files the user creates “offline” is the same as if they had created them directly on the network.
Procedure 5.2: Disabling or deleting user accounts #
Open the YaST dialog and click the tab.
To temporarily disable a user account without deleting it, select the user from the list and click . Activate . The user cannot log in to your machine until you enable the account again.
To delete a user account, select the user from the list and click . Choose if you also want to delete the user's home directory or to retain the data.
5.3 Additional options for user accounts #Edit source
Besides the settings for a default user account, openSUSE® Leap offers further options. For example, options to enforce password policies, use encrypted home directories or define disk quotas for users and groups.
5.3.1 Automatic login and passwordless login #Edit source
If you use the GNOME desktop environment you can configure Auto Login for a certain user and Passwordless Login for all users. Auto login causes a user to become automatically logged in to the desktop environment on boot. This functionality can only be activated for one user at a time. Login without password allows all users to log in to the system after they have entered their user name in the login manager.
Warning: Security risk
Enabling Auto Login or Passwordless Login on a machine that can be accessed by more than one person is a security risk. Without the need to authenticate, any user can gain access to your system and your data. If your system contains confidential data, do not use this functionality.
To activate auto login or login without password, access these functions in the YaST with › .
5.3.2 Enforcing password policies #Edit source
On any system with multiple users, it is a good idea to enforce at least basic password security policies. Users should change their passwords regularly and use strong passwords that cannot easily be exploited. For local users, proceed as follows:
Procedure 5.3: Configuring password settings #
Open the YaST dialog and select the tab.
Select user and click .
Switch to the tab. The user's last password change is displayed on the tab.
To make the user change their password at next login, activate .
To enforce password rotation, set a and a .
To remind the user to change their password before it expires, set the number of .
To restrict the period of time the user can log in after their password has expired, change the value in .
You can also specify a certain expiration date for the complete account. Enter the in YYYY-MM-DD format. This setting is not password-related but rather applies to the account itself.
For more information about options and default values, click .
Apply your changes with .
5.3.3 Managing quotas #Edit source
To prevent system capacities from being exhausted without notification, system administrators can set up quotas for users or groups. Quotas can be defined for one or more file systems and restrict the amount of disk space that can be used and the number of inodes (index nodes) that can be created there. Inodes are data structures on a file system that store basic information about a regular file, directory or other file system object. They store all attributes of a file system object (like user and group ownership, read, write or execute permissions), except file name and contents.
openSUSE Leap allows usage of soft and
hard quotas. Additionally, grace intervals can be
defined that allow users or groups to temporarily exceed their quotas by
certain amounts.
- Soft quota
Defines a warning level at which users are informed that they are nearing their limit. Administrators may urge the users to clean up and reduce their data on the partition. The soft quota limit is normally lower than the hard quota limit.
- Hard quota
Defines the limit at which write requests are denied. When the hard quota is reached, no more data can be stored and applications may crash.
- Grace period
Defines the time between the overflow of the soft quota and a warning being issued. Normally set to a rather low value of one or several hours.
Procedure 5.4: Enabling quota support for a partition #
To configure quotas for certain users and groups, you need to enable quota support for the respective partition in the YaST Expert Partitioner first.
In YaST, select › and click to proceed.
In the , select the partition for which to enable quotas and click .
Click and activate . If the
quotapackage is not already installed, it will be installed when you confirm the respective message with .Confirm your changes and leave the .
Make sure the service
quotaonis running by entering the following command:>sudosystemctl status quotaon.serviceIt should be marked as being
active. If this is not the case, start it with the commandsystemctl start quotaon.service.
Procedure 5.5: Setting up quotas for users or groups #
Now you can define soft or hard quotas for specific users or groups and set time periods as grace intervals.
In the YaST , select the user or the group you want to set the quotas for and click .
On the tab, select the entry and click to open the dialog.
From , select the partition to which the quota should apply.
Below , restrict the amount of disk space. Enter the number of 1 KB blocks the user or group may have on this partition. Specify a and a value.
Additionally, you can restrict the number of inodes the user or group may have on the partition. Below , enter a and .
You can only define grace intervals if the user or group has already exceeded the soft limit specified for size or inodes. Otherwise, the time-related text boxes are not activated. Specify the time period for which the user or group is allowed to exceed the limits set above.
Confirm your settings with .
Click to close the administration dialog and save the changes.
Alternatively, to save all changes without exiting the dialog, click › .
openSUSE Leap also ships command line tools like
repquota or warnquota. System
administrators can use these tools to control the disk usage or send e-mail
notifications to users exceeding their quota. Using
quota_nld, administrators can also forward kernel
messages about exceeded quotas to D-BUS. For more information, refer to the
repquota, the warnquota
and the quota_nld man page.
5.4 Changing default settings for local users #Edit source
When creating new local users, several default settings are used by YaST. These include, for example, the group the user belongs to, or the access permissions of the user's home directory. You can change these default settings to meet your requirements:
Open the YaST dialog and select the tab.
To change the group the new users should automatically belong to, select another group from .
If you do not want to use
/home/USERNAMEas the default path for new users' home directories, modify the .To change the default permission modes for newly created home directories, adjust the umask value in . For more information about umask, refer to Book “Security and Hardening Guide”, Chapter 19 “Access control lists in Linux” and to the
umaskman page.For information about the individual options, click .
Apply your changes with .
5.5 Assigning users to groups #Edit source
Local users are assigned to several groups according to the default settings, which you can access from the dialog on the tab. In the following, learn how to modify an individual user's group assignment. If you need to change the default group assignments for new users, refer to Section 5.4, “Changing default settings for local users”.
Procedure 5.6: Changing a user's group assignment #
Open the YaST dialog and click the tab. It lists users and the groups the users belong to.
Click and switch to the tab.
To change the group the user belongs to, click and select the group from the list.
To assign the user additional secondary groups, activate the corresponding check boxes in the list.
Click to apply your changes.
Click to close the administration dialog and save the changes.
Alternatively, to save all changes without exiting the dialog, click › .
5.6 Managing groups #Edit source
With YaST you can also easily add, modify or delete groups.
Procedure 5.7: Creating and modifying groups #
Open the YaST dialog and click the tab.
With define the set of groups you want to manage. The dialog lists groups in the system.
To create a new group, click .
To modify an existing group, select the group and click .
In the following dialog, enter or change the data. The list on the right shows an overview of all available users and system users which can be members of the group.
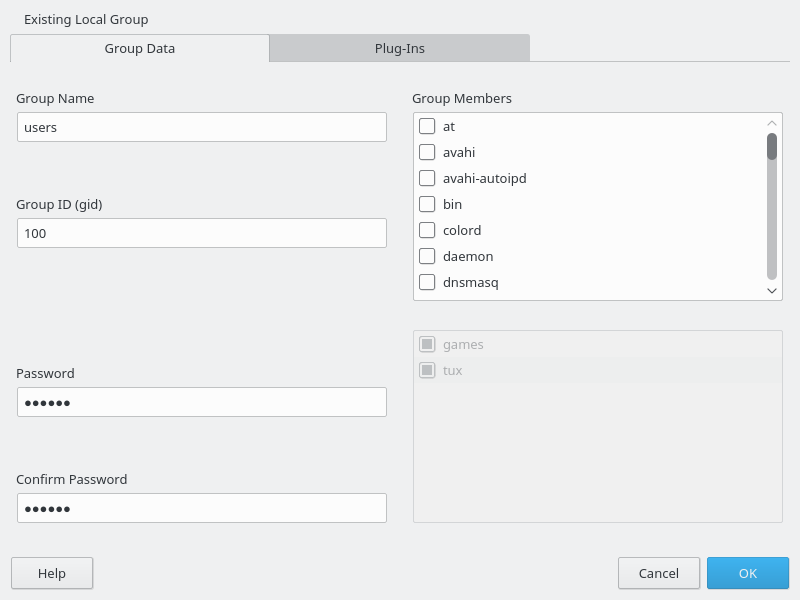
To add existing users to a new group select them from the list of possible by checking the corresponding box. To remove them from the group deactivate the box.
Click to apply your changes.
Click to close the administration dialog and save the changes.
Alternatively, to save all changes without exiting the dialog, click › .
To delete a group, it must not contain any group members. To delete a group, select it from the list and click . Click to close the administration dialog and save the changes. Alternatively, to save all changes without exiting the dialog, click › .
5.7 Changing the user authentication method #Edit source
When your machine is connected to a network, you can change the authentication method. The following options are available:
- NIS
Users are administered centrally on a NIS server for all systems in the network. For details, see Book “Security and Hardening Guide”, Chapter 3 “Using NIS”.
- SSSD
The System Security Services Daemon (SSSD) can locally cache user data and then allow users to use the data, even if the real directory service is (temporarily) unreachable. For details, see Book “Security and Hardening Guide”, Chapter 4 “Setting up authentication clients using YaST”, Section 4.2 “SSSD”.
- Samba
SMB authentication is often used in mixed Linux and Windows networks. For details, see Book “Security and Hardening Guide”, Chapter 7 “Active Directory support”.
To change the authentication method, proceed as follows:
Open the dialog in YaST.
Click the tab to show an overview of the available authentication methods and the current settings.
To change the authentication method, click and select the authentication method you want to modify. This takes you directly to the client configuration modules in YaST. For information about the configuration of the appropriate client, refer to the following sections:
NIS: Book “Security and Hardening Guide”, Chapter 3 “Using NIS”, Section 3.2 “Configuring NIS clients”
LDAP: Book “Security and Hardening Guide”, Chapter 4 “Setting up authentication clients using YaST”, Section 4.1 “Configuring an authentication client with YaST”
SSSD: Book “Security and Hardening Guide”, Chapter 4 “Setting up authentication clients using YaST”, Section 4.2 “SSSD”
After accepting the configuration, return to the overview.
Click to close the administration dialog.
5.8 Default system users #Edit source
By default, openSUSE Leap creates user names, which cannot be deleted. These users are typically defined in the Linux Standard Base. The following list provides the common user names and their purpose:
Common user names installed by default #
bin,daemonLegacy user, included for compatibility with legacy applications. New applications should no longer use this user name.
gdmUsed by GNOME Display Manager (GDM) to provide graphical logins and manage local and remote displays.
lpUsed by the Printer daemon for Common Unix Printing System (CUPS).
mailUser reserved for mailer programs like
sendmailorpostfix.manUsed by man to access man pages.
messagebusUsed to access D-Bus (desktop bus), a software bus for inter-process communication. Daemon is
dbus-daemon.nobodyUser that owns no files and is in no privileged groups. Nowadays, its use is limited as it is recommended by Linux Standard Base to provide a separate user account for each daemon.
nscdUsed by the Name Service Caching Daemon. This daemon is a lookup service to improve performance with NIS and LDAP. Daemon is
nscd.polkitdUsed by the PolicyKit Authorization Framework, which defines and handles authorization requests for unprivileged processes. Daemon is
polkitd.postfixUsed by the Postfix mailer.
pulseUsed by the Pulseaudio sound server.
rootUsed by the system administrator, providing all appropriate privileges.
rpcUsed by the
rpcbindcommand, an RPC port mapper.rtkitUsed by the rtkit package providing a D-Bus system service for real time scheduling mode.
saltUser for parallel remote execution provided by Salt. Daemon is named
salt-master.scardUser for communication with smart cards and readers. Daemon is named
pcscd.srvGeoClueUsed by the GeoClue D-Bus service to provide location information.
sshdUsed by the Secure Shell daemon (SSH) to ensure secured and encrypted communication over an insecure network.
statdUsed by the Network Status Monitor protocol (NSM), implemented in the
rpc.statddaemon, to listen for reboot notifications.systemd-coredumpUsed by the
/usr/lib/systemd/systemd-coredumpcommand to acquire, save and process core dumps.systemd-networkUsed by the
/usr/lib/systemd/systemd-networkdcommand to manage networks.systemd-timesyncUsed by the
/usr/lib/systemd/systemd-timesyncdcommand to synchronize the local system clock with a remote Network Time Protocol (NTP) server.
5.9 Default system groups #Edit source
By default, SLE creates multiple user groups that are used by system services. The following list describes examples of required and common optional groups.
rootAdministrative group with all privileges.
binIncluded for compatibility with legacy applications. New applications should not use this group.
daemonPreviously used to limit daemons' access to the system. Daemons should run under their own UID/GID now to separate daemons from one another.
audioPrivileges for audio devices.
gdmPrivileges for the GNOME Display Manager.
chronyPrivileges for the time synchronization service.
kvmPrivileges for the QEMU machine emulator toolkit.
libvirtPrivileges for virtualization stack.
lpPrivileges for printer operation.
mailPrivileges for mail services.
manPrivileges specific to manual pages and the
mancommand.sshdPrivileges for SSH communication protocol daemon.