6 Changing language and country settings with YaST #Edit source
Abstract#
This chapter explains how to configure language and country settings. You can change the language globally for the whole system, individually for certain users or desktops, or temporarily for single applications. Additionally, you can configure secondary languages and adjust the date and country settings.
If you work in different countries or in a multilingual environment, you
should configure your system accordingly. openSUSE® Leap can handle
different locales in parallel. A locale is a set of
parameters that defines the language and country settings reflected in the
user interface.
The main system language is selected during installation, and keyboard and time zone settings are adjusted accordingly. However, you can install additional languages and determine which of the installed languages should be the default.
For those tasks, use the YaST language module as described in Section 6.1, “Changing the system language”. Install secondary languages to get optional localization if you need to start applications or desktops in languages other than the primary one.
The YaST time zone module allows you to adjust your country and time zone settings accordingly. It also lets you synchronize your system clock against a time server. For details, refer to Section 6.2, “Changing the country and time settings”.
6.1 Changing the system language #Edit source
Depending on how you use your desktop and whether you want to switch the entire system to another language or only the desktop environment, you have several options:
- Changing the system language globally
Proceed as described in Section 6.1.1, “Modifying system languages with YaST” and Section 6.1.2, “Switching the default system language” to install additional localized packages with YaST and to set the default language. Changes are effective after the next login. To ensure that the entire system reflects the change, reboot the system or close and restart all running services, applications and programs.
- Changing the language for the desktop only
Provided you have previously installed the desired language packages for your desktop environment with YaST as described below, you can switch the language of your desktop using the desktop's control center. Refer to Book “GNOME User Guide”, Chapter 3 “Customizing your settings”, Section 3.2 “Configuring language settings” for details. After the X server has been restarted, your entire desktop reflects your new choice of language. Applications not belonging to your desktop framework are not affected by this change and may still appear in the language that was set in YaST.
- Temporarily switching languages for one application only
You can also run a single application in another language (that has already been installed with YaST). To do so, start it from the command line by specifying the language code as described in Section 6.1.3, “Switching languages for standard X and GNOME applications”.
6.1.1 Modifying system languages with YaST #Edit source
YaST supports two different language categories:
The primary language set in YaST applies to the entire system, including YaST and the desktop environment. This language is used whenever available unless you manually specify another language.
Install secondary languages to make your system multilingual. Languages installed as secondary can be selected manually, when needed. For example, use a secondary language to start an application in a certain language to do word processing in this language.
Before installing additional languages, determine which of them should be the default system language (primary language).
To access the YaST language module, start YaST and click › .
Alternatively, start the dialog directly by
running sudo yast2 language & from a command line.

Procedure 6.1: Installing additional languages #
When installing additional languages, YaST allows you to
set different locale settings for the user root, see Step 4. The option
determines how
the locale variables (LC_*) in the file
/etc/sysconfig/language are set for
root. You can set them to the same locale as for regular
users. Alternatively, you can keep them unaffected by any language
changes, or only set the variable RC_LC_CTYPE to
the same values as for the regular users. The
RC_LC_CTYPE variable sets the localization for
language-specific function calls.
To add languages in the YaST language module, select the you want to install.
To make a language the default language, set it as .
Additionally, adapt the keyboard to the new primary language and adjust the time zone, if appropriate.

Tip: Advanced settings
For advanced keyboard or time zone settings, select › or › in YaST. For more information, refer to Chapter 15, Setting up your system keyboard layout and Section 6.2, “Changing the country and time settings”.
To change language settings specific to the user
root, click .Set to the desired value. For more information, click .
Decide whether to use for
rootor not.
If your locale was not included in the list of primary languages available, try specifying it with . However, this may result in certain locales being incomplete.
Confirm the changes in the dialogs with . If you have selected secondary languages, YaST installs the localized software packages for the additional languages.
The system is now multilingual. However, to start an application in a language other than the primary one, you need to set the desired language explicitly as explained in Section 6.1.3, “Switching languages for standard X and GNOME applications”.
6.1.2 Switching the default system language #Edit source
To globally change the default language of a system, use the following procedure:
Start the YaST language module.
Select the desired new system language as .

Important: Deleting former system languages
If you switch to a different primary language, the localized software packages for the former primary language gets removed from the system. To switch the default system language but keep the former primary language as an additional language, add it as by selecting the respective check box.
Adjust the keyboard and time zone options as desired.
Confirm your changes with .
After YaST has applied the changes, restart current X sessions (for example, by logging out and logging in again) to make YaST and the desktop applications reflect your new language settings.
6.1.3 Switching languages for standard X and GNOME applications #Edit source
After you have installed the respective language with YaST, you can run a single application in another language.
Start the application from the command line by using the following command:
LANG=LANGUAGE application
For example, to start f-spot in German, run
LANG=de_DE f-spot. For other languages, use the
appropriate language code. Get a list of all language codes available with
the locale -av command.
6.2 Changing the country and time settings #Edit source
Using the YaST date and time module, adjust your system date, clock and
time zone information to the area you are working in. To access the YaST
module, start YaST and click › . Alternatively, start the
dialog directly by running
sudo yast2 timezone & from a command line.
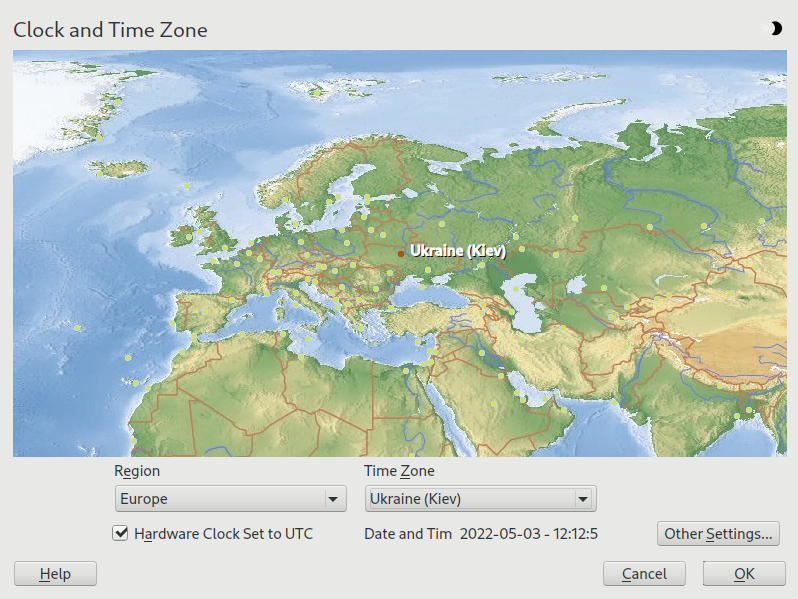
First, select a general region, such as . Choose an appropriate country that matches the one you are working in, for example, .
Depending on which operating systems run on your workstation, adjust the hardware clock settings accordingly:
If you run another operating system on your machine, such as Microsoft Windows*, your system may not use UTC, but local time. In this case, deactivate .
If you only run Linux on your machine, set the hardware clock to UTC and have the switch from standard time to daylight saving time performed automatically.
Important: Set the hardware clock to UTC
The switch from standard time to daylight saving time (and vice versa) can only be performed automatically when the hardware clock (CMOS clock) is set to UTC. This also applies if you use automatic time synchronization with NTP, because automatic synchronization is only performed if the time difference between the hardware and system clock is less than 15 minutes.
Since a wrong system time can cause serious problems (missed backups, dropped mail messages, mount failures on remote file systems, etc.) it is strongly recommended to always set the hardware clock to UTC.
You can change the date and time manually or opt for synchronizing your machine against an NTP server, either permanently or only for adjusting your hardware clock.
Procedure 6.2: Manually adjusting time and date #
In the YaST timezone module, click to set date and time.
Select and enter date and time values.
Confirm your changes.
Procedure 6.3: Setting date and time with NTP server #
Click to set date and time.
Select .
Enter the address of an NTP server, if not already populated.
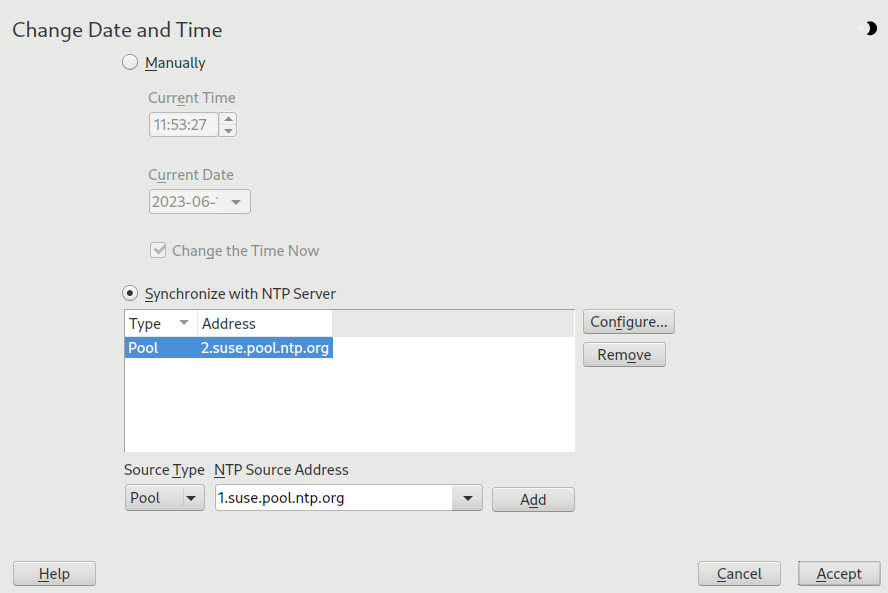
With the button, you can open the advanced NTP configuration. For details, see Book “Reference”, Chapter 18 “Time synchronization with NTP”, Section 18.1 “Configuring an NTP client with YaST”.
Confirm your changes.