9 Installing or removing software #Edit source
Abstract#
Using YaST's software management module, you can search for software packages as well as install and remove them. When installing packages, YaST automatically resolves all dependencies. To install packages that are not on the installation medium, you can add software repositories and YaST to manage them. You can also keep your system up to date by managing software updates using the update applet.
The YaST Software Manager makes it possible to manage software sources on your system. There are two versions of this YaST module: a graphical version for X Window and a text-based version to use with the command line. The graphical flavor is described below—for details on the text-based YaST, see Book “Reference”, Chapter 1 “YaST in text mode”.
Note: Confirmation and review of changes
When installing, updating or removing packages, any changes in the Software Manager are only applied after clicking or . YaST maintains a list with all actions, allowing you to review and modify your changes before applying them to the system.
9.1 Definition of terms #Edit source
The following terms are important for understanding installing and removing software in openSUSE Leap.
- Repository
A local or remote directory containing packages, plus additional information about these packages (package metadata).
- (Repository) alias/repository name
A short name for a repository (called
Aliaswithin Zypper and within YaST). It can be chosen by the user when adding a repository and must be unique.- Repository description files
Each repository provides files describing content of the repository (package names, versions, etc.). These repository description files are downloaded to a local cache that is used by YaST.
- Product
Represents a whole product, for example, openSUSE® Leap.
- Pattern
A pattern is an installable group of packages dedicated to a certain purpose. For example, the
Laptoppattern contains all packages that are needed in a mobile computing environment. Patterns define package dependencies (such as required or recommended packages) and come with a preselection of packages marked for installation. This ensures that the most important packages needed for a certain purpose are available on your system after installation of the pattern. If necessary, you can manually select or deselect packages within a pattern.- Package
A package is a compressed file in
rpmformat that contains the files for a particular program.- Patch
A patch consists of one or more packages and may be applied by delta RPMs. It may also introduce dependencies to packages that are not installed yet.
- Resolvable
A generic term for product, pattern, package or patch. The most commonly used type of resolvable is a package or a patch.
- Delta RPM
A delta RPM consists only of the binary diff between two defined versions of a package, and therefore has the smallest download size. Before being installed, the full RPM package is rebuilt on the local machine.
- Package dependencies
Certain packages are dependent on other packages, such as shared libraries. In other terms, a package may
requireother packages—if the required packages are not available, the package cannot be installed. Besides dependencies (package requirements) that must be fulfilled, certain packagesrecommendother packages. These recommended packages are only installed if they are available, otherwise they are ignored and the package recommending them is installed nevertheless.
9.2 Using the YaST software manager #Edit source
Start the software manager from the by choosing › .

9.2.1 Searching software #Edit source
The YaST software manager can install packages or patterns from all currently enabled repositories. It offers different views and filters to make it easier to find the software you are searching for. The view is the default view of the window. To change view, click and select one of the following entries from the drop-down box. The selected view opens in a new tab.
Views for searching packages or patterns #
Lists all patterns available for installation on your system.
Lists all packages sorted by groups such as , , or .
A filter to list all packages needed to add a new system language.
A filter to list packages by repository. To select more than one repository, hold the Ctrl key while clicking repository names. The “pseudo repository” lists all packages currently installed.
Shows which packages belong to a certain module or extension. Select an entry (for example,
BasesystemorHigh Availability) to display a list of packages that belong to this module or extension.Lets you search for a package according to certain criteria. Enter a search term and press Enter. Refine your search by specifying where to and by changing the . For example, if you do not know the package name but only the name of the application that you are searching for, try including the package in the search process.
If you have already selected packages for installation, update or removal, this view shows the changes that will be applied to your system when you click . To filter for packages with a certain status in this view, activate or deactivate the respective check boxes. Press Shift–F1 for details on the status flags.
Tip: Finding packages not belonging to an active repository
To list all packages that do not belong to an active repository, choose › › and then choose › . This is useful, for example, if you have deleted a repository and want to make sure no packages from that repository remain installed.
9.2.2 Installing and removing packages or patterns #Edit source
Certain packages are dependent on other packages, such as shared libraries. Several packages cannot coexist with others on the system. If possible, YaST automatically resolves these dependencies or conflicts. If your choice results in a dependency conflict that cannot be automatically solved, you need to solve it manually as described in Section 9.2.4, “Package dependencies”.
Note: Removal of packages
When removing any packages, by default YaST only removes the selected packages. If you want YaST to also remove any other packages that become unneeded after removal of the specified package, select › from the main menu.
Search for packages as described in Section 9.2.1, “Searching software”.
The packages found are listed in the right pane. To install a package or remove it, right-click it and choose or . If the relevant option is not available, check the package status indicated by the symbol in front of the package name—press Shift–F1 for help.

Tip: Applying an action to all packages listed
To apply an action to all packages listed in the right pane, go to the main menu and choose an action from › .
To install a pattern, right-click the pattern name and choose .
It is not possible to remove a pattern. Instead, select the packages for the pattern you want to remove and mark them for removal.
To select more packages, repeat the steps mentioned above.
Before applying your changes, you can review or modify them by clicking › . By default, all packages that will change status are listed.
To revert the status for a package, right-click the package and select one of the following entries: if the package was scheduled to be deleted or updated, or if it was scheduled for installation. To abandon all changes and quit the Software Manager, click and .
When you are finished, click to apply your changes.
If YaST finds additional dependencies, it shows a list of related packages to install, update or remove. Click to accept them.
After all selected packages are installed, updated or removed, the YaST Software Manager automatically closes.
Note: Installing source packages
Installing source packages with YaST Software Manager is not possible at
the moment. Use the command line tool zypper for this
purpose. For more information, see
Book “Reference”, Chapter 2 “Managing software with command line tools”, Section 2.1.3.5 “Installing or downloading source packages”.
9.2.3 Updating packages #Edit source
Instead of updating individual packages, you can also update all installed packages or all packages from a certain repository. When mass updating packages, the following aspects are generally considered:
priorities of the repositories that provide the package,
architecture of the package (for example, AMD64/Intel 64),
version number of the package,
package vendor.
Which of the aspects has the highest importance for choosing the update candidates depends on the respective update option you choose.
To update all installed packages to the latest version, choose › › from the main menu.
All repositories are checked for possible update candidates, using the following policy: YaST first tries to restrict the search to packages with the same architecture and vendor as the installed one. If the search is positive, the “best” update candidate from those is selected according to the process below. However, if no comparable package of the same vendor can be found, the search is expanded to all packages with the same architecture. If still no comparable package can be found, all packages are considered and the “best” update candidate is selected according to the following criteria:
Repository priority: prefer the package from the repository with the highest priority.
If more than one package results from this selection, choose the one with the “best” architecture (best choice: matching the architecture of the installed one).
If the resulting package has a higher version number than the installed one, the installed package is updated and replaced with the selected update candidate.
This option tries to avoid changes in architecture and vendor for the installed packages, but under certain circumstances, they are tolerated.

Note: Update unconditionally
If you choose › › instead, the same criteria apply but any candidate package found is installed unconditionally. Thus, choosing this option may lead to downgrading certain packages.
To make sure that the packages for a mass update derive from a certain repository:
Choose the repository from which to update as described in Section 9.2.1, “Searching software” .
On the right hand side of the window, click . This explicitly allows YaST to change the package vendor when replacing the packages.
When you proceed with , all installed packages are replaced by packages deriving from this repository, if available. This may lead to changes in vendor and architecture and even to downgrading certain packages.
To refrain from this, click . You can only cancel this until you click the button.
Before applying your changes, you can review or modify them by clicking › . By default, all packages that will change status, are listed.
If all options are set according to your wishes, confirm your changes with to start the mass update.
9.2.4 Package dependencies #Edit source
Most packages are dependent on other packages. If a package, for example, uses a shared library, it is dependent on the package providing this library. Certain packages cannot coexist, causing a conflict (for example, you can only install one mail transfer agent: sendmail or postfix). When installing or removing software, the Software Manager makes sure no dependencies or conflicts remain unsolved to ensure system integrity.
In case there exists only one solution to resolve a dependency or a conflict, it is resolved automatically. Multiple solutions always cause a conflict which needs to be resolved manually. If solving a conflict involves a vendor or architecture change, it also needs to be solved manually. When clicking to apply any changes in the Software Manager, you get an overview of all actions triggered by the automatic resolver which you need to confirm.
By default, dependencies are automatically checked. A check is performed every time you change a package status (for example, by marking a package for installation or removal). This is generally useful, but can become exhausting when manually resolving a dependency conflict. To disable this function, go to the main menu and deactivate › . Manually perform a dependency check with › . A consistency check is always performed when you confirm your selection with .
To review a package's dependencies, right-click it and choose . A map showing the dependencies opens. Packages that are already installed are displayed in a green frame.
Note: Manually solving package conflicts
Unless you are experienced, follow the suggestions YaST makes when handling package conflicts, otherwise you may not be able to resolve them. Keep in mind that every change you make potentially triggers other conflicts, so you can easily end up with a steadily increasing number of conflicts. In case this happens, the Software Manager, all your changes and start again.

Figure 9.1: Conflict management of the software manager #
9.2.5 Handling package recommendations #Edit source
In addition to the hard dependencies required to run a program (for example a certain library), a package can also have weak dependencies, which add for example extra functionality or translations. These weak dependencies are called package recommendations.
When installing a new package, recommended packages are still
installed by default. When updating an existing package, missing
recommendations are not be installed automatically. To change this, set
PKGMGR_RECOMMENDED="yes" in
/etc/sysconfig/yast2. To install all missing
recommendations for already installed packages, start › and choose › .
To disable the installation of recommended packages when installing new
packages, deactivate › in the
YaST Software Manager. When using the command-line tool Zypper to install
packages, use the option --no-recommends.
9.3 Managing software repositories and services #Edit source
To install third-party software, add software repositories to your system. By default, product repositories such as openSUSE Leap-DVD 15.6 and a matching update repository are automatically configured. Depending on the initially selected product, an additional repository containing translations, dictionaries, etc. might also be configured.
To manage repositories, start YaST and select › . The dialog opens. Here, you can also manage subscriptions to by changing the at the right corner of the dialog to . A Service in this context is a (RIS) that can offer one or more software repositories. Such a Service can be changed dynamically by its administrator or vendor.
Each repository provides files describing repository content (package names, versions, etc.). YaST downloads these repository description files to a local cache. To ensure their integrity, software repositories can be signed with the GPG Key of the repository maintainer. Whenever you add a new repository, YaST offers the ability to import its key.
Warning: Trusting external software sources
Before adding external software repositories to your list of repositories, make sure this repository can be trusted. SUSE is not responsible for any problems arising from software installed from third-party software repositories.
9.3.1 Adding software repositories #Edit source
You can either add repositories from DVD/CD, a USB flash drive, a local directory, an ISO image, or a network source.
To add repositories from the dialog in YaST proceed as follows:
Click .
Select one of the options listed in the dialog:
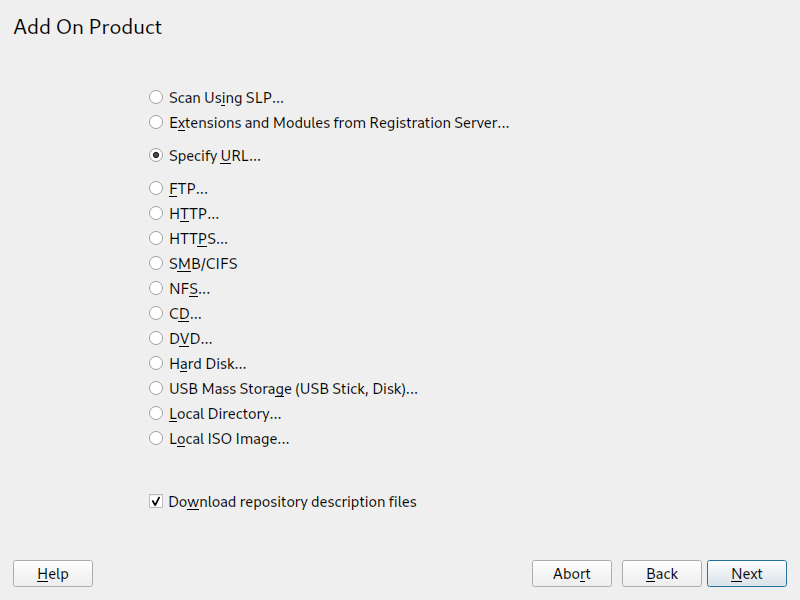
Figure 9.2: Adding a software repository #
To scan your network for installation servers announcing their services via SLP, select and click .
To add a repository from a removable medium, choose the relevant option and insert the medium or connect the USB device to the machine, respectively. Click to start the installation.
For the majority of repositories, you will be asked to specify the path (or URL) to the media after selecting the respective option and clicking . Specifying a is optional. If none is specified, YaST will use the product name or the URL as repository name.
The option is activated by default. If you deactivate the option, YaST will automatically download the files later, if needed.
Depending on the repository you add, you may be prompted to import the repository's GPG key or asked to agree to a license.
After confirming, YaST will download and parse the metadata. It will add the repository to the list of .
If needed, adjust the repository as described in Section 9.3.2, “Managing repository properties”.
Confirm your changes with to close the configuration dialog.
After having successfully added the repository, the software manager starts and you can install packages from this repository. For details, refer to Chapter 9, Installing or removing software.
9.3.2 Managing repository properties #Edit source
The overview of the lets you change the following repository properties:
- Status
The repository status can either be or . You can only install packages from repositories that are enabled. To turn a repository off temporarily, select it and deactivate . You can also double-click a repository name to toggle its status. To remove a repository completely, click .
- Refresh
When refreshing a repository, its content description (package names, versions, etc.) is downloaded to a local cache that is used by YaST. It is sufficient to do this once for static repositories such as CDs or DVDs, whereas repositories whose content changes often should be refreshed frequently. The easiest way to keep a repository's cache up to date is to choose . To do a manual refresh click and select one of the options.
Packages from remote repositories are downloaded before being installed. By default, they are deleted upon successful installation. Activating prevents the deletion of downloaded packages. The download location is configured in
/etc/zypp/zypp.conf, by default it is/var/cache/zypp/packages.The of a repository is a value between
1and200, with1being the highest priority and200the lowest priority. Any new repositories that are added with YaST get a priority of99by default. If you do not care about a priority value for a certain repository, you can also set the value to0to apply the default priority to that repository (99). If a package is available in more than one repository, then the repository with the highest priority takes precedence. This is useful to avoid downloading packages unnecessarily from the Internet by giving a local repository (for example, a DVD) a higher priority.
Important: Priority compared to version
The repository with the highest priority takes precedence in any case. Therefore, make sure that the update repository always has the highest priority, otherwise you might install an outdated version that will not be updated until the next online update.
- Name and URL
To change a repository name or its URL, select it from the list with a single-click and then click .
9.3.3 Managing repository keys #Edit source
To ensure their integrity, software repositories can be signed with the GPG Key of the repository maintainer. Whenever you add a new repository, YaST offers to import its key. Verify it as you would do with any other GPG key and make sure it does not change. If you detect a key change, something might be wrong with the repository. Disable the repository as an installation source until you know the cause of the key change.
To manage all imported keys, click in the dialog. Select an entry with the mouse to show the key properties at the bottom of the window. , , or keys with a click on the respective buttons.
9.4 The GNOME package updater #Edit source
SUSE offers a continuous stream of software security patches and updates for your product. They can be installed using tools available with your desktop or by running the YaST online update module. This section describes how to update the system from the GNOME desktop using the .
Contrary to the YaST Online Update module, the GNOME not only offers to install patches from the update repositories, but also new versions of packages that are already installed. (Patches fix security issues or malfunctions; the functionality and version number is usually not changed. New versions of a package increase the version number and add functionality or introduce major changes.)
Whenever new patches or package updates are available, GNOME shows a notification in the notification area or on the lock screen.
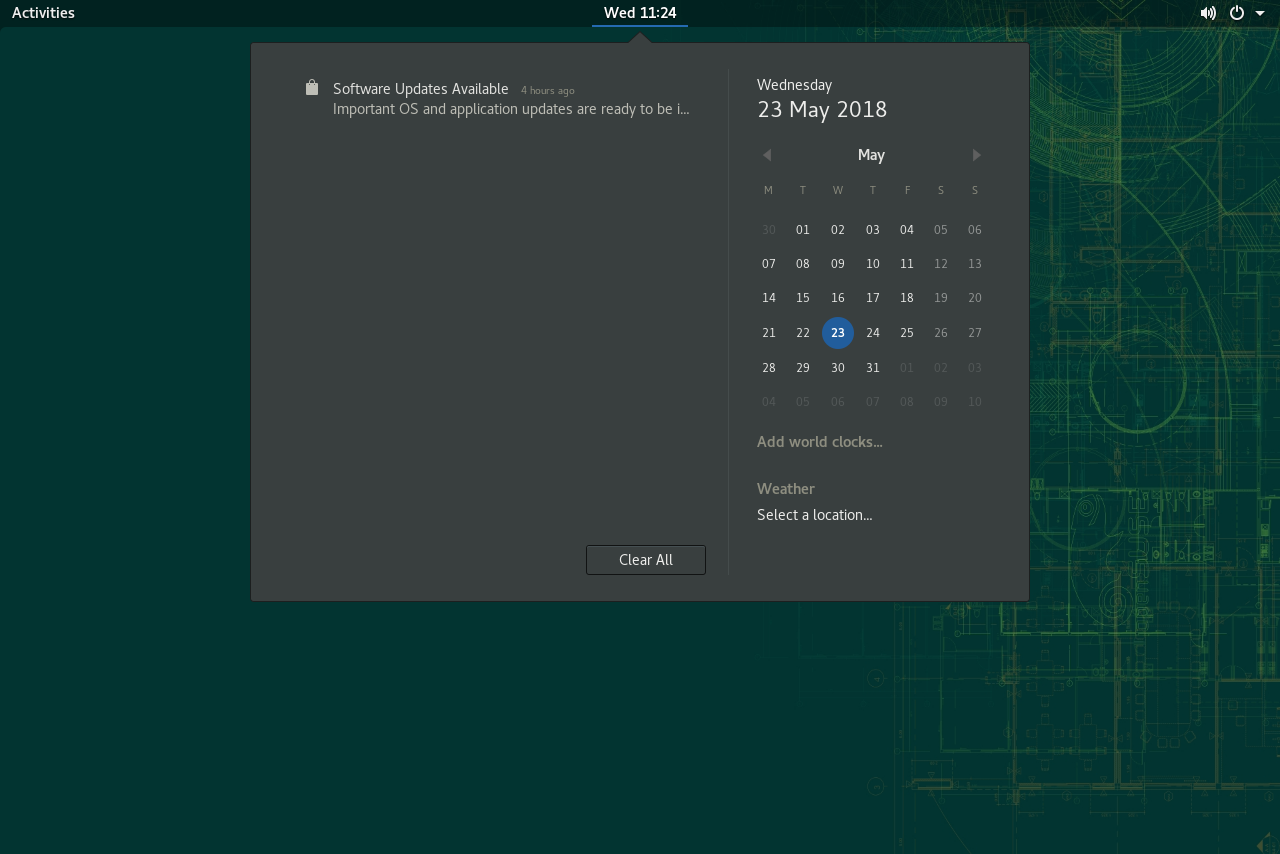
Figure 9.3: Update notification on GNOME desktop #
To configure the notification settings for the , start GNOME and choose › .
Procedure 9.1: Installing patches and updates with the GNOME package updater #
To install the patches and updates, click the notification message. This opens the GNOME . Alternatively, open the updater from by typing
package
    U
and choosing .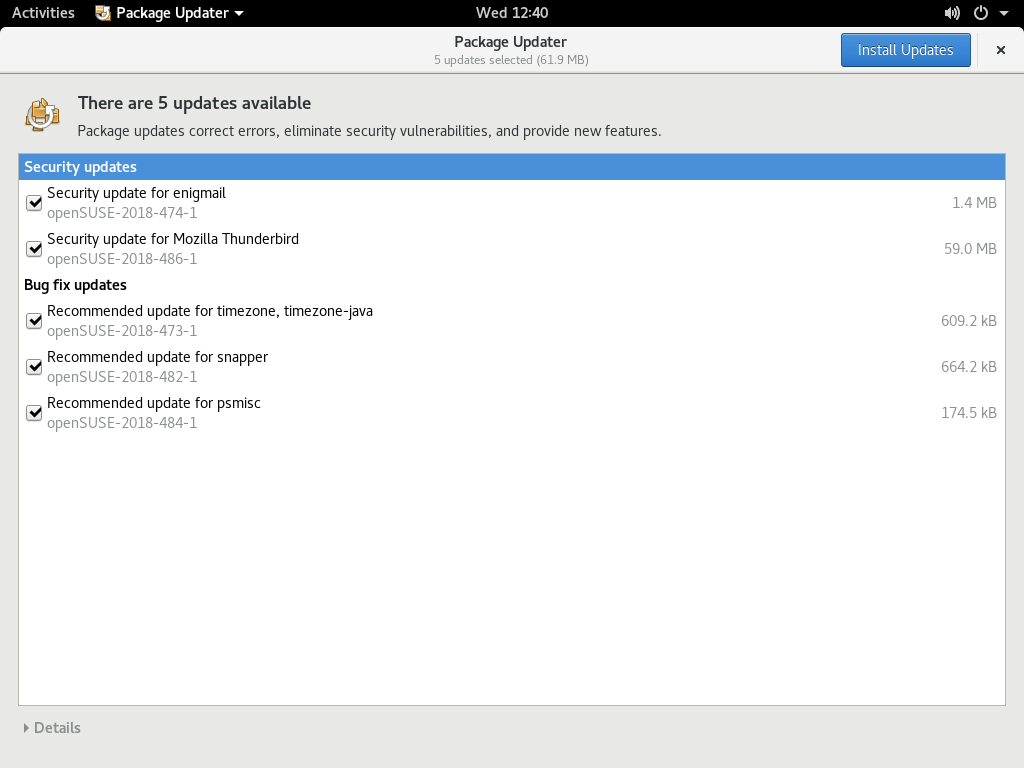
Updates are sorted into four categories:
- Security updates (patches)
Fix severe security hazards and should always be installed.
- Recommended updates (patches)
Fix issues that could compromise your computer. Installing them is strongly recommended.
- Optional updates (patches)
Fix non-security relevant issues or provide enhancements.
- Other updates
New versions of packages that are installed.
All available updates are preselected for installation. If you do not want to install all updates, deselect unwanted updates first. It is strongly recommended to always install all security and recommended updates.
To get detailed information on an update, click its title and then . The information is displayed in a box beneath the package list.
Click to start the installation.
Some updates may require to restart the machine or to log out. Check the message displayed after installation for instructions.
9.5 Updating packages with #Edit source
In addition to the GNOME , GNOME provides which has the following functionality:
Install, update, and remove software delivered as an RPM via PackageKit
Install, update, and remove software delivered as a Flatpak
Install, update, and remove GNOME shell extensions (https://extensions.gnome.org)
Update firmware for hardware devices using Linux Vendor Firmware Service (LVFS, https://fwupd.org)
also provides screenshots, ratings, and reviews for software.
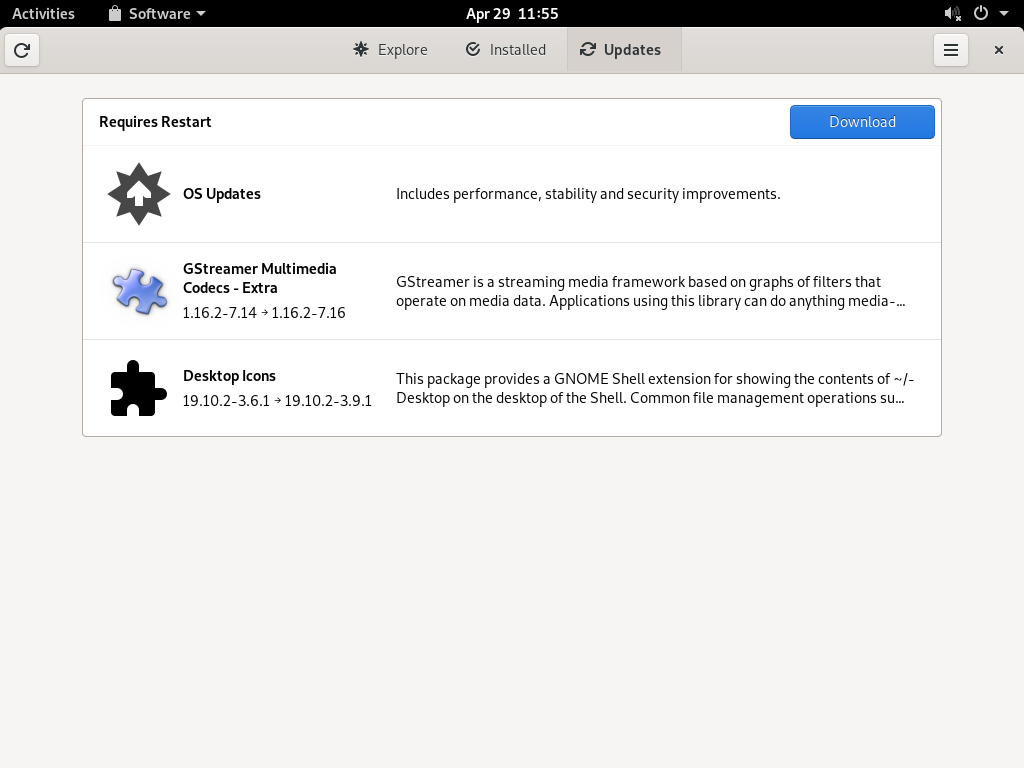
Figure 9.4: — view #
has the following differences to other tools provided on openSUSE Leap:
Unlike YaST or Zypper, for installing software packaged as an RPM, is restricted to software that provides AppStream metadata. This includes most desktop applications.
While the GNOME updates packages within the running system (forcing you to restart the respective applications), downloads the updates and applies them after reboot.