12 Upgrading the system and system changes #Edit source
Abstract#
You can upgrade an existing system without completely reinstalling it. There are two types of renewing the system or parts of it: updating individual software packages and upgrading the entire system. Updating individual packages is covered in Chapter 9, Installing or removing software and Chapter 11, YaST online update. Two ways to upgrade the system are discussed in the following sections— see Section 12.1.3, “Upgrading with YaST” and Section 12.1.4, “Distribution upgrade with Zypper”.
12.1 Upgrading the system #Edit source
Important: openSUSE Leap 15.6 is only available as 64-bit version
openSUSE Leap 15.6 is only available as 64-bit version. Upgrading 32-bit installations to 64-bit is not supported. Please follow the instructions in Chapter 1, Installation Quick Start and Chapter 3, Installation steps to install openSUSE Leap on your computer or consider switching to openSUSE Tumbleweed.
The release notes are bundled in the installer, and you may also read them online at openSUSE Leap Release Notes.
Software tends to “grow” from version to version. Therefore,
take a look at the available partition space with df
before updating. If you suspect you are running short of disk space,
secure your data before you update and repartition your system. There is
no general rule regarding how much space each partition should have.
Space requirements depend on your particular partitioning profile, the
software selected, and the version numbers of the system.
12.1.1 Preparations #Edit source
Before upgrading, copy the old configuration files to a separate medium
(such as removable hard disk or USB flash drive) to secure the data.
This primarily applies to files stored in /etc as
well as some of the directories and files in /var.
You may also want to write the user data in /home
(the HOME directories) to a backup medium. Back up this
data as root. Only
root has read permission
for all local files.
Before starting your update, make note of the root partition. The
command df / lists the device name of the root
partition. In Example 12.1, “List with df -h”, the root partition
to write down is /dev/sda3 (mounted as
/).
Example 12.1: List with df -h #
Filesystem     Size  Used Avail Use% Mounted on
/dev/sda3       74G   22G   53G  29% /
udev           252M  124K  252M   1% /dev
/dev/sda5      116G  5.8G  111G   5% /home
/dev/sda1       39G  1.6G   37G   4% /windows/C
/dev/sda2      4.6G  2.6G  2.1G  57% /windows/D
12.1.2 Possible problems #Edit source
If you upgrade a default system from the previous version to this version, YaST works out the necessary changes and performs them. Depending on your customization, some steps (or the entire upgrade procedure) may fail and you must resort to copying back your backup data. Check the following issues before starting the system update.
12.1.2.1 Checking passwd and group in /etc #Edit source
Before upgrading the system, make sure that
/etc/passwd and /etc/group do
not contain any syntax errors. For this purpose, start the verification
utilities pwck and grpck as
root to eliminate any
reported errors.
12.1.2.2 Shut down virtual machines #Edit source
If your machine serves as a VM Host Server for KVM or Xen, make sure to properly shut down all running VM Guests prior to the update. Otherwise you may not be able to access the guests after the update.
12.1.2.3 PostgreSQL #Edit source
Before updating PostgreSQL
(postgres), dump the
databases. See the manual page of pg_dump. This is
only necessary if you actually used PostgreSQL prior to your update.
12.1.3 Upgrading with YaST #Edit source
Following the preparation procedure outlined in Section 12.1.1, “Preparations”, you can now upgrade your system:
Insert the openSUSE Leap DVD into the drive, then reboot the computer to start the installation program. On machines with a traditional BIOS you will see the graphical boot screen shown below. On machines equipped with UEFI, a slightly different boot screen is used. Secure boot on UEFI machines is supported.
Use F2 to change the language for the installer. A corresponding keyboard layout is chosen automatically. See Section 2.2.1, “The boot screen on machines with traditional BIOS” or Section 2.2.2, “The boot screen on machines equipped with UEFI” for more information about changing boot parameters.
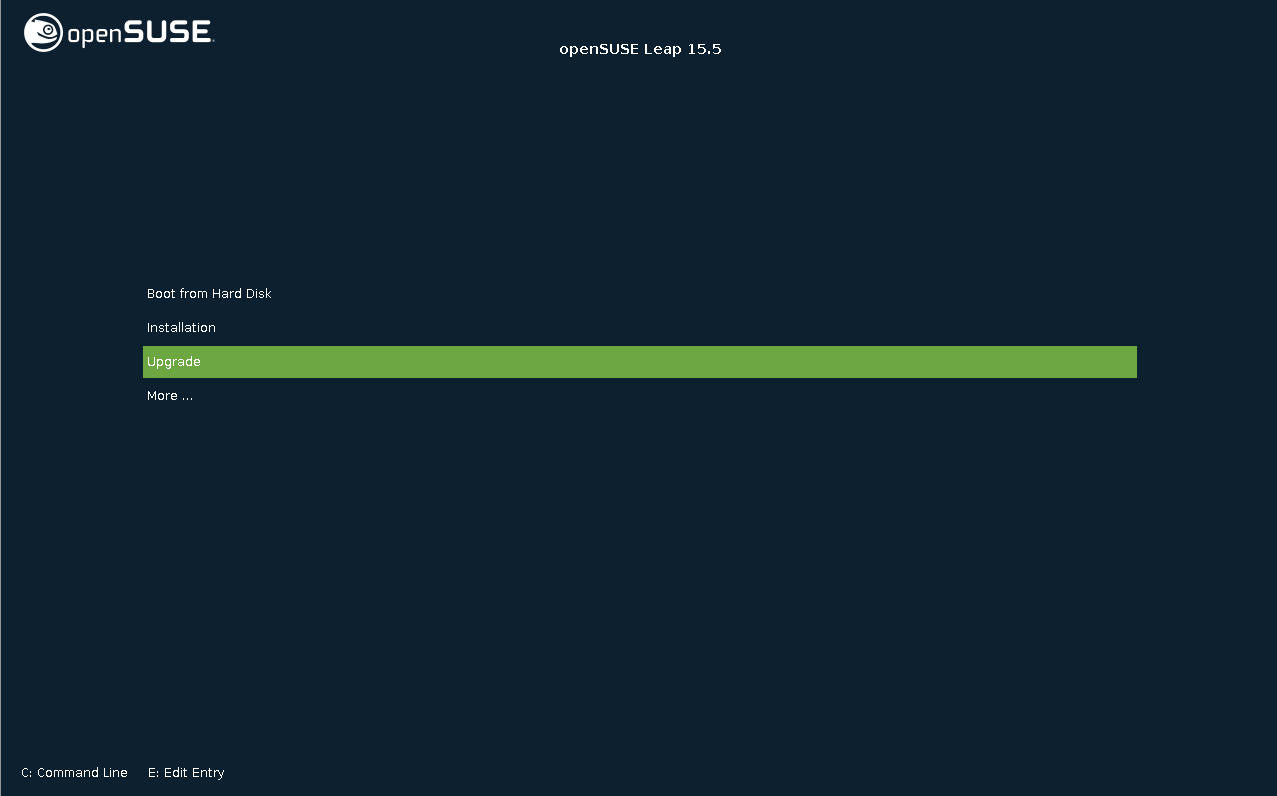
Select on the boot screen, then press Enter. This boots the system and loads the openSUSE Leap installer. Do not select .
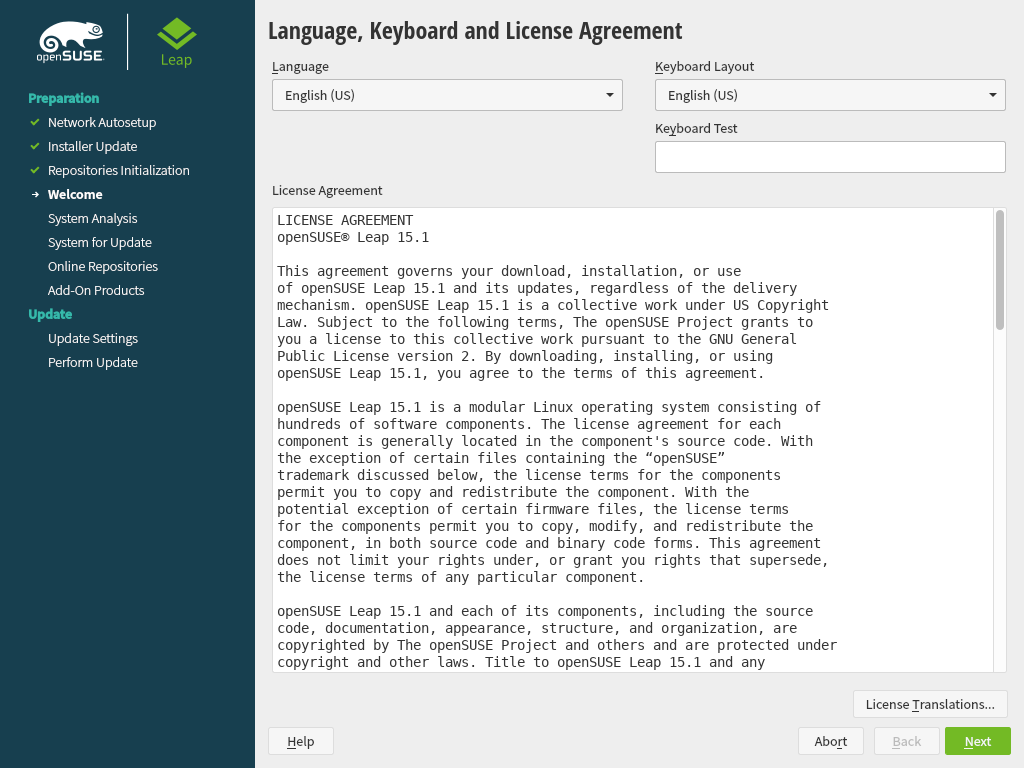
The and are initialized with the language settings you have chosen on the boot screen. Change them here, if necessary.
Read the License Agreement. It is presented in the language you have chosen on the boot screen. are available. Proceed with .
YaST determines if there are multiple root partitions. If there is only one, continue with the next step. If there are several, select the right partition and confirm with (
/dev/sda3was selected in the example in Section 12.1.1, “Preparations”). YaST reads the oldfstabon this partition to analyze and mount the file systems listed there.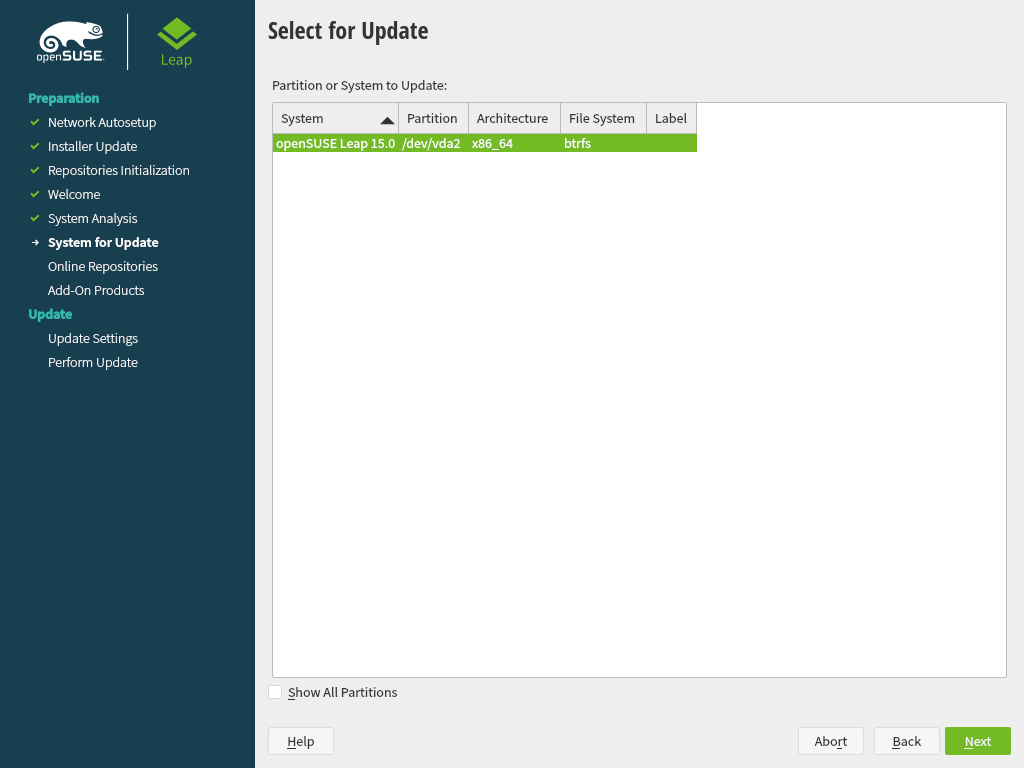

Tip: Release notes
From this point on, the Release Notes can be viewed from any screen during the installation process by selecting .
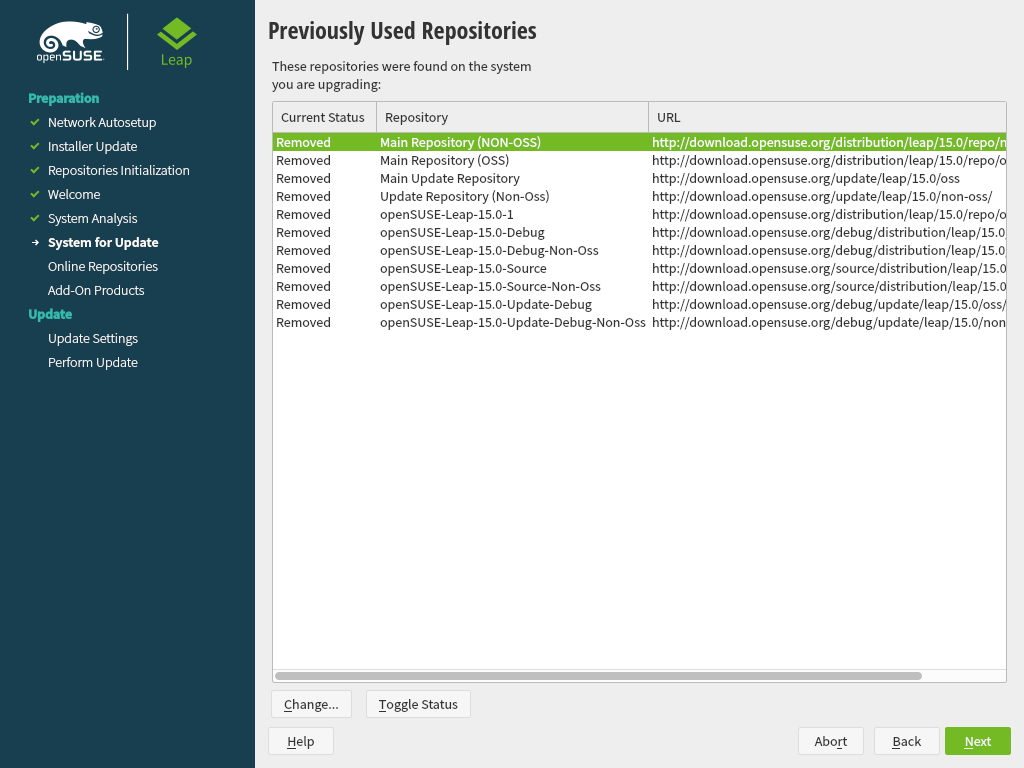
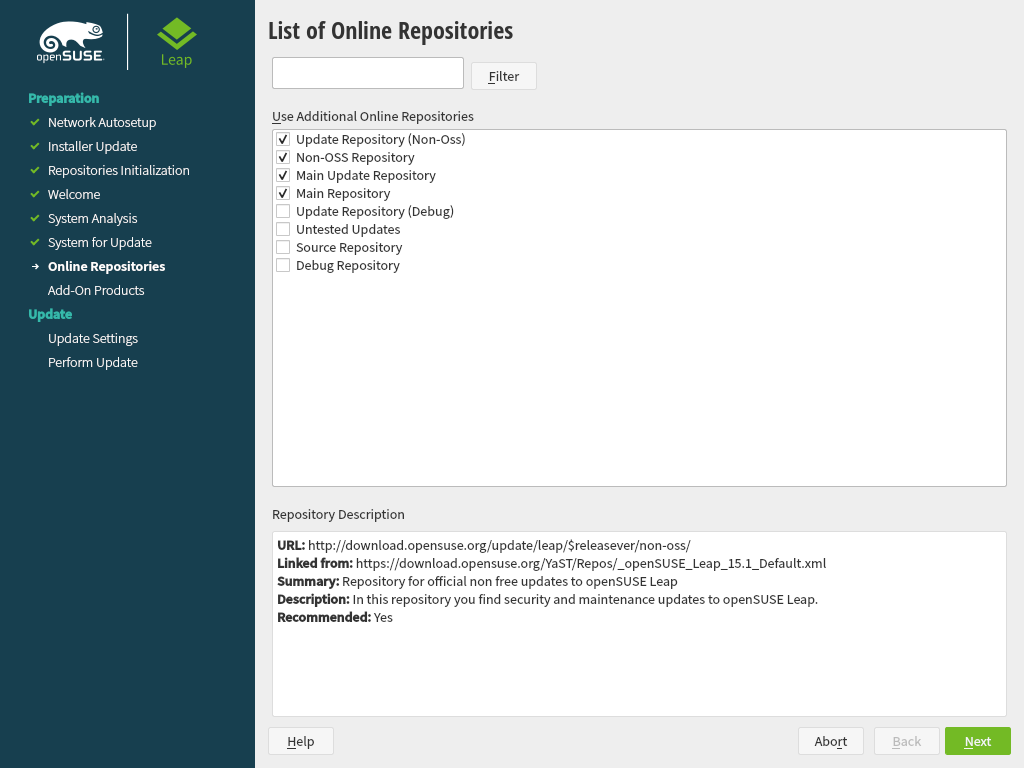
YaST shows a list of . By default all repositories will get removed. If you had not added any custom repositories, do not change the settings. The packages for the upgrade will be installed from DVD and you can optionally enable the default online repositories can be chosen in the next step.
If you have had added custom repositories, for example from the openSUSE Build Service, you have two choices:
Leave the repository in state
Removed. Software that was installed from this repository will get removed during the upgrade. Use this method if no version of the repository that matches the new openSUSE Leap version, is available.Update and enable the repository. Use this method if a version that matches the new openSUSE Leap version is available for the repository. Change it's URL by clicking the repository in the list and then . Enable the repository afterwards by clicking until it is set to .
Do not use repositories matching the previous version unless you are absolutely sure they will also work with the new openSUSE version. If not, the system may be unstable or not work at all.
In case an Internet connection is available, you may now activate optional online repositories. Please enable all repositories you had enable before to ensure all packages get upgraded correctly. Enabling the update repositories is strongly recommended—this will ensure that you get the latest package versions available, including ll security updates and fixes.
After having proceeded with , you need to confirm the license agreement for the online repositories with .
Use the screen to review and—if necessary—change several proposed installation settings. The current configuration is listed for each setting. To change it, click the headline.
View detailed hardware information by clicking . In the resulting screen you can also change —see Section 3.11.7, “” for more information.
By default, YaST will update perform full based on a selection of patterns. Each pattern contains several software packages needed for specific functions (for example, Web and LAMP server or a print server).
Here you can change the package selection or change the to .
You can further tweak the package selection on the screen. Here you can not only select patterns but also list their contents and search for individual packages. See Chapter 9, Installing or removing software for more information.
If you intend to enhance your system, it is recommended to finish the upgrade first and then install additional software.
You also have the possibility to make backups of various system components. Selecting backups slows down the upgrade process. Use this option if you do not have a recent system backup.
This section allows you to change the and configure additional Optionally, you can adjust the keyboard layout and timezone to the selected primary language.
Here you can change the keyboard layout and adjust additional .
This section shows the boot loader configuration. Changing the defaults is only recommended if really needed. Refer to Book “Reference”, Chapter 12 “The boot loader GRUB 2” for details.
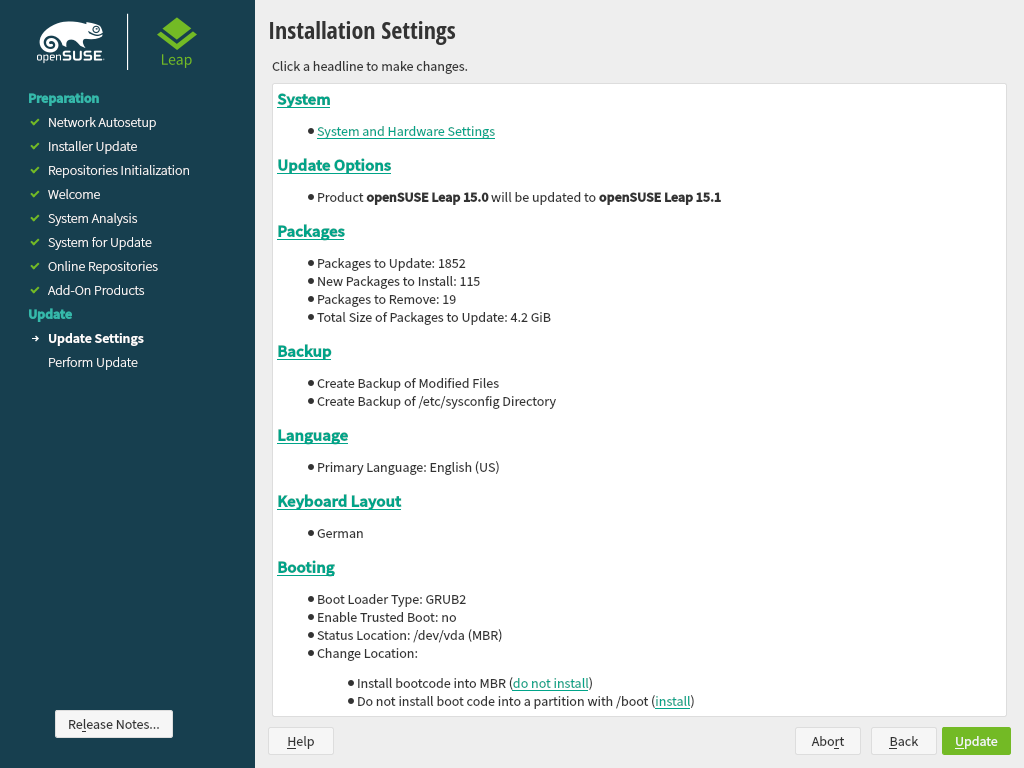
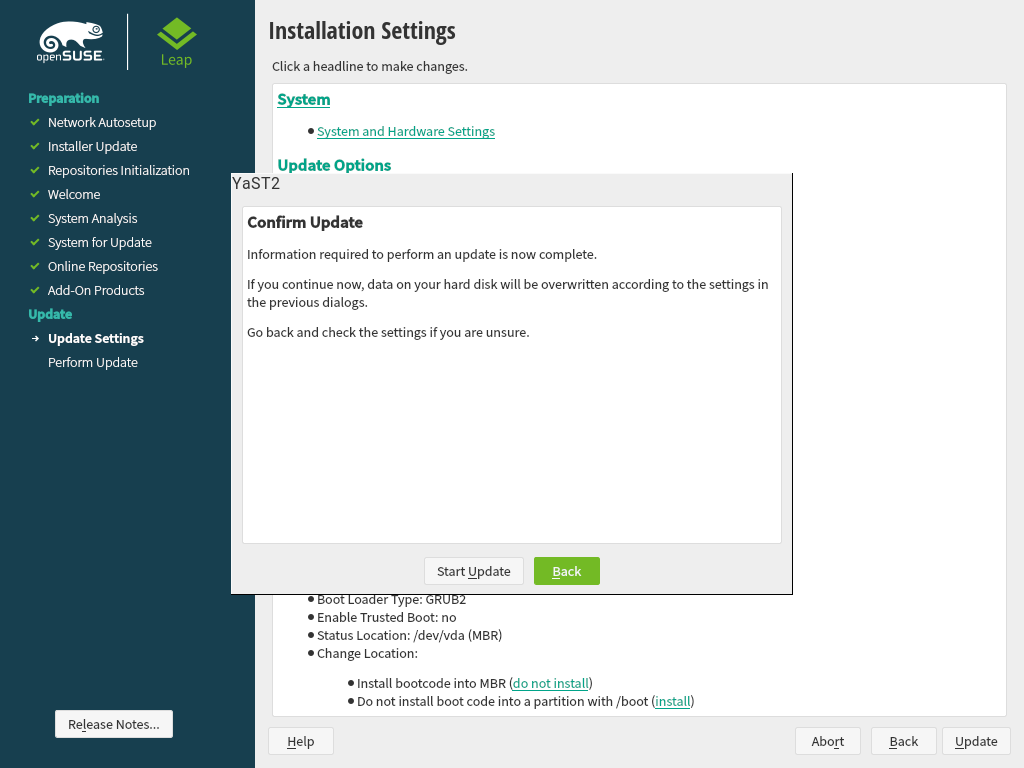
After you have finalized the system configuration on the screen, click . Depending on your software selection you may need to agree to license agreements before the installation confirmation screen pops up. Up to this point no changes have been made to your system. After you click a second time, the upgrade process starts.
Once the basic upgrade installation is finished, YaST reboots the system. Finally, YaST updates the remaining software, if any and displays the release notes, if wanted.
12.1.4 Distribution upgrade with Zypper #Edit source
With the zypper command line utility you can upgrade to
the next version of the distribution. Most importantly, you can initiate
the system upgrade process from within the running system.
This feature is attractive for advanced users who want to run remote upgrades or upgrades on many similarly configured systems.
12.1.4.1 Preparing the upgrade with Zypper #Edit source
To avoid unexpected errors during the upgrade process using
zypper, minimize risky constellations.
Quit as many applications and stop unneeded services as possible and log out all regular users.
Disable third-party repositories before starting the upgrade, or lower the priority of these repositories to make sure packages from the default system repositories will get preference. Enable them again after the upgrade and edit their version string to match the version number of the distribution of the upgraded now running system.
12.1.4.2 The upgrade procedure #Edit source
Warning: Check your system backup
Before actually starting the upgrade procedure, check that your system backup is up-to-date and restorable. This is especially important because you need to enter many of the following steps manually.
The program zypper supports long and short command
names. For example, you can abbreviate zypper install
as zypper in. In the following text, the short
variants are used.
Run the online update to make sure the software management stack is up-to-date:
>sudozypper patchConfigure the repositories you want to use as update sources. Getting this right is crucial. The NAME of the repositories used in the following steps may vary depending on the customization of your OS. For more info, refer to Book “Reference”, Chapter 2 “Managing software with command line tools”, Section 2.1.6 “Managing repositories with Zypper”)
To view your current repositories, enter:
>zypper --releasever=15.6 lr -uIn the result of the previous command, check the last column (). All repository links should contain
15.6as version number. If this is not the case, the version number is missing or hard-coded in the repository definition file under/etc/zypp/repos.d/. To fix this, proceed as follows:Decide whether the repository is still needed. If not, delete it:
>sudozypper rr NAMEDelete all repositories you no longer need.
For third-party repositories without a version number, check with the repository provider whether openSUSE Leap 15.6 is supported. If so, keep the repository. If not, delete it as described above.
All remaining repositories you want to keep need to be updated to the new version. To allow for future updates without repository modifications, replace the hard-coded version number with the variable
$releasever. If15.3is hard-coded, run:>sudosed -i 's/15.3/$releasever/' /etc/zypp/repos.d/*.repoRepeat this step for every hard-coded version number.
Use your browser to check whether the new repository URL is correct. If not, a new version of the repository may not exist yet. Deactivate the repository and try again later.
>sudozypper mr -d NAMEPackages from deactivated repositories will not be removed if all dependencies are still fulfilled.
Finally, check the current repository configuration again
>sudozypper --releasever=15.6 lr -uAll repositories should now point to a
15.6version (except for third-party repositories without versioning that support new releases). Repositories still pointing to an old version should at least be disabled (the column needs to showNo).Update the repository metadata by running:
>sudozypper --releasever=15.6 refStart the distribution upgrade that will lift your system to the new version:
>sudozypper --releasever=15.6 dupDepending on the software selection, you may need to approve one or more licenses. Check the output of the command. If everything is OK, approve with .
Finally, restart your machine to boot into the new openSUSE Leap version:
>sudoshutdown -r now
You can upgrade your system by using zypper dup.
When using this command, take the following into account:
If you are using
zypper dupand there is not enough disk space available, the upgrade fails. In this case, use--pkg-cache-dir DIRto set an alternative package cache directory.All packages with unresolved dependencies will be removed. Packages installed from disabled repositories are kept as long as their dependencies are satisfied. Packages that are no longer available in the repositories are considered orphaned. Such packages are uninstalled if their dependencies cannot be satisfied. If they can be satisfied, such packages stay installed.
zypper dupensures that all installed packages come from one of the available repositories. It does not consider the version or architecture, but prevents changing the vendor of the installed packages by default, using the--no-allow-vendor-changeoption. If you have third-party repositories enabled, some repositories may break during the upgrade. In this case, use--allow-vendor-changeinstead.
12.1.5 Updating individual packages #Edit source
Regardless of your overall updated environment, you can always update individual packages. From this point on, however, it is your responsibility to ensure that your system remains consistent.
Use the YaST software management tool to update packages as described in Chapter 9, Installing or removing software. Select components from the YaST package selection list according to your needs. If a newer version of a package exists, the version numbers of the installed and the available versions are listed in blue color in the column. If you select a package essential for the overall operation of the system, YaST issues a warning. Such packages should be updated only in the update mode. For example, many packages contain shared libraries. Updating these programs and applications in the running system may lead to system instability.
12.2 More information #Edit source
Problems and special issues of the various versions are published online as they are identified. See the links listed below. Important updates of individual packages can be accessed using the YaST Online Update. For more information, see Chapter 11, YaST online update.
Refer to the Product highlights (https://en.opensuse.org/Product_highlights and the
Bugs article in the openSUSE wiki at https://en.opensuse.org/openSUSE:Most_annoying_bugs for
information about recent changes and issues.